
This is a step-by-step guide for using the Google Colab notebook in the Quick Start Guide to run AUTOMATIC1111. This is one of the easiest ways to use AUTOMATIC1111 because you don’t need to deal with the installation.
See installation instructions on Windows PC and Mac if you prefer to run locally.
This notebook is designed to share models in Google Drive with the following notebooks.
Google has blocked usage of Stable Diffusion with a free Colab account. You need a paid plan to use this notebook.
Table of Contents
- What is AUTOMATIC1111?
- What is Google Colab?
- Alternatives
- Step-by-step instructions to run the Colab notebook
- ngrok (Optional)
- When you are done
- Computing resources and compute units
- Models available
- Other models
- Installing models
- Installing extensions from URL
- Extra arguments to webui
- Version
- Secrets
- Extensions
- Frequently asked questions
- Next Step
What is AUTOMATIC1111?
Stable Diffusion is a machine-learning model. It is not very user-friendly by itself. You need to write codes to use it. Most users use a GUI (Graphical User Interface). Instead of writing codes, we write prompts in a text box and click buttons to generate images.
AUTOMATIC1111 is one of the first Stable Diffusion GUIs developed. It supports standard AI functions like text-to-image, image-to-image, upscaling, ControlNet, and even training models (although I won’t recommend it).
What is Google Colab?
Google Colab (Google Colaboratory) is an interactive computing service offered by Google. It is a Jupyter Notebook environment that allows you to execute code.
They have three paid plans – Pay As You Go, Colab Pro, and Colab Pro+. You need the Pro or Pro+ Plan to use all the models. I recommend using the Colab Pro plan. It gives you 100 compute units per month, which is about 50 hours per standard GPU. (It’s a steal)

With a paid plan, you have the option to use Premium GPU. It is an A100 processor. That comes in handy when you need to train Dreambooth models fast.
When you use Colab for AUTOMATIC1111, be sure to disconnect and shut down the notebook when you are done. It will consume compute units when the notebook is kept open.
You will need to sign up with one of the plans to use the Stable Diffusion Colab notebook. They have blocked the free usage of AUTOMATIC1111.
Alternatives
Think Diffusion provides fully managed AUTOMATIC1111/Forge/ComfyUI web service. They cost a bit more than Colab but save you from the trouble of installing models and extensions and faster startup time. They offer 20% extra credit to our readers. (Affiliate link)
Step-by-step instructions to run the Colab notebook
Step 0. Sign up for a Colab Pro or a Pro+ plans. (I use Colab Pro.)
Step 1. Open the Colab notebook in Quick Start Guide.
Access the notebook below if you are a member of this site.
You should see the notebook with the second cell below.
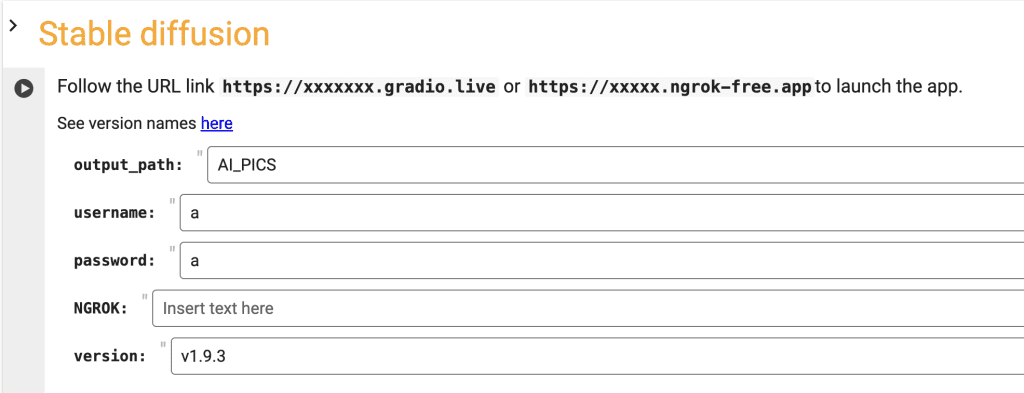
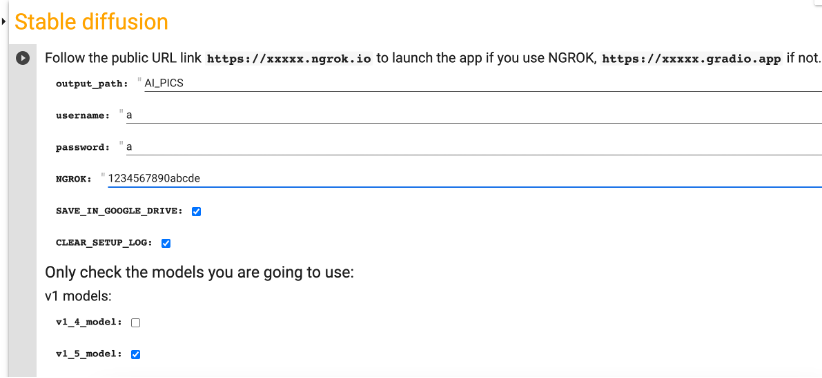
Step 2. Set the username and password. You will need to enter them before using AUTOMATIC11111.
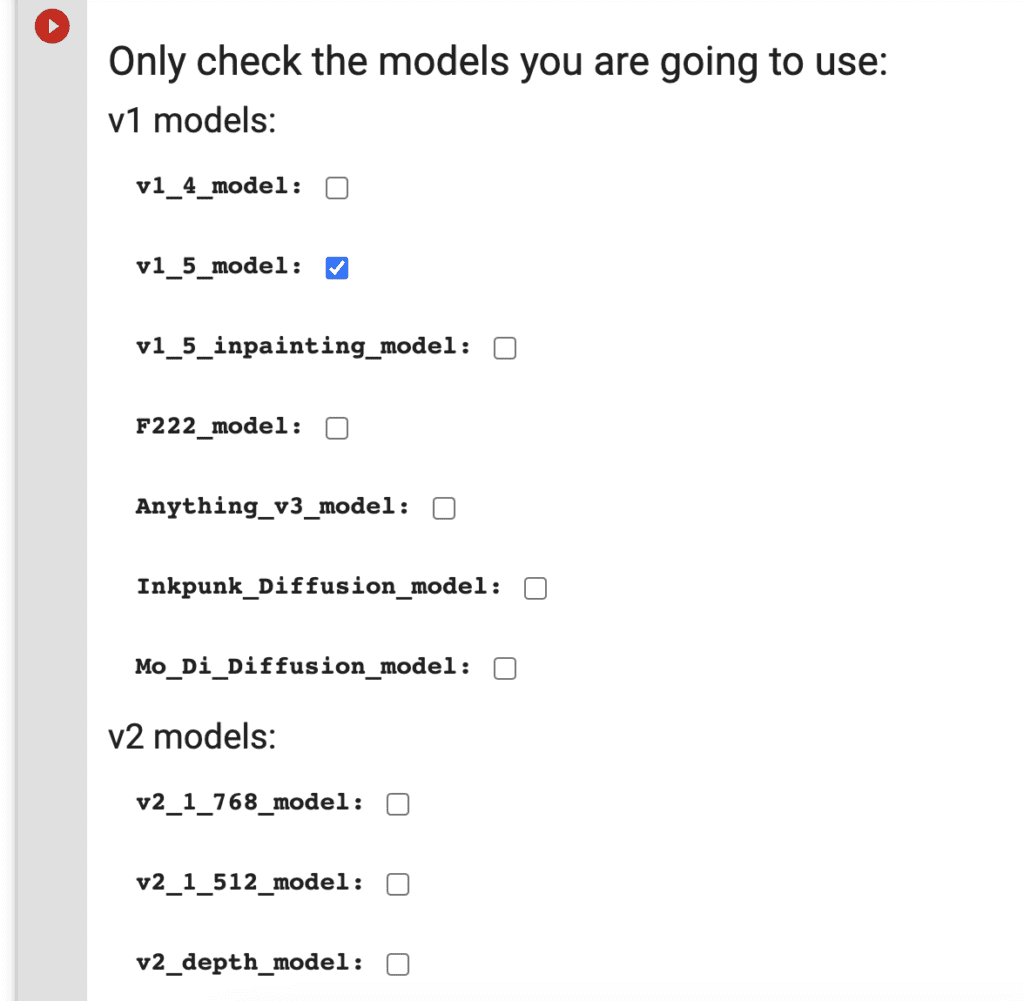
Step 3. Check the models you want to load. If you are a first-time user, you can use the default settings.
Step 4. Click the Play button on the left of the cell to start.
Step 5. It will install A1111 and models in the the Colab envirnoment.

Step 6. Follow the gradio.live link to start AUTOMATIC1111.
Step 7. Enter the username and password you specified in the notebook.
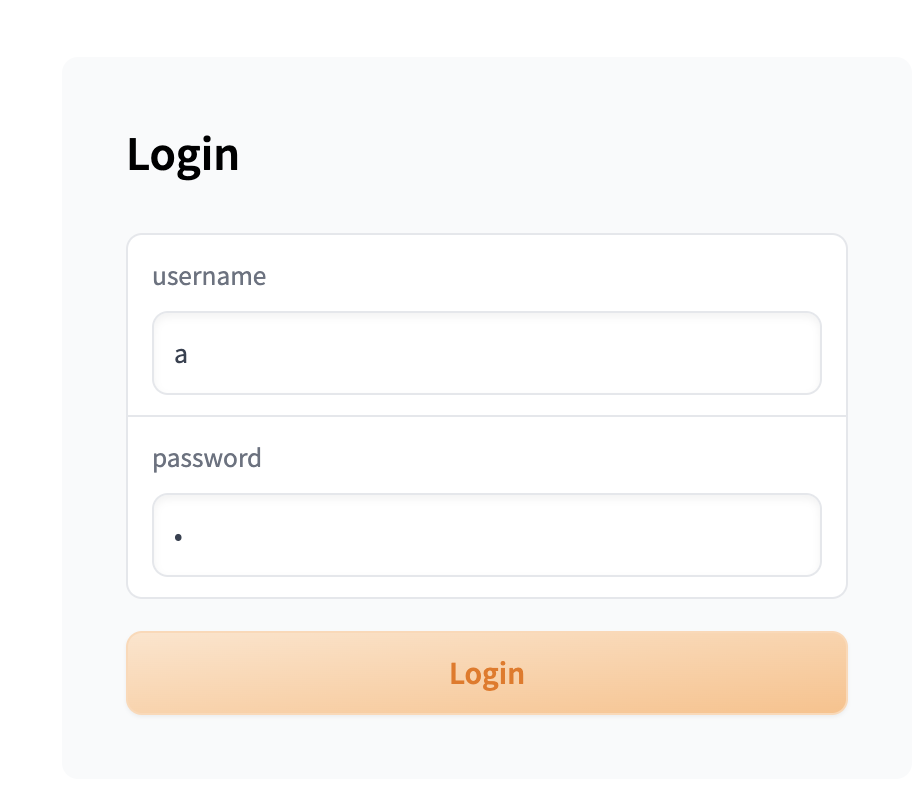
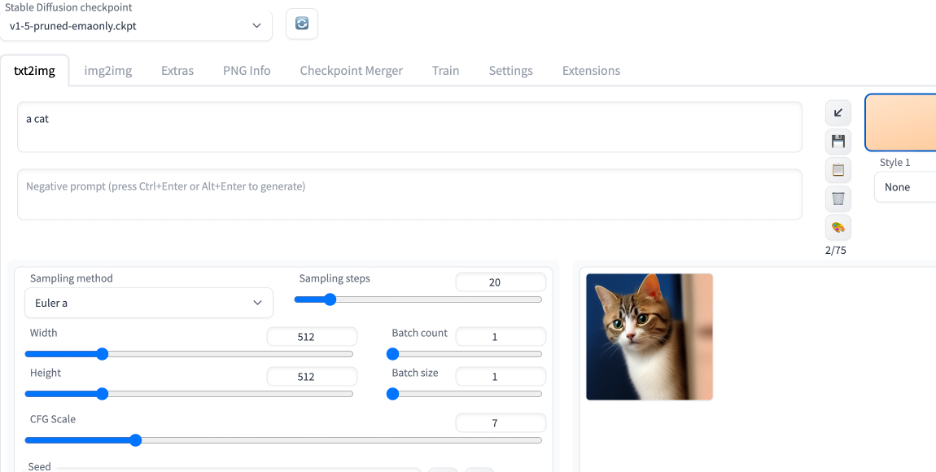
Step 8. You should see the AUTOMATIC1111 GUI after you log in.

Put in “a cat” in the prompt text box and press Generate to test using Stable Diffusion. You should see it generates an image of a cat.
ngrok (Optional)
If you run into display issues with the GUI, you can try using ngrok instead of Gradio to establish the public connection. It is a more stable alternative to the default gradio connection.
You will need to set up a free account and get an authoken.
- Go to https://ngrok.com/
- Create an account
- Verify email
- Copy the authoken from https://dashboard.ngrok.com/get-started/your-authtoken and paste in the ngrok field in the notebook.
The Stable Diffusion cell in the notebook should look like below after you put in your ngrok authtoken.
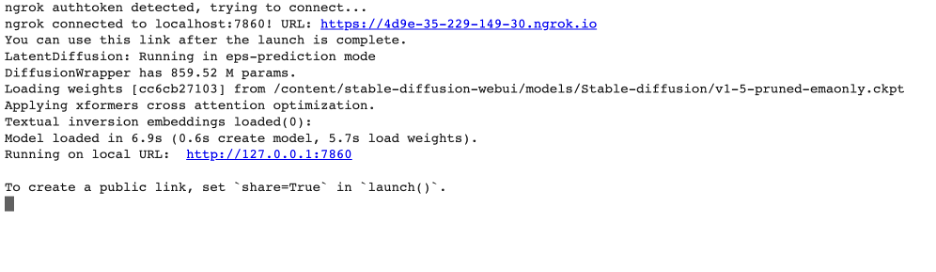
Click the play button on the left to start running. When it is done loading, you will see a link to ngrok.io in the output under the cell. Click the ngrok.io link to start AUTOMATIC1111. The first link in the example output below is the ngrok.io link.
When you visit the ngrok link, it should show a message like below
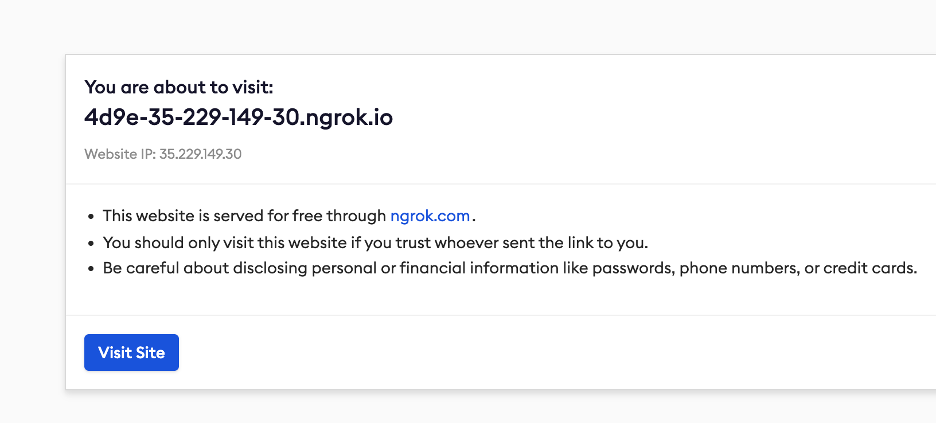
Click on Visit Site to Start AUOTMATIC1111 GUI. Occasionally, you will see a warning message that the site is unsafe to visit. It is likely because someone used the same ngrok link to put up something malicious. Since you are the one who created this link, you can ignore the safety warning and proceed.
When you are done
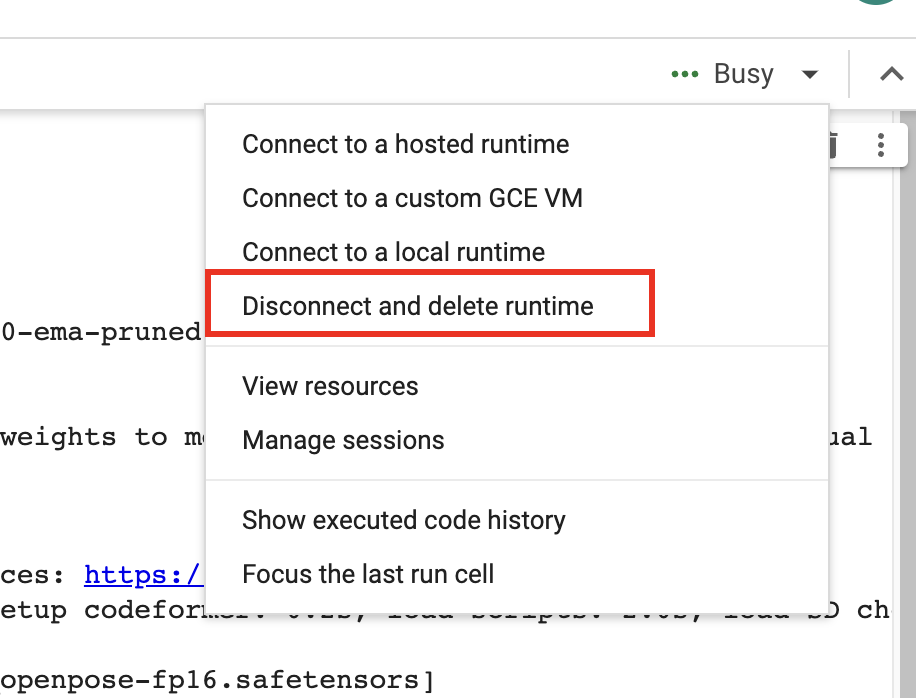
When you finish using the notebook, don’t forget to click “Disconnect and delete runtime” in the top right drop-down menu. Otherwise, you will continue to consume compute credits.
Computing resources and compute units
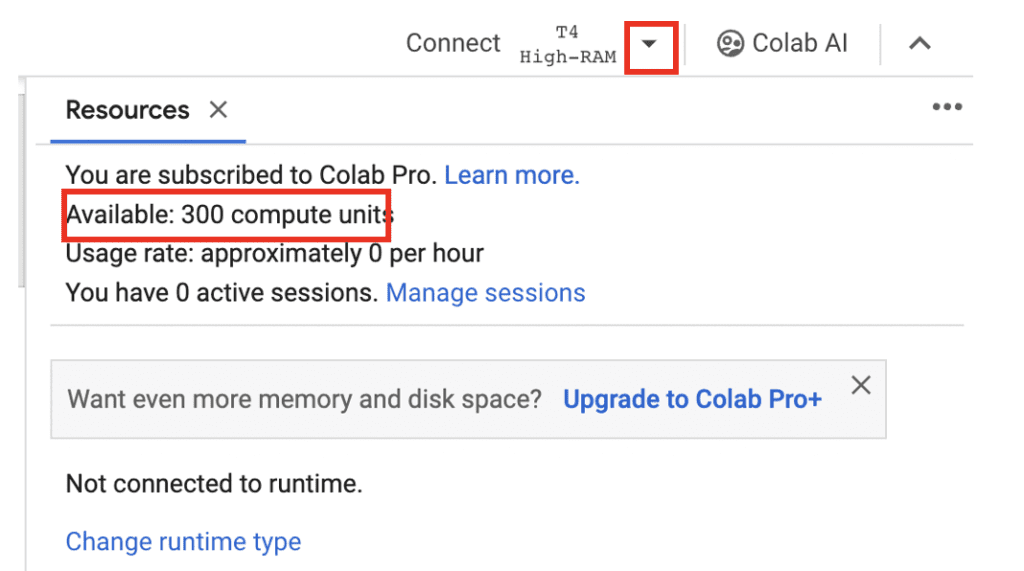
To view computing resources and credits, click the downward caret next to the runtime type (E.g. T4, High RAM) on the top right. You will see the remaining compute units and usage rate.
Models available
For your convenience, the notebook has options to load some popular models. You will find a brief description of them in this section.
v1.5 models
v1.5 model

v1.5 model is released after 1.4. It is the last v1 model. Images from this model is very similar to v1.4. You can treat the v1.5 model as the default v1 base model.
v1.5 inpainting model
The official v1.5 model trained for inpainting.
Realistic Vision

Realistic Vision v2 is good for generating anything realistic, whether they are people, objects, or scenes.
F222

F222 is good at generating photo-realistic images. It is good at generating females with correct anatomy.
Caution: F222 is prone to generating explicit images. Suppress explicit images with a prompt “dress” or a negative prompt “nude”.
Dreamshaper

Dreamshaper is easy to use and good at generating a popular photorealistic illustration style. It is an easy way to “cheat” and get good images without a good prompt!
Open Journey Model

Open Journey is a model fine-tuned with images generated by Mid Journey v4. It has a different aesthetic and is a good general-purpose model.
Triggering keyword: mdjrny-v4 style
Anything v3

Anything V3 is a special-purpose model trained to produce high-quality anime-style images. You can use danbooru tags (like 1girl, white hair) in the text prompt.
It’s useful for casting celebrities to amine style, which can then be blended seamlessly with illustrative elements.
Inkpunk Diffusion
Inkpunk Diffusion is a Dreambooth-trained model with a very distinct illustration style.
Use keyword: nvinkpunk
v2 models
v2 models are the newest base models released by Stability AI. It is generally harder to use and is not recommended for beginners.
v2.1 768 model

The v2.1-768 model is the latest high-resolution v2 model. The native resolution is 768×768 pixels. Make sure to set at least one side of the image to 768 pixels. It is imperative to use negative prompts in v2 models.
You will need Colab Pro to use this model because it needs a high RAM instance.
v2 depth model

v2 depth model extracts depth information from an input image and uses it to guide image generation. See the tutorial on depth-to-image.
SDXL model

This Coalb notebook supports SDXL 1.0 base and refiner models.
Select SDXL_1 to load the SDXL 1.0 model.
Important: Don’t use VAE from v1 models. Go to Settings > Stable Diffusion. Set SD VAE to AUTOMATIC or None.
Check out some SDXL prompts to get started.
Other models
Here are some models that you may be interested in.
See more realistic models here.
Dreamlike Photoreal

Dreamlike Photoreal Model Page
Model download URL
https://huggingface.co/dreamlike-art/dreamlike-photoreal-2.0/resolve/main/dreamlike-photoreal-2.0.safetensorsDreamlike Photoreal model is good at generating beautiful females with correct anatomy. It is similar to F222.
triggering keyword: photo
Caution: This model is prone to generating explicit photos. Suppress explicit images with a prompt “dress” or a negative prompt “nude”.
Lyriel

Lyriel excels in artistic style and is good at rendering a variety of subjects, ranging from portraits to objects.
Model download URL:
https://civitai.com/api/download/models/50127Deliberate v2

Deliberate v2 is a well-trained model capable of generating photorealistic illustrations, anime, and more.
Installing models
There are two ways to install models that are not on the model selection list.
- Use the
Checkpoint_models_from_URLandLora_models_from_URLfields. - Put model files in your Google Drive.
Install models using URLs
You can only install checkpoint or LoRA models using this method.
Put in the download URL links in the field. The link you initiate the file download when you visit it in your browser.
Checkpoint_models_from_URL: Use this field for checkpoint models.Lora_models_from_URL: Use this field for LoRA models.
Some models on CivitAi needs an API key to download. Go to the account page on CivitAI to create a key and put it in Civitai_API_Key.

Below is an example of getting the download link on CivitAI.
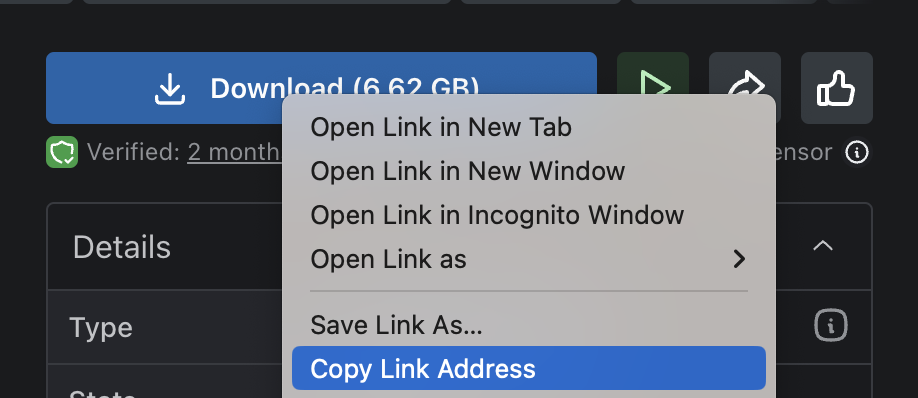
Remove everything after the first question mark (?).
For example, change https://civitai.com/api/download/models/993999?type=Model&format=SafeTensor to https://civitai.com/api/download/models/993999.
Put it in the Model_from_URL field.
Installing models in Google Drive
After running the notebook for the first time, you should see the folder AI_PICS > models created in your Google Drive. The folder structure inside this folder mirror AUTOMATIC1111‘s and is designed to share models with other notebooks from this site.
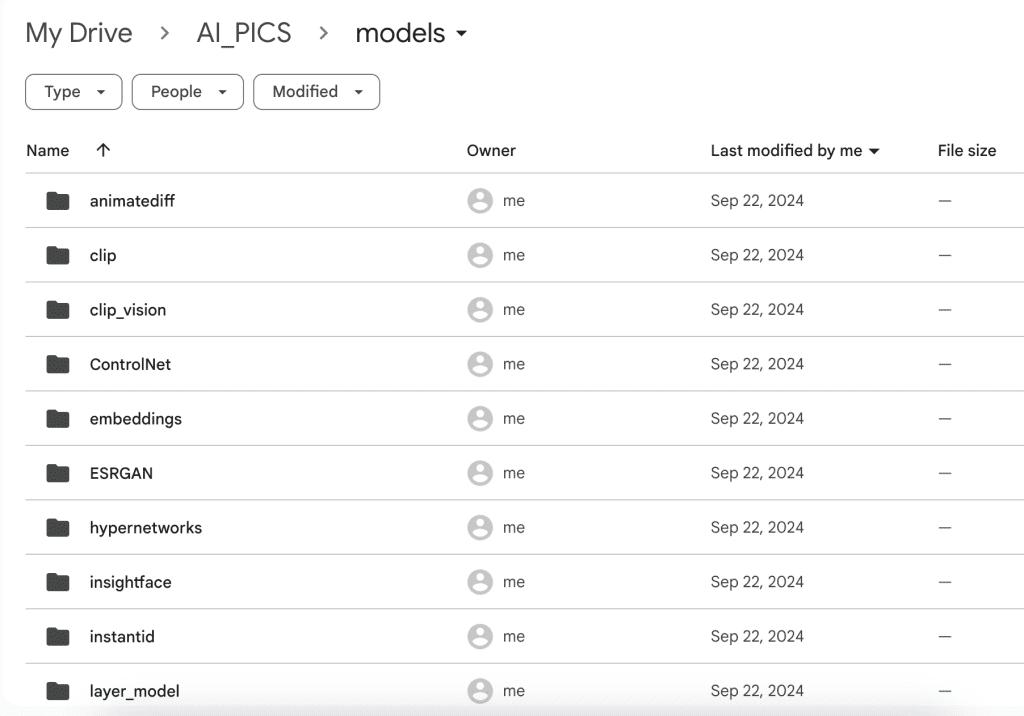
Put your model files in the corresponding folder. For example,
- Put checkpoint model files in AI_PICS > models > Stable-diffusion.
- Put LoRA model files in AI_PICS > models > Lora.
You will need to restart the notebook to see the new models.
Installing extensions from URL
This field can be used to install any number of extensions. To do so, you will need the URL of the extension’s Github page.
For example, put in the following if you want to install the Civitai model extension.
https://github.com/civitai/sd_civitai_extensionYou can also install multiple extensions. The URLs need to be separated with commas. For example, the following URLs install the Civitai and the multi-diffusion extensions.
https://github.com/civitai/sd_civitai_extension,https://github.com/pkuliyi2015/multidiffusion-upscaler-for-automatic1111Extra arguments to webui
You can add extra arguments to the Web-UI by using the Extra_arguments field.
For example, if you use the lycoris extension, it is handy to use the extra webui argument --lyco-dir to specify a custom lycoris model directory in your Google Drive.
Other useful arguments are
--api. Allow API access. Useful for some applications, e.g. the PhotoShop Automatic1111 plugin.
Version
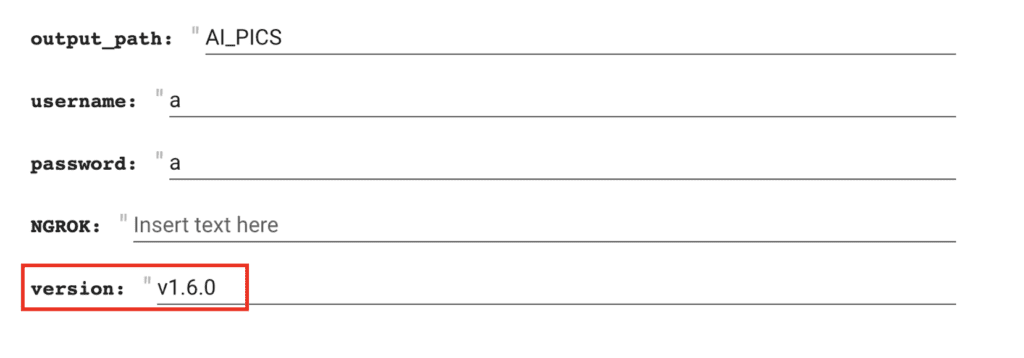
Now you can specify the version of Stable Diffusion WebUI you want to load. Use this at your own risk, as I only test the version saved.
Notes on some versions
v1.6.0: You need to add--disable-model-loading-ram-optimizationin the Extra_arguments field.
Secrets
This notebook supports storing API keys in addition to Secrets. If the keys were defined in secrets, the notebook would always use them. The notebook currently supports these two API keys (All upper cases):
NGROK: Ngrok API key.CIVITAI_API_KEY: API key for CivitAI.
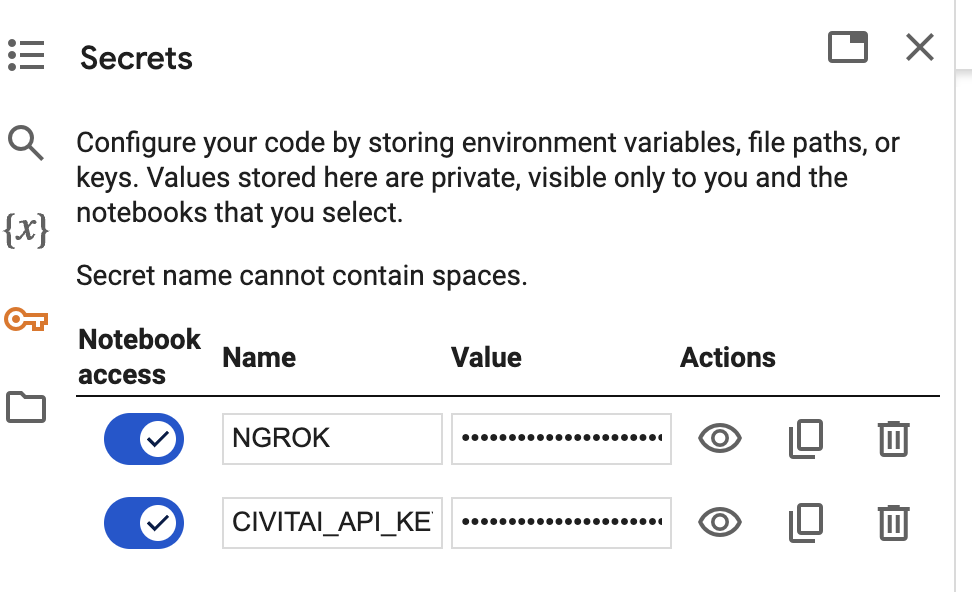
You will need to enable Notebook access for each key like above.
Extensions
ControlNet

ControlNet is a Stable Diffusion extension that can copy the composition and pose of the input image and more. ControlNet has taken the Stable Diffusion community by storm because there is so much you can do with it. Here are some examples
This notebook supports ControlNet. See the tutorial article.
You can put your custom ControlNet models in AI_PICS/ControlNet folder.
Deforum – Making Videos using Stable Diffusion
You can make videos with text prompts using the Deforum extension. See this tutorial for a walkthrough.
Regional Prompter
Regional prompter lets you use different prompts for different regions of the image. It is a valuable extension for controlling the composition and placement of objects.
After Detailer


After Detailer (!adetailer) extension fixes faces and hands automatically when you generate images.
Openpose editor
Openpose editor is an extension that lets you edit the openpose control image. It is useful for manipulating the pose of an image generation with ControlNet. It is used with ControlNet.
AnimateDiff
AnimateDiff lets you create short videos from a text prompt. You can use any Stable Diffusion model and LoRA. Follow this tutorial to learn how to use it.
text2video

Text2video lets you create short videos from a text prompt using a model called Modelscope. Follow this tutorial to learn how to use it.
Infinite Image Browser
The Infinite Image Browser extension lets you manage your generations right in the A1111 interface. The secret key is SDA.
Frequently asked questions
Do I need a paid Colab account to use the notebook?
Yes, you need a Colab Pro or Pro+ account to use this notebook. Google has blocked the free usage of Stable Diffusion.
Is there any alternative to Google Colab?
Yes, Think Diffusion provides fully managed AUTOMATIC1111/Forge/ WebUI online as a web service. They offer 20% extra credit to our readers. (Affiliate link)
Do I need to use ngrok?
You don’t need to use ngrok to use the Colab notebook. In my experience, ngrok provides a more stable connection between your browser and the GUI. If you experience issues like buttons not responding, you should try ngrok.
What is the password for the Infinite Image Browser?
SDAWhy do I keep getting disconnected?
Two possible reasons:
- There’s a human verification shortly after starting each Colab notebook session. You will get disconnected if you do not respond to it. Make sure to switch back to the Colab notebook and check for verification.
- You are using a free account. Google has blocked A1111 in Colab. Get Colab Pro.
Can I use the dreambooth models I trained?
Yes, put the model file in the corresponding folder in Google Drive.
- Checkpoint models: AI_PICS > models > Stable-diffusion.
- LoRA models: AI_PICS > models > Lora.
How to enable API?
You can use AUMATIC1111 as an API server. Add the following to Extra Web-UI arguments.
--apiThe server’s URL is the same as the one you access the Web-UI. (i.e. the gradio or ngrok link)
Why do my SDXL images look garbled?
Check to make sure you are not using a VAE from v1 models. Check Settings > Stable Diffusion > SD VAE. Set it to None or Automatic.
Next Step
If you are new to Stable Diffusion, check out the Absolute beginner’s guide.
Thank you so much for this workbook.
It seems, however, that the problems with ReActor are still there. I’ve tried reinstalling everything from scratch, but to no avail.
Haven’t changed any settings, perhaps I am missing something?
Many thanks.
the original repo is not available anymore. updated to a new link.
Hello. There’s a problem in generating images. This error will appear:
NansException: A tensor with all NaNs was produced in Unet. This could be either because there’s not enough precision to represent the picture, or because your video card does not support half type. Try setting the “Upcast cross attention layer to float32” option in Settings > Stable Diffusion or using the –no-half commandline argument to fix this. Use –disable-nan-check commandline argument to disable this check.
It happens to some models and LoRAs. You can try adding those suggested arguments to the extra_arguments field in the notebook. Other than that, there’s not much you can do about it.
Hello! I’m having a problem with openpose editor. I can’t find it in the UI even after I checked it in the checkbox. How to fix this? Thank you
Hello Mr Andrew,
I’ve been using your A1111 Colab notebook for almost 1 year now and I’m very satisfied, so thank you for the good work! However, I’m writing now to report an issue that began occurring today (yesterday it all worked fine and I didn’t touch a thing): when I try to launch it, I get this error.
[…]
Apply lowram patch
/content/stable-diffusion-webui
WEBUI ARGUMENTS: –gradio-img2img-tool color-sketch –enable-insecure-extension-access –gradio-queue –ckpt-dir /content/drive/MyDrive/AI_PICS/models –share –gradio-auth “a”:”a” –disable-model-loading-ram-optimization –opt-sdp-attention
Python 3.10.12 (main, Nov 6 2024, 20:22:13) [GCC 11.4.0]
Version: v1.9.3
Commit hash: 1c0a0c4c26f78c32095ebc7f8af82f5c04fca8c0
Launching Web UI with arguments: –gradio-img2img-tool color-sketch –enable-insecure-extension-access –gradio-queue –ckpt-dir /content/drive/MyDrive/AI_PICS/models –share –gradio-auth a:a –disable-model-loading-ram-optimization –opt-sdp-attention
Traceback (most recent call last):
File “/content//stable-diffusion-webui/launch.py”, line 48, in
main()
File “/content//stable-diffusion-webui/launch.py”, line 44, in main
start()
File “/content/stable-diffusion-webui/modules/launch_utils.py”, line 465, in start
import webui
File “/content/stable-diffusion-webui/webui.py”, line 13, in
initialize.imports()
File “/content/stable-diffusion-webui/modules/initialize.py”, line 17, in imports
import pytorch_lightning # noqa: F401
File “/usr/local/lib/python3.10/dist-packages/pytorch_lightning/__init__.py”, line 35, in
from pytorch_lightning.callbacks import Callback # noqa: E402
File “/usr/local/lib/python3.10/dist-packages/pytorch_lightning/callbacks/__init__.py”, line 28, in
from pytorch_lightning.callbacks.pruning import ModelPruning
File “/usr/local/lib/python3.10/dist-packages/pytorch_lightning/callbacks/pruning.py”, line 31, in
from pytorch_lightning.core.module import LightningModule
File “/usr/local/lib/python3.10/dist-packages/pytorch_lightning/core/__init__.py”, line 16, in
from pytorch_lightning.core.module import LightningModule
File “/usr/local/lib/python3.10/dist-packages/pytorch_lightning/core/module.py”, line 47, in
from pytorch_lightning.loggers import Logger
File “/usr/local/lib/python3.10/dist-packages/pytorch_lightning/loggers/__init__.py”, line 22, in
from pytorch_lightning.loggers.wandb import WandbLogger # noqa: F401
File “/usr/local/lib/python3.10/dist-packages/pytorch_lightning/loggers/wandb.py”, line 36, in
import wandb
File “/usr/local/lib/python3.10/dist-packages/wandb/__init__.py”, line 21, in
from wandb import sdk as wandb_sdk
File “/usr/local/lib/python3.10/dist-packages/wandb/sdk/__init__.py”, line 28, in
from .wandb_init import _attach, init
File “/usr/local/lib/python3.10/dist-packages/wandb/sdk/wandb_init.py”, line 39, in
from . import wandb_login, wandb_setup
File “/usr/local/lib/python3.10/dist-packages/wandb/sdk/wandb_login.py”, line 19, in
from .wandb_settings import Settings
File “/usr/local/lib/python3.10/dist-packages/wandb/sdk/wandb_settings.py”, line 25, in
from pydantic import (
ImportError: cannot import name ‘computed_field’ from ‘pydantic’ (/usr/local/lib/python3.10/dist-packages/pydantic/__init__.cpython-310-x86_64-linux-gnu.so)
Would you please look into it?
I’ve tried googling for a solution but I’m not very well-versed in this sort of things.
Thank you
The error is fixed. I am glad that the notebook serves you well.
Thank you for your fast reply… But I still get the same issue. Just to make sure, I tried opening the version at “Latest version of this notebook can be found at here” and leaving all checkboxes at their default value. But the error message is still the same…
I got the same error again, too. The link in the old notebook still points at itself.
Apparently a completely new file, albeit one that looks a lot like the old one has been installed. You’re looking for AUTOMATIC1111_SDA.ipynb
I had to start from the top of the Stable Diffusion Art website. If you’re navigating by title name, you’re looking for this page:
How to run Stable Diffusion on Google Colab (AUTOMATIC1111)
(this its URL)
https://stable-diffusion-art.com/automatic1111-colab/
(scroll down)
(Click on the Green button labeled: A1111 Colab Notebook)
This notebook appears, its name implies its in a different source tree:
AUTOMATIC1111_SDA.ipynb
Sigh.
Thank you!
There’s a new notebook. Follow the link in this article or the quick start guide.
I think Lora’s are broken in the latest notebook. I see zero Lora’s under the tab, and they were all compatible with the model I’m using before the new notebook was installed. Can you check Andrew, and perhaps suggest what I’m doing wrong?
I just checked and can see lora there. Try follow the original link to access the notebook unmodified. Put LoRAs in google drive AI_PICS > models > Lora. Press refresh button.
Don’t know what happened. I found the Lora files in AI_PICS>Lora. I have since moved them to AI_PICS > models >Lora. Thanks.
LoRA_models_from_URL field isn’t present in the notebook either
Putting LORAs on the AI_PICS > models > Lora doesn’t make them show up, even after reload 🤔
Hi, I just tested the notebook and the loading LoRA in Google Drive is working correctly.
1. Try press the Refresh button on the LoRA tab.
2. A1111 only shows LoRAs that are compatible with the checkpoint model. E.g. Select an XL checkpoint -> Refresh the LoRA tab to show XL LoRAs.
The Save_In_Google_Drive option is gone in the latest version of the notebook.
It is removed. You can access the old version which I no longer maintain. https://stable-diffusion-art.com/legacy-A1111-notebook
Would you ever consider doing a notebook as UI-friendly as yours but with ComfyUI? People are migrating towards it and still am unable to find a Colab notebook as clear as yours.
I managed to run ‘Comfy’ UI with a Colab notebook. The problem is that this is the most ironic name for anything ever. Comfy like a maze made of burning chainsaws.
I have one but its not as well written as this one. I will think about it given that A1111 is not catching up with the latest tech.
+1 for the request for a Comfy notebook. I’m willing to pay extra for a ComfyUI notebook from yours, Andrew.
@Bjørn, what notebook do you use?
OK I will think about it 🙂
Hi Andrew,
Thank you for the Colab. I’m grateful to be using it.
Recently, I’ve encountered a couple of issues while using this Colab:
1. When I use NGROK, I get an error stating that my request has been refused. Are we still able to use NGROK?
2. When I use Gradio, the page displays an error saying, “This site can’t be reached.” I’m wondering if there’s an issue with Gradio.
Andrew, do you have any idea what might be causing these issues? Thank you for your help.
Hi, I just ran with Gradio and it is working correctly. Perhaps it is a temp issue. The need for ngrok is a lot less nowadays. I recommend using it only when gradio is not available.
Save_In_Google_Drive Everything mode has stopped working for me with the A100. I’ve been able to use it on a regular basis up until around 4 days ago. I’m not sure what changed in that time, but I’ve tried every day since then with no luck, both with gradio and ngrok. T4 still works but I find it much too slow for SDXL, which is why i subscribe for colab Pro+. There are never any error messages or warnings in either the UI or the colab log. The UI boots up and I can access it just fine, I can change & save settings but am unable to actually generate any images or even view/refresh my LoRAs. I click the generate button and the buttons change to the typical Interrupt|Skip buttons, but nothing happens and it just acts like it’s stuck before it even says 0% progress. There is no additional output in the colab log when I do this either, the most recent lines on there are just the startup messages about applying attention optimization, embedding loading, and model loading in however many seconds.
I get the same sort of issue when i try to view or refresh my LoRAs before even trying to generate an image, it acts like it’s starting to refresh but then just gets stuck in some sort of infinite loading/processing.
Do you have any advice?
The save everything setting is problematic due to inherent working of colab. You can try starting a new AI_PICS folder (e.g. AI_PICS2) to see if the problem can be resolved. Otherwise, use the default save setting.
If I use the default save setting, will I have to re-install/re-download my checkpoints, embeddings, and loras every time I start up?
You may need to move the model files to different folders in G drive. See this post for folder locations. You can switch to default to see if you still see the models and whether it resolves the issue.
Share link not created.
V1.9.0. Selected AnimateDiff and ControlNet. It seems this is is since 27/Apr as comments below.
>>>>>>
Running on local URL: http://127.0.0.1:7860
Interrupted with signal 2 in
Could not create share link. Please check your internet connection or our status page: https://status.gradio.app.
Startup time: 267.1s (prepare environment: 52.7s, import torch: 4.6s, import gradio: 1.0s, setup paths: 3.6s, initialize shared: 0.3s, other imports: 0.7s, list SD models: 0.5s, load scripts: 19.3s, create ui: 18.9s, gradio launch: 165.5s).
Looks like it was a temp issue.
Hello, Andrew. First of all, I would like to say thanks for your Colab work! Been actively using them without much issues~
Just a heads up, today, gradio has an issue where the xxxxxx.gradio.live link would not appear, only the local URL which is non-functional as expected.
Apply lowram patch
/content/stable-diffusion-webui
WEBUI ARGUMENTS: –gradio-img2img-tool color-sketch –enable-insecure-extension-access –gradio-queue –share –gradio-auth “a:a” –disable-model-loading-ram-optimization –opt-sdp-attention –medvram-sdxl
Python 3.10.12 (main, Nov 20 2023, 15:14:05) [GCC 11.4.0]
Version: v1.9.0
Commit hash: adadb4e3c7382bf3e4f7519126cd6c70f4f8557b
Launching Web UI with arguments: –gradio-img2img-tool color-sketch –enable-insecure-extension-access –gradio-queue –share –gradio-auth a:a –disable-model-loading-ram-optimization –opt-sdp-attention –medvram-sdxl
2024-04-27 15:26:50.920974: E external/local_xla/xla/stream_executor/cuda/cuda_dnn.cc:9261] Unable to register cuDNN factory: Attempting to register factory for plugin cuDNN when one has already been registered
2024-04-27 15:26:50.921028: E external/local_xla/xla/stream_executor/cuda/cuda_fft.cc:607] Unable to register cuFFT factory: Attempting to register factory for plugin cuFFT when one has already been registered
2024-04-27 15:26:50.922414: E external/local_xla/xla/stream_executor/cuda/cuda_blas.cc:1515] Unable to register cuBLAS factory: Attempting to register factory for plugin cuBLAS when one has already been registered
2024-04-27 15:26:52.248896: W tensorflow/compiler/tf2tensorrt/utils/py_utils.cc:38] TF-TRT Warning: Could not find TensorRT
no module ‘xformers’. Processing without…
no module ‘xformers’. Processing without…
No module ‘xformers’. Proceeding without it.
[-] ADetailer initialized. version: 24.4.2, num models: 10
Checkpoint sweetMix_v22Flat.safetensors [83326ee94a] not found; loading fallback aurora_v10.safetensors [1b5f8211ec]
Loading weights [1b5f8211ec] from /content/stable-diffusion-webui/models/Stable-diffusion/aurora_v10.safetensors
Running on local URL: http://127.0.0.1:7860
Creating model from config: /content/stable-diffusion-webui/configs/v1-inference.yaml
Loading VAE weights specified in settings: /content/stable-diffusion-webui/models/VAE/blessed2.vae.pt
Applying attention optimization: sdp… done.
Model loaded in 7.1s (load weights from disk: 0.8s, create model: 2.4s, apply weights to model: 2.6s, load VAE: 0.5s, load textual inversion embeddings: 0.5s, calculate empty prompt: 0.2s).
ngrok works fine for now.
I just realised this after letting the colab run for a while:
Model loaded in 52.2s (calculate hash: 31.3s, load weights from disk: 0.4s, create model: 3.5s, apply weights to model: 2.6s, load VAE: 7.5s, load textual inversion embeddings: 6.3s, calculate empty prompt: 0.5s).
Interrupted with signal 2 in
Could not create share link. Missing file: /usr/local/lib/python3.10/dist-packages/gradio/frpc_linux_amd64_v0.2.
Please check your internet connection. This can happen if your antivirus software blocks the download of this file. You can install manually by following these steps:
1. Download this file: https://cdn-media.huggingface.co/frpc-gradio-0.2/frpc_linux_amd64
2. Rename the downloaded file to: frpc_linux_amd64_v0.2
3. Move the file to this location: /usr/local/lib/python3.10/dist-packages/gradio
Startup time: 217.8s (prepare environment: 2.1s, import torch: 4.6s, import gradio: 1.0s, setup paths: 3.4s, initialize shared: 1.0s, other imports: 1.1s, list SD models: 4.2s, load scripts: 22.6s, create ui: 1.2s, gradio launch: 176.4s).
Maybe that’s the reason why gradio links are not appearing anymore?
Hi, gradio is working now. Its likely a temporary issue.
Hello i have error “HTTP Requests exceeded” in ngrok…
And from localhost SD not runnig “ERR_CONNECTION_REFUSED” when i try connect from colab.
Can you give advice with it?
Interesting… ngrok is normally not needed nowadays. You can try without.
Yes… but if i set empty in NGROK. I can not connect to SD colab…
The gradio link shows up now. It was a temp issue.
Hey,
The animatediff is not working. I’ve got this error:
*** Error calling: /content/stable-diffusion-webui/extensions/sd-webui-animatediff/scripts/animatediff.py/ui
Traceback (most recent call last):
File “/content/stable-diffusion-webui/modules/scripts.py”, line 547, in wrap_call
return func(*args, **kwargs)
File “/content/stable-diffusion-webui/extensions/sd-webui-animatediff/scripts/animatediff.py”, line 43, in ui
from scripts.animatediff_mm import mm_animatediff as motion_module
ModuleNotFoundError: No module named ‘scripts.animatediff_mm’
—
*** Error calling: /content/stable-diffusion-webui/extensions/sd-webui-animatediff/scripts/animatediff.py/ui
Traceback (most recent call last):
File “/content/stable-diffusion-webui/modules/scripts.py”, line 547, in wrap_call
return func(*args, **kwargs)
File “/content/stable-diffusion-webui/extensions/sd-webui-animatediff/scripts/animatediff.py”, line 43, in ui
from scripts.animatediff_mm import mm_animatediff as motion_module
ModuleNotFoundError: No module named ‘scripts.animatediff_mm’
It should be working now. updated A1111 to v1.9.0
Still not working
Traceback (most recent call last):
File “/usr/local/lib/python3.10/dist-packages/gradio/routes.py”, line 488, in run_predict
output = await app.get_blocks().process_api(
File “/usr/local/lib/python3.10/dist-packages/gradio/blocks.py”, line 1431, in process_api
result = await self.call_function(
File “/usr/local/lib/python3.10/dist-packages/gradio/blocks.py”, line 1103, in call_function
prediction = await anyio.to_thread.run_sync(
File “/usr/local/lib/python3.10/dist-packages/anyio/to_thread.py”, line 33, in run_sync
return await get_asynclib().run_sync_in_worker_thread(
File “/usr/local/lib/python3.10/dist-packages/anyio/_backends/_asyncio.py”, line 877, in run_sync_in_worker_thread
return await future
File “/usr/local/lib/python3.10/dist-packages/anyio/_backends/_asyncio.py”, line 807, in run
result = context.run(func, *args)
File “/usr/local/lib/python3.10/dist-packages/gradio/utils.py”, line 707, in wrapper
response = f(*args, **kwargs)
File “/content/stable-diffusion-webui/modules/call_queue.py”, line 95, in f
mem_stats = {k: -(v//-(1024*1024)) for k, v in shared.mem_mon.stop().items()}
File “/content/stable-diffusion-webui/modules/memmon.py”, line 92, in stop
return self.read()
File “/content/stable-diffusion-webui/modules/memmon.py”, line 77, in read
free, total = self.cuda_mem_get_info()
File “/content/stable-diffusion-webui/modules/memmon.py”, line 34, in cuda_mem_get_info
return torch.cuda.mem_get_info(index)
File “/usr/local/lib/python3.10/dist-packages/torch/cuda/memory.py”, line 655, in mem_get_info
return torch.cuda.cudart().cudaMemGetInfo(device)
RuntimeError: CUDA error: device-side assert triggered
CUDA kernel errors might be asynchronously reported at some other API call, so the stacktrace below might be incorrect.
For debugging consider passing CUDA_LAUNCH_BLOCKING=1.
Compile with `TORCH_USE_CUDA_DSA` to enable device-side assertions.
Hi! I can’t seem to load controlnet and openpose editor even tho I clicked the checkbox on the extensions
Hi, I just ran the notebook as is but adding controlnet and openpose editor. controlnet works but openpose editor didn’t show up. It seems to be the issue with the extension. You can report the issue in their repo.
I am getting an error when I run any prompts, “RuntimeError: Given groups=1, weight of size [320, 5, 3, 3], expected input[2, 9, 64, 64] to have 5 channels, but got 9 channels instead
Time taken: 1.4 sec.”
I used a different checkpoint, and that fixed that issue, but another issue is that the models that I put into the AI_PICS>Models folder are not loading in the GUI, I must be doing something wrong. I am trying to add these two
animagine-xl-2.0.safetensors
AnythingV5V3_v5PrtRE.safetensors
maybe I need to disconnect and reconnect, now I see them in the drop down. I am all set.
👍
Hi Andrew! Not sure if this is the spot to ask, but I’ve been using your Notebook from the Quick Start Guide in google colab for a while and came back to try it again this week, but I’m getting odd out of memory errors with PyTorch gobling up a lot of GPU ram. Its making it necessary to run in low ram mode, or limit batches to just 2 512×768 pictures (or both), though I’ve supposedly got 15GB of GPU ram with my Colab Pro membership. Did something change, and is there any way I can correct or work around this?
I can’t post a screenshot here, but the error message that appears is:
‘OutOfMemoryError: CUDA out of memory. Tried to allocate 4.50 GiB. GPU 0 has a total capacity of 14.75 GiB of which 3.25 GiB is free. Process 106112 has 11.50 GiB memory in use. Of the allocated memory 6.92 GiB is allocated by PyTorch, and 4.42 GiB is reserved by PyTorch but unallocated. If reserved but unallocated memory is large try setting PYTORCH_CUDA_ALLOC_CONF=expandable_segments:True to avoid fragmentation. See documentation for Memory Management (https://pytorch.org/docs/stable/notes/cuda.html#environment-variables)’
Hi! I updated the notebook today (3/21). Give it a try.
Its working great now, thanks so much!
Hi, thanks so much for all your work!
I love reading your articles and learning so much!
I currently have a problem with that Colab notebook. So I wanted to ask if anything is known:
I am using Colab pro. T4 and sometimes also V100.
With both GPUs I have the problem that the system-ram fills up and then I lose the connection or in the notebook it simply terminates the program with “^C”
The system-ram is getting fuller and fuller per generated image (approx. 5gb or so per image) and this does not decrease again. It runs full and when it reaches about 45, 48 of 50, it aborts….
Is there a known problem or am I doing something wrong? 😀
Hi! I updated the notebook today (3/21). Give it a try.
Checking back…I”m using the 4/18 version of the notebook and having this problem. Is there anything that I need to do to resolve?
This is an issue with A1111. Not much I can do.
No module named ‘torchvision.transforms.functional_tensor’
Is this a common error? I’ve tried 4 times now and paid for Colab.
A similar problem
I updated to v1.8.0 and it seems to be working fine. Post the whole error message and how to reproduce.
Still doesn’t work. The log with the error is very long, it doesn’t fit here, I posted it at the link: https://badgena.notion.site/SD-Colab-Error-991ec7728bea4416930ea2a26dae5c12?pvs=4
I see you save everything in your google drive. This is known to cause issue from time to time.
Either use the recommended saving option, or delete/rename the folder in your google drive and try again.
it doesn’t work on google colab😤 it wants you to give all the acsess to your google account, but even if you give it, Step 7 never happens
not sure what to do with google account now… change all passwords urgently?…
The google account access is only for saving the images and settings in your google drive. (If you are a programmer, you can read the codes in the notebook to confirm)
Post the error message if you want to try again.
Hello? How can I add civitai link models instead of huggingface?
They require login to download model so a link on notebook won’t work.
You need to use civitai helper. See the extension guide – https://stable-diffusion-art.com/automatic1111-extensions/
Hi, openpose editor doesn’t load even though I included it in the extensions choices
It used to work fine for me, but this week I’m having trouble connecting. Wondering why?
The interface can be launched just fine. However, after like few mins, the error started to appear.
“Error
Connection errored out.”
Also, the local url never work for me. It says check proxy and firewall.
I didn’t use any proxy and Chrome is in the whitelist.
hi, I’m also getting this runtime error and failed to launch. Could you help me to fix it?
Python 3.10.12 (main, Nov 20 2023, 15:14:05) [GCC 11.4.0]
Version: v1.7.0
Commit hash: cf2772fab0af5573da775e7437e6acdca424f26e
Traceback (most recent call last):
File “/content/drive/MyDrive/AI_PICS/stable-diffusion-webui/launch.py”, line 48, in
main()
File “/content/drive/MyDrive/AI_PICS/stable-diffusion-webui/launch.py”, line 39, in main
prepare_environment()
File “/content/drive/MyDrive/AI_PICS/stable-diffusion-webui/modules/launch_utils.py”, line 384, in prepare_environment
raise RuntimeError(
RuntimeError: Torch is not able to use GPU; add –skip-torch-cuda-test to COMMANDLINE_ARGS variable to disable this check
I’ve used it for a while and its working.
Local connection: It’s not supposed to work. It’s local to the colab environment that you don’t have access to. That’s why we need to open the public connection.
Runtime Error: It seems that you have started the notebook without GPU. Are you using a paid colab account? You have to. Otherwise you will be disconnected or not allocated with GPU sometimes.
Hi, thx for your quick reply.
I’m on a “pay as you go”plan and running with T4 GPU.
Sometimes when I start up, I run into a runtime error, or after the interface launches fine, I hit a snag with a ‘connection errorred out’. Mostly the latter.
Your setup should run run fine. You can paste the whole error message next time when it happens.
Hi. I’m brand new to this. Where do I download a copy of AUTOMATIC1111 so I can upload it to my Google Drive and then open it in aCoLab notebook?
You simply run the notebook and it will be downloaded automatically to colab. It will not be saved to your google drive due to the size. you can save and reuse models in your google drive.
Where do I get the notebook? How do I run it?
I’ve set up a Google CoLab Pro account and I’m trying to follow the tutorial “How to run Stable Diffusion on Google Colab (AUTOMATIC1111)”, but when I get to the section “Step-by-step instructions to run the Colab notebook” it tells me to open the Colab notebook in Quick Start Guide. But when I click on that link it takes me to this page:
https://andrewongai.gumroad.com/l/stable_diffusion_quick_start
where there is no Colab Notebook…
Hi, you need to download the quick start guide first. It’s free. The link is in the guide.
Hey there—I’m running A1111 through Google Colab, looks like I’m getting this error when I try to run it:
OSError: Can’t load tokenizer for ‘openai/clip-vit-large-patch14’. If you were trying to load it from ‘https://huggingface.co/models’, make sure you don’t have a local directory with the same name. Otherwise, make sure ‘openai/clip-vit-large-patch14’ is the correct path to a directory containing all relevant files for a CLIPTokenizer tokenizer.
Any ideas?
Never mind—I see huggingface is under maintenance so I’m sure that’s why.
I’ve started getting the following error:
ImportError: cannot import name ‘set_documentation_group’ from ‘gradio_client.documentation’ (/usr/local/lib/python3.10/dist-packages/gradio_client/documentation.py)
Hi, I tested the recommended setting and didn’t see this error.
Hi. How many images (approximately) you can generate using Colab-Pro Subscription (SD1.5 and SDXL models) during a month?
Not use if pricing is the same in all countries. But in the US, you get about 50 hours for $10. You should get 4 SD1.5 images within a minute.
Hi Andrew
Recently, AnimateDiff has “CUDA out of memory” error.
I use T4 with High RAM and enabled ControlNet, DeForum and AnimateDiff. When, I run AnimateDiff to create video with Prompt Travle, the error as below occurs. I tested with A100 (40G VRAM), which successfully generates video. I wonder if 15G VRAM is not enough to run AnimateDiff on Colab.
Andrew, do you have any idea why the error occurs?
OK, I will take a look!
Hi Andrew again
I wonder if had a chance to check if AnimateDiff causes CUDA out of memory error if T4 is used? I wonder if this error occurs only on my part or it is a common error.
Sorry for the delay. I did a quick test with an SD1.5 model and did not see the error. The GPU memory is merely at 6.1GB. Please detail the steps to reproduce.
Hi Andrew,
I’m using your notebook StableDiffusionUI_ngrok_sagiodev.ipynb for 2 months already but got stucked at: “Installing Deforum requirement: pims” step today.
I saw there were an update yesterday. Could this cause my problem?
Norbert
Hi, I checked deforum and it worked correctly.
It is updated to using v1.7 by default. you can revert it to v1.6 by changing the version field.
been having issues lately (forgive me if silly questions I don’t fully understand all this)
I had previously been making models no problems but lately whenever I create a new model, no matter what I type the images it produces are almost identical to the training images, completely ignoring al my prompts. Some people have been saying it’s over training but I have been using the same method for all my previous models and have had no trouble (100 training steps for each image). Not sure if it has anything to do with it but ever since the models have been saving as ‘safetensors’ instead of ‘ckpt’ I’ve been having this issue. I’ve tried lowering the steps but then I don’t seem to get the same quality I was previously getting. I was previously doing around 100 training images with 10000 steps and getting great results. Someone suggested lowering the learning rate to 3e-6 but when I do that I get an error for running out of disc space right when it’s about to finish. Appreciate what you do and again I apologize if I sound dumb lol
I’m trying to add the adetailer model face_yolov8n_v2. Am I able to do that in the models folder of the collab?
a custom model in adetailer is not supported. you will need to upload manually through the file explorer on the left.
Hey Andrew, just installed the notebook.
I am currently trying to create a video with deforum but for some reason
1. the revAnimated V1-2-2-2 model doesn’t load. It appears in the dropdown menu in the upper left corner but everytime I select it, it changes back to another preinstalled model immediately.
2. Also when I hit generate in Deforum I get this error message:
*START OF TRACEBACK*
Traceback (most recent call last):
File “/content/stable-diffusion-webui/extensions/deforum/scripts/deforum_helpers/run_deforum.py”, line 116, in run_deforum
render_animation(args, anim_args, video_args, parseq_args, loop_args, controlnet_args, root)
[…]
RuntimeError: Input type (torch.cuda.HalfTensor) and weight type (torch.HalfTensor) should be the same
*END OF TRACEBACK*
User friendly error message:
Error: Input type (torch.cuda.HalfTensor) and weight type (torch.HalfTensor) should be the same. Please, check your schedules/ init values.
Please help and merry christmas from an Andrew to Andrew 😀
Merry Xmas!
For 1: what’s the error message when loading the model? You can try re-downloading the model.
For 2: I used the preloaded dreamshaper model on the colab notebook running on T4. Running deforum with default settings. The video generation was successful.
Merry Christmas man!
For both problems I figured out a solution. For some reason the download didn’t quite work when I just pasted the link into the notebook before startup.
I now just downloaded the Lora and Checkpoint that I needed and added it to my google drive.
Thanks for this amazing website and notebook.
Have a great time with your family and enjoy the upcoming days! 🎅
Hi Everybody – Unable to get any of my ckpts to mount currently. Anybody else having issues?
changing setting sd_model_checkpoint to charrr.ckpt: AttributeError
Traceback (most recent call last):
File “/content/stable-diffusion-webui/modules/options.py”, line 140, in set
option.onchange()
File “/content/stable-diffusion-webui/modules/call_queue.py”, line 13, in f
res = func(*args, **kwargs)
File “/content/stable-diffusion-webui/modules/initialize_util.py”, line 170, in
shared.opts.onchange(“sd_model_checkpoint”, wrap_queued_call(lambda: sd_models.reload_model_weights()), call=False)
File “/content/stable-diffusion-webui/modules/sd_models.py”, line 741, in reload_model_weights
state_dict = get_checkpoint_state_dict(checkpoint_info, timer)
File “/content/stable-diffusion-webui/modules/sd_models.py”, line 315, in get_checkpoint_state_dict
res = read_state_dict(checkpoint_info.filename)
File “/content/stable-diffusion-webui/modules/sd_models.py”, line 301, in read_state_dict
sd = get_state_dict_from_checkpoint(pl_sd)
File “/content/stable-diffusion-webui/modules/sd_models.py”, line 245, in get_state_dict_from_checkpoint
pl_sd = pl_sd.pop(“state_dict”, pl_sd)
AttributeError: ‘NoneType’ object has no attribute ‘pop’
Yess, I got the same error. try to download the models manually and add them to your drive. this way it should work.
Hey Andrew!
Thanks for the Colab notebook. I was wondering where does it exactly save the models and the files on my drive? I have already downloaded models and want to just add them to the folder where the models are.
In the AI_PICS folder.
Found it! I also added the SDXL Turbo but somehow it doesn’t load it! it keeps switching back to other models you added there by default. Am i missing something?
The SDXL turbo is no different from other models. See the error message on Colab if you cannot load it. You can try re-downloading the model. Sometimes its just corrupted.
Soooo after doing all the above and having successfully launched it once and saved it to gdrive, after you close the runtime, how do you open it up again next time? lol
Probably a newbie question, but the guide states “The LoRA model will be saved to your Google Drive under AI_PICS > Lora if Use_Google_Drive is selected” and “start the notebook with the Use_Google_Drive option”
How does one select “Use_Google_Drive”? I can’t find that option anywhere.
Hi, you only need to use the recommended setting for saving in google drive. I will update the text.
Downloaded and tried to install Auto1111 colab purchased from here…
And got this for the last hour or so…
This share link expires in 72 hours. For free permanent hosting and GPU upgrades, run `gradio deploy` from Terminal to deploy to Spaces (https://huggingface.co/spaces)
Startup time: 13.4s (prepare environment: 1.8s, import torch: 6.1s, import gradio: 0.6s, setup paths: 0.5s, initialize shared: 0.2s, other imports: 0.7s, load scripts: 0.7s, create ui: 0.4s, gradio launch: 2.2s).
Creating model from config: /content/stable-diffusion-webui/configs/v1-inference.yaml
Applying attention optimization: sdp-no-mem… done.
Model loaded in 6.0s (load weights from disk: 2.9s, create model: 1.8s, apply weights to model: 1.0s, calculate empty prompt: 0.2s).
no other messsages…
do you see the gradio.live link above? If not, likely be a temporary problem with gradio.
ngork’s link is usually more stable. you can try.
Tried the Gradio.live link>.. Reported “no interface…”
anyway the line out feed suggested that nothing was running on that port anyway.
that’s strange. I just tried and it is working. Make sure you use the link when the notebook is running.
I receive this error message: nansException: A tensor with all NaNs was produced in VAE. This could be because there’s not enough precision to represent the picture. Try adding –no-half-vae commandline argument to fix this. Use –disable-nan-check commandline argument to disable this check.
Try adding those arguments to “Extra Web-UI arguments” in the notebook.
You mean like this? “–disable-model-loading-ram-optimization –opt-sdp-no-mem-attention –no-half-vae –disable-nan-check” as the first two were there already,
Anyway I get this message: launch.py: error: unrecognized arguments: –no-half-vae –disable-nan-check
Solved it, didn’t have compute units in colab, but why does the animation look very different with animatediff, compared to when I generate a single image only?
because the image condition is conditioned by animatediff’s motion model, in addition to the text prompt.
hi. i was able to run this a few months ago w a free colab account and now it’s saying the code isn’t allowed. what’s the deal?
yeah, they banned free SD.
Hey!
Today notebook stopped starting with this error.
I have Colab Pro
“You cannot currently connect to a GPU due to usage limits in Colab. Learn more”
Colab Pro+ works. I think it’s Google limiting access, hopefully only at peak times, because I’ve been just about to downgrade to Pro – I don’t use 500 points a month… Maybe try again? (I’d be rather displeased if it becomes Pro+ only)
I tested with colab pro and it is working correct. perhaps it is a temp problem.
I’m trying very hard to train Dreambooth on Google Colab using your notebook. However It seems your notebook is not installing xformers properly. When I launch dreambooth, I give the message “No module ‘xformers’. Proceeding without it”.
In AUTOMATIC1111, I can create a new model in the Dreambooth extension. But when I try to train it, after about 15 of running it would tell me xformers is not installed.
I read some of the comments about using sdp? I followed your instructions to change my settings and deleted the iconfig file, however Dreambooth is still giving me the error that xformers is not installed.
How do I properly install xformers with your notebook, so I am able to use Dreambooth to train a model?
I found a solution. Before running the contents of the notebook, I had to first run the following line in the notebook.
pip3 install -U xformers –index-url https://download.pytorch.org/whl/cu118
Then I added –xformers to the “Extra_arguments”
Hello Andrew~
I’m currently having problem in trying to execute the colab notebook, below is the log I have obtained:
Apply lowram patch
/content/stable-diffusion-webui
WEBUI ARGUMENTS: –gradio-img2img-tool color-sketch –enable-insecure-extension-access –gradio-queue –ngrok 2XZW8TEOBnMlRVh6KlNr98YVZpD_88RqBGJBd7cLfaE2PScbd –gradio-auth lofited:lofitedcal –disable-model-loading-ram-optimization –opt-sdp-no-mem-attention
Python 3.10.12 (main, Jun 11 2023, 05:26:28) [GCC 11.4.0]
Version: v1.6.0
Commit hash: 5ef669de080814067961f28357256e8fe27544f4
Launching Web UI with arguments: –gradio-img2img-tool color-sketch –enable-insecure-extension-access –gradio-queue –ngrok 2XZW8TEOBnMlRVh6KlNr98YVZpD_88RqBGJBd7cLfaE2PScbd –gradio-auth lofited:lofitedcal –disable-model-loading-ram-optimization –opt-sdp-no-mem-attention
2023-11-03 15:09:27.332699: E tensorflow/compiler/xla/stream_executor/cuda/cuda_dnn.cc:9342] Unable to register cuDNN factory: Attempting to register factory for plugin cuDNN when one has already been registered
2023-11-03 15:09:27.332752: E tensorflow/compiler/xla/stream_executor/cuda/cuda_fft.cc:609] Unable to register cuFFT factory: Attempting to register factory for plugin cuFFT when one has already been registered
2023-11-03 15:09:27.332777: E tensorflow/compiler/xla/stream_executor/cuda/cuda_blas.cc:1518] Unable to register cuBLAS factory: Attempting to register factory for plugin cuBLAS when one has already been registered
2023-11-03 15:09:28.306097: W tensorflow/compiler/tf2tensorrt/utils/py_utils.cc:38] TF-TRT Warning: Could not find TensorRT
Traceback (most recent call last):
File “/content//stable-diffusion-webui/launch.py”, line 48, in
main()
File “/content//stable-diffusion-webui/launch.py”, line 44, in main
start()
File “/content/stable-diffusion-webui/modules/launch_utils.py”, line 432, in start
import webui
File “/content/stable-diffusion-webui/webui.py”, line 13, in
initialize.imports()
File “/content/stable-diffusion-webui/modules/initialize.py”, line 21, in imports
import gradio # noqa: F401
File “/usr/local/lib/python3.10/dist-packages/gradio/__init__.py”, line 3, in
import gradio.components as components
File “/usr/local/lib/python3.10/dist-packages/gradio/components/__init__.py”, line 1, in
from gradio.components.annotated_image import AnnotatedImage
File “/usr/local/lib/python3.10/dist-packages/gradio/components/annotated_image.py”, line 12, in
from gradio import utils
File “/usr/local/lib/python3.10/dist-packages/gradio/utils.py”, line 353, in
class AsyncRequest:
File “/usr/local/lib/python3.10/dist-packages/gradio/utils.py”, line 372, in AsyncRequest
client = httpx.AsyncClient()
File “/usr/local/lib/python3.10/dist-packages/httpx/_client.py”, line 1397, in __init__
self._transport = self._init_transport(
File “/usr/local/lib/python3.10/dist-packages/httpx/_client.py”, line 1445, in _init_transport
return AsyncHTTPTransport(
File “/usr/local/lib/python3.10/dist-packages/httpx/_transports/default.py”, line 275, in __init__
self._pool = httpcore.AsyncConnectionPool(
TypeError: AsyncConnectionPool.__init__() got an unexpected keyword argument ‘socket_options’
Same problem.
Same problem 🙁
…TypeError: AsyncConnectionPool.__init__() got an unexpected keyword argument ‘socket_options’…
Seconded… *looks at comments below* Fourthed 😉
Fix: add the line
!pip install httpx==0.24.1
in the notebook, before python.py is run. Whatever httpx is, it needs a downgrade from 0.25.1. (Credit: lilyasviel)
thank you!
Hello! I am having trouble with this. Where in the code do I add the line?
I hope you will reply, thank you!
display the code and add the line command to the penultimate line (just before : !python {root}/stable-diffusion-webui/launch.py {args})
Hi, the notebook is fixed. Please pull the copy updated Nov 4th.
Hi Andrew
The roop extension no longer works. It seems that the huggingface model file is no longer available.
Hi Andrew again
Although the huggingface model file is no longer available, it seems roop is still working on Colab.
Look up FaceSwapLab. It’s not only way better (I created a checkpoint of my face with 40 images, it gives incredible results) but also has the inswapper_128.onnx file included. Save it somewhere separately, because it keeps making appearances, then disappears here and re-appears there. Not sure why, because it was officially released, it’s not pirated.
Unfortunately the _256 and _512 modules have not been released (if anybody has them, I would not hate you for sending me a link…)
Also, Andrew, thanks for “forcing” us to use sdp – it’s twice as fast as xformers at AnimateDiff 8-o
yeah, xformers and sdp are the same thing. We should move on to sdp unless on old machines where it’s not supported.
Yes, the notebook uses an alternative source.
Hi Andrew
I just noticed that you updated the colab with SDP attention instead of XFormers. May I ask what it actually mean and why this change was necessary?
I don’t know, personally, but for me what it means is that the notebook doesn’t work anymore on a v100 without giving a CUDA out of memory error when trying to hi-res fix/upscale a single 512×512 image. (I actually haven’t tried it on the T4 yet). Before the change away from xformers I used to do 4 batches of 4 512×768 images at once with 2x hi-res fix enabled, without any issues. Now I can’t even upscale one. I wonder if there’s a way to turn xformers back on, maybe in the extra_arguments field.
For existing users, do either one:
– Change Settings > Optimizations > Cross attention optimization to Automatic. Apply Settings.
– Or, delete uiconfig.json in AI_PICS folder
Thanks, I’ll try this
So, I checked and my cross attention optimization was already set to automatic. Using the same setup as before with trying to do a single 512×768 image with 2x hi-res fix, I still get the CUDA out of memory error:
OutOfMemoryError: CUDA out of memory. Tried to allocate 9.00 GiB. GPU 0 has a total capacty of 15.77 GiB of which 3.64 GiB is free. Process 124835 has 12.13 GiB memory in use. Of the allocated memory 11.25 GiB is allocated by PyTorch, and 462.89 MiB is reserved by PyTorch but unallocated. If reserved but unallocated memory is large try setting max_split_size_mb to avoid fragmentation. See documentation for Memory Management and PYTORCH_CUDA_ALLOC_CONF
I guess I’ll try deleting uiconfig.json and re-initializing all my UI settings to see if that does anything…
Yeah, that didn’t change anything. It just gives the same error.
Is there any way to use the older version of the notebook, or was this a change that google made to colab that makes us no longer able to use xformers?
The notebook didn’t change but colab environment did. I can reproduce your error in V100 but haven’t find a way to fix it yet. It works on T4 with sdp attention, which is the pytorch native implementation of xformers. I will try more when I have time, but switch to T4 or test other machine types for now.
Change it to sdp – single dot product. I think Automatic still tries to use xformers (which isn’t there) or doggettx.
It doesn’t work anymore with a colab update. You will need to update the settings after this change. Do either one:
– Change Settings > Optimizations > Cross attention optimization to Automatic. Apply Settings.
– Or, delete uiconfig.json in AI_PICS folder
Hi Andrew
Where can I find the “Change Settings” menu? Is it on the colab page? I can’t find it. Or do I need to find it somewhere else?
In A1111, setting page.
Thank you, Andrew.
The notebook stopped working today. Getting this error when clicking Generate:
RuntimeError: dictionary changed size during iteration
0% 0/20 [00:00<?, ?it/s]
*** Error completing request
ALSO Seeing this new error during the build:
WARNING:xformers:WARNING[XFORMERS]: xFormers can't load C++/CUDA extensions. xFormers was built for:
PyTorch 2.0.1+cu118 with CUDA 1108 (you have 2.1.0+cu118)
Python 3.10.11 (you have 3.10.12)
Please reinstall xformers (see https://github.com/facebookresearch/xformers#installing-xformers)
Memory-efficient attention, SwiGLU, sparse and more won't be available.
Set XFORMERS_MORE_DETAILS=1 for more details
OK, fixed.
Thanks, it works!
Spoke too fast.
I did a fresh install with “save small models etc.”, the only model I download is SD1.5, ControlNet, AnimateDiff. No other settings changed. When I try to animate 512×768, I get:
OutOfMemoryError: CUDA out of memory. Tried to allocate 11.53 GiB. GPU 0 has a total capacty of 15.77 GiB of which 10.83 GiB is free. Process 285530 has 4.94 GiB memory in use. Of the allocated memory 4.15 GiB is allocated by PyTorch, and 407.56 MiB is reserved by PyTorch but unallocated. If reserved but unallocated memory is large try setting max_split_size_mb to avoid fragmentation. See documentation for Memory Management and PYTORCH_CUDA_ALLOC_CONF
I was using my regular install with a different model when this hit first, so I thought I’d try from scratch. I also changed the AnimateDiff setting to “optimise attention layers with sdp” in case that would help. No other extensions, no other changes. Colab tells me I am only using 3.7GB VRAM.
512×512 just about renders, but after a restart – once I get this error, I can’t render anything at all anymore.
There’s something hardcoded in settings. Do either one:
– Change Settings > Optimizations > Cross attention optimization to Automatic. Apply Settings.
– Or, delete uiconfig.json in AI_PICS folder
Thank you it works now 🙂
I notice the Google Drive requested permissions have changed. Instead of just requesting access to the drive, it’s requesting contacts, file logs, personal information and many other permissions it didn’t ask for before. Are these new permissions part of your updates?
No, they are not my updates.
Good to know – thanks again.
In that case, Google is reaching too far into our private data. Current permissions requested are:
https://www.googleapis.com/auth/userinfo.email https://www.googleapis.com/auth/docs.test https://www.googleapis.com/auth/drive https://www.googleapis.com/auth/drive.activity.readonly https://www.googleapis.com/auth/drive.photos.readonly https://www.googleapis.com/auth/experimentsandconfigs https://www.googleapis.com/auth/peopleapi.readonly openid
These permissions were not required previously. According to the manifest, Google is stating that these permission requests are from the developer, not Google (sigh).
It was working fine till today or yesterday. I have error message
ARNING:xformers:WARNING[XFORMERS]: xFormers can’t load C++/CUDA extensions. xFormers was built for:
PyTorch 2.0.1+cu118 with CUDA 1108 (you have 2.1.0+cu118)
Python 3.10.11 (you have 3.10.12)
Please reinstall xformers (see https://github.com/facebookresearch/xformers#installing-xformers)
Memory-efficient attention, SwiGLU, sparse and more won’t be available.
Set XFORMERS_MORE_DETAILS=1 for more details
Not sure how to go about reinstalling xformers from the site, it seems like i have newer versions and need to go back to the old ones..
Same. Colab welcomed me with excited information that Google updated things. Yay. Much excite. Except now xformers won’t load, FaceSwapLab won’t either, and it’s impossible to render anything… Thanks for nothing, GOOGLE.
Andrew – will you be maintaining this notebook, or have you completely moved to HorrorUI– typo, ComfyUI?
Fixed: change “Cross attention optimisation” to “sdp – scaled dot product.”
I’m getting this comment when I run A1111:
WARNING:xformers:WARNING[XFORMERS]: xFormers can’t load C++/CUDA extensions. xFormers was built for:
PyTorch 2.0.1+cu118 with CUDA 1108 (you have 2.1.0+cu118)
Python 3.10.11 (you have 3.10.12)
Please reinstall xformers (see https://github.com/facebookresearch/xformers#installing-xformers)
Memory-efficient attention, SwiGLU, sparse and more won’t be available.
Set XFORMERS_MORE_DETAILS=1 for more details
It won’t run. What goes wrong?
It reports the following:
Apply lowram patch
/content/stable-diffusion-webui
WEBUI ARGUMENTS: –gradio-img2img-tool color-sketch –enable-insecure-extension-access –gradio-queue –xformers –share –gradio-auth buzzzen:Tk9^=e,t –disable-model-loading-ram-optimization
Python 3.10.12 (main, Jun 11 2023, 05:26:28) [GCC 11.4.0]
Version: v1.6.0
Commit hash: 5ef669de080814067961f28357256e8fe27544f4
Installing xformers
Launching Web UI with arguments: –gradio-img2img-tool color-sketch –enable-insecure-extension-access –gradio-queue –xformers –share –gradio-auth buzzzen:Tk9^=e,t –disable-model-loading-ram-optimization
2023-10-12 12:45:35.327918: W tensorflow/compiler/tf2tensorrt/utils/py_utils.cc:38] TF-TRT Warning: Could not find TensorRT
Checkpoint sd_xl_base_1.0.safetensors [31e35c80fc] not found; loading fallback v1-5-pruned-emaonly.ckpt
Calculating sha256 for /content/stable-diffusion-webui/models/Stable-diffusion/v1-5-pruned-emaonly.ckpt: Traceback (most recent call last):
File “/content//stable-diffusion-webui/launch.py”, line 48, in
main()
File “/content//stable-diffusion-webui/launch.py”, line 44, in main
start()
File “/content/stable-diffusion-webui/modules/launch_utils.py”, line 436, in start
webui.webui()
File “/content/stable-diffusion-webui/webui.py”, line 79, in webui
app, local_url, share_url = shared.demo.launch(
File “/usr/local/lib/python3.10/dist-packages/gradio/blocks.py”, line 1896, in launch
) = networking.start_server(
File “/usr/local/lib/python3.10/dist-packages/gradio/networking.py”, line 131, in start_server
app = App.create_app(blocks, app_kwargs=app_kwargs)
File “/usr/local/lib/python3.10/dist-packages/gradio/routes.py”, line 175, in create_app
app.configure_app(blocks)
File “/usr/local/lib/python3.10/dist-packages/gradio/routes.py”, line 131, in configure_app
self.auth = {account[0]: account[1] for account in auth}
File “/usr/local/lib/python3.10/dist-packages/gradio/routes.py”, line 131, in
self.auth = {account[0]: account[1] for account in auth}
IndexError: tuple index out of range
cc6cb27103417325ff94f52b7a5d2dde45a7515b25c255d8e396c90014281516
Loading weights [cc6cb27103] from /content/stable-diffusion-webui/models/Stable-diffusion/v1-5-pruned-emaonly.ckpt
Creating model from config: /content/stable-diffusion-webui/configs/v1-inference.yaml
(…)it-large-patch14/resolve/main/vocab.json: 100% 961k/961k [00:00<00:00, 13.9MB/s]
(…)it-large-patch14/resolve/main/merges.txt: 100% 525k/525k [00:00<00:00, 42.2MB/s]
(…)h14/resolve/main/special_tokens_map.json: 100% 389/389 [00:00<00:00, 1.67MB/s]
(…)tch14/resolve/main/tokenizer_config.json: 100% 905/905 [00:00<00:00, 4.04MB/s]
(…)t-large-patch14/resolve/main/config.json: 100% 4.52k/4.52k [00:00<00:00, 16.4MB/s]
Applying attention optimization: xformers… done.
Model loaded in 36.6s (calculate hash: 19.3s, load weights from disk: 11.5s, create model: 3.6s, apply weights to model: 1.1s, load textual inversion embeddings: 0.3s, calculate empty prompt: 0.7s).
Hi, I cannot reproduce the error. txt2img is working correctly.
Hi Andrew
I just read your new AnimateDiff tutorial (https://stable-diffusion-art.com/animatediff) and tried to use Video Source with ControlNet on this Google Colab.
I drag a short video (2 seconds with FPS is 30), so total 60 frames. Enabled ControlNet and set the Openpose as you explained. I click the Generate button and waited a bit, but it says “RuntimeError: The size of tensor a (60) must match the size of tensor b (120) at non-singleton dimension 0”
Below is the whole message on the Colab notebook output section. I tried with different checkpoint models with different prompts. But the same error messages occur. I can generate GIF successfully without Video Source. The errors happens when I put a Video Source with ControlNet. Please help.
>>>>>>>>>>>>>>
Total progress: 100% 30/30 [00:10<00:00, 2.84it/s]
2023-10-10 11:54:00,974 – AnimateDiff – INFO – AnimateDiff process start.
Calculating sha256 for /content/stable-diffusion-webui/extensions/sd-webui-animatediff/model/mm_sd_v15_v2.ckpt: 69ed0f5fef82b110aca51bcab73b21104242bc65d6ab4b8b2a2a94d31cad1bf0
2023-10-10 11:54:05,947 – AnimateDiff – INFO – You are using mm_sd_v15_v2.ckpt, which has been tested and supported.
2023-10-10 11:54:05,948 – AnimateDiff – INFO – Loading motion module mm_sd_v15_v2.ckpt from /content/stable-diffusion-webui/extensions/sd-webui-animatediff/model/mm_sd_v15_v2.ckpt
2023-10-10 11:54:10,660 – AnimateDiff – WARNING – Missing keys
2023-10-10 11:54:11,164 – AnimateDiff – INFO – Injecting motion module mm_sd_v15_v2.ckpt into SD1.5 UNet middle block.
2023-10-10 11:54:11,164 – AnimateDiff – INFO – Injecting motion module mm_sd_v15_v2.ckpt into SD1.5 UNet input blocks.
2023-10-10 11:54:11,164 – AnimateDiff – INFO – Injecting motion module mm_sd_v15_v2.ckpt into SD1.5 UNet output blocks.
2023-10-10 11:54:11,164 – AnimateDiff – INFO – Setting DDIM alpha.
2023-10-10 11:54:11,188 – AnimateDiff – INFO – Injection finished.
2023-10-10 11:54:11,188 – AnimateDiff – INFO – Hacking lora to support motion lora
2023-10-10 11:54:11,188 – AnimateDiff – INFO – Hacking CFGDenoiser forward function.
2023-10-10 11:54:11,189 – AnimateDiff – INFO – Hacking ControlNet.
2023-10-10 11:54:12,607 – ControlNet – INFO – Loading model: control_v11p_sd15_openpose [cab727d4]
2023-10-10 11:54:20,298 – ControlNet – INFO – Loaded state_dict from [/content/stable-diffusion-webui/extensions/sd-webui-controlnet/models/control_v11p_sd15_openpose.pth]
2023-10-10 11:54:20,298 – ControlNet – INFO – controlnet_default_config
2023-10-10 11:54:23,089 – ControlNet – INFO – ControlNet model control_v11p_sd15_openpose [cab727d4] loaded.
2023-10-10 11:54:23,637 – ControlNet – INFO – Loading preprocessor: dw_openpose_full
2023-10-10 11:54:23,637 – ControlNet – INFO – preprocessor resolution = 512
Downloading: “https://huggingface.co/yzd-v/DWPose/resolve/main/yolox_l.onnx” to /content/stable-diffusion-webui/extensions/sd-webui-controlnet/annotator/downloads/openpose/yolox_l.onnx
100% 207M/207M [00:00<00:00, 347MB/s]
Downloading: "https://huggingface.co/yzd-v/DWPose/resolve/main/dw-ll_ucoco_384.onnx" to /content/stable-diffusion-webui/extensions/sd-webui-controlnet/annotator/downloads/openpose/dw-ll_ucoco_384.onnx
100% 128M/128M [00:00<00:00, 318MB/s]
2023-10-10 11:56:22,694 – ControlNet – INFO – ControlNet Hooked – Time = 130.45434308052063
0% 0/30 [00:08<?, ?it/s]
*** Error completing request
*** Arguments: ('task(vc4hmbdxtwxkuj2)', 'pretty 1girl, absurdres, 8k uhd, platinum blonde hair, bob cut, medium breasts, black tshirt, denim shorts, garden background, flowers, magnolias, apple tree, close up portrait', '3d, cartoon, anime, sketches, (worst quality, bad quality, child, cropped:1.4) ((monochrome)), ((grayscale)), (bad-hands-5:1.0), (badhandv4:1.0), (easynegative:0.8), (bad-artist-anime:0.8), (bad-artist:0.8), (bad_prompt:0.8), (bad-picture-chill-75v:0.8), (bad_prompt_version2:0.8), (bad_quality:0.8)', [], 30, 'DPM++ 2M Karras', 1, 1, 8.5, 768, 512, False, 0.55, 2, '4x_foolhardy_Remacri', 36, 0, 0, 'Use same checkpoint', 'Use same sampler', '', '', [], , 0, False, ”, 0.8, 1514816117, False, -1, 0, 0, 0, , , , , False, False, ‘positive’, ‘comma’, 0, False, False, ”, 1, ”, [], 0, ”, [], 0, ”, [], True, False, False, False, 0, False, None, None, False, None, None, False, None, None, False, 50) {}
Traceback (most recent call last):
File “/content/stable-diffusion-webui/modules/call_queue.py”, line 57, in f
res = list(func(*args, **kwargs))
File “/content/stable-diffusion-webui/modules/call_queue.py”, line 36, in f
res = func(*args, **kwargs)
File “/content/stable-diffusion-webui/modules/txt2img.py”, line 55, in txt2img
processed = processing.process_images(p)
File “/content/stable-diffusion-webui/modules/processing.py”, line 732, in process_images
res = process_images_inner(p)
File “/content/stable-diffusion-webui/extensions/sd-webui-animatediff/scripts/animatediff_cn.py”, line 108, in hacked_processing_process_images_hijack
return getattr(processing, ‘__controlnet_original_process_images_inner’)(p, *args, **kwargs)
File “/content/stable-diffusion-webui/modules/processing.py”, line 867, in process_images_inner
samples_ddim = p.sample(conditioning=p.c, unconditional_conditioning=p.uc, seeds=p.seeds, subseeds=p.subseeds, subseed_strength=p.subseed_strength, prompts=p.prompts)
File “/content/stable-diffusion-webui/extensions/sd-webui-controlnet/scripts/hook.py”, line 451, in process_sample
return process.sample_before_CN_hack(*args, **kwargs)
File “/content/stable-diffusion-webui/modules/processing.py”, line 1140, in sample
samples = self.sampler.sample(self, x, conditioning, unconditional_conditioning, image_conditioning=self.txt2img_image_conditioning(x))
File “/content/stable-diffusion-webui/modules/sd_samplers_kdiffusion.py”, line 235, in sample
samples = self.launch_sampling(steps, lambda: self.func(self.model_wrap_cfg, x, extra_args=self.sampler_extra_args, disable=False, callback=self.callback_state, **extra_params_kwargs))
File “/content/stable-diffusion-webui/modules/sd_samplers_common.py”, line 261, in launch_sampling
return func()
File “/content/stable-diffusion-webui/modules/sd_samplers_kdiffusion.py”, line 235, in
samples = self.launch_sampling(steps, lambda: self.func(self.model_wrap_cfg, x, extra_args=self.sampler_extra_args, disable=False, callback=self.callback_state, **extra_params_kwargs))
File “/usr/local/lib/python3.10/dist-packages/torch/utils/_contextlib.py”, line 115, in decorate_context
return func(*args, **kwargs)
File “/content/stable-diffusion-webui/repositories/k-diffusion/k_diffusion/sampling.py”, line 594, in sample_dpmpp_2m
denoised = model(x, sigmas[i] * s_in, **extra_args)
File “/usr/local/lib/python3.10/dist-packages/torch/nn/modules/module.py”, line 1501, in _call_impl
return forward_call(*args, **kwargs)
File “/content/stable-diffusion-webui/extensions/sd-webui-animatediff/scripts/animatediff_infv2v.py”, line 271, in mm_cfg_forward
x_out[a:b] = self.inner_model(x_in[a:b], sigma_in[a:b], cond=make_condition_dict(c_crossattn, image_cond_in[a:b]))
File “/usr/local/lib/python3.10/dist-packages/torch/nn/modules/module.py”, line 1501, in _call_impl
return forward_call(*args, **kwargs)
File “/content/stable-diffusion-webui/repositories/k-diffusion/k_diffusion/external.py”, line 112, in forward
eps = self.get_eps(input * c_in, self.sigma_to_t(sigma), **kwargs)
File “/content/stable-diffusion-webui/repositories/k-diffusion/k_diffusion/external.py”, line 138, in get_eps
return self.inner_model.apply_model(*args, **kwargs)
File “/content/stable-diffusion-webui/modules/sd_hijack_utils.py”, line 17, in
setattr(resolved_obj, func_path[-1], lambda *args, **kwargs: self(*args, **kwargs))
File “/content/stable-diffusion-webui/modules/sd_hijack_utils.py”, line 28, in __call__
return self.__orig_func(*args, **kwargs)
File “/content/stable-diffusion-webui/repositories/stable-diffusion-stability-ai/ldm/models/diffusion/ddpm.py”, line 858, in apply_model
x_recon = self.model(x_noisy, t, **cond)
File “/usr/local/lib/python3.10/dist-packages/torch/nn/modules/module.py”, line 1501, in _call_impl
return forward_call(*args, **kwargs)
File “/content/stable-diffusion-webui/repositories/stable-diffusion-stability-ai/ldm/models/diffusion/ddpm.py”, line 1335, in forward
out = self.diffusion_model(x, t, context=cc)
File “/usr/local/lib/python3.10/dist-packages/torch/nn/modules/module.py”, line 1501, in _call_impl
return forward_call(*args, **kwargs)
File “/content/stable-diffusion-webui/extensions/sd-webui-controlnet/scripts/hook.py”, line 858, in forward_webui
raise e
File “/content/stable-diffusion-webui/extensions/sd-webui-controlnet/scripts/hook.py”, line 855, in forward_webui
return forward(*args, **kwargs)
File “/content/stable-diffusion-webui/extensions/sd-webui-controlnet/scripts/hook.py”, line 592, in forward
control = param.control_model(x=x_in, hint=hint, timesteps=timesteps, context=context, y=y)
File “/usr/local/lib/python3.10/dist-packages/torch/nn/modules/module.py”, line 1501, in _call_impl
return forward_call(*args, **kwargs)
File “/content/stable-diffusion-webui/extensions/sd-webui-controlnet/scripts/cldm.py”, line 31, in forward
return self.control_model(*args, **kwargs)
File “/usr/local/lib/python3.10/dist-packages/torch/nn/modules/module.py”, line 1501, in _call_impl
return forward_call(*args, **kwargs)
File “/content/stable-diffusion-webui/extensions/sd-webui-controlnet/scripts/cldm.py”, line 311, in forward
h += guided_hint
RuntimeError: The size of tensor a (60) must match the size of tensor b (120) at non-singleton dimension 0
Not quite sure but you can try a different sampler.
I’m sorry for this very basic question but where are the imaes being saved? There’s no output folder in my google drive.
Hi, it’s saved in AI_PICS/outputs in you google drive.
I have an issue with ngrok, link don’t work when started, if i leave ngrok and use only gradio all works fine
That has more to do with ngrok’s service. I can test it out next time I upgrade the notebook.
Hi Andrew .)
First of all, thank you for your incredible work on Colab!
Since the last update 23-09-23 the system memory on Colab seems to pile up until crash.
Is it me or maybe the last update changed something related?
Hi, can you tell me how to reproduce the crash?
Hi Andrew,
thank you for the reply.
We were using sdxl with regional prompt on a standard colab profile, T4, 12gb system ram.
Performing rendering the amount of the system ram rise, as expected, than remain up, say roughly 11,5 Gb.
The next rendering the system ram continues to rise until max , piling up, than the system disconnects.
The day before, the 22th, we used this way Colab with the same sdxl configurations and prompts, working fine all the day.
Thanks
Just updated the notebook. Can you try with the new one?
Hi Andrew,
it’s working .)
Runs smoothly, multiple renderings in sequence, system ram lower than 3gb, not piling up until now .)
Thank you so much!
.)
Hi. I’m looking to use the train function, and I want to do a custom prompt template file for the textual inversion part. In a local install of a1111 I should put these text files in the /textual_inversion_templates directory. Is there a way to create this directory for the colab to find it?
Can you try using the file explorer on text to create?
Which username and password should we use to run the installation cell? (where it says just “a”…is it a new user and password we would use for the Colab/SD notebook orthe username and password I have for GitHub? or my Google Proo account..? thanks!
This password is for protecting your A1111 from others to access. You can set to anything you like.
Hello, I tried to add models manually into the models folder, but A1111 only sees the ckpt files and not the safetensors ones, is there something to enable somewhere ?
That shouldn’t be. It must be the model link being incorrect. Use a link that would download the file when you visit it on browser.
Hi, I tried google colab with version 1.6 but when I try to use controlent with img2img I get this error “RuntimeError: mat1 and mat2 shapes cannot be multiplied (154×2048 and 768×320)” what can it be? thank you
Thank you for providing the updated version. Unfortunately, I have encountered an issue with Torch, as detailed below. Could you kindly offer guidance on how to resolve this matter? thank you
“Traceback (most recent call last):
File “/content//stable-diffusion-webui/launch.py”, line 48, in
main()
File “/content//stable-diffusion-webui/launch.py”, line 39, in main
prepare_environment()
File “/content/stable-diffusion-webui/modules/launch_utils.py”, line 356, in prepare_environment
raise RuntimeError(
RuntimeError: Torch is not able to use GPU; add –skip-torch-cuda-test to COMMANDLINE_ARGS variable to disable this check”
It appears you didn’t select to use gpu. change the runtime type to use a gpu.
you have to repeat the steps each time you run the notebook. make sure also you have disconnected the GPU before stopping your work. else colab will consider the GPU “running” and will use up your credits.
this was in “reply” to msaliza. and this i am typing in reply to my comment. lets see where it is posted. do I have to do something special for a “reply” to a comment?
The reply function is glitchy. Sometimes the replied message doesn’t follow the thread but appears at the top.
Appreciate if someone in the knows can tell me how to fix it.
Thank you so much for putting this together. Up until now, I’ve never had an issue running the notebook, but now I get an error (using the same settings that I’ve always used) and I’m not sure what’s going on. Before, the only assets created in Drive were what I added or created. Now I can see that every time I hit play, it starts uploading a ton of random images and things.
/content/drive/MyDrive/AI_PICS/stable-diffusion-webui
WEBUI ARGUMENTS: –gradio-img2img-tool color-sketch –enable-insecure-extension-access –gradio-queue –xformers –share –gradio-auth a:a –disable-model-loading-ram-optimization
Python 3.10.12 (main, Jun 11 2023, 05:26:28) [GCC 11.4.0]
Version: v1.5.0
Commit hash: a3ddf464a2ed24c999f67ddfef7969f8291567be
Installing xformers
Launching Web UI with arguments: –gradio-img2img-tool color-sketch –enable-insecure-extension-access –gradio-queue –xformers –share –gradio-auth a:a –disable-model-loading-ram-optimization
2023-09-10 14:16:17.861903: I tensorflow/core/platform/cpu_feature_guard.cc:182] This TensorFlow binary is optimized to use available CPU instructions in performance-critical operations.
To enable the following instructions: AVX2 AVX512F FMA, in other operations, rebuild TensorFlow with the appropriate compiler flags.
2023-09-10 14:16:18.867965: W tensorflow/compiler/tf2tensorrt/utils/py_utils.cc:38] TF-TRT Warning: Could not find TensorRT
usage: launch.py
[-h]
[–update-all-extensions]
[–skip-python-version-check]
[–skip-torch-cuda-test]
[–reinstall-xformers]
[–reinstall-torch]
[–update-check]
[–test-server]
[–skip-prepare-environment]
[–skip-install]
[–do-not-download-clip]
[–data-dir DATA_DIR]
[–config CONFIG]
[–ckpt CKPT]
[–ckpt-dir CKPT_DIR]
[–vae-dir VAE_DIR]
[–gfpgan-dir GFPGAN_DIR]
[–gfpgan-model GFPGAN_MODEL]
[–no-half]
[–no-half-vae]
[–no-progressbar-hiding]
[–max-batch-count MAX_BATCH_COUNT]
[–embeddings-dir EMBEDDINGS_DIR]
[–textual-inversion-templates-dir TEXTUAL_INVERSION_TEMPLATES_DIR]
[–hypernetwork-dir HYPERNETWORK_DIR]
[–localizations-dir LOCALIZATIONS_DIR]
[–allow-code]
[–medvram]
[–lowvram]
[–lowram]
[–always-batch-cond-uncond]
[–unload-gfpgan]
[–precision {full,autocast}]
[–upcast-sampling]
[–share]
[–ngrok NGROK]
[–ngrok-region NGROK_REGION]
[–ngrok-options NGROK_OPTIONS]
[–enable-insecure-extension-access]
[–codeformer-models-path CODEFORMER_MODELS_PATH]
[–gfpgan-models-path GFPGAN_MODELS_PATH]
[–esrgan-models-path ESRGAN_MODELS_PATH]
[–bsrgan-models-path BSRGAN_MODELS_PATH]
[–realesrgan-models-path REALESRGAN_MODELS_PATH]
[–clip-models-path CLIP_MODELS_PATH]
[–xformers]
[–force-enable-xformers]
[–xformers-flash-attention]
[–deepdanbooru]
[–opt-split-attention]
[–opt-sub-quad-attention]
[–sub-quad-q-chunk-size SUB_QUAD_Q_CHUNK_SIZE]
[–sub-quad-kv-chunk-size SUB_QUAD_KV_CHUNK_SIZE]
[–sub-quad-chunk-threshold SUB_QUAD_CHUNK_THRESHOLD]
[–opt-split-attention-invokeai]
[–opt-split-attention-v1]
[–opt-sdp-attention]
[–opt-sdp-no-mem-attention]
[–disable-opt-split-attention]
[–disable-nan-check]
[–use-cpu USE_CPU [USE_CPU …]]
[–listen]
[–port PORT]
[–show-negative-prompt]
[–ui-config-file UI_CONFIG_FILE]
[–hide-ui-dir-config]
[–freeze-settings]
[–ui-settings-file UI_SETTINGS_FILE]
[–gradio-debug]
[–gradio-auth GRADIO_AUTH]
[–gradio-auth-path GRADIO_AUTH_PATH]
[–gradio-img2img-tool GRADIO_IMG2IMG_TOOL]
[–gradio-inpaint-tool GRADIO_INPAINT_TOOL]
[–gradio-allowed-path GRADIO_ALLOWED_PATH]
[–opt-channelslast]
[–styles-file STYLES_FILE]
[–autolaunch]
[–theme THEME]
[–use-textbox-seed]
[–disable-console-progressbars]
[–enable-console-prompts]
[–vae-path VAE_PATH]
[–disable-safe-unpickle]
[–api]
[–api-auth API_AUTH]
[–api-log]
[–nowebui]
[–ui-debug-mode]
[–device-id DEVICE_ID]
[–administrator]
[–cors-allow-origins CORS_ALLOW_ORIGINS]
[–cors-allow-origins-regex CORS_ALLOW_ORIGINS_REGEX]
[–tls-keyfile TLS_KEYFILE]
[–tls-certfile TLS_CERTFILE]
[–disable-tls-verify]
[–server-name SERVER_NAME]
[–gradio-queue]
[–no-gradio-queue]
[–skip-version-check]
[–no-hashing]
[–no-download-sd-model]
[–subpath SUBPATH]
[–add-stop-route]
[–api-server-stop]
[–timeout-keep-alive TIMEOUT_KEEP_ALIVE]
[–ldsr-models-path LDSR_MODELS_PATH]
[–lora-dir LORA_DIR]
[–lyco-dir-backcompat LYCO_DIR_BACKCOMPAT]
[–scunet-models-path SCUNET_MODELS_PATH]
[–swinir-models-path SWINIR_MODELS_PATH]
launch.py: error: unrecognized arguments: –disable-model-loading-ram-optimization
Hi, it appears that you save the whole thing to your google drive. You can either:
1. use the recommended save setting. This option is preferred and is faster.
2. If not, delete the whole stable-diffusion-webui directory in your google drive and restart.
Hi Andrew
I tested the new version on the colab, but I can’t select a model. Below is the error. This error repeats each time I select a checkpoint model. Is it because 1.6.0 is not ready for colab yet? Or did I miss something?
>>>
Failed to create model quickly; will retry using slow method.
changing setting sd_model_checkpoint to revAnimated_v122.safetensors: NotImplementedError
Traceback (most recent call last):
File “/content/stable-diffusion-webui/modules/options.py”, line 140, in set
option.onchange()
File “/content/stable-diffusion-webui/modules/call_queue.py”, line 13, in f
res = func(*args, **kwargs)
File “/content/stable-diffusion-webui/modules/initialize_util.py”, line 170, in
shared.opts.onchange(“sd_model_checkpoint”, wrap_queued_call(lambda: sd_models.reload_model_weights()), call=False)
File “/content/stable-diffusion-webui/modules/sd_models.py”, line 751, in reload_model_weights
load_model(checkpoint_info, already_loaded_state_dict=state_dict)
File “/content/stable-diffusion-webui/modules/sd_models.py”, line 611, in load_model
sd_model = instantiate_from_config(sd_config.model)
File “/content/stable-diffusion-webui/repositories/stable-diffusion-stability-ai/ldm/util.py”, line 89, in instantiate_from_config
return get_obj_from_str(config[“target”])(**config.get(“params”, dict())).cuda()
File “/content/stable-diffusion-webui/repositories/stable-diffusion-stability-ai/ldm/models/diffusion/ddpm.py”, line 550, in __init__
super().__init__(conditioning_key=conditioning_key, *args, **kwargs)
File “/content/stable-diffusion-webui/repositories/stable-diffusion-stability-ai/ldm/models/diffusion/ddpm.py”, line 92, in __init__
self.model = DiffusionWrapper(unet_config, conditioning_key)
File “/content/stable-diffusion-webui/repositories/stable-diffusion-stability-ai/ldm/models/diffusion/ddpm.py”, line 1314, in __init__
self.diffusion_model = instantiate_from_config(diff_model_config)
File “/content/stable-diffusion-webui/repositories/stable-diffusion-stability-ai/ldm/util.py”, line 89, in instantiate_from_config
return get_obj_from_str(config[“target”])(**config.get(“params”, dict())).cuda()
File “/usr/local/lib/python3.10/dist-packages/torch/nn/modules/module.py”, line 905, in cuda
return self._apply(lambda t: t.cuda(device))
File “/usr/local/lib/python3.10/dist-packages/torch/nn/modules/module.py”, line 797, in _apply
module._apply(fn)
File “/usr/local/lib/python3.10/dist-packages/torch/nn/modules/module.py”, line 797, in _apply
module._apply(fn)
File “/usr/local/lib/python3.10/dist-packages/torch/nn/modules/module.py”, line 820, in _apply
param_applied = fn(param)
File “/usr/local/lib/python3.10/dist-packages/torch/nn/modules/module.py”, line 905, in
return self._apply(lambda t: t.cuda(device))
NotImplementedError: Cannot copy out of meta tensor; no data!
Hi Andrew again
I re-refreshed the colab and re-saved a copy. I tried again and now I can select the checkpoint models.
It seems all work fine. However, I have the erros as below (the first one) on the terminal cell. With the errors, I can still use 1.6.0 without any noticable issues. Can I just ignore the error messages?
And, if I type v1.5.2, I have a different error as below (the secone one) and the start link is not there. Do I have to delete the “–disable-model-loading-ram-optimization” extra argument if I want to use 1.5.2?
>>>>>>>>>>>>>>>>>
>>> the first error >>>
>>>>>>>>>>>>>>>>>
ERROR: Exception in ASGI application
Traceback (most recent call last):
File “/usr/local/lib/python3.10/dist-packages/uvicorn/protocols/websockets/websockets_impl.py”, line 247, in run_asgi
result = await self.app(self.scope, self.asgi_receive, self.asgi_send)
File “/usr/local/lib/python3.10/dist-packages/uvicorn/middleware/proxy_headers.py”, line 84, in __call__
return await self.app(scope, receive, send)
File “/usr/local/lib/python3.10/dist-packages/fastapi/applications.py”, line 273, in __call__
await super().__call__(scope, receive, send)
File “/usr/local/lib/python3.10/dist-packages/starlette/applications.py”, line 122, in __call__
await self.middleware_stack(scope, receive, send)
File “/usr/local/lib/python3.10/dist-packages/starlette/middleware/errors.py”, line 149, in __call__
await self.app(scope, receive, send)
File “/usr/local/lib/python3.10/dist-packages/starlette/middleware/cors.py”, line 76, in __call__
await self.app(scope, receive, send)
File “/usr/local/lib/python3.10/dist-packages/starlette/middleware/gzip.py”, line 26, in __call__
await self.app(scope, receive, send)
File “/usr/local/lib/python3.10/dist-packages/starlette/middleware/exceptions.py”, line 79, in __call__
raise exc
File “/usr/local/lib/python3.10/dist-packages/starlette/middleware/exceptions.py”, line 68, in __call__
await self.app(scope, receive, sender)
File “/usr/local/lib/python3.10/dist-packages/fastapi/middleware/asyncexitstack.py”, line 21, in __call__
raise e
File “/usr/local/lib/python3.10/dist-packages/fastapi/middleware/asyncexitstack.py”, line 18, in __call__
await self.app(scope, receive, send)
File “/usr/local/lib/python3.10/dist-packages/starlette/routing.py”, line 718, in __call__
await route.handle(scope, receive, send)
File “/usr/local/lib/python3.10/dist-packages/starlette/routing.py”, line 341, in handle
await self.app(scope, receive, send)
File “/usr/local/lib/python3.10/dist-packages/starlette/routing.py”, line 82, in app
await func(session)
File “/usr/local/lib/python3.10/dist-packages/fastapi/routing.py”, line 289, in app
await dependant.call(**values)
File “/usr/local/lib/python3.10/dist-packages/gradio/routes.py”, line 604, in join_queue
session_info = await asyncio.wait_for(
File “/usr/lib/python3.10/asyncio/tasks.py”, line 445, in wait_for
return fut.result()
File “/usr/local/lib/python3.10/dist-packages/starlette/websockets.py”, line 133, in receive_json
self._raise_on_disconnect(message)
File “/usr/local/lib/python3.10/dist-packages/starlette/websockets.py”, line 105, in _raise_on_disconnect
raise WebSocketDisconnect(message[“code”])
starlette.websockets.WebSocketDisconnect: 1006
>>>>>>>>>>>>>>>>>>>
>>> the second error >>>
>>>>>>>>>>>>>>>>>>>
Launching Web UI with arguments: –gradio-img2img-tool color-sketch –enable-insecure-extension-access –gradio-queue –xformers –ngrok 2PuZKHTxXKtkZwtMS5AhOhbLGHu_S219oSkBNFprycSHH9Z6 –disable-model-loading-ram-optimization
2023-09-08 11:44:17.362216: I tensorflow/core/platform/cpu_feature_guard.cc:182] This TensorFlow binary is optimized to use available CPU instructions in performance-critical operations.
To enable the following instructions: AVX2 AVX512F FMA, in other operations, rebuild TensorFlow with the appropriate compiler flags.
2023-09-08 11:44:18.323487: W tensorflow/compiler/tf2tensorrt/utils/py_utils.cc:38] TF-TRT Warning: Could not find TensorRT
usage: launch.py
[-h]
[–update-all-extensions]
[–skip-python-version-check]
[–skip-torch-cuda-test]
[–reinstall-xformers]
[–reinstall-torch]
[–update-check]
[–test-server]
[–skip-prepare-environment]
[–skip-install]
[–do-not-download-clip]
[–data-dir DATA_DIR]
[–config CONFIG]
[–ckpt CKPT]
[–ckpt-dir CKPT_DIR]
[–vae-dir VAE_DIR]
[–gfpgan-dir GFPGAN_DIR]
[–gfpgan-model GFPGAN_MODEL]
[–no-half]
[–no-half-vae]
[–no-progressbar-hiding]
[–max-batch-count MAX_BATCH_COUNT]
[–embeddings-dir EMBEDDINGS_DIR]
[–textual-inversion-templates-dir TEXTUAL_INVERSION_TEMPLATES_DIR]
[–hypernetwork-dir HYPERNETWORK_DIR]
[–localizations-dir LOCALIZATIONS_DIR]
[–allow-code]
[–medvram]
[–lowvram]
[–lowram]
[–always-batch-cond-uncond]
[–unload-gfpgan]
[–precision {full,autocast}]
[–upcast-sampling]
[–share]
[–ngrok NGROK]
[–ngrok-region NGROK_REGION]
[–ngrok-options NGROK_OPTIONS]
[–enable-insecure-extension-access]
[–codeformer-models-path CODEFORMER_MODELS_PATH]
[–gfpgan-models-path GFPGAN_MODELS_PATH]
[–esrgan-models-path ESRGAN_MODELS_PATH]
[–bsrgan-models-path BSRGAN_MODELS_PATH]
[–realesrgan-models-path REALESRGAN_MODELS_PATH]
[–clip-models-path CLIP_MODELS_PATH]
[–xformers]
[–force-enable-xformers]
[–xformers-flash-attention]
[–deepdanbooru]
[–opt-split-attention]
[–opt-sub-quad-attention]
[–sub-quad-q-chunk-size SUB_QUAD_Q_CHUNK_SIZE]
[–sub-quad-kv-chunk-size SUB_QUAD_KV_CHUNK_SIZE]
[–sub-quad-chunk-threshold SUB_QUAD_CHUNK_THRESHOLD]
[–opt-split-attention-invokeai]
[–opt-split-attention-v1]
[–opt-sdp-attention]
[–opt-sdp-no-mem-attention]
[–disable-opt-split-attention]
[–disable-nan-check]
[–use-cpu USE_CPU [USE_CPU …]]
[–listen]
[–port PORT]
[–show-negative-prompt]
[–ui-config-file UI_CONFIG_FILE]
[–hide-ui-dir-config]
[–freeze-settings]
[–ui-settings-file UI_SETTINGS_FILE]
[–gradio-debug]
[–gradio-auth GRADIO_AUTH]
[–gradio-auth-path GRADIO_AUTH_PATH]
[–gradio-img2img-tool GRADIO_IMG2IMG_TOOL]
[–gradio-inpaint-tool GRADIO_INPAINT_TOOL]
[–gradio-allowed-path GRADIO_ALLOWED_PATH]
[–opt-channelslast]
[–styles-file STYLES_FILE]
[–autolaunch]
[–theme THEME]
[–use-textbox-seed]
[–disable-console-progressbars]
[–enable-console-prompts]
[–vae-path VAE_PATH]
[–disable-safe-unpickle]
[–api]
[–api-auth API_AUTH]
[–api-log]
[–nowebui]
[–ui-debug-mode]
[–device-id DEVICE_ID]
[–administrator]
[–cors-allow-origins CORS_ALLOW_ORIGINS]
[–cors-allow-origins-regex CORS_ALLOW_ORIGINS_REGEX]
[–tls-keyfile TLS_KEYFILE]
[–tls-certfile TLS_CERTFILE]
[–disable-tls-verify]
[–server-name SERVER_NAME]
[–gradio-queue]
[–no-gradio-queue]
[–skip-version-check]
[–no-hashing]
[–no-download-sd-model]
[–subpath SUBPATH]
[–add-stop-route]
[–api-server-stop]
[–timeout-keep-alive TIMEOUT_KEEP_ALIVE]
[–deforum-api]
[–deforum-simple-api]
[–deforum-run-now DEFORUM_RUN_NOW]
[–deforum-terminate-after-run-now]
[–controlnet-dir CONTROLNET_DIR]
[–controlnet-annotator-models-path CONTROLNET_ANNOTATOR_MODELS_PATH]
[–no-half-controlnet]
[–controlnet-preprocessor-cache-size CONTROLNET_PREPROCESSOR_CACHE_SIZE]
[–controlnet-loglevel {DEBUG,INFO,WARNING,ERROR,CRITICAL}]
[–ldsr-models-path LDSR_MODELS_PATH]
[–lora-dir LORA_DIR]
[–lyco-dir-backcompat LYCO_DIR_BACKCOMPAT]
[–scunet-models-path SCUNET_MODELS_PATH]
[–swinir-models-path SWINIR_MODELS_PATH]
launch.py: error: unrecognized arguments: –disable-model-loading-ram-optimization
I don’t see the error message on v1.6.0.
Yes, the disable model loading option is only for v1.6.0
Thank you for your reply, Andrew.
Hope the compatibility issue is fixed soon. Appreciate your work always.
A fix is released. Refresh the notebook to get v1.6.0
Hi Andrew
First of all, thank you for your work for the colab.
Do you have a plan to update to 1.6.0?
Yes but v1.6.0 is not compatible with colab yet. waiting for a fix.
Hi Andrew,
thank you sooo much!
Hello, I’ve been using your colab, and seen that you have changed defautl sampler and added new 3M samplers to it. I have updated yesterday but do not see them in the list, and the default one is still euler. Any ideas how to fix this?
Are they one of those that are added in v1.6? It is not compatible with colab yet.
Thank you for a great tutorial. I have been successfully connected for the first time. However, I cannot connect to the same WebUI when I shut down my computer. Does this mean that I should go through all the steps again and again in order to access stable diffusion WebUI?
Hi Andrew,
Big thanks for the grat work!
Howerver, could you tell me how to keep the promt styles i saved? everytime i resart the notebook they just disapear.
Thank you !
I have added saving styles to google drive. enjoy!
You can try to use the memory fix, run this before your code:
# MEMFIX
!curl -Lo memfix.zip https://github.com/nolanaatama/microsoftexcel/raw/main/memfix.zip
!unzip /content/memfix.zip
!apt -y update -qq
%env LD_PRELOAD=/content/libtcmalloc_minimal.so.4
Hey!
Just wanted to say that in the latest version of notebook doesn’t work upscales for Deforum. This is because libvulkan1 is missing by default. You need to add !apt-get install libvulkan1 to the installDeforum function.
Oh! And Deforum need ControlNet. You can install it by default with Deforum )
Thanks for reporting! I added controlnet to deforum. The libvulkan1 library doesn’t seem to be necessary though.
Did you try setup checkbox Deforum -> Output -> Upscale without libvulkan1 library and check the result? In my case it doesn’t work.
You are right. Thanks for the command! Added.
Hi Andrew,
I read through the whole article but I’m thinking is there an already premade Google app notebook that I can download and edit if you can provide me the link that would be much better.
You can find the link in the quick start guide.
https://andrewongai.gumroad.com/l/stable_diffusion_quick_start
Hi Andrew,
Thanks a ton for the great work that you’ve done with this website, I have learnt everything about SD from you!
I have recently started running SD on Google colab using this tutorial, but I am facing a couple of issues , i hope you would be able to help
1. I use this colab notebook to run SD but after each session I need disconnect and delete the runtime (else colab keeps consuming computing units). Then I need to install SD by running this notebook everytime I need to use SD which is a major pain. Is there some way I can keep the session running without consuming compute units?
2. Can you recommend the most optimum hardware accelerator (amongst A100, V100, T4 and TPU?) , I usually use SD to generate comics art and realistic photos
3. Should I link my Gdrive with SD? would that help in loading the models at each install or would only help in storing the generated images ? As in, are there any other advantages of connecting my GDrive ,apart from automatically storing the generated images?
Any help will be greatly appreciated!
Hi Anitha,
1. This is how Colab works unfortunately. You will need to install everything all over. It should just take a few minutes using the recommended settings.
2. T4 for most cost-effective usage. You will get 50 hours per $10 USD. No place on earth offers service that inexpensive. A100 and V100 are faster but you get fewer hours in return.
3. Yes, linking Gdrive can help speed up the startup and saving the images. You can save a copy of models in google drive so that you don’t need to download them again. likewise for lora, lycoris, embedding and hypernetworks.
Thanks a ton Andrew!!
Have you used thelastben’s webui that works with Google Drive, I am having trouble getting embedding to load in my Google Drive folder.
https://github.com/TheLastBen/fast-stable-diffusion
I can only offer help with my notebook as I dont use LastBen.
Hello Andrew, everything is working properly. I understand everything and I installed everything to google drive. Iam using pro plan so no worries its ok. The only question I have is, when I quit the work last night, I stopped google collab like u said and I left the google collab ntb window open to run it when I will came back. My NTB restarted. The question is what is the best way to run it again with everything saved in my google drive? I just start the process again, ticked all the boxes like last time, I didnt put url´s of the models couse its saved, but I got an error. Do I have to tick all the boxes like I did before? Do I have to put there URL´s like last time? I just need to know what is the best way to start it again and continue after I close my NTB. Thanks bro
If you save everything in google drive (not recommended as it cause error from time to time), you don’t need to put in the extension and model list in google notebook. Everything should have been saved in your google drive.
noted, thanks.
should i keep them listed every time i load the colab notebook or once they’re downloaded they’re permanently saved? (I have the recommended saving option on for settings etc)
You need to keep them listed every time when using the recommended option.
ok will do thanks, by any chance is there a way to avoid redownloading control net for every time i run it? cause its a waste of resources. if i install it from the extension tab will it remain permanently saved (as to avoid chosing it from your pre-loading colab options and hopefully will load faster). thanks
*last question. installing custom extension wont work. They do install and asked to restart but when i reload none of the options are visible.
You should install through the colab input field.
You will need to redownload the controllnet models every time in colab. They are saved in the temporary storage. On the bright side, it doesn’t take up your google drives space.
also i’m noticing that despite being a colab pro i still get disconnected after 5-10min use. not actually disconnected but it tells me completed and webui stops working (timeout?) but colab notebook remains connected so gpu time still goes down :<
hi, just found out about your great tutorial/site. I’ve bought a colab pro and was working fine until i decided to try and save all on google drive (got the 100gb upgrade). It took about 30min+ of gpu time to download all and ran but there were no models in the list so it couldnt generate anything (the sd 1.5 model didnt download and gave error in the console). Also, most importantly, once i close everything, how can i reload it from my colab folder? I did find the webui folder under content but not sure which file/how to load it in collab? should i create a new notebook and code it myself? because when i tried reloading your own colab notebook it is redownloading everything again! (and yes this time i chose download > nothing)
thanks in advanced
Hi, I don’t recommend saving everything in google drive because it is slower. See the FAQ. Please use the recommended settings.
The disconnection is likely due to GPU or CPU running out of memory. It happens when switching models too many times. A1111 has memory leak. You will need to click the play button again.
Problem solved (except the RAM leak when refiner kicks in…) by choosing to install everything in GDrive.
They must have changed something literally days ago. I was also trying the SD.Next notebook and it was working very nicely… until suddenly it wasn’t. I’m not going to pretend I have a clue what was changed – something related to symlinks, I guess – but I’m now… or for now… playing with SDXL again.
When I start with a completely fresh notebook/folder and mark nothing but SDXL_1, I can generate images, but I don’t think the refiner gets applied.
Here are some errors I get while loading:
Processing triggers for libc-bin (2.35-0ubuntu3.1) …
/sbin/ldconfig.real: /usr/local/lib/libtbbbind_2_0.so.3 is not a symbolic link
/sbin/ldconfig.real: /usr/local/lib/libtbbbind.so.3 is not a symbolic link
/sbin/ldconfig.real: /usr/local/lib/libtbb.so.12 is not a symbolic link
/sbin/ldconfig.real: /usr/local/lib/libtbbmalloc.so.2 is not a symbolic link
/sbin/ldconfig.real: /usr/local/lib/libtbbmalloc_proxy.so.2 is not a symbolic link
/sbin/ldconfig.real: /usr/local/lib/libtbbbind_2_5.so.3 is not a symbolic link
[…]
Prompt: dog, 1024×1024, I didn’t touch anything else:
Applying attention optimization: xformers… done.
Model loaded in 36.2s (calculate hash: 20.3s, load weights from disk: 1.3s, create model: 8.3s, apply weights to model: 4.3s, apply half(): 0.1s, calculate empty prompt: 1.7s).
Downloading VAEApprox model to: /content/stable-diffusion-webui/models/VAE-approx/vaeapprox-sdxl.pt
100% 209k/209k [00:00<00:00, 52.7MB/s]
0% 0/20 [00:00<?, ?it/s]
5% 1/20 [00:07<02:13, 7.03s/it]
10% 2/20 [00:07<01:00, 3.34s/it]
15% 3/20 [00:08<00:37, 2.18s/it]
20% 4/20 [00:09<00:26, 1.64s/it]
25% 5/20 [00:10<00:20, 1.34s/it]
30% 6/20 [00:10<00:16, 1.15s/it]
35% 7/20 [00:11<00:13, 1.03s/it]
40% 8/20 [00:12<00:11, 1.04it/s]
45% 9/20 [00:13<00:10, 1.09it/s]
50% 10/20 [00:14<00:08, 1.14it/s]
55% 11/20 [00:15<00:07, 1.17it/s]
60% 12/20 [00:15<00:06, 1.19it/s]
65% 13/20 [00:16<00:05, 1.20it/s]
70% 14/20 [00:17<00:04, 1.20it/s]
75% 15/20 [00:18<00:04, 1.21it/s]
80% 16/20 [00:19<00:03, 1.21it/s]
85% 17/20 [00:19<00:02, 1.21it/s]
90% 18/20 [00:20<00:01, 1.21it/s]
95% 19/20 [00:21<00:00, 1.21it/s]
100% 20/20 [00:22<00:00, 1.12s/it]
=========================================================================================
A tensor with all NaNs was produced in VAE.
Web UI will now convert VAE into 32-bit float and retry.
To disable this behavior, disable the 'Automaticlly revert VAE to 32-bit floats' setting.
To always start with 32-bit VAE, use –no-half-vae commandline flag.
=========================================================================================
Total progress: 100% 20/20 [00:49<00:00, 2.49s/it]
VRAM goes up to 14.2 GB, but doesn't crash.
Now, same prompt "dog," random seed, batch of one, sampler DPM++ 2M Karras I switch on Hires. fix and set the sampler to R-ERSGAN 4x+:
*** Error completing request
*** Arguments: ('task(1zscohhsitlx85j)', 'dog', '', [], 30, 16, False, False, 1, 1, 7, -1.0, -1.0, 0, 0, 0, False, 1024, 1024, True, 0.7, 2, 'R-ESRGAN 4x+', 15, 0, 0, 0, '', '', [], , 0, False, False, ‘positive’, ‘comma’, 0, False, False, ”, 1, ”, [], 0, ”, [], 0, ”, [], True, False, False, False, 0) {}
Traceback (most recent call last):
File “/content/stable-diffusion-webui/modules/call_queue.py”, line 58, in f
res = list(func(*args, **kwargs))
File “/content/stable-diffusion-webui/modules/call_queue.py”, line 37, in f
res = func(*args, **kwargs)
File “/content/stable-diffusion-webui/modules/txt2img.py”, line 62, in txt2img
processed = processing.process_images(p)
File “/content/stable-diffusion-webui/modules/processing.py”, line 677, in process_images
res = process_images_inner(p)
File “/content/stable-diffusion-webui/modules/processing.py”, line 794, in process_images_inner
samples_ddim = p.sample(conditioning=p.c, unconditional_conditioning=p.uc, seeds=p.seeds, subseeds=p.subseeds, subseed_strength=p.subseed_strength, prompts=p.prompts)
File “/content/stable-diffusion-webui/modules/processing.py”, line 1109, in sample
samples = self.sd_model.get_first_stage_encoding(self.sd_model.encode_first_stage(decoded_samples))
File “/usr/local/lib/python3.10/dist-packages/torch/utils/_contextlib.py”, line 115, in decorate_context
return func(*args, **kwargs)
File “/content/stable-diffusion-webui/repositories/generative-models/sgm/models/diffusion.py”, line 127, in encode_first_stage
z = self.first_stage_model.encode(x)
File “/content/stable-diffusion-webui/repositories/generative-models/sgm/models/autoencoder.py”, line 321, in encode
return super().encode(x).sample()
File “/content/stable-diffusion-webui/repositories/generative-models/sgm/models/autoencoder.py”, line 308, in encode
h = self.encoder(x)
File “/usr/local/lib/python3.10/dist-packages/torch/nn/modules/module.py”, line 1501, in _call_impl
return forward_call(*args, **kwargs)
File “/content/stable-diffusion-webui/repositories/generative-models/sgm/modules/diffusionmodules/model.py”, line 579, in forward
h = self.down[i_level].block[i_block](hs[-1], temb)
File “/usr/local/lib/python3.10/dist-packages/torch/nn/modules/module.py”, line 1501, in _call_impl
return forward_call(*args, **kwargs)
File “/content/stable-diffusion-webui/repositories/generative-models/sgm/modules/diffusionmodules/model.py”, line 131, in forward
h = nonlinearity(h)
File “/usr/local/lib/python3.10/dist-packages/torch/nn/functional.py”, line 2059, in silu
return torch._C._nn.silu(input)
torch.cuda.OutOfMemoryError: CUDA out of memory. Tried to allocate 2.00 GiB (GPU 0; 14.75 GiB total capacity; 12.82 GiB already allocated; 972.81 MiB free; 13.64 GiB reserved in total by PyTorch) If reserved memory is >> allocated memory try setting max_split_size_mb to avoid fragmentation. See documentation for Memory Management and PYTORCH_CUDA_ALLOC_CONF
—
13.8 GB VRAM is used and not freed at this point.
How do I actually use the refiner without the ARefiner extension? If it’s being used, I see no evidence of that… it doesn’t seem to load at any point. Anyway, I send the image (not upscaled) to img2img and choose refiner as the model (I don’t get as far as changing settings or generating the image):
Calculating sha256 for /content/stable-diffusion-webui/models/Stable-diffusion/sd_xl_refiner_1.0.safetensors: 7440042bbdc8a24813002c09b6b69b64dc90fded4472613437b7f55f9b7d9c5f
Loading weights [7440042bbd] from /content/stable-diffusion-webui/models/Stable-diffusion/sd_xl_refiner_1.0.safetensors
Creating model from config: /content/stable-diffusion-webui/repositories/generative-models/configs/inference/sd_xl_refiner.yaml
Failed to create model quickly; will retry using slow method.
Downloading (…)ip_pytorch_model.bin: 100% 10.2G/10.2G [00:48<00:00, 211MB/s]
changing setting sd_model_checkpoint to sd_xl_refiner_1.0.safetensors: OutOfMemoryError
Traceback (most recent call last):
File "/content/stable-diffusion-webui/modules/shared.py", line 633, in set
self.data_labels[key].onchange()
File "/content/stable-diffusion-webui/modules/call_queue.py", line 14, in f
res = func(*args, **kwargs)
File "/content/stable-diffusion-webui/webui.py", line 238, in
shared.opts.onchange(“sd_model_checkpoint”, wrap_queued_call(lambda: modules.sd_models.reload_model_weights()), call=False)
File “/content/stable-diffusion-webui/modules/sd_models.py”, line 578, in reload_model_weights
load_model(checkpoint_info, already_loaded_state_dict=state_dict)
File “/content/stable-diffusion-webui/modules/sd_models.py”, line 504, in load_model
sd_model = instantiate_from_config(sd_config.model)
File “/content/stable-diffusion-webui/repositories/stable-diffusion-stability-ai/ldm/util.py”, line 89, in instantiate_from_config
return get_obj_from_str(config[“target”])(**config.get(“params”, dict())).cuda()
File “/usr/local/lib/python3.10/dist-packages/lightning_fabric/utilities/device_dtype_mixin.py”, line 73, in cuda
return super().cuda(device=device)
File “/usr/local/lib/python3.10/dist-packages/torch/nn/modules/module.py”, line 905, in cuda
return self._apply(lambda t: t.cuda(device))
File “/usr/local/lib/python3.10/dist-packages/torch/nn/modules/module.py”, line 797, in _apply
module._apply(fn)
File “/usr/local/lib/python3.10/dist-packages/torch/nn/modules/module.py”, line 797, in _apply
module._apply(fn)
File “/usr/local/lib/python3.10/dist-packages/torch/nn/modules/module.py”, line 797, in _apply
module._apply(fn)
[Previous line repeated 6 more times]
File “/usr/local/lib/python3.10/dist-packages/torch/nn/modules/module.py”, line 820, in _apply
param_applied = fn(param)
File “/usr/local/lib/python3.10/dist-packages/torch/nn/modules/module.py”, line 905, in
return self._apply(lambda t: t.cuda(device))
torch.cuda.OutOfMemoryError: CUDA out of memory. Tried to allocate 20.00 MiB (GPU 0; 14.75 GiB total capacity; 14.34 GiB already allocated; 4.81 MiB free; 14.59 GiB reserved in total by PyTorch) If reserved memory is >> allocated memory try setting max_split_size_mb to avoid fragmentation. See documentation for Memory Management and PYTORCH_CUDA_ALLOC_CONF
And crash.
Did both – I switched to T4 when I noticed I was getting so many crashes I was just wasting Colab tokens. I don’t save everything to Google Drive, I used all the default options when I did a clean install. (I am using Safari, by the way, not Brave, learned that lesson!)
It’s the worst sort of error, actually, when you can’t reproduce it on your end, and I commiserate – I used to work at IT, somebody would report some sort of error, and I could only say “it works here.” Would it help if I do another fresh install, run with default options and SDXL_1 model only, then upload a full log?
I tested one more time and it seems to work. Perhaps you can try reproducing what I did.
1. Start a refresh notebook (default settings)
2. Change folder name to AI_PICS2
3. Select SDXL model.
4. Start the notebook using the default T4, high ram runtime.
I was able to use SDXL model to generate images indefinitely.
It does have an issue of switching back and forth between the SDXL base and refiner models. Somehow it ran out of RAM. I don’t think we can do anything about it.
Same. Something has been changed – I wonder if Google updated a version of… something. With V100/High RAM I restart, on average, every 15-18 minutes. I even deleted everything, reinstalled the latest notebook to Google Drive, checked to only use SDXL_1 model, no extensions, and it crashed before the first render finished.
I don’t keep logs, but this bit seems new (before actual startup):
/sbin/ldconfig.real: /usr/local/lib/libtbbbind_2_0.so.3 is not a symbolic link
/sbin/ldconfig.real: /usr/local/lib/libtbbbind_2_5.so.3 is not a symbolic link
/sbin/ldconfig.real: /usr/local/lib/libtbbmalloc_proxy.so.2 is not a symbolic link
/sbin/ldconfig.real: /usr/local/lib/libtbbbind.so.3 is not a symbolic link
/sbin/ldconfig.real: /usr/local/lib/libtbbmalloc.so.2 is not a symbolic link
/sbin/ldconfig.real: /usr/local/lib/libtbb.so.12 is not a symbolic link
Also, the dreaded “Failed to create model quickly; will retry using slow method” as I watch RAM (not VRAM) go up… up… up… ^C ends the journey.
So glad it’s not just me, to be honest…
I just tested the notebook and it seems to be working fine. Try
– Use the recommended save option. (DON’T save everything to google drive)
– Use the default compute (T4, high ram)
First of all, big thanks for your great tutorials. They help so much. I managed to run Colab with A1111 for some in credit mode. It used to work fine, but since last week, I have super slow start-up times and constant connection time out, in short, it’s unusable. I have installed extensions (e.g. SadTalker), but it used to work like a charme. Anybody else experiencing issues?
I’m using the latest Notebook
I tested Colab today and seems to be working properly. You can try
– Use the recommended saving option
– Delete or switch to a new save folder (e.g. AI_PICS2)
Hi, Andrew! I’m still struggling with the starting steps. If you or anyone reading this could reply, it would help a ton! I really hope to get into AI Art.
What problem has you encountered?
The Gradio live link expired within about ten minutes of my downloading the Stable Diffusion files. How do I proceed without the link? I can’t access the GUI. And I read something about permanent hosting on Huggingface – could you explain what that means and how to do it?
Do you have Colab Pro? Google blocks free usage of SD.
That’s an ad from huggingface. It is very expensive. I don’t recommend it.
Is there any way to output merged checkpoint without saving the whole A1111 installation in my Google Drive? There’s only option to save small models or everything, and my drive is running thin.
Yes, all files are accessible using the File Explorer on left. Find the merged model and download it.
Hi, im trying to change webui-user.bat file, cause im getting CUDA and/or FLOAT errors.
Im trying to add:
set PYTORCH_CUDA_ALLOC_CONF=garbage_collection_threshold:0.8,max_split_size_mb:512
set COMMANDLINE_ARGS= –xformers –no-half-vae
Am i doing something wrong here ? I dont think it wiped the file before the update. Im using colab with 15GB of ram
Cheers
What issue or error message did you get? You normally don’t need to set the pytorch args. The command args can be set on the notebook input “extra arguments”
Try:
--disable-nan-check --no-half-vaeHi, Andrew! Is there a way to connect the Automatic1111 through API in your tutorial? Thanks!
Yes, please see the updated the FAQ.
Hi, Andrew! Thanks for this great guide; it’s been extremely helpful. However, I’ve encountered an issue that I don’t know how to resolve. The Gradio live link expired within about ten minutes of my downloading the Stable Diffusion files. How do I proceed without the link? I can’t access the GUI. And I read something about permanent hosting on Huggingface – could you explain what that means and how to do it?
Hi Andrew
Following your article, I created a base image with SDXL base model in txt2img and sent it to img2img to refine it.
If I select SDXL refiner model, it takes a while and “Connection errored out.” error occurs.
I tried many times but it always happens with this error. I tried both Gradio and Ngrok. Both have the same error.
Could you help with it?
Hi Ken, thanks for reporting the issue. I was able to reproduce it. The root cause was memory leak in A1111. The CPU memory was not freed after switching model. I have applied a patch to reduce the issue. Please pull the latest notebook (Updated 7/28). It lets you use the refiner model at once… I will keep investigating.
Thank you, Andrew.
You are the best.
Thank you, I read about the extensions but somehow missed that section, I feel like an idiot now. Anyway, thanks again.
To use the Quick Start Guide with the new SDXL model (haven’t been able to get the refiner to work yet but the model does) line 334 needs to be changed to
!git checkout -f a3ddf464a2ed24c999f67ddfef7969f8291567be
and in the args, –no-half-vae needs to be added.
Thank you, the notebook is just updated to support SDXL. It seems no-half-vae is no longer required.
Hi, I installed LyCORIS support via “KohakuBlueleaf /a1111-sd-webui-lycoris”, but I do not know where to put my safetensor files. I tried as a lycoris named folder inside the AI_PICS directory, but it did not work.
Hi, you will need to specify an extra argument for model directory for this extension. See the extra argument section.
https://stable-diffusion-art.com/automatic1111-colab/#Extra_arguments_to_webui
At the beginning “You need a paid plan.”
At the end “You don’t need a paid plan.”
Do I need it or not?
Yes, you need it. Google has recently blocked the free usage with SD.
UPDATE: It seems it was either a syntax error to do with there not being a space between loras, or an issue with a specific lora breaking all of them. It’s now working.
Ok, everything runs fine on first installation. However, when I stop and restart the notebook, everything is installed again! I’d like just to run automatic, without reinstalling all this every time. Is that possible?
Unfortunately this is the limitation of colab.
On the bright side, you always get a fresh install and don’t need deal with cleaning up A1111.
Sorry, I should say that I’m trying to use loras using the native capability that loads from the notebook instance as default.
Hi, I’m getting a float/string error in Colab when trying to run the lora extension. This error is only appearing now, and the extension worked for me fine before:
activating extra network lora with arguments [, , , , , , ]: ValueError
Traceback (most recent call last):
File “/content/stable-diffusion-webui/modules/extra_networks.py”, line 92, in activate
extra_network.activate(p, extra_network_args)
File “/content/stable-diffusion-webui/extensions-builtin/Lora/extra_networks_lora.py”, line 22, in activate
multipliers.append(float(params.items[1]) if len(params.items) > 1 else 1.0)
ValueError: could not convert string to float: ‘0.0.3’
Hello. Could you please advise me, when I run AUTOMATIC1111, the system won’t even let me generate a picture. The following error pops up: Unexpected token ‘<', " <!DOCTYPE "… is not valid JSON. I have done everything according to the instructions. Why can this happen and are there any ways to fix it?
I hava an issue with pytorch.metrics version on colab! How do I fix this?
Kind regards!!
Can you show me how you see this error, from the latest version of the notebook? I cannot reproduce the error.
Hi Andrew, thanks for the amazing resource and guide.
However, I have a question. Is there a way to install custom models for ControlNet?
Currently I choose the “save small models, images, and settings” to Google Drive and there doesn’t seem to be a folder to add the ControlNet models into. Would the options “save everything” help solve this problem?
Again, I appreciate your hard work and look forward to your reply.
Hi, there’s currently no way to load or save custom controlnet models. You will need to modify the notebook to add new ones. which one do you want to load?
save everything won’t help in this case.
Hi, this is the model I wanted to load https://huggingface.co/monster-labs/control_v1p_sd15_qrcode_monster
But honestly, its use is pretty niche (for making QR art), so if it slows down the load up time for the entire colab note, I wouldn’t want you to do it. I was asking mostly to see if there’s a way to load it up privately on my GooogleDrive like with Checkpoint models and what not.
Thanks for the reply tho, and keep up the great work you’re doing for the AI community.
The checkpoint file is not that big. You can put it in AI_PICS/models if don’t want to download it every time.
The trickier part is the controlnet model. Currently it lacks mechanism to upload a custom controlnet model. You will need to download and drop it through the file explorer panel or download using the console to the correct folder.
its a great necessity to add the t2i adapter models into ControlNet extension, for I don’t know the way to do it in Colab, but extremely need t2i color model in preprocessing
Hello
Thanks for this tutorial. Everything was clear until this step ‘Click the ngrok.io link to start AUTOMATIC1111’
I got my link and clicked on it, but once I clicked … I got this message:
‘ERR_NGROK_3200
Tunnel … not found’
Do you have any ideas how to solve it?
Thanks!
Mac
Hi. I tried to run it again using the recommended setting but the problem still persists. I made a video of it. Here is the link: https://www.loom.com/share/78e22b2caaab4f89a7dd2925705e823e
Hi, please try running the colab notebook as is, without any changes (including the username and password). The special characters in password may cause issue.
Hi Andrew, your article really helps. I would like the know how many pics of high res fixed 2X for 512×512 can I make if I buy a PRO plan. Or can I make as much as I want for 50 hours that you mentioned? Thanks a lot !
Yes, as much as you want in 50 hours.
Was working flawlessly until i tried to install civitai extension, it worked for the first 30 minutes then the UI broke for some reason, (nothing in the UI will load after clicking save and reload ui in the extensions tab) , ive tried everything i can think of but it just fails to load now, i tried deleting everything and starting fresh, still doesn’t work. (To clarify it breaks whenever the UI is reloaded, in the beginning of the instance its working, as soon as i try to load up an extension or click that save n reload button it breaks)
You can delete the AI_PICS folder in Google Drive. That would totally reset the notebook.
Well, nevermind. It’s google “kicking” me out because I’m using the free version, I guess.
Same problem. Only one option, paid version?
Unfortunately Google has blocked free usage of webui.
Seems the problem is with ngrok
Hello! I’ve tried the notebook a couple of times today, different accounts, and every try it just stopped, no error information, no code, or anything.
Two things to look for:
(1) Google has blocked running AUTOMATIC1111 webui unless you use a paid account. So make sure you have Colab Pro or using pay as you go.
(2) There may be a human verification on the notebook page shortly after it starts. Make sure to click on it.
Hello andrew, Great tutorial – i want to train the images of a person then can i use all the models described above such anything v3, inkpunk diffusion and also open journey? just like i can go with dreambooth and SD1.5. When i went to the train bar, is asks for a directory of input images, which directory should i add? from the google drive?
Hi, I don’t use A1111 for dreambooth so I cannot advise.
See the following article for our dreambooth notebook. Yes, you can use other models.
https://stable-diffusion-art.com/dreambooth/
Hi! Thank you for this. While installing, I encountered the following appeared and the link to the webui did not appear:
‘Model loaded in 51.6s (calculate hash: 29.0s, load weights from disk: 5.1s, create model: 13.8s, apply weights to model: 1.1s, load VAE: 2.3s).
Traceback (most recent call last):
File “/content//stable-diffusion-webui/launch.py”, line 383, in
start()
File “/content//stable-diffusion-webui/launch.py”, line 377, in start
webui.webui()
File “/content/stable-diffusion-webui/webui.py”, line 254, in webui
app, local_url, share_url = shared.demo.launch(
File “/usr/local/lib/python3.10/dist-packages/gradio/blocks.py”, line 1374, in launch
server_name, server_port, local_url, app, server = networking.start_server(
File “/usr/local/lib/python3.10/dist-packages/gradio/networking.py”, line 140, in start_server
app = App.create_app(blocks)
File “/usr/local/lib/python3.10/dist-packages/gradio/routes.py”, line 136, in create_app
app.configure_app(blocks)
File “/usr/local/lib/python3.10/dist-packages/gradio/routes.py”, line 115, in configure_app
self.auth = {account[0]: account[1] for account in auth}
File “/usr/local/lib/python3.10/dist-packages/gradio/routes.py”, line 115, in
self.auth = {account[0]: account[1] for account in auth}
IndexError: tuple index out of range’
What should I do? Thank you.
Hi, I just ran the Colab notebook and is working correctly. Please use the recommended setting in Save in Google Drive. Let me know how it goes.
Thank you! I was sucessful to run your colab notebook in the first run, but when I loaded it again it started to give me a lot of errors. I’m not familiar with colab, wish I could just simply rerun the already installed Instance on google drive with a simple command line like in mac, but I have no idea how to do it.
The best is to use the recommended setting. Don’t save everything in Google colab.
Hello, Andrew.
First of all, thanks for this nice work, it is really helpful.
I would like to ask you about saving everything after you switch off the environment. I mean, I’ve installed all and saved in Drive. Then, the day later, I just want to be at the same point. I mount the Drive:
the cell that opens when I click in the Drive folder on the left tool bar:
from google.colab import drive
drive.mount(‘/content/drive’)
But, what can I do now? I work with Gradio because my local host doesn’t work. If I open the past Gradio link it says “No interface is running”, so I can’t open anything, even though I’m “connected” and have the Drive “mounted”.
Do I need to run always the colab, at its very beginning, where is the first line “stable-diffusion-art.com – Check out latest tutorials” and install and wait everytime, or is there any other way to mount Drive, run what is mounted and enjoy the interface?
Thanks in advance and hope this questions would be useful for other users too.
Adrian
Hi, you need to run the colab notebook is the server so you need to have it running when you use A1111. Simply connecting it is not enough.
This is a really great guide. Your Colab is really helpful.
Have you noticed that Styles don’t seem to save or load back up upon restarting the notebook? Any idea on how to save a set of styles and get them to load into the web ui when it starts up?
Hi, I will need to make changes to the notebook in order to save them.
heyho! Thanks so much, i finally got it to work with a google colab pro account 🙂
is ther any way to produce pictures higher than 512x512px?
i tried the v2 768px model (i understand thats the only way to get higher resolution correct?),
but i always ee the following error: RuntimeError: mat1 and mat2 shapes cannot be multiplied (154×1024 and 768×320).
im trying to convert my companies icon to iconic landscape shots (like the guy with the nike logo ;D )
Hi, I don’t advise using v2 models. We normally generate a 512px picture and upscale it. See e.g.
https://stable-diffusion-art.com/realistic-princess/
This is fantastic, thanks very much! The only thing I can’t figure out is how to specify a path for init images/videos in deforum. I can specify input and output paths to direct img2img batch to folders in Drive, is there a similar method for Deforum?
.safetensors seems ok now, it was just not fully uploaded to my colab I guess.. 🙂
Very well done thanks! It run like a charm :). Just one question, I was trying to import a controlnet model and I added it where they are on Colab : /content/stable-diffusion-webui/extensions/sd-webui-controlnet/models/
But it doesn”t work even with a YAML . Is it because it’s a ‘.safetensors’ and not a .pth like all models ?
I’m talking about control_v1p_sd15_brightness.safetensors. How can I use it ?
Thanks so much 🙂
Same problem with me. After installing, I don’t see it in ControlNet
Hi Andrew, I have a quick question that I really appreciate if you or anyone could help me: So after one time I can login to the AUTOMATIC1111, I finished and logged off. Next time when I want to re-start, should I re-run the entire notebook again? Thanks!
Hi Sam, yes, it is intended to be rerunned all over again. You can save models and settings in google drive as described in this article.
All good now, I miss the NGROK field. It should not be filled. Thank you Andrew.
IP cannot opened. No public URL generated.
Hi, gradio’s public link service can be sketchy from time to time. Try again later or use ngrok link.
“Step 1. Open the Colab notebook in Quick Start Guide. You should see the notebook with the second cell like below.”
Am I blind or something? There is no colab notebook linked.
It’s in the “Google Colab” section.
I added a link on top. You can’t miss it now. 🙂
Hello! Thanks for the tutorial! I trained a model from your Colab, and it saved in Dreambooth_model folder successfully, so do I need to move it to folder: “AI_PICS/Lora” for autoload? If I have several trained models and wish to load only one while launching Colab, can I put the Google Drive path into the startup console “Install models from URL”?
Thanks ?
Hi, the output of the dreambooth notebook is a checkpoint model. So put it in AI_PICS/models and use the recommended setting to start the Notebook.
thank you so much andrew!
it was working flawlessly until today, I got an error whilst using –lyco-dir in extra arguments. its give me ‘ExtraNetworksPageLyCORIS’ object has no attribute ‘get_sort_keys’ error. now I’m back to uploading lycoris manually to sd web ui.
Likely there’s an update from the extension that breaks it. Go to their github page and report the issue.
Hey Andrew, is it possible to use the latent couple model from this? I have installed and enabled it but it doesnt seem to be working.
I think the plugin hasn’t been updated for months. Does regional prompter works for you. They have many similar functions.
https://stable-diffusion-art.com/regional-prompter/
Hi. Andrew this tutorial helped me a lot. But when i start to use Stable Diffusion after 3,4 minutes it disconnects me from it. Is that becuase of that i am a free user? Should i buy the Google Colab Pro subscription?
Google said they’ve banned stable diffusion in Colab’s free tier. So yes, you should get Pro to be sure. Another thing to look for is a human verification checkbox on the notebook page shortly after it starts.
Hi Andrew ! Amazing works btw. I’m having trouble with lycoris, can you tell me how to move lycoris directory? since I already keep my lycoris in google drive, I want it to be loaded from there. I have to upload it to stable ui everytime I want to use it and its quite time consuming.
Hi use
--lyco-dirin the extra_arguments field to specify a folder in google drive. See the extension readme.Hello! Quick question, when you start up this program it talks about setting up permanent hosting on huggingface spaces. Would you happen to have a tutorial on host this or a copy of this notebook on there? The instructions and quickstart guide aren’t very clear. Thank you
It’s an ad from them. I won’t advise hosting your notebook there.
Oh I see, I didn’t realize that. Thank you very much.
Hi Andrew! Works well for me! Amazing!
Can check what’d be the difference between downloading everything onto Drive and downloading only small models? If I download everything, can I get it to load faster since everything will be deleted from the server if I had to restart. The load time is really slow…
Save everything would be even slower because google drives’s speed.
It is mainly for people training their models, so that they don’t need to move models back to google drive before being disconnecting.
Well… it doesn’t work :/
(Sorry about the multiple comments, I was looking for them under “Reply” instead of scrolling up)
Here’s a short version: I am running the “Small models, images and settings” version. I tried with and without ngrok, my own Google Drive copy and just your original from Github. I also tried a copy of the previous commit. No ControlNet for me.
Runtime type: GPU, A100, High RAM.
I tried a different image in ControlNet, horizontal, and got the same result:
AttributeError: ‘NoneType’ object has no attribute ‘to’
Time taken: 3.92sTorch active/reserved: 2235/2802 MiB, Sys VRAM: 3897/15102 MiB (25.8%)
I once forgot to click ControlNet when starting up… and the pycairo errors did not appear.
I’m thinking of deleting everything and installing the full version, I have enough drive space. Or should I not click ControlNet and try to install it from the URL? (Will that make any difference?) Is there something else I can/should delete somewhere?
Thanks and sorry again about the multiple comments!
Hey Andrew! Sorry to be requesting more stuff, but I think this should be on the easier side of things…
Could you please add the option to use custom launch parameters? The latest update of A1111 broke an extension I was using, and to use another one I would need to add some parameters to the startup (–lyco-dir).
And just a quick question, does this notebook launches the latest commit of A1111?
Hi, yes, I will put it to my list.
Hi, added extra arguments. Let me know how it goes.
Answering your 2nd question: The notebook currently uses an older commit.
No, RAM seems fine (I checked the usage). I also tried running with and without ngrok, and both copy on my Google Drive and the Github directly. It’s set to “Save in Google Drive: Small models, images and settings (Recommended)”.
Notebook settings:
Acceleration: GPU
GPU type: A100
Runtime shape: High RAM
During initialisation, I also get those errors:
error: subprocess-exited-with-error
× Building wheel for pycairo (pyproject.toml) did not run successfully.
│ exit code: 1
╰─> See above for output.
note: This error originates from a subprocess, and is likely not a problem with pip.
Building wheel for pycairo (pyproject.toml) … error
ERROR: Failed building wheel for pycairo
Successfully built svglib fvcore iopath
Failed to build pycairo
ERROR: Could not build wheels for pycairo, which is required to install pyproject.toml-based projects
And later, during the startup:
Couldn’t install sd-webui-controlnet requirement: svglib.
Command: “/usr/bin/python3” -m pip install svglib –prefer-binary
Error code: 1
stdout: Looking in indexes: https://pypi.org/simple, https://us-python.pkg.dev/colab-wheels/public/simple/
Building wheels for collected packages: pycairo
Building wheel for pycairo (pyproject.toml): started
Building wheel for pycairo (pyproject.toml): finished with status ‘error’
Failed to build pycairo
stderr: error: subprocess-exited-with-error
× Building wheel for pycairo (pyproject.toml) did not run successfully.
│ exit code: 1
╰─> See above for output.
note: This error originates from a subprocess, and is likely not a problem with pip.
ERROR: Failed building wheel for pycairo
ERROR: Could not build wheels for pycairo, which is required to install pyproject.toml-based projects
Warning: Failed to install svglib, some preprocessors may not work.
And then, once I run ControlNet, the preview doesn’t work – I did check for the glitch, nothing. Generate causes the same error as before, ending with “AttributeError: ‘NoneType’ object has no attribute ‘to'”
Last time I ran the notebook I forgot to click ControlNet and I didn’t get the pycairo errors.
I saw both the pycairo and sgvlib error. They do not affect the controlnet functions.
Here’s a screenshot just taken using the colab notebook. Please follow the settings and see if you can make it work.
https://stable-diffusion-art.com/wp-content/uploads/2023/05/5041ea90-0afe-421c.gradio.live_.png
Send me an email if you are open to a short call. It’s easier to figure out what’s wrong that way…
I sent you a message through the contact form, hope it got through!
If not, here’s the result, with the same settings – your description says “preprocessor params: (512, 64, 64)” after the render. Mine: “preprocessor params: (512, 0.5, 64)”.
That’s openpose. reference_only crashes like before.
Can we do a chat rather than a call?
No, I don’t think so either… As I am initialising the notebook, this also appears:
note: This error originates from a subprocess, and is likely not a problem with pip.
Building wheel for pycairo (pyproject.toml) … error
ERROR: Failed building wheel for pycairo
Successfully built svglib fvcore iopath
Failed to build pycairo
ERROR: Could not build wheels for pycairo, which is required to install pyproject.toml-based projects
This is expected. It won’t affect the function.
deforun not showing up even after your revert commit
Just confirmed it showed up.
List your settings when starting the notebook, and your google colab paid tier.
Use the recommended setting in Save in Google Drive. Don’t use save everything.
Select the Deforum extension before starting.
The contact form doesn’t work… but ControlNet doesn’t work either. I can send the whole log and message in an email, maybe? It either crashes the notebook or just does nothing.
Oh wait, I just saw people post their logs here…
My original message:
Hello,
I bought the one-click notebook earlier today, using it with Colab Pro. It had some hiccups, but eventually I ALMOST got it to work… except ControlNet.
No matter the settings, I click the explosion icon, preview, I see the progress bar, but then it disappears and no preview shows up. I tried openpose, just to see what happens, and what happens is that it ignores CN and shows me two images – one being the prompt, one completely black.
Setting ControlNet to reference_* (all three versions) doesn’t work at all, crashing the notebook. It doesn’t seem to matter what model or renderer I use, incl. pruned 1.5. ControlNet works on my Mac Mini M2 (CN version: 1.1.190, same as yours).
Let me know what to do, thanks! The log below:
Error completing request
Arguments: (‘task(8m4f0sxe7cg5ww3)’, ‘photograph of a bearded man in a kilt standing by the fire outside at night’, ‘woman, daylight’, [], 20, 3, False, False, 1, 1, 7, -1.0, -1.0, 0, 0, 0, False, 768, 512, False, 0.7, 2, ‘Latent’, 0, 0, 0, [], 0, , False, False, ‘positive’, ‘comma’, 0, False, False, ”, 1, ”, 0, ”, 0, ”, True, False, False, False, 0, None, None, False, 50) {}
Traceback (most recent call last):
File “/content/stable-diffusion-webui/modules/call_queue.py”, line 56, in f
res = list(func(*args, **kwargs))
File “/content/stable-diffusion-webui/modules/call_queue.py”, line 37, in f
res = func(*args, **kwargs)
File “/content/stable-diffusion-webui/modules/txt2img.py”, line 56, in txt2img
processed = process_images(p)
File “/content/stable-diffusion-webui/modules/processing.py”, line 486, in process_images
res = process_images_inner(p)
File “/content/stable-diffusion-webui/extensions/sd-webui-controlnet/scripts/batch_hijack.py”, line 42, in processing_process_images_hijack
return getattr(processing, ‘__controlnet_original_process_images_inner’)(p, *args, **kwargs)
File “/content/stable-diffusion-webui/modules/processing.py”, line 636, in process_images_inner
samples_ddim = p.sample(conditioning=c, unconditional_conditioning=uc, seeds=seeds, subseeds=subseeds, subseed_strength=p.subseed_strength, prompts=prompts)
File “/content/stable-diffusion-webui/extensions/sd-webui-controlnet/scripts/hook.py”, line 252, in process_sample
return process.sample_before_CN_hack(*args, **kwargs)
File “/content/stable-diffusion-webui/modules/processing.py”, line 836, in sample
samples = self.sampler.sample(self, x, conditioning, unconditional_conditioning, image_conditioning=self.txt2img_image_conditioning(x))
File “/content/stable-diffusion-webui/modules/sd_samplers_kdiffusion.py”, line 351, in sample
samples = self.launch_sampling(steps, lambda: self.func(self.model_wrap_cfg, x, extra_args={
File “/content/stable-diffusion-webui/modules/sd_samplers_kdiffusion.py”, line 227, in launch_sampling
return func()
File “/content/stable-diffusion-webui/modules/sd_samplers_kdiffusion.py”, line 351, in
samples = self.launch_sampling(steps, lambda: self.func(self.model_wrap_cfg, x, extra_args={
File “/usr/local/lib/python3.10/dist-packages/torch/autograd/grad_mode.py”, line 27, in decorate_context
return func(*args, **kwargs)
File “/content/stable-diffusion-webui/repositories/k-diffusion/k_diffusion/sampling.py”, line 169, in sample_heun
denoised = model(x, sigma_hat * s_in, **extra_args)
File “/usr/local/lib/python3.10/dist-packages/torch/nn/modules/module.py”, line 1194, in _call_impl
return forward_call(*input, **kwargs)
File “/content/stable-diffusion-webui/modules/sd_samplers_kdiffusion.py”, line 119, in forward
x_out = self.inner_model(x_in, sigma_in, cond={“c_crossattn”: [cond_in], “c_concat”: [image_cond_in]})
File “/usr/local/lib/python3.10/dist-packages/torch/nn/modules/module.py”, line 1194, in _call_impl
return forward_call(*input, **kwargs)
File “/content/stable-diffusion-webui/repositories/k-diffusion/k_diffusion/external.py”, line 112, in forward
eps = self.get_eps(input * c_in, self.sigma_to_t(sigma), **kwargs)
File “/content/stable-diffusion-webui/repositories/k-diffusion/k_diffusion/external.py”, line 138, in get_eps
return self.inner_model.apply_model(*args, **kwargs)
File “/content/stable-diffusion-webui/modules/sd_hijack_utils.py”, line 17, in
setattr(resolved_obj, func_path[-1], lambda *args, **kwargs: self(*args, **kwargs))
File “/content/stable-diffusion-webui/modules/sd_hijack_utils.py”, line 28, in __call__
return self.__orig_func(*args, **kwargs)
File “/content/stable-diffusion-webui/repositories/stable-diffusion-stability-ai/ldm/models/diffusion/ddpm.py”, line 858, in apply_model
x_recon = self.model(x_noisy, t, **cond)
File “/usr/local/lib/python3.10/dist-packages/torch/nn/modules/module.py”, line 1194, in _call_impl
return forward_call(*input, **kwargs)
File “/content/stable-diffusion-webui/repositories/stable-diffusion-stability-ai/ldm/models/diffusion/ddpm.py”, line 1329, in forward
out = self.diffusion_model(x, t, context=cc)
File “/usr/local/lib/python3.10/dist-packages/torch/nn/modules/module.py”, line 1194, in _call_impl
return forward_call(*input, **kwargs)
File “/content/stable-diffusion-webui/extensions/sd-webui-controlnet/scripts/hook.py”, line 481, in forward_webui
return forward(*args, **kwargs)
File “/content/stable-diffusion-webui/extensions/sd-webui-controlnet/scripts/hook.py”, line 334, in forward
param.control_model.to(devices.get_device_for(“controlnet”))
AttributeError: ‘NoneType’ object has no attribute ‘to’
Hi, thats strange. I cannot reproduce the error. ControlNet is working as expected.
The first time using a preprocessor, there’s a glitch that it doesn’t show the preview after clicking the explosion icon. It was downloading models in the background.
After I uncheck and check the preview box, and click the explosion icon again, the preview showed up. Tested a few preprocessors. All are working. No error message. I use Colab Plus which uses higher RAM. But I don’t think you are seeing out of memory error.
Hey! Sorry to be requesting more stuff, but I think this should be on the easy side of things…
Could you please add the option to use custom launch parameters?
And just a quick question, does this notebook launches the latest commit of A1111 or is it using the release version, or maybe even a custom build?
Pretty please?
HI Andrew, I am completely newbie. Just bought your quick start guide to get the colab link. Somehow I am unable to load your quick start guide from notion.site. It keeps loading forever. Can you please email it to me. Thanks
Hi emailed.
Hi Andreww
As you suggested below somewhere, I tried to use NGROK and I put my nyrok key in the NGROK field. Then, there is no public URL anymore.
I checked your code and it shows that if NGROM is not empty, –share is not added in the args.
Could you direct me if I am doing right?
Hi, the behavior sounds right to me. There should be an ngrok URL somewhere a bit up in the log.
I just figured it out …. i’m a dumdum hahaha
Thank you for this notebook ,it’s actually a fun experience./
I’m just wondering if there’s anyway to do batch processing with img2img. I don’t know how the directory works.
If it can be used, can you give me an example how?
LyCORIS is sort of a “Advanced LORA” (it stands for “Lora beYond Conventional methods, Other Rank adaptation Implementations for Stable diffusion.”)
Its models have more layers, I believe they’re better overall when compared to normal LORAs. But in order for the extension to read the models, they have to be in the folder “LyCORIS” (in the same subfolder as LORA, Embeddings, Models, Hypernetworks…).
The base model is in this git:
https://github.com/KohakuBlueleaf/LyCORIS
And the external source to install:
https://github.com/KohakuBlueleaf/a1111-sd-webui-lycoris
I see. Currently there’s really no way to download models to that folder except using the command prompt.
An alternative is to use the “Save Everything” option so that the whole A1111 is in your google drive. But expect issues from time to time.
Just in case someone else might be interested in this, I found an extension that should load LyCORIS (as well as LOCON and LOHA) as LORA.
https://github.com/KohakuBlueleaf/a1111-sd-webui-locon
Anyway I could do a copy command? I tried to place the models in the LORA folders just to see if it could work, it was a long shot but didn’t work. But what it means is that the files are already in the Colab drive, just in the wrong subfolder.
I am not totally sure what needs to be done before using this extension. Could you please explain to me?
Do you need to copy some model files to the extension’s folder? (Like controlnet models)
Hello! I’d like to thank you so very much for your efforts, for this guide, and for maintaining the Colab working and up to date!
Recently you’ve added the possibility of installing extensions during the startup. I’ve tried to use LyCORIS, but the problem is that I can’t upload the models to the Colab folder (always errors out during upload), and I can’t make it read (or even copy) straight from drive. Anyway to solve this?
Thanks!
That’s a bit tough to solve with the interface. If you have Colab Pro subscription, you would have access to the command line interface. Use wget to download them.
Total newbie here… not even sure how I create an account besides using the Register field when I started to write this reply.
This reply is a general question: you write “This option will not save any models in your Google Drive. But it will load all the models you put in AI_PICS/models.” — but AI_PICS is a folder in my Google Drive. What am I missing? Thank you!
Unless you check the box “Save_model_in_Google_Drive:” nothing besides the pictures will be saved to your drive, but it will be loaded in case you have models/etc in the corresponding folders in your drive.
There is a list of models available for selection on the notebook page. When choosing the recommended option, those models will only be downloaded in Colab’s temporary working space. They will not be saved in your Google Drive. In other words, they will be downloaded every time when you select them. This is to conserve space in you Google Drive.
But if you have models that you use regularly, you can save them under AI_PICS/models. They will be available in A1111. You can either download a model manually and save it there, or use Model_from_URL field and selecting Save_model_in_Google_Drive to save a copy there. It is useful for installing models that are not on the menu.
Hope this make things a little bit clearer…
Hey, great manual.
I ran the script, but I only receive the local URL, then it stops. There is no gradio link.
Any idea why?
Much appreciated.
gradio somethings acts out.
Try ngrok. The service is more stable.
Hi, I tried to install in another PC and this message occured as well:
File “D:\Stable_Diffusion\stable-diffusion-webui-master\venv\lib\site-packages\pip\_vendor\urllib3\response.py”, line 442, in _error_catcher
raise ReadTimeoutError(self._pool, None, “Read timed out.”)
pip._vendor.urllib3.exceptions.ReadTimeoutError: HTTPSConnectionPool(host=’download.pytorch.org’, port=443): Read timed out.
[notice] A new release of pip available: 22.3.1 -> 23.1.2
[notice] To update, run: D:\Stable_Diffusion\stable-diffusion-webui-master\venv\Scripts\python.exe -m pip install –upgrade pip
Traceback (most recent call last):
File “D:\Stable_Diffusion\stable-diffusion-webui-master\launch.py”, line 352, in
prepare_environment()
File “D:\Stable_Diffusion\stable-diffusion-webui-master\launch.py”, line 254, in prepare_environment
run(f'”{python}” -m {torch_command}’, “Installing torch and torchvision”, “Couldn’t install torch”, live=True)
File “D:\Stable_Diffusion\stable-diffusion-webui-master\launch.py”, line 80, in run
raise RuntimeError(f”””{errdesc or ‘Error running command’}.
RuntimeError: Couldn’t install torch.
Command: “D:\Stable_Diffusion\stable-diffusion-webui-master\venv\Scripts\python.exe” -m pip install torch==2.0.0 torchvision==0.15.1 –extra-index-url https://download.pytorch.org/whl/cu118
Error code: 2
How to fix this? Thanks.
Hi, I’ve just downloaded Automatic1111 and models, and encountered this error message:
venv “C:\Users\Corgi\Documents\Stable_Diffusion_WebUI\stable-diffusion-webui\venv\Scripts\Python.exe”
Python 3.10.10 (tags/v3.10.10:aad5f6a, Feb 7 2023, 17:20:36) [MSC v.1929 64 bit (AMD64)]
Commit hash: 5ab7f213bec2f816f9c5644becb32eb72c8ffb89
Traceback (most recent call last):
File “C:\Users\Corgi\Documents\Stable_Diffusion_WebUI\stable-diffusion-webui\launch.py”, line 352, in
prepare_environment()
File “C:\Users\Corgi\Documents\Stable_Diffusion_WebUI\stable-diffusion-webui\launch.py”, line 257, in prepare_environment
run_python(“import torch; assert torch.cuda.is_available(), ‘Torch is not able to use GPU; add –skip-torch-cuda-test to COMMANDLINE_ARGS variable to disable this check'”)
File “C:\Users\Corgi\Documents\Stable_Diffusion_WebUI\stable-diffusion-webui\launch.py”, line 120, in run_python
return run(f'”{python}” -c “{code}”‘, desc, errdesc)
File “C:\Users\Corgi\Documents\Stable_Diffusion_WebUI\stable-diffusion-webui\launch.py”, line 96, in run
raise RuntimeError(message)
RuntimeError: Error running command.
Command: “C:\Users\Corgi\Documents\Stable_Diffusion_WebUI\stable-diffusion-webui\venv\Scripts\python.exe” -c “import torch; assert torch.cuda.is_available(), ‘Torch is not able to use GPU; add –skip-torch-cuda-test to COMMANDLINE_ARGS variable to disable this check'”
Error code: 1
stdout: Microsoft Visual C++ Redistributable is not installed, this may lead to the DLL load failure.
It can be downloaded at https://aka.ms/vs/16/release/vc_redist.x64.exe
stderr: Traceback (most recent call last):
File “”, line 1, in
File “C:\Users\Corgi\Documents\Stable_Diffusion_WebUI\stable-diffusion-webui\venv\lib\site-packages\torch\__init__.py”, line 133, in
raise err
OSError: [WinError 126] The specified module could not be found. Error loading “C:\Users\Corgi\Documents\Stable_Diffusion_WebUI\stable-diffusion-webui\venv\lib\site-packages\torch\lib\c10.dll” or one of its dependencies.
Press any key to continue . . .
How to fix it? Thanks.
See the windows installation guide on this site. It looks like the installation fails because your PC has no GPU?
I am unable to get to the end of the code, usually it stops where i get to click on choosing a public url and then i could use the model, something seems to not be working now /content/stable-diffusion-webui
WEBUI ARGUMENTS: –gradio-img2img-tool color-sketch –enable-insecure-extension-access –gradio-queue –xformers –ngrok –gradio-auth a:a
Python 3.10.11 (main, Apr 5 2023, 14:15:10) [GCC 9.4.0]
Commit hash: a9fed7c364061ae6efb37f797b6b522cb3cf7aa2
Installing requirements for Web UI
Expecting value: line 1 column 1 (char 0)
Launching Web UI with arguments: –gradio-img2img-tool color-sketch –enable-insecure-extension-access –gradio-queue –xformers –ngrok –gradio-auth a:a
2023-05-08 08:39:21.686001: I tensorflow/core/platform/cpu_feature_guard.cc:182] This TensorFlow binary is optimized to use available CPU instructions in performance-critical operations.
To enable the following instructions: AVX2 FMA, in other operations, rebuild TensorFlow with the appropriate compiler flags.
2023-05-08 08:39:23.220305: W tensorflow/compiler/tf2tensorrt/utils/py_utils.cc:38] TF-TRT Warning: Could not find TensorRT
Traceback (most recent call last):
File “/content//stable-diffusion-webui/launch.py”, line 383, in
start()
File “/content//stable-diffusion-webui/launch.py”, line 373, in start
import webui
File “/content/stable-diffusion-webui/webui.py”, line 28, in
from modules import extra_networks, ui_extra_networks_checkpoints
File “/content/stable-diffusion-webui/modules/ui_extra_networks_checkpoints.py”, line 5, in
from modules import shared, ui_extra_networks, sd_models
File “/content/stable-diffusion-webui/modules/shared.py”, line 665, in
opts.load(config_filename)
File “/content/stable-diffusion-webui/modules/shared.py”, line 602, in load
self.data = json.load(file)
File “/usr/lib/python3.10/json/__init__.py”, line 293, in load
return loads(fp.read(),
File “/usr/lib/python3.10/json/__init__.py”, line 346, in loads
return _default_decoder.decode(s)
File “/usr/lib/python3.10/json/decoder.py”, line 337, in decode
obj, end = self.raw_decode(s, idx=_w(s, 0).end())
File “/usr/lib/python3.10/json/decoder.py”, line 355, in raw_decode
raise JSONDecodeError(“Expecting value”, s, err.value) from None
json.decoder.JSONDecodeError: Expecting value: line 1 column 1 (char 0)
Hi, it should be working now. Please refresh the notebook and confirm with update 5/8.
Hi there!
I have encountered a problem that the webui cannot load properly from the start. The colab looping these messages:
ERROR: Exception in ASGI application
Traceback (most recent call last):
File “/usr/local/lib/python3.10/dist-packages/uvicorn/protocols/websockets/websockets_impl.py”, line 254, in run_asgi
result = await self.app(self.scope, self.asgi_receive, self.asgi_send)
File “/usr/local/lib/python3.10/dist-packages/uvicorn/middleware/proxy_headers.py”, line 78, in __call__
return await self.app(scope, receive, send)
File “/usr/local/lib/python3.10/dist-packages/fastapi/applications.py”, line 273, in __call__
await super().__call__(scope, receive, send)
File “/usr/local/lib/python3.10/dist-packages/starlette/applications.py”, line 122, in __call__
await self.middleware_stack(scope, receive, send)
File “/usr/local/lib/python3.10/dist-packages/starlette/middleware/errors.py”, line 149, in __call__
await self.app(scope, receive, send)
File “/usr/local/lib/python3.10/dist-packages/starlette/middleware/gzip.py”, line 26, in __call__
await self.app(scope, receive, send)
File “/usr/local/lib/python3.10/dist-packages/starlette/middleware/exceptions.py”, line 79, in __call__
raise exc
File “/usr/local/lib/python3.10/dist-packages/starlette/middleware/exceptions.py”, line 68, in __call__
await self.app(scope, receive, sender)
File “/usr/local/lib/python3.10/dist-packages/fastapi/middleware/asyncexitstack.py”, line 21, in __call__
raise e
File “/usr/local/lib/python3.10/dist-packages/fastapi/middleware/asyncexitstack.py”, line 18, in __call__
await self.app(scope, receive, send)
File “/usr/local/lib/python3.10/dist-packages/starlette/routing.py”, line 718, in __call__
await route.handle(scope, receive, send)
File “/usr/local/lib/python3.10/dist-packages/starlette/routing.py”, line 341, in handle
await self.app(scope, receive, send)
File “/usr/local/lib/python3.10/dist-packages/starlette/routing.py”, line 82, in app
await func(session)
File “/usr/local/lib/python3.10/dist-packages/fastapi/routing.py”, line 289, in app
await dependant.call(**values)
File “/usr/local/lib/python3.10/dist-packages/gradio/routes.py”, line 436, in join_queue
session_info = await websocket.receive_json()
File “/usr/local/lib/python3.10/dist-packages/starlette/websockets.py”, line 133, in receive_json
self._raise_on_disconnect(message)
File “/usr/local/lib/python3.10/dist-packages/starlette/websockets.py”, line 105, in _raise_on_disconnect
raise WebSocketDisconnect(message[“code”])
starlette.websockets.WebSocketDisconnect: 1006
I have totally no idea why, and it happened a few days ago, before that everything went perfect.
Hi, it should be working now. Please refresh the notebook and confirm with update 5/8.
thanks bro, i tried the 5/8 version, however, colab still show the same error message as above, it happens when gradio is launched, and all button in gradio seems unfunctional and the model cannot properly load
OK, I tested all over again just for you and it is working as expected. A few things to try:
1. Refresh the notebook and run with the default, recommended settings.
2. Rename the output folder to AI_PICS2 to start a fresh folder. This is to test if your files on Google Drive is corrupted.
3. Use ngrok which should help with unresponsive GUI. Though I don’t expect to resolve any error message.
That’s all I can think of!
Hello, thank you for replying. And how do I update them and have the latest notebook.
You can visit the original URL you get the notebook.
The link is also at the top of the notebook. Look for “Latest version of this notebook can be found at here.”
Hello Andrew,
I wanted to thank you for enabling the use 3 controllnet models at the same time as a default setting within the colab installation! 😀 Its just great!
A small feedback to manually changing settings and installing extensions after running the notebook: It still gives back the error code “Connection errored out.” and ends the session with a need to restart the notebook without any extension installed.
So my question would be if this is a colab thing that can’t be overcome due to the colab notebook set-up in gerneral?
If so, might I suggest adding of a auspicious looking upscaler ( https://www.youtube.com/playlist?list=PLn5I5CQb-t3RCQCK620TvhPpu2GVCloUt —> https://github.com/Coyote-A/ultimate-upscale-for-automatic1111) and an great addon called “Open Pose Editor” that enhances the controllnet open-pose-model by enabling you to pose an open pose model within a created background directly in A1111. This video demonstrates what I mean and why its awesome: https://youtu.be/MDHC7E6G1RA=s378 (at min 06:11)
Many thanks for considering and a wonderful weekend.
Alice
After installing extensions, you will need to stop and rerun the cell in colab to make them effective. I will look into adding the extensions.
Andrewwwwww! 😀
I was busy the last days and just came back to check your reply and to run the collab notebook, noting that you have actually installed the “Open Pose Editor” and “Ultimate_SD_Upscale”. Amazing! ?*Imagine me dancing around in my room out of joy*
You really made my day and I, again, can’t thank you engough for your great work – THANK YOU! ???✨
And I’ll also mind your recommendation to “to stop and rerun the cell in colab” to make installation changes work.
Thanks for coming back and put down some encouraging comments. That makes my day too!
Hi. Can you help me with this error:
ModuleNotFoundError Traceback (most recent call last)
in ()
4 import sys
5 import fileinput
—-> 6 from pyngrok import ngrok, conf
7
8 Use_Cloudflare_Tunnel = False #@param {type:”boolean”}
ModuleNotFoundError: No module named ‘pyngrok’
—————————————————————————
NOTE: If your import is failing due to a missing package, you can
manually install dependencies using either !pip or !apt.
To view examples of installing some common dependencies, click the
“Open Examples” button below.
Hi, I just tested using ngrok on the latest notebook (updated May 6) and is working correctly. Please refresh and make use you are using the latest one.
Am getting the same error. Anyway to fix?
Hello Andrew,
I have an error when i tried to use any custome model with the link option, (for ex i tried to use this: https://huggingface.co/WarriorMama777/OrangeMixs/raw/main/Models/AbyssOrangeMix3/AOM3A3_orangemixs.safetensors)
i use the “Small models, images and settings” option and the last notebook.
Calculating sha256 for /content/stable-diffusion-webui/models/Stable-diffusion/AOM3A3_orangemixs.safetensors: 299ed4ac9c0127e5d08c10749cd4f4341cd306bbff235287dccdd5cd0615d587
Loading weights [299ed4ac9c] from /content/stable-diffusion-webui/models/Stable-diffusion/AOM3A3_orangemixs.safetensors
loading stable diffusion model: Exception
Traceback (most recent call last):
File “/content/stable-diffusion-webui/webui.py”, line 136, in initialize
modules.sd_models.load_model()
File “/content/stable-diffusion-webui/modules/sd_models.py”, line 407, in load_model
state_dict = get_checkpoint_state_dict(checkpoint_info, timer)
File “/content/stable-diffusion-webui/modules/sd_models.py”, line 262, in get_checkpoint_state_dict
res = read_state_dict(checkpoint_info.filename)
File “/content/stable-diffusion-webui/modules/sd_models.py”, line 241, in read_state_dict
pl_sd = safetensors.torch.load_file(checkpoint_file, device=device)
File “/usr/local/lib/python3.10/dist-packages/safetensors/torch.py”, line 98, in load_file
with safe_open(filename, framework=”pt”, device=device) as f:
Exception: Error while deserializing header: HeaderTooLarge
Hi, I tested the model and it is working properly. Your link does not seem to be correct. You need to use a link that will download the model when you use the URL on a browser.
https://huggingface.co/WarriorMama777/OrangeMixs/resolve/main/Models/AbyssOrangeMix3/AOM3A3_orangemixs.safetensors
Thank you for your reply, Andrew.
It downloas the lastest version.
But, I have the errors below each time I start the notebook. I wonder if I can just ignore this.
“Failed to install svglib, some preprocessors may not work”
– Claue
>>>>>>>>>>>>>>>>>
Installing sd-webui-controlnet requirement: svglib
Couldn’t install sd-webui-controlnet requirement: svglib.
Command: “/usr/bin/python3” -m pip install svglib –prefer-binary
Error code: 1
stdout: Looking in indexes: https://pypi.org/simple, https://us-python.pkg.dev/colab-wheels/public/simple/
Collecting svglib
Using cached svglib-1.5.1-py3-none-any.whl
Collecting cssselect2>=0.2.0
Using cached cssselect2-0.7.0-py3-none-any.whl (15 kB)
Collecting reportlab
Using cached reportlab-4.0.0-py3-none-any.whl (1.9 MB)
Requirement already satisfied: lxml in /usr/local/lib/python3.10/dist-packages (from svglib) (4.9.2)
Requirement already satisfied: tinycss2>=0.6.0 in /usr/local/lib/python3.10/dist-packages (from svglib) (1.2.1)
Requirement already satisfied: webencodings in /usr/local/lib/python3.10/dist-packages (from cssselect2>=0.2.0->svglib) (0.5.1)
Collecting freetype-py=2.3.0
Using cached freetype_py-2.3.0-py3-none-manylinux_2_5_x86_64.manylinux1_x86_64.manylinux_2_12_x86_64.manylinux2010_x86_64.whl (978 kB)
Collecting rlPyCairo=0.2.0
Using cached rlPyCairo-0.2.0-py3-none-any.whl (10 kB)
Requirement already satisfied: pillow>=9.0.0 in /usr/local/lib/python3.10/dist-packages (from reportlab->svglib) (9.4.0)
Collecting pycairo>=1.20.0
Using cached pycairo-1.23.0.tar.gz (344 kB)
Installing build dependencies: started
Installing build dependencies: finished with status ‘done’
Getting requirements to build wheel: started
Getting requirements to build wheel: finished with status ‘done’
Installing backend dependencies: started
Installing backend dependencies: finished with status ‘done’
Preparing metadata (pyproject.toml): started
Preparing metadata (pyproject.toml): finished with status ‘done’
Building wheels for collected packages: pycairo
Building wheel for pycairo (pyproject.toml): started
Building wheel for pycairo (pyproject.toml): finished with status ‘error’
Failed to build pycairo
stderr: error: subprocess-exited-with-error
× Building wheel for pycairo (pyproject.toml) did not run successfully.
│ exit code: 1
╰─> See above for output.
note: This error originates from a subprocess, and is likely not a problem with pip.
ERROR: Failed building wheel for pycairo
ERROR: Could not build wheels for pycairo, which is required to install pyproject.toml-based projects
Warning: Failed to install svglib, some preprocessors may not work.
The notebook works fine for me despite these warnings. let me know if there’s anything doesn’t work.
Hello Andrew,
First of all, thank you for this guide article.
In order to update ControlNet and Deforum, I clicked the “Check of update” button in the extensions tab. But, it doesn’t work.
I checked the ControlNet and Deforum options on the notebook when I started. I am using the “Everything” option of the Save_in_Google_drive section.
Is there any way I can updated ControlNet and Deforum?
Claue
Hi Claue,
You can try deleting deforum and controlnet in google drive in the extension folder. It should reinstall the updated version next time you run.
The recommended option is “save small models…”. That would give youleast problems.
Hi
Can you please check the notebook, I ran it for several days and succeeded, suddenly it outputs errors today
File “/usr/local/lib/python3.10/dist-packages/safetensors/torch.py”, line 98, in load_file
with safe_open(filename, framework=”pt”, device=device) as f:
Exception: Error while deserializing header: HeaderTooLarge
Stable diffusion model failed to load, exiting
Hi, I just test running it and it is working as expected. Please refresh the notebook and try again with the default setting.
Hello once more with one more question,
I recently found an awesome video of how to use ControlNet with 2 and more models at the same time like canny + depth + others which greatly improves the img2img results. I tried to imply that with the collab notebook but after adjusting the ControlNet settings in A1111 its necessary to reload the UI which made the collab A1111 crash with this notebook (causing different errors like ‘no running interface’ sth that I believe said ‘runtime error’ as if google collab had on of its disconnections. So before running through all the installation process again just to make it crash all over, I thought I rather ask the developer first.
The changed settings and reloading of UI I referr to are described in this video at min 0:26
–> https://www.youtube.com/watch?v=MDHC7E6G1RA
Many thanks! 😀
OK, I will look into it
Hello again Andrew and thanks for you quick reply! 😀
I have been using a copy (from a few days ago) of the notebook to manually save installation preferences. The update must have happened shortly after, I guess, because trying the refreshed version worked fine again! Many thanks for your dedication to keeping it running! Is there anything one can do to support you for your efforts?
Another thing that just came to my mind: If I had SD installed locally on my laptop, would I have run into the same issue? I currently found checkpoints and LORAs I love very much and am thinking about how I may best preserve those setups as they are no matter future code and dev changes (like “never touch a running system” 😉 ). So my question would be if a local installation would be immune or better said independent of future developement changes, or erros due to changes that need updates to work fine. I am asking because I have no knowledge about the code mechanics itself, and am not sure if it adapts changes made on the developers sources provided on the internet if installed locally. I’d like to be independent with my SD installation because, though I am super-grateful that you do provide a working notebook for all of us, I do not rely upon that you will do so forever, as to keep it running comes with, as you put it, “mind-boogling effort”.
And I just don’t have the time right now to learn python myself, to become independent regarding codefixes.
Many, many thanks for the great work you do and for the time you take answering to all of us! I apprachiate it a lot! I really do! <3
Alice
Thanks for offering help! It’s already helpful that everyone is reporting bugs. It would be great if someone could tell me the fix so I can just put it in, like last time 😛
Your local copy shouldn’t have an issue as long as you don’t touch your pythons and update SD.
Thanks a lot for your reply and also for looking into the dissconnect-issue then reloading the UI!
A quick remark concerning yesterday’s Controllnet topic (the use of more than 1 model at a time): As it appears the latest version of it seems to feature model stacking without adjusting the settings first… or so it appears at glance at the img2img interface. Controllnet now features different tabs with an option to select a different model on each – a thing I just noticed today but had no time to test, yet.
… and as to finding the right bug fixes: wouldn’t it be great if there was an AI for THAT, and, while at it, one that also proactively implements them? 😉
That would be great! Despite all the hype, AI is still very far away from doing that 🙂
Hello Andrew and thanks a lot for providing the Google Collab installation in the quick start guide! 😀
I have been using it last week and it just worked really well. Only today the notebook continues feedbacking me the following error when I run the script:
RuntimeError: Detected that PyTorch and torchvision were compiled with different CUDA versions. PyTorch has CUDA Version=11.7 and torchvision has CUDA Version=11.8. Please reinstall the torchvision that matches your PyTorch install.
Is that a code thing that needs to be fixed or did I possibly make an mistake? (I am the paid version of collab so I should basically be able to run stable difffusion, right?)
Many thanks for your help!
Hi, I did a quick test and the notebook is working as expected. Have you refreshed the notebook? It was updated a few days ago to fix this problem.
let me know how it goes.
Hi there.
I am receiving an error after running the script in google colab:
/content/stable-diffusion-webui
WEBUI ARGUMENTS: –gradio-img2img-tool color-sketch –enable-insecure-extension-access –gradio-queue –xformers –share –gradio-auth THIS WAS MY DESIRED USERNAME:THIS WAS MY DESIRED PASSWORD
/bin/bash: -c: line 0: unexpected EOF while looking for matching `”
/bin/bash: -c: line 1: syntax error: unexpected end of file
Reload the notebook page to start with a new one. This will clear out the edits you made.
Run with the default username and password to make sure it is working correctly.
The error could be illegal characters in your password. Try sticking with numbers and characters.
It worked this time. Not sure what the issue was. Thanks for your kind and prompt reply!
For some reason, AUTOMATIC1111 on Colab will not generate at all this evening, and keeps erroring out. I have tried connecting with both gradio and ngrk with the same result. Are you aware of any specific issues? Thank you!
I did a quick test and it is working as expected. I updated the notebook yesterday. Did you refresh?
thank you so much for making this!! .. im getting this error message “torch/torchvision version mismatch..” right now .. do i need to update or delete something for it to work? thanks again
Hi, I updated the notebook yesterday. Please make sure you are disconnected, then refresh the notebook. You should see the update log reflecting yesterday’s day.
Thank you so very much for your efforts!! I, and many others, appreciate it a lot!!!
Also, I don’t mean to be a bother, but any chance we can also load the VAE files from Drive when choosing not to keep everything?
I will look into it.
Notebook updated to save and load VAE files in google drive.
Just fixed the torch/torchvision version mismatch error. Thanks @erickmtz for the pointer.
The effort needed to keep this notebook running is mind boggling…
This is happening again.
Hey, I recently found this issue when running the notebook:
W tensorflow/compiler/tf2tensorrt/utils/py_utils.cc:38] TF-TRT Warning: Could not find TensorRT
Traceback (most recent call last):
File “/content//stable-diffusion-webui/launch.py”, line 383, in
start()
File “/content//stable-diffusion-webui/launch.py”, line 373, in start
import webui
File “/content/stable-diffusion-webui/webui.py”, line 25, in
import ldm.modules.encoders.modules
File “/content/stable-diffusion-webui/repositories/stable-diffusion-stability-ai/ldm/modules/encoders/modules.py”, line 7, in
import open_clip
File “/usr/local/lib/python3.10/dist-packages/open_clip/__init__.py”, line 2, in
from .factory import create_model, create_model_and_transforms, create_model_from_pretrained, get_tokenizer
File “/usr/local/lib/python3.10/dist-packages/open_clip/factory.py”, line 13, in
from .model import CLIP, CustomTextCLIP, convert_weights_to_lp, convert_to_custom_text_state_dict,\
File “/usr/local/lib/python3.10/dist-packages/open_clip/model.py”, line 17, in
from .modified_resnet import ModifiedResNet
File “/usr/local/lib/python3.10/dist-packages/open_clip/modified_resnet.py”, line 7, in
from open_clip.utils import freeze_batch_norm_2d
File “/usr/local/lib/python3.10/dist-packages/open_clip/utils.py”, line 5, in
from torchvision.ops.misc import FrozenBatchNorm2d
File “/usr/local/lib/python3.10/dist-packages/torchvision/__init__.py”, line 6, in
from torchvision import datasets, io, models, ops, transforms, utils
File “/usr/local/lib/python3.10/dist-packages/torchvision/datasets/__init__.py”, line 1, in
from ._optical_flow import FlyingChairs, FlyingThings3D, HD1K, KittiFlow, Sintel
File “/usr/local/lib/python3.10/dist-packages/torchvision/datasets/_optical_flow.py”, line 12, in
from ..io.image import _read_png_16
File “/usr/local/lib/python3.10/dist-packages/torchvision/io/__init__.py”, line 8, in
from ._load_gpu_decoder import _HAS_GPU_VIDEO_DECODER
File “/usr/local/lib/python3.10/dist-packages/torchvision/io/_load_gpu_decoder.py”, line 1, in
from ..extension import _load_library
File “/usr/local/lib/python3.10/dist-packages/torchvision/extension.py”, line 107, in
_check_cuda_version()
File “/usr/local/lib/python3.10/dist-packages/torchvision/extension.py”, line 80, in _check_cuda_version
raise RuntimeError(
RuntimeError: Detected that PyTorch and torchvision were compiled with different CUDA versions. PyTorch has CUDA Version=11.7 and torchvision has CUDA Version=11.8. Please reinstall the torchvision that matches your PyTorch install.
This issue has been reported in
https://github.com/AUTOMATIC1111/stable-diffusion-webui/issues/9341
“It looks like the installed version on colab’s VM image has been updated to “torch-2.0.0+cu118″ I was able to fix this by adding the line below.”
The proposed workaround is to add this line
!pip install torch==1.13.1+cu117 torchvision==0.14.1+cu117 torchtext==0.14.1 torchaudio==0.13.1 torchdata==0.5.1 –extra-index-url https://download.pytorch.org/whl/cu117
before:
!python {root}/stable-diffusion-webui/launch.py {args}
I’m getting this error today, too. I’ve only been using this notebook for about a month, but it’s been great. Thanks!
Could you add ABG (background removing) extension to the plugins?
https://github.com/KutsuyaYuki/ABG_extension
Sure I will look into it.
Thanks so much for keeping this updated! I don’t know how I’d use Stable Diffusion without it. What should we do when you release new versions? Most of the time, it works fine, but other times I get error messages when I first run the updated notebook, and the only way I’ve found to fix them is to stop using the notebook for a day or two. I just moved to the 4/19/2023 update, and get this error when I try to generate an image:
Weights loaded in 86.1s (calculate hash: 80.7s, load weights from disk: 0.5s, apply weights to model: 4.0s, load VAE: 0.4s, move model to device: 0.6s).
0% 0/25 [00:03<?, ?it/s]
Error completing request
.
.(there's a whole wall of stuff in here that I don't know if you need to see in the comments)
.
File "/usr/local/lib/python3.10/dist-packages/xformers/ops/fmha/common.py", line 116, in validate_inputs
raise ValueError(
ValueError: Query/Key/Value should all have the same dtype
query.dtype: torch.float32
key.dtype : torch.float32
value.dtype: torch.float16
I do not see the error. Could you please tell me how to reproduce it? Have you changed any default settings? What model did you use?
Hi Andrew, the LORA’s are not showing in the additional networks tabs, is there a way to fix it ? (i ve installed https://github.com/kohya-ss/sd-webui-additional-networks.git and the safetensors loras are in the right folder)
Thanks for your amazing work again 🙂
Hi, you don’t need to install this extension. A1111 supports additional networks on its own. The extra network button is under the Generate button. See the lora tutorial.
https://stable-diffusion-art.com/lora/
Checking out commit for K-diffusion with hash: 5b3af030dd83e0297272d861c19477735d0317ec…
Cloning CodeFormer into /content/drive/MyDrive/AI_PICS/stable-diffusion-webui/repositories/CodeFormer…
Traceback (most recent call last):
File “/content/drive/MyDrive/AI_PICS/stable-diffusion-webui/launch.py”, line 381, in
prepare_environment()
File “/content/drive/MyDrive/AI_PICS/stable-diffusion-webui/launch.py”, line 319, in prepare_environment
git_clone(codeformer_repo, repo_dir(‘CodeFormer’), “CodeFormer”, codeformer_commit_hash)
File “/content/drive/MyDrive/AI_PICS/stable-diffusion-webui/launch.py”, line 170, in git_clone
run(f'”{git}” -C “{dir}” checkout {commithash}’, None, “Couldn’t checkout {name}’s hash: {commithash}”)
File “/content/drive/MyDrive/AI_PICS/stable-diffusion-webui/launch.py”, line 113, in run
raise RuntimeError(message)
RuntimeError: Couldn’t checkout {name}’s hash: {commithash}.
Command: “git” -C “/content/drive/MyDrive/AI_PICS/stable-diffusion-webui/repositories/CodeFormer” checkout c5b4593074ba6214284d6acd5f1719b6c5d739af
Error code: 1
stdout:
stderr: error: Your local changes to the following files would be overwritten by checkout:
scripts/crop_align_face.py
Please commit your changes or stash them before you switch branches.
Aborting
________________________________________________________________________________________
hi,camen,How to deal with this error, please tell me detailed operation process
Delete the folder /content/drive/MyDrive/AI_PICS/stable-diffusion-webui/repositories in google drive and try again.
Many thanks for this VERY helpful articel! 😀 Only one question left: Do I have to wait through the whole installation process every time I start the code in the DiffusionUI_ngrok_sagiodev.ipynb notebook anew? Or can I somehow save the setup for future sessions? I chose the “small models, images and settings”-option to be saved in Google Drive but that didn’t seem to make a difference. Next I made a copy of the notebook which was actually saved to google drive but this again made me run through all the installation process after I re-ran the script. Is there a way to get it start faster and maybe save some settings?
Many thanks for your help!
You are correct that you will have to wait. I currently don’t have a good way to save the whole thing in google drive fast.
StylePile, inspiration, cutoff, anti-burn, Civitai-Helper etc. However, I wonder if they are placed in the extension folder just like controlnet. Could you use the extension folder as a whole as lora and models, and don’t downloading controlnet, it would be more convenient to put them all on google drive?
I’ll try to write a few commonly used extensions into the automated program, but I’m not sure if it will work
Do you have a list of commonly used extensions? It may be worth adding as options if they are useful.
I would like to know if this notebook file supports extenshions. I installed some extensions, but after restarting the notebook, it returned to the initial state. Do I need to reinstall it?
Unfortunately, extension support is limited. It has something to do with the nature of Colab environment.
Yes, you will need to re-install it. Or if you code, you need to add to the notebook like the controlnet.
You can try save “everything” in Colab. After restart, some extensions may not work correctly.
Thanks for the tutorial. Is it possible to pass a folder of images from local machine/google drive and perform transformations automatically on all of them instead of dragging and dropping?
Depending on what you do. For upscalers, I think you can process a whole folder using the same setting.
You can use the File Explorer on the left panel. Your google drive is under drive > MyDrive. Right-click a folder and click Copy Path. This is the path you can use in A1111.
this error happens when switching to instruct_pix2pix_model
when I tried in more detail and changed the models about 4 or 5 times, I got the error network error again
I think A1111 has a memory leak. There’s really not much I can do until they fix the issue.
Use Colab Pro if you can afford it. It will allocate a high-RAM machine to you so this issue will not happen until much later.
problem solved yes you are right
Great!
Error error when changing more than 2 times between two models
the problem still continues
Mmm… I can reproduce in the previous version but already fixed the issue. Perhaps you see a different one. Let me know how to reproduce step by step in a new noteobok.
when i want to change modules i get error
Hi, the error is now resolved.
HI, it shows that no xformers module. How to enable it in Google Colab for SD
No module ‘xformers’. Proceeding without it.
It’s a known warning message. It should work without issues.
Edit: Let’s actually answer your question: The xformers package is causing issues so I turned it off. You can enable it by adding –xformers to the webui argument.
Thank you again, that worked. All running fine.
Hello I am getting this error trying to run the new notebook if I save Everything. If I set it to “Some”, then it will run, but can’t use any of my own models or upscalers.
—————————————————
Error:
/content/drive/MyDrive/AI_PICS/stable-diffusion-webui
WEBUI ARGUMENTS: –gradio-img2img-tool color-sketch –enable-insecure-extension-access –gradio-queue –ngrok 2NstsI3AxuQNFyJiPxnlfwpUmdF_7jLs4pUHz1fiBTdiNQBNR –gradio-auth a:a
Python 3.9.16 (main, Dec 7 2022, 01:11:51)
[GCC 9.4.0]
Commit hash: 22bcc7be428c94e9408f589966c2040187245d81
Fetching updates for Stable Diffusion…
Checking out commit for Stable Diffusion with hash: cf1d67a6fd5ea1aa600c4df58e5b47da45f6bdbf…
Traceback (most recent call last):
File “/content/drive/MyDrive/AI_PICS/stable-diffusion-webui/launch.py”, line 356, in
prepare_environment()
File “/content/drive/MyDrive/AI_PICS/stable-diffusion-webui/launch.py”, line 289, in prepare_environment
git_clone(stable_diffusion_repo, repo_dir(‘stable-diffusion-stability-ai’), “Stable Diffusion”, stable_diffusion_commit_hash)
File “/content/drive/MyDrive/AI_PICS/stable-diffusion-webui/launch.py”, line 148, in git_clone
run(f'”{git}” -C “{dir}” checkout {commithash}’, f”Checking out commit for {name} with hash: {commithash}…”, f”Couldn’t checkout commit {commithash} for {name}”)
File “/content/drive/MyDrive/AI_PICS/stable-diffusion-webui/launch.py”, line 97, in run
raise RuntimeError(message)
RuntimeError: Couldn’t checkout commit cf1d67a6fd5ea1aa600c4df58e5b47da45f6bdbf for Stable Diffusion.
Command: “git” -C “/content/drive/MyDrive/AI_PICS/stable-diffusion-webui/repositories/stable-diffusion-stability-ai” checkout cf1d67a6fd5ea1aa600c4df58e5b47da45f6bdbf
Error code: 1
stdout:
stderr: error: Your local changes to the following files would be overwritten by checkout:
ldm/util.py
Please commit your changes or stash them before you switch branches.
Aborting
————————————————-
Thanks in advance
I just made changes to the notebook. Can you delete the folder AI_PICS/stable-diffusion-webui/repositories in your google drive and run the new notebook?
Hi all, fixed. Thanks for everyone’s patience.
+1, it appear to me suddenly this morning
Sorry for the newbie question, but how do I disconnect when I’m done? And I have to shut down my computer completely as well? Thanks!
Hi, click the downward caret on top right and then “Disconnect and delete runtime”
Hi, I am getting the torchvision error like the previous dude. Think you have to update torchvision?
It’s giving an error when I load… RuntimeError: Detected that PyTorch and torchvision were compiled with different CUDA versions. PyTorch has CUDA Version=11.7 and torchvision has CUDA Version=11.8. Please reinstall the torchvision that matches your PyTorch install.
second this. Was working this morning. I guess something has changed in torchvision.
Launching Web UI with arguments: –gradio-img2img-tool color-sketch –xformers –enable-insecure-extension-access –gradio-queue –ngrok 2N7M3L6zp128DKiv2LLmfQK3QJJ_5pjd8tynPkRDJ4hFeEysp –gradio-auth a:a
Traceback (most recent call last):
File “/content/drive/MyDrive/AI_PICS/stable-diffusion-webui/launch.py”, line 455, in
start()
File “/content/drive/MyDrive/AI_PICS/stable-diffusion-webui/launch.py”, line 399, in start
import webui
File “/content/drive/MyDrive/AI_PICS/stable-diffusion-webui/webui.py”, line 15, in
from modules import import_hook, errors, extra_networks, ui_extra_networks_checkpoints
File “/content/drive/MyDrive/AI_PICS/stable-diffusion-webui/modules/ui_extra_networks_checkpoints.py”, line 6, in
from modules import shared, ui_extra_networks, sd_models
File “/content/drive/MyDrive/AI_PICS/stable-diffusion-webui/modules/sd_models.py”, line 13, in
from ldm.util import instantiate_from_config
RecursionError: maximum recursion depth exceeded during compilation
I see you installed on google drive which can be problematic. It’s not a preferred method. You can try deleting the module folder.
Ok I will delete the module folder but thought Google Drive was what this Colab install instructed to do? I had it running fine all this time, just got this error today.
Thanks for your help
The recommended option for Save_in_Google_Drive is “Small models, images and settings”. This would install A1111 in Colab’s space but save small files and images in your google drive.
You probably have selected saving “everything”. I added this option on request for people who train models so that they don’t need to move the models from colab to google drive. But because of how colab works, it will have problem from time to time.
I am getting this error today
RecursionError: maximum recursion depth exceeded during compilation
I don’t see any error. In what operation?
Once again, very useful article, kudos!
Yes
Hi, I just fixed the issue. Please pull the new copy.
Hello !
I am getting this error while trying to install Stable Diffusion on colab :
ERROR: pip’s dependency resolver does not currently take into account all the packages that are installed. This behaviour is the source of the following dependency conflicts.
torchvision 0.14.1+cu116 requires torch==1.13.1, but you have torch 2.0.0 which is incompatible.
torchtext 0.14.1 requires torch==1.13.1, but you have torch 2.0.0 which is incompatible.
torchaudio 0.13.1+cu116 requires torch==1.13.1, but you have torch 2.0.0 which is incompatible.
fastai 2.7.11 requires torch=1.7, but you have torch 2.0.0 which is incompatible.
and at the end :
RuntimeError: Detected that PyTorch and torchvision were compiled with different CUDA versions. PyTorch has CUDA Version=11.7 and torchvision has CUDA Version=11.6. Please reinstall the torchvision that matches your PyTorch install.
What’s wrong ?
Thanks.
Are you using the notebook in quick start guide?
Are we able to upload a Vae to this workbook?
Yes you can drop them in the corresponding directory using the file explorer panel on the left.
The two released by Stability is already installed at startup.
I am using ngrok, but the public url is not showing.
The message that appears in colab, To create a public link, set `share=True` in `launch()`.
Hi, I just tested, and it works. The ngrok link appears earlier in the log. You may need to scroll up a little to see.
works now
Great! I was going to say I wasn’t able to reproduce the error.
Getting this error:
/content/stable-diffusion-webui
WEBUI ARGUMENTS: –gradio-img2img-tool color-sketch –xformers –enable-insecure-extension-access –gradio-queue –share –gradio-auth a:********
/bin/bash: -c: line 0: syntax error near unexpected token `(‘
/bin/bash: -c: line 0: `python /content//stable-diffusion-webui/launch.py –gradio-img2img-tool color-sketch –xformers –enable-insecure-extension-access –gradio-queue –share –gradio-auth a:*********’
Ok thanks
Any reason this is looking for this directory? mis-spelled?
sed: can’t read /content/drive/MyDrive/AI_PICS/stable-diffusion-webui/reotpositories/stable-diffusion-stability-ai/ldm/util.py: No such file or directory
Thanks for reporting!
A typo was introduced during updates. This is a hack for better memory usage. Otherwise it will be out of memory when using controlnet.
I keep getting this error, is it something on my end?
⏳ Installing Stable Diffusion WebUI …
Tesla T4, 15360 MiB, 15101 MiB
—————————————————————————
NameError Traceback (most recent call last)
in
149
150 get_ipython().system(‘mkdir -p {root}’)
–> 151 os.chdir(root)
152 get_ipython().system(‘apt-get -y install -qq aria2’)
153 get_ipython().system(‘pip install pyngrok’)
NameError: name ‘root’ is not defined
Hi, it is fixed now.
I got this error when running for the first time:
Mounted at /content/drive
⏳ Installing Stable Diffusion WebUI …
Tesla T4, 15360 MiB, 15101 MiB
—————————————————————————
FileNotFoundError Traceback (most recent call last)
in
146 print(‘⏳ Installing Stable Diffusion WebUI …’)
147 get_ipython().system(‘nvidia-smi –query-gpu=name,memory.total,memory.free –format=csv,noheader’)
–> 148 os.chdir(root)
149 get_ipython().system(‘apt-get -y install -qq aria2’)
150 get_ipython().system(‘pip install pyngrok’)
FileNotFoundError: [Errno 2] No such file or directory: ‘/content/drive/MyDrive/AI_PICS’
I wonder what I did wrong.
My bad. The problem is now fixed.
OK, I have added a save “everything” in google drive option. check it out.
Hey, so this is like my pRIMO notebook – problem is – the extensions crash and won’t reload when i use it. is it not meant to save extensions to drive int he extensino folder you provide? Also is it not easier just to impliment what “LAST BEN” does – and literally just install SD to google drive? LOL. Only reason this one’s my primo is ngrok is so mcuh more stable, and i do say i’m quite used to. the cracked set up i ahve XD
After installing some extensions, you need to restart the cell (not just the GUI). You are correct that extensions are not saved in Google Drive because it is problematic for some. Some extensions requires library install and it won’t persist through sessions.
I experimented with installing the whole thing in google drive but it was not faster. The reason is writing to google drive is a lot slower than to colab’s temp storage. Another reason is you don’t need to deal with your previous install because it always starts a fresh copy.
Hello! Wonderful guide, thank you very much for all the work you’ve put into it! I used to be able to use models from my Drive when there were still two boxes under the ‘load models from drive’ section (one box for links, one box for the name of the model itself I believe), but ever since the update I can’t seem to make things work. I’ve tried putting the model (safetensor) into AI_PICS/models, but it won’t appear in AUTOMATIC. Any clues on what I might be doing wrong? Thanks in advance!
Hi, It should be fixed now. Put models in AI_PICS/models.
Can you paste the error message? Mine is ok.
Thanks for the tutorials. Have you tested performance of gpu vs tpu in google colab?
I don’t think it’s supported. The whole software is written with pytorch GPU. Using TPU would need tensorflow.
Great guide! Everything works well, except that I have two problems.
Firstly, when I put a link to the direct download of a model in the “Model_from_URL:” field, it downloads the model during startup and there are no errors. However, when I go into the automatic1111 interface later, I can not select the model on the top left corner. Only the other models that I ticked from the preselected models are visible.
Secondly, When I do inpainting for example with the v1.5 inpainting model and then want to switch to another model, for example f222, the colab program crashes and I only see ^c at the end, basically shutting everything down.
Would be really great if you could help me with these two issues!
Hi, can you check if the url is correct? It should download a large file ( > 2GB) when you put it on a browser. If it is correct, please send me an example URL that doesn’t work.
I haven’t experienced this issue in v1 models. But it looks like a memory issue. It can also happen when you use v2 768px models. One “easy” solution is to use Google Pro, which has a higher RAM limit. But I will look into it.
I think I just found the best tutorial in here. This is a very simple and useful(powerful) note. But I still have a few question:
1. I couldn’t find any installation files on my google drive. Does this mean I need to download all the models again when I re-run this note?
2. After reboot-ui, the connection seems failed and I have to restart the whole thing. Is this normal or I should use ngrok to secure the connection?
3. Local 127.0.0.1 seems not working, I do have local sd-webui but I didn’t run it. Any suggestion?
Thanks again for your efforts to share this wonderful tutorial.
Hi Silver, glad you find this notebook useful! It is an effort to make SD more accessible.
1. Yes, every time you rerun the notebook, it installs and runs a fresh copy. You are correct on downloading models every time. Ideally, you will only check the models you will use to keep the startup time short.
You can add models by stopping the cell, checking more models, and rerunning.
There will be no download if using models on your Google Drive with the custom model field.
2. After rebooting webui, you will get a new link on the colab console. Follow the new link.
3. Localhost is not supposed to work on colab. That’s why you need ngork or radio links.
Was thinking about it, but after some testing, realized the google collab runs about as fast as my PC, so I may run off my Desktop. Do you have a tutorial on Checkpoint merges
Hi, yes a basic one though:
https://stable-diffusion-art.com/models/#Merging_two_models
Is it possible to run a permanent instance using Hugging Face?
I think someone did but very slow.
I see the same error. And the only model he see is “V1-5-pruned”…
Can I train a dreambooth model directly from WebUi interface ?
That’s strange. I recreated your file location and file name and can see the hp-15 model showing up. In the file browser of colab, do you see the file /content/stable-diffusion-webui/models/Stable-diffusion/hp-15.ckpt? If the link exist, it should be there, and you should see it in the model selection dropbox.
You can train dreambooth in webui but not recommended because it is buggy. And it won’t solve this problem.
Download Results:
gid |stat|avg speed |path/URI
======+====+===========+=======================================================
09f50d|OK | 0B/s|/content/stable-diffusion-webui/models/Stable-diffusion/v1-5-pruned-emaonly.ckpt
Status Legend:
(OK):download completed.
ln: failed to create symbolic link ‘/content/stable-diffusion-webui/models/Stable-diffusion/hp-15.ckpt’: File exists
This appears to be not your first time running the notebook after connection because the link to your model has already been created.
You should be able to see and select hp-15 model in the model dropdown menu. can you?
Do you see error if you restart the colab notebook runtime?
Hello Andrew !
Wow amazing work here 🙂 Thank’s a lot !
Need some help to get my own dreambooth finetuned model (hp-15.ckpt) downloaded…I am not able access it from the WebUi.
The file is in my Google Drive – AI_PICS/stable-diffusion-webui/models/hp-15.ckpt
Any idea ?
Thanks !
Henri
Hi Henri, putting “AI_PICS/stable-diffusion-webui/models/hp-15.ckpt” to custom_model field should work… What’s the error message on the Colab notebook?
Quick Start Guide website doesn’t have any link for Colab???? Did you forget to put it inside?
Hi, after downloading the Quick Start Guide, you should see Option 2: Google Colab. There’s a highlight box with an hyperlink icon, and a link to the Colab notebook.
Hi thank you for sharing these very useful stuffs!
I have a question: I noticed that the current Colab will use v1-5-pruned-emaonly.ckpt version of stable diffusion instead of the original v1-5-pruned.ckpt. I tried to install model from URL https://huggingface.co/runwayml/stable-diffusion-v1-5/blob/main/v1-5-pruned.ckpt but it sent me an error like this:
Loading weights [716604cc8a] from /content/stable-diffusion-webui/models/Stable-diffusion/v1-5-pruned.ckpt
loading stable diffusion model: UnpicklingError
How are we suppose to use the non-emaonly version?
Hi, I believe the URL is incorrect. If you go to this URL, it will go to a webpage instead of downloading the model. (Note that a huggingface link for a model file is …../blob/resolve/…. instead of …./blob/main/….. Go to this page and copy the link that actually downloads the model should work.
A side note: I believe the result are the same between this version and ema-only. ema-only is a smaller file. The original one contains two sets of weights which you don’t need unless you are training your own model.
Thank you!
Hey,
under “Train” -> “Preprocess images”: How do i define the path to “Source directory” and “Destination directory” ?
source dir is a directory containing your images in google colab environment. Destination directory is an output directory you.
Check out automatic1111’s documentation on github.
– Thanks for the clarification, now I can work in peace 🙂
– For #2, is there a way to determine what model version one deals with? For example, if you look at `rachelwalkerstylewatercolour ` referenced earlier, there is no version number or anything like it. I tried it with my 2.1 setup and it didn’t work, but I don’t know the root cause (could be something I misconfigured, or maybe it won’t work in principle). Is there a checklist for what to look at? (e.g., is it for the same image size? is it compatible with my version of SD? etc.)
– Re: GIMP I am specifically interested in a workflow that occurs entirely inside GIMP, so there is a single UI for everything, without a need to save intermediate images and move them around. This would save a lot of time.
I use SD to produce illustrations for a children’s poetry book that I write. When there’s less moving around between windows, it is easier to maintain focus on the creative part of the equation.
Hi Alex, I just checked the rachelwalkerstylewatercolour model. It is v1. I was able to download the ckpt file to the model directory and load without issue.
Potentially we can look at the network structure but its a hassle to do manually. I usually look at the file size. Because most are using the same tool to produce, v1 models are either 2 or 4 GB.
1. Can you also explain how to correctly start it up after, say, an overnight break? I followed other guides I found online and they work well for the first time. But if I run the notebook again – various errors occur (e.g., some files already exist, etc.) – so I am never able to smoothly resume work, except by deleting everything, creating a new Colab notebook, etc. There definitely ought to be a better way to do it.
2. When dealing with custom models at step 5 – how do I know which ones would be compatible? For example, I want to use this one: huggingface.co/BunnyViking/rachelwalkerstylewatercolour along with SD 2.1, would it work out? My previous attempt to do so resulted in some cryptic Python errors that didn’t make sense to me, so I am under the impression that I cannot arbitrarily combine models, that there are requirements that need to be taken into account.
p.s. I’ve been following your tutorials so far and they’re quite informative, thank you for your work. I’d be interested in materials that explain how to integrate this into GIMP in tandem with SD running on Colab. There are various guides that cover this topic, but the ones on your site actually work without having to improvise and do all sorts of acrobatics to cover the gaps – I’d like to read YOUR tutorial about it.
Hi Alex,
1. This notebook can be run again after it is disconnected, say overnight. You don’t need to change anything. Every time it runs, it pulls the latest version of AUTOMATIC1111.
2. The ones that are available for selection in the notebook are compatible. All you need to do is to check the box next to one. It’s a bit more set up if you want to install ones that are not on the list. Installing v2 model is similar to installing 2.1, you will need a config file with the same name. See:
https://stable-diffusion-art.com/install-stable-diffusion-2-1/
For installing v1 models, see
https://stable-diffusion-art.com/models/#How_to_install_and_use_a_model
Re: Using GIMP with SD
I have written this tutorial for end-to-end workflow, with some steps using GIMP
https://stable-diffusion-art.com/workflow/
Are there any special topics you are interested in?