Do you know you can specify the prompts for different regions of an image? You can do that on AUTOMATIC1111 with the Regional Prompter extension.
In this post, you will first go through a simple step-by-step example of using the regional prompting technqiue. Then you will learn more advanced usages of using regional prompting together with ControlNet.
Table of Contents
Software
We will use AUTOMATIC1111 Stable Diffusion GUI. You can use this GUI on Windows, Mac, or Google Colab.
Installing Regional Prompter extension
Colab Notebook
Installing Regional Prompter extension in the Colab Notebook in the Quick Start Guide is easy. All you need to do is to check the Regional Prompter extension.
Windows or Mac
Follow these steps to install the Regional Prompter extension in AUTOMATIC1111.
- Start AUTOMATIC1111 Web-UI normally.
- Navigate to the Extension Page.
- Click the Available tab.
- Click Load from: button.
- Find the extension “Regional Prompter”.
- Click Install.
- Restart the web-ui.
A simple example
Let’s go through a simple example. I will use a very simple prompt in order to illustrate the effect.
Let’s say you want to generate a man and a woman in the same image. Using the simple prompt
a man and a woman
and the negative prompt
disfigured, ugly
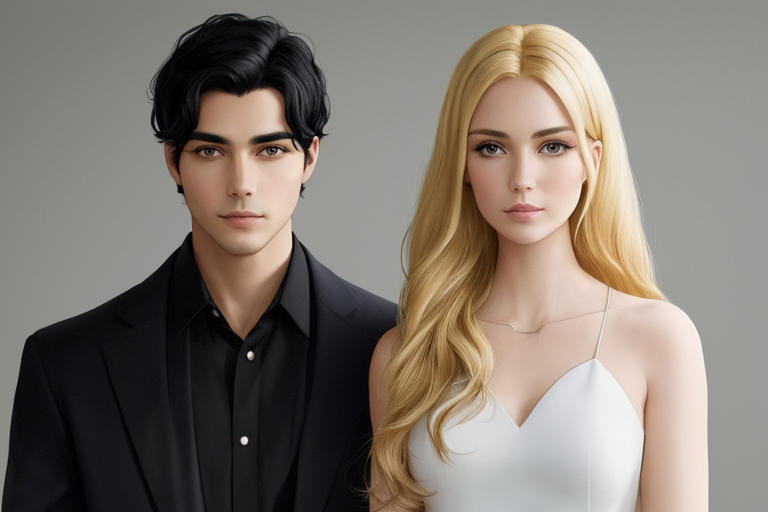
We get… a man and a woman.
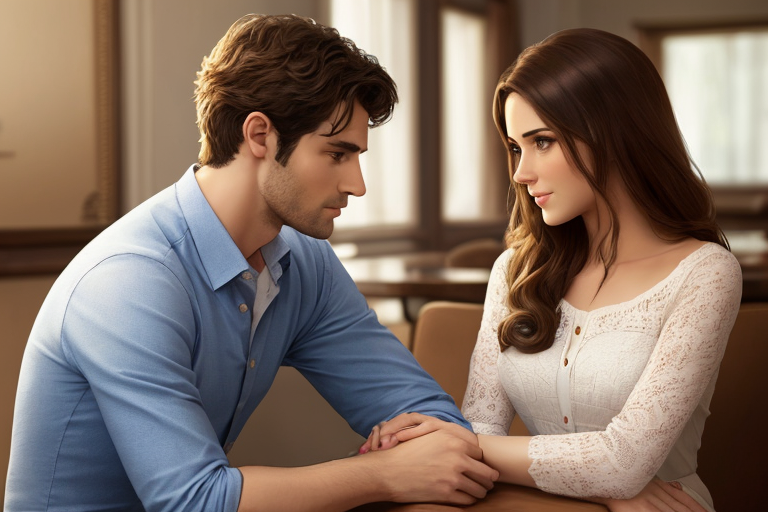
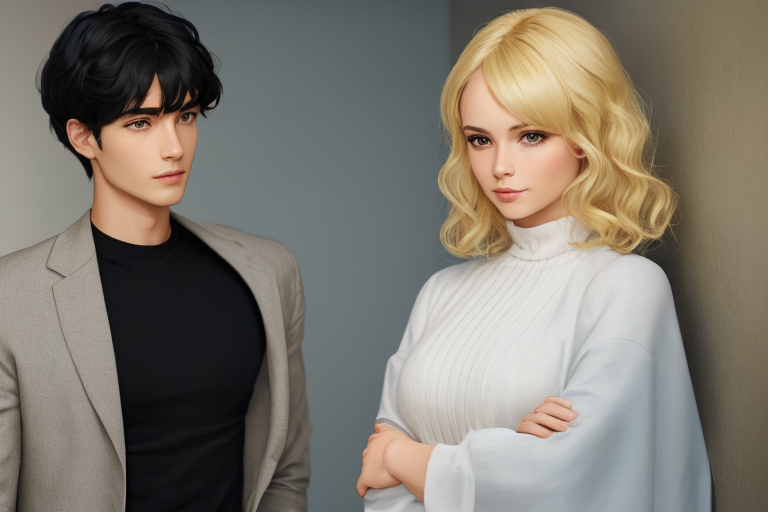
So far so good. But what if you want to be more specific? Like generating a man with black hair and a woman with blonde hair? Naturally, you write that in the prompt.
a man with black hair, a woman with blonde hair
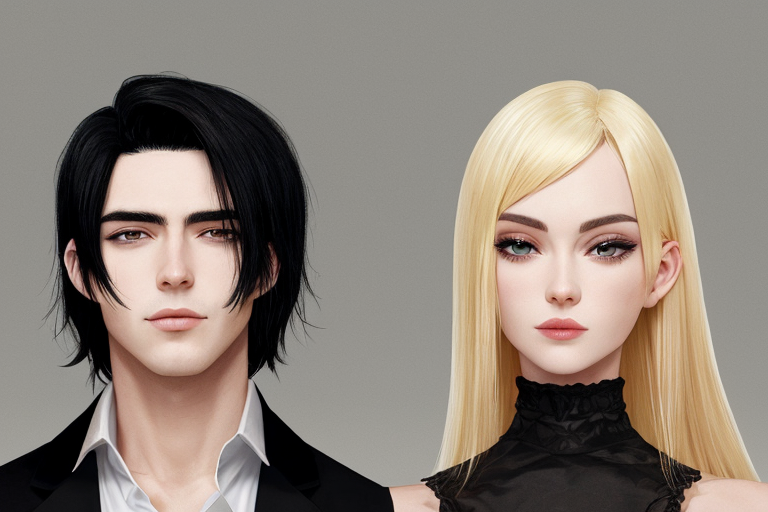
You will get what you describe sometimes, but more often than not Stable Diffusion confuses which hair color should go with whom. The situation will be even more difficult if you want to further specify the color of the clothing, etc.
What happened? Why can’t Stable Diffusion do even this simple thing? The self-attention mechanism incorrectly associates the hair color and the person.
There’s a solution to this problem: specify the prompt for a black-haired man only to the left-hand side of the image and the blonde-haired woman to the right-hand side of the image.
Regional Prompter
To use the Regional Prompter extension:
- Unfold the Regional Prompter section on the txt2img page.
2. Check Active to activate the regional prompter.
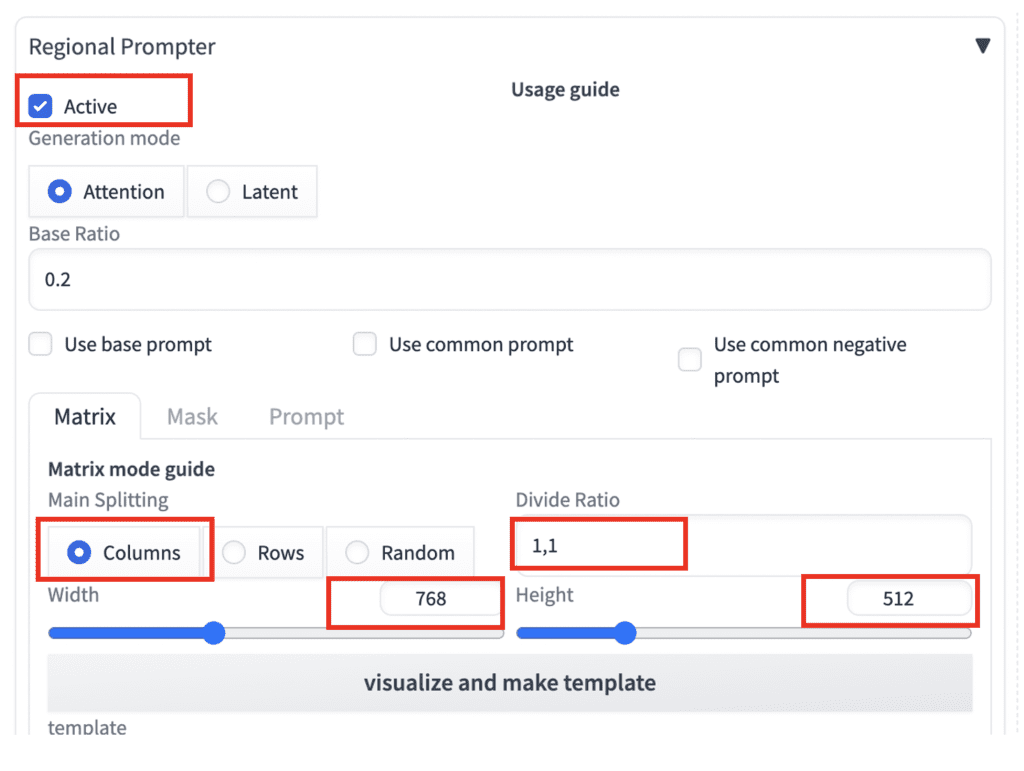
3. Most default settings are good to go with this example. Check the following settings.
- Main Splitting: Columns
- Divide Ratio: 1, 1
- Width and Height: They have to match the txt2img setting.
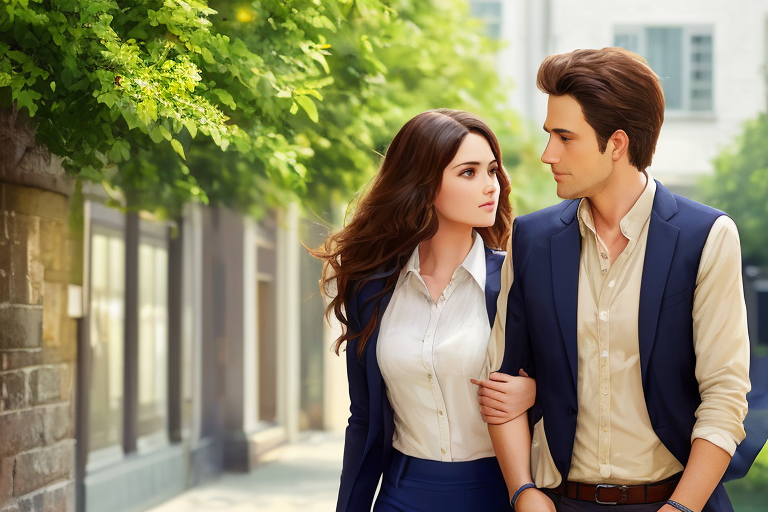
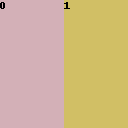
4. Click visualize and make template. You will see an image with two regions: region 0 is on the left, and Region 1 is on the right. They are divided equally in the 1-to-1 ratio.
5. Put in the prompt
a man and a woman, a man with black hair
BREAK
a man and a woman, a woman with blonde hair
The BREAK keyword separates the prompts. We have two prompts above. The first prompt will be applied to region 0. The second prompt will be applied to region 1.
Negative prompt:
disfigured, deformed, ugly
Since there’s no BREAK in the negative prompt, the whole prompt will be applied to both regions.
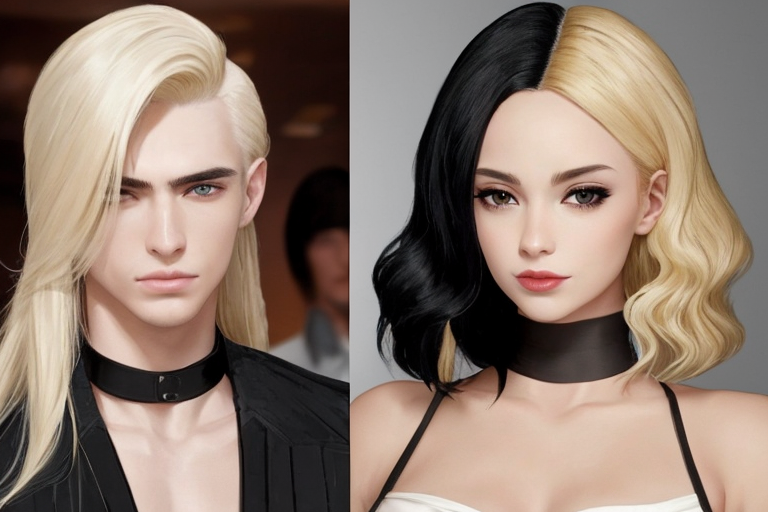
These are what we get:
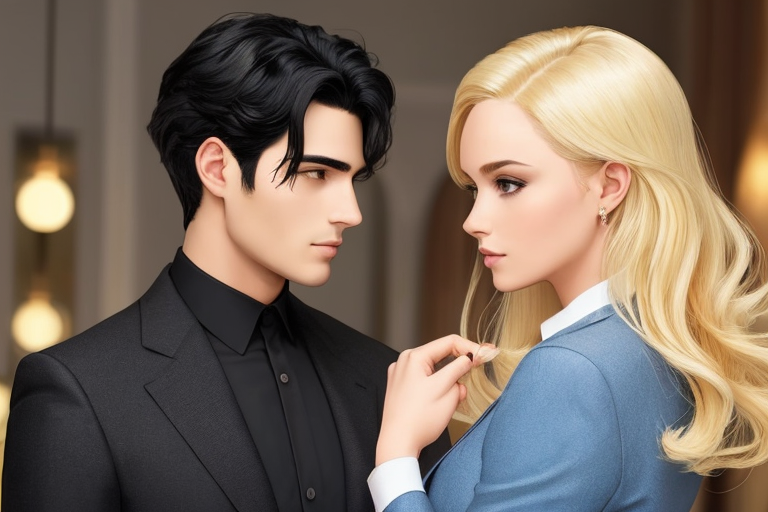
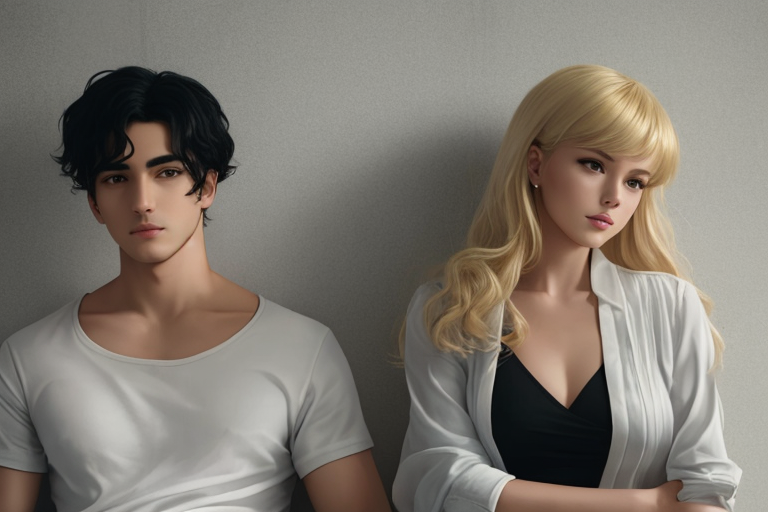
Stable Diffusion correctly generates a man with black hair in region 0 (left) and a woman with blonde hair in region 1. (right)
Note that this doesn’t work 100% of the time. In my experience, it’s more like 75% of the time. But still, it’s much better than leaving it to pure chance.
Common prompt
You may have noticed the two prompts shared a common part “a man and a woman”.
a man and a woman, a man with black hair
BREAK
a man and a woman, a woman with blonde hair
Why do you need the common prompt? Stable Diffusion will only generate one person if you don’t have the common prompt:
a man with black hair
BREAK
a woman with blonde hair
Why? Both prompts for the left and the right regions describe a single person. So you get… one person! You need to tell Stable Diffusion that this is a picture of two persons: a man and a woman.
That’s why you need a common prompt, “a man and a woman”.
Unlike this toy example, the common prompt is typically pretty long. Instead of writing it out in each region, there’s a convenient way to deal with this.
- Check the option Use common prompt.

2. Now you can add the common prompt (a man and a woman) at the beginning.
a man and a woman
BREAK
a man with black hair
BREAK
a woman with blonde hair
We have three prompts above: (1) common prompt, (2) prompt for region 0, and (2) prompt for region 1.
The common prompt is added to the beginning of the prompt for each region.
The common prompt is just a syntactic sugar. Using it is equivalent to what we had in the original prompt:
a man and a woman, a man with black hair
BREAK
a man and a woman, a woman with blonde hair
More complex regions
The secret of mastering Regional Prompter is to define regions accurately. In this section, I will explain how to set the divide ratio correctly to break up the image the way you want. It could be difficult to understand or remember how to specify the regions correctly. You can always click visualize and make template to generate the region image to confirm.
In one-dimensional division, you can divide the regions horizontally or vertically.
Horizontal division
To divide the regions horizontally, select Columns in Main Splitting. A number separated by commas represent each region. The number represents the size of the region.
Examples of Divide Ratio:
1,1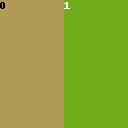
1,1,1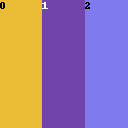
1,2,1
Vertical division
The Rows splitting is similar, except the regions are in rows. Below are some examples of the divide ratio.
1,1
1,1,1
1,2,1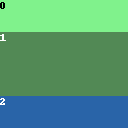
2D regions
You can divide the region both vertically and horizontally in the same image. Select the Columns splitting. The rules are
- Rows are separated by
; - Each row is a series of numbers separated by commas, e.g.
1,1,1 - The first number in each row represents the height of the row. The subsequent numbers represent the width of the regions.
Let’s look at a few examples.
1,1,1; 1,1,1This defines two rows, with each row of height 1. Both rows have two regions with equal widths (1,1).
There are 4 regions in total.
1,1,1; 2,1,1- This defines two rows.
- The height of the first row is 1. The height of the second row is 2.
- Each row has two regions with equal widths (1,1).
- There are 4 regions in total.
Finally, let’s look at a more complicated example. If you understand this, you understand everything about region division!
1,1,1,1; 2,1,2- There are two rows.
- The height of the first row is 1. The height of the second row is 2.
- The first row has 3 regions with widths 1. (1,1,1)
- The second row has two regions with widths 1 and 2. (1,2)
- There are 5 regions in total.
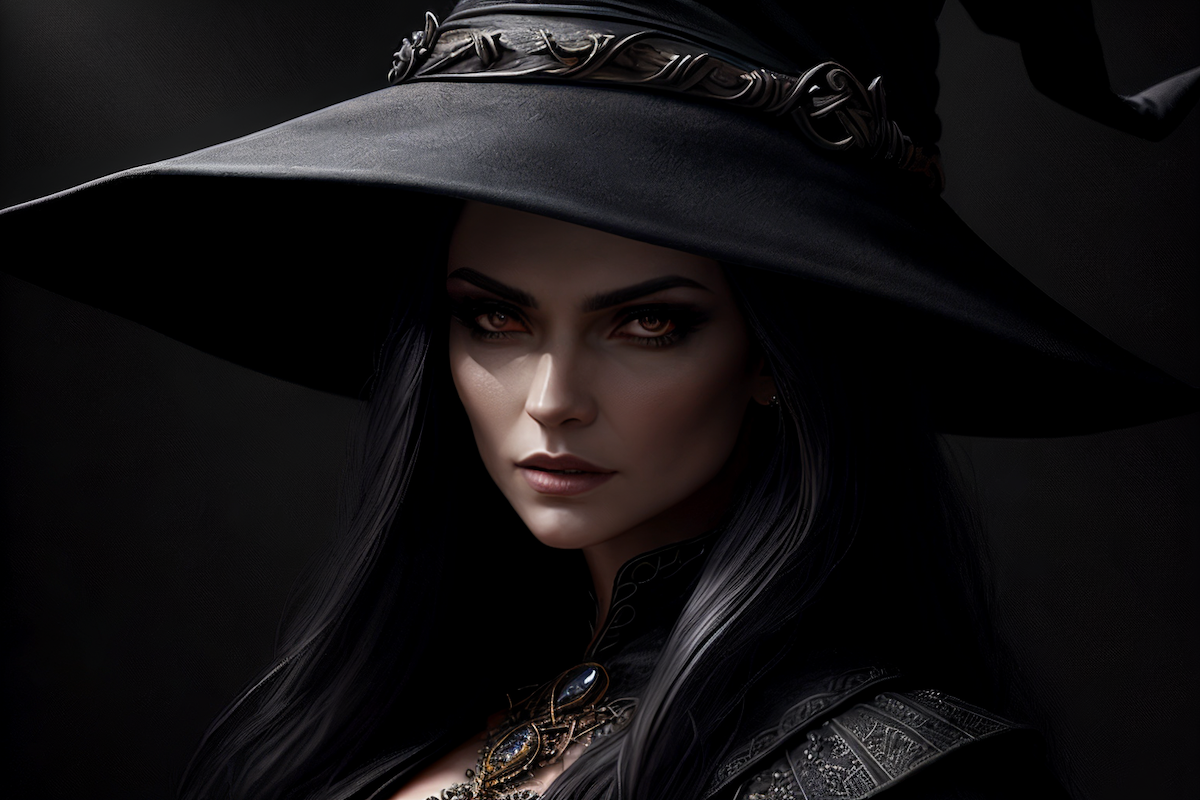
A 2D regional prompting example
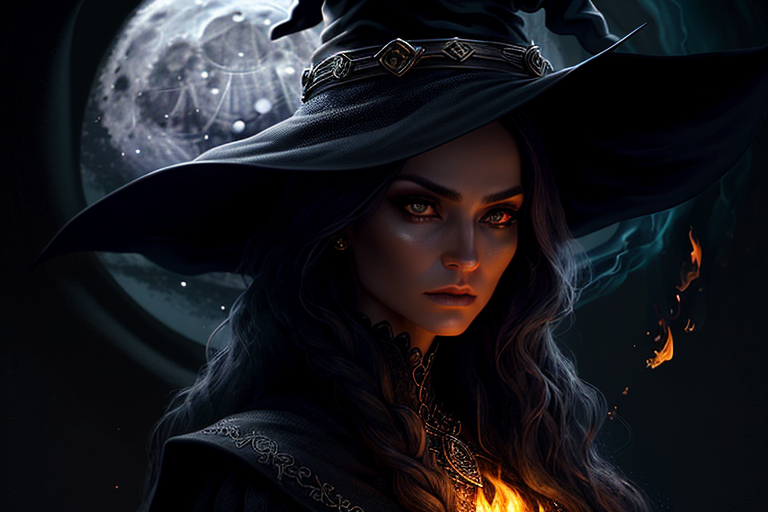
Let’s say I am trying images for real. I came up with the following prompt.
Model: Lyriel v1.5
Prompt:
a witch, highly detailed face, half body, studio lighting, dramatic lighting, highly detailed clothing, looking at you, mysterious, dramatic lighting, (full moon:1.3), (beautiful fire magic: 1.2)
Negative prompt:
underage, immature, disfigured, deformed
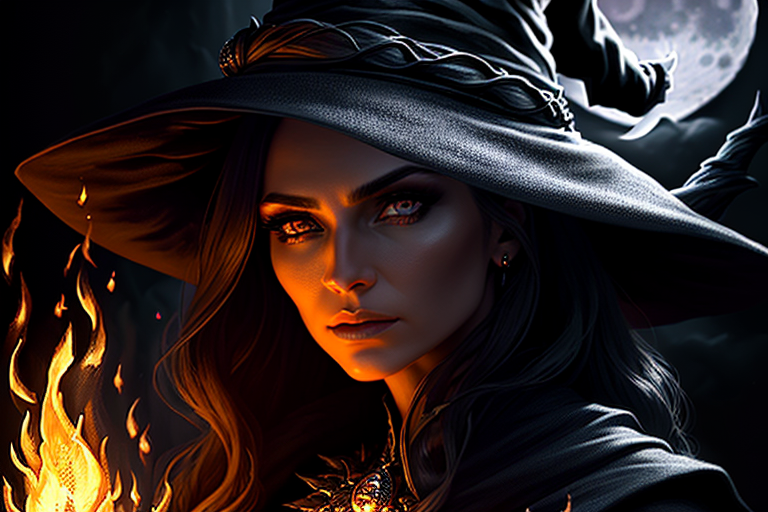
We get some decent images like the following.
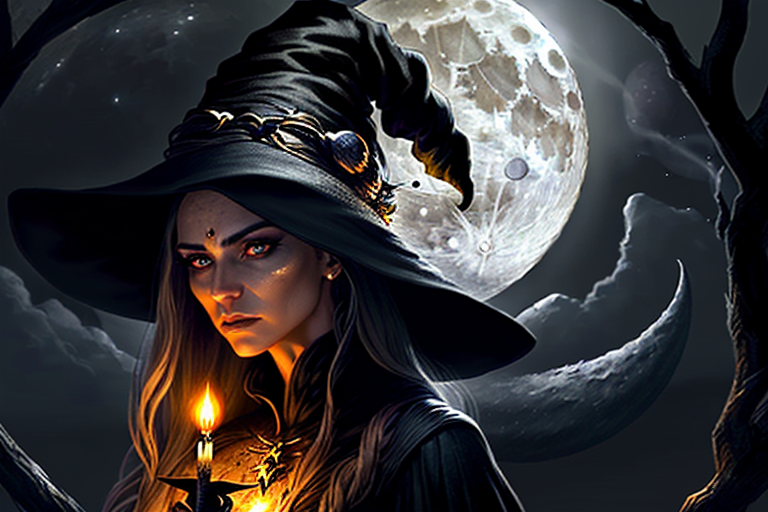
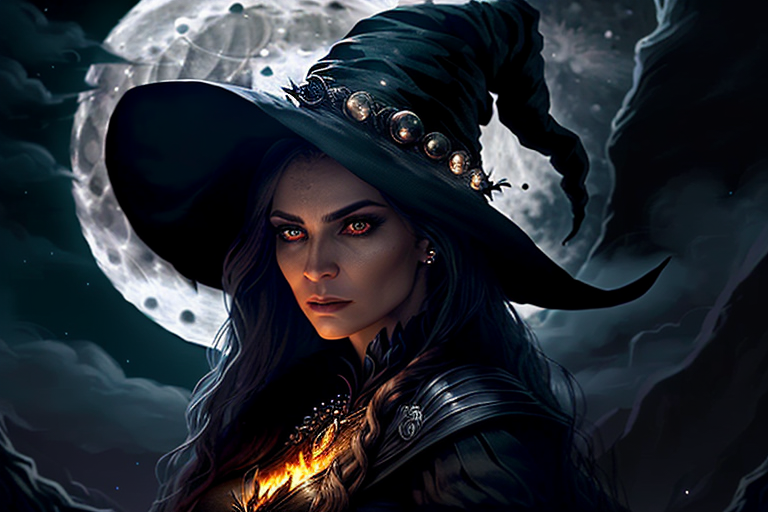

Not bad, but there’s no way to control where the moon and the fire are. All you can do is keep hitting the Generate button until you get the placements you want.
This is where the Regional Prompter can help.
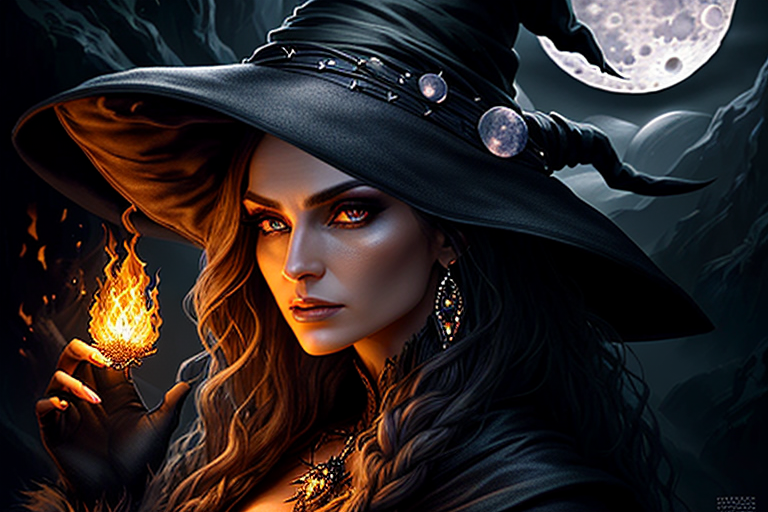
Use the following settings:
- Main Split: Columns
- Use common prompt: Yes
- Divide ratio:
1,1,1;2,1,1
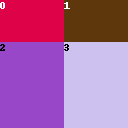
Prompt:
a witch, highly detailed face, half body, studio lighting, dramatic lighting, highly detailed clothing, looking at you, mysterious, dramatic lighting
BREAK
(full moon:1.3)
BREAK
BREAK
BREAK
(beautiful fire magic: 1.2)
This put the moon in region 0 (top left) and the fire in region 3 (bottom right).
We now have control over the positions!
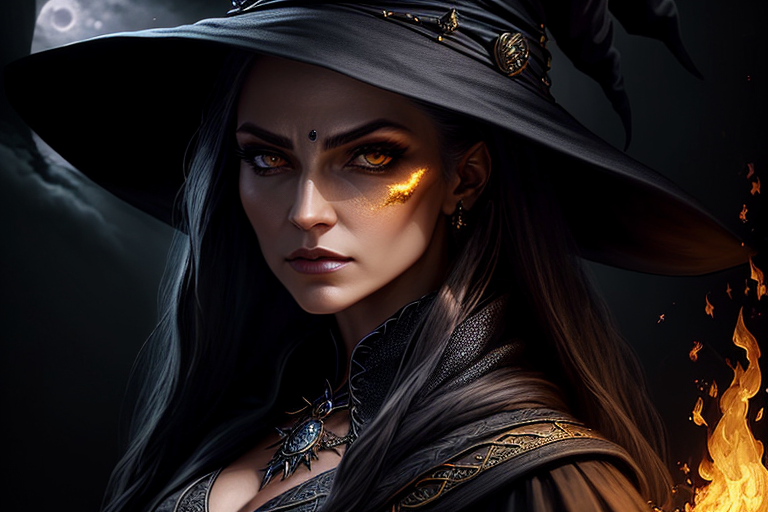
Let’s put the moon at the top right (region 1) and fire at the bottom left (region 2).
a witch, highly detailed face, half body, studio lighting, dramatic lighting, highly detailed clothing, looking at you, mysterious, dramatic lighting
BREAK
BREAK
(full moon:1.3)
BREAK
(beautiful fire magic: 1.2)
BREAK
See the moon at the top right and the fire at the bottom left.
Again, you should be aware that regional prompting does not work 100% of the time. So, generate at least a few images at a time.
Region prompting with ControlNet
Regional prompter can specify prompts for each region but cannot control overall image composition. Well, we have a tool that can do precisely that: ControlNet.
Let’s go through two examples of using Regional Prompter and ControlNet together to achieve the degree of manipulation that we can only dream of without them.
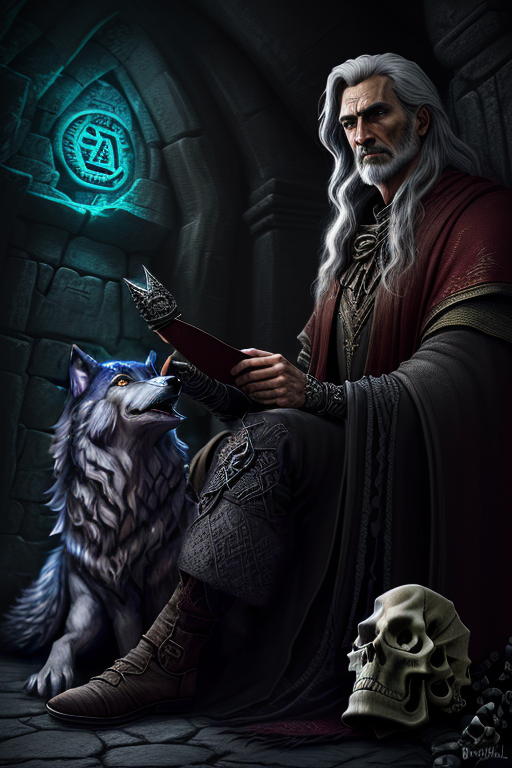
Let’s say you want to generate an image of a wizard studying an old scroll in a small cellar space. In addition, you want to have a wolf next to him and some skulls on the floor.
That’s a lot of elements to take care of. You will see a range of compositions using the regular text-to-image.
Text-to-image
As a clueless Stable Diffusion user, I put in this prompt and hope for the best.
a mysterious wizard , highly detailed face, highly detailed clothing, cinematic, dark, horror, worn stone wall, ancient symbol, old mystical torn scroll, wolf, many skulls
Negative prompt:
underage, immature, disfigured, deformed
Model: Lyriel v1.5
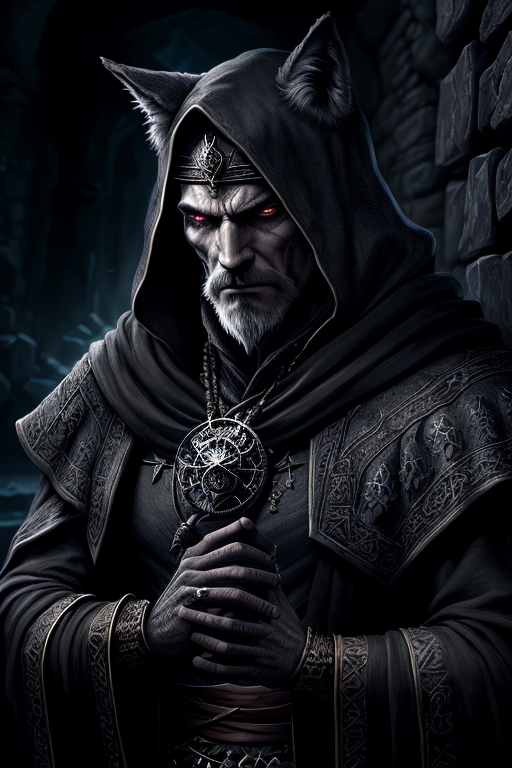
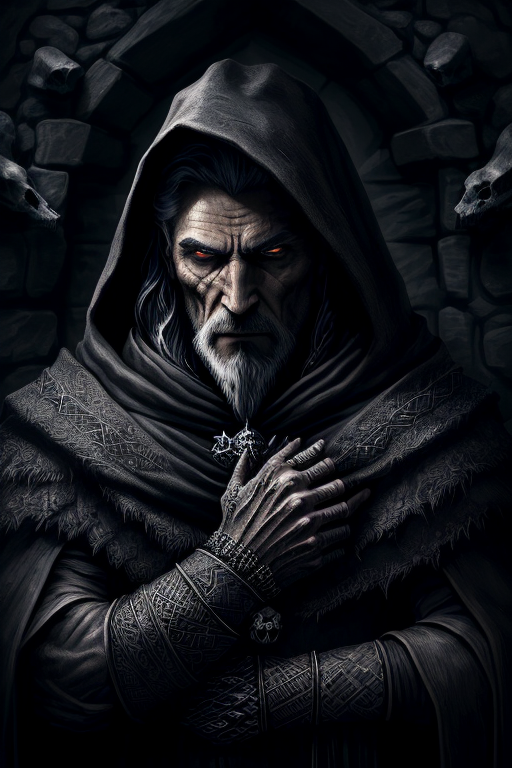
These are decent images, thanks to my prompting skill. (!)
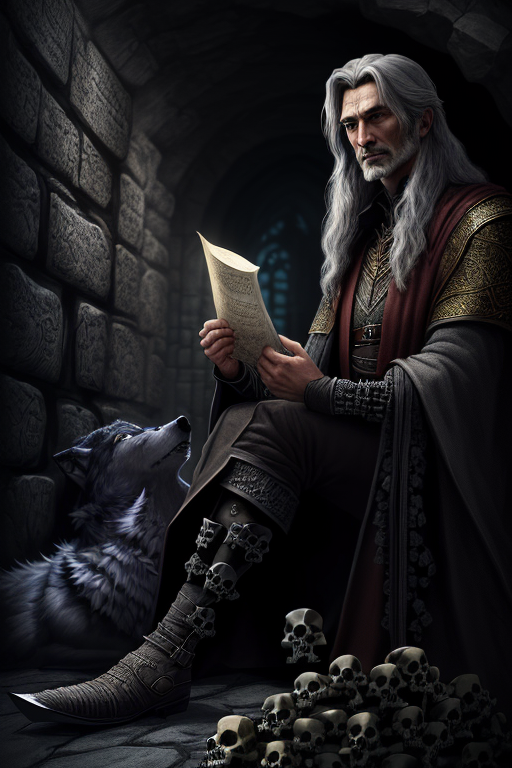
But that’s not quite what I wanted to generate. Maybe I didn’t say clearly he’s studying a scroll. Let’s rearrange the prompt a bit.
a mysterious wizard studying old mystical torn scroll, highly detailed face, highly detailed clothing, cinematic, dark, horror, worn stone wall, ancient symbol, wolf, many skulls
Now it’s closer to what’s in my mind. But I have little control over the Wizard’s pose and how close it zooms in.
Adding ControlNet
Naturally, the next step is to control the pose using ControlNet. I assume you already have it installed and know the basics.
I will guide you through using it in this workflow. Read the ControlNet article if you want to learn more.
I will use this stock image as a reference.
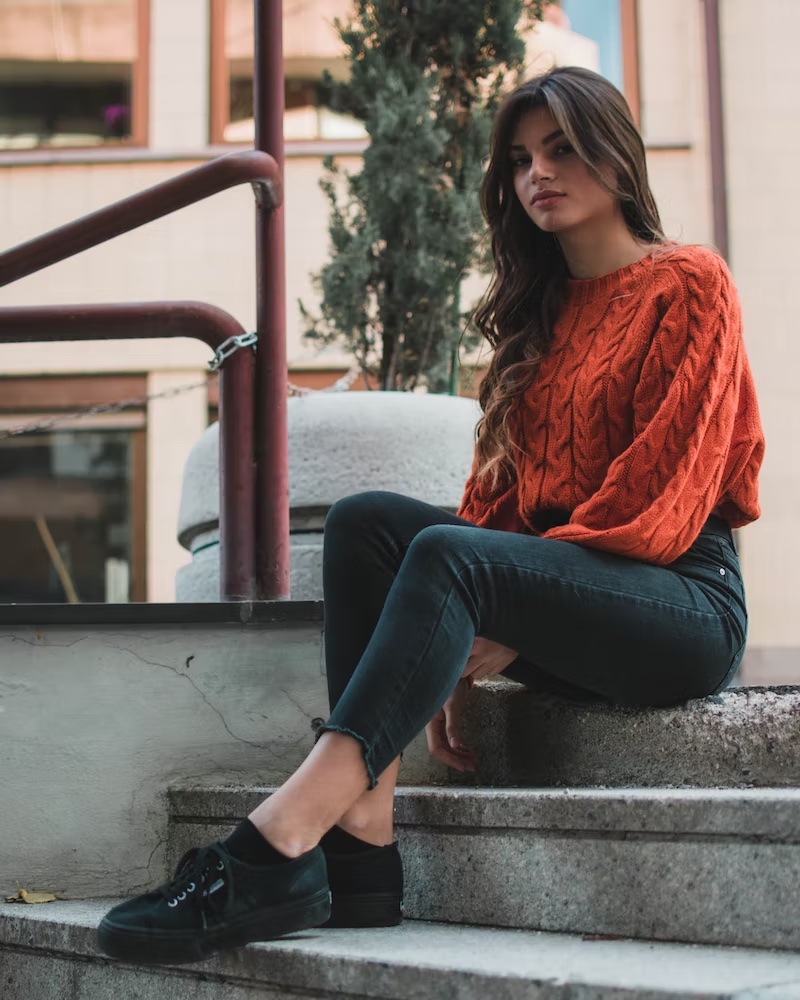
Step 1. Upload the reference image to the image canvas. You can drag and drop the reference image there.
Step 2. Check Enable.
Step 3. Select openpose in the Preprocessor dropdown menu.
Step 4. Select control_opepose in the Model dropdown menu.
Optionally, preview the extracted pose by performing the following steps.
- Check Allow Preview.
- A new icon that looks like an explosion will appear next to the Model dropdown menu. Click on the icon to preview the pose.
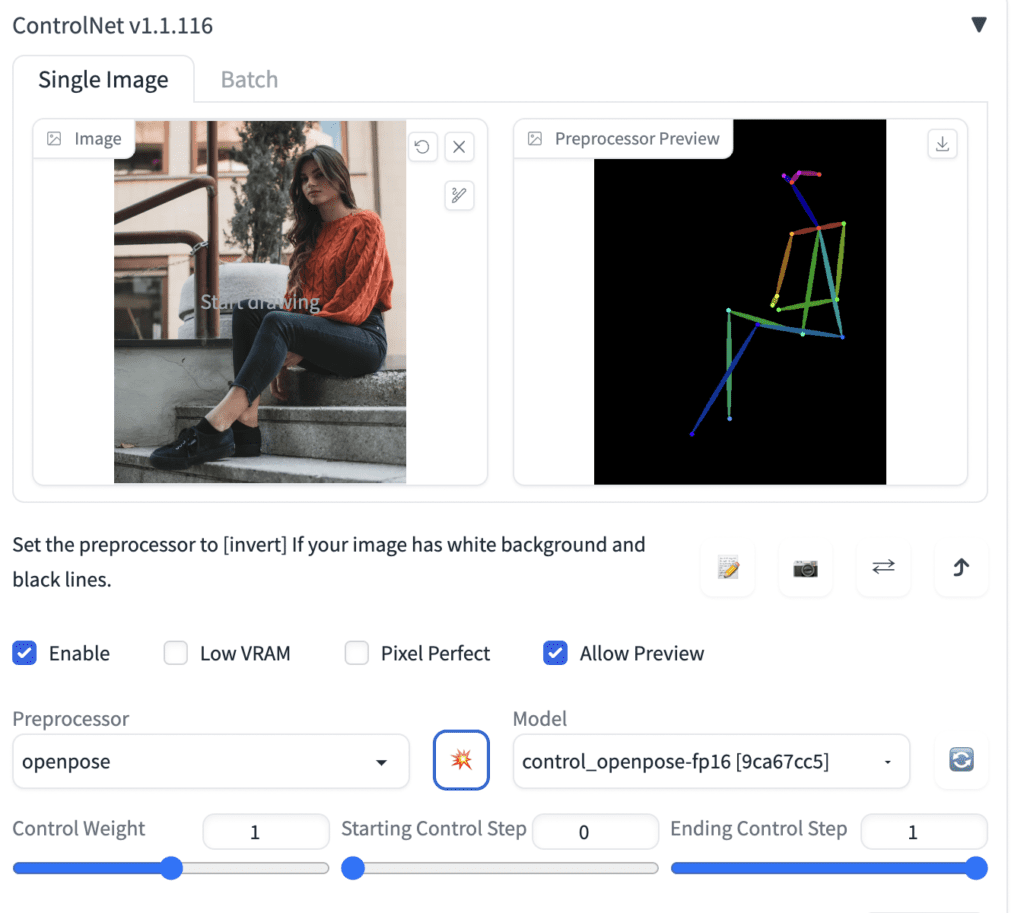
Press Generate to generate images with ControlNet.
Here’s what we get.
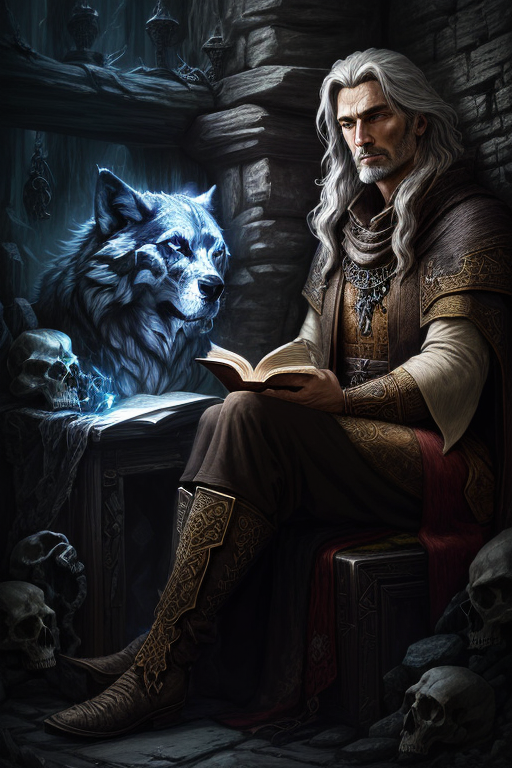
Now it’s one step forward. We have fixed the wizard’s pose. He now always sits down and shows his full body.
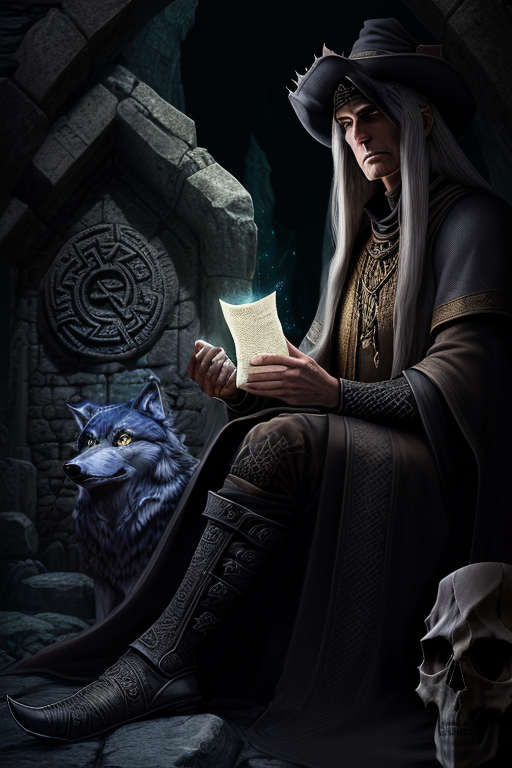
But it still lacks a mechanism to specify the prompts in certain areas. You probably know what I am going with. That’s right, add regional prompts!
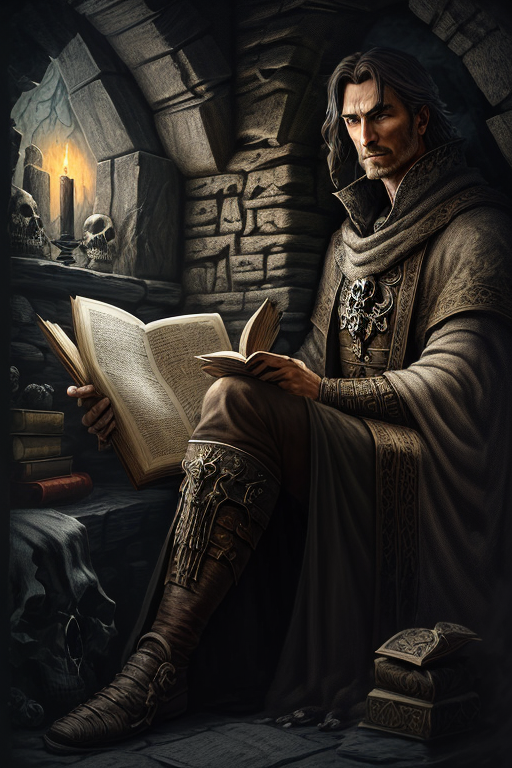
Adding regional prompts
Now, activate the Regional Prompter extension by checking the Active checkbox.
We will still use the Horizontal Divide mode.
Check Use common prompt.
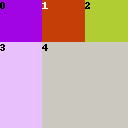
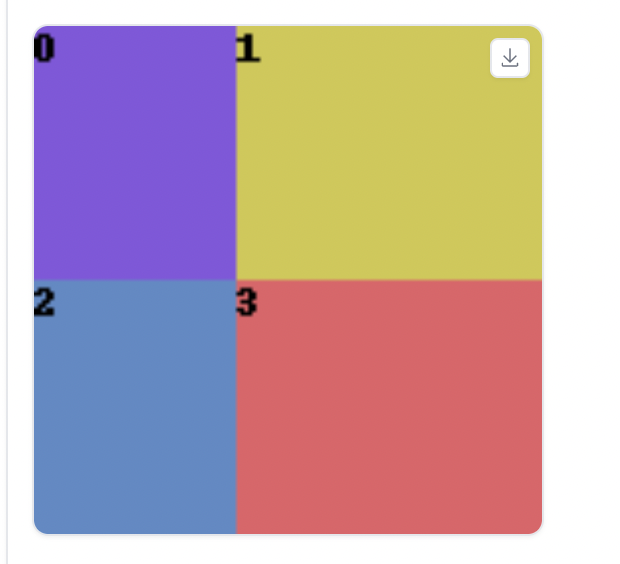
We will divide the image into 4 regions. The Divide Ratio is
1,1,1.5; 1,1,1.5
The 4 regions are like this.
We want to have the following:
- Whole image: a wizard
- Region 0: a stone wall with ancient symbols
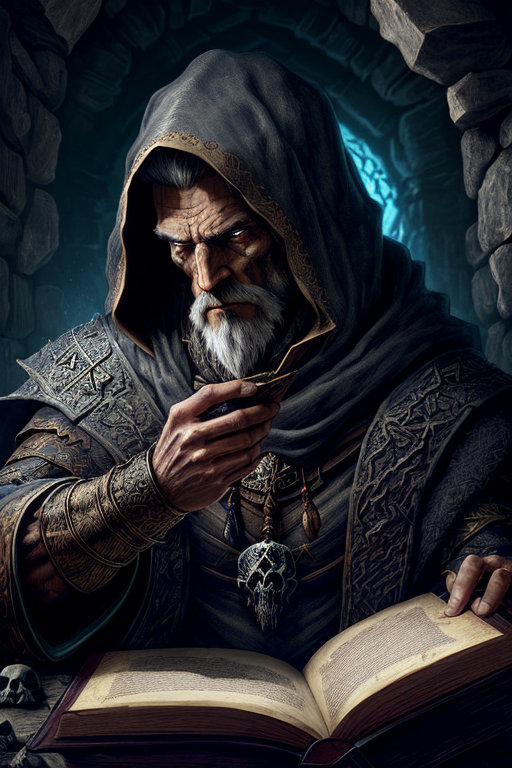
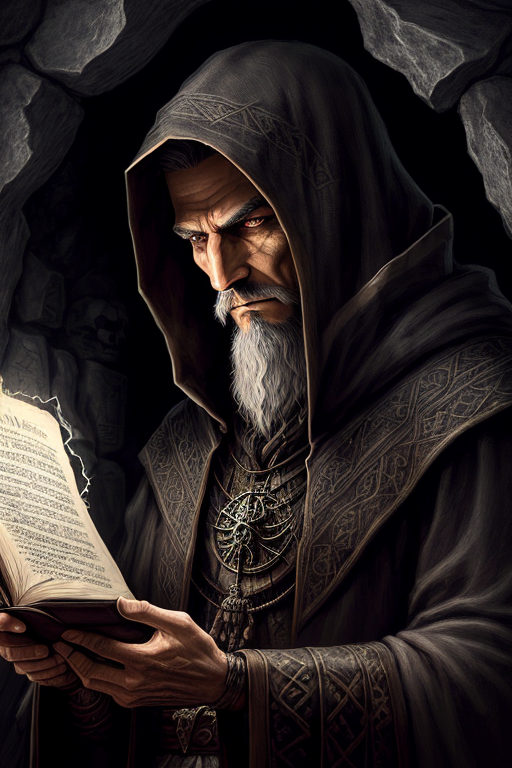
- Region 1: wizard reading a scroll
- Region 2: a wolf beside a stone wall
- Region 3: some skulls
So, the prompt is
a mysterious wizard , highly detailed face, highly detailed clothing, cinematic, dark, horror
BREAK
worn stone wall, (ancient symbols :1.3)
BREAK
old mystical (torn scroll :1.2)
BREAK
worn stone wall, (wolf:1.5)
BREAK
(many skulls:1.5), blurry
Note that I increase the weights of some keywords. Otherwise, the objects may not show up.
Now you have complete control of where the dog, the skull, and the mystical symbol are. See the images below.
Correct color assignment
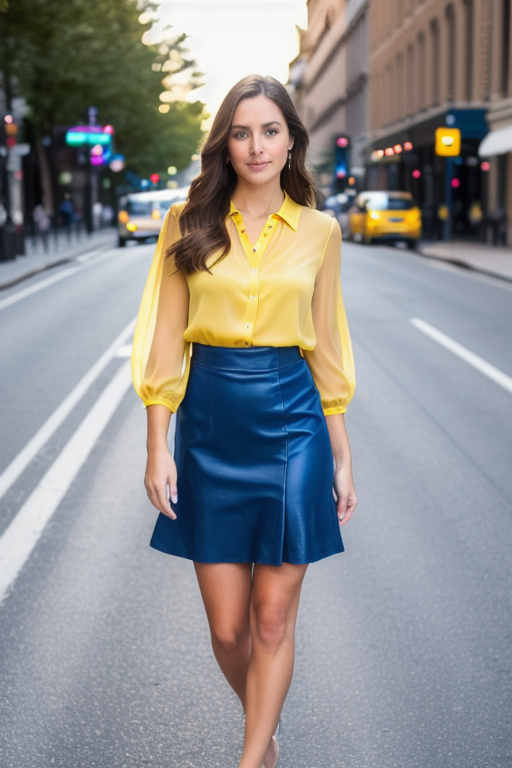
Let’s say you want to generate some photoshoots of a woman with brown hair, a yellow blouse, and a blue skirt. Sounds easy?
You will know this is a challenge if you have tried generating something like that.
Let’s see some examples with the following prompt. (Modified from the Realistic People tutorial)
full body photo of young woman, natural brown hair, yellow blouse, blue skirt, busy street, rim lighting, studio lighting, looking at the camera, dslr, ultra quality, sharp focus, tack sharp, dof, film grain, Fujifilm XT3, crystal clear, 8K UHD, highly detailed glossy eyes, high detailed skin, skin pores
disfigured, ugly, bad, immature, cartoon, anime, 3d, painting, b&w
Model: Realistic Vision v2
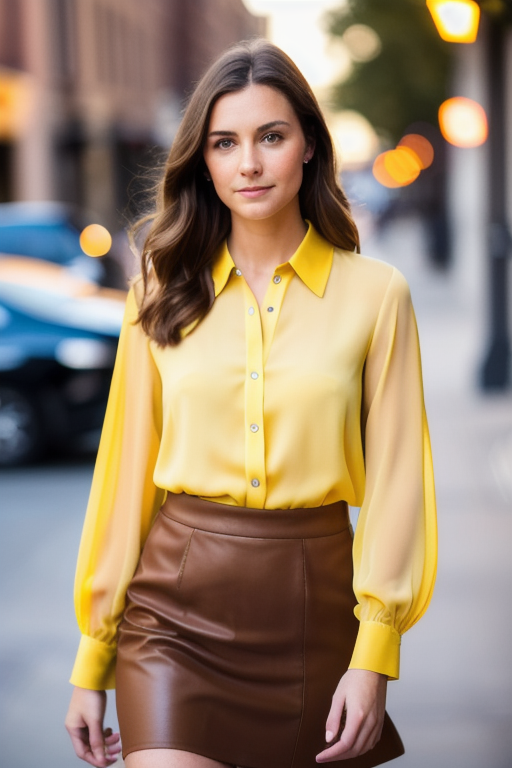
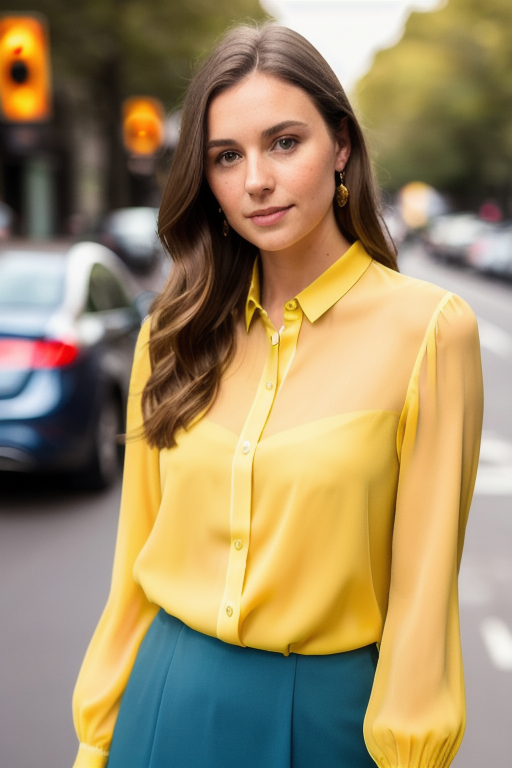
Stable Diffusion improvised! The colors are all mixed up.
You will see it’s not that easy to tell Stable Diffusion which color should go where. The self-attention of the prompt tokens does not work well here.
You will get a correct assignment by chance. But I would rather use that chance to get a good composition…
Regional Prompter
The color assignment is something the regional prompter can help with. Let’s divide the image vertically into 3 parts.
Main Splitting: Rows
Divide ratio: 1, 1, 1.5
Use common prompt: Yes
Prompt:
full body photo of young woman, busy street, rim lighting, studio lighting, looking at the camera, dslr, ultra quality, sharp focus, tack sharp, dof, film grain, Fujifilm XT3, crystal clear, 8K UHD, highly detailed glossy eyes, high detailed skin, skin pores
BREAK
natural brown hair
BREAK
(yellow blouse: 1.3)
BREAK
(blue skirt: 1.3)
The negative prompt is the same:
disfigured, ugly, bad, immature, cartoon, anime, 3d, painting, b&w
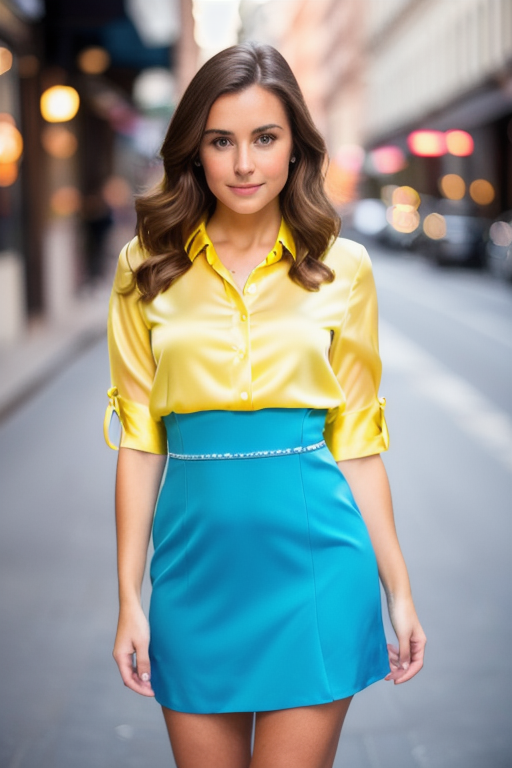
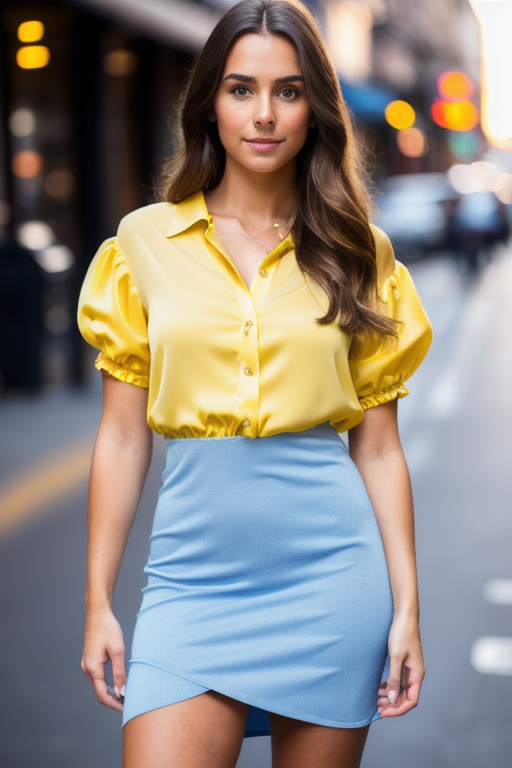
Very nice! Regional prompts are effective solutions to the color assignment problem.
Use ControlNet Pose to get even more control.
Regional Prompter as a creative tool
We are blessed with Stable Diffusion in our hands. Regional prompter gives you the ability to prompt at different parts of the image. Let’s think about making something new! Create some visual effects that were not possible before!
Below is an example of dividing an image of a nature scene into four parts horizontally and assigning different weather to each part.
Divide mode: Horizontal
Divide ratio: 1,1,1,1
Use common prompt: Yes
Model: Lyriel v1.5
Prompt:
a beautiful wild park, path to freedom, courage and love, national geographic photo of the year
BREAK
spring, trees, birds, green grasses, (sunny, wild flowers:1.2), god ray, clear sky
BREAK
cloudy, dry
BREAK
thunderstorm, rain
BREAK
winter, heavy snow, barren trees
Negative prompt
BREAK
snow
BREAK
BREAK
BREAK
BREAK
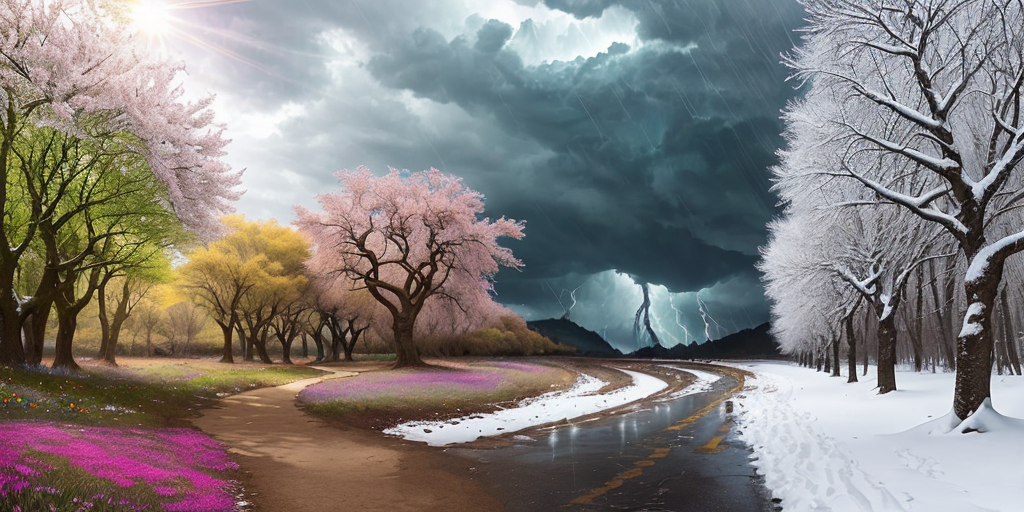
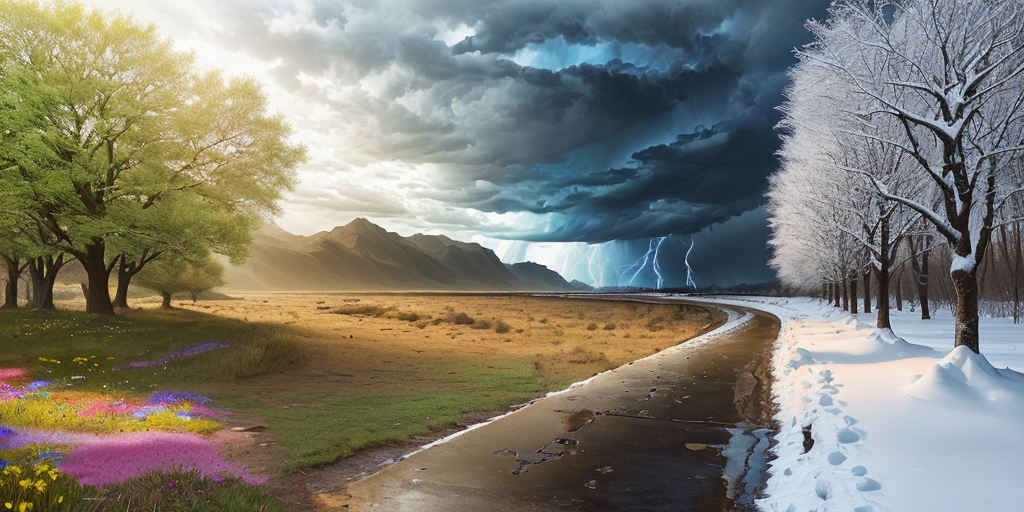
I’m sure you can be more creative than I am. Let your ideas flow and start experimenting!
Final notes
- Increase the weight of a keyword if you don’t see the object.
- It’s pretty normal to get an imperfect image. Fix it up here or there with inpainting. Unlike many other extensions, Regional Prompter shares settings between txt2img and img2img. So make sure to uncheck Active if you don’t want to use it for inpainting.
- This extension has more functions than the ones I have gone through. See the regional prompter GitHub page to learn more.
- There’s an earlier plugin called Latent Couple that does something similar. Regional Prompter is getting updated and has some extra functions.
- Experiment with Attention and Latent generation mode to see which one works best for you. (Attention works pretty well for me.)
I’m still getting extensive LoRA bleed between characters following this tutorial in Automatic1111. Very frustrating. 🙁
“Again, you should be aware that regional prompting does not work 100% of the time.”
Actually it doesn’t work anyway, 100% of the time. You have more chances to put things in desired position by chance than using this crap.
Hi,
I’m having trouble installing Regional Prompter. I’m working in Forge on Collab. I used the extensions tab to find and install it. The list shows that it is installed and all the files are in AI_PICS/Forge/extensions/sd-webui-regional-prompter . Yet, it does not show up in the webUI. Other extensions such as LoraKeywordFinder that I installed at the same time work just fine. I did find the errors below, but other extensions had the same error and work fine. Do you have any suggestions as to what is going on? Thanks!
Failed reading extension data from Git repository (sd-webui-regional-prompter)
Traceback (most recent call last):
File “/content/stable-diffusion-webui-forge/modules/extensions.py”, line 175, in do_read_info_from_repo
commit = repo.head.commit
File “/usr/local/lib/python3.10/dist-packages/git/refs/symbolic.py”, line 226, in _get_commit
obj = self._get_object()
File “/usr/local/lib/python3.10/dist-packages/git/refs/symbolic.py”, line 219, in _get_object
return Object.new_from_sha(self.repo, hex_to_bin(self.dereference_recursive(self.repo, self.path)))
File “/usr/local/lib/python3.10/dist-packages/git/objects/base.py”, line 94, in new_from_sha
oinfo = repo.odb.info(sha1)
File “/usr/local/lib/python3.10/dist-packages/git/db.py”, line 40, in info
hexsha, typename, size = self._git.get_object_header(bin_to_hex(binsha))
File “/content/stable-diffusion-webui-forge/modules/gitpython_hack.py”, line 18, in get_object_header
ret = subprocess.check_output(
File “/usr/lib/python3.10/subprocess.py”, line 421, in check_output
return run(*popenargs, stdout=PIPE, timeout=timeout, check=True,
File “/usr/lib/python3.10/subprocess.py”, line 505, in run
stdout, stderr = process.communicate(input, timeout=timeout)
File “/usr/lib/python3.10/subprocess.py”, line 1154, in communicate
stdout, stderr = self._communicate(input, endtime, timeout)
File “/usr/lib/python3.10/subprocess.py”, line 2022, in _communicate
self._check_timeout(endtime, orig_timeout, stdout, stderr)
File “/usr/lib/python3.10/subprocess.py”, line 1198, in _check_timeout
raise TimeoutExpired(
subprocess.TimeoutExpired: Command ‘[‘git’, ‘cat-file’, ‘–batch-check’]’ timed out after 2 seconds
The error is on updating the extension so it is not related to it not functioning.
The extension doesn’t support Forge. See:
https://github.com/hako-mikan/sd-webui-regional-prompter/issues/342
It seems that there’s another version you can try.
Hello,
Thank you very much for the great explanation! However, I’m having trouble with a more complex image generation. I want to generate an image of a dark-haired man wearing a red t-shirt and blue jeans, alongside a blonde woman wearing a yellow t-shirt and white jeans. But the specified colors never come out right.
I selected “use common prompt” and “columns” and my divide ratio is: 1,1;1,1,1
Here is my prompt:
a man and a woman, in garden
BREAK
a man with dark hair
BREAK
wearing a red t-shirt
BREAK
wearing blue jeans
BREAK
a blonde woman
BREAK
wearing a yellow t-shirt
BREAK
wearing white jeans
Where could the issue be? Thank you so much for your help!
as usually you have crazy way to explain info thanks for your information you did here, also this regional prompter work with comfyUi, cuz i have case in my project i want know which way can help me to handling it,
i’m already now created training models for my 3d cartoon characters in Civitai to use them to create shots images for my episodes to keep characters consistent during all shots, the models training with loRA flux, my question now how i can merge or compose these two characters models with background to create my shot frame image, which better solution to doing this,
this can explain what i want
https://www.youtube.com/watch?v=XL7Ty8Q0JYg&t=114s
The video uses inpainting. It is a more flexible method if that works for you.
For regional prompting with flux, you can use this workflow: https://github.com/logtd/ComfyUI-Fluxtapoz?tab=readme-ov-file#regional-prompting
thanks let me check it
Not working on ForgeUI (regional prompter)
some extensions don’t support forge
Hello, first of all, I’d like to thank you for the well-prepared information. I’ve been working with Regional Prompter for a few days now. I was following a YouTube tutorial that used ADDCOL and ADDROW. So far, almost all my attempts with Regional Prompter have ended in disaster. Now I’ve come across your page, where BREAK is used instead. I understand that ADDCOL divides the image vertically, and ADDROW divides it horizontally. But I’m still not clear on when to use BREAK. I’ve also looked at the page on GitHub, but somehow, I just can’t grasp it. I’d like to mention that English is not my native language, and translation programs sometimes produce very strange results, especially with technical topics. Many thanks!
BREAK is used to separate the prompts between regions. You can follow the examples above to see if you get the expected results.
Like Dany said, this is something for all your articles:
You make things more comprehensible and easy to work with. Thank you so much!!!
Thank you!
I’m a decade too late to read your amazing work.. -_-
Have a question I hope you can help with, as I’ve been struggling for a couple of days trying to resolve it.
I’m trying to do a picture with two characters on a common background. For my base prompt I have listed out my main ‘conditions’, including style, lighting, scenery, etc. For ease let’s call this ‘Setting’.
Each character has a detailed sub-prompt with full physical descriptions and outfits (and a couple of specific LoRAs), call them CharA, and CharB.
If I set up a simple 50/50 matrix, and structure the prompts as:
Setting
BREAK
CharA
BREAK
CharB
I do use Latent to support LoRAs, and what I get is a completely different image, not related at all to CharA on the left, and a non-styled image of CharB on the right.
I’ve run through several tutorials without any luck and have tried using ControlNet as well, and keep getting duplicates of CharA in each pose position. Any thoughts on what the issue could be?
the idea seems be to correct. but as always, the devil is in the details. I haven’t tried too much with different lora in each region. does it work without lora in your set up?
per my experience, the most likely cause of this is that you need to match the number of BREAKs in your negative clause to the number in your positive clause. If you don’t use a negative for either setting, chara, or charb, just leave that part blank. For example, if there’s no negative for char a, you negative would look something like:
blurry, out of focus, out of frame, bad quality, poorly drawn BREAK BREAK ugly, deformed, badly drawn face, fused body parts
Life-saver xD never thought of the neg prompts… I guess you could use the “Use common negative prompt” check too, I have yet to try it out
Hi
Thanks for the tutorial !
One question with BREAK usage
=> I’m usually using it to emphase colors (like : BREAK, (blue dress:1.2), BREAK, Red shirt…) – maybe I’m wrong to do that but it seems to show some acceptable results.
Nevertheless, doesn’t it induce issues with the BREAK used in the prompt for regional prompting ?
Yes, they are hijacking the BREAK function for their own purpose.
Thanks !
Another question (sorry) : can we link a reference image through control.net to a given region ?
Yes. Use img2img inpainting.
Great post!
Thanks Andrew
Thank you for putting this into plain English. I couldn’t figure out the instructions on the git for my life.
This site has ads all over the place, not sure what you’re experiencing in that respect. I see PetLife ad on the right, Chobani Oatmilk at the bottom, now the right ad switched to a weekend Royal Caribbean cruise… now Walmart. Stop & Shop ad in the middle. Yeah, not sure what you’re experiencing honestly. Hey, Andrew needs to make money like anyone else. I’ll click on a couple and consider purchasing. Thanks Andrew for putting so much time into making this site. If you can or want, head on over to my blog for posts on how to make your home life easier, with diverse different innovative gadgets to improve any task you need to complete. The site is:
https://gadgetsforge.com
Has all you need for home life hacks! I did find so many useful prompts I will implement, like the blending of various faces like Emma Watson and Taylor Swift. The weighting is definitely something I didn’t know before. I’ll be including that in a lot of prompts going forward.
Great post!
One question –
This prompt –
“a man and a woman, a man with black hair
BREAK
a man and a woman, a woman with blonde hair” –
shows a man with black hair and a woman with black hair.
Say I want three pictures of the man and the woman each doing different things, then a fourth image of just the man and a fifth image of just the woman. The man and woman need to look exactly the same in all the pictures they are in (or nearly identical) regardless of if they are alone in the picture or with each other.
How would I go about crafting prompts in stable diffusion with regional prompter to ensure character consistency in this case? Is regional prompter the right extension at all for this case, or would i have to use something else?
Thank you so much.
shows a man with black hair and a woman with blonde hair* (sorry for typo)
regional prompter controls the generation in each image region.
You can try blending faces to achieve consistency first.
https://stable-diffusion-art.com/realistic-people/#Controlling_faces
Then apply different consistent faces in each region.
If my observation is correct, the lora that you add to the prompt has an accumulative effect. I found it out when I want to use the same lora in two different regions. If I put add the lora once, to the common prompt, the weight of the lora becomes double. If I put one in each region, it has the same effect. This basically make using a lora in more than 1 regions impossible.
In their help doc, they suggested using a different mode when you use lora.
It works with LoRAs in the “base” prompt, but not when they are in the “common” prompt. If you want different LoRAs in different regions that’s supposedly possible with the “latent” calc mode.
Also, need to do ADDCOMM (no LoRAs) before ADDBASE (with LoRAs) for the LoRAs. Don’t ask me why, but it only works this way!
Hi there, thanks for the tutorial! Wondering how the “a man and a woman” technique could be applied to four people. Tried everything including “four people” in the common prompt, and no success so far. Any guidance would be appreciated!
Four people could be a challenge. Just to use controlnet pose.
I have tried this with 3,4,5 and 6 people. Results are not 100% all the time but with good prompting and BREAK prompts you get exactly what you need 70-80% of the time
Gudie –> Guide
Thanks!
this guide is a little off. There’s base prompt vs common prompt. Knowing when to use each is important. A lot of the prompts you used could just be a base prompt instead of common prompt. And if you want to add loras, then it can only go in base prompt, otherwise it causes a lot of errors. latent can have loras per region if more control is needed, but usually not needed since it’s also slower
This is the only site I’ve willingly turned my adblock off for, ever… Only to be disappointed for the first time ever when there are NO ads? Am I running a network wide adblock?
Seems that every time I want to know something about Stable Diffusion and I look it up, I end up on your site.
Thank you for your hard work in putting these articles together and for the length you go in explaining the detail, it’s very intuitive and easy to follow.
Thanks for your support!
a very informative and good read, I was wondering if the mask function also works as effeciently as this?
I haven’t played with their mask function so I will let others comment…
Awesome stuff. Thanks for the article!
Could similar be achieved with control net segmentation and providing prompt for each segment?
Thanks!
In principle yes. Regional prompt is different text conditioning applied to different parts of the latent space.
Someone will need to implement it, but it will likely need to be a two-step process. First find the segmentation mask and then apply a prompt to each segmentation.
You can use this together with LORA Block Weight for even more control when you try to combine different LORA over different regions and it messes up
Thank you, that’s very useful information. Will this also work when using LoRAs? E.g., for multiple objects or persons?
The extension’s page suggests using LoRA with the Latent mode.
Thank you for another great article.
Just wondering, could you elaborate on how to use the prompt and prompt-ex divide modes?
From the Github it seems like it adds on to an already finished image (like inpainting but for specific sections?) , but I’m not sure how we’re actually supposed to use it.
There’s a guide for it in the repo written by the author, down to syntax examples which I think are fairly clear (prompt_ja.md). What it seems to do is, given a base prompt, detailing information can be added to each token used in the base prompt (for example, a logo on a shirt), by adding a BREAK followed by the detail prompt + token. It’s like automatic inpainting without having to draw any masks, the masks are derived from the token’s influence on the output.
Actually, I should write this under every article, so this applies generally to all your posts: many, many thanks! SD is quite a complex topic with many even more complex aspects, but your detailed posts help extremely to overcome the first hurdle! Therefore, thanks again 🙂
Thank you for your kind words!