
We will go through how to download and install the popular Stable Diffusion software AUTOMATIC1111 on Windows step-by-step.
Stable Diffusion is a text-to-image AI that can be run on a consumer-grade PC with a GPU. After this tutorial, you can generate AI images on your own PC.
Table of Contents
- Systems requirements
- Installation steps
- Options
- Next Step
- RTX 4000 series graphic cards
- Update Stable Diffusion Webui AUTOMATIC1111
- Resetting Stable Diffusion Webui
- Frequently Asked Questions
- AUTOMATIC1111 does not start after updating.
- Does it work on AMD GPU?
- What Python version should I use?
- How to resolve NaN errors when generating images?
- How to resolve out-of-memory errors?
- Python doesn’t work correctly.
- Is there an easier way to install AUTOMATIC1111?
- I tried everything, but it still does not work.
Systems requirements
Your PC should run Windows 10 or higher with a discrete Nvidia video card (GPU) with 4 GB VRAM or more. An integrated GPU will not work.
If your PC does not meet these requirements, alternatives are
- Fully managed A1111 service – Think Diffusion. (Affiliate link, you get 20% extra credits.)
- Cloud service – Google Colab.
- Mac Apple Silicon M1/M2.
Installing on AMD GPU
AUTOMATIC1111 does not officially support AMD GPUs, but it is possible to make it work if you are tech-savvy or willing to try. See the unofficial installation guide on the official GitHub page.
Installation steps
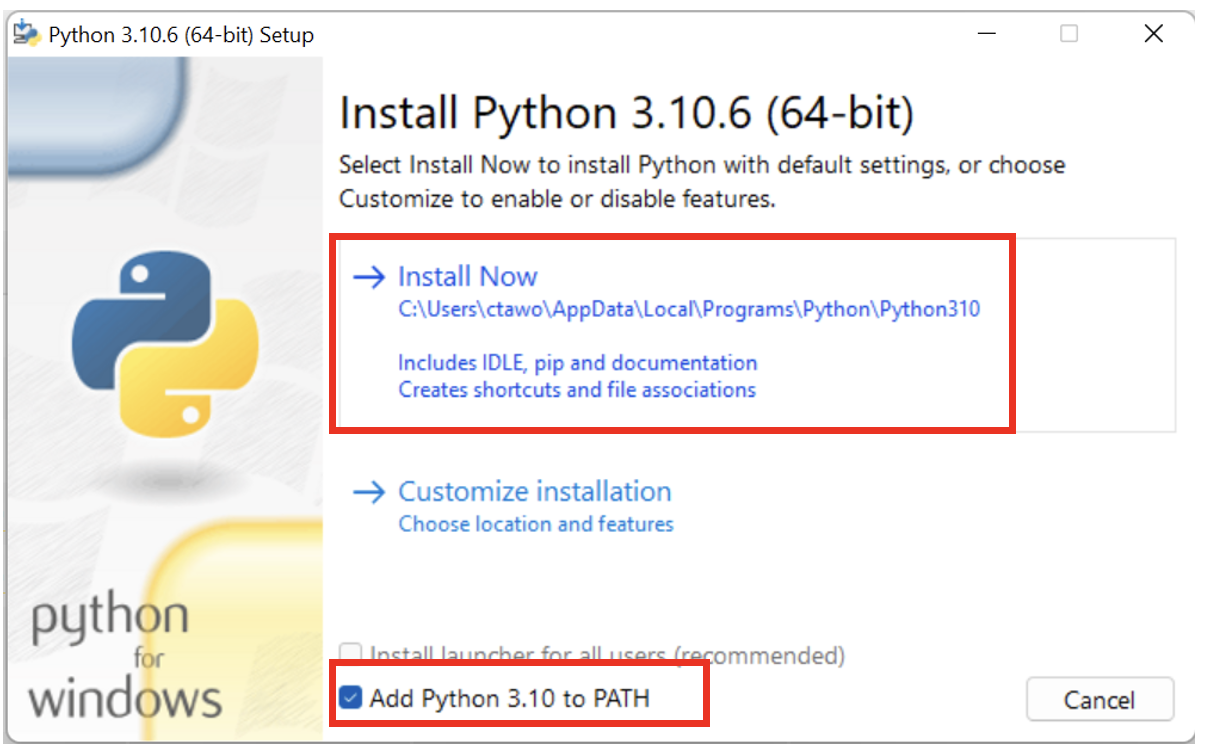
Step 1: Install python
You will need Python 3.10.6. (DON’T use Python 3.11 or newer) There are two ways to install Python on Windows
Option 1: Install from the Microsoft store.
Option 2: Use the 64-bit Windows installer provided by the Python website. (If you use this option, make sure to select “Add Python to 3.10 to PATH“)
I recommend installing it from the Microsoft store.
First, remove all Python versions you have previously installed. You can do that in Control Panel → Add or remove programs.
Visit Python 3.10 on Microsoft Store and install the Python software.
This step is most likely to go wrong. Let’s do a check.
Press the Windows key on your keyboard and type “cmd” to find a program called “Command Prompt”.

Open the Command Prompt App. You should see a black terminal like you are a hacker…
Type “python” and press Enter. You should see you see it prints out Python 3.10. This tells you your Python is installed correctly.
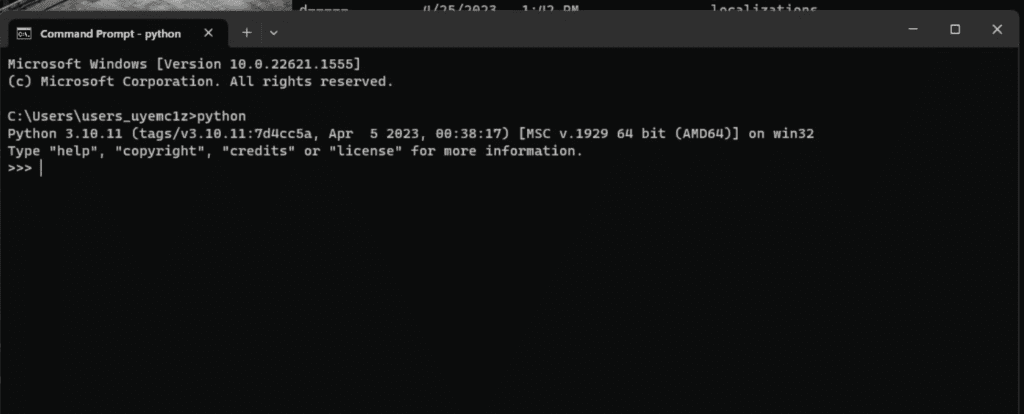
Now you can close the Command Prompt App.
Don’t proceed to the next step until you get Python 3.10 installed correctly.
If you don’t see Python 3.10 running, try
- Restarting the PC
- Removing all the previous versions of Python and reinstalling from the Microsoft Store
- If the one from Microsoft Store doesn’t work for you, remove it and try the one on the Python website.
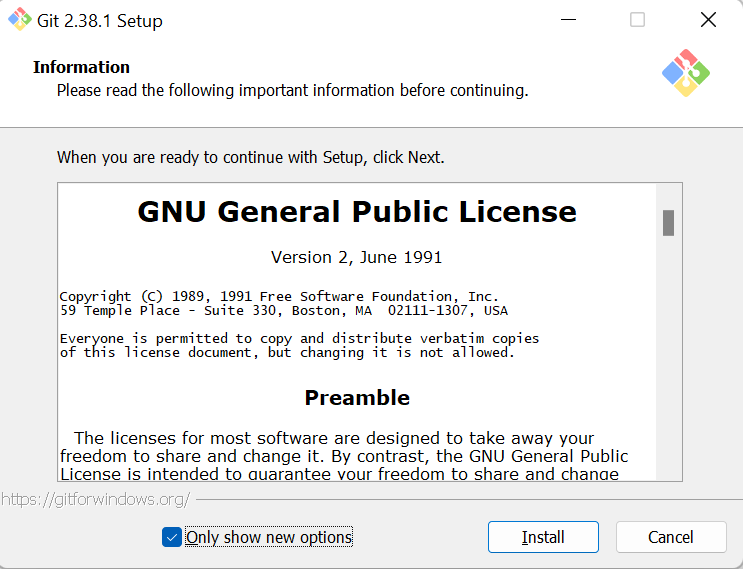
Step 2: Install git
Git is a code repository management system. You will need it to install and update AUTOMATIC1111.
Go to this page to download the windows version.
Open the installer. Click Install to accept the license and install the software.
Follow the instruction to complete the installation.
Step 3: Clone web-ui
This step downloads the Stable Diffusion software (AUTOMATIC1111).
Press the Window key (It should be on the left of the space bar on your keyboard), and a search window should appear. Type cmd.
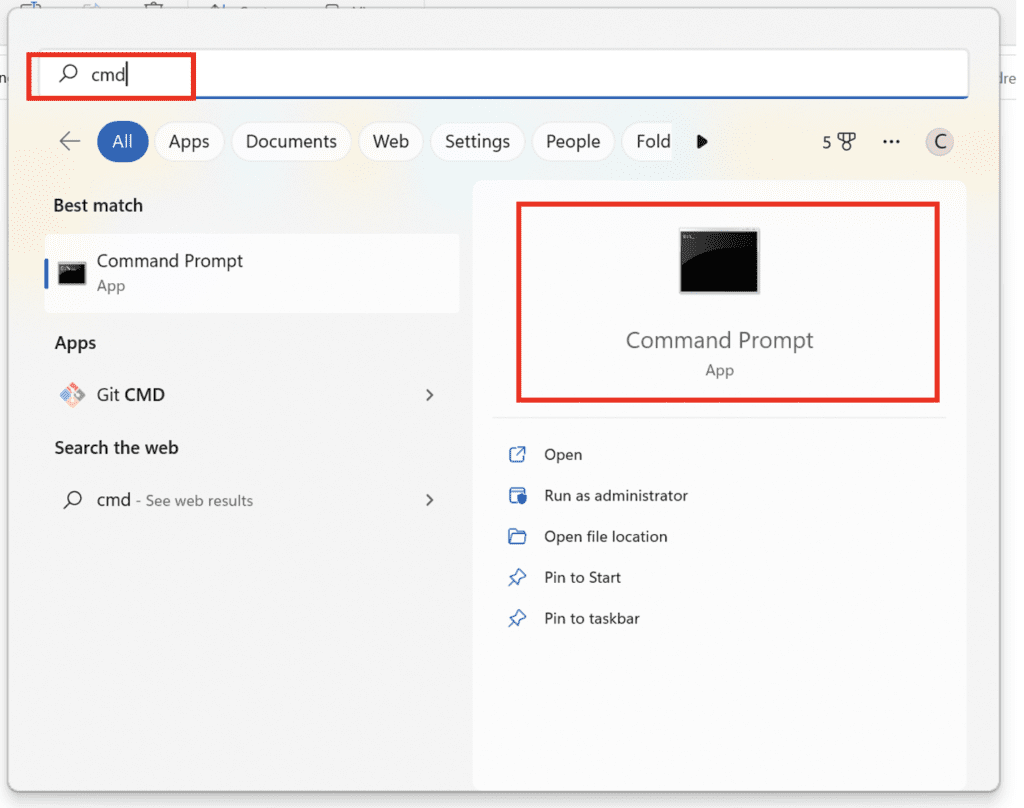
Click on Command Prompt. The command prompt window would show up.
First, make sure you are in your home folder by typing the following command and then pressing Enter. (Tip: You should be able to use right-click to paste in Command Prompt.)
cd %userprofile%You should see your prompt shows something like C:\Users\YOUR_USER_NAME>.
Next type the following command and press Enter to clone the AUTOMATIC1111 repository.
git clone https://github.com/AUTOMATIC1111/stable-diffusion-webui.git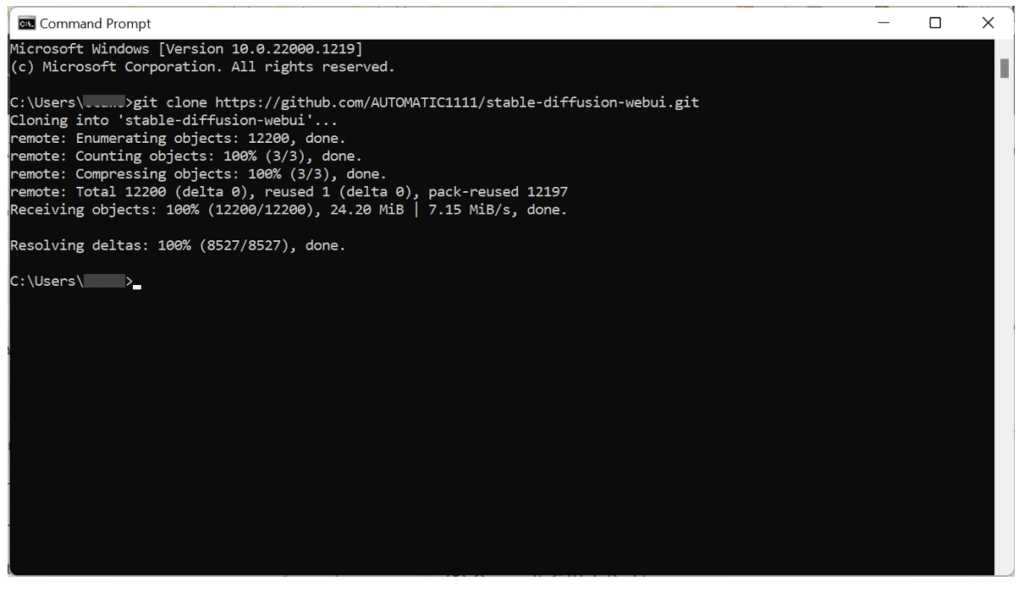
A folder called stable-diffusion-webui should be created in your home directory.
It’s ok to clone the repository in a different folder instead of %userprofile%, as long as you can find the newly created stable-diffusion-webui folder. You will need to change the folder location accordingly in the following steps.
Step 4: Switch to the dev branch
Stability AI has unshared a public repository that A1111 depends on, so the main branch doesn’t work anymore. You will need to use the dev branch.
In the same terminal, enter the the stable-diffusion-webui folder you just created.
cd stable-diffusion-webuiSwith to the dev branch.
git checkout devStep 5: Download a model
Next, go to the newly created folder in File Explorer. Put in
%userprofile%\stable-diffusion-webuiin the address bar and press enter.
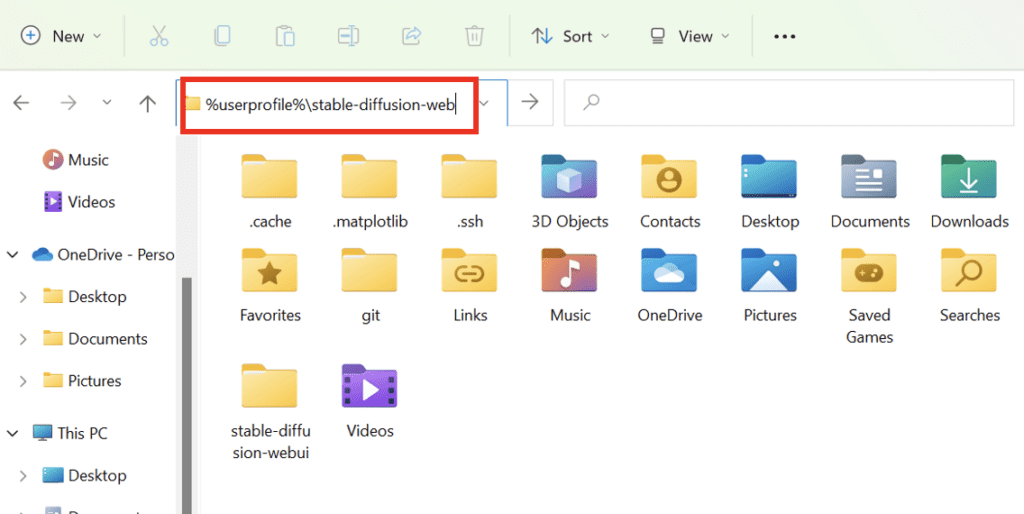
Navigate to the folder models and then Stable-diffusion. You should see a file Put Stable Diffusion checkpoints here.txt like below.
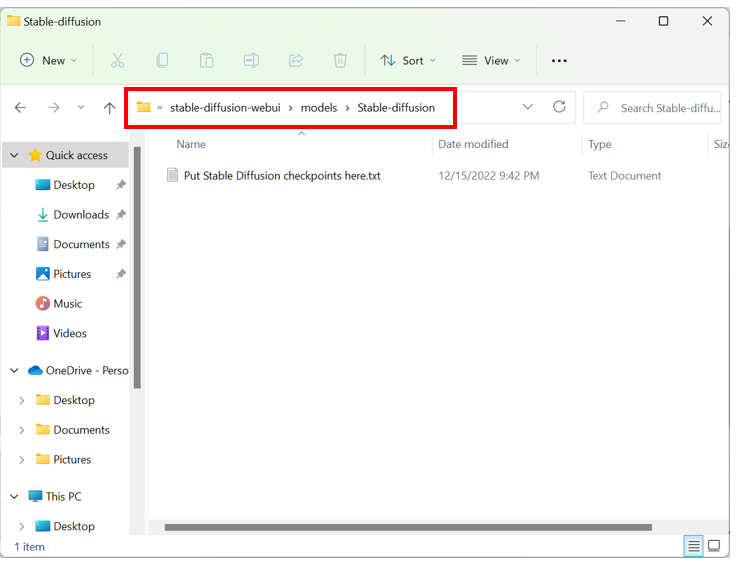
Download the Stable Diffusion v1.5 model checkpoint file (download link). Put it in that folder.
Step 6: Run webui
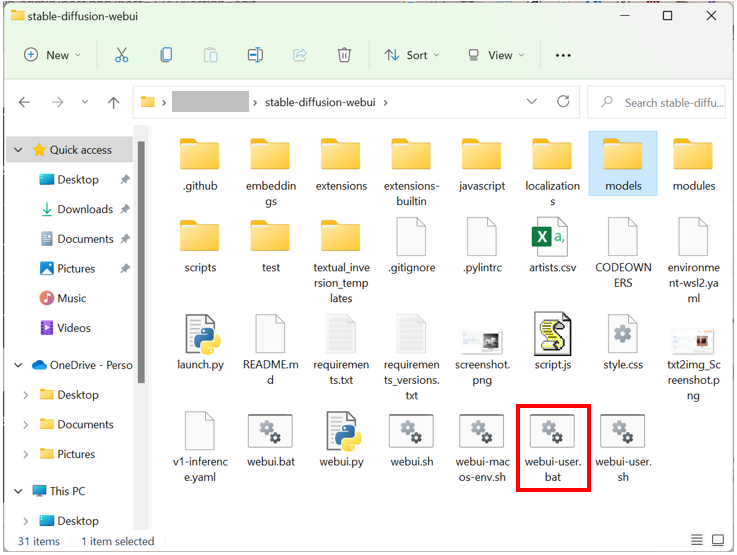
Now in File Explorer, go back to the stable-diffusion-webui folder. That is, go back up two levels or type
%userprofile%\stable-diffusion-webuiagain in the address bar.
Find a file called webui-user.bat. Double-click to run and complete the installation.
This last step is going to take a while. When it is done, you will see a message
Running on local URL: http://127.0.0.1:7860
like the one below.
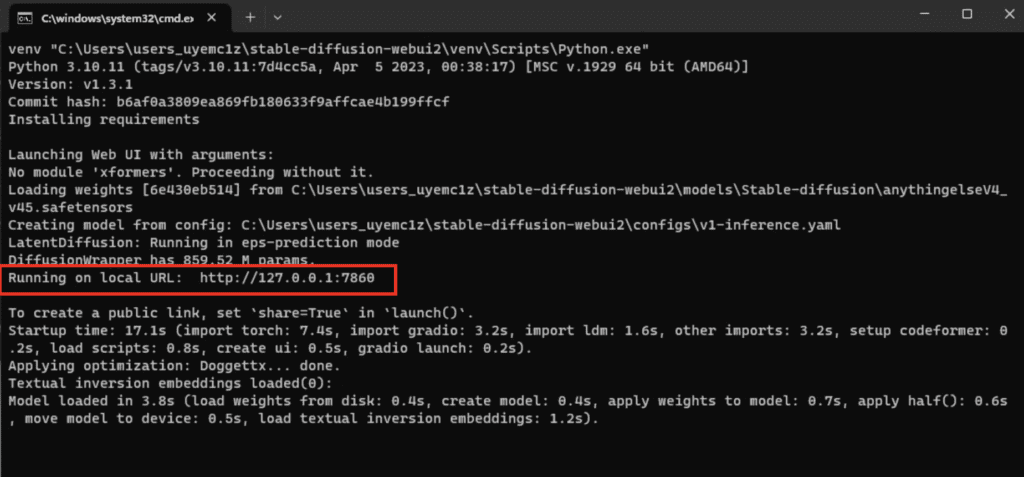
In your web browser, go to the URL
http://127.0.0.1:7860/
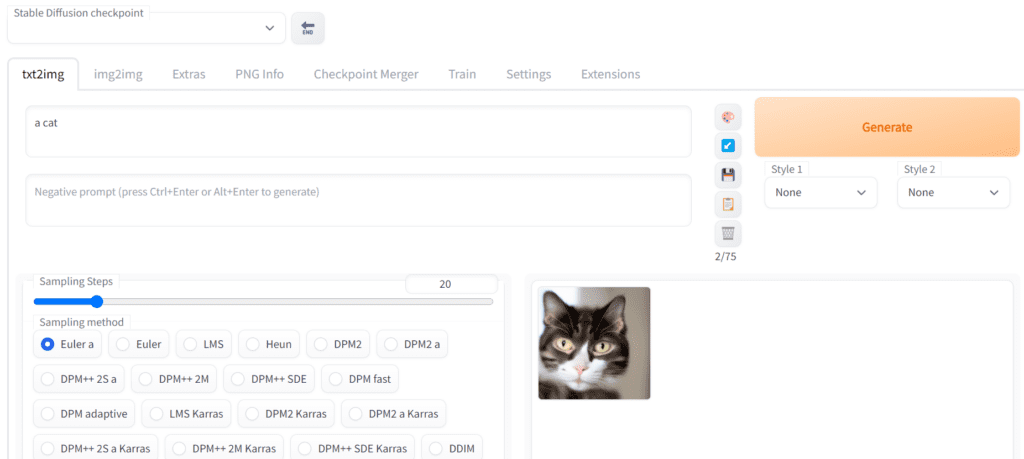
You should see the AUTOMATIC1111 webui! Put in a prompt (e.g. “a cat”) and hit Generate to test if Stable Diffusion is running correctly.
When you are done using Stable Diffusion, close the cmd black window to shut down Stable Diffusion.
To rerun Stable Diffusion, you need to double-click the webui-user.bat.
Options
You can speed up Stable Diffusion models with the --opt-sdp-attention option. If you have less than 8 GB VRAM on GPU, it is a good idea to turn on the --medvram option to save memory to generate more images at a time.
To enable them, right-click on the file webui-user.bat and select Edit. (You may need to select “Show More Options” first if you use Windows 11).
Replace the line
set COMMANDLINE_ARGS=
With
set COMMANDLINE_ARGS=--opt-sdp-attention --medvram
Save and close the file.
Double-click the webui-user.bat file to run Stable Diffusion.
Additional arguments
Add --gradio-img2img-tool color-sketch to COMMANDLINE_ARGS to enable the color sketch tool, which could be helpful in img2img. For example, the new line should look like:
set COMMANDLINE_ARGS=--opt-sdp-attention --medvram --gradio-img2img-tool color-sketchIf you want to use the computer as a server and access the GUI with another computer, use the add --listen to enable a connection from another computer. You will need to grant permission to allow outside connection the first time you run it.
Next Step
That’s it! I hope you will have fun making AI images.
If you are new to Stable Diffusion, check out the Quick Start Guide for some quick tips to use Stable Diffusion.
Head to our beginner’s series to learn Stable Diffusion step by step.
Check out this prompt generator for building high-quality prompts.
RTX 4000 series graphic cards
Good news for you if you use RTX 4070, RTX 4080 or RTX 4090 Nvidia graphic cards. The latest version of AUTOMATIC1111 supports these video card. (with torch 2.0 and cuda 11.8)
I will provide a benchmark speed so that you can make sure your setup is working correctly. The settings are:
- batch size: 4
- batch count: 10
- Image size: 512×512
- Sampling steps: 20
- Sampling method: Euler a
- Model: SD v1.5
Using a batch size of 1 is not recommended, as the measured speed is likely to be highly dependent on other components on your system.
You should see the speed of generating each image. Pick a stable value, usually in the middle like the 5th batch. The speed is in it/s (iterations per second).
You should get about 10 its/s on RTX 4090. (Note that this is 4 images per iteration) This is the max speed you can get nowadays.
You can use one of the following speed-up parameters.
Option 1:
--xformersOption 2:
--opt-sdp-no-mem-attention --no-half-vae --opt-channelslastOption 2 is slightly faster, but test them out to see what works best for you.
Update Stable Diffusion Webui AUTOMATIC1111
Your copy of AUTOMATIC1111 won’t be automatically updated by default. Given how fast things are moving, you will likely need to update it to use the latest and coolest.
Two update options:
- Automatic update
- Updating with a command
Option 1: Automatic update
You can configure Stable Diffusion WebUI to update every it starts.
Edit the file webui-user.bat. Add “git pull” before the line call webui.bat. The file should look something like
@echo off

set PYTHON=
set GIT=
set VENV_DIR=
set COMMANDLINE_ARGS=--xformers --medvram
git pull
call webui.bat
Save the file.
From now on, webui will update itself every time it starts.
Option 2: Update with a command
“If it is not broken, don’t fix it.” This principle applies to Stable Diffusion, which involves updating the software only when a new feature is needed.
In Windows, open the file explorer and navigate to the installation directory of Stable Diffusion WebUI (stable-diffusion-webui). Then, type cmd in the address bar and press Enter.
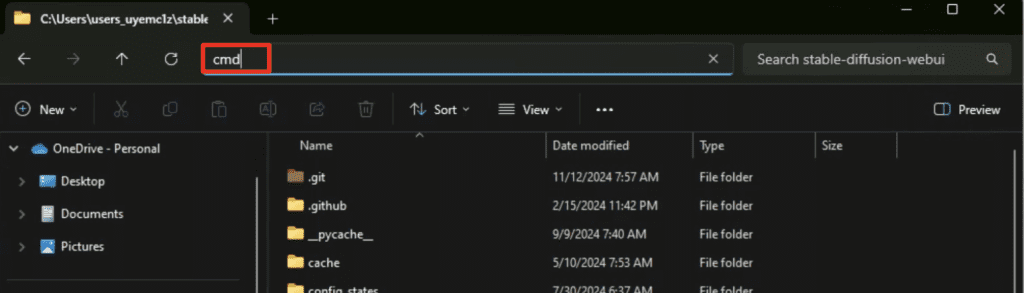
A terminal should appear. Run the following command and press Enter to update update Stable Diffusion WebUI.
git pullResetting Stable Diffusion Webui
If git pull shows an error, it is usually because you have accidentally changed some files. You can reset the webui folder using the following two commands.
git checkout -f masterAnd then run git pull again.
git pullNote that all files will be reset. You will need to make changes to webui-user.bat again.
Reverting to a previous version
Sometimes the latest version of webui is broken, and you don’t want to use it. You can revert to a previous version by following the instructions below.
Step 1: Go to this page to view previous versions. Each row is an earlier version.
Step 2: Pick a previous version you want to restore. You can judge it by the date and comment.
Step 3: Press the copy button to copy the hash code of the version.
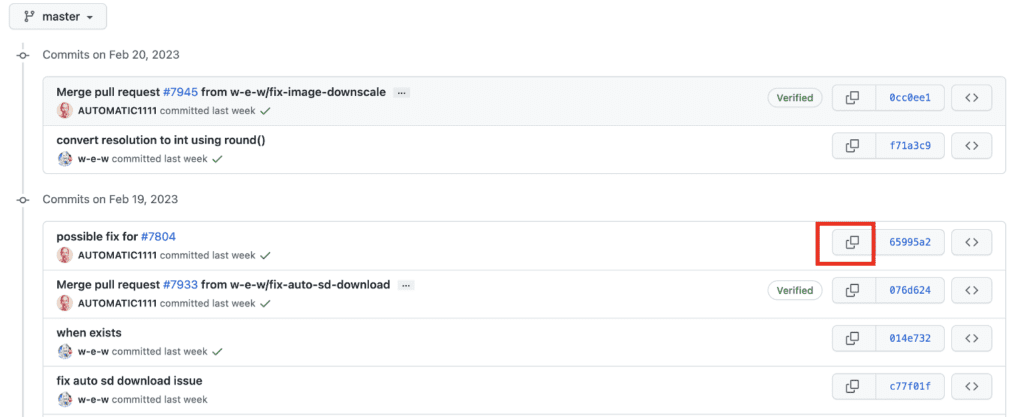
Step 4: In the command prompt, run the following commands. The hash code (highlighted below) is just an example. You will paste the one you just copied.
git checkout 076d624a297532d6e4abebe5807fd7c7504d7a73If you see errors, reset the webui (see the previous section) and retry.
After checking out the previous code, delete the venv folder and restart WebUI.
Frequently Asked Questions
AUTOMATIC1111 does not start after updating.
Delete the venv folder and restart AUTOMATIC1111.
If it still doesn’t work, delete both the venv and the repositories folders and restart.
If it still doesn’t work and you have recently installed an extension, delete the folder of that extension in the extensions folder. Delete the venv folder and restart.
Does it work on AMD GPU?
No, you have to have an NVIDIA GPU.
What Python version should I use?
Python 3.10.6. Later versions of 3.10 work fine. But don’t use 3.11 or later.
How to resolve NaN errors when generating images?
Add --no-half argument to webui-user.bat (See Adding arguments)
How to resolve out-of-memory errors?
Use --lowvram instead of --medvram argument in webui-user.bat (See Adding arguments)
For optimizing memory usage for SDXL models:
- Nvidia (12GB+)
--xformers - Nvidia (8GB)
--medvram-sdxl --xformers - Nvidia (4GB)
--lowvram --xformers
See this article for more details.
Python doesn’t work correctly.
Try removing the previously installed Python using Add or remove programs.
There are two options for installing Python listed. Try the other one if the one you used didn’t work.
Is there an easier way to install AUTOMATIC1111?
The above is the official install instructions. Two alternatives:
- Recently they started to tag release builds. They are supposed to work after downloading and unzipping.
- There’s an unofficial easy installer for Windows you can try.
I tried everything, but it still does not work.
You can use Google Colab to run AUTOMATIC1111. This is what I use. The notebook launches AUTOMATIC1111 with one mouse click.
Or Use AUTOMATIC1111 online.
ERROR: Could not install packages due to an OSError: [WinError 32] Процесс не может получить доступ к файлу, так как этот файл занят другим процессом: ‘C:\\Users\\PAPA\\AppData\\Local\\Temp\\pip-unpack-piys1pl0\\torchvision-0.16.2+cu121-cp310-cp310-win_amd64.whl’
Check the permissions.
Traceback (most recent call last):
File “E:\SD\stable-diffusion-webui\launch.py”, line 48, in
main()
File “E:\SD\stable-diffusion-webui\launch.py”, line 39, in main
prepare_environment()
File “E:\SD\stable-diffusion-webui\modules\launch_utils.py”, line 381, in prepare_environment
run(f'”{python}” -m {torch_command}’, “Installing torch and torchvision”, “Couldn’t install torch”, live=True)
File “E:\SD\stable-diffusion-webui\modules\launch_utils.py”, line 116, in run
raise RuntimeError(“\n”.join(error_bits))
RuntimeError: Couldn’t install torch.
Command: “E:\SD\stable-diffusion-webui\venv\Scripts\python.exe” -m pip install torch==2.1.2 torchvision==0.16.2 –extra-index-url https://download.pytorch.org/whl/cu121
Error code: 1
Please help
Hi,
I’m quite sure i flowed the instructions correctly. I also ran the webui-user.bat, but now it comes up with the following error in the cmd. Can you please have a look?
venv “C:\Users\mypc\stable-diffusion-webui\venv\Scripts\Python.exe”
Python 3.10.6 (tags/v3.10.6:9c7b4bd, Aug 1 2022, 21:53:49) [MSC v.1932 64 bit (AMD64)]
Version: v1.10.1-93-gfd68e0c3
Commit hash: fd68e0c3846b07c637c3d57b0c38f06c8485a753
Installing clip
Traceback (most recent call last):
File “C:\Users\mypc\stable-diffusion-webui\launch.py”, line 53, in
main()
File “C:\Users\mypc\stable-diffusion-webui\launch.py”, line 44, in main
prepare_environment()
File “C:\Users\mypc\stable-diffusion-webui\modules\launch_utils.py”, line 426, in prepare_environment
run_pip(f”install {clip_package}”, “clip”)
File “C:\Users\mypc\stable-diffusion-webui\modules\launch_utils.py”, line 142, in run_pip
return run(f'”{python}” -m pip {command} –prefer-binary{index_url_line}’, desc=f”Installing {desc}”, errdesc=f”Couldn’t install {desc}”, live=live)
File “C:\Users\mypc\stable-diffusion-webui\modules\launch_utils.py”, line 114, in run
raise RuntimeError(“\n”.join(error_bits))
RuntimeError: Couldn’t install clip.
Command: “C:\Users\mypc\stable-diffusion-webui\venv\Scripts\python.exe” -m pip install https://github.com/openai/CLIP/archive/d50d76daa670286dd6cacf3bcd80b5e4823fc8e1.zip –prefer-binary
Error code: 1
stdout: Collecting https://github.com/openai/CLIP/archive/d50d76daa670286dd6cacf3bcd80b5e4823fc8e1.zip
Using cached https://github.com/openai/CLIP/archive/d50d76daa670286dd6cacf3bcd80b5e4823fc8e1.zip (4.3 MB)
Installing build dependencies: started
Installing build dependencies: finished with status ‘done’
Getting requirements to build wheel: started
Getting requirements to build wheel: finished with status ‘error’
stderr: error: subprocess-exited-with-error
Getting requirements to build wheel did not run successfully.
exit code: 1
[17 lines of output]
Traceback (most recent call last):
File “C:\Users\mypc\stable-diffusion-webui\venv\lib\site-packages\pip\_vendor\pyproject_hooks\_in_process\_in_process.py”, line 389, in
main()
File “C:\Users\mypc\stable-diffusion-webui\venv\lib\site-packages\pip\_vendor\pyproject_hooks\_in_process\_in_process.py”, line 373, in main
json_out[“return_val”] = hook(**hook_input[“kwargs”])
File “C:\Users\mypc\stable-diffusion-webui\venv\lib\site-packages\pip\_vendor\pyproject_hooks\_in_process\_in_process.py”, line 143, in get_requires_for_build_wheel
return hook(config_settings)
File “C:\Users\mypc\AppData\Local\Temp\pip-build-env-i6zsejoe\overlay\Lib\site-packages\setuptools\build_meta.py”, line 333, in get_requires_for_build_wheel
return self._get_build_requires(config_settings, requirements=[])
File “C:\Users\mypc\AppData\Local\Temp\pip-build-env-i6zsejoe\overlay\Lib\site-packages\setuptools\build_meta.py”, line 301, in _get_build_requires
self.run_setup()
File “C:\Users\mypc\AppData\Local\Temp\pip-build-env-i6zsejoe\overlay\Lib\site-packages\setuptools\build_meta.py”, line 520, in run_setup
super().run_setup(setup_script=setup_script)
File “C:\Users\mypc\AppData\Local\Temp\pip-build-env-i6zsejoe\overlay\Lib\site-packages\setuptools\build_meta.py”, line 317, in run_setup
exec(code, locals())
File “”, line 3, in
ModuleNotFoundError: No module named ‘pkg_resources’
[end of output]
note: This error originates from a subprocess, and is likely not a problem with pip.
ERROR: Failed to build ‘https://github.com/openai/CLIP/archive/d50d76daa670286dd6cacf3bcd80b5e4823fc8e1.zip’ when getting requirements to build wheel
Press any key to continue . . .
Hi. I’m stuck with the installation of Windows 11 and a 5060ti. Error code: 128. I’m looking for complete instructions on how to perform a clean install of Windows 11. From scratch.
which version of python did you use (You can absolutely run stable diffusion on python versions from 3.10.6 to 3.11.9 as i did with no issues).
If you want to troubleshoot then go to the “webui-user.bat” inside “stable-diffusion-webui” at the very bottom (it is seen as “webui-user” the bat is can’t bee seen), double click on it, click on “Edit in notepad”, and you will see like this
——————————————————————————————————-
@echo off
set PYTHON=
set GIT=
set VENV_DIR=
set COMMANDLINE_ARGS=–skip-python-version-check
call webui.bat
——————————————————————————————————-
Just copy and paste this, hit one save on the top left corner of your notepad and now click on the “webui-user” file.
I’ve just installed Stable Diffusion, but when I run webui-user.bat I get:
Cloning Stable Diffusion into C:\Users\john\stable-diffusion-webui\repositories\stable-diffusion-stability-ai…
Cloning into ‘C:\Users\john\stable-diffusion-webui\repositories\stable-diffusion-stability-ai’…
info: please complete authentication in your browser…
remote: Repository not found.
fatal: repository ‘https://github.com/Stability-AI/stablediffusion.git/’ not found
So it looks like the name of the repository it is looking for is not quite right, and I’m unsure of what it ought to be or what I need to change to correct it. Please can you advise?
I’m having the same exact problem. I looked up the repository it is looking for and it’s simply not there, at least by that name. Is there an update to these instructions, or a quick edit we can do to the webui-user.bat file?
I tried installing this on Linux several months ago, and the WebUI portion of the instructions also crashed. They seem to be a consistent bugaboo for beginners.
Thanks!
Hi, see updated instructions.
Hi, you can switch to the dev branch of A1111. Run “git checkout dev” in the command line terminal under stable-diffusion-webui directory.
See updated instructions.
Hello everyone.
First, I would like to express my gratitude to Mr. Andrew for the Stable-Diffusion program. Based on my experience over the past year and a half since installing the program and enjoying it immensely, I would like to recommend the following:
The stable-diffusion file only works on version 3.10. After downloading the file from the website (search Google for this specific version) to your Downloads folder, do not install it directly. Instead, uninstall all previous versions of your system, and then restart Windows.delete all temporary files.
Now install Python 3.10, but before doing so, you must disconnect from the internet to prevent automatic reversion to the latest version. After the installation is complete, you can reconnect to the internet and install Git.
Note: I have previously installed stable-diffusion many times without failure. While I did encounter some errors, I discovered that the programming language (Python) is the most important factor, and version 3.10 is the most suitable. This step is essential; you simply need to choose the correct version and install it correctly.
Hi. I followed all instructions to the letter, but when I run the batch file it terminates with an error – RuntimeError: CUDA error: no kernel image is available for execution on the device CUDA kernel errors might be asynchronously reported at some other API call, so the stacktrace below might be incorrect. For debugging consider passing CUDA_LAUNCH_BLOCKING=1. Compile with `TORCH_USE_CUDA_DSA` to enable device-side assertions.
Where have I gone wrong?
was having probs with windows store (python) think i may have installed 3.11 which I now see I should not have.. though (have not done the clone part) i did get some sort of git stable diffusion to load. How do I fix python? just uninstall and try again? seemed like the only option was 3.11 could use just a touch of guidance thanks!
not sure how to delete my comment here but uninstalled 3.11 not sure why i thought that would be hard
This only works on version 3.10. Link: python-3.10.6-amd64. I recommend uninstalling all previous versions of your system, then restarting Windows and deleting all temporary files. Before installing Python 3.10, you should disconnect from the internet to prevent automatic reversion to the latest version.
GIT has a million options.. its not just install or maybe it is.. you should go through that a bit more in my opinion.. Step 2: Install git
Git is a code repository management system. You will need it to install and update
Open the installer. Click Install to accept the license and install the software.
Thanks! IT Works! Originally I was running Stable Difffusion locally. Reloaded Windows so I decide to give your instructions a try. Easy to follow. Precise. I have a “Launch” option in stable-diffusion-webui.
Great Stuff.
i get this i have a geforce rtx5070
Stable diffusion model failed to load
Loading weights [c0d1994c73] from C:\Users\Randall\stable-diffusion-webui\models\Stable-diffusion\realisticVisionV60B1_v20Novae.safetensors
Creating model from config: C:\Users\Randall\stable-diffusion-webui\configs\v1-inference.yaml
loading stable diffusion model: RuntimeError
Traceback (most recent call last):
File “C:\Users\Randall\AppData\Local\Programs\Python\Python310\lib\threading.py”, line 973, in _bootstrap
self._bootstrap_inner()
File “C:\Users\Randall\AppData\Local\Programs\Python\Python310\lib\threading.py”, line 1016, in _bootstrap_inner
self.run()
File “C:\Users\Randall\stable-diffusion-webui\venv\lib\site-packages\anyio\_backends\_asyncio.py”, line 807, in run
result = context.run(func, *args)
File “C:\Users\Randall\stable-diffusion-webui\venv\lib\site-packages\gradio\utils.py”, line 707, in wrapper
response = f(*args, **kwargs)
File “C:\Users\Randall\stable-diffusion-webui\modules\ui.py”, line 1165, in
update_image_cfg_scale_visibility = lambda: gr.update(visible=shared.sd_model and shared.sd_model.cond_stage_key == “edit”)
File “C:\Users\Randall\stable-diffusion-webui\modules\shared_items.py”, line 175, in sd_model
return modules.sd_models.model_data.get_sd_model()
File “C:\Users\Randall\stable-diffusion-webui\modules\sd_models.py”, line 693, in get_sd_model
load_model()
File “C:\Users\Randall\stable-diffusion-webui\modules\sd_models.py”, line 845, in load_model
load_model_weights(sd_model, checkpoint_info, state_dict, timer)
File “C:\Users\Randall\stable-diffusion-webui\modules\sd_models.py”, line 440, in load_model_weights
model.load_state_dict(state_dict, strict=False)
File “C:\Users\Randall\stable-diffusion-webui\modules\sd_disable_initialization.py”, line 223, in
module_load_state_dict = self.replace(torch.nn.Module, ‘load_state_dict’, lambda *args, **kwargs: load_state_dict(module_load_state_dict, *args, **kwargs))
File “C:\Users\Randall\stable-diffusion-webui\modules\sd_disable_initialization.py”, line 221, in load_state_dict
original(module, state_dict, strict=strict)
File “C:\Users\Randall\stable-diffusion-webui\venv\lib\site-packages\torch\nn\modules\module.py”, line 2138, in load_state_dict
load(self, state_dict)
File “C:\Users\Randall\stable-diffusion-webui\venv\lib\site-packages\torch\nn\modules\module.py”, line 2126, in load
load(child, child_state_dict, child_prefix)
File “C:\Users\Randall\stable-diffusion-webui\venv\lib\site-packages\torch\nn\modules\module.py”, line 2126, in load
load(child, child_state_dict, child_prefix)
File “C:\Users\Randall\stable-diffusion-webui\venv\lib\site-packages\torch\nn\modules\module.py”, line 2126, in load
load(child, child_state_dict, child_prefix)
[Previous line repeated 1 more time]
File “C:\Users\Randall\stable-diffusion-webui\venv\lib\site-packages\torch\nn\modules\module.py”, line 2120, in load
module._load_from_state_dict(
File “C:\Users\Randall\stable-diffusion-webui\modules\sd_disable_initialization.py”, line 225, in
linear_load_from_state_dict = self.replace(torch.nn.Linear, ‘_load_from_state_dict’, lambda *args, **kwargs: load_from_state_dict(linear_load_from_state_dict, *args, **kwargs))
File “C:\Users\Randall\stable-diffusion-webui\modules\sd_disable_initialization.py”, line 191, in load_from_state_dict
module._parameters[name] = torch.nn.parameter.Parameter(torch.zeros_like(param, device=device, dtype=dtype), requires_grad=param.requires_grad)
File “C:\Users\Randall\stable-diffusion-webui\venv\lib\site-packages\torch\_meta_registrations.py”, line 4516, in zeros_like
res.fill_(0)
RuntimeError: CUDA error: no kernel image is available for execution on the device
CUDA kernel errors might be asynchronously reported at some other API call, so the stacktrace below might be incorrect.
For debugging consider passing CUDA_LAUNCH_BLOCKING=1.
Compile with `TORCH_USE_CUDA_DSA` to enable device-side assertions.
Stable diffusion model failed to load
Follow this modified instruction for 5090 https://github.com/AUTOMATIC1111/stable-diffusion-webui/discussions/16818
Thanks Andrew. Used the link you provided to make a1111 work with a 5060 ti card.
Reported “it/s” per your instructions shows average of ~3.7it/s.
Using –opt-sdp-attention and –xformers options.
Been getting this lately, which is confusing me, I hadn’t been getting it before.
Couldn’t launch python
exit code: 9009
stderr:
Python was not found; run without arguments to install from the Microsoft Store, or disable this shortcut from Settings > Apps > Advanced app settings > App execution aliases.
Launch unsuccessful. Exiting.
Press any key to continue . . .
It was working just fine until two days ago.
You may have deleted your python or its cache? try deleting the venv folder and relaunch. If that doesn’t work, try reinstalling python
Hello Andrew, I tried this on my new PC with an rtx 5070 ti and i am getting the below error when i am trying to generate an image
RuntimeError: CUDA error: no kernel image is available for execution on the device CUDA kernel errors might be asynchronously reported at some other API call, so the stacktrace below might be incorrect. For debugging consider passing CUDA_LAUNCH_BLOCKING=1. Compile with `TORCH_USE_CUDA_DSA` to enable device-side assertions.
I have exatly the same issue with my new RTX 5080.
I am getting the same error on my RTX 5070 with latest NVIDIA drivers
I got this error too. Can anyone solved on 5080?
Same
I don’t have a RTX 5000 card but you can try this:
https://github.com/AUTOMATIC1111/stable-diffusion-webui/issues/16824
There is a discrepancy near the beginning of the instructions. When cloning there is no stable-diffusion folder in \models\. There is only \models\diffusion and models\sd3.
There should be. See: https://github.com/AUTOMATIC1111/stable-diffusion-webui/tree/master/models
Hi
I have this mistake.
Can you help me please?
“”C:\Users\Admin\stable-diffusion-webui\venv\Scripts\activate.bat”” no se reconoce como un comando interno o externo,
programa o archivo por lotes ejecutable.
venv “C:\Users\Admin\stable-diffusion-webui\venv\Scripts\Python.exe”
Python 3.10.11 (tags/v3.10.11:7d4cc5a, Apr 5 2023, 00:38:17) [MSC v.1929 64 bit (AMD64)]
Version: v1.10.1
Commit hash: 82a973c04367123ae98bd9abdf80d9eda9b910e2
Installing torch and torchvision
C:\Users\Admin\stable-diffusion-webui\venv\Scripts\python.exe: No module named pip
Traceback (most recent call last):
File “C:\Users\Admin\stable-diffusion-webui\launch.py”, line 48, in
main()
File “C:\Users\Admin\stable-diffusion-webui\launch.py”, line 39, in main
prepare_environment()
File “C:\Users\Admin\stable-diffusion-webui\modules\launch_utils.py”, line 381, in prepare_environment
run(f'”{python}” -m {torch_command}’, “Installing torch and torchvision”, “Couldn’t install torch”, live=True)
File “C:\Users\Admin\stable-diffusion-webui\modules\launch_utils.py”, line 116, in run
raise RuntimeError(“\n”.join(error_bits))
RuntimeError: Couldn’t install torch.
Command: “C:\Users\Admin\stable-diffusion-webui\venv\Scripts\python.exe” -m pip install torch==2.1.2 torchvision==0.16.2 –extra-index-url https://download.pytorch.org/whl/cu121
Error code: 1
Presione una tecla para continuar . . .
Hi dear Andrew.
I’m using the paid version of software on my AMD Ryzen 9 system and running into some hiccups. Despite following your installation guide and using ROCm, things aren’t running smoothly. I want to use Dreambooth extension but cannot be added or I don’t see it under Train tab. Could you help me troubleshoot? Any advice or updates that could help would be great. Thanks!
Unfortunately, I don’t have an AMD machine so I don’t have much experience in troubleshooting it.
The A1111 software is free. What did you purchase?
Thank you for your reply! I paid for Stable Diffusion to get started, but I’m now encountering compatibility issues with my AMD hardware. I wasn’t aware that this might be a limitation at the time of purchase. If you have any suggestions for troubleshooting or alternative approaches, I’d really appreciate it!
AMD could work but prepare to spend a lot of time troubleshoot because most models are built with Nvidia gpu in mind. (that’s why they are doing so well)
You can use A1111 online, like with my google colab notebook https://stable-diffusion-art.com/automatic1111-colab/
Thank you for your outstanding work ! I have a question please :
I have a saved stable-diffusion-webui folder fully working at an external HD drive.
I have a laptop i would like to run it at C:\Users\xxx dir but xxx is a different user name of course.
Can i “git clone” it from there instead from an online url ?
Thank you so much
No, but you can copy the folder to your C drive, delete the venv folder, and run it.
Worked fine for the most part. When testing python I had to run `py` rather than `python` and adjust the PYTHON variable in `webui-user.bat` to match
Shit don’t work 🙁
“You can try updating A1111, deleting (or renaming if you want to restore it) the venv folder, and restart. The venv folder will regenerate.”
Thanks.
It would not let me reply to your original post.
I am afraid I don’t know how to update A1111. Is there a tutorial for that?
Yes it is on this post 🙂
https://stable-diffusion-art.com/install-windows/#Updating_AUTOMATIC1111
Hi, I did the installation according to the instructions and everything without any problem, the problem occurred when I tried to generate a simple picture of a cat up to 90%, the cat was visible, as soon as the picture was generated at 100%, it was all gray, respectively, it generated only a gray picture without anything… I tried a complete reinstallation, as well as various instructions such as –precision full –no-half, but still the same problem. Don’t know how to fix it please?
seems to be an issue with the VAE. Try setting VAE to automatic in settings.
I have VAE set to automatic and the problem still persists :/
Had the same issue. VAE was already set to automatic.
Found out myself. The model linked on this page seems to be the issue. I tried the “realistic” model and it worked.
Interesting. That was the original SD 1.5 model. I updated the link to the same model in the safetensors format to follow the best security practice.
Did you ever figure this out. Just installed and running into the same issue.
Version Stable diffusion v1.5 downloand link not working anymore… :/ It write this:
Invalid username or password.
Launching Web UI with arguments: –xformers –medvram
Traceback (most recent call last):
File “C:\Users\User\stable-diffusion-webui\launch.py”, line 48, in
main()
File “C:\Users\User\stable-diffusion-webui\launch.py”, line 44, in main
start()
File “C:\Users\User\stable-diffusion-webui\modules\launch_utils.py”, line 465, in start
import webui
File “C:\Users\User\stable-diffusion-webui\webui.py”, line 13, in
initialize.imports()
File “C:\Users\User\stable-diffusion-webui\modules\initialize.py”, line 39, in imports
from modules import processing, gradio_extensons, ui # noqa: F401
File “C:\Users\User\stable-diffusion-webui\modules\processing.py”, line 14, in
import cv2
File “C:\Users\User\stable-diffusion-webui\venv\lib\site-packages\cv2\__init__.py”, line 181, in
bootstrap()
File “C:\Users\User\stable-diffusion-webui\venv\lib\site-packages\cv2\__init__.py”, line 153, in bootstrap
native_module = importlib.import_module(“cv2”)
File “C:\Users\User\AppData\Local\Programs\Python\Python310\lib\importlib\__init__.py”, line 126, in import_module
return _bootstrap._gcd_import(name[level:], package, level)
ImportError: DLL load failed while importing cv2: The specified module could not be found.
Press any key to continue . . .
I have the same problem here. Looked a lot for a solution, but I cannot find it.
I think I did everything well, correct python version.
Probably I am missing something, please help if anyone knows the answer.
ERROR: Could not find a version that satisfies the requirement torch==2.1.2 (from versions: 2.2.0, 2.2.0+cu121, 2.2.1, 2.2.1+cu121, 2.2.2, 2.2.2+cu121, 2.3.0, 2.3.0+cu121)
ERROR: No matching distribution found for torch==2.1.2
make sure you use python 3.10
Hi, new problem here.
After launching webui-user.bat, it opens the Stable Diffusion page in the Chrome browser.
when I try to generate the “a cat” prompt, this text appears under the image preview
“AttributeError: ‘NoneType’ object has no attribute ‘lowvram'”
I’ve looked through all the files, but I have no idea how to fix it.
I understand that the “lowvram” parameter is missing somewhere. But where?
Hi, after clicking on webui-user.bat
I’have this message in red:
Version: v1.9.3
Commit hash: 1c0a0c4c26f78c32095ebc7f8af82f5c04fca8c0
Installing torch and torchvision
Looking in indexes: https://pypi.org/simple, https://download.pytorch.org/whl/cu121
Collecting torch==2.1.2
Using cached https://download.pytorch.org/whl/cu121/torch-2.1.2%2Bcu121-cp310-cp310-win_amd64.whl (2473.9 MB)
ERROR: THESE PACKAGES DO NOT MATCH THE HASHES FROM THE REQUIREMENTS FILE. If you have updated the package versions, please update the hashes. Otherwise, examine the package contents carefully; someone may have tampered with them.
torch==2.1.2 from https://download.pytorch.org/whl/cu121/torch-2.1.2%2Bcu121-cp310-cp310-win_amd64.whl#sha256=9925143dece0e63c5404a72d59eb668ef78795418e96b576f94d75dcea6030b9:
Expected sha256 9925143dece0e63c5404a72d59eb668ef78795418e96b576f94d75dcea6030b9
Got dba2917daacb9de3d858e4352674eca4404a417bef28760e82e76994da4a6f9b
Why and what do I do?
Thank you
Solved I had to update pip
Hy. I already follow all your steps and run stable diffusion in chrome succesfuly.
But after I type a prompt and click “generate” nothing happened.
Specs:
WIN. 11
CPU: AMD Ryzen 5 3600
GPU: Nvidia GTX1660
Please Help me. Thank You.
Do you see any error messages in terminal?
Just a quick note for anyone else trying to get Stable Diffusion working on WSL2
(Windows 11 with WSL2 and Ubuntu 22.04.4 selected as distribution):
It worked fine at least on my 4080RTX, the key part (at least for me) was that the default python installed for the default Ubuntu distribution kept trying to use python 3.9.
Which resulted in an error code:
Error code: 137
(aliasing python3.10 and/or PATH$ to include the supported python 3.10 version didn’t work for me, what did work for me was setting it in the webui-user.sh before trying to run webui.sh
uncomment the line containing python_cmd and update value to the (currently) supported Python path:
python_cmd=/usr/bin/python3.10
This solved my issue.
I encountered this error. I have installed pip module manually. Any other recommendations?
venv “C:\stable-diffusion\stable-diffusion-webui\venv\Scripts\Python.exe”
Python 3.10.6 (tags/v3.10.6:9c7b4bd, Aug 1 2022, 21:53:49) [MSC v.1932 64 bit (AMD64)]
Version: v1.8.0
Commit hash: bef51aed032c0aaa5cfd80445bc4cf0d85b408b5
Installing torch and torchvision
C:\stable-diffusion\stable-diffusion-webui\venv\Scripts\python.exe: No module named pip
Traceback (most recent call last):
File “C:\stable-diffusion\stable-diffusion-webui\launch.py”, line 48, in
main()
File “C:\stable-diffusion\stable-diffusion-webui\launch.py”, line 39, in main
prepare_environment()
File “C:\stable-diffusion\stable-diffusion-webui\modules\launch_utils.py”, line 380, in prepare_environment
run(f'”{python}” -m {torch_command}’, “Installing torch and torchvision”, “Couldn’t install torch”, live=True)
File “C:\stable-diffusion\stable-diffusion-webui\modules\launch_utils.py”, line 115, in run
raise RuntimeError(“\n”.join(error_bits))
RuntimeError: Couldn’t install torch.
Command: “C:\stable-diffusion\stable-diffusion-webui\venv\Scripts\python.exe” -m pip install torch==2.1.2 torchvision==0.16.2 –extra-index-url https://download.pytorch.org/whl/cu121
Error code: 1
Press any key to continue . . .
your python installation is missing the pip package.
You can try removing it and installing python 3.10 from the microsoft store.
start all over.
Hi, nothing happens when I double click the webui-user.bat file, some git command prompt like thing opens for like half a second then closes itself and nothing happens
You can try running in the command prompt to see what error message is. It is usually your python not installed correctly.
Hi,
When I run webui_user.bat, it give me this error message :
venv “C:\Users\janis\stable-diffusion-webui\venv\Scripts\Python.exe”
Python 3.10.11 (tags/v3.10.11:7d4cc5a, Apr 5 2023, 00:38:17) [MSC v.1929 64 bit (AMD64)]
Version: v1.8.0
Commit hash: bef51aed032c0aaa5cfd80445bc4cf0d85b408b5
Traceback (most recent call last):
File “C:\Users\janis\stable-diffusion-webui\launch.py”, line 48, in
main()
File “C:\Users\janis\stable-diffusion-webui\launch.py”, line 39, in main
prepare_environment()
File “C:\Users\janis\stable-diffusion-webui\modules\launch_utils.py”, line 386, in prepare_environment
raise RuntimeError(
RuntimeError: Torch is not able to use GPU; add –skip-torch-cuda-test to COMMANDLINE_ARGS variable to disable this check
Appuyez sur une touche pour continuer…
Can anyone help me about what I have to do to resolve this?
Thanks!
It appears your PC has no GPU. You need one to run SD
I have a 3060 ti and am trying to install this for the first time. I followed the instructions but installed python 3.12, then uninstalled and installed 3.10 instead as instructed from the windows store. I now get this error when running the webui batch file. I’d really appreciate some help
venv “C:\Users\guswo\stable-diffusion-webui\venv\Scripts\Python.exe”
No Python at ‘”C:\Users\guswo\AppData\Local\Microsoft\WindowsApps\PythonSoftwareFoundation.Python.3.12_qbz5n2kfra8p0\python.exe’
Your delete and reinstall A1111 to see if that fixes it.
I’m using the collab and trying to use version 1.5. Since the most recent update I’m now getting the following error: ModuleNotFoundError: No module named ‘torchvision.transforms.functional_tensor’. Is there some way I can fix the code to roll back and updates?
the most recent update simply load v1.8.0 instead of v1.7.0. Are you saying you are trying to load v1.5.0? You can post the whole error message
Yes, I’m trying to load v1.5.0. Before the update, I was able to load v1.5.0 just fine. Here is the error:
2024-03-19 23:23:30.305660: E external/local_xla/xla/stream_executor/cuda/cuda_dnn.cc:9261] Unable to register cuDNN factory: Attempting to register factory for plugin cuDNN when one has already been registered
2024-03-19 23:23:30.305707: E external/local_xla/xla/stream_executor/cuda/cuda_fft.cc:607] Unable to register cuFFT factory: Attempting to register factory for plugin cuFFT when one has already been registered
2024-03-19 23:23:30.307059: E external/local_xla/xla/stream_executor/cuda/cuda_blas.cc:1515] Unable to register cuBLAS factory: Attempting to register factory for plugin cuBLAS when one has already been registered
2024-03-19 23:23:30.314216: I tensorflow/core/platform/cpu_feature_guard.cc:182] This TensorFlow binary is optimized to use available CPU instructions in performance-critical operations.
To enable the following instructions: AVX2 AVX512F FMA, in other operations, rebuild TensorFlow with the appropriate compiler flags.
2024-03-19 23:23:31.355701: W tensorflow/compiler/tf2tensorrt/utils/py_utils.cc:38] TF-TRT Warning: Could not find TensorRT
/usr/local/lib/python3.10/dist-packages/gradio_client/documentation.py:103: UserWarning: Could not get documentation group for : No known documentation group for module ‘gradio.mix’
warnings.warn(f”Could not get documentation group for {cls}: {exc}”)
/usr/local/lib/python3.10/dist-packages/gradio_client/documentation.py:103: UserWarning: Could not get documentation group for : No known documentation group for module ‘gradio.mix’
warnings.warn(f”Could not get documentation group for {cls}: {exc}”)
no module ‘xformers’. Processing without…
no module ‘xformers’. Processing without…
No module ‘xformers’. Proceeding without it.
ModuleNotFoundError: No module named ‘torchvision.transforms.functional_tensor’
There’s likely an incompatibility between v1.5.0 and the colab env. Looks like the version of torchvision is incorrect. You can try copying the notebook and install it.
The notebook works for v1.8.0. I won’t be able to support multiple versions of A1111.
Hey! I’ve got everything set up and working, but do you remember the prompt you used for the image at the very top of the page? I’m testing out models and the like to get a feel for what I like, and that’s an amazing image, but I’m having a ton of trouble nailing it down and it’d serve as a great example for what a “good” prompt looks like.
unfortunately it is long lost. you can check out https://stable-diffusion-art.com/sdxl-styles/
How do fix this issue
“xformers wasn’t build with cuda support” my gpu is rtx 2060
Try not using xformers. Use the sdp option. See
https://stable-diffusion-art.com/speed-up-stable-diffusion/
When I went in my command prompt to download the folder and put in git clone https://github.com/AUTOMATIC1111/stable-diffusion-webui.git and then go to the folder %userprofile%\stable-diffusion-webui it shows that there is nothing in the folder. Is there any way I can delete the folder and try re cloning it in the command prompt?
There should be something. You can delete the stable-diffusion-webui folder in Explorer and try again. Watch out for error messages
Ive tried to delete the empty folder in my files but it wont let me, have you run into that before?
No. It seems the git pull failed. Post the error message.
Never mind I Fixed that issue, when I re-cloned the file, I notice the Webus-user.bat is not in the folder though.
You system may hide the .bat depending on settings.
How do I fix that
You don’t need to fix it. just double-click the file webui-user without the .bat.
Hi! I am one of that hapless lot who get the “Torch is not able to use GPU” error. I do have a discrete GPU on my laptop (GeForce MX150), and after I got the error I was surprised to find out that it was disabled in the Win10 settings. I enabled it back, rebooted and tried again to visit http://127.0.0.1:7860 in a browser, but got nothing. Then I deleted the stable-diffusion-webui folder and repeated the process starting from the cloning, but got the same error anyway. What else could be the problem?..
You can try updating your gpu driver
With v551.61 it worked. Thank you very much!
CMD can not download the torch-2.0.1%2Bcu118-cp310-cp310-win_amd64.whl file, where can i download it myself.
For whatever reason CMD can not download the torch-2.0.1%2Bcu118-cp310-cp310-win_amd64.whl file, where can i download it myself.
try this: https://download.pytorch.org/whl/torch/
For whatever reason CMD can not download the torch-2.0.1%2Bcu118-cp310-cp310-win_amd64.whl file, I’m downloading it myself and wanted to know where exactly I should put it?
You can put it in the stable-diffusion-webui folder and run:
.\venv\Scripts\pip.exe install your_wheel_file.whlYou’ve saved my life, thank you so much.
Hey, I have the same issue. I would like to know where you downloaded the torch-2.0.1%2Bcu118-cp310-cp310-win_amd64.whl file yourself. Please drop a link.
Just wanted to say thanks for the guide. Followed your instructions step by step and SD has been running perfect for the last four months. I am running SD on win 10 Ryzen 5 3600 32gig ram and RTX 3060 12gig. I am sure this is not the fastest build to run this on but have had no issues and it processes the outputs at a decent rate. I do have one question for OP or others can anyone suggest alternative sites to find models and loras outside civitai or HF. From an old man who started out with a Vic-20 and is trying to keep up with new tech these days thanks so much for this well written and easy to follow guide.
You are welcome! I am not aware of any notable alternatives.
Still the best and most straightforward guide to installing. BRAVO!
Hi Andrew,
When I double click on webui-user.bat it returns me error as below:
venv “C:\Users\willi\stable-diffusion-webui\venv\Scripts\Python.exe”
Python 3.10.11 (tags/v3.10.11:7d4cc5a, Apr 5 2023, 00:38:17) [MSC v.1929 64 bit (AMD64)]
Version: v1.7.0
Commit hash: cf2772fab0af5573da775e7437e6acdca424f26e
Traceback (most recent call last):
File “C:\Users\willi\stable-diffusion-webui\launch.py”, line 48, in
main()
File “C:\Users\willi\stable-diffusion-webui\launch.py”, line 39, in main
prepare_environment()
File “C:\Users\willi\stable-diffusion-webui\modules\launch_utils.py”, line 384, in prepare_environment
raise RuntimeError(
RuntimeError: Torch is not able to use GPU; add –skip-torch-cuda-test to COMMANDLINE_ARGS variable to disable this check
Would you please advise?
Thanks a lot
William
It seems that you have no GPU on your machine?
when i click on the webui user.bat file cmd promt ploads and i getthis error thus i cant move pastthis how do i solve thgi this so everythim g works==============================================================================================================
Python 3.12.2 (tags/v3.12.2:6abddd9, Feb 6 2024, 21:26:36) [MSC v.1937 64 bit (AMD64)]
Version: v1.8.0
Commit hash: bef51aed032c0aaa5cfd80445bc4cf0d85b408b5
Installing torch and torchvision
Looking in indexes: https://pypi.org/simple, https://download.pytorch.org/whl/cu121
ERROR: Could not find a version that satisfies the requirement torch==2.1.2 (from versions: 2.2.0, 2.2.0+cu121, 2.2.1, 2.2.1+cu121)
ERROR: No matching distribution found for torch==2.1.2
Traceback (most recent call last):
File “C:\Users\16pro\stable-diffusion-webui\launch.py”, line 48, in
main()
File “C:\Users\16pro\stable-diffusion-webui\launch.py”, line 39, in main
prepare_environment()
File “C:\Users\16pro\stable-diffusion-webui\modules\launch_utils.py”, line 380, in prepare_environment
run(f'”{python}” -m {torch_command}’, “Installing torch and torchvision”, “Couldn’t install torch”, live=True)
File “C:\Users\16pro\stable-diffusion-webui\modules\launch_utils.py”, line 115, in run
raise RuntimeError(“\n”.join(error_bits))
RuntimeError: Couldn’t install torch.
Command: “C:\Users\16pro\stable-diffusion-webui\venv\Scripts\python.exe” -m pip install torch==2.1.2 torchvision==0.16.2 –extra-index-url https://download.pytorch.org/whl/cu121
Error code: 1
Press any key to continue . . .
You should use python 3.10
I seems to have the same error. Can someone find what’s the problem?
Thanks!
Thanks Andrew! I accidentally installed it on 3.11…runs fine most of the time, and with some modules, like Controlnet and Animatediff. BUT animatediff likes to sometimes tell me it doesn’t which of the two cues devices to use. I assume I have one…..
After reading this, I’ll go back to 3.10.x
Thanks for the awesome setup guide with images
with installed PYTHON 3.12.1….d ont run?
The simplest way to make it work is to uninstall 3.12 and install 3.10
Well, that was short:
import importlib.metadata
ModuleNotFoundError: No module named ‘importlib.metadata’
—————-
Could you update the webui.bat script to make it install all the python dependencies? Getting them one by one is a pain in the ass.
First, I dont write the software. I merely wrote the installation guide.
normally it will install all packages. Check what python you are using. have to be 3.10.x
Just to confirm, did you generate the venv before running install.py? If not, your virtual environment is missing a ton of stuff. I ran into that today tbh lol
There’s a typo in your screenshot under Options (–xformers missing the s on the end)
I also had trouble with a new install:
AssertionError: An object named ‘ResNetArcFace’ was already registered in ‘arch’ registry!
fixed by deleting folders
basicsr and gfpgan from
stable-diffusion-webui\venv\Lib\site-packages\
then re-running webui-user.bat
thanks!
Installing torch and torchvision
Looking in indexes: https://pypi.org/simple, https://download.pytorch.org/whl/cu118
WARNING: Retrying (Retry(total=4, connect=None, read=None, redirect=None, status=None)) after connection broken by ‘NewConnectionError(‘: Failed to establish a new connection: [WinError 10013] An attempt was made to access a socket in a way forbidden by its access permissions’)’: /simple/torch/
Any pointers?
What a great tutorial – this beats every other one I have seen/tried.
As of late 2023-early 2024, Automatic1111 will work with an AMD GPU, but you have to be running Linux, and the process is non-trivial. AMD has created a software translation layer called ROCm that sits underneath Pytorch and allows an AMD GPU’s shaders to pretend to be CUDA cores. The Linux version is still very, very new, and there are constant problems with the nightly build breaking when the user installs a newer version of Python, etc., etc. I am optimistic that it will get better. For now it’s maybe not ready for prime time. A ROCm implementation for Windows is still a work in progress. Intel and Microsoft have created a package they call DirectML that has some conceptual similarities to ROCm, which at least theoretically allows Stable Diffusion to run on an AMD GPU. Currently DirectML is little, if at all, faster than running it on the CPU.
I have a different problem. I have Windows and an nVidia GPU, but A1111 won’t complete the installation. It gives error messages about cv2 and missing DLL files. I am running a de-bloated and de-crapified Windows 10 N installation. Apparently some part of Python for Windows is dependent on DLL files only found in the more vanilla versions of Windows 10. These files are not available from MS. I am annoyed. I had A1111 working with Linux, sort of, until I tried to install Dreambooth. Then everything stopped working and I got Python error messages I’m still trying to figure out. I wouldn’t have touched Dreambooth but Kohya_ss wouldn’t install either, dying in a convulsion of Python errors about dependencies and versions. I am annoyed.
It works great with Apple Silicon too.
you can try deleting the venv folder and restart. Another important thing to check is to make sure you are using python 3.10
Hi Andrew,
Thanks for the article. I am having issues with getting the ReActor extension to appear. I originally had the Roop extension installed before ReActor extension installation. The ReActor extension does not appear for me at all, even with the Roop extension ‘unticked,’ as well as applying and restarting UI.
I also deleted the Roop folder (C:\Users\KainPC\stable-diffusion-webui\extensions), have deleted the VENV folder entirely, and made sure there is only one folder for insightface, at C:\Users\KainPC\stable-diffusion-webui\models\insightface with the inswapper_128.onnx file inside.
I’m stuck in trying to get ReActor to work without having to do an entire uninstall and reinstall. Please could you assist?
Kind regards,
Kain
Opening an issue on the ReActor repos may get a better help… But I will try to help since you asked.
My experience with installing ReActor was that it works out of the box. But its possible that there’s a conflict with another extension. You can look for an error message during startup.
Já fiz todas as recomendações aqui do site para a correção do erro abaixo, porem não tive sucesso. Alguém pode me ajudar de outra forma?
Creating venv in directory C:\Users\xxxxxritório\stable-diffusion-webui\venv using python “C:\Users\xxxxxrit¾rio\AppData\Local\Programs\Python\Python310\python.exe”
Unable to create venv in directory “C:\Users\xxxxxritório\stable-diffusion-webui\venv”
exit code: 3
stderr:
O sistema não pode encontrar o caminho especificado.
Launch unsuccessful. Exiting.
Pressione qualquer tecla para continuar. . .
It could be that your user name “xxxxxrit¾rio” has special characters. Try installing in a local that you can create files but the path doesn’t have special characters.
Hi Andrew, great guide, thank you! When running the CMD to obtain the git clone, I get this:
fatal: destination path ‘stable-diffusion-webui’ already exists and is not an empty directory.
The trouble is, I can’t trace that instance of it. Not even in %AppData%. I did have an earlier version but so far as I can see, it’s completely gone. Where could it be tucked away? Any clues would be useful for me to work on. Thanks!
Please don’t worry. I downloaded the repository as an alternative and all set up fine.
Thanks!
Creating venv in directory C:\Users\asus\uday\stable-diffusion-webui\venv using python “C:\Users\asus\AppData\Local\Microsoft\WindowsApps\PythonSoftwareFoundation.Python.3.10_qbz5n2kfra8p0\python.exe”
Unable to create venv in directory “C:\Users\asus\uday\stable-diffusion-webui\venv”
exit code: 1
stderr:
Error: Command ‘[‘C:\\Users\\asus\\uday\\stable-diffusion-webui\\venv\\Scripts\\python.exe’, ‘-m’, ‘ensurepip’, ‘–upgrade’, ‘–default-pip’]’ returned non-zero exit status 1.
Launch unsuccessful. Exiting.
Press any key to continue . . .
can someone please help
Can anyone help me, thank you very much.
-1
here is my problem, I download a model from civitai and choose it as checkpoit but went i load cmd there is a problem and i cant generate any image, i deleted the model and replace it with another and everything is normal. Can someone have me with this error, thank you very much
RuntimeError: Expected all tensors to be on the same device, but found at least two devices, cpu and cuda:0! (when checking argument for argument index in method wrapper_CUDA__index_select)
i deleted the model and replace it with another and everything is normal.
Thank you very much for this useful guide, and also for helping users trouble-shoot in the comments. I am not very tech-oriented, but I was able to install and use SD with this page and your helpful comments.
Thank you so much! =)
Glad you had a great experience!
Hello there.
i did everything as you said and i recieve this error :
RuntimeError: CUDA error: no kernel image is available for execution on the device CUDA kernel errors might be asynchronously reported at some other API call, so the stacktrace below might be incorrect. For debugging consider passing CUDA_LAUNCH_BLOCKING=1. Compile with `TORCH_USE_CUDA_DSA` to enable device-side assertions.
I deleted venv folder and ran webui.bat again.still this error occures.can you help me please?
This is a more serious error. Try a fresh installation. Some extensions can cause this error when in conflict with each other.
Can someone help?
NansException: A tensor with all NaNs was produced in Unet. This could be either because there’s not enough precision to represent the picture, or because your video card does not support half type. Try setting the “Upcast cross attention layer to float32” option in Settings > Stable Diffusion or using the –no-half commandline argument to fix this. Use –disable-nan-check commandline argument to disable this check.
Try to put
--no-half --disable-nan-checkin webui-user.bat and see if it works.Just install NMKD SD GUI app… much, much easier.
Yo, why only python 3.10, and not newer? Whats wrong with next versions, anddd i lost some new function with 3.10? Thank youuu
A1111 is built and tested on python 3.10. You can likely make it work on 3.11 but you are asking for troubles to solve.
So, whats the troubles do u mean?
need to manually install libraries because the auto installation fails
Hello!
There are errors in arguments in FAQ:
How to resolve out-of-memory errors?
Use –low-vram instead of –med-vram argument in webui-user.bat (See Adding arguments)
Correct arguments: –lowvram / –medvram
Thank you! Corrected.
I can’t find the file [webui-user.bat] in the stable-diffusion-webui file? did I mess up a step? I have all the other files except that one.
The file webui-user.bat comes with the clone step. Your file explorer may have set to hide the extension .bat. Go find a file called webui-user.
Hi, Andrew! When I double click on webui-user.bat it returns me this error. I tried running this several times:
venv “C:\Users\ildik\stable-diffusion-webui\venv\Scripts\Python.exe”
Python 3.10.6 (tags/v3.10.6:9c7b4bd, Aug 1 2022, 21:53:49) [MSC v.1932 64 bit (AMD64)]
Version: v1.6.0
Commit hash: 5ef669de080814067961f28357256e8fe27544f4
Launching Web UI with arguments:
Traceback (most recent call last):
File “C:\Users\ildik\stable-diffusion-webui\launch.py”, line 48, in
main()
File “C:\Users\ildik\stable-diffusion-webui\launch.py”, line 44, in main
start()
File “C:\Users\ildik\stable-diffusion-webui\modules\launch_utils.py”, line 432, in start
import webui
File “C:\Users\ildik\stable-diffusion-webui\webui.py”, line 13, in
initialize.imports()
File “C:\Users\ildik\stable-diffusion-webui\modules\initialize.py”, line 21, in imports
import gradio # noqa: F401
File “C:\Users\ildik\stable-diffusion-webui\venv\lib\site-packages\gradio\__init__.py”, line 3, in
import gradio.components as components
File “C:\Users\ildik\stable-diffusion-webui\venv\lib\site-packages\gradio\components\__init__.py”, line 1, in
from gradio.components.annotated_image import AnnotatedImage
File “C:\Users\ildik\stable-diffusion-webui\venv\lib\site-packages\gradio\components\annotated_image.py”, line 12, in
from gradio import utils
File “C:\Users\ildik\stable-diffusion-webui\venv\lib\site-packages\gradio\utils.py”, line 353, in
class AsyncRequest:
File “C:\Users\ildik\stable-diffusion-webui\venv\lib\site-packages\gradio\utils.py”, line 372, in AsyncRequest
client = httpx.AsyncClient()
File “C:\Users\ildik\stable-diffusion-webui\venv\lib\site-packages\httpx\_client.py”, line 1397, in __init__
self._transport = self._init_transport(
File “C:\Users\ildik\stable-diffusion-webui\venv\lib\site-packages\httpx\_client.py”, line 1445, in _init_transport
return AsyncHTTPTransport(
File “C:\Users\ildik\stable-diffusion-webui\venv\lib\site-packages\httpx\_transports\default.py”, line 275, in __init__
self._pool = httpcore.AsyncConnectionPool(
TypeError: AsyncConnectionPool.__init__() got an unexpected keyword argument ‘socket_options’
Press any key to continue . . .
What is the problem? Can you help me?
Thanks, Ildiko
Hi, this is a known issue. See the fix here
https://github.com/AUTOMATIC1111/stable-diffusion-webui/issues/13840
Thank you very much!
Hi I have tried this fix several ways and I can’t get it to work. Any advice?
this is a rather old issue and should not happen. what’s your error message.
Thanks.
It’s the same one others have reported: “TypeError: AsyncConnectionPool.__init__() got an unexpected keyword argument ‘socket_options'” (I added the double quotes).
The two fixes I saw were in the link you provided. I tried running
venv\Scripts\activate
pip install httpx==0.24.1
in CMD, but that did not work.
Then I tried manually adding httpx==0.24.1 to the requirements doc and that didn’t work.
I have restarted the machine just in case but that didn’t fix it either.
I am admittedly not a coder and fairly ignorant even of DOS, so this is probably harder for me than for others, but up until that point your instructions had worked perfectly.
Thanks again for your attention and for any help you might provide.
You can try updating A1111, deleting (or renaming if you want to restore it) the venv folder, and restart. The venv folder will regenerate.
Hi, I have a NVIDIA card but I get the error :
RuntimeError: Torch is not able to use GPU; add –skip-torch-cuda-test to COMMANDLINE_ARGS variable to disable this check
When I add –skip-torch-cuda-test, I get the error :
OSError: [WinError 126] The specified module could not be found. Error loading “G:\ai\stable-diffusion-webui\venv\lib\site-packages\torch\lib\cudart64_110.dll”or one of its dependencies.
If I launch python from venv/Scripts and do “import torch” it does the same error.
Do you have an idea how to get my GPU recognized or how to load the dependencies properly?
It has to be an discrete NVIDIA card. What do you have?
You can also try updating the nvidia driver on windows.
I have a NVIDIA GeForce GTX 960. It has NVIDIA CUDA 11.4.189 driver.
I was able to use Stable Diffusion before, but I updated it as I wanted to install safetensors and thought it would be a good thing to pull the latest version of AUTOMATIC1111’s web-ui too. (which happens to have safetensors in its requirements now btw)
So it seems a bit more complicated than just being about NVIDIA. I guess I’m gonna have to find an older version of the web-ui that works on an older version of torch.
You can try deleting the venv folder inside stable-diffusion-webui. There may be some old temp files.
I did everything according to this article. But I can’t start the script.
When webui-user.bat is started I have a message:
“Couldn’t launch python
exit code: 9020
stderr:
The system cannot execute the specified program.”
Can anybody advice what I have to do?
Your python is not installed correctly. Try again using the microsoft store method. Reboot and see if this message goes away. If not, try the other method in the article.
hello can someone help me out with this ive tried a lot of things but cant figure this out my gpu is a 6700xt (amd)
venv “C:\Users\alexa\stable-diffusion-webui\venv\Scripts\Python.exe”
Python 3.10.11 (tags/v3.10.11:7d4cc5a, Apr 5 2023, 00:38:17) [MSC v.1929 64 bit (AMD64)]
Version: v1.6.0
Commit hash: 5ef669de080814067961f28357256e8fe27544f4
Installing torch and torchvision
Looking in indexes: https://pypi.org/simple, https://download.pytorch.org/whl/cu118
Collecting torch==2.0.1
Using cached https://download.pytorch.org/whl/cu118/torch-2.0.1%2Bcu118-cp310-cp310-win_amd64.whl (2619.1 MB)
Collecting torchvision==0.15.2
Using cached https://download.pytorch.org/whl/cu118/torchvision-0.15.2%2Bcu118-cp310-cp310-win_amd64.whl (4.9 MB)
Collecting networkx
Using cached networkx-3.2-py3-none-any.whl (1.6 MB)
Collecting typing-extensions
Using cached typing_extensions-4.8.0-py3-none-any.whl (31 kB)
Collecting filelock
Using cached filelock-3.12.4-py3-none-any.whl (11 kB)
Collecting jinja2
Using cached https://download.pytorch.org/whl/Jinja2-3.1.2-py3-none-any.whl (133 kB)
Collecting sympy
Using cached https://download.pytorch.org/whl/sympy-1.12-py3-none-any.whl (5.7 MB)
Collecting numpy
Using cached numpy-1.26.1-cp310-cp310-win_amd64.whl (15.8 MB)
Collecting requests
Using cached requests-2.31.0-py3-none-any.whl (62 kB)
Collecting pillow!=8.3.*,>=5.3.0
Using cached Pillow-10.1.0-cp310-cp310-win_amd64.whl (2.6 MB)
Collecting MarkupSafe>=2.0
Using cached MarkupSafe-2.1.3-cp310-cp310-win_amd64.whl (17 kB)
Collecting certifi>=2017.4.17
Using cached certifi-2023.7.22-py3-none-any.whl (158 kB)
Collecting idna=2.5
Using cached https://download.pytorch.org/whl/idna-3.4-py3-none-any.whl (61 kB)
Collecting charset-normalizer=2
Using cached charset_normalizer-3.3.0-cp310-cp310-win_amd64.whl (98 kB)
Collecting urllib3=1.21.1
Using cached urllib3-2.0.7-py3-none-any.whl (124 kB)
Collecting mpmath>=0.19
Using cached https://download.pytorch.org/whl/mpmath-1.3.0-py3-none-any.whl (536 kB)
Installing collected packages: mpmath, urllib3, typing-extensions, sympy, pillow, numpy, networkx, MarkupSafe, idna, filelock, charset-normalizer, certifi, requests, jinja2, torch, torchvision
Successfully installed MarkupSafe-2.1.3 certifi-2023.7.22 charset-normalizer-3.3.0 filelock-3.12.4 idna-3.4 jinja2-3.1.2 mpmath-1.3.0 networkx-3.2 numpy-1.26.1 pillow-10.1.0 requests-2.31.0 sympy-1.12 torch-2.0.1+cu118 torchvision-0.15.2+cu118 typing-extensions-4.8.0 urllib3-2.0.7
Traceback (most recent call last):
File “C:\Users\alexa\stable-diffusion-webui\launch.py”, line 48, in
main()
File “C:\Users\alexa\stable-diffusion-webui\launch.py”, line 39, in main
prepare_environment()
File “C:\Users\alexa\stable-diffusion-webui\modules\launch_utils.py”, line 356, in prepare_environment
raise RuntimeError(
RuntimeError: Torch is not able to use GPU; add –skip-torch-cuda-test to COMMANDLINE_ARGS variable to disable this check
Press any key to continue . . .
Hi, this guide is for NVidia GPU cards. Find another guide for amd.
i dont know about this but before few comments i red one comment that amd gpu wont works nvidia gpu only works …first check details about that by doing google
Hey there, I also have the error
venv “C:\Users\XXX\stable-diffusion-webui\venv\Scripts\Python.exe”
Python 3.10.11 (tags/v3.10.11:7d4cc5a, Apr 5 2023, 00:38:17) [MSC v.1929 64 bit (AMD64)]
Version: v1.6.0
Commit hash: 5ef669de080814067961f28357256e8fe27544f4
Traceback (most recent call last):
File “C:\Users\XXX\stable-diffusion-webui\launch.py”, line 48, in
main()
File “C:\Users\XXX\stable-diffusion-webui\launch.py”, line 39, in main
prepare_environment()
File “C:\Users\XXX\stable-diffusion-webui\modules\launch_utils.py”, line 356, in prepare_environment
raise RuntimeError(
RuntimeError: Torch is not able to use GPU; add –skip-torch-cuda-test to COMMANDLINE_ARGS variable to disable this check
Press any key to continue . . .
Could you please tell me what to do?
It cannot find a GPU card. Do you have an NVIDIA card?
I have same issue after update to current head. Forced reinstall and still crash with this same error as though torch cannot find my 4080 now. Deleted venv and retry – same issue. Forced reinstall torch and no go. Looking at commits there seems to be some talk about urgent issue to push but most recent commit 4afaaf8a020c1df457bcf7250cb1c7f609699fa7
still same issue as above – cannot seem to find the gpu. I updated nvidia drivers and tried again no joy.
I use InstantDiffusion.con
Hello,
I am a noob but know how to follow the instructions : )
This is what I’ve got after running webui-user.bat … (any solutions to this issue?)
Python 3.10.11 (tags/v3.10.11:7d4cc5a, Apr 5 2023, 00:38:17) [MSC v.1929 64 bit (AMD64)]
Version: v1.6.0
Commit hash: 5ef669de080814067961f28357256e8fe27544f4
Traceback (most recent call last):
File “C:\Users\posit\stable-diffusion-webui\launch.py”, line 48, in
main()
File “C:\Users\posit\stable-diffusion-webui\launch.py”, line 39, in main
prepare_environment()
File “C:\Users\posit\stable-diffusion-webui\modules\launch_utils.py”, line 356, in prepare_environment
raise RuntimeError(
RuntimeError: Torch is not able to use GPU; add –skip-torch-cuda-test to COMMANDLINE_ARGS variable to disable this check
Press any key to continue . . .
It complains that you don’t have a gpu. do you have an nvidia card?
Hi,
I have a Radeon RX480 8gb… I kind of made it work but when using Stable Diffusion processing is very slow and on the end photo just disappears. It shows countdown and when it gets to few seconds left the creation is gone.
Would this be a GPU/CPU issue?
Thanks for your reply!
I know people start to get AMD GPU to work but I believe the config is highly card and driver dependent. Sorry I don’t have any experience there.
NP, thanks.
how to uninstall in future?
Removing the folder will do.
Having played more with it, I think both models I’ve used, 1.5 and 222, are just not very good AI. I typed, “Bear fighting Sean Connery” and the picture had Connery holding some kind of strange contraption or toolkit with tendrils coming off of it, but their was no bear. Then I tried “Polar bear fighting Sean Connery” and this time I did get a polar bear and Sean Connery, but they were facing away from each other. Not a normal person’s idea of a “fight.” Not sure what is wrong with the AI.
The base model doesn’t do animals very well. You’ll need a LORA or another animal specific checkpoint. Model f222 is a pron base model. Be careful asking for animals unless you’re into that sort of thing. What has been seen cannot be unseen.
OK, confused about NSFW restrictions on this installation. My understanding was that Stable Diffusion would just show a black square if you tripped its NSFW filter. However, I gave it various instructions similar to “Marilyn Monroe sitting on the President’s desk completely naked,” some of them very explicit, yet most the results were just topless, and Marilyn wasn’t obeying the instructions I gave. I installed SD Model 1.5 as instructed. Is that just a limitation of the model – that it turns your requests into PG13 requests?
The NSFW filters in many online generators are not part of the model. When generating images locally on A1111, there are no NSFW filters.
You can suppress NSFW content by adding nsfw, nude, etc to your negative prompt. But it won’t be a foolproof solution.
“RTX 4000 series graphic cards”
What about the RTX 4060. Is that one supported? You listed some by name but not that one.
yes
Bonjour
Pour préparer une conversions d’emploi, je souhaitait utiliser Stable diffusion.
Cependant, le Webui-user une fois lancé se coince sur le message suivant:
“return torch.embedding(weight, input, padding_idx, scale_grad_by_freq, sparse)
RuntimeError: CUDA error: no kernel image is available for execution on the device
CUDA kernel errors might be asynchronously reported at some other API call, so the stacktrace below might be incorrect.
For debugging consider passing CUDA_LAUNCH_BLOCKING=1.
Compile with `TORCH_USE_CUDA_DSA` to enable device-side assertions.
Stable diffusion model failed to load”
Sauriez-vous SVP m’indiquer ou est le problème et que dois-je faire pour le résoudre?
Merci pour votre retour
Cordialement
M. Maxime WALGENWITZ
Rebonjour,
Pour précision, je travail sur Windows10
Et le message d’origine en anglais a été directement traduit en français, j’espère que cela restera lisible et compréhensible
Cordialement
M. Maxime WALGENWITZ
Try deleting the venv folder and run webui-user.bat
Hello there. I have same issue and it didn’t solve with deleting venv folder. What should i do?
I’m getting this response everytime I try running git clone https://github.com/automatic1111/stable-diffusion-webui.git. The error I get is, ‘Https://github.com/automatic1111/stable-diffusion-webui.git/’: The requested URL returned error: 403. I’m running Windows 11 and haven’t found a workable solution
It seems to be a permission issue. Try installing it in your user’s home directory.
I have tried for days to be able to install, I have installed, uninstalled python, disabled the antivirus, download everything requested again, but I cannot move forward, always the same error:
venv “C:\Users\Omen\stable-diffusion-webui\venv\Scripts\Python.exe”
Python 3.10.6 (tags/v3.10.6:9c7b4bd, Aug 1 2022, 21:53:49) [MSC v.1932 64 bit (AMD64)]
Version: v1.5.1
Commit hash: 68f336bd994bed5442ad95bad6b6ad5564a5409a
Installing torch and torchvision
C:\Users\Omen\stable-diffusion-webui\venv\Scripts\python.exe: No module named pip
Traceback (most recent call last):
File “C:\Users\Omen\stable-diffusion-webui\launch.py”, line 39, in
main()
File “C:\Users\Omen\stable-diffusion-webui\launch.py”, line 30, in main
prepare_environment()
File “C:\Users\Omen\stable-diffusion-webui\modules\launch_utils.py”, line 311, in prepare_environment
run(f'”{python}” -m {torch_command}’, “Installing torch and torchvision”, “Couldn’t install torch”, live=True)
File “C:\Users\Omen\stable-diffusion-webui\modules\launch_utils.py”, line 113, in run
raise RuntimeError(“\n”.join(error_bits))
RuntimeError: Couldn’t install torch.
Command: “C:\Users\Omen\stable-diffusion-webui\venv\Scripts\python.exe” -m pip install torch==2.0.1 torchvision==0.15.2 –extra-index-url https://download.pytorch.org/whl/cu118
Error code: 1
Presione una tecla para continuar . . .
Check if your python work by typing this in cmd:
C:\Users\Omen\stable-diffusion-webui\venv\Scripts\python.exe
It should enter the python environment.
hi, I also have this problem. I tried that command and got
Python 3.10.6 (tags/v3.10.6:9c7b4bd, Aug 1 2022, 21:53:49) [MSC v.1932 64 bit (AMD64)] on win32
Type “help”, “copyright”, “credits” or “license” for more information.
>>>
what should i do?
This shows your python is installed correctly — one less thing to worry about. what’s your error message?
this is the best and most comprehensive anything python related tutorial i’ve seen in years
Hi I have this type of error I have been stuck on this for 2 days
venv “C:\Users\Josias\stable-diffusion-webui\venv\Scripts\Python.exe” Python 3.10.6 (tags/v3.10.6:9c7b4bd, 1er août 2022, 21:38:17) [MSC v. 1932 32 bits (Intel)] Version : v1.5.1 Commit hash : 68f336bd994bed5442ad95bad6b6ad5564a5409a Lancement de l’interface utilisateur Web avec des arguments : –skip-torch-cuda-test Microsoft Visual C++ Redistributable n’est pas installé, cela peut entraîner l’échec du chargement de la DLL. Il peut être téléchargé sur https://aka.ms/vs/16/release/vc_redist.x64.exeTraceback (appel le plus récent en dernier) : Fichier “C:\Users\Josias\stable-diffusion-webui\launch.py”, ligne 39, dans main() Fichier “C:\Users\Josias\stable-diffusion-webui\ launch.py”, ligne 35, dans le fichier start() principal “C:\Users\Josias\stable-diffusion-webui\modules\launch_utils.py”, ligne 390, dans start import webui File “C:\Users\Josias \stable-diffusion-webui\webui.py”, ligne 38, dans le fichier de torche d’importation “C:\Users\Josias\stable-diffusion-webui\venv\lib\site-packages\torch_ init _.py”, ligne 122 , dans raise err OSError : [WinError 193] %1 n’est pas une application Win32 valide. Erreur lors du chargement de “C:\Users\Josias\stable-diffusion-webui\venv\lib\site-packages\torch\lib\asmjit.dll” ou de l’une de ses dépendances.
Thanks for the terrific tutorial. I’ve been waiting to buy a new graphics card since before the pandemic started. I followed your tutorial but installed python without the Microsoft store and got Stable Diffusion up and running on the first try! I’m using very old but capable Gigabyte GA-990FXA-UD3 RF motherboard, 32 gigs of RAM, AMD FX-8350 CPU, GeForce RTX 3060 Twin Edge OC 12 GB GDDR6 and a single 120mm water cooler. Obviously I could get better results with a newer motherboard but I just wanted to say it’s a great tutorial!
Thanks for letting me know!
what do u mean it doesnt work with AMD? this some ole bullshit
What I do wrong? It’s my second try. Before this error code 1 was error code 2
venv “P:\stable-diffusion-webui\venv\Scripts\Python.exe”
Python 3.10.11 (tags/v3.10.11:7d4cc5a, Apr 5 2023, 00:38:17) [MSC v.1929 64 bit (AMD64)]
Version: v1.5.1
Commit hash: 68f336bd994bed5442ad95bad6b6ad5564a5409a
Installing torch and torchvision
Looking in indexes: https://pypi.org/simple, https://download.pytorch.org/whl/cu118
Collecting torch==2.0.1
Downloading https://download.pytorch.org/whl/cu118/torch-2.0.1%2Bcu118-cp310-cp310-win_amd64.whl (2619.1 MB)
—————————— ——— 2.0/2.6 GB 13.9 MB/s eta 0:00:44ERROR: Could not install packages due to an OSError: [Errno 28] No space left on device
—————————— ——— 2.0/2.6 GB 13.4 MB/s eta 0:00:46
WARNING: There was an error checking the latest version of pip.
Traceback (most recent call last):
File “P:\stable-diffusion-webui\launch.py”, line 39, in
main()
File “P:\stable-diffusion-webui\launch.py”, line 30, in main
prepare_environment()
File “P:\stable-diffusion-webui\modules\launch_utils.py”, line 311, in prepare_environment
run(f'”{python}” -m {torch_command}’, “Installing torch and torchvision”, “Couldn’t install torch”, live=True)
File “P:\stable-diffusion-webui\modules\launch_utils.py”, line 113, in run
raise RuntimeError(“\n”.join(error_bits))
RuntimeError: Couldn’t install torch.
Command: “P:\stable-diffusion-webui\venv\Scripts\python.exe” -m pip install torch==2.0.1 torchvision==0.15.2 –extra-index-url https://download.pytorch.org/whl/cu118
Error code: 1
No Python folder/file in the webui models folder. Is this because Path wasn’t established in the Python download as I mentioned earlier?
Chris
You should see some models file in the “models” folder. They should have .pt or .safetensors extensions. Delete them and download the v1.5 model listed in the article.
Also, I noted that there was no ‘box-check’ to add a path for the Python install with the M’Soft Store download. Is this important? If so, how do I add it?
This note doesn’t apply to installing through MS store.
Hi Andrew,
“The model file is a zip file. It cannot unzip it so it is not downloaded correctly. Check the file size. It should be > 4GB.”
I’ve done a file search in Windows which took some time and thrown up probably over 100 files! What file should I be looking for? Obviously, the MSoft Store has automatically unzipped their Python 3.10.11 file. Is it possible to ‘re-zip’ the files or, alternatively, amend the batch file with a brief correction to read the unzipped Python files.
I’ll spend this weekend amending the SD batch files incorporating changes to all the routines thathave been flagged up.
Chris
The model file is in SD folder: stable-diffusion-webui > models
Hi Andrew
Thanks for your feedback yesterday. I decided to fully delete and reclone the SD webui. (I haven’t reinstalled the Python and github routines as mine appear to be exactly the same as your screen images in your installation guide.)
Unfortunately, I’ve had the same unsuccessful result as yesterday. I won’t regurgitate everything from the batch file as it appears to be the same as before. However, I will show the significant errors and ask you to comment on them and perhaps suggest ways of overcoming them.
Firstly, during the early part if the batch file run, the following notice again appears:
[notice] A new release of pip is available: 23.0.1 -> 23.2.1
[notice] To update, run: C:\Users\44739\stable-diffusion-webui\venv\Scripts\python.exe -m pip install –upgrade pip.
As it’s impossible to do this while the bat file is running, I will attempt to run the patch when (if!) I get the webui.bat running correctly.
The major problems started when installing requirements for CodeFormer:
Installing requirements
Launching Web UI with arguments:
no module ‘xformers’. Processing without…
no module ‘xformers’. Processing without…
No module ‘xformers’. Proceeding without it.
Where is the module ‘xformers’?
The next problem is:
*** Error verifying pickled file from C:\Users\44739\stable-diffusion-webui\models\Stable-diffusion\v1-5-pruned-emaonly.ckpt
*** The file may be malicious, so the program is not going to read it.
*** You can skip this check with –disable-safe-unpickle commandline argument.
What can be done about this?
Then, during the subsequent traceback it shows:
Files\WindowsApps\PythonSoftwareFoundation.Python.3.10_3.10.3056.0_x64__qbz5n2kfra8p0\lib\zipfile.py”, line 1336, in _RealGetContents
raise BadZipFile(“File is not a zip file”)
zipfile.BadZipFile: File is not a zip file
Why is this a BadZipFile?
Then, during handling of the above exception, another exception occurred:
File “C:\Users\44739\stable-diffusion-webui\modules\safe.py”, line 137, in load_with_extra
check_pt(filename, extra_handler)
File “C:\Users\44739\stable-diffusion-webui\modules\safe.py”, line 104, in check_pt
unpickler.load()
File “C:\Program Files\WindowsApps\PythonSoftwareFoundation.Python.3.10_3.10.3056.0_x64__qbz5n2kfra8p0\lib\pickle.py”, line 1211, in load
raise EOFError
EOFError
Why is this?
Then, while loading stable diffusion model: AttributeError, it goes through another traceback, it concludes with:
File “C:\Users\44739\stable-diffusion-webui\modules\sd_models.py”, line 207, in get_state_dict_from_checkpoint
pl_sd = pl_sd.pop(“state_dict”, pl_sd)
AttributeError: ‘NoneType’ object has no attribute ‘pop’
Stable diffusion model failed to load
Applying attention optimization: Doggettx… done.
Running on local URL: http://127.0.0.1:7860
I haven’t bothered trying to run the AUTOMATIC1111 webui, as I know it will result in nothing as before. I’ve now reached the end of my tether!
As this has resulted in repeating exactly what happened beforehand, I will now use the online Automatic1111 website to expand my knowledge about SDXL1 until a totally stable install routine is available, hopefully with a simple .exe file to use it easily!
I would welcome your comments and possible solutions on the above.
Regards
Chris
pip is nothing to worry about.
The model file is a zip file. It cannot unzip it so it is not downloaded correctly. Check the file size. It should be > 4GB.
You can add
--xformersto webui-user.bat. See the Option section in the article.Finally, you may consider getting professional help on installing.
Thanks for reponding so speedily. Yas, I have an RTX3060, 12 Gb. VRAM
I’ll try one more time tomorrow!
Hi Andrew
I did as you last suggested but without success.
I loaded the Stable Diffusion webui bat. It must have been recently amended as it stated it was now using Python 3.10.10. So I deleted my Python files and downloaded Python 3.10.10 from the M’Soft Store. (Incidentally, it should be noted that, in the notes on the webpage, they state that the file is now the latest, Python3.10.11 but no date for the update is shown.)
I then ran the webui bat. Early in the run it flagged that it was expecting P3.10.10 and noted that P3.10.11 was running, but the bat. file continued. It then noted that there was an upgrade to pip available and flagged up the following:
C:\Users\44739\stable-diffusion-webui\venv\Scripts\python.exe -m pip install –upgrade pip
The program continued to run but resulted in:
Stable diffusion model failed to load
Applying attention optimization: Doggettx… done.
Running on local URL: http://127.0.0.1:7860
I investigated the SDHL webui bat. file and copied the printout. I won’t detail everything, but the following extracts show several serious errors that need addressing. (I tried to highlight particular points in bold for clarity but apparenty this page won’t allow this.)
…..
Installing requirements
Launching Web UI with arguments:
no module ‘xformers’. Processing without…
no module ‘xformers’. Processing without…
No module ‘xformers’. Proceeding without it.
Loading weights [e3b0c44298] from C:\Users\#####\stable-diffusion-webui\models\Stable-diffusion\v1-5-pruned-emaonly.ckpt
*** Error verifying pickled file from C:\Users\#####\stable-diffusion-webui\models\Stable-diffusion\v1-5-pruned-emaonly.ckpt
*** The file may be malicious, so the program is not going to read it.
*** You can skip this check with –disable-safe-unpickle commandline argument.
It then did a traceback concluding with the following:
Files\WindowsApps\PythonSoftwareFoundation.Python.3.10_3.10.3056.0_x64__qbz5n2kfra8p0\lib\zipfile.py”, line 1336, in _RealGetContents
raise BadZipFile(“File is not a zip file”)
zipfile.BadZipFile: File is not a zip file
During handling of the above exception, another exception occurred:
File “C:\Users\#####\stable-diffusion-webui\modules\safe.py”, line 137, in load_with_extra
check_pt(filename, extra_handler)
File “C:\Users\#####\stable-diffusion-webui\modules\safe.py”, line 104, in check_pt
unpickler.load()
File “C:\Program Files\WindowsApps\PythonSoftwareFoundation.Python.3.10_3.10.3056.0_x64__qbz5n2kfra8p0\lib\pickle.py”, line 1211, in load
raise EOFError
EOFError
loading stable diffusion model: AttributeError
It then went through another traceback concluding with:
File “C:\Users\44739\stable-diffusion-webui\modules\sd_models.py”, line 207, in get_state_dict_from_checkpoint
pl_sd = pl_sd.pop(“state_dict”, pl_sd)
AttributeError: ‘NoneType’ object has no attribute ‘pop’
Stable diffusion model failed to load
Applying attention optimization: Doggettx… done.
Running on local URL: http://127.0.0.1:7860
To create a public link, set `share=True` in `launch()`.
Startup time: 483.6s (launcher: 444.5s, import torch: 15.9s, import gradio: 6.1s, setup paths: 7.0s, other imports: 6.0s, setup codeformer: 0.5s, load scripts: 2.4s, create ui: 0.7s, gradio launch: 0.3s).
So there we are – still unusable. I’m not a programmer (how many SDXL users are?) and all this is way above my pay grade to get it running properly. So, I’ve now decided that, until a better, more stable install routine is available, I’ll use Gravity Diffus to run AUTOMATIC1111. At least, I’ll be able to familiarise myself with the prompts and routines until that is available.
I would still welcome your input on this. Your tutorials are much the best for newbies like me and I’ll be keeping an eye on them to see when (if!!) it becomes available.
Regards,
Chris Vowell
You python version should be ok.
Try deleting the files in the “models” folder and download the SD 1.5 model again. The file seems to be corrupted.
You have an Nvidia gpu correct?
venv “C:\stable diffusion\stable-diffusion-webui\venv\Scripts\Python.exe”
Python 3.10.6 (tags/v3.10.6:9c7b4bd, Aug 1 2022, 21:53:49) [MSC v.1932 64 bit (AMD64)]
Version: v1.5.1
Commit hash: 68f336bd994bed5442ad95bad6b6ad5564a5409a
Launching Web UI with arguments:
no module ‘xformers’. Processing without…
no module ‘xformers’. Processing without…
No module ‘xformers’. Proceeding without it.
Downloading: “https://huggingface.co/runwayml/stable-diffusion-v1-5/resolve/main/v1-5-pruned-emaonly.safetensors” to C:\stable diffusion\stable-diffusion-webui\models\Stable-diffusion\v1-5-pruned-emaonly.safetensors
1%|▊ | 45.3M/3.97G [17:34<39:51:12, 29.4kB/s]
My CMD is stuck here even though my computer's connection is very good, I have tested the internet speed is 186mbps. everything is downloading pretty well on google chorme.
You can download the model using manually and put it in C:\stable diffusion\stable-diffusion-webui\models
No this problem is show when I installing process of stable diffusion, I am not installing any extensions, how to fix this explains me the full process and why should this problem go?
try deleting the venv folder and restart.
Where is find the extension folder?
stable-diffusion-webui > extensions
Sorry, another typo. It was Python 3.10.6 I’ve installed
Hi Andrew,
Well, after a weekend of slowly following your suggestions, including removing all previous versions of Python and installing the M’store version of Python 3.10.1, I did eventually manage to get the Stable Diffusion program running – sort of.
When I opened it, I inserted ‘a black cat’ in the prompt but within a second I got no image but the following in the bottom right corner:
AttributeError: ‘NoneType’ object has no attribute ‘pop’
Time taken: 0.2 sec.
A: 0.01 GB, R: 0.02 GB, Sys: 2.1/12 GB (17.4%)
I checked the following in the batch file:
Stable diffusion model failed to load
*** Error completing request
followed by list of arguments, 10 of which were flagged False and then several Tracebacks concluding with the same AttributeError.
Have you any suggestions as to how I can resolve this?
Regards,
Chris Vowell
Perhaps something messed up during multiple installations. Deleting the ‘repositories’ and ‘venv’ folder inside stable-diffusion-webui and run it again.
Hello, Andrew. Ive been having issues and I really couldn’t find any solution. Every time I try to download webui.user.bat it stops at somewhere like that.
Collecting torch==2.0.1
then it stops, also makes my computer slow down terribly. Can you please help me?
Do you have enough disk space? At least 10GB would be safe.
How to fix this issue
WARNING: Retrying (Retry (total-2, connect=None, read=None, redirect=None, status=None)) after connection broken by ‘NewC
onnectionError(‘: Failed to establish a new
connection: [Errno 11001] getaddrinfo failed’)’: /whl/cu118/torch/
WARNING: Retrying (Retry (total-1, connect=None, read=None, redirect=None, status=None)) after connection broken by ‘NewC
onnectionError(‘: Failed to establish a new
connection: [Errno 11001] getaddrinfo failed’)’: /whl/cu118/torch/
CWARNING: Retrying (Retry (total-0, connect=None, read=None, redirect=None, status=None)) after connection broken by ‘NewC
SonnectionError(‘: Failed to establish a new
connection: [Errno 11001] getaddrinfo failed’)’: /whl/cu118/torch/
ERROR: Could not find a version that satisfies the requirement torch==2.0.1 (from versions: none)
ERROR: No matching distribution found for torch==2.0.1
WARNING: There was an error checking the latest version of pip.
Traceback (most recent call last):
File “E:\STABLE DIFFUSION AI\STABLE
SE
DIFFUSION\stable-diffusion-webui-master\launch.py”, line 39, in
line 30, in main
main()
File “E: \STABLE DIFFUSION AI\STABLE DIFFUSION\stable-diffusion-webui-master\launch.py”,
prepare_environment ()
File “E:\STABLE DIFFUSION AI\STABLE DIFFUSION\stable-diffusion-webui-master\modules\launch_utils.py”,
Error code: 1
Press any key to continue
line 311, in pre
live=True)
line 113, in run
pare_environment
run (f””{python}” -m {torch_command}’, “Installing torch and torchvision”, “Couldn’t install torch”,
File “E:\STABLE DIFFUSION AI\STABLE DIFFUSION\stable-diffusion-webui-master\modules\launch_utils.py”,
raise RuntimeError(“\n”.join(error_bits))
RuntimeError: Couldn’t install torch.
Command: “E:\STABLE DIFFUSION AI\STABLE DIFFUSION\stable-diffusion-webui-master\venv\Scripts\python.exe” -m pip install
torch==2.0.1 torchvision=-0.15.2 –extra-index-url https://download.pytorch.org/whl/cu118
Try deleting the venv folder and start the webui again.
If this happen after installing an extension, delete the folder of that extension and try again.
Hi Andrew,
I’m now getting very confused. I went to the python website (python.org/downloads/windows/) to download Python 3.10.6. I’ve done that, only to find that it’s marked (-ember-AMD64) so presumably it’s only for AMD graphics cards. I’ve now looked at other versions but only one, Python 3.10.7 doesn’t have the -embed-AMD64 suffix. Which do I use?
Many thanks
Chris
Hi Chris,
To start over, first delete the venv folder of in stable-diffusion-webui and uninstall all python you previously installed. (Use Add or remove programs)
The best bet for python is the one in Microsoft store. If you cannot install that one, use the 64-bit Windows installer on Python website.
Hi Andrew,
Thanks for getting back to me so speedily.
With git, it’s the installation process. There are 6-8 screen pages you have to get through before commencing the install. Although there are some points to identify what they’re about, they aren’t that clear to a newbie. Some clarification as to what they do and why would be useful. I guess I must have made suitable choices to get it installed as I did. I hope I don’t have to go through this again as I can’t remember now what choices I made!
Regarding the python message, noted. It’s just that I hadn’t expected it to then continue for over another hour with no successful result.
I’ll look into your DreamStudio suggestion today. BTW, I made a typo about my graphics card – it’s got 12 Gb of VRAM.
I’m setting aside time this weekend to have another go at installing SDXL1. If you can, can you let me know ASAP which parts of the process I must redo, i.e which programs to delete, amend, reinstall, etc.
Regarding your opening comment, that’s obvious but, as I concluded in my opening message, this needn’t be so. SDXL1 appears to be such a good AI graphics program, it would gain much wider usage if it was easier to install via an exe. file, especially for non-tech newbies like me. And I’m sure there must be many of us!
Many thanks again,
Chris
Thank you for an apparently full explanation of the processes required for installing SDXL 1.0. BUT, having carefully followed your recommendations without success, I am now suffering from early-onset baldness from tearing my hair out all day. TBH, I have never experienced a more arcane and frankly flaky procedure to get a program to run!
Firstly some background. I’m a retired architect and interior designer, experienced in 3D CAD and many other graphics programs. I should state here that I’m a total newbie to AI graphics but became intrigued after using Clip-Drop SDXL to create images (though C-D SDXL 0.9 was, in my opinion, better than their present SDXL 1.0 version). I read yours and other online articles about SDXL to get an understanding of how SDXL works and what is required to run it. Yours are, by far, the best for newbies like me.
I have a fast PC with 32 Gb of on-board Ram and an Nvidia RTX 3060 graphics card with 2 Gb of VRAM, so I feel confident that I have the kit to run it.
Taking the plunge I tried to install it today by carefully following the procedures you’ve set out here. But, from the get-go had worries because I AM NOT A PROGRAMMER! I occasionally use the Cmd. prompt for simple procedures and I felt reasonably confident that I could tackle this install after reading this article.
But I soon began to have concerns. I went to the MS Store to get Python, downloaded and installed the latest version. “Because it must be the best one, right?” (Wrong!, as I was to find out.)
I then used the Cmd. prompt to install GIT which went reasonably well except for many intermediate web-screens requesting certain parameters to be chosen. I was totally flummoxed by this because, as a newbie, they didn’t clearly explain what they’re for. (Why are they required and what do they do?) Anyway, I made what I thought were correct choices and it installed OK I then used the Cmd. Prompt to clone the AUTOMATIC1111 repository, and my browser to successfully install the Stable Diffusion webui and its bat. file
Then the problems started. The Cmd. Screen chuntered away slowly for the next few minutes but then presented the following:
“INCOMPATIBLE PYTHON VERSION This program is tested with 3.10.6 Python, but you have 3.11.4. If you encounter an error with “RuntimeError: Couldn’t install torch.” message,or any other error regarding unsuccessful package (library) installation,please downgrade (or upgrade) to the latest version of 3.10 Python and delete current Python and “venv” folder in WebUI’s directory.”
ARGHH, I thought, but it continued downloading. I thought, no matter, it’ll probably be OK. It then chuntered away for the next hour until: “Stable diffusion model failed to load.” What a waste of time! Needless to say, I gave up then. I’ll try to install the correct python version again tomorrow and start again.
But there are some serious issues that need addressing here.
1. Can you amend your page to note the need to install Python 3.10.6 and not later versions.
2. Can you clarify what the various install bits if GIT are (as mentioned above)?
3. Why the bloody hell should the Stable Diffusion webui bat. file continue downloading when this end result was likely? It should have terminated when the Python version issue arose.
4. Above all, why is there no easy to use .exe file to more simply install SDXL? I use other graphics programs (such as Poser Pro) that have Python natively installed to run them. Why not Stable Diffusion? IT BADLY NEEDS ONE!
Hi, sorry for your suffering but it is part of the Stable Diffusion experience…
1. Good suggestions on python. Added.
2. Which part of git is not clear? Your git clone seemed to be successful.
3. The python 3.11 message was just a warning. Someone may have a reason to 3.11 and it could work with some tweaking. (Not recommended for newbies)
4. Alternatively you can use a web service like the DreamStudio to use SDXL at an affordable price, if installation is something you don’t want to deal with. 3060 with 2GB VRAM is likely not enough. You can also use my colab notebook to run A1111:
https://stable-diffusion-art.com/automatic1111-colab/
Hi Andrew, thank you so much for all you do, I’ve learned a lot from your website.
I have a couple older computers which run Stable Diffusion slowly, but when I try and put it on the PC with the best graphics card I keep running into some errors when running webui-user.bat.
I was hoping someone could have a look and tell me what you think.
Steps I’ve already tried –
Reinstalled Everything, Made sure everything had Admin privileges, Verified Python v3.10.6 64 Bit, Deleted %Appdata% Pip Files, Deleted Venv Folder, Disabled Antiviruses, Verified Python to Path, Rebooted endlessly, Moved Pyhon Directory to Program Files, retried steps which have worked before, etc.
The problem i seem to be having is i can’t get Torch to finish downloading when i run webui-user.bat. It will get half way through then hang and this error.
I don’t know what i’m doing wrong.
————————————————————
C:\SD\stable-diffusion-webui>webui-user
venv “C:\SD\stable-diffusion-webui\venv\Scripts\Python.exe”
Python 3.10.6 (tags/v3.10.6:9c7b4bd, Aug 1 2022, 21:53:49) [MSC v.1932 64 bit (AMD64)]
Version: v1.5.1
Commit hash: 68f336bd994bed5442ad95bad6b6ad5564a5409a
Installing torch and torchvision
Looking in indexes: https://pypi.org/simple, https://download.pytorch.org/whl/cu118
Collecting torch==2.0.1
Downloading https://download.pytorch.org/whl/cu118/torch-2.0.1%2Bcu118-cp310-cp310-win_amd64.whl (2619.1 MB)
—————– ———————- 1.2/2.6 GB 26.2 MB/s eta 0:00:56
ERROR: Exception:
Traceback (most recent call last):
File “C:\SD\stable-diffusion-webui\venv\lib\site-packages\pip\_vendor\urllib3\response.py”, line 438, in _error_catcher
yield
File “C:\SD\stable-diffusion-webui\venv\lib\site-packages\pip\_vendor\urllib3\response.py”, line 561, in read
data = self._fp_read(amt) if not fp_closed else b””
File “C:\SD\stable-diffusion-webui\venv\lib\site-packages\pip\_vendor\urllib3\response.py”, line 527, in _fp_read
return self._fp.read(amt) if amt is not None else self._fp.read()
File “C:\SD\stable-diffusion-webui\venv\lib\site-packages\pip\_vendor\cachecontrol\filewrapper.py”, line 90, in read
data = self.__fp.read(amt)
File “C:\Program Files\Python\Python310\lib\http\client.py”, line 465, in read
s = self.fp.read(amt)
File “C:\Program Files\Python\Python310\lib\socket.py”, line 705, in readinto
return self._sock.recv_into(b)
File “C:\Program Files\Python\Python310\lib\ssl.py”, line 1274, in recv_into
return self.read(nbytes, buffer)
File “C:\Program Files\Python\Python310\lib\ssl.py”, line 1130, in read
return self._sslobj.read(len, buffer)
TimeoutError: The read operation timed out
During handling of the above exception, another exception occurred:
Traceback (most recent call last):
File “C:\SD\stable-diffusion-webui\venv\lib\site-packages\pip\_internal\cli\base_command.py”, line 180, in exc_logging_wrapper
status = run_func(*args)
File “C:\SD\stable-diffusion-webui\venv\lib\site-packages\pip\_internal\cli\req_command.py”, line 248, in wrapper
return func(self, options, args)
File “C:\SD\stable-diffusion-webui\venv\lib\site-packages\pip\_internal\commands\install.py”, line 377, in run
requirement_set = resolver.resolve(
File “C:\SD\stable-diffusion-webui\venv\lib\site-packages\pip\_internal\resolution\resolvelib\resolver.py”, line 92, in resolve
result = self._result = resolver.resolve(
File “C:\SD\stable-diffusion-webui\venv\lib\site-packages\pip\_vendor\resolvelib\resolvers.py”, line 546, in resolve
state = resolution.resolve(requirements, max_rounds=max_rounds)
File “C:\SD\stable-diffusion-webui\venv\lib\site-packages\pip\_vendor\resolvelib\resolvers.py”, line 397, in resolve
self._add_to_criteria(self.state.criteria, r, parent=None)
File “C:\SD\stable-diffusion-webui\venv\lib\site-packages\pip\_vendor\resolvelib\resolvers.py”, line 173, in _add_to_criteria
if not criterion.candidates:
File “C:\SD\stable-diffusion-webui\venv\lib\site-packages\pip\_vendor\resolvelib\structs.py”, line 156, in __bool__
return bool(self._sequence)
File “C:\SD\stable-diffusion-webui\venv\lib\site-packages\pip\_internal\resolution\resolvelib\found_candidates.py”, line 155, in __bool__
return any(self)
File “C:\SD\stable-diffusion-webui\venv\lib\site-packages\pip\_internal\resolution\resolvelib\found_candidates.py”, line 143, in
return (c for c in iterator if id(c) not in self._incompatible_ids)
File “C:\SD\stable-diffusion-webui\venv\lib\site-packages\pip\_internal\resolution\resolvelib\found_candidates.py”, line 47, in _iter_built
candidate = func()
File “C:\SD\stable-diffusion-webui\venv\lib\site-packages\pip\_internal\resolution\resolvelib\factory.py”, line 206, in _make_candidate_from_link
self._link_candidate_cache[link] = LinkCandidate(
File “C:\SD\stable-diffusion-webui\venv\lib\site-packages\pip\_internal\resolution\resolvelib\candidates.py”, line 293, in __init__
super().__init__(
File “C:\SD\stable-diffusion-webui\venv\lib\site-packages\pip\_internal\resolution\resolvelib\candidates.py”, line 156, in __init__
self.dist = self._prepare()
File “C:\SD\stable-diffusion-webui\venv\lib\site-packages\pip\_internal\resolution\resolvelib\candidates.py”, line 225, in _prepare
dist = self._prepare_distribution()
File “C:\SD\stable-diffusion-webui\venv\lib\site-packages\pip\_internal\resolution\resolvelib\candidates.py”, line 304, in _prepare_distribution
return preparer.prepare_linked_requirement(self._ireq, parallel_builds=True)
File “C:\SD\stable-diffusion-webui\venv\lib\site-packages\pip\_internal\operations\prepare.py”, line 538, in prepare_linked_requirement
return self._prepare_linked_requirement(req, parallel_builds)
File “C:\SD\stable-diffusion-webui\venv\lib\site-packages\pip\_internal\operations\prepare.py”, line 609, in _prepare_linked_requirement
local_file = unpack_url(
File “C:\SD\stable-diffusion-webui\venv\lib\site-packages\pip\_internal\operations\prepare.py”, line 166, in unpack_url
file = get_http_url(
File “C:\SD\stable-diffusion-webui\venv\lib\site-packages\pip\_internal\operations\prepare.py”, line 107, in get_http_url
from_path, content_type = download(link, temp_dir.path)
File “C:\SD\stable-diffusion-webui\venv\lib\site-packages\pip\_internal\network\download.py”, line 147, in __call__
for chunk in chunks:
File “C:\SD\stable-diffusion-webui\venv\lib\site-packages\pip\_internal\cli\progress_bars.py”, line 53, in _rich_progress_bar
for chunk in iterable:
File “C:\SD\stable-diffusion-webui\venv\lib\site-packages\pip\_internal\network\utils.py”, line 63, in response_chunks
for chunk in response.raw.stream(
File “C:\SD\stable-diffusion-webui\venv\lib\site-packages\pip\_vendor\urllib3\response.py”, line 622, in stream
data = self.read(amt=amt, decode_content=decode_content)
File “C:\SD\stable-diffusion-webui\venv\lib\site-packages\pip\_vendor\urllib3\response.py”, line 560, in read
with self._error_catcher():
File “C:\Program Files\Python\Python310\lib\contextlib.py”, line 153, in __exit__
self.gen.throw(typ, value, traceback)
File “C:\SD\stable-diffusion-webui\venv\lib\site-packages\pip\_vendor\urllib3\response.py”, line 443, in _error_catcher
raise ReadTimeoutError(self._pool, None, “Read timed out.”)
pip._vendor.urllib3.exceptions.ReadTimeoutError: HTTPSConnectionPool(host=’download.pytorch.org’, port=443): Read timed out.
Traceback (most recent call last):
File “C:\SD\stable-diffusion-webui\launch.py”, line 39, in
main()
File “C:\SD\stable-diffusion-webui\launch.py”, line 30, in main
prepare_environment()
File “C:\SD\stable-diffusion-webui\modules\launch_utils.py”, line 311, in prepare_environment
run(f'”{python}” -m {torch_command}’, “Installing torch and torchvision”, “Couldn’t install torch”, live=True)
File “C:\SD\stable-diffusion-webui\modules\launch_utils.py”, line 113, in run
raise RuntimeError(“\n”.join(error_bits))
RuntimeError: Couldn’t install torch.
Command: “C:\SD\stable-diffusion-webui\venv\Scripts\python.exe” -m pip install torch==2.0.1 torchvision==0.15.2 –extra-index-url https://download.pytorch.org/whl/cu118
Error code: 2
Press any key to continue . . .
C:\SD\stable-diffusion-webui>
It cannot install pytorch on your machine. Possibilities:
1. Cannot connect to a remote site. make sure you are able to access download.pytorch.org
2. Try installing on the home folder to rule out read/write issue
I’ve installed it, everything went smoothly.
The Python from the Microsoft store didn’t work, so I used the installer.
Hello,
how do I get the new sampler list?
I’ve upgraded Automatic 1111 but I still have the old list and I’d like to have both if possible?
version: v1.5.1 – python: 3.10.6 – torch: 2.0.1+cu118 – xformers: 0.0.17 – gradio: 3.32.0 – checkpoint: 0f1b80cfe8
It should be automatic. Check Settings > Sampler parameters to see if you have hidden any.
Thank you very much!
In the past, stable diffusion didn’t have a UI yet and it was very confusing, so I installed Invoker AI (stable diffusion with UI), but it seems that this software hasn’t been updated for a long time so the results from the AI are not good and outdated.
What I need is Image Upscaler, and I’m interested to try ESRGAN. This will cut my work time, electricity costs, and resources. For example, when I create an illustration of 5000x5000px size, with Image Upscaler I can make it at 2500x2500px and then resize it to a bigger size at the end.
I can’t use premium AI because most of my projects are NDA, so I prefer stable diffusion because it can be installed on my computer and I can block it using a firewall.
Tonight I will install stable diffusion following this tutorial.
Thank you
File “C:\Users\M. Eren\stable-diffusion-webui\modules\devices.py”, line 158, in test_for_nans
raise NansException(message)
modules.devices.NansException: A tensor with all NaNs was produced in Unet. This could be either because there’s not enough precision to represent the picture, or because your video card does not support half type. Try setting the “Upcast cross attention layer to float32” option in Settings > Stable Diffusion or using the –no-half commandline argument to fix this. Use –disable-nan-check commandline argument to disable this check.
When I try to generate, this happening. How can I solve it?
Try adding
--no-halfto webui-user.batDo I have to install pytorch everytime I run the webui_user.bat?
No, only the first time.
My %userprofile% has Scandinavian characters. The Webui.bat can’t parse the Python path right. Is there a command line option to manually plug in the path?
You should install in another folder. python may have issue running.
Does not worlk. webuii-user.bat crashes at torch who complains “torch is not able to use gpu”.
Guess the script has some problems.
googled that specific message but the suggested solution did work either.
thought?
It seems your machine has no Nvidia GPU. You need that to run A1111.
I simply can’t find webui-user.bat in the %userprofile%\stable-diffusion-webui folder. I followed all the steps.
Your system may have the .bat extension hidden. Try look for a “webui-user” file.
Hi, I did manage to get this running but have the following error:
RuntimeError: Torch is not able to use GPU; add –skip-torch-cuda-test to COMMANDLINE_ARGS variable to disable this check
I could guess what to do, but I’m not a programmer so if anyone could tell me what to do? Thanks!!
Hi, your PC doesn’t seem to have an NVidia GPU card. It is needed for running the Web UI. Consider using Colab.
https://stable-diffusion-art.com/automatic1111-colab/
Something changed – I used webui a while back. Tried again today, and this message started appearing to me as well – may be something changed in torch? Deleted my folder, cloned and went through the steps – still not working.
Do you have an NVidia GPU? If yes, try rebooting.
Hi, All went well, except when I run the webui-user.bat. The command prompt window flashes quickly then disappears. I wait for quite a while and try the http://127.0.0.1:7860/ in my browser, but nothing. It seems that it doesn’t complete the command? Any ideas?
Open the Command Prompt App. You should see a black terminal like you are a hacker…
Never mind. The issue is back again.
You need to add that argument to your webui-user.bat file.
1. Go to your Stable Diffusion install directory.
2. Find webui-user.bat, right click and select edit(double clicking will launch the program, you don’t want that)
3. Add –no-half-vae to the line “set COMMANDLINE_ARGS=”
You should be left with this:
@echo off
set PYTHON=
set GIT=
set VENV_DIR=
set COMMANDLINE_ARGS=–no-half-vae
call webui.bat
Afterwards ONLY use webui-user.bat to launch Stable Diffusion, NOT webui.bat so that the –no-half-vae is applied when launching Stable Diffusion.
Running this command in the root folder of the repository has worked for me for the time being (don’t put the `s in): `git checkout 5ab7f213` I also have been recently struggling with the NaNs error.
hey i have this NansException: A tensor with all NaNs was produced in VAE. This could be because there’s not enough precision to represent the picture. Try adding –no-half-vae commandline argument to fix this. Use –disable-nan-check commandline argument to disable this check. how do i fix it?
Se quedó en eso
venv “C:\Users\odaly\stable-diffusion-webui\venv\Scripts\Python.exe”
Python 3.10.11 (tags/v3.10.11:7d4cc5a, Apr 5 2023, 00:38:17) [MSC v.1929 64 bit (AMD64)]
Version: v1.3.2
Commit hash: baf6946e06249c5af9851c60171692c44ef633e0
Installing requirements
Launching Web UI with arguments:
No module ‘xformers’. Proceeding without it.
Loading weights [6ce0161689] from C:\Users\odaly\stable-diffusion-webui\models\Stable-diffusion\v1-5-pruned-emaonly.safetensors
Running on local URL: http://127.0.0.1:7860
To create a public link, set `share=True` in `launch()`.
Startup time: 12.5s (import torch: 3.2s, import gradio: 2.3s, import ldm: 2.0s, other imports: 1.7s, setup codeformer: 0.1s, load scripts: 2.0s, create ui: 0.7s, gradio launch: 0.3s).
Creating model from config: C:\Users\odaly\stable-diffusion-webui\configs\v1-inference.yaml
LatentDiffusion: Running in eps-prediction mode
DiffusionWrapper has 859.52 M params.
Applying optimization: Doggettx… done.
Textual inversion embeddings loaded(0):
Model loaded in 18.3s (load weights from disk: 1.2s, create model: 0.8s, apply weights to model: 7.9s, apply half(): 4.2s, move model to device: 0.9s, load textual inversion embeddings: 3.1s).
Hi, I am recieving an error but I do have 15.8GB RAM free, 64-bit operating system, x64-based processor,Intel(R) Core(TM) i7-10510U CPU @ 1.80GHz 2.30 GHz, Windows 11
File “C:\Users\\stable-diffusion-webui\venv\lib\site-packages\torch\nn\modules\module.py”, line 1143, in convert
return t.to(device, dtype if t.is_floating_point() or t.is_complex() else None, non_blocking)
torch.cuda.OutOfMemoryError: CUDA out of memory. Tried to allocate 20.00 MiB (GPU 0; 2.00 GiB total capacity; 1.68 GiB already allocated; 0 bytes free; 1.72 GiB reserved in total by PyTorch) If reserved memory is >> allocated memory try setting max_split_size_mb to avoid fragmentation. See documentation for Memory Management and PYTORCH_CUDA_ALLOC_CONF
Stable diffusion model failed to load
Applying optimization: Doggettx… done.
Hello I have this error message poping when I try to launch the webui-user.bat:
venv “C:\Users\natha\stable-diffusion-webui\venv\Scripts\Python.exe”
Python 3.10.6 (tags/v3.10.6:9c7b4bd, Aug 1 2022, 21:53:49) [MSC v.1932 64 bit (AMD64)]
Version: v1.3.2
Commit hash: baf6946e06249c5af9851c60171692c44ef633e0
Traceback (most recent call last):
File “C:\Users\natha\stable-diffusion-webui\launch.py”, line 38, in
main()
File “C:\Users\natha\stable-diffusion-webui\launch.py”, line 29, in main
prepare_environment()
File “C:\Users\natha\stable-diffusion-webui\modules\launch_utils.py”, line 257, in prepare_environment
raise RuntimeError(
RuntimeError: Torch is not able to use GPU; add –skip-torch-cuda-test to COMMANDLINE_ARGS variable to disable this check
So I did what was told and added the bit to the commandline var but I keep having the same error message, I have a Legion laptop with an Nvidia GeForce GTX 1600 Ti?
’tis all good I finally changed the correct variable (which is not the one indicated in the error message but I’m sure y’all know that by now) and it’s up and running!
What did you do to fix the error? I’ve been having trouble and can’t fix it.
Could you help what did you changed to work? I have the same issues on the same setup. Thanks
The added option disable using GPU. For some reason you are not able to use GPU.
No error, just nothing happens in browser and console lol. After that I cant do nothing and need relaunch webui-user.bat. That strange – this Stable is totally unstable 😀 Sometimes I cant use even txt2img with 512×512 pix – just nothing happens like here: https://imgur.com/a/WwPTJbF
I’m tryinig –lowdvram now and look likes it works… Thanks 😀 Continuing to test. My specs: Notebook Katana GF76 11SC-483XRU: i5-11400H, GTX 1650 4GB 535.98 driver, 8Gb ram, SSD.. It doesn’t seem to be enough?
Hi, your graphic card is a bit marginal. It is best to have at least 8GB of VRAM. You can consider using Google Colab if you are struggling with more complex workflows, e.g. controlnet.
Unfortunately you have an AMD64 and in this blog post you can see this ssentence:
“ Does it work on AMD GPU?
No, you have to have an NVIDIA GPU.”
Google Colab is a good alternative though
Doesnt work again after I tryed img2img, nothing else – no refresh page end other. Strange…
What’s the error message in the console windows? From your earlier description, I suspect your machine has a GPU with low VRAM.
You try
--lowvram --xformersand limit yourself to generating 512×512 images in img2img.Ah, ok, It worked after I set –xformers –medvram
Thank you!!! ^__^
Doesnt work 🙁 All steps is ok, but when I press “Generate” – nothing happens, just “In queue” forever. Tried on Chorme and Edge… Plz help
Can anyone help troubleshoot this?
venv “C:\Users\danie\stable-diffusion-webui\venv\Scripts\Python.exe”
Python 3.10.11 (tags/v3.10.11:7d4cc5a, Apr 5 2023, 00:38:17) [MSC v.1929 64 bit (AMD64)]
Version: v1.3.1-1-gcbe17997
Commit hash: cbe1799797a6bd9d5367d106c3c8f0e147a3df6e
Installing torch and torchvision
C:\Users\danie\stable-diffusion-webui\venv\Scripts\python.exe: No module named pip
Traceback (most recent call last):
File “C:\Users\danie\stable-diffusion-webui\launch.py”, line 38, in
main()
File “C:\Users\danie\stable-diffusion-webui\launch.py”, line 29, in main
prepare_environment()
File “C:\Users\danie\stable-diffusion-webui\modules\launch_utils.py”, line 254, in prepare_environment
run(f'”{python}” -m {torch_command}’, “Installing torch and torchvision”, “Couldn’t install torch”, live=True)
File “C:\Users\danie\stable-diffusion-webui\modules\launch_utils.py”, line 101, in run
raise RuntimeError(“\n”.join(error_bits))
RuntimeError: Couldn’t install torch.
Command: “C:\Users\danie\stable-diffusion-webui\venv\Scripts\python.exe” -m pip install torch==2.0.1 torchvision==0.15.2 –extra-index-url https://download.pytorch.org/whl/cu118
Error code: 1
Your python installation is incomplete for some reason. Try running the following inside the stable-diffusion-webui folder
.\venv\Scripts\python.exe -m ensurepipHello, – My installation is freezing at the exact same point as Cole (June 5). I made sure that python and git installed properly. Not running as administrator and installing in the default home folder. Card is GTX RTX 2070. I am sorry I don’t know how to set an argument (Ive tried). After it got to the freeze point I tried again and again. on subsequent tries it didn’t need to download anything. This is the full cmd window install message to the point it froze the last time I tried. (thanks by the way for the great easily understood directions and all your time.)
venv “C:\Users\Eric\stable-diffusion-webui\venv\Scripts\Python.exe”
Python 3.10.11 (tags/v3.10.11:7d4cc5a, Apr 5 2023, 00:38:17) [MSC v.1929 64 bit (AMD64)]
Version: v1.3.2
Commit hash: baf6946e06249c5af9851c60171692c44ef633e0
Installing requirements
Launching Web UI with arguments:
No module ‘xformers’. Proceeding without it.
Loading weights [cc6cb27103] from C:\Users\Eric\stable-diffusion-webui\models\Stable-diffusion\v1-5-pruned-emaonly.ckpt
Running on local URL: http://127.0.0.1:7860
To create a public link, set `share=True` in `launch()`.
Startup time: 5.6s (import torch: 1.4s, import gradio: 1.2s, import ldm: 0.5s, other imports: 0.8s, load scripts: 1.1s, create ui: 0.4s, gradio launch: 0.1s).
Creating model from config: C:\Users\Eric\stable-diffusion-webui\configs\v1-inference.yaml
LatentDiffusion: Running in eps-prediction mode
DiffusionWrapper has 859.52 M params.
Applying optimization: Doggettx… done.
Textual inversion embeddings loaded(0):
Model loaded in 5.8s (load weights from disk: 2.2s, create model: 0.4s, apply weights to model: 0.6s, apply half(): 0.7s, move model to device: 0.8s, load textual inversion embeddings: 1.1s).
It looks ok to me. You can proceed to the next step: Visit http://127.0.0.1:7860
When i launch webui-user.bat:
Unable to create venv in directory “C:\Users\user\stable-diffusion-webui\venv”
exit code: 3
stderr:
The system cannot find the specified path.
Launch unsuccessful. Exiting.
It has problem creating the venv folder for installation.
Sometimes it’s caused by the user name being a foreign language (XXXXX in C:\Users\XXXXX\stable-diffusion-webui\venv)
Hi
The installation does not go to completion. An error msg says something about torch not running on the GPU. Which if I am correct it is Radeon RX550 series. It says to add a line in the bat file, could someone say exactly what and where to put it please. Thanks
Hi, they only support NVidia GPUs so you cannot use Radeon. You can add that argument to webui-user.bat, but essentially you will use it without GPU which will be very slow.
Hi, weird thing here whereby i don’t have any webui-user.bat file, I only have a webui (windows batch file) and webui (python file), however when I double click the first one it loads the UI ok, and seems to work. Just wondering why this and could it cause other issues down the line eg (in control net I don’t have any Control Net Model when I choose preprocessor Canny?
Your controlnet issue is unrelated. You will need to download the canny control model. See this article for instructions.
https://stable-diffusion-art.com/controlnet/
We normally set webui parameters in webui-user.bat so it’s not ideal without it. But it is working for you, I advise is not to touch it…
If you are ok with command line, you can try running the following in webui’s directory.
git statusYou should see it said file missing. If not, then it is not missing…
To restore it, run
git restore webui-user.batSo I’m certain that I’ve followed all of the listed steps, but it seems that CMD isn’t progressing past this point?
Model loaded in 10.7s (calculate hash: 3.7s, load weights from disk: 0.1s, create model: 0.4s, apply weights to model: 2.9s, apply half(): 0.8s, load VAE: 0.2s, move model to device: 0.7s, load textual inversion embeddings: 1.8s).
Any idea why?
Thank you 🙂
I am not sure. It should progress to showing “Running on local URL:XXXXX”. You can try
– Set argument
--listen --port 6899to see if changing to another port/ip address works.– Make sure you install and run NOT as administrator.
– Install in your home folder.
Thank you
Any idea what this error means? The install just stopped towards the end and displayed an error that I didn’t get a chance to copy, but when I run the program, I get this message:
venv “E:\stable-diffusion-webui\venv\Scripts\Python.exe”
fatal: detected dubious ownership in repository at ‘E:/stable-diffusion-webui’
‘E:/stable-diffusion-webui’ is on a file system that does not record ownership
To add an exception for this directory, call:
git config –global –add safe.directory E:/stable-diffusion-webui
fatal: detected dubious ownership in repository at ‘E:/stable-diffusion-webui’
‘E:/stable-diffusion-webui’ is on a file system that does not record ownership
To add an exception for this directory, call:
git config –global –add safe.directory E:/stable-diffusion-webui
Python 3.10.11 (tags/v3.10.11:7d4cc5a, Apr 5 2023, 00:38:17) [MSC v.1929 64 bit (AMD64)]
Version:
Commit hash:
git is not happy about the E:\ location. Try installing on your home folder.
It’s possible to also skip installation and run it on the browser using something like Automatic1111 app or Stablematic https://stablematic.com/
Hello, Andrew, i followed all the steps above (at least i think so) and got this error message:
venv “D:\Downloads\NovelAI\stable-diffusion-webui\venv\Scripts\Python.exe”
Python 3.10.6 (tags/v3.10.6:9c7b4bd, Aug 1 2022, 21:53:49) [MSC v.1932 64 bit (AMD64)]
Version:
Commit hash:
Cloning Stable Diffusion into D:\Downloads\NovelAI\stable-diffusion-webui\repositories\stable-diffusion-stability-ai…
Traceback (most recent call last):
File “D:\Downloads\NovelAI\stable-diffusion-webui\launch.py”, line 38, in
main()
File “D:\Downloads\NovelAI\stable-diffusion-webui\launch.py”, line 29, in main
prepare_environment()
File “D:\Downloads\NovelAI\stable-diffusion-webui\modules\launch_utils.py”, line 288, in prepare_environment
git_clone(stable_diffusion_repo, repo_dir(‘stable-diffusion-stability-ai’), “Stable Diffusion”, stable_diffusion_commit_hash)
File “D:\Downloads\NovelAI\stable-diffusion-webui\modules\launch_utils.py”, line 147, in git_clone
run(f'”{git}” clone “{url}” “{dir}”‘, f”Cloning {name} into {dir}…”, f”Couldn’t clone {name}”)
File “D:\Downloads\NovelAI\stable-diffusion-webui\modules\launch_utils.py”, line 101, in run
raise RuntimeError(“\n”.join(error_bits))
RuntimeError: Couldn’t clone Stable Diffusion.
Command: “git” clone “https://github.com/Stability-AI/stablediffusion.git” “D:\Downloads\NovelAI\stable-diffusion-webui\repositories\stable-diffusion-stability-ai”
Error code: 1
stderr: “”git”” ७ 譥
, ᯮ塞 ணࠬ 䠩.
Already tried:
– deleting “vent”;
– updating pip
– reinstall Python
Can i ask you for help? I cant understand what seems to be an issue.
Solve this already, an issue was with Git, it somehow was not written in PATH.
https://stackoverflow.com/questions/4492979/error-git-is-not-recognized-as-an-internal-or-external-command
thanks dude, you’re a lifesaver
i got this massage in webui user bat, “ModuleNotFoundError: No module named ‘basicsr.version’”. Can anyone help me with this.
Maybe related.
https://github.com/AUTOMATIC1111/stable-diffusion-webui/issues/1598
Already up to date.
venv “C:\Users\ROG STRIX\stable-diffusion-webui\venv\Scripts\Python.exe”
Python 3.10.6 (tags/v3.10.6:9c7b4bd, Aug 1 2022, 21:53:49) [MSC v.1932 64 bit (AMD64)]
Version:
Commit hash:
Installing requirements
Launching Web UI with arguments:
No module ‘xformers’. Proceeding without it.
Traceback (most recent call last):
File “C:\Users\ROG STRIX\stable-diffusion-webui\venv\lib\site-packages\git\__init__.py”, line 89, in
refresh()
File “C:\Users\ROG STRIX\stable-diffusion-webui\venv\lib\site-packages\git\__init__.py”, line 76, in refresh
if not Git.refresh(path=path):
File “C:\Users\ROG STRIX\stable-diffusion-webui\venv\lib\site-packages\git\cmd.py”, line 392, in refresh
raise ImportError(err)
ImportError: Bad git executable.
The git executable must be specified in one of the following ways:
– be included in your $PATH
– be set via $GIT_PYTHON_GIT_EXECUTABLE
– explicitly set via git.refresh()
All git commands will error until this is rectified.
This initial warning can be silenced or aggravated in the future by setting the
$GIT_PYTHON_REFRESH environment variable. Use one of the following values:
– quiet|q|silence|s|none|n|0: for no warning or exception
– warn|w|warning|1: for a printed warning
– error|e|raise|r|2: for a raised exception
Example:
export GIT_PYTHON_REFRESH=quiet
The above exception was the direct cause of the following exception:
Traceback (most recent call last):
File “C:\Users\ROG STRIX\stable-diffusion-webui\launch.py”, line 38, in
main()
File “C:\Users\ROG STRIX\stable-diffusion-webui\launch.py”, line 34, in main
start()
File “C:\Users\ROG STRIX\stable-diffusion-webui\modules\launch_utils.py”, line 330, in start
import webui
File “C:\Users\ROG STRIX\stable-diffusion-webui\webui.py”, line 49, in
from modules import shared, sd_samplers, upscaler, extensions, localization, ui_tempdir, ui_extra_networks, config_states
File “C:\Users\ROG STRIX\stable-diffusion-webui\modules\sd_samplers.py”, line 1, in
from modules import sd_samplers_compvis, sd_samplers_kdiffusion, shared
File “C:\Users\ROG STRIX\stable-diffusion-webui\modules\sd_samplers_compvis.py”, line 9, in
from modules import sd_samplers_common, prompt_parser, shared
File “C:\Users\ROG STRIX\stable-diffusion-webui\modules\sd_samplers_common.py”, line 5, in
from modules import devices, processing, images, sd_vae_approx, sd_samplers, sd_vae_taesd
File “C:\Users\ROG STRIX\stable-diffusion-webui\modules\processing.py”, line 16, in
from modules import devices, prompt_parser, masking, sd_samplers, lowvram, generation_parameters_copypaste, extra_networks, sd_vae_approx, scripts, sd_samplers_common
File “C:\Users\ROG STRIX\stable-diffusion-webui\modules\scripts.py”, line 9, in
from modules import shared, paths, script_callbacks, extensions, script_loading, scripts_postprocessing
File “C:\Users\ROG STRIX\stable-diffusion-webui\modules\extensions.py”, line 6, in
import git
File “C:\Users\ROG STRIX\stable-diffusion-webui\venv\lib\site-packages\git\__init__.py”, line 91, in
raise ImportError(“Failed to initialize: {0}”.format(exc)) from exc
ImportError: Failed to initialize: Bad git executable.
The git executable must be specified in one of the following ways:
– be included in your $PATH
– be set via $GIT_PYTHON_GIT_EXECUTABLE
– explicitly set via git.refresh()
All git commands will error until this is rectified.
This initial warning can be silenced or aggravated in the future by setting the
$GIT_PYTHON_REFRESH environment variable. Use one of the following values:
– quiet|q|silence|s|none|n|0: for no warning or exception
– warn|w|warning|1: for a printed warning
– error|e|raise|r|2: for a raised exception
Example:
export GIT_PYTHON_REFRESH=quiet
what should i do?
It seems that it couldn’t find git. This error is rare. Have you installed git?
Test: In cmd, type git and then enter should run the program.
hello so i’ve encountered this error: RuntimeError: mixed dtype (CPU): expect parameter to have scalar type of Float.
before that in the installation setup it told me i need python 3.10 and i have 3.11.3 but it worked somehow, second i don’t have nvidia i have amd but again it worked somehow, and third when i open with the given link i dont see the cat picture and when i try to generate the image it gives me the error from above.
You better use python 3.10. Otherwise it is difficult for others to help you.
In my web browser, I tried the URL
http://127.0.0.1:7860/
But I saw:
“Unable to connect Firefox can’t establish a connection to the server at 127.0.0.1:7860”
Please help!
Did you see this url in webui’s terminal? If you don’t something else was wrong.
hello so i’ve encountered this error: RuntimeError: mixed dtype (CPU): expect parameter to have scalar type of Float.
before that in the installation setup it told me i need python 3.10 and i have 3.11.3 but it worked somehow, second i don’t have nvidia i have amd but again it worked somehow, and third when i open with the given link i dont see the cat picture and when i try to generate the image it gives me the error from above.
Hello, Andrew, I ran into exactly the same problem with the op. I tried both things that you listed, and restarted from the git clone step twice, I still only see the two webui-user files instead of the webui-user.bat. Could you please help me with it? Much appreciated!
I think in your case, the extension “.bat” was hidden because of your Windows setting. You one of them is webui-user.bat. The Type of the file should be “Windows Batch File”. Double click on that one.
Hello.
I have laptop with discrete NVIDIA GeFroce GTX GPU and CPU . When I use Stable Diffusion I check resource usage and can see that my CPU is highly loaded, but discrete GPU is not wroking.
Do you know how can I force AUTOMATIC1111 webui work on my discrete GPU?
It uses GPU by default on Windows
The settings in webui-user.bat to control how much GPU VRAM to use are
--lowram

--medvarm
Hi Dear
Could you please help?
i followed the process and im struggling i also read the coments and followed some guidelines like download and run this https://download.pytorch.org/whl/cu118/torch-2.0.1%2Bcu118-cp310-cp310-win_amd64.whl
I tried go here http://127.0.0.1:7860/
Unable to reach site Connection denied by 127.0.0.1.
Try to:
Check the connection
Check your proxy and firewall
ERR_CONNECTION_REFUSED
but im still struggling in here:
Installing torch and torchvision
Looking in indexes: https://pypi.org/simple, https://download.pytorch.org/whl/cu118
Collecting torch==2.0.1
Downloading https://download.pytorch.org/whl/cu118/torch-2.0.1%2Bcu118-cp310-cp310-win_amd64.whl (2619.1 MB)
————————————— 2.6/2.6 GB 21.1 MB/s eta 0:00:01
ERROR: Exception:
Traceback (most recent call last):
File “C:\Users\Giuseppe\stable-diffusion-webui\venv\lib\site-packages\pip\_internal\cli\base_command.py”, line 160, in exc_logging_wrapper
status = run_func(*args)
File “C:\Users\Giuseppe\stable-diffusion-webui\venv\lib\site-packages\pip\_internal\cli\req_command.py”, line 247, in wrapper
return func(self, options, args)
File “C:\Users\Giuseppe\stable-diffusion-webui\venv\lib\site-packages\pip\_internal\commands\install.py”, line 419, in run
requirement_set = resolver.resolve(
File “C:\Users\Giuseppe\stable-diffusion-webui\venv\lib\site-packages\pip\_internal\resolution\resolvelib\resolver.py”, line 92, in resolve
result = self._result = resolver.resolve(
File “C:\Users\Giuseppe\stable-diffusion-webui\venv\lib\site-packages\pip\_vendor\resolvelib\resolvers.py”, line 481, in resolve
state = resolution.resolve(requirements, max_rounds=max_rounds)
File “C:\Users\Giuseppe\stable-diffusion-webui\venv\lib\site-packages\pip\_vendor\resolvelib\resolvers.py”, line 348, in resolve
self._add_to_criteria(self.state.criteria, r, parent=None)
File “C:\Users\Giuseppe\stable-diffusion-webui\venv\lib\site-packages\pip\_vendor\resolvelib\resolvers.py”, line 172, in _add_to_criteria
if not criterion.candidates:
File “C:\Users\Giuseppe\stable-diffusion-webui\venv\lib\site-packages\pip\_vendor\resolvelib\structs.py”, line 151, in __bool__
return bool(self._sequence)
File “C:\Users\Giuseppe\stable-diffusion-webui\venv\lib\site-packages\pip\_internal\resolution\resolvelib\found_candidates.py”, line 155, in __bool__
return any(self)
File “C:\Users\Giuseppe\stable-diffusion-webui\venv\lib\site-packages\pip\_internal\resolution\resolvelib\found_candidates.py”, line 143, in
return (c for c in iterator if id(c) not in self._incompatible_ids)
File “C:\Users\Giuseppe\stable-diffusion-webui\venv\lib\site-packages\pip\_internal\resolution\resolvelib\found_candidates.py”, line 47, in _iter_built
candidate = func()
File “C:\Users\Giuseppe\stable-diffusion-webui\venv\lib\site-packages\pip\_internal\resolution\resolvelib\factory.py”, line 206, in _make_candidate_from_link
self._link_candidate_cache[link] = LinkCandidate(
File “C:\Users\Giuseppe\stable-diffusion-webui\venv\lib\site-packages\pip\_internal\resolution\resolvelib\candidates.py”, line 297, in __init__
super().__init__(
File “C:\Users\Giuseppe\stable-diffusion-webui\venv\lib\site-packages\pip\_internal\resolution\resolvelib\candidates.py”, line 162, in __init__
self.dist = self._prepare()
File “C:\Users\Giuseppe\stable-diffusion-webui\venv\lib\site-packages\pip\_internal\resolution\resolvelib\candidates.py”, line 231, in _prepare
dist = self._prepare_distribution()
File “C:\Users\Giuseppe\stable-diffusion-webui\venv\lib\site-packages\pip\_internal\resolution\resolvelib\candidates.py”, line 308, in _prepare_distribution
return preparer.prepare_linked_requirement(self._ireq, parallel_builds=True)
File “C:\Users\Giuseppe\stable-diffusion-webui\venv\lib\site-packages\pip\_internal\operations\prepare.py”, line 491, in prepare_linked_requirement
return self._prepare_linked_requirement(req, parallel_builds)
File “C:\Users\Giuseppe\stable-diffusion-webui\venv\lib\site-packages\pip\_internal\operations\prepare.py”, line 536, in _prepare_linked_requirement
local_file = unpack_url(
File “C:\Users\Giuseppe\stable-diffusion-webui\venv\lib\site-packages\pip\_internal\operations\prepare.py”, line 166, in unpack_url
file = get_http_url(
File “C:\Users\Giuseppe\stable-diffusion-webui\venv\lib\site-packages\pip\_internal\operations\prepare.py”, line 107, in get_http_url
from_path, content_type = download(link, temp_dir.path)
File “C:\Users\Giuseppe\stable-diffusion-webui\venv\lib\site-packages\pip\_internal\network\download.py”, line 147, in __call__
for chunk in chunks:
File “C:\Users\Giuseppe\stable-diffusion-webui\venv\lib\site-packages\pip\_internal\cli\progress_bars.py”, line 53, in _rich_progress_bar
for chunk in iterable:
File “C:\Users\Giuseppe\stable-diffusion-webui\venv\lib\site-packages\pip\_internal\network\utils.py”, line 63, in response_chunks
for chunk in response.raw.stream(
File “C:\Users\Giuseppe\stable-diffusion-webui\venv\lib\site-packages\pip\_vendor\urllib3\response.py”, line 622, in stream
data = self.read(amt=amt, decode_content=decode_content)
File “C:\Users\Giuseppe\stable-diffusion-webui\venv\lib\site-packages\pip\_vendor\urllib3\response.py”, line 561, in read
data = self._fp_read(amt) if not fp_closed else b””
File “C:\Users\Giuseppe\stable-diffusion-webui\venv\lib\site-packages\pip\_vendor\urllib3\response.py”, line 527, in _fp_read
return self._fp.read(amt) if amt is not None else self._fp.read()
File “C:\Users\Giuseppe\stable-diffusion-webui\venv\lib\site-packages\pip\_vendor\cachecontrol\filewrapper.py”, line 96, in read
self._close()
File “C:\Users\Giuseppe\stable-diffusion-webui\venv\lib\site-packages\pip\_vendor\cachecontrol\filewrapper.py”, line 76, in _close
self.__callback(result)
File “C:\Users\Giuseppe\stable-diffusion-webui\venv\lib\site-packages\pip\_vendor\cachecontrol\controller.py”, line 353, in cache_response
self._cache_set(cache_url, request, response, body, expires_time)
File “C:\Users\Giuseppe\stable-diffusion-webui\venv\lib\site-packages\pip\_vendor\cachecontrol\controller.py”, line 274, in _cache_set
self.serializer.dumps(request, response, body),
File “C:\Users\Giuseppe\stable-diffusion-webui\venv\lib\site-packages\pip\_vendor\cachecontrol\serialize.py”, line 70, in dumps
return b”,”.join([b”cc=4″, msgpack.dumps(data, use_bin_type=True)])
File “C:\Users\Giuseppe\stable-diffusion-webui\venv\lib\site-packages\pip\_vendor\msgpack\__init__.py”, line 38, in packb
return Packer(**kwargs).pack(o)
File “C:\Users\Giuseppe\stable-diffusion-webui\venv\lib\site-packages\pip\_vendor\msgpack\fallback.py”, line 883, in pack
self._pack(obj)
File “C:\Users\Giuseppe\stable-diffusion-webui\venv\lib\site-packages\pip\_vendor\msgpack\fallback.py”, line 862, in _pack
return self._pack_map_pairs(
File “C:\Users\Giuseppe\stable-diffusion-webui\venv\lib\site-packages\pip\_vendor\msgpack\fallback.py”, line 968, in _pack_map_pairs
self._pack(v, nest_limit – 1)
File “C:\Users\Giuseppe\stable-diffusion-webui\venv\lib\site-packages\pip\_vendor\msgpack\fallback.py”, line 821, in _pack
return self._buffer.write(obj)
MemoryError
[notice] A new release of pip is available: 23.0.1 -> 23.1.2
[notice] To update, run: C:\Users\Giuseppe\stable-diffusion-webui\venv\Scripts\python.exe -m pip install –upgrade pip
Traceback (most recent call last):
File “C:\Users\Giuseppe\stable-diffusion-webui\launch.py”, line 369, in
prepare_environment()
File “C:\Users\Giuseppe\stable-diffusion-webui\launch.py”, line 271, in prepare_environment
run(f'”{python}” -m {torch_command}’, “Installing torch and torchvision”, “Couldn’t install torch”, live=True)
File “C:\Users\Giuseppe\stable-diffusion-webui\launch.py”, line 95, in run
raise RuntimeError(f”””{errdesc or ‘Error running command’}.
RuntimeError: Couldn’t install torch.
Command: “C:\Users\Giuseppe\stable-diffusion-webui\venv\Scripts\python.exe” -m pip install torch==2.0.1 torchvision==0.15.2 –extra-index-url https://download.pytorch.org/whl/cu118
Error code: 2
Press any key to continue
Hi, this may be related.
https://github.com/AUTOMATIC1111/stable-diffusion-webui/issues/10496
I have encountered this lengthy error. Could help me please?
INFO: CCompilerOpt.cc_test_flags[1077] : testing flags (/WX)
WARN: CCompilerOpt.__init__[1244] : feature ‘AVX512_KNL’ is disabled, MSVC compiler doesn’t support it
WARN: CCompilerOpt.__init__[1244] : feature ‘AVX512_KNM’ is disabled, MSVC compiler doesn’t support it
INFO: CCompilerOpt.__init__[1786] : check requested baseline
INFO: CCompilerOpt.feature_test[1551] : testing feature ‘SSE2’ with flags ()
INFO: CCompilerOpt.feature_test[1551] : testing feature ‘SSE’ with flags ()
INFO: CCompilerOpt.feature_test[1551] : testing feature ‘SSE3’ with flags ()
INFO: CCompilerOpt.__init__[1795] : check requested dispatch-able features
INFO: CCompilerOpt.feature_test[1551] : testing feature ‘SSE42’ with flags ()
INFO: CCompilerOpt.feature_test[1551] : testing feature ‘SSSE3’ with flags ()
INFO: CCompilerOpt.feature_test[1551] : testing feature ‘SSE41’ with flags ()
INFO: CCompilerOpt.feature_test[1551] : testing feature ‘POPCNT’ with flags ()
INFO: CCompilerOpt.cc_test_flags[1077] : testing flags (/arch:AVX)
INFO: CCompilerOpt.feature_test[1551] : testing feature ‘AVX’ with flags (/arch:AVX)
INFO: CCompilerOpt.cc_test_flags[1077] : testing flags (/arch:AVX2)
INFO: CCompilerOpt.feature_test[1551] : testing feature ‘AVX2’ with flags (/arch:AVX2)
INFO: CCompilerOpt.feature_test[1551] : testing feature ‘F16C’ with flags (/arch:AVX)
INFO: CCompilerOpt.feature_test[1551] : testing feature ‘FMA3’ with flags (/arch:AVX2)
INFO: CCompilerOpt.cc_test_flags[1077] : testing flags (/arch:AVX512)
INFO: CCompilerOpt.feature_test[1551] : testing feature ‘AVX512F’ with flags (/arch:AVX512)
INFO: CCompilerOpt.feature_test[1551] : testing feature ‘AVX512CD’ with flags (/arch:AVX512)
INFO: CCompilerOpt.feature_test[1551] : testing feature ‘AVX512_SKX’ with flags (/arch:AVX512)
INFO: CCompilerOpt.feature_test[1551] : testing feature ‘AVX512_CLX’ with flags (/arch:AVX512)
INFO: CCompilerOpt.feature_test[1551] : testing feature ‘AVX512_CNL’ with flags (/arch:AVX512)
INFO: CCompilerOpt.feature_test[1551] : testing feature ‘AVX512_ICL’ with flags (/arch:AVX512)
INFO: CCompilerOpt.__init__[1807] : skip features (SSE SSE3 SSE2) since its part of baseline
INFO: CCompilerOpt.__init__[1811] : initialize targets groups
INFO: CCompilerOpt.__init__[1813] : parse target group simd_test
INFO: CCompilerOpt._parse_target_tokens[2024] : skip targets (XOP VSX VSX2 VX VSX4 NEON VXE2 ASIMD VXE FMA4 VSX3) not part of baseline or dispatch-able features
INFO: CCompilerOpt._parse_policy_not_keepbase[2136] : skip baseline features (SSE2)
INFO: CCompilerOpt.generate_dispatch_header[2357] : generate CPU dispatch header: (build\src.win-amd64-3.11\numpy\distutils\include\npy_cpu_dispatch_config.h)
WARN: CCompilerOpt.generate_dispatch_header[2366] : dispatch header dir build\src.win-amd64-3.11\numpy\distutils\include does not exist, creating it
INFO: CCompilerOpt.feature_extra_checks[1631] : Testing extra checks for feature ‘AVX512F’ (AVX512F_REDUCE)
INFO: CCompilerOpt.feature_extra_checks[1631] : Testing extra checks for feature ‘AVX512_SKX’ (AVX512BW_MASK AVX512DQ_MASK)
INFO: No module named ‘numpy.distutils._msvccompiler’ in numpy.distutils; trying from distutils
INFO: customize MSVCCompiler
WARN: Missing compiler_cxx fix for MSVCCompiler
INFO: customize MSVCCompiler using ConditionalOpenMP
INFO: C:\Program Files (x86)\Microsoft Visual Studio\2022\BuildTools\VC\Tools\MSVC\14.36.32532\bin\HostX86\x64\cl.exe /c /nologo /O2 /W3 /GL /DNDEBUG /MD -ID:\stable-diffusion-webui\venv\include -IC:\Users\hieu\AppData\Local\Programs\Python\Python311\include -IC:\Users\hieu\AppData\Local\Programs\Python\Python311\include -IC:\Program Files (x86)\Microsoft Visual Studio\2022\BuildTools\VC\Tools\MSVC\14.36.32532\include -IC:\Program Files (x86)\Microsoft Visual Studio\2022\BuildTools\VC\Tools\MSVC\14.36.32532\ATLMFC\include -IC:\Program Files (x86)\Microsoft Visual Studio\2022\BuildTools\VC\Auxiliary\VS\include -IC:\Program Files (x86)\Windows Kits\10\include\10.0.22000.0\ucrt -IC:\Program Files (x86)\Windows Kits\10\\include\10.0.22000.0\\um -IC:\Program Files (x86)\Windows Kits\10\\include\10.0.22000.0\\shared -IC:\Program Files (x86)\Windows Kits\10\\include\10.0.22000.0\\winrt -IC:\Program Files (x86)\Windows Kits\10\\include\10.0.22000.0\\cppwinrt /Tctest.c /Fotest.obj /openmp
INFO: C:\Program Files (x86)\Microsoft Visual Studio\2022\BuildTools\VC\Tools\MSVC\14.36.32532\bin\HostX86\x64\link.exe /nologo /INCREMENTAL:NO /LTCG /LIBPATH:D:\stable-diffusion-webui\venv\libs /LIBPATH:C:\Users\hieu\AppData\Local\Programs\Python\Python311\libs /LIBPATH:C:\Users\hieu\AppData\Local\Programs\Python\Python311 /LIBPATH:D:\stable-diffusion-webui\venv\PCbuild\amd64 /LIBPATH:C:\Program Files (x86)\Microsoft Visual Studio\2022\BuildTools\VC\Tools\MSVC\14.36.32532\lib\x64 /LIBPATH:C:\Program Files (x86)\Windows Kits\10\lib\10.0.22000.0\ucrt\x64 /LIBPATH:C:\Program Files (x86)\Windows Kits\10\\lib\10.0.22000.0\\um\x64 test.obj /OUT:testlib.dll /DLL
INFO: building ‘skimage._shared.geometry’ extension
INFO: compiling C sources
creating build\temp.win-amd64-3.11\Release\skimage
creating build\temp.win-amd64-3.11\Release\skimage\_shared
INFO: C:\Program Files (x86)\Microsoft Visual Studio\2022\BuildTools\VC\Tools\MSVC\14.36.32532\bin\HostX86\x64\cl.exe /c /nologo /O2 /W3 /GL /DNDEBUG /MD -IC:\Users\hieu\AppData\Local\Temp\pip-build-env-b28twx9e\overlay\Lib\site-packages\numpy\core\include -Ibuild\src.win-amd64-3.11\numpy\distutils\include -ID:\stable-diffusion-webui\venv\include -IC:\Users\hieu\AppData\Local\Programs\Python\Python311\include -IC:\Users\hieu\AppData\Local\Programs\Python\Python311\include -IC:\Program Files (x86)\Microsoft Visual Studio\2022\BuildTools\VC\Tools\MSVC\14.36.32532\include -IC:\Program Files (x86)\Microsoft Visual Studio\2022\BuildTools\VC\Tools\MSVC\14.36.32532\ATLMFC\include -IC:\Program Files (x86)\Microsoft Visual Studio\2022\BuildTools\VC\Auxiliary\VS\include -IC:\Program Files (x86)\Windows Kits\10\include\10.0.22000.0\ucrt -IC:\Program Files (x86)\Windows Kits\10\\include\10.0.22000.0\\um -IC:\Program Files (x86)\Windows Kits\10\\include\10.0.22000.0\\shared -IC:\Program Files (x86)\Windows Kits\10\\include\10.0.22000.0\\winrt -IC:\Program Files (x86)\Windows Kits\10\\include\10.0.22000.0\\cppwinrt /Tcskimage\_shared\geometry.c /Fobuild\temp.win-amd64-3.11\Release\skimage\_shared\geometry.obj /openmp
INFO: C:\Program Files (x86)\Microsoft Visual Studio\2022\BuildTools\VC\Tools\MSVC\14.36.32532\bin\HostX86\x64\link.exe /nologo /INCREMENTAL:NO /LTCG /DLL /MANIFEST:EMBED,ID=2 /MANIFESTUAC:NO /LIBPATH:D:\stable-diffusion-webui\venv\libs /LIBPATH:C:\Users\hieu\AppData\Local\Programs\Python\Python311\libs /LIBPATH:C:\Users\hieu\AppData\Local\Programs\Python\Python311 /LIBPATH:D:\stable-diffusion-webui\venv\PCbuild\amd64 /LIBPATH:C:\Program Files (x86)\Microsoft Visual Studio\2022\BuildTools\VC\Tools\MSVC\14.36.32532\lib\x64 /LIBPATH:C:\Program Files (x86)\Windows Kits\10\lib\10.0.22000.0\ucrt\x64 /LIBPATH:C:\Program Files (x86)\Windows Kits\10\\lib\10.0.22000.0\\um\x64 /EXPORT:PyInit_geometry build\temp.win-amd64-3.11\Release\skimage\_shared\geometry.obj /OUT:build\lib.win-amd64-3.11\skimage\_shared\geometry.cp311-win_amd64.pyd /IMPLIB:build\temp.win-amd64-3.11\Release\skimage\_shared\geometry.cp311-win_amd64.lib
INFO: building ‘skimage._shared.transform’ extension
INFO: compiling C sources
INFO: C:\Program Files (x86)\Microsoft Visual Studio\2022\BuildTools\VC\Tools\MSVC\14.36.32532\bin\HostX86\x64\cl.exe /c /nologo /O2 /W3 /GL /DNDEBUG /MD -IC:\Users\hieu\AppData\Local\Temp\pip-build-env-b28twx9e\overlay\Lib\site-packages\numpy\core\include -IC:\Users\hieu\AppData\Local\Temp\pip-build-env-b28twx9e\overlay\Lib\site-packages\numpy\core\include -Ibuild\src.win-amd64-3.11\numpy\distutils\include -ID:\stable-diffusion-webui\venv\include -IC:\Users\hieu\AppData\Local\Programs\Python\Python311\include -IC:\Users\hieu\AppData\Local\Programs\Python\Python311\include -IC:\Program Files (x86)\Microsoft Visual Studio\2022\BuildTools\VC\Tools\MSVC\14.36.32532\include -IC:\Program Files (x86)\Microsoft Visual Studio\2022\BuildTools\VC\Tools\MSVC\14.36.32532\ATLMFC\include -IC:\Program Files (x86)\Microsoft Visual Studio\2022\BuildTools\VC\Auxiliary\VS\include -IC:\Program Files (x86)\Windows Kits\10\include\10.0.22000.0\ucrt -IC:\Program Files (x86)\Windows Kits\10\\include\10.0.22000.0\\um -IC:\Program Files (x86)\Windows Kits\10\\include\10.0.22000.0\\shared -IC:\Program Files (x86)\Windows Kits\10\\include\10.0.22000.0\\winrt -IC:\Program Files (x86)\Windows Kits\10\\include\10.0.22000.0\\cppwinrt /Tcskimage\_shared\transform.c /Fobuild\temp.win-amd64-3.11\Release\skimage\_shared\transform.obj /openmp
INFO: C:\Program Files (x86)\Microsoft Visual Studio\2022\BuildTools\VC\Tools\MSVC\14.36.32532\bin\HostX86\x64\link.exe /nologo /INCREMENTAL:NO /LTCG /DLL /MANIFEST:EMBED,ID=2 /MANIFESTUAC:NO /LIBPATH:D:\stable-diffusion-webui\venv\libs /LIBPATH:C:\Users\hieu\AppData\Local\Programs\Python\Python311\libs /LIBPATH:C:\Users\hieu\AppData\Local\Programs\Python\Python311 /LIBPATH:D:\stable-diffusion-webui\venv\PCbuild\amd64 /LIBPATH:C:\Program Files (x86)\Microsoft Visual Studio\2022\BuildTools\VC\Tools\MSVC\14.36.32532\lib\x64 /LIBPATH:C:\Program Files (x86)\Windows Kits\10\lib\10.0.22000.0\ucrt\x64 /LIBPATH:C:\Program Files (x86)\Windows Kits\10\\lib\10.0.22000.0\\um\x64 /EXPORT:PyInit_transform build\temp.win-amd64-3.11\Release\skimage\_shared\transform.obj /OUT:build\lib.win-amd64-3.11\skimage\_shared\transform.cp311-win_amd64.pyd /IMPLIB:build\temp.win-amd64-3.11\Release\skimage\_shared\transform.cp311-win_amd64.lib
INFO: building ‘skimage._shared.interpolation’ extension
INFO: compiling C sources
INFO: C:\Program Files (x86)\Microsoft Visual Studio\2022\BuildTools\VC\Tools\MSVC\14.36.32532\bin\HostX86\x64\cl.exe /c /nologo /O2 /W3 /GL /DNDEBUG /MD -IC:\Users\hieu\AppData\Local\Temp\pip-build-env-b28twx9e\overlay\Lib\site-packages\numpy\core\include -Ibuild\src.win-amd64-3.11\numpy\distutils\include -ID:\stable-diffusion-webui\venv\include -IC:\Users\hieu\AppData\Local\Programs\Python\Python311\include -IC:\Users\hieu\AppData\Local\Programs\Python\Python311\include -IC:\Program Files (x86)\Microsoft Visual Studio\2022\BuildTools\VC\Tools\MSVC\14.36.32532\include -IC:\Program Files (x86)\Microsoft Visual Studio\2022\BuildTools\VC\Tools\MSVC\14.36.32532\ATLMFC\include -IC:\Program Files (x86)\Microsoft Visual Studio\2022\BuildTools\VC\Auxiliary\VS\include -IC:\Program Files (x86)\Windows Kits\10\include\10.0.22000.0\ucrt -IC:\Program Files (x86)\Windows Kits\10\\include\10.0.22000.0\\um -IC:\Program Files (x86)\Windows Kits\10\\include\10.0.22000.0\\shared -IC:\Program Files (x86)\Windows Kits\10\\include\10.0.22000.0\\winrt -IC:\Program Files (x86)\Windows Kits\10\\include\10.0.22000.0\\cppwinrt /Tcskimage\_shared\interpolation.c /Fobuild\temp.win-amd64-3.11\Release\skimage\_shared\interpolation.obj /openmp
INFO: C:\Program Files (x86)\Microsoft Visual Studio\2022\BuildTools\VC\Tools\MSVC\14.36.32532\bin\HostX86\x64\link.exe /nologo /INCREMENTAL:NO /LTCG /DLL /MANIFEST:EMBED,ID=2 /MANIFESTUAC:NO /LIBPATH:D:\stable-diffusion-webui\venv\libs /LIBPATH:C:\Users\hieu\AppData\Local\Programs\Python\Python311\libs /LIBPATH:C:\Users\hieu\AppData\Local\Programs\Python\Python311 /LIBPATH:D:\stable-diffusion-webui\venv\PCbuild\amd64 /LIBPATH:C:\Program Files (x86)\Microsoft Visual Studio\2022\BuildTools\VC\Tools\MSVC\14.36.32532\lib\x64 /LIBPATH:C:\Program Files (x86)\Windows Kits\10\lib\10.0.22000.0\ucrt\x64 /LIBPATH:C:\Program Files (x86)\Windows Kits\10\\lib\10.0.22000.0\\um\x64 /EXPORT:PyInit_interpolation build\temp.win-amd64-3.11\Release\skimage\_shared\interpolation.obj /OUT:build\lib.win-amd64-3.11\skimage\_shared\interpolation.cp311-win_amd64.pyd /IMPLIB:build\temp.win-amd64-3.11\Release\skimage\_shared\interpolation.cp311-win_amd64.lib
INFO: building ‘skimage._shared.fast_exp’ extension
INFO: compiling C sources
INFO: C:\Program Files (x86)\Microsoft Visual Studio\2022\BuildTools\VC\Tools\MSVC\14.36.32532\bin\HostX86\x64\cl.exe /c /nologo /O2 /W3 /GL /DNDEBUG /MD -IC:\Users\hieu\AppData\Local\Temp\pip-build-env-b28twx9e\overlay\Lib\site-packages\numpy\core\include -Ibuild\src.win-amd64-3.11\numpy\distutils\include -ID:\stable-diffusion-webui\venv\include -IC:\Users\hieu\AppData\Local\Programs\Python\Python311\include -IC:\Users\hieu\AppData\Local\Programs\Python\Python311\include -IC:\Program Files (x86)\Microsoft Visual Studio\2022\BuildTools\VC\Tools\MSVC\14.36.32532\include -IC:\Program Files (x86)\Microsoft Visual Studio\2022\BuildTools\VC\Tools\MSVC\14.36.32532\ATLMFC\include -IC:\Program Files (x86)\Microsoft Visual Studio\2022\BuildTools\VC\Auxiliary\VS\include -IC:\Program Files (x86)\Windows Kits\10\include\10.0.22000.0\ucrt -IC:\Program Files (x86)\Windows Kits\10\\include\10.0.22000.0\\um -IC:\Program Files (x86)\Windows Kits\10\\include\10.0.22000.0\\shared -IC:\Program Files (x86)\Windows Kits\10\\include\10.0.22000.0\\winrt -IC:\Program Files (x86)\Windows Kits\10\\include\10.0.22000.0\\cppwinrt /Tcskimage\_shared\fast_exp.c /Fobuild\temp.win-amd64-3.11\Release\skimage\_shared\fast_exp.obj /openmp
INFO: C:\Program Files (x86)\Microsoft Visual Studio\2022\BuildTools\VC\Tools\MSVC\14.36.32532\bin\HostX86\x64\link.exe /nologo /INCREMENTAL:NO /LTCG /DLL /MANIFEST:EMBED,ID=2 /MANIFESTUAC:NO /LIBPATH:D:\stable-diffusion-webui\venv\libs /LIBPATH:C:\Users\hieu\AppData\Local\Programs\Python\Python311\libs /LIBPATH:C:\Users\hieu\AppData\Local\Programs\Python\Python311 /LIBPATH:D:\stable-diffusion-webui\venv\PCbuild\amd64 /LIBPATH:C:\Program Files (x86)\Microsoft Visual Studio\2022\BuildTools\VC\Tools\MSVC\14.36.32532\lib\x64 /LIBPATH:C:\Program Files (x86)\Windows Kits\10\lib\10.0.22000.0\ucrt\x64 /LIBPATH:C:\Program Files (x86)\Windows Kits\10\\lib\10.0.22000.0\\um\x64 /EXPORT:PyInit_fast_exp build\temp.win-amd64-3.11\Release\skimage\_shared\fast_exp.obj /OUT:build\lib.win-amd64-3.11\skimage\_shared\fast_exp.cp311-win_amd64.pyd /IMPLIB:build\temp.win-amd64-3.11\Release\skimage\_shared\fast_exp.cp311-win_amd64.lib
INFO: building ‘skimage.draw._draw’ extension
INFO: compiling C sources
creating build\temp.win-amd64-3.11\Release\skimage\draw
INFO: C:\Program Files (x86)\Microsoft Visual Studio\2022\BuildTools\VC\Tools\MSVC\14.36.32532\bin\HostX86\x64\cl.exe /c /nologo /O2 /W3 /GL /DNDEBUG /MD -IC:\Users\hieu\AppData\Local\Temp\pip-build-env-b28twx9e\overlay\Lib\site-packages\numpy\core\include -Iskimage\_shared -IC:\Users\hieu\AppData\Local\Temp\pip-build-env-b28twx9e\overlay\Lib\site-packages\numpy\core\include -Ibuild\src.win-amd64-3.11\numpy\distutils\include -ID:\stable-diffusion-webui\venv\include -IC:\Users\hieu\AppData\Local\Programs\Python\Python311\include -IC:\Users\hieu\AppData\Local\Programs\Python\Python311\include -IC:\Program Files (x86)\Microsoft Visual Studio\2022\BuildTools\VC\Tools\MSVC\14.36.32532\include -IC:\Program Files (x86)\Microsoft Visual Studio\2022\BuildTools\VC\Tools\MSVC\14.36.32532\ATLMFC\include -IC:\Program Files (x86)\Microsoft Visual Studio\2022\BuildTools\VC\Auxiliary\VS\include -IC:\Program Files (x86)\Windows Kits\10\include\10.0.22000.0\ucrt -IC:\Program Files (x86)\Windows Kits\10\\include\10.0.22000.0\\um -IC:\Program Files (x86)\Windows Kits\10\\include\10.0.22000.0\\shared -IC:\Program Files (x86)\Windows Kits\10\\include\10.0.22000.0\\winrt -IC:\Program Files (x86)\Windows Kits\10\\include\10.0.22000.0\\cppwinrt /Tcskimage\draw\_draw.c /Fobuild\temp.win-amd64-3.11\Release\skimage\draw\_draw.obj /openmp
INFO: C:\Program Files (x86)\Microsoft Visual Studio\2022\BuildTools\VC\Tools\MSVC\14.36.32532\bin\HostX86\x64\link.exe /nologo /INCREMENTAL:NO /LTCG /DLL /MANIFEST:EMBED,ID=2 /MANIFESTUAC:NO /LIBPATH:D:\stable-diffusion-webui\venv\libs /LIBPATH:C:\Users\hieu\AppData\Local\Programs\Python\Python311\libs /LIBPATH:C:\Users\hieu\AppData\Local\Programs\Python\Python311 /LIBPATH:D:\stable-diffusion-webui\venv\PCbuild\amd64 /LIBPATH:C:\Program Files (x86)\Microsoft Visual Studio\2022\BuildTools\VC\Tools\MSVC\14.36.32532\lib\x64 /LIBPATH:C:\Program Files (x86)\Windows Kits\10\lib\10.0.22000.0\ucrt\x64 /LIBPATH:C:\Program Files (x86)\Windows Kits\10\\lib\10.0.22000.0\\um\x64 /EXPORT:PyInit__draw build\temp.win-amd64-3.11\Release\skimage\draw\_draw.obj /OUT:build\lib.win-amd64-3.11\skimage\draw\_draw.cp311-win_amd64.pyd /IMPLIB:build\temp.win-amd64-3.11\Release\skimage\draw\_draw.cp311-win_amd64.lib
INFO: building ‘skimage.feature._cascade’ extension
INFO: compiling C sources
creating build\temp.win-amd64-3.11\Release\skimage\feature
INFO: C:\Program Files (x86)\Microsoft Visual Studio\2022\BuildTools\VC\Tools\MSVC\14.36.32532\bin\HostX86\x64\cl.exe /c /nologo /O2 /W3 /GL /DNDEBUG /MD -IC:\Users\hieu\AppData\Local\Temp\pip-build-env-b28twx9e\overlay\Lib\site-packages\numpy\core\include -IC:\Users\hieu\AppData\Local\Temp\pip-build-env-b28twx9e\overlay\Lib\site-packages\numpy\core\include -Ibuild\src.win-amd64-3.11\numpy\distutils\include -ID:\stable-diffusion-webui\venv\include -IC:\Users\hieu\AppData\Local\Programs\Python\Python311\include -IC:\Users\hieu\AppData\Local\Programs\Python\Python311\include -IC:\Program Files (x86)\Microsoft Visual Studio\2022\BuildTools\VC\Tools\MSVC\14.36.32532\include -IC:\Program Files (x86)\Microsoft Visual Studio\2022\BuildTools\VC\Tools\MSVC\14.36.32532\ATLMFC\include -IC:\Program Files (x86)\Microsoft Visual Studio\2022\BuildTools\VC\Auxiliary\VS\include -IC:\Program Files (x86)\Windows Kits\10\include\10.0.22000.0\ucrt -IC:\Program Files (x86)\Windows Kits\10\\include\10.0.22000.0\\um -IC:\Program Files (x86)\Windows Kits\10\\include\10.0.22000.0\\shared -IC:\Program Files (x86)\Windows Kits\10\\include\10.0.22000.0\\winrt -IC:\Program Files (x86)\Windows Kits\10\\include\10.0.22000.0\\cppwinrt /EHsc /Tpskimage\feature\_cascade.cpp /Fobuild\temp.win-amd64-3.11\Release\skimage\feature\_cascade.obj /openmp /Zm1000
INFO: C:\Program Files (x86)\Microsoft Visual Studio\2022\BuildTools\VC\Tools\MSVC\14.36.32532\bin\HostX86\x64\link.exe /nologo /INCREMENTAL:NO /LTCG /DLL /MANIFEST:EMBED,ID=2 /MANIFESTUAC:NO /LIBPATH:D:\stable-diffusion-webui\venv\libs /LIBPATH:C:\Users\hieu\AppData\Local\Programs\Python\Python311\libs /LIBPATH:C:\Users\hieu\AppData\Local\Programs\Python\Python311 /LIBPATH:D:\stable-diffusion-webui\venv\PCbuild\amd64 /LIBPATH:C:\Program Files (x86)\Microsoft Visual Studio\2022\BuildTools\VC\Tools\MSVC\14.36.32532\lib\x64 /LIBPATH:C:\Program Files (x86)\Windows Kits\10\lib\10.0.22000.0\ucrt\x64 /LIBPATH:C:\Program Files (x86)\Windows Kits\10\\lib\10.0.22000.0\\um\x64 /EXPORT:PyInit__cascade build\temp.win-amd64-3.11\Release\skimage\feature\_cascade.obj /OUT:build\lib.win-amd64-3.11\skimage\feature\_cascade.cp311-win_amd64.pyd /IMPLIB:build\temp.win-amd64-3.11\Release\skimage\feature\_cascade.cp311-win_amd64.lib
INFO: building ‘skimage.feature.corner_cy’ extension
INFO: compiling C sources
INFO: C:\Program Files (x86)\Microsoft Visual Studio\2022\BuildTools\VC\Tools\MSVC\14.36.32532\bin\HostX86\x64\cl.exe /c /nologo /O2 /W3 /GL /DNDEBUG /MD -IC:\Users\hieu\AppData\Local\Temp\pip-build-env-b28twx9e\overlay\Lib\site-packages\numpy\core\include -IC:\Users\hieu\AppData\Local\Temp\pip-build-env-b28twx9e\overlay\Lib\site-packages\numpy\core\include -Ibuild\src.win-amd64-3.11\numpy\distutils\include -ID:\stable-diffusion-webui\venv\include -IC:\Users\hieu\AppData\Local\Programs\Python\Python311\include -IC:\Users\hieu\AppData\Local\Programs\Python\Python311\include -IC:\Program Files (x86)\Microsoft Visual Studio\2022\BuildTools\VC\Tools\MSVC\14.36.32532\include -IC:\Program Files (x86)\Microsoft Visual Studio\2022\BuildTools\VC\Tools\MSVC\14.36.32532\ATLMFC\include -IC:\Program Files (x86)\Microsoft Visual Studio\2022\BuildTools\VC\Auxiliary\VS\include -IC:\Program Files (x86)\Windows Kits\10\include\10.0.22000.0\ucrt -IC:\Program Files (x86)\Windows Kits\10\\include\10.0.22000.0\\um -IC:\Program Files (x86)\Windows Kits\10\\include\10.0.22000.0\\shared -IC:\Program Files (x86)\Windows Kits\10\\include\10.0.22000.0\\winrt -IC:\Program Files (x86)\Windows Kits\10\\include\10.0.22000.0\\cppwinrt /Tcskimage\feature\corner_cy.c /Fobuild\temp.win-amd64-3.11\Release\skimage\feature\corner_cy.obj /openmp
INFO: C:\Program Files (x86)\Microsoft Visual Studio\2022\BuildTools\VC\Tools\MSVC\14.36.32532\bin\HostX86\x64\link.exe /nologo /INCREMENTAL:NO /LTCG /DLL /MANIFEST:EMBED,ID=2 /MANIFESTUAC:NO /LIBPATH:D:\stable-diffusion-webui\venv\libs /LIBPATH:C:\Users\hieu\AppData\Local\Programs\Python\Python311\libs /LIBPATH:C:\Users\hieu\AppData\Local\Programs\Python\Python311 /LIBPATH:D:\stable-diffusion-webui\venv\PCbuild\amd64 /LIBPATH:C:\Program Files (x86)\Microsoft Visual Studio\2022\BuildTools\VC\Tools\MSVC\14.36.32532\lib\x64 /LIBPATH:C:\Program Files (x86)\Windows Kits\10\lib\10.0.22000.0\ucrt\x64 /LIBPATH:C:\Program Files (x86)\Windows Kits\10\\lib\10.0.22000.0\\um\x64 /EXPORT:PyInit_corner_cy build\temp.win-amd64-3.11\Release\skimage\feature\corner_cy.obj /OUT:build\lib.win-amd64-3.11\skimage\feature\corner_cy.cp311-win_amd64.pyd /IMPLIB:build\temp.win-amd64-3.11\Release\skimage\feature\corner_cy.cp311-win_amd64.lib
INFO: building ‘skimage.feature.censure_cy’ extension
INFO: compiling C sources
INFO: C:\Program Files (x86)\Microsoft Visual Studio\2022\BuildTools\VC\Tools\MSVC\14.36.32532\bin\HostX86\x64\cl.exe /c /nologo /O2 /W3 /GL /DNDEBUG /MD -IC:\Users\hieu\AppData\Local\Temp\pip-build-env-b28twx9e\overlay\Lib\site-packages\numpy\core\include -IC:\Users\hieu\AppData\Local\Temp\pip-build-env-b28twx9e\overlay\Lib\site-packages\numpy\core\include -Ibuild\src.win-amd64-3.11\numpy\distutils\include -ID:\stable-diffusion-webui\venv\include -IC:\Users\hieu\AppData\Local\Programs\Python\Python311\include -IC:\Users\hieu\AppData\Local\Programs\Python\Python311\include -IC:\Program Files (x86)\Microsoft Visual Studio\2022\BuildTools\VC\Tools\MSVC\14.36.32532\include -IC:\Program Files (x86)\Microsoft Visual Studio\2022\BuildTools\VC\Tools\MSVC\14.36.32532\ATLMFC\include -IC:\Program Files (x86)\Microsoft Visual Studio\2022\BuildTools\VC\Auxiliary\VS\include -IC:\Program Files (x86)\Windows Kits\10\include\10.0.22000.0\ucrt -IC:\Program Files (x86)\Windows Kits\10\\include\10.0.22000.0\\um -IC:\Program Files (x86)\Windows Kits\10\\include\10.0.22000.0\\shared -IC:\Program Files (x86)\Windows Kits\10\\include\10.0.22000.0\\winrt -IC:\Program Files (x86)\Windows Kits\10\\include\10.0.22000.0\\cppwinrt /Tcskimage\feature\censure_cy.c /Fobuild\temp.win-amd64-3.11\Release\skimage\feature\censure_cy.obj /openmp
INFO: C:\Program Files (x86)\Microsoft Visual Studio\2022\BuildTools\VC\Tools\MSVC\14.36.32532\bin\HostX86\x64\link.exe /nologo /INCREMENTAL:NO /LTCG /DLL /MANIFEST:EMBED,ID=2 /MANIFESTUAC:NO /LIBPATH:D:\stable-diffusion-webui\venv\libs /LIBPATH:C:\Users\hieu\AppData\Local\Programs\Python\Python311\libs /LIBPATH:C:\Users\hieu\AppData\Local\Programs\Python\Python311 /LIBPATH:D:\stable-diffusion-webui\venv\PCbuild\amd64 /LIBPATH:C:\Program Files (x86)\Microsoft Visual Studio\2022\BuildTools\VC\Tools\MSVC\14.36.32532\lib\x64 /LIBPATH:C:\Program Files (x86)\Windows Kits\10\lib\10.0.22000.0\ucrt\x64 /LIBPATH:C:\Program Files (x86)\Windows Kits\10\\lib\10.0.22000.0\\um\x64 /EXPORT:PyInit_censure_cy build\temp.win-amd64-3.11\Release\skimage\feature\censure_cy.obj /OUT:build\lib.win-amd64-3.11\skimage\feature\censure_cy.cp311-win_amd64.pyd /IMPLIB:build\temp.win-amd64-3.11\Release\skimage\feature\censure_cy.cp311-win_amd64.lib
INFO: building ‘skimage.feature.orb_cy’ extension
INFO: compiling C sources
INFO: C:\Program Files (x86)\Microsoft Visual Studio\2022\BuildTools\VC\Tools\MSVC\14.36.32532\bin\HostX86\x64\cl.exe /c /nologo /O2 /W3 /GL /DNDEBUG /MD -IC:\Users\hieu\AppData\Local\Temp\pip-build-env-b28twx9e\overlay\Lib\site-packages\numpy\core\include -IC:\Users\hieu\AppData\Local\Temp\pip-build-env-b28twx9e\overlay\Lib\site-packages\numpy\core\include -Ibuild\src.win-amd64-3.11\numpy\distutils\include -ID:\stable-diffusion-webui\venv\include -IC:\Users\hieu\AppData\Local\Programs\Python\Python311\include -IC:\Users\hieu\AppData\Local\Programs\Python\Python311\include -IC:\Program Files (x86)\Microsoft Visual Studio\2022\BuildTools\VC\Tools\MSVC\14.36.32532\include -IC:\Program Files (x86)\Microsoft Visual Studio\2022\BuildTools\VC\Tools\MSVC\14.36.32532\ATLMFC\include -IC:\Program Files (x86)\Microsoft Visual Studio\2022\BuildTools\VC\Auxiliary\VS\include -IC:\Program Files (x86)\Windows Kits\10\include\10.0.22000.0\ucrt -IC:\Program Files (x86)\Windows Kits\10\\include\10.0.22000.0\\um -IC:\Program Files (x86)\Windows Kits\10\\include\10.0.22000.0\\shared -IC:\Program Files (x86)\Windows Kits\10\\include\10.0.22000.0\\winrt -IC:\Program Files (x86)\Windows Kits\10\\include\10.0.22000.0\\cppwinrt /Tcskimage\feature\orb_cy.c /Fobuild\temp.win-amd64-3.11\Release\skimage\feature\orb_cy.obj /openmp
INFO: C:\Program Files (x86)\Microsoft Visual Studio\2022\BuildTools\VC\Tools\MSVC\14.36.32532\bin\HostX86\x64\link.exe /nologo /INCREMENTAL:NO /LTCG /DLL /MANIFEST:EMBED,ID=2 /MANIFESTUAC:NO /LIBPATH:D:\stable-diffusion-webui\venv\libs /LIBPATH:C:\Users\hieu\AppData\Local\Programs\Python\Python311\libs /LIBPATH:C:\Users\hieu\AppData\Local\Programs\Python\Python311 /LIBPATH:D:\stable-diffusion-webui\venv\PCbuild\amd64 /LIBPATH:C:\Program Files (x86)\Microsoft Visual Studio\2022\BuildTools\VC\Tools\MSVC\14.36.32532\lib\x64 /LIBPATH:C:\Program Files (x86)\Windows Kits\10\lib\10.0.22000.0\ucrt\x64 /LIBPATH:C:\Program Files (x86)\Windows Kits\10\\lib\10.0.22000.0\\um\x64 /EXPORT:PyInit_orb_cy build\temp.win-amd64-3.11\Release\skimage\feature\orb_cy.obj /OUT:build\lib.win-amd64-3.11\skimage\feature\orb_cy.cp311-win_amd64.pyd /IMPLIB:build\temp.win-amd64-3.11\Release\skimage\feature\orb_cy.cp311-win_amd64.lib
INFO: building ‘skimage.feature._texture’ extension
INFO: compiling C sources
INFO: C:\Program Files (x86)\Microsoft Visual Studio\2022\BuildTools\VC\Tools\MSVC\14.36.32532\bin\HostX86\x64\cl.exe /c /nologo /O2 /W3 /GL /DNDEBUG /MD -IC:\Users\hieu\AppData\Local\Temp\pip-build-env-b28twx9e\overlay\Lib\site-packages\numpy\core\include -Iskimage\_shared -IC:\Users\hieu\AppData\Local\Temp\pip-build-env-b28twx9e\overlay\Lib\site-packages\numpy\core\include -Ibuild\src.win-amd64-3.11\numpy\distutils\include -ID:\stable-diffusion-webui\venv\include -IC:\Users\hieu\AppData\Local\Programs\Python\Python311\include -IC:\Users\hieu\AppData\Local\Programs\Python\Python311\include -IC:\Program Files (x86)\Microsoft Visual Studio\2022\BuildTools\VC\Tools\MSVC\14.36.32532\include -IC:\Program Files (x86)\Microsoft Visual Studio\2022\BuildTools\VC\Tools\MSVC\14.36.32532\ATLMFC\include -IC:\Program Files (x86)\Microsoft Visual Studio\2022\BuildTools\VC\Auxiliary\VS\include -IC:\Program Files (x86)\Windows Kits\10\include\10.0.22000.0\ucrt -IC:\Program Files (x86)\Windows Kits\10\\include\10.0.22000.0\\um -IC:\Program Files (x86)\Windows Kits\10\\include\10.0.22000.0\\shared -IC:\Program Files (x86)\Windows Kits\10\\include\10.0.22000.0\\winrt -IC:\Program Files (x86)\Windows Kits\10\\include\10.0.22000.0\\cppwinrt /Tcskimage\feature\_texture.c /Fobuild\temp.win-amd64-3.11\Release\skimage\feature\_texture.obj /openmp
INFO: C:\Program Files (x86)\Microsoft Visual Studio\2022\BuildTools\VC\Tools\MSVC\14.36.32532\bin\HostX86\x64\link.exe /nologo /INCREMENTAL:NO /LTCG /DLL /MANIFEST:EMBED,ID=2 /MANIFESTUAC:NO /LIBPATH:D:\stable-diffusion-webui\venv\libs /LIBPATH:C:\Users\hieu\AppData\Local\Programs\Python\Python311\libs /LIBPATH:C:\Users\hieu\AppData\Local\Programs\Python\Python311 /LIBPATH:D:\stable-diffusion-webui\venv\PCbuild\amd64 /LIBPATH:C:\Program Files (x86)\Microsoft Visual Studio\2022\BuildTools\VC\Tools\MSVC\14.36.32532\lib\x64 /LIBPATH:C:\Program Files (x86)\Windows Kits\10\lib\10.0.22000.0\ucrt\x64 /LIBPATH:C:\Program Files (x86)\Windows Kits\10\\lib\10.0.22000.0\\um\x64 /EXPORT:PyInit__texture build\temp.win-amd64-3.11\Release\skimage\feature\_texture.obj /OUT:build\lib.win-amd64-3.11\skimage\feature\_texture.cp311-win_amd64.pyd /IMPLIB:build\temp.win-amd64-3.11\Release\skimage\feature\_texture.cp311-win_amd64.lib
INFO: building ‘skimage.feature._hoghistogram’ extension
INFO: compiling C sources
INFO: C:\Program Files (x86)\Microsoft Visual Studio\2022\BuildTools\VC\Tools\MSVC\14.36.32532\bin\HostX86\x64\cl.exe /c /nologo /O2 /W3 /GL /DNDEBUG /MD -IC:\Users\hieu\AppData\Local\Temp\pip-build-env-b28twx9e\overlay\Lib\site-packages\numpy\core\include -Iskimage\_shared -IC:\Users\hieu\AppData\Local\Temp\pip-build-env-b28twx9e\overlay\Lib\site-packages\numpy\core\include -Ibuild\src.win-amd64-3.11\numpy\distutils\include -ID:\stable-diffusion-webui\venv\include -IC:\Users\hieu\AppData\Local\Programs\Python\Python311\include -IC:\Users\hieu\AppData\Local\Programs\Python\Python311\include -IC:\Program Files (x86)\Microsoft Visual Studio\2022\BuildTools\VC\Tools\MSVC\14.36.32532\include -IC:\Program Files (x86)\Microsoft Visual Studio\2022\BuildTools\VC\Tools\MSVC\14.36.32532\ATLMFC\include -IC:\Program Files (x86)\Microsoft Visual Studio\2022\BuildTools\VC\Auxiliary\VS\include -IC:\Program Files (x86)\Windows Kits\10\include\10.0.22000.0\ucrt -IC:\Program Files (x86)\Windows Kits\10\\include\10.0.22000.0\\um -IC:\Program Files (x86)\Windows Kits\10\\include\10.0.22000.0\\shared -IC:\Program Files (x86)\Windows Kits\10\\include\10.0.22000.0\\winrt -IC:\Program Files (x86)\Windows Kits\10\\include\10.0.22000.0\\cppwinrt /Tcskimage\feature\_hoghistogram.c /Fobuild\temp.win-amd64-3.11\Release\skimage\feature\_hoghistogram.obj /openmp
INFO: C:\Program Files (x86)\Microsoft Visual Studio\2022\BuildTools\VC\Tools\MSVC\14.36.32532\bin\HostX86\x64\link.exe /nologo /INCREMENTAL:NO /LTCG /DLL /MANIFEST:EMBED,ID=2 /MANIFESTUAC:NO /LIBPATH:D:\stable-diffusion-webui\venv\libs /LIBPATH:C:\Users\hieu\AppData\Local\Programs\Python\Python311\libs /LIBPATH:C:\Users\hieu\AppData\Local\Programs\Python\Python311 /LIBPATH:D:\stable-diffusion-webui\venv\PCbuild\amd64 /LIBPATH:C:\Program Files (x86)\Microsoft Visual Studio\2022\BuildTools\VC\Tools\MSVC\14.36.32532\lib\x64 /LIBPATH:C:\Program Files (x86)\Windows Kits\10\lib\10.0.22000.0\ucrt\x64 /LIBPATH:C:\Program Files (x86)\Windows Kits\10\\lib\10.0.22000.0\\um\x64 /EXPORT:PyInit__hoghistogram build\temp.win-amd64-3.11\Release\skimage\feature\_hoghistogram.obj /OUT:build\lib.win-amd64-3.11\skimage\feature\_hoghistogram.cp311-win_amd64.pyd /IMPLIB:build\temp.win-amd64-3.11\Release\skimage\feature\_hoghistogram.cp311-win_amd64.lib
INFO: building ‘skimage.feature._haar’ extension
INFO: compiling C sources
INFO: C:\Program Files (x86)\Microsoft Visual Studio\2022\BuildTools\VC\Tools\MSVC\14.36.32532\bin\HostX86\x64\cl.exe /c /nologo /O2 /W3 /GL /DNDEBUG /MD -IC:\Users\hieu\AppData\Local\Temp\pip-build-env-b28twx9e\overlay\Lib\site-packages\numpy\core\include -Iskimage\_shared -IC:\Users\hieu\AppData\Local\Temp\pip-build-env-b28twx9e\overlay\Lib\site-packages\numpy\core\include -Ibuild\src.win-amd64-3.11\numpy\distutils\include -ID:\stable-diffusion-webui\venv\include -IC:\Users\hieu\AppData\Local\Programs\Python\Python311\include -IC:\Users\hieu\AppData\Local\Programs\Python\Python311\include -IC:\Program Files (x86)\Microsoft Visual Studio\2022\BuildTools\VC\Tools\MSVC\14.36.32532\include -IC:\Program Files (x86)\Microsoft Visual Studio\2022\BuildTools\VC\Tools\MSVC\14.36.32532\ATLMFC\include -IC:\Program Files (x86)\Microsoft Visual Studio\2022\BuildTools\VC\Auxiliary\VS\include -IC:\Program Files (x86)\Windows Kits\10\include\10.0.22000.0\ucrt -IC:\Program Files (x86)\Windows Kits\10\\include\10.0.22000.0\\um -IC:\Program Files (x86)\Windows Kits\10\\include\10.0.22000.0\\shared -IC:\Program Files (x86)\Windows Kits\10\\include\10.0.22000.0\\winrt -IC:\Program Files (x86)\Windows Kits\10\\include\10.0.22000.0\\cppwinrt /EHsc /Tpskimage\feature\_haar.cpp /Fobuild\temp.win-amd64-3.11\Release\skimage\feature\_haar.obj /openmp /Zm1000
INFO: C:\Program Files (x86)\Microsoft Visual Studio\2022\BuildTools\VC\Tools\MSVC\14.36.32532\bin\HostX86\x64\link.exe /nologo /INCREMENTAL:NO /LTCG /DLL /MANIFEST:EMBED,ID=2 /MANIFESTUAC:NO /LIBPATH:D:\stable-diffusion-webui\venv\libs /LIBPATH:C:\Users\hieu\AppData\Local\Programs\Python\Python311\libs /LIBPATH:C:\Users\hieu\AppData\Local\Programs\Python\Python311 /LIBPATH:D:\stable-diffusion-webui\venv\PCbuild\amd64 /LIBPATH:C:\Program Files (x86)\Microsoft Visual Studio\2022\BuildTools\VC\Tools\MSVC\14.36.32532\lib\x64 /LIBPATH:C:\Program Files (x86)\Windows Kits\10\lib\10.0.22000.0\ucrt\x64 /LIBPATH:C:\Program Files (x86)\Windows Kits\10\\lib\10.0.22000.0\\um\x64 /EXPORT:PyInit__haar build\temp.win-amd64-3.11\Release\skimage\feature\_haar.obj /OUT:build\lib.win-amd64-3.11\skimage\feature\_haar.cp311-win_amd64.pyd /IMPLIB:build\temp.win-amd64-3.11\Release\skimage\feature\_haar.cp311-win_amd64.lib
INFO: building ‘skimage.feature._sift’ extension
INFO: compiling C sources
INFO: C:\Program Files (x86)\Microsoft Visual Studio\2022\BuildTools\VC\Tools\MSVC\14.36.32532\bin\HostX86\x64\cl.exe /c /nologo /O2 /W3 /GL /DNDEBUG /MD -IC:\Users\hieu\AppData\Local\Temp\pip-build-env-b28twx9e\overlay\Lib\site-packages\numpy\core\include -Iskimage\_shared -IC:\Users\hieu\AppData\Local\Temp\pip-build-env-b28twx9e\overlay\Lib\site-packages\numpy\core\include -Ibuild\src.win-amd64-3.11\numpy\distutils\include -ID:\stable-diffusion-webui\venv\include -IC:\Users\hieu\AppData\Local\Programs\Python\Python311\include -IC:\Users\hieu\AppData\Local\Programs\Python\Python311\include -IC:\Program Files (x86)\Microsoft Visual Studio\2022\BuildTools\VC\Tools\MSVC\14.36.32532\include -IC:\Program Files (x86)\Microsoft Visual Studio\2022\BuildTools\VC\Tools\MSVC\14.36.32532\ATLMFC\include -IC:\Program Files (x86)\Microsoft Visual Studio\2022\BuildTools\VC\Auxiliary\VS\include -IC:\Program Files (x86)\Windows Kits\10\include\10.0.22000.0\ucrt -IC:\Program Files (x86)\Windows Kits\10\\include\10.0.22000.0\\um -IC:\Program Files (x86)\Windows Kits\10\\include\10.0.22000.0\\shared -IC:\Program Files (x86)\Windows Kits\10\\include\10.0.22000.0\\winrt -IC:\Program Files (x86)\Windows Kits\10\\include\10.0.22000.0\\cppwinrt /Tcskimage\feature\_sift.c /Fobuild\temp.win-amd64-3.11\Release\skimage\feature\_sift.obj /openmp
INFO: C:\Program Files (x86)\Microsoft Visual Studio\2022\BuildTools\VC\Tools\MSVC\14.36.32532\bin\HostX86\x64\link.exe /nologo /INCREMENTAL:NO /LTCG /DLL /MANIFEST:EMBED,ID=2 /MANIFESTUAC:NO /LIBPATH:D:\stable-diffusion-webui\venv\libs /LIBPATH:C:\Users\hieu\AppData\Local\Programs\Python\Python311\libs /LIBPATH:C:\Users\hieu\AppData\Local\Programs\Python\Python311 /LIBPATH:D:\stable-diffusion-webui\venv\PCbuild\amd64 /LIBPATH:C:\Program Files (x86)\Microsoft Visual Studio\2022\BuildTools\VC\Tools\MSVC\14.36.32532\lib\x64 /LIBPATH:C:\Program Files (x86)\Windows Kits\10\lib\10.0.22000.0\ucrt\x64 /LIBPATH:C:\Program Files (x86)\Windows Kits\10\\lib\10.0.22000.0\\um\x64 /EXPORT:PyInit__sift build\temp.win-amd64-3.11\Release\skimage\feature\_sift.obj /OUT:build\lib.win-amd64-3.11\skimage\feature\_sift.cp311-win_amd64.pyd /IMPLIB:build\temp.win-amd64-3.11\Release\skimage\feature\_sift.cp311-win_amd64.lib
INFO: building ‘skimage.feature.brief_cy’ extension
INFO: compiling C sources
INFO: clang-cl.exe /c /nologo /O2 /W3 /GL /DNDEBUG /MD -DENABLE_PYTHON_MODULE -D__PYTHRAN__=3 -DPYTHRAN_BLAS_NONE -IC:\Users\hieu\AppData\Local\Temp\pip-build-env-b28twx9e\overlay\Lib\site-packages/pythran -IC:\Users\hieu\AppData\Local\Temp\pip-build-env-b28twx9e\overlay\Lib\site-packages\numpy\core\include -IC:\Users\hieu\AppData\Local\Temp\pip-build-env-b28twx9e\overlay\Lib\site-packages\numpy\core\include -Ibuild\src.win-amd64-3.11\numpy\distutils\include -ID:\stable-diffusion-webui\venv\include -IC:\Users\hieu\AppData\Local\Programs\Python\Python311\include -IC:\Users\hieu\AppData\Local\Programs\Python\Python311\include -IC:\Program Files (x86)\Microsoft Visual Studio\2022\BuildTools\VC\Tools\MSVC\14.36.32532\include -IC:\Program Files (x86)\Microsoft Visual Studio\2022\BuildTools\VC\Tools\MSVC\14.36.32532\ATLMFC\include -IC:\Program Files (x86)\Microsoft Visual Studio\2022\BuildTools\VC\Auxiliary\VS\include -IC:\Program Files (x86)\Windows Kits\10\include\10.0.22000.0\ucrt -IC:\Program Files (x86)\Windows Kits\10\\include\10.0.22000.0\\um -IC:\Program Files (x86)\Windows Kits\10\\include\10.0.22000.0\\shared -IC:\Program Files (x86)\Windows Kits\10\\include\10.0.22000.0\\winrt -IC:\Program Files (x86)\Windows Kits\10\\include\10.0.22000.0\\cppwinrt /EHsc /Tpskimage/feature/brief_pythran.cpp /Fobuild\temp.win-amd64-3.11\Release\skimage/feature/brief_pythran.obj /std:c++14 /w /openmp /Zm1000
[WinError 2] The system cannot find the file specified
error: Command “clang-cl.exe /c /nologo /O2 /W3 /GL /DNDEBUG /MD -DENABLE_PYTHON_MODULE -D__PYTHRAN__=3 -DPYTHRAN_BLAS_NONE -IC:\Users\hieu\AppData\Local\Temp\pip-build-env-b28twx9e\overlay\Lib\site-packages/pythran -IC:\Users\hieu\AppData\Local\Temp\pip-build-env-b28twx9e\overlay\Lib\site-packages\numpy\core\include -IC:\Users\hieu\AppData\Local\Temp\pip-build-env-b28twx9e\overlay\Lib\site-packages\numpy\core\include -Ibuild\src.win-amd64-3.11\numpy\distutils\include -ID:\stable-diffusion-webui\venv\include -IC:\Users\hieu\AppData\Local\Programs\Python\Python311\include -IC:\Users\hieu\AppData\Local\Programs\Python\Python311\include -IC:\Program Files (x86)\Microsoft Visual Studio\2022\BuildTools\VC\Tools\MSVC\14.36.32532\include -IC:\Program Files (x86)\Microsoft Visual Studio\2022\BuildTools\VC\Tools\MSVC\14.36.32532\ATLMFC\include -IC:\Program Files (x86)\Microsoft Visual Studio\2022\BuildTools\VC\Auxiliary\VS\include -IC:\Program Files (x86)\Windows Kits\10\include\10.0.22000.0\ucrt -IC:\Program Files (x86)\Windows Kits\10\\include\10.0.22000.0\\um -IC:\Program Files (x86)\Windows Kits\10\\include\10.0.22000.0\\shared -IC:\Program Files (x86)\Windows Kits\10\\include\10.0.22000.0\\winrt -IC:\Program Files (x86)\Windows Kits\10\\include\10.0.22000.0\\cppwinrt /EHsc /Tpskimage/feature/brief_pythran.cpp /Fobuild\temp.win-amd64-3.11\Release\skimage/feature/brief_pythran.obj /std:c++14 /w /openmp /Zm1000” failed with exit status 127
INFO:
########### EXT COMPILER OPTIMIZATION ###########
INFO: Platform :
Architecture: x64
Compiler : msvc
CPU baseline :
Requested : ‘min’
Enabled : SSE SSE2 SSE3
Flags : none
Extra checks: none
CPU dispatch :
Requested : ‘max -xop -fma4’
Enabled : SSSE3 SSE41 POPCNT SSE42 AVX F16C FMA3 AVX2 AVX512F AVX512CD AVX512_SKX AVX512_CLX AVX512_CNL AVX512_ICL
Generated : none
INFO: CCompilerOpt.cache_flush[857] : write cache to path -> C:\Users\hieu\AppData\Local\Temp\pip-install-7nz1yc1h\scikit-image_a75b5e31a8ff4172a19384edc307ccd7\build\temp.win-amd64-3.11\Release\ccompiler_opt_cache_ext.py
[end of output]
note: This error originates from a subprocess, and is likely not a problem with pip.
ERROR: Failed building wheel for scikit-image
ERROR: Could not build wheels for scikit-image, which is required to install pyproject.toml-based projects
The error comes from python packages. I think you may have python previously installed? Remove all of them and start over from installing python if possible.
Otherwise, you will need to sort them out yourself.
no-half has fixed it for me. Thanks for the reply Adrew! Great effort helping literally hundreds of people here in the comments!
I deleted and reinstalled it 6 times but unfortunately there is no cure, you can add some arguments to the web ui.bat but then deforum does not work
I followed everything to a T but there is no file named “webui-user-bat”. I have 2 “webui-user” files, one is a windows batch file, the other is a shell script. I ran the batch file but doesn’t look like you python window.
You should have webui-user.bat
It is one of the files you downloaded when you run the git clone command.
In cmd, cd into the webui folder and try run “git checkout -f”
If you still not seeing it, delete the webui folder and restart from the git clone step.
Already tried setting the “Upcast cross attention layer to float32″ option, but to no avail.
Error completing request
Arguments: (‘task(x1euojzg33zou9e)’, ‘cat’, ”, [], 20, 0, False, False, 1, 1, 7, -1.0, -1.0, 0, 0, 0, False, 512, 512, False, 0.7, 2, ‘Latent’, 0, 0, 0, [], 0, False, False, ‘positive’, ‘comma’, 0, False, False, ”, 1, ”, [], 0, ”, [], 0, ”, [], True, False, False, False, 0) {}
Traceback (most recent call last):
File “C:\Users\mail\stable-diffusion-webui\modules\call_queue.py”, line 57, in f
res = list(func(*args, **kwargs))
File “C:\Users\mail\stable-diffusion-webui\modules\call_queue.py”, line 37, in f
res = func(*args, **kwargs)
File “C:\Users\mail\stable-diffusion-webui\modules\txt2img.py”, line 56, in txt2img
processed = process_images(p)
File “C:\Users\mail\stable-diffusion-webui\modules\processing.py”, line 526, in process_images
res = process_images_inner(p)
File “C:\Users\mail\stable-diffusion-webui\modules\processing.py”, line 680, in process_images_inner
samples_ddim = p.sample(conditioning=c, unconditional_conditioning=uc, seeds=seeds, subseeds=subseeds, subseed_strength=p.subseed_strength, prompts=prompts)
File “C:\Users\mail\stable-diffusion-webui\modules\processing.py”, line 907, in sample
samples = self.sampler.sample(self, x, conditioning, unconditional_conditioning, image_conditioning=self.txt2img_image_conditioning(x))
File “C:\Users\mail\stable-diffusion-webui\modules\sd_samplers_kdiffusion.py”, line 377, in sample
samples = self.launch_sampling(steps, lambda: self.func(self.model_wrap_cfg, x, extra_args={
File “C:\Users\mail\stable-diffusion-webui\modules\sd_samplers_kdiffusion.py”, line 251, in launch_sampling
return func()
File “C:\Users\mail\stable-diffusion-webui\modules\sd_samplers_kdiffusion.py”, line 377, in
samples = self.launch_sampling(steps, lambda: self.func(self.model_wrap_cfg, x, extra_args={
File “C:\Users\mail\stable-diffusion-webui\venv\lib\site-packages\torch\utils\_contextlib.py”, line 115, in decorate_context
return func(*args, **kwargs)
File “C:\Users\mail\stable-diffusion-webui\repositories\k-diffusion\k_diffusion\sampling.py”, line 145, in sample_euler_ancestral
denoised = model(x, sigmas[i] * s_in, **extra_args)
File “C:\Users\mail\stable-diffusion-webui\venv\lib\site-packages\torch\nn\modules\module.py”, line 1501, in _call_impl
return forward_call(*args, **kwargs)
File “C:\Users\mail\stable-diffusion-webui\modules\sd_samplers_kdiffusion.py”, line 167, in forward
devices.test_for_nans(x_out, “unet”)
File “C:\Users\mail\stable-diffusion-webui\modules\devices.py”, line 156, in test_for_nans raise NansException(message)
modules.devices.NansException: A tensor with all NaNs was produced in Unet. This could be either because there’s not enough precision to represent the picture, or because your video card does not support half type. Try setting the “Upcast cross attention layer to float32” option in Settings > Stable Diffusion or using the –no-half commandline argument to fix this. Use –disable-nan-check commandline argument to disable this check.
Does it happen only to certain models?
Have you tried no-half and disable-nan-check?
Never mind, it has finally worked. Thanks for the tutorial.
I also had a long error after multiple attempts to download pytorch.
Also based on your response to someone else:
“If you are able to manually down the whl files, you can install them by
.\venv\Scripts\python.exe -m pip install C:/some-dir/some-file.whl”
After I’ve downloaded the file, will I open CMD in the webui-user folder and type this “.\venv\Scripts\python.exe -m pip install C:/…”?
And last question, are there additional that are gigs in size that will be downloaded through cmd?
Hi and sorry for my long message, I’ve tried running the bat file and around 1gb of download, it fails. ive done it multiple times and its now tiring. If I download the pytouch file using this link, how will I install it into the right directory?
I’m guessing within the folder for the bat file, ill open cmd and type .\venv\Script\python.exe -m …
based on your response to someone else:
“If you are able to manually down the whl files, you can install them by
.\venv\Scripts\python.exe -m pip install C:/some-dir/some-file.whl”
And also please another question, after downloading pytorch, is there any file to be downloaded that’s in gigs? Just asking because i have limited internet and i’ve already spent ove a quarter on the model and now on this this error.
below is the error message
Downloading https://download.pytorch.org/whl/cu118/torch-2.0.1%2Bcu118-cp310-cp310-win_amd64.whl (2619.1 MB)
———————– —————- 1.6/2.6 GB 892.0 kB/s eta 0:19:45
ERROR: Exception:
Traceback (most recent call last):
File “C:\AI\stable-diffusion-webui\venv\lib\site-packages\pip\_vendor\urllib3\response.py”, line 435, in _error_catcher
yield
File “C:\AI\stable-diffusion-webui\venv\lib\site-packages\pip\_vendor\urllib3\response.py”, line 516, in read
data = self._fp.read(amt) if not fp_closed else b””
File “C:\AI\stable-diffusion-webui\venv\lib\site-packages\pip\_vendor\cachecontrol\filewrapper.py”, line 90, in read
data = self.__fp.read(amt)
File “C:\Users\Devin\AppData\Local\Programs\Python\Python310\lib\http\client.py”, line 465, in read
s = self.fp.read(amt)
File “C:\Users\Devin\AppData\Local\Programs\Python\Python310\lib\socket.py”, line 705, in readinto
return self._sock.recv_into(b)
File “C:\Users\Devin\AppData\Local\Programs\Python\Python310\lib\ssl.py”, line 1274, in recv_into
return self.read(nbytes, buffer)
File “C:\Users\Devin\AppData\Local\Programs\Python\Python310\lib\ssl.py”, line 1130, in read
return self._sslobj.read(len, buffer)
TimeoutError: The read operation timed out
During handling of the above exception, another exception occurred:
Traceback (most recent call last):
File “C:\AI\stable-diffusion-webui\venv\lib\site-packages\pip\_internal\cli\base_command.py”, line 167, in exc_logging_wrapper
status = run_func(*args)
File “C:\AI\stable-diffusion-webui\venv\lib\site-packages\pip\_internal\cli\req_command.py”, line 247, in wrapper
return func(self, options, args)
File “C:\AI\stable-diffusion-webui\venv\lib\site-packages\pip\_internal\commands\install.py”, line 369, in run
requirement_set = resolver.resolve(
File “C:\AI\stable-diffusion-webui\venv\lib\site-packages\pip\_internal\resolution\resolvelib\resolver.py”, line 92, in resolve
result = self._result = resolver.resolve(
File “C:\AI\stable-diffusion-webui\venv\lib\site-packages\pip\_vendor\resolvelib\resolvers.py”, line 481, in resolve
state = resolution.resolve(requirements, max_rounds=max_rounds)
File “C:\AI\stable-diffusion-webui\venv\lib\site-packages\pip\_vendor\resolvelib\resolvers.py”, line 348, in resolve
self._add_to_criteria(self.state.criteria, r, parent=None)
File “C:\AI\stable-diffusion-webui\venv\lib\site-packages\pip\_vendor\resolvelib\resolvers.py”, line 172, in _add_to_criteria
if not criterion.candidates:
File “C:\AI\stable-diffusion-webui\venv\lib\site-packages\pip\_vendor\resolvelib\structs.py”, line 151, in __bool__
return bool(self._sequence)
File “C:\AI\stable-diffusion-webui\venv\lib\site-packages\pip\_internal\resolution\resolvelib\found_candidates.py”, line 155, in __bool__
return any(self)
File “C:\AI\stable-diffusion-webui\venv\lib\site-packages\pip\_internal\resolution\resolvelib\found_candidates.py”, line 143, in
return (c for c in iterator if id(c) not in self._incompatible_ids)
File “C:\AI\stable-diffusion-webui\venv\lib\site-packages\pip\_internal\resolution\resolvelib\found_candidates.py”, line 47, in _iter_built
candidate = func()
File “C:\AI\stable-diffusion-webui\venv\lib\site-packages\pip\_internal\resolution\resolvelib\factory.py”, line 206, in _make_candidate_from_link
self._link_candidate_cache[link] = LinkCandidate(
File “C:\AI\stable-diffusion-webui\venv\lib\site-packages\pip\_internal\resolution\resolvelib\candidates.py”, line 297, in __init__
super().__init__(
File “C:\AI\stable-diffusion-webui\venv\lib\site-packages\pip\_internal\resolution\resolvelib\candidates.py”, line 162, in __init__
self.dist = self._prepare()
File “C:\AI\stable-diffusion-webui\venv\lib\site-packages\pip\_internal\resolution\resolvelib\candidates.py”, line 231, in _prepare
dist = self._prepare_distribution()
File “C:\AI\stable-diffusion-webui\venv\lib\site-packages\pip\_internal\resolution\resolvelib\candidates.py”, line 308, in _prepare_distribution
return preparer.prepare_linked_requirement(self._ireq, parallel_builds=True)
File “C:\AI\stable-diffusion-webui\venv\lib\site-packages\pip\_internal\operations\prepare.py”, line 438, in prepare_linked_requirement
return self._prepare_linked_requirement(req, parallel_builds)
File “C:\AI\stable-diffusion-webui\venv\lib\site-packages\pip\_internal\operations\prepare.py”, line 483, in _prepare_linked_requirement
local_file = unpack_url(
File “C:\AI\stable-diffusion-webui\venv\lib\site-packages\pip\_internal\operations\prepare.py”, line 165, in unpack_url
file = get_http_url(
File “C:\AI\stable-diffusion-webui\venv\lib\site-packages\pip\_internal\operations\prepare.py”, line 106, in get_http_url
from_path, content_type = download(link, temp_dir.path)
File “C:\AI\stable-diffusion-webui\venv\lib\site-packages\pip\_internal\network\download.py”, line 147, in __call__
for chunk in chunks:
File “C:\AI\stable-diffusion-webui\venv\lib\site-packages\pip\_internal\cli\progress_bars.py”, line 53, in _rich_progress_bar
for chunk in iterable:
File “C:\AI\stable-diffusion-webui\venv\lib\site-packages\pip\_internal\network\utils.py”, line 63, in response_chunks
for chunk in response.raw.stream(
File “C:\AI\stable-diffusion-webui\venv\lib\site-packages\pip\_vendor\urllib3\response.py”, line 573, in stream
data = self.read(amt=amt, decode_content=decode_content)
File “C:\AI\stable-diffusion-webui\venv\lib\site-packages\pip\_vendor\urllib3\response.py”, line 509, in read
with self._error_catcher():
File “C:\Users\Devin\AppData\Local\Programs\Python\Python310\lib\contextlib.py”, line 153, in __exit__
self.gen.throw(typ, value, traceback)
File “C:\AI\stable-diffusion-webui\venv\lib\site-packages\pip\_vendor\urllib3\response.py”, line 440, in _error_catcher
raise ReadTimeoutError(self._pool, None, “Read timed out.”)
pip._vendor.urllib3.exceptions.ReadTimeoutError: HTTPSConnectionPool(host=’download.pytorch.org’, port=443): Read timed out.
[notice] A new release of pip available: 22.2.1 -> 23.1.2
[notice] To update, run: C:\AI\stable-diffusion-webui\venv\Scripts\python.exe -m pip install –upgrade pip
Traceback (most recent call last):
File “C:\AI\stable-diffusion-webui\launch.py”, line 369, in
prepare_environment()
File “C:\AI\stable-diffusion-webui\launch.py”, line 271, in prepare_environment
run(f'”{python}” -m {torch_command}’, “Installing torch and torchvision”, “Couldn’t install torch”, live=True)
File “C:\AI\stable-diffusion-webui\launch.py”, line 95, in run
raise RuntimeError(f”””{errdesc or ‘Error running command’}.
RuntimeError: Couldn’t install torch.
Command: “C:\AI\stable-diffusion-webui\venv\Scripts\python.exe” -m pip install torch==2.0.1 torchvision==0.15.2 –extra-index-url https://download.pytorch.org/whl/cu118
Error code: 2
Press any key to continue . . .
Hi, I got this while installing torch. Try differents solutions: delete venv, reinstalling python 3.10, use cmd prompt to install manually, none works. Can u help me? Can I download manually from the torch link u gave above, if so which folder should I put it in? Thanks
ERROR: Exception
Traceback (most recent call last):
File “C:\Users\ADMIN\stable-diffusion-webui\venv\lib\site-packages\pip\_vendor\urllib3\response.py”, line 438, in _error_catcher
yield
File “C:\Users\ADMIN\stable-diffusion-webui\venv\lib\site-packages\pip\_vendor\urllib3\response.py”, line 561, in read
data = self._fp_read(amt) if not fp_closed else b””
File “C:\Users\ADMIN\stable-diffusion-webui\venv\lib\site-packages\pip\_vendor\urllib3\response.py”, line 527, in _fp_read
return self._fp.read(amt) if amt is not None else self._fp.read()
File “C:\Users\ADMIN\stable-diffusion-webui\venv\lib\site-packages\pip\_vendor\cachecontrol\filewrapper.py”, line 90, in read
data = self.__fp.read(amt)
File “C:\Users\ADMIN\AppData\Local\Programs\Python\Python310\lib\http\client.py”, line 465, in read
s = self.fp.read(amt)
File “C:\Users\ADMIN\AppData\Local\Programs\Python\Python310\lib\socket.py”, line 705, in readinto
return self._sock.recv_into(b)
File “C:\Users\ADMIN\AppData\Local\Programs\Python\Python310\lib\ssl.py”, line 1274, in recv_into
return self.read(nbytes, buffer)
File “C:\Users\ADMIN\AppData\Local\Programs\Python\Python310\lib\ssl.py”, line 1130, in read
return self._sslobj.read(len, buffer)
TimeoutError: The read operation timed out
During handling of the above exception, another exception occurred:
Traceback (most recent call last):
File “C:\Users\ADMIN\stable-diffusion-webui\venv\lib\site-packages\pip\_internal\cli\base_command.py”, line 169, in exc_logging_wrapper
status = run_func(*args)
File “C:\Users\ADMIN\stable-diffusion-webui\venv\lib\site-packages\pip\_internal\cli\req_command.py”, line 248, in wrapper
return func(self, options, args)
File “C:\Users\ADMIN\stable-diffusion-webui\venv\lib\site-packages\pip\_internal\commands\install.py”, line 377, in run
requirement_set = resolver.resolve(
File “C:\Users\ADMIN\stable-diffusion-webui\venv\lib\site-packages\pip\_internal\resolution\resolvelib\resolver.py”, line 92, in resolve
result = self._result = resolver.resolve(
File “C:\Users\ADMIN\stable-diffusion-webui\venv\lib\site-packages\pip\_vendor\resolvelib\resolvers.py”, line 546, in resolve
state = resolution.resolve(requirements, max_rounds=max_rounds)
File “C:\Users\ADMIN\stable-diffusion-webui\venv\lib\site-packages\pip\_vendor\resolvelib\resolvers.py”, line 397, in resolve
self._add_to_criteria(self.state.criteria, r, parent=None)
File “C:\Users\ADMIN\stable-diffusion-webui\venv\lib\site-packages\pip\_vendor\resolvelib\resolvers.py”, line 173, in _add_to_criteria
if not criterion.candidates:
File “C:\Users\ADMIN\stable-diffusion-webui\venv\lib\site-packages\pip\_vendor\resolvelib\structs.py”, line 156, in __bool__
return bool(self._sequence)
File “C:\Users\ADMIN\stable-diffusion-webui\venv\lib\site-packages\pip\_internal\resolution\resolvelib\found_candidates.py”, line 155, in __bool__
return any(self)
File “C:\Users\ADMIN\stable-diffusion-webui\venv\lib\site-packages\pip\_internal\resolution\resolvelib\found_candidates.py”, line 143, in
return (c for c in iterator if id(c) not in self._incompatible_ids)
File “C:\Users\ADMIN\stable-diffusion-webui\venv\lib\site-packages\pip\_internal\resolution\resolvelib\found_candidates.py”, line 47, in _iter_built
candidate = func()
File “C:\Users\ADMIN\stable-diffusion-webui\venv\lib\site-packages\pip\_internal\resolution\resolvelib\factory.py”, line 206, in _make_candidate_from_link
self._link_candidate_cache[link] = LinkCandidate(
File “C:\Users\ADMIN\stable-diffusion-webui\venv\lib\site-packages\pip\_internal\resolution\resolvelib\candidates.py”, line 293, in __init__
super().__init__(
File “C:\Users\ADMIN\stable-diffusion-webui\venv\lib\site-packages\pip\_internal\resolution\resolvelib\candidates.py”, line 156, in __init__
self.dist = self._prepare()
File “C:\Users\ADMIN\stable-diffusion-webui\venv\lib\site-packages\pip\_internal\resolution\resolvelib\candidates.py”, line 225, in _prepare
dist = self._prepare_distribution()
File “C:\Users\ADMIN\stable-diffusion-webui\venv\lib\site-packages\pip\_internal\resolution\resolvelib\candidates.py”, line 304, in _prepare_distribution
return preparer.prepare_linked_requirement(self._ireq, parallel_builds=True)
File “C:\Users\ADMIN\stable-diffusion-webui\venv\lib\site-packages\pip\_internal\operations\prepare.py”, line 516, in prepare_linked_requirement
return self._prepare_linked_requirement(req, parallel_builds)
File “C:\Users\ADMIN\stable-diffusion-webui\venv\lib\site-packages\pip\_internal\operations\prepare.py”, line 587, in _prepare_linked_requirement
local_file = unpack_url(
File “C:\Users\ADMIN\stable-diffusion-webui\venv\lib\site-packages\pip\_internal\operations\prepare.py”, line 166, in unpack_url
file = get_http_url(
File “C:\Users\ADMIN\stable-diffusion-webui\venv\lib\site-packages\pip\_internal\operations\prepare.py”, line 107, in get_http_url
from_path, content_type = download(link, temp_dir.path)
File “C:\Users\ADMIN\stable-diffusion-webui\venv\lib\site-packages\pip\_internal\network\download.py”, line 147, in __call__
for chunk in chunks:
File “C:\Users\ADMIN\stable-diffusion-webui\venv\lib\site-packages\pip\_internal\cli\progress_bars.py”, line 53, in _rich_progress_bar
for chunk in iterable:
File “C:\Users\ADMIN\stable-diffusion-webui\venv\lib\site-packages\pip\_internal\network\utils.py”, line 63, in response_chunks
for chunk in response.raw.stream(
File “C:\Users\ADMIN\stable-diffusion-webui\venv\lib\site-packages\pip\_vendor\urllib3\response.py”, line 622, in stream
data = self.read(amt=amt, decode_content=decode_content)
File “C:\Users\ADMIN\stable-diffusion-webui\venv\lib\site-packages\pip\_vendor\urllib3\response.py”, line 560, in read
with self._error_catcher():
File “C:\Users\ADMIN\AppData\Local\Programs\Python\Python310\lib\contextlib.py”, line 153, in __exit__
self.gen.throw(typ, value, traceback)
File “C:\Users\ADMIN\stable-diffusion-webui\venv\lib\site-packages\pip\_vendor\urllib3\response.py”, line 443, in _error_catcher
raise ReadTimeoutError(self._pool, None, “Read timed out.”)
pip._vendor.urllib3.exceptions.ReadTimeoutError: HTTPSConnectionPool(host=’download.pytorch.org’, port=443): Read timed out.
If you are able to manually down the whl files, you can install them by
.\venv\Scripts\python.exe -m pip install C:/some-dir/some-file.whl
Hllo, i got an error during the installation :
venv “C:\Users\Anthony\Desktop\SD 2.0\stable-diffusion-webui\venv\Scripts\Python.exe”
Python 3.10.7 (tags/v3.10.7:6cc6b13, Sep 5 2022, 14:08:36) [MSC v.1933 64 bit (AMD64)]
Version: v1.2.1
Commit hash: 89f9faa63388756314e8a1d96cf86bf5e0663045
Installing torch and torchvision
C:\Users\Anthony\Desktop\SD 2.0\stable-diffusion-webui\venv\Scripts\python.exe: No module named pip
Traceback (most recent call last):
File “C:\Users\Anthony\Desktop\SD 2.0\stable-diffusion-webui\launch.py”, line 369, in
prepare_environment()
File “C:\Users\Anthony\Desktop\SD 2.0\stable-diffusion-webui\launch.py”, line 271, in prepare_environment
run(f'”{python}” -m {torch_command}’, “Installing torch and torchvision”, “Couldn’t install torch”, live=True)
File “C:\Users\Anthony\Desktop\SD 2.0\stable-diffusion-webui\launch.py”, line 95, in run
raise RuntimeError(f”””{errdesc or ‘Error running command’}.
RuntimeError: Couldn’t install torch.
Command: “C:\Users\Anthony\Desktop\SD 2.0\stable-diffusion-webui\venv\Scripts\python.exe” -m pip install torch==2.0.1 torchvision==0.15.2 –extra-index-url https://download.pytorch.org/whl/cu118
Error code: 1
Hi, the error is:
C:\Users\Anthony\Desktop\SD 2.0\stable-diffusion-webui\venv\Scripts\python.exe: No module named pip
In cmd, after going into the stable-diffusion-webui folder, run
ven\Scripts\python.exe -m ensurepip --upgrade
thank you very much ,my dear andrew.Salute to you – a stranger far away
venv “D:\stable-diffusion-webui\venv\Scripts\Python.exe”
Python 3.10.6 (tags/v3.10.6:9c7b4bd, Aug 1 2022, 21:53:49) [MSC v.1932 64 bit (AMD64)]
Version: v1.2.1
Commit hash: 89f9faa63388756314e8a1d96cf86bf5e0663045
Installing torch and torchvision
Looking in indexes: https://pypi.org/simple, https://download.pytorch.org/whl/cu118
WARNING: Retrying (Retry(total=4, connect=None, read=None, redirect=None, status=None)) after connection broken by ‘ProxyError(‘Cannot connect to proxy.’, TimeoutError(‘_ssl.c:980: The handshake operation timed out’))’: /simple/torch/
WARNING: Retrying (Retry(total=3, connect=None, read=None, redirect=None, status=None)) after connection broken by ‘ReadTimeoutError(“HTTPSConnectionPool(host=’pypi.org’, port=443): Read timed out. (read timeout=15)”)’: /simple/torch/
Collecting torch==2.0.1
Downloading https://download.pytorch.org/whl/cu118/torch-2.0.1%2Bcu118-cp310-cp310-win_amd64.whl (2619.1 MB)
—————————————- 0.0/2.6 GB 487.5 kB/s eta 1:28:36
ERROR: Exception:
Traceback (most recent call last):
File “D:\stable-diffusion-webui\venv\lib\site-packages\pip\_vendor\urllib3\response.py”, line 438, in _error_catcher
yield
File “D:\stable-diffusion-webui\venv\lib\site-packages\pip\_vendor\urllib3\response.py”, line 561, in read
data = self._fp_read(amt) if not fp_closed else b””
File “D:\stable-diffusion-webui\venv\lib\site-packages\pip\_vendor\urllib3\response.py”, line 527, in _fp_read
return self._fp.read(amt) if amt is not None else self._fp.read()
File “D:\stable-diffusion-webui\venv\lib\site-packages\pip\_vendor\cachecontrol\filewrapper.py”, line 90, in read
data = self.__fp.read(amt)
File “C:\Users\Administrator\AppData\Local\Programs\Python\Python310\lib\http\client.py”, line 465, in read
s = self.fp.read(amt)
File “C:\Users\Administrator\AppData\Local\Programs\Python\Python310\lib\socket.py”, line 705, in readinto
return self._sock.recv_into(b)
File “C:\Users\Administrator\AppData\Local\Programs\Python\Python310\lib\ssl.py”, line 1274, in recv_into
return self.read(nbytes, buffer)
File “C:\Users\Administrator\AppData\Local\Programs\Python\Python310\lib\ssl.py”, line 1130, in read
return self._sslobj.read(len, buffer)
TimeoutError: The read operation timed out
During handling of the above exception, another exception occurred:
Traceback (most recent call last):
File “D:\stable-diffusion-webui\venv\lib\site-packages\pip\_internal\cli\base_command.py”, line 169, in exc_logging_wrapper
status = run_func(*args)
File “D:\stable-diffusion-webui\venv\lib\site-packages\pip\_internal\cli\req_command.py”, line 248, in wrapper
return func(self, options, args)
File “D:\stable-diffusion-webui\venv\lib\site-packages\pip\_internal\commands\install.py”, line 377, in run
requirement_set = resolver.resolve(
File “D:\stable-diffusion-webui\venv\lib\site-packages\pip\_internal\resolution\resolvelib\resolver.py”, line 92, in resolve
result = self._result = resolver.resolve(
File “D:\stable-diffusion-webui\venv\lib\site-packages\pip\_vendor\resolvelib\resolvers.py”, line 546, in resolve
state = resolution.resolve(requirements, max_rounds=max_rounds)
File “D:\stable-diffusion-webui\venv\lib\site-packages\pip\_vendor\resolvelib\resolvers.py”, line 397, in resolve
self._add_to_criteria(self.state.criteria, r, parent=None)
File “D:\stable-diffusion-webui\venv\lib\site-packages\pip\_vendor\resolvelib\resolvers.py”, line 173, in _add_to_criteria
if not criterion.candidates:
File “D:\stable-diffusion-webui\venv\lib\site-packages\pip\_vendor\resolvelib\structs.py”, line 156, in __bool__
return bool(self._sequence)
File “D:\stable-diffusion-webui\venv\lib\site-packages\pip\_internal\resolution\resolvelib\found_candidates.py”, line 155, in __bool__
return any(self)
File “D:\stable-diffusion-webui\venv\lib\site-packages\pip\_internal\resolution\resolvelib\found_candidates.py”, line 143, in
return (c for c in iterator if id(c) not in self._incompatible_ids)
File “D:\stable-diffusion-webui\venv\lib\site-packages\pip\_internal\resolution\resolvelib\found_candidates.py”, line 47, in _iter_built
candidate = func()
File “D:\stable-diffusion-webui\venv\lib\site-packages\pip\_internal\resolution\resolvelib\factory.py”, line 206, in _make_candidate_from_link
self._link_candidate_cache[link] = LinkCandidate(
File “D:\stable-diffusion-webui\venv\lib\site-packages\pip\_internal\resolution\resolvelib\candidates.py”, line 293, in __init__
super().__init__(
File “D:\stable-diffusion-webui\venv\lib\site-packages\pip\_internal\resolution\resolvelib\candidates.py”, line 156, in __init__
self.dist = self._prepare()
File “D:\stable-diffusion-webui\venv\lib\site-packages\pip\_internal\resolution\resolvelib\candidates.py”, line 225, in _prepare
dist = self._prepare_distribution()
File “D:\stable-diffusion-webui\venv\lib\site-packages\pip\_internal\resolution\resolvelib\candidates.py”, line 304, in _prepare_distribution
return preparer.prepare_linked_requirement(self._ireq, parallel_builds=True)
File “D:\stable-diffusion-webui\venv\lib\site-packages\pip\_internal\operations\prepare.py”, line 516, in prepare_linked_requirement
return self._prepare_linked_requirement(req, parallel_builds)
File “D:\stable-diffusion-webui\venv\lib\site-packages\pip\_internal\operations\prepare.py”, line 587, in _prepare_linked_requirement
local_file = unpack_url(
File “D:\stable-diffusion-webui\venv\lib\site-packages\pip\_internal\operations\prepare.py”, line 166, in unpack_url
file = get_http_url(
File “D:\stable-diffusion-webui\venv\lib\site-packages\pip\_internal\operations\prepare.py”, line 107, in get_http_url
from_path, content_type = download(link, temp_dir.path)
File “D:\stable-diffusion-webui\venv\lib\site-packages\pip\_internal\network\download.py”, line 147, in __call__
for chunk in chunks:
File “D:\stable-diffusion-webui\venv\lib\site-packages\pip\_internal\cli\progress_bars.py”, line 53, in _rich_progress_bar
for chunk in iterable:
File “D:\stable-diffusion-webui\venv\lib\site-packages\pip\_internal\network\utils.py”, line 63, in response_chunks
for chunk in response.raw.stream(
File “D:\stable-diffusion-webui\venv\lib\site-packages\pip\_vendor\urllib3\response.py”, line 622, in stream
data = self.read(amt=amt, decode_content=decode_content)
File “D:\stable-diffusion-webui\venv\lib\site-packages\pip\_vendor\urllib3\response.py”, line 560, in read
with self._error_catcher():
File “C:\Users\Administrator\AppData\Local\Programs\Python\Python310\lib\contextlib.py”, line 153, in __exit__
self.gen.throw(typ, value, traceback)
File “D:\stable-diffusion-webui\venv\lib\site-packages\pip\_vendor\urllib3\response.py”, line 443, in _error_catcher
raise ReadTimeoutError(self._pool, None, “Read timed out.”)
pip._vendor.urllib3.exceptions.ReadTimeoutError: HTTPSConnectionPool(host=’download.pytorch.org’, port=443): Read timed out.
Traceback (most recent call last):
File “D:\stable-diffusion-webui\launch.py”, line 369, in
prepare_environment()
File “D:\stable-diffusion-webui\launch.py”, line 271, in prepare_environment
run(f'”{python}” -m {torch_command}’, “Installing torch and torchvision”, “Couldn’t install torch”, live=True)
File “D:\stable-diffusion-webui\launch.py”, line 95, in run
raise RuntimeError(f”””{errdesc or ‘Error running command’}.
RuntimeError: Couldn’t install torch.
Command: “D:\stable-diffusion-webui\venv\Scripts\python.exe” -m pip install torch==2.0.1 torchvision==0.15.2 –extra-index-url https://download.pytorch.org/whl/cu118
Error code: 2
It cannot be installed because it cannot download this file
https://download.pytorch.org/whl/cu118/torch-2.0.1%2Bcu118-cp310-cp310-win_amd64.whl
Check your internet connection to see if this file can be accessed with your browser.
Microsoft Windows [版本 10.0.19044.2965]
(c) Microsoft Corporation。保留所有权利。
C:\Users\Administrator>stable-diffusion-webui.\venv\scripts\python.exe -m ensurepip
Looking in links: c:\Users\ADMINI~1\AppData\Local\Temp\tmpcybm_qvh
Requirement already satisfied: setuptools in c:\users\administrator\stable-diffusion-webui\venv\lib\site-packages (63.2.0)
Requirement already satisfied: pip in c:\users\administrator\stable-diffusion-webui\venv\lib\site-packages (23.1.2)
venv “C:\Users\Administrator\stable-diffusion-webui\venv\Scripts\Python.exe”
Python 3.10.6 (tags/v3.10.6:9c7b4bd, Aug 1 2022, 21:38:17) [MSC v.1932 32 bit (Intel)]
Version: v1.2.1
Commit hash: 89f9faa63388756314e8a1d96cf86bf5e0663045
Installing torch and torchvision
Looking in indexes: https://pypi.org/simple, https://download.pytorch.org/whl/cu118
ERROR: Could not find a version that satisfies the requirement torch==2.0.1 (from versions: none)
ERROR: No matching distribution found for torch==2.0.1
Traceback (most recent call last):
File “C:\Users\Administrator\stable-diffusion-webui\launch.py”, line 369, in
prepare_environment()
File “C:\Users\Administrator\stable-diffusion-webui\launch.py”, line 271, in prepare_environment
run(f'”{python}” -m {torch_command}’, “Installing torch and torchvision”, “Couldn’t install torch”, live=True)
File “C:\Users\Administrator\stable-diffusion-webui\launch.py”, line 95, in run
raise RuntimeError(f”””{errdesc or ‘Error running command’}.
RuntimeError: Couldn’t install torch.
Command: “C:\Users\Administrator\stable-diffusion-webui\venv\Scripts\python.exe” -m pip install torch==2.0.1 torchvision==0.15.2 –extra-index-url https://download.pytorch.org/whl/cu118
Error code: 1
what should i do?
Hi,
Have you ever had a working setup on this machine?
You can try:
1. delete the venv folder inside the webui folder, and reurn webui-user.bat
If it still doesn’t work
2. In cmd, inside the webui folder, install pytorch manually
venv\Scripts\python.exe -m pip install torch torchvision torchaudio --index-url https://download.pytorch.org/whl/cu118 --upgrade --force-reinstall
Thanks for the guide. I followed all the steps but when I clicked ‘webui-user-bat’, this error popped up and the download stopped. What should I do to fix it ?
ERROR: Exception:
Traceback (most recent call last):
File “C:\Users\dagan\stable-diffusion-webui\venv\lib\site-packages\pip\_vendor\urllib3\response.py”, line 438, in _error_catcher
yield
File “C:\Users\dagan\stable-diffusion-webui\venv\lib\site-packages\pip\_vendor\urllib3\response.py”, line 561, in read
data = self._fp_read(amt) if not fp_closed else b””
File “C:\Users\dagan\stable-diffusion-webui\venv\lib\site-packages\pip\_vendor\urllib3\response.py”, line 527, in _fp_read
return self._fp.read(amt) if amt is not None else self._fp.read()
File “C:\Users\dagan\stable-diffusion-webui\venv\lib\site-packages\pip\_vendor\cachecontrol\filewrapper.py”, line 90, in read
data = self.__fp.read(amt)
File “C:\Users\dagan\AppData\Local\Programs\Python\Python310\lib\http\client.py”, line 465, in read
s = self.fp.read(amt)
File “C:\Users\dagan\AppData\Local\Programs\Python\Python310\lib\socket.py”, line 705, in readinto
return self._sock.recv_into(b)
File “C:\Users\dagan\AppData\Local\Programs\Python\Python310\lib\ssl.py”, line 1274, in recv_into
return self.read(nbytes, buffer)
File “C:\Users\dagan\AppData\Local\Programs\Python\Python310\lib\ssl.py”, line 1130, in read
return self._sslobj.read(len, buffer)
TimeoutError: The read operation timed out
During handling of the above exception, another exception occurred:
Traceback (most recent call last):
File “C:\Users\dagan\stable-diffusion-webui\venv\lib\site-packages\pip\_internal\cli\base_command.py”, line 169, in exc_logging_wrapper
status = run_func(*args)
File “C:\Users\dagan\stable-diffusion-webui\venv\lib\site-packages\pip\_internal\cli\req_command.py”, line 248, in wrapper
return func(self, options, args)
File “C:\Users\dagan\stable-diffusion-webui\venv\lib\site-packages\pip\_internal\commands\install.py”, line 377, in run
requirement_set = resolver.resolve(
File “C:\Users\dagan\stable-diffusion-webui\venv\lib\site-packages\pip\_internal\resolution\resolvelib\resolver.py”, line 92, in resolve
result = self._result = resolver.resolve(
File “C:\Users\dagan\stable-diffusion-webui\venv\lib\site-packages\pip\_vendor\resolvelib\resolvers.py”, line 546, in resolve
state = resolution.resolve(requirements, max_rounds=max_rounds)
File “C:\Users\dagan\stable-diffusion-webui\venv\lib\site-packages\pip\_vendor\resolvelib\resolvers.py”, line 397, in resolve
self._add_to_criteria(self.state.criteria, r, parent=None)
File “C:\Users\dagan\stable-diffusion-webui\venv\lib\site-packages\pip\_vendor\resolvelib\resolvers.py”, line 173, in _add_to_criteria
if not criterion.candidates:
File “C:\Users\dagan\stable-diffusion-webui\venv\lib\site-packages\pip\_vendor\resolvelib\structs.py”, line 156, in __bool__
return bool(self._sequence)
File “C:\Users\dagan\stable-diffusion-webui\venv\lib\site-packages\pip\_internal\resolution\resolvelib\found_candidates.py”, line 155, in __bool__
return any(self)
File “C:\Users\dagan\stable-diffusion-webui\venv\lib\site-packages\pip\_internal\resolution\resolvelib\found_candidates.py”, line 143, in
return (c for c in iterator if id(c) not in self._incompatible_ids)
File “C:\Users\dagan\stable-diffusion-webui\venv\lib\site-packages\pip\_internal\resolution\resolvelib\found_candidates.py”, line 47, in _iter_built
candidate = func()
File “C:\Users\dagan\stable-diffusion-webui\venv\lib\site-packages\pip\_internal\resolution\resolvelib\factory.py”, line 206, in _make_candidate_from_link
self._link_candidate_cache[link] = LinkCandidate(
File “C:\Users\dagan\stable-diffusion-webui\venv\lib\site-packages\pip\_internal\resolution\resolvelib\candidates.py”, line 293, in __init__
super().__init__(
File “C:\Users\dagan\stable-diffusion-webui\venv\lib\site-packages\pip\_internal\resolution\resolvelib\candidates.py”, line 156, in __init__
self.dist = self._prepare()
File “C:\Users\dagan\stable-diffusion-webui\venv\lib\site-packages\pip\_internal\resolution\resolvelib\candidates.py”, line 225, in _prepare
dist = self._prepare_distribution()
File “C:\Users\dagan\stable-diffusion-webui\venv\lib\site-packages\pip\_internal\resolution\resolvelib\candidates.py”, line 304, in _prepare_distribution
return preparer.prepare_linked_requirement(self._ireq, parallel_builds=True)
File “C:\Users\dagan\stable-diffusion-webui\venv\lib\site-packages\pip\_internal\operations\prepare.py”, line 516, in prepare_linked_requirement
return self._prepare_linked_requirement(req, parallel_builds)
File “C:\Users\dagan\stable-diffusion-webui\venv\lib\site-packages\pip\_internal\operations\prepare.py”, line 587, in _prepare_linked_requirement
local_file = unpack_url(
File “C:\Users\dagan\stable-diffusion-webui\venv\lib\site-packages\pip\_internal\operations\prepare.py”, line 166, in unpack_url
file = get_http_url(
File “C:\Users\dagan\stable-diffusion-webui\venv\lib\site-packages\pip\_internal\operations\prepare.py”, line 107, in get_http_url
from_path, content_type = download(link, temp_dir.path)
File “C:\Users\dagan\stable-diffusion-webui\venv\lib\site-packages\pip\_internal\network\download.py”, line 147, in __call__
for chunk in chunks:
File “C:\Users\dagan\stable-diffusion-webui\venv\lib\site-packages\pip\_internal\cli\progress_bars.py”, line 53, in _rich_progress_bar
for chunk in iterable:
File “C:\Users\dagan\stable-diffusion-webui\venv\lib\site-packages\pip\_internal\network\utils.py”, line 63, in response_chunks
for chunk in response.raw.stream(
File “C:\Users\dagan\stable-diffusion-webui\venv\lib\site-packages\pip\_vendor\urllib3\response.py”, line 622, in stream
data = self.read(amt=amt, decode_content=decode_content)
File “C:\Users\dagan\stable-diffusion-webui\venv\lib\site-packages\pip\_vendor\urllib3\response.py”, line 560, in read
with self._error_catcher():
File “C:\Users\dagan\AppData\Local\Programs\Python\Python310\lib\contextlib.py”, line 153, in __exit__
self.gen.throw(typ, value, traceback)
File “C:\Users\dagan\stable-diffusion-webui\venv\lib\site-packages\pip\_vendor\urllib3\response.py”, line 443, in _error_catcher
raise ReadTimeoutError(self._pool, None, “Read timed out.”)
pip._vendor.urllib3.exceptions.ReadTimeoutError: HTTPSConnectionPool(host=’download.pytorch.org’, port=443): Read timed out.
Traceback (most recent call last):
File “C:\Users\dagan\stable-diffusion-webui\launch.py”, line 369, in
prepare_environment()
File “C:\Users\dagan\stable-diffusion-webui\launch.py”, line 271, in prepare_environment
run(f'”{python}” -m {torch_command}’, “Installing torch and torchvision”, “Couldn’t install torch”, live=True)
File “C:\Users\dagan\stable-diffusion-webui\launch.py”, line 95, in run
raise RuntimeError(f”””{errdesc or ‘Error running command’}.
RuntimeError: Couldn’t install torch.
Command: “C:\Users\dagan\stable-diffusion-webui\venv\Scripts\python.exe” -m pip install torch==2.0.1 torchvision==0.15.2 –extra-index-url https://download.pytorch.org/whl/cu118
Error code: 2
Looks like you have issue connecting to the site that contains the torch packages. Try to try the command stated at the end and visit the url to see if you have access.
Working as a charm ! Thank You !!
venv “C:\Users\user\stable-diffusion-webui\venv\Scripts\Python.exe”
Python 3.10.6 (tags/v3.10.6:9c7b4bd, Aug 1 2022, 21:53:49) [MSC v.1932 64 bit (AMD64)]
Version: v1.2.1
Commit hash: 89f9faa63388756314e8a1d96cf86bf5e0663045
Traceback (most recent call last):
File “C:\Users\user\stable-diffusion-webui\launch.py”, line 369, in
prepare_environment()
File “C:\Users\user\stable-diffusion-webui\launch.py”, line 274, in prepare_environment
run_python(“import torch; assert torch.cuda.is_available(), ‘Torch is not able to use GPU; add –skip-torch-cuda-test to COMMANDLINE_ARGS variable to disable this check'”)
File “C:\Users\user\stable-diffusion-webui\launch.py”, line 135, in run_python
return run(f'”{python}” -c “{code}”‘, desc, errdesc)
File “C:\Users\user\stable-diffusion-webui\launch.py”, line 111, in run
raise RuntimeError(message)
RuntimeError: Error running command.
Command: “C:\Users\user\stable-diffusion-webui\venv\Scripts\python.exe” -c “import torch; assert torch.cuda.is_available(), ‘Torch is not able to use GPU; add –skip-torch-cuda-test to COMMANDLINE_ARGS variable to disable this check'”
Error code: 1
stdout:
stderr: Traceback (most recent call last):
File “”, line 1, in
AssertionError: Torch is not able to use GPU; add –skip-torch-cuda-test to COMMANDLINE_ARGS variable to disable this check
Press any key to continue
i t stop me there what can i do? help please
Hi, does your PC has a discrete Nvidia graphic card? It said it couldn’t find a GPU to use.
Unfortunaly, I have same issues & My PC is not using NVidia Card
sorry bad English
Hi, you need an nvidia card.
Hi Andrew. I did everything step by step till step 5. But I dont have a webui-user.bat datai. but if I search it in the bar I can find it but if I press on it the cmd window pops up but nothing more. It didnt start and there is “press something” and if I press something it closed. Do you know how to get a .bat ?
C:\Users\user>git clone https://github.com/AUTOMATIC1111/stable-diffusion-webui.gitCopied!
Cloning into ‘stable-diffusion-webui.gitCopied!’…
remote: Repository not found.
fatal: repository ‘https://github.com/AUTOMATIC1111/stable-diffusion-webui.gitCopied!/’ not found
step 3 worked and now it dosent
dident oast step 5
help please
I have a Webui-user.bat file, but when I double click, the command prompt comes up a “Launch unsuccessful: Exiting
There’s not enough info for me to advise. It would be helpful if you can somehow capture the whole error message.
You can try running webui-user.bat in command prompt to see what it says.
venv “C:\Users\Tom\stable-diffusion-webui\venv\Scripts\Python.exe”
Python 3.10.11 (tags/v3.10.11:7d4cc5a, Apr 5 2023, 00:38:17) [MSC v.1929 64 bit (AMD64)]
Version: v1.2.1
Commit hash: 89f9faa63388756314e8a1d96cf86bf5e0663045
Installing torch and torchvision
C:\Users\Tom\stable-diffusion-webui\venv\Scripts\python.exe: No module named pip
Traceback (most recent call last):
File “C:\Users\Tom\stable-diffusion-webui\launch.py”, line 369, in
prepare_environment()
File “C:\Users\Tom\stable-diffusion-webui\launch.py”, line 271, in prepare_environment
run(f'”{python}” -m {torch_command}’, “Installing torch and torchvision”, “Couldn’t install torch”, live=True)
File “C:\Users\Tom\stable-diffusion-webui\launch.py”, line 95, in run
raise RuntimeError(f”””{errdesc or ‘Error running command’}.
RuntimeError: Couldn’t install torch.
Command: “C:\Users\Tom\stable-diffusion-webui\venv\Scripts\python.exe” -m pip install torch==2.0.1 torchvision==0.15.2 –extra-index-url https://download.pytorch.org/whl/cu118
Error code: 1
Thats what I got if I want to start the webui-user.bat do you know how to fix this?
The issue is
“C:\Users\Tom\stable-diffusion-webui\venv\Scripts\python.exe: No module named pip”
For some reason pip is missing. You will need to find a way to install it in venv.
Try running this inside stable-diffusion-webui directory:
.\venv\Scripts\python.exe -m ensurepiphello,andrew.I have the same problem as Tom:File “C:\Users\Tom\stable-diffusion-webui\launch.py”, line 369, in
prepare_environment()
File “C:\Users\Tom\stable-diffusion-webui\launch.py”, line 271, in prepare_environment
run(f’”{python}” -m {torch_command}’, “Installing torch and torchvision”, “Couldn’t install torch”, live=True)
File “C:\Users\Tom\stable-diffusion-webui\launch.py”, line 95, in run
raise RuntimeError(f”””{errdesc or ‘Error running command’}.
RuntimeError: Couldn’t install torch.
Command: “C:\Users\Tom\stable-diffusion-webui\venv\Scripts\python.exe” -m pip install torch==2.0.1 torchvision==0.15.2 –extra-index-url https://download.pytorch.org/whl/cu118
Error code: 1
and I also tried the method you provided, but the problem is still not resolved:Command: “C:\Users\Tom\stable-diffusion-webui\venv\Scripts\python.exe” -m pip install torch==2.0.1 torchvision==0.15.2 –extra-index-url https://download.pytorch.org/whl/cu118
Error code: 1what do I do
Hi, it’s not clear exactly what the problem is. You can try removing all python versions from your PC using Add or Remove Programs, and reinstall python. Delete the webui dir and start all over.
If problem still persist, please post the full error message.
works fine in img2img if I resize to 2048×2048 but not if upscaling 4x. I’m using 2.1 768
Thanks for the great guide.
It’s strange that you need 40GB VRAM for upscaling 4x. R-ESRGAN is a small model. I suspect your settings are incorrect. I have just written an article for upscaling. The first method is AI upscaler. You can try follow.
https://stable-diffusion-art.com/controlnet-upscale/
Hi. Got this up and running today after using easy diffusion for a while.
Getting this error when latent upscaling 2x or 4x with a 4090 :
OutOfMemoryError: CUDA out of memory. Tried to allocate 40.50 GiB (GPU 0; 23.99 GiB total capacity; 12.60 GiB already allocated; 7.54 GiB free; 13.79 GiB reserved in total by PyTorch) If reserved memory is >> allocated memory try setting max_split_size_mb to avoid fragmentation. See documentation for Memory Management and PYTORCH_CUDA_ALLOC_CONF
Time taken: 3m 4.05sTorch active/reserved: 21056/23552 MiB, Sys VRAM: 24564/24564 MiB (100.0%)
and using R-ESRGAN 4x+
OutOfMemoryError: CUDA out of memory. Tried to allocate 9.00 GiB (GPU 0; 23.99 GiB total capacity; 16.18 GiB already allocated; 4.18 GiB free; 16.63 GiB reserved in total by PyTorch) If reserved memory is >> allocated memory try setting max_split_size_mb to avoid fragmentation. See documentation for Memory Management and PYTORCH_CUDA_ALLOC_CONF
Time taken: 40.99sTorch active/reserved: 16572/21600 MiB, Sys VRAM: 24564/24564 MiB (100.0%)
My installed version of Python is 3.11.1 – is this version compatible with Stable Diffusion?
It MAY work but better to stick with 3.10 if you don’t want to troubleshoot unexpected issues.
Never mind
What i’d like to do is how to manually install it on a different drive. Every time I try, it won’t let me change directory away from C
torch.cuda.OutOfMemoryError: CUDA out of memory. Tried to allocate 20.00 MiB (GPU 0; 2.00 GiB total capacity; 1.63 GiB already allocated; 0 bytes free; 1.66 GiB reserved in total by PyTorch) If reserved memory is >> allocated memory try setting max_split_size_mb to avoid fragmentation. See documentation for Memory Management and PYTORCH_CUDA_ALLOC_CONF
I am getting this (Windows 10, NVIDIA GeForceMX450). Can you help me??
Hi, your video card has only 2GB which maybe a bit too low. You can try adding the following arguments
--lowvram --opt-split-attention --always-batch-cond-uncond
I am getting the same error as above, Torch cannot use GPU. I have a Nvidia GEFORCE GT750M 2 GB, running on a windows partition on mac retina with Intel i7 with 16 GB VRAM. Says press anykey to continue and it closes cmd. is this not supported?
That’s a bit too complicated a setup for me to advise…
2 important questions:
1. How to delete the extensions?
2. How to fix slow start up of SD with extensions?
Thank you in advance
The only way I found is to delete the extension’s folder in File Explorer.
Being slow is likely because the extension is programmed to do something. I don’t think we can do much except deleting or disabling them.
Going through the Microsoft store worked. thank you!
Here is the whole window after I run the .bat
https://pasteboard.co/e1CRE0izeH1O.jpg
Your python is not installed correctly. You can try installing from the Microsoft store. See the python section.
stderr:
‘-m’ is not recognized as an internal or external command,
operable program or batch file.
Anything more before that?
same error as before.
it says “Your branch is up to date with ‘origin/master’.”
Does it work now? If not pls post the full error message
I am getting the following Error when I run webui-user.bat:
exit code: 9009
stderr:
‘-m’ is not recognized as an internal or external command,
operable program or batch file.
I think you may have inadvertently edited the file webui-user.bat in a way that you are not supposed to.
you can revert the change typing the following command inside the stable-diffusion-webui directory:
git checkout -f
Waste of time. It dosent work:
RuntimeError: Couldn’t install torch.
Command: “C:\Users\User\stable-diffusion-webui\venv\Scripts\python.exe” -m pip install torch==2.0.0 torchvision==0.15.1 –extra-index-url https://download.pytorch.org/whl/cu118
Error code: 1
Press any key to continue . . .
hey is there anyone with this problem? can you help me?
venv “C:\Users\Admin\stable-diffusion-webui\venv\Scripts\Python.exe”
Python 3.10.6 (tags/v3.10.6:9c7b4bd, Aug 1 2022, 21:53:49) [MSC v.1932 64 bit (AMD64)]
Commit hash: 22bcc7be428c94e9408f589966c2040187245d81
Traceback (most recent call last):
File “C:\Users\Admin\stable-diffusion-webui\launch.py”, line 355, in
prepare_environment()
File “C:\Users\Admin\stable-diffusion-webui\launch.py”, line 260, in prepare_environment
run_python(“import torch; assert torch.cuda.is_available(), ‘Torch is not able to use GPU; add –skip-torch-cuda-test to COMMANDLINE_ARGS variable to disable this check'”)
File “C:\Users\Admin\stable-diffusion-webui\launch.py”, line 121, in run_python
return run(f'”{python}” -c “{code}”‘, desc, errdesc)
File “C:\Users\Admin\stable-diffusion-webui\launch.py”, line 97, in run
raise RuntimeError(message)
RuntimeError: Error running command.
Command: “C:\Users\Admin\stable-diffusion-webui\venv\Scripts\python.exe” -c “import torch; assert torch.cuda.is_available(), ‘Torch is not able to use GPU; add –skip-torch-cuda-test to COMMANDLINE_ARGS variable to disable this check'”
Error code: 1
stdout:
stderr: C:\Users\Admin\stable-diffusion-webui\venv\lib\site-packages\torch\cuda\__init__.py:88: UserWarning: CUDA initialization: The NVIDIA driver on your system is too old (found version 10010). Please update your GPU driver by downloading and installing a new version from the URL: http://www.nvidia.com/Download/index.aspx Alternatively, go to: https://pytorch.org to install a PyTorch version that has been compiled with your version of the CUDA driver. (Triggered internally at ..\c10\cuda\CUDAFunctions.cpp:109.)
return torch._C._cuda_getDeviceCount() > 0
Traceback (most recent call last):
File “”, line 1, in
AssertionError: Torch is not able to use GPU; add –skip-torch-cuda-test to COMMANDLINE_ARGS variable to disable this check
Do you have a Nvidia GPU card?
AMD Support? AMD RX 6800 …. 16GB Vram …
Someone made it work with amd with its a lot of work
I am lost. My install breaks with this error: “ModuleNotFoundError: No module named ‘basicsr.version'”
I don’t see anyone reporting this above.
Mmm… this is a new old. Try to start a new installation.
In May of 2023, these instructions do not work.
It should work. What’s the error message?
I have the following error when I run webui-user.bat ERROR: Could not find a version that satisfies the requirement torch==1.13.1+cu117 (from versions: 2.0.0, 2.0.0+cu117)
ERROR: No matching distribution found for torch==1.13.1+cu117
You can see if you are using Python 3.10. It should have printed out in the console. Remove all python and install the one in Microsoft store if not.
Delete the venv folder inside stable-diffusion-webui and start over.
I have the following error when I attempt to run webui-user.bat
do i need to have Git-2.38.1?
Had the same problem and running
python3 -m ensurepip
worked like a charm. Thanks!
Okay, well to answer my own question, I removed the 3.11 and installed 3.10 instead. Now it’s working. Thanks!
I keep getting a error of this. I have Python 3.10 installed.
Please see the error, thanks.
No Python at ‘”C:\Users\USERPROFILE\AppData\Local\Programs\Python\Python311\python.exe’
It is calling a python that doesn’t exist anymore… please remove all python install from your PC, remove the stable diffusion folder, then install python 3.10 from Microsoft. start all over after.
So it’s already tapping into the NVIDA GPU by default? I don’t have to take extra steps to make sure it’s tapping into that?
That’s correct.
Hello. I’m trying to run Stable Diffusion on an Acer Nitro 5 gaming laptop. The OS is Windows 11, GPU 0 is Intel UHD Graphics, and GPU 1 is NVIDIA GeForce RTX 3050 Ti Laptop GPU.
In order to ensure maximum performance, how do I make sure the program is tapping into NVIDIA and not Intel?
Yes, the default installation is suitable for RTX 3000 series. It will not start if you are not using the GPU.
Is there documentation on COMMANDLINE_ARGS ?
welcome to the world of A1111. You can read the codes or try using the
--helpargument.https://github.com/AUTOMATIC1111/stable-diffusion-webui/wiki/Features
Hi!
I had Stable Diffusion before but had to remove it, and am now trying to reinstall it. Everything went smoothly until I tried to use .bat, which gives me this:
venv “C:\Users\Matilda\stable-diffusion-webui\venv\Scripts\Python.exe”
Python 3.10.6 (tags/v3.10.6:9c7b4bd, Aug 1 2022, 21:53:49) [MSC v.1932 64 bit (AMD64)]
Commit hash: 22bcc7be428c94e9408f589966c2040187245d81
Installing torch and torchvision
C:\Users\Matilda\stable-diffusion-webui\venv\Scripts\python.exe: No module named pip
Traceback (most recent call last):
File “C:\Users\Matilda\stable-diffusion-webui\launch.py”, line 355, in
prepare_environment()
File “C:\Users\Matilda\stable-diffusion-webui\launch.py”, line 257, in prepare_environment
run(f'”{python}” -m {torch_command}’, “Installing torch and torchvision”, “Couldn’t install torch”, live=True)
File “C:\Users\Matilda\stable-diffusion-webui\launch.py”, line 81, in run
raise RuntimeError(f”””{errdesc or ‘Error running command’}.
RuntimeError: Couldn’t install torch.
Command: “C:\Users\Matilda\stable-diffusion-webui\venv\Scripts\python.exe” -m pip install torch==1.13.1+cu117 torchvision==0.14.1+cu117 –extra-index-url https://download.pytorch.org/whl/cu117
Error code: 1
Press any key to continue . . .
What do I do next?
Hi, it looks like you don’t have pip installed in your python3.
Try run
python3 -m ensurepipIf it still doesn’t work, uninstall all python and install the one on Microsoft store.
I’m guessing this wont work if I’m using my laptop with an Iris Xe Graphic Card?
You are correct.
It was a permissions issue. I ran “webui-user.bat” in a CMD window as an administrator.
Thanks for your help!
I’m installing SD in a blank folder on my PC. I correctly installed Python 3.10.6, but I keep getting this:
Collecting torch==1.13.1+cu117
Downloading https://download.pytorch.org/whl/cu117/torch-1.13.1%2Bcu117-cp310-cp310-win_amd64.whl (2255.4 MB)
… a LOT of RED error messages …
RuntimeError: Couldn’t install torch.
Command: “C:\AI\StableDiffusion\stable-diffusion-webui\venv\Scripts\python.exe” -m pip install torch==1.13.1+cu117 torchvision==0.14.1+cu117 –extra-index-url https://download.pytorch.org/whl/cu117
Error code: 2
Any ideas what’s wrong?
I don’t see the whole error message but it could be a permission issue. Try installing in your home directory to rule out a permission issue.
Everything goes smooth, until I get to the command prompt. No matter what I do, I am repeatedly slammed with the
C:\Users\xxxx>git clone https://github.com/AUTOMATIC1111/stable-diffusion-webui.git
fatal: destination path ‘stable-diffusion-webui’ already exists and is not an empty directory.
I am unsure of how to proceed
It appears you already have the directory called “stable-diffusion-webui”.
If you don’t need it, you can delete this folder and start again.
You can reach the folder in File explorer at
%userprofile%\stable-diffusion-webui
After running the .bat in step 5 I get an error message which prevents me to complete the rest:
ERROR: Could not find a version that satisfies the requirement torch==1.13.1+cu117 (from versions: 2.0.0, 2.0.0+cu117)
Can anyone help? thanks!
Can you check if you are running Python 3.10?
In cmd, run
python --versionInstall Python 3.10 from Microsoft store if not.
So you’re saying that Python 3.11.3 won’t work? Since I’ve been having the same problem for days now.
I DID get this to work a little while back but then not anymore.
Tried reinstalling it all but back at the same problem.
https://github.com/AUTOMATIC1111/stable-diffusion-webui/issues/9150 hi,camen,Is there an existing issue for this?
I have searched the existing issues and checked the recent builds/commits
What happened?
web-ui didn’t work in every page, the same issue happend no matter which function I try to use. generate, setting, load new models, etc.
nothings works now, It happened everywhere
even if I cloned a new one, the same issue happened.
try to remove extentions, delete config.jason, ui-config.jasion, add the user.css file… didn’t work
Check the error logs: The first step in troubleshooting any issue is to check the logs for any error messages or warnings that may indicate what the problem is. If the logs are not available, enable logging and reproduce the issue to generate new logs.
Verify dependencies: Stable-diffusion web-ui has several dependencies that must be installed and configured correctly for it to work. Verify that all dependencies are up-to-date and correctly configured.
Verify web server configuration: The web server configuration could be causing the issue. Check the web server configuration to ensure that it is correctly set up to serve the stable-diffusion web-ui.
Check for conflicts: It is possible that there is a conflict with another installed application or extension. Disable all extensions and applications except for the stable-diffusion web-ui to see if this resolves the issue.
Verify the integrity of the source code: Clone the stable-diffusion web-ui repository again, and verify that the source code is intact and complete.
Rebuild the application: If all else fails, rebuild the application from scratch. This may resolve any underlying issues with the code.
It seems you are not using the correct arguments. Did you change them? What are your arguments for webui? It prints out at startup.
I did everything so far but when the tutorial told me to find “webui-user.bat” to open it didn´t apeare nothing on my foldier…… so now what I can do?
Hi, the file is created by the “git clone” step. It appears that it was not successful.
I was stuck the same way and retried the “Git Clone” step and got this msg in cmd “C:\Users\XXXXX>git clone https://github.com/AUTOMATIC1111/stable-diffusion-webui.git
fatal: destination path ‘stable-diffusion-webui’ already exists and is not an empty directory.” Do I need to completely delete that folder and retry the step?
Yes
AMD cards can’t use,I need easier way to do this. I don’t know coding.
An easy way is using Google Colab. See the Quick Start Guide.
Help me
venv “C:\Users\Josias\stable-diffusion-webui\venv\Scripts\Python.exe” Python 3.10.6 (tags/v3.10.6:9c7b4bd, 1er août 2022, 21:38:17) [MSC v. 1932 32 bits (Intel)] Version : v1.5.1 Commit hash : 68f336bd994bed5442ad95bad6b6ad5564a5409a Lancement de l’interface utilisateur Web avec des arguments : –skip-torch-cuda-test Microsoft Visual C++ Redistributable n’est pas installé, cela peut entraîner l’échec du chargement de la DLL. Il peut être téléchargé sur https://aka.ms/vs/16/release/vc_redist.x64.exeTraceback (appel le plus récent en dernier) : Fichier “C:\Users\Josias\stable-diffusion-webui\launch.py”, ligne 39, dans main() Fichier “C:\Users\Josias\stable-diffusion-webui\ launch.py”, ligne 35, dans le fichier start() principal “C:\Users\Josias\stable-diffusion-webui\modules\launch_utils.py”, ligne 390, dans start import webui File “C:\Users\Josias \stable-diffusion-webui\webui.py”, ligne 38, dans le fichier de torche d’importation “C:\Users\Josias\stable-diffusion-webui\venv\lib\site-packages\torch_ init _.py”, ligne 122 , dans raise err OSError : [WinError 193] %1 n’est pas une application Win32 valide. Erreur lors du chargement de “C:\Users\Josias\stable-diffusion-webui\venv\lib\site-packages\torch\lib\asmjit.dll” ou de l’une de ses dépendances.
Don’t advise people to run this on a Mac. It is widely known that it works like sh*t.
Nice, got it to work, thanks!
Hi.
Thanks for the right up. Sorry to be a pain, but it looks like it’s almost complete, yet it’s been sat at this stage for the last hour with no movement – any reccommendations?
[notice] A new release of pip available: 22.3.1 -> 23.0.1
[notice] To update, run: C:\Users\97bgr\stable-diffusion-webui\venv\Scripts\python.exe -m pip install –upgrade pip
Installing gfpgan
Installing clip
Installing open_clip
Cloning Stable Diffusion into C:\Users\97bgr\stable-diffusion-webui\repositories\stable-diffusion-stability-ai…
Cloning Taming Transformers into C:\Users\97bgr\stable-diffusion-webui\repositories\taming-transformers…
Cloning K-diffusion into C:\Users\97bgr\stable-diffusion-webui\repositories\k-diffusion…
Cloning CodeFormer into C:\Users\97bgr\stable-diffusion-webui\repositories\CodeFormer…
Cloning BLIP into C:\Users\97bgr\stable-diffusion-webui\repositories\BLIP…
Installing requirements for CodeFormer
Installing requirements for Web UI
Launching Web UI with arguments:
No module ‘xformers’. Proceeding without it.
Calculating sha256 for C:\Users\97bgr\stable-diffusion-webui\models\Stable-diffusion\v1-5-pruned-emaonly.ckpt: cc6cb27103417325ff94f52b7a5d2dde45a7515b25c255d8e396c90014281516
Loading weights [cc6cb27103] from C:\Users\97bgr\stable-diffusion-webui\models\Stable-diffusion\v1-5-pruned-emaonly.ckpt
Creating model from config: C:\Users\97bgr\stable-diffusion-webui\configs\v1-inference.yaml
LatentDiffusion: Running in eps-prediction mode
DiffusionWrapper has 859.52 M params.
Thanks
Ben
See temp solution here: https://github.com/AUTOMATIC1111/stable-diffusion-webui/issues/7901
hello, what a fantastic website and clear guide with additional resources! I have a question about the installation process; while installing the web ui, the installer gets stuck at the command line
DiffusionWrapper has 859.52 M params.
It stops doing anything after that. I closed and reopened the prompt, but it got stuck at the same point. Is that just supposed to take a reaaalllyyy long time, or is something wrong?
See temp solution here: https://github.com/AUTOMATIC1111/stable-diffusion-webui/issues/7901
E:\stable-diffusion\stable-diffusion-webui>git pull
Already up to date.
venv “E:\stable-diffusion\stable-diffusion-webui\venv\Scripts\Python.exe”
Python 3.10.6 (tags/v3.10.6:9c7b4bd, Aug 1 2022, 21:53:49) [MSC v.1932 64 bit (AMD64)]
Commit hash: 22bcc7be428c94e9408f589966c2040187245d81
Installing requirements for Web UI
Launching Web UI with arguments:
No module ‘xformers’. Proceeding without it.
Loading weights [d1facd9a2b] from E:\stable-diffusion\stable-diffusion-webui\models\Stable-diffusion\anything-v3-fp16-pruned.safetensors
Creating model from config: E:\stable-diffusion\stable-diffusion-webui\configs\v1-inference.yaml
LatentDiffusion: Running in eps-prediction mode
DiffusionWrapper has 859.52 M params.
Hey,
i got a problem. After the last massage nothing happens, i tried leaving it for 40 minutes and still nothing. Do you know what i can do?
—
OS: WIndows 11
CPU: Ryzen 5800x
GPU: 1070 TI (8GB)
RAM: 16GB
Hi, I dont see this issue on my windows machine but this is a known bug. See temp solution here: https://github.com/AUTOMATIC1111/stable-diffusion-webui/issues/7901
Hi, I’m sorry if my post is doubled here, I can’t see my original one.
So, first of all, thanks for the tutorial, but unfortunately I’m having issues installing this.
It does not get past the part that says DiffusionWrapper has 859.52 M params.
There are no error messages, it just sits there forever.
My video card is a RTX 4070Ti.
Here is the full text of cmd.exe
Creating venv in directory C:\ai\stable-diffusion-webui\venv using python “C:\Users\LCDM\AppData\Local\Programs\Python\Python310\python.exe”
venv “C:\ai\stable-diffusion-webui\venv\Scripts\Python.exe”
Python 3.10.9 (tags/v3.10.9:1dd9be6, Dec 6 2022, 20:01:21) [MSC v.1934 64 bit (AMD64)]
Commit hash: 22bcc7be428c94e9408f589966c2040187245d81
Installing torch and torchvision
Looking in indexes: https://pypi.org/simple, https://download.pytorch.org/whl/cu117
Collecting torch==1.13.1+cu117
Using cached https://download.pytorch.org/whl/cu117/torch-1.13.1%2Bcu117-cp310-cp310-win_amd64.whl (2255.4 MB)
Collecting torchvision==0.14.1+cu117
Using cached https://download.pytorch.org/whl/cu117/torchvision-0.14.1%2Bcu117-cp310-cp310-win_amd64.whl (4.8 MB)
Collecting typing-extensions
Using cached typing_extensions-4.5.0-py3-none-any.whl (27 kB)
Collecting numpy
Using cached numpy-1.24.2-cp310-cp310-win_amd64.whl (14.8 MB)
Collecting requests
Using cached requests-2.28.2-py3-none-any.whl (62 kB)
Collecting pillow!=8.3.*,>=5.3.0
Using cached Pillow-9.5.0-cp310-cp310-win_amd64.whl (2.5 MB)
Collecting idna=2.5
Using cached https://download.pytorch.org/whl/idna-3.4-py3-none-any.whl (61 kB)
Collecting charset-normalizer=2
Using cached charset_normalizer-3.1.0-cp310-cp310-win_amd64.whl (97 kB)
Collecting certifi>=2017.4.17
Using cached https://download.pytorch.org/whl/certifi-2022.12.7-py3-none-any.whl (155 kB)
Collecting urllib3=1.21.1
Using cached urllib3-1.26.15-py2.py3-none-any.whl (140 kB)
Installing collected packages: urllib3, typing-extensions, pillow, numpy, idna, charset-normalizer, certifi, torch, requests, torchvision
Successfully installed certifi-2022.12.7 charset-normalizer-3.1.0 idna-3.4 numpy-1.24.2 pillow-9.5.0 requests-2.28.2 torch-1.13.1+cu117 torchvision-0.14.1+cu117 typing-extensions-4.5.0 urllib3-1.26.15
[notice] A new release of pip available: 22.3.1 -> 23.0.1
[notice] To update, run: C:\ai\stable-diffusion-webui\venv\Scripts\python.exe -m pip install –upgrade pip
Installing gfpgan
Installing clip
Installing open_clip
Installing requirements for CodeFormer
Installing requirements for Web UI
Launching Web UI with arguments:
No module ‘xformers’. Proceeding without it.
Loading weights [14749efc0a] from C:\ai\stable-diffusion-webui\models\Stable-diffusion\sd-v1-4-full-ema.ckpt
Creating model from config: C:\ai\stable-diffusion-webui\configs\v1-inference.yaml
LatentDiffusion: Running in eps-prediction mode
DiffusionWrapper has 859.52 M params.
Any suggestions?
Hi, I dont see this issue on my windows machine but this is a known bug. See temp solution here: https://github.com/AUTOMATIC1111/stable-diffusion-webui/issues/7901
Hi, thanks for the post, but I’m having trouble installing this.
It does not get past the part that says DiffusionWrapper has 859.52 M params.
Creating venv in directory C:\ai\stable-diffusion-webui\venv using python “C:\Users\L\AppData\Local\Programs\Python\Python310\python.exe”
venv “C:\ai\stable-diffusion-webui\venv\Scripts\Python.exe”
Python 3.10.9 (tags/v3.10.9:1dd9be6, Dec 6 2022, 20:01:21) [MSC v.1934 64 bit (AMD64)]
Commit hash: 22bcc7be428c94e9408f589966c2040187245d81
Installing torch and torchvision
Looking in indexes: https://pypi.org/simple, https://download.pytorch.org/whl/cu117
Collecting torch==1.13.1+cu117
Using cached https://download.pytorch.org/whl/cu117/torch-1.13.1%2Bcu117-cp310-cp310-win_amd64.whl (2255.4 MB)
Collecting torchvision==0.14.1+cu117
Using cached https://download.pytorch.org/whl/cu117/torchvision-0.14.1%2Bcu117-cp310-cp310-win_amd64.whl (4.8 MB)
Collecting typing-extensions
Using cached typing_extensions-4.5.0-py3-none-any.whl (27 kB)
Collecting numpy
Using cached numpy-1.24.2-cp310-cp310-win_amd64.whl (14.8 MB)
Collecting requests
Using cached requests-2.28.2-py3-none-any.whl (62 kB)
Collecting pillow!=8.3.*,>=5.3.0
Using cached Pillow-9.5.0-cp310-cp310-win_amd64.whl (2.5 MB)
Collecting idna=2.5
Using cached https://download.pytorch.org/whl/idna-3.4-py3-none-any.whl (61 kB)
Collecting charset-normalizer=2
Using cached charset_normalizer-3.1.0-cp310-cp310-win_amd64.whl (97 kB)
Collecting certifi>=2017.4.17
Using cached https://download.pytorch.org/whl/certifi-2022.12.7-py3-none-any.whl (155 kB)
Collecting urllib3=1.21.1
Using cached urllib3-1.26.15-py2.py3-none-any.whl (140 kB)
Installing collected packages: urllib3, typing-extensions, pillow, numpy, idna, charset-normalizer, certifi, torch, requests, torchvision
Successfully installed certifi-2022.12.7 charset-normalizer-3.1.0 idna-3.4 numpy-1.24.2 pillow-9.5.0 requests-2.28.2 torch-1.13.1+cu117 torchvision-0.14.1+cu117 typing-extensions-4.5.0 urllib3-1.26.15
[notice] A new release of pip available: 22.3.1 -> 23.0.1
[notice] To update, run: C:\ai\stable-diffusion-webui\venv\Scripts\python.exe -m pip install –upgrade pip
Installing gfpgan
Installing clip
Installing open_clip
Installing requirements for CodeFormer
Installing requirements for Web UI
Launching Web UI with arguments:
No module ‘xformers’. Proceeding without it.
Loading weights [14749efc0a] from C:\ai\stable-diffusion-webui\models\Stable-diffusion\sd-v1-4-full-ema.ckpt
Creating model from config: C:\ai\stable-diffusion-webui\configs\v1-inference.yaml
LatentDiffusion: Running in eps-prediction mode
DiffusionWrapper has 859.52 M params.
Any ideas?
My video card is a 4070ti
Thanks, let me add to the FAQ.
Hi Andrew, Thanks for the great content on your site! I’ve also run into a problem with stable diffusion.
My cpmputer has NVIDIA 1070ti,16G RAM,Windows 10.
venv “C:\Users\minotaur\stable-diffusion-webui\venv\Scripts\Python.exe”
Python 3.10.6 (tags/v3.10.6:9c7b4bd, Aug 1 2022, 21:53:49) [MSC v.1932 64 bit (AMD64)]
Commit hash: 22bcc7be428c94e9408f589966c2040187245d81
Installing gfpgan
Installing requirements for Web UI
Traceback (most recent call last):
File “C:\Users\minotaur\stable-diffusion-webui\launch.py”, line 355, in
prepare_environment()
File “C:\Users\minotaur\stable-diffusion-webui\launch.py”, line 299, in prepare_environment
run_pip(f”install -r \”{requirements_file}\””, “requirements for Web UI”)
File “C:\Users\minotaur\stable-diffusion-webui\launch.py”, line 129, in run_pip
return run(f'”{python}” -m pip {args} –prefer-binary{index_url_line}’, desc=f”Installing {desc}”, errdesc=f”Couldn’t install {desc}”)
File “C:\Users\minotaur\stable-diffusion-webui\launch.py”, line 97, in run
raise RuntimeError(message)
RuntimeError: Couldn’t install requirements for Web UI.
Command: “C:\Users\minotaur\stable-diffusion-webui\venv\Scripts\python.exe” -m pip install -r “requirements_versions.txt” –prefer-binary
Error code: 1
stdout: Looking in indexes: https://pypi.tuna.tsinghua.edu.cn/simple
Collecting blendmodes==2022
Using cached https://pypi.tuna.tsinghua.edu.cn/packages/a9/1a/fc3216efda12211fd50823a720fed817e6d936ecacd9531277207c4e9838/blendmodes-2022-py3-none-any.whl (10 kB)
Collecting transformers==4.25.1
Using cached https://pypi.tuna.tsinghua.edu.cn/packages/90/5b/02becd3e137fdacdc30c6442d04094d0b92e500f978df00b1a197b68fd2b/transformers-4.25.1-py3-none-any.whl (5.8 MB)
Collecting accelerate==0.12.0
Using cached https://pypi.tuna.tsinghua.edu.cn/packages/52/36/1a3aec552da693acbb65f9f3613433bea0e065448ef27dc7a9c2f2fb1efa/accelerate-0.12.0-py3-none-any.whl (143 kB)
Requirement already satisfied: basicsr==1.4.2 in c:\users\minotaur\stable-diffusion-webui\venv\lib\site-packages (from -r requirements_versions.txt (line 4)) (1.4.2)
Collecting gfpgan==1.3.8
Using cached https://pypi.tuna.tsinghua.edu.cn/packages/80/a2/84bb50a2655fda1e6f35ae57399526051b8a8b96ad730aea82abeaac4de8/gfpgan-1.3.8-py3-none-any.whl (52 kB)
stderr: ERROR: Could not find a version that satisfies the requirement gradio==3.23 (from versions: 0.1.0, 0.1.1, 0.1.2, 0.1.3, 0.1.4, 0.1.5, 0.1.6, 0.1.7, 0.1.8, 0.1.9, 0.2.0, 0.2.1, 0.3.0, 0.3.1, 0.3.2, 0.3.3, 0.3.4, 0.3.5, 0.4.0, 0.4.1, 0.4.2, 0.4.4, 0.5.0, 0.7.0, 0.7.1, 0.7.2, 0.7.3, 0.7.4, 0.7.5, 0.7.6, 0.7.7, 0.7.8, 0.8.0, 0.8.1, 0.9.0, 0.9.1, 0.9.2, 0.9.3, 0.9.4, 0.9.5, 0.9.6, 0.9.7, 0.9.8, 0.9.9.2, 0.9.9.3, 0.9.9.5, 0.9.9.6, 0.9.9.7, 0.9.9.8, 0.9.9.9, 0.9.9.9.2, 1.0.0a1, 1.0.0a3, 1.0.0a4, 1.0.0, 1.0.1, 1.0.2, 1.0.3, 1.0.4, 1.0.5, 1.0.6, 1.0.7, 1.1.0, 1.1.1, 1.1.2, 1.1.3, 1.1.4, 1.1.5, 1.1.6, 1.1.8, 1.1.8.1, 1.1.9, 1.2.2, 1.2.3, 1.3.0, 1.3.1, 1.3.2, 1.4.0, 1.4.2, 1.4.3, 1.4.4, 1.5.0, 1.5.1, 1.5.3, 1.5.4, 1.6.0, 1.6.1, 1.6.2, 1.6.3, 1.6.4, 1.7.0, 1.7.1, 1.7.2, 1.7.3, 1.7.4, 1.7.5, 1.7.6, 1.7.7, 2.0.0, 2.0.1, 2.0.2, 2.0.4, 2.0.5, 2.0.6, 2.0.7, 2.0.8, 2.0.9, 2.0.10, 2.1.0, 2.1.1, 2.1.2, 2.1.4, 2.1.6, 2.1.7, 2.2.0, 2.2.1, 2.2.2, 2.2.3, 2.2.4, 2.2.5, 2.2.6, 2.2.7, 2.2.8, 2.2.9a0, 2.2.9a2, 2.2.10, 2.2.11, 2.2.12, 2.2.13, 2.2.14, 2.2.15, 2.3.0a0, 2.3.0b99, 2.3.0b101, 2.3.0b102, 2.3.0, 2.3.3, 2.3.4, 2.3.5b0, 2.3.5, 2.3.6, 2.3.7b0, 2.3.7b1, 2.3.7b2, 2.3.7, 2.3.8b0, 2.3.9, 2.4.0a0, 2.4.0, 2.4.1, 2.4.2, 2.4.4, 2.4.5, 2.4.6, 2.4.7b0, 2.4.7b2, 2.4.7b3, 2.4.7b4, 2.4.7b5, 2.4.7b6, 2.4.7b7, 2.4.7b8, 2.4.7b9, 2.5.0, 2.5.1, 2.5.2, 2.5.3, 2.5.8a0, 2.6.0, 2.6.1a0, 2.6.1b0, 2.6.1b3, 2.6.1, 2.6.2, 2.6.3, 2.6.4b0, 2.6.4b2, 2.6.4b3, 2.6.4, 2.7.0a101, 2.7.0a102, 2.7.0b70, 2.7.0, 2.7.5, 2.7.5.1, 2.7.5.2b0, 2.7.5.2, 2.8.0a100, 2.8.0b0, 2.8.0b2, 2.8.0b3, 2.8.0b4, 2.8.0b5, 2.8.0b6, 2.8.0b10, 2.8.0b12, 2.8.0b20, 2.8.0b22, 2.8.0, 2.8.1, 2.8.2, 2.8.3, 2.8.4, 2.8.5, 2.8.6, 2.8.7, 2.8.8, 2.8.9, 2.8.10, 2.8.11, 2.8.12, 2.8.13, 2.8.14, 2.9.0b0, 2.9.0b1, 2.9.0b2, 2.9.0b3, 2.9.0b5, 2.9.0b6, 2.9.0b7, 2.9.0b8, 2.9.0b9, 2.9.0b10, 2.9b11, 2.9b12, 2.9b13, 2.9b14, 2.9b15, 2.9b20, 2.9b21, 2.9b22, 2.9b23, 2.9b24, 2.9b25, 2.9b26, 2.9b27, 2.9b28, 2.9b30, 2.9b31, 2.9b32, 2.9b33, 2.9b40, 2.9b48, 2.9b50, 2.9.0, 2.9.0.1, 2.9.1, 2.9.2, 2.9.3, 2.9.4, 3.0b0, 3.0b1, 3.0b2, 3.0b5, 3.0b6, 3.0b8, 3.0b9, 3.0b10, 3.0, 3.0.1b120, 3.0.1b121, 3.0.1b300, 3.0.1, 3.0.2, 3.0.3, 3.0.4, 3.0.5, 3.0.6b1, 3.0.6b2, 3.0.6b3, 3.0.6, 3.0.7, 3.0.8b1, 3.0.8, 3.0.9b10, 3.0.9b11, 3.0.9b20, 3.0.9, 3.0.10b2, 3.0.10b16, 3.0.10, 3.0.11b1, 3.0.11, 3.0.12, 3.0.13b13, 3.0.13b15, 3.0.13b100, 3.0.13, 3.0.14, 3.0.15, 3.0.16, 3.0.17, 3.0.18b0, 3.0.18, 3.0.19b0, 3.0.19b1, 3.0.19b2, 3.0.19, 3.0.20.dev0, 3.0.20, 3.0.21, 3.0.22, 3.0.23.dev1, 3.0.23, 3.0.24, 3.0.25, 3.0.26, 3.1.0, 3.1.1, 3.1.2, 3.1.3a0, 3.1.3a2, 3.1.3a3, 3.1.3a4, 3.1.3a5, 3.1.3, 3.1.4b0, 3.1.4b1, 3.1.4b2, 3.1.4b3, 3.1.4b4, 3.1.4b5, 3.1.4, 3.1.5b1, 3.1.5b2, 3.1.5b3, 3.1.5b4, 3.1.5b5, 3.1.5b7, 3.1.5b8, 3.1.5b9, 3.1.5b10, 3.1.5, 3.1.6b1, 3.1.6, 3.1.7, 3.1.8b0, 3.1.8b2, 3.1.8b3, 3.1.8b4, 3.1.8b6, 3.2, 3.2.1b0, 3.2.1b1, 3.2.1b2, 3.3b0, 3.3b1, 3.3, 3.3.1, 3.4b0, 3.4b1, 3.4b2, 3.4b3, 3.4b5, 3.4, 3.4.1, 3.5, 3.6.0b1, 3.6.0b2, 3.6.0b3, 3.6.0b7, 3.6.0b10, 3.6, 3.7, 3.8b1, 3.8b2, 3.8, 3.8.1.dev1, 3.8.1, 3.8.2, 3.9, 3.9.1, 3.10.0, 3.10.1, 3.11.0, 3.12.0b1, 3.12.0b2, 3.12.0b3, 3.12.0b6, 3.12.0b7, 3.12.0, 3.13.0b1, 3.13.0, 3.13.1b0, 3.13.1b1, 3.13.1b2, 3.13.1, 3.13.2, 3.14.0a1, 3.14.0, 3.15.0, 3.16.0, 3.16.1b1, 3.16.1, 3.16.2, 3.17.0, 3.17.1b1, 3.17.1b2, 3.17.1, 3.18.0, 3.18.1b1, 3.18.1b2, 3.18.1b3, 3.18.1b4, 3.18.1b5, 3.18.1b6, 3.18.1b7, 3.19.0, 3.19.1, 3.20.0b1, 3.20.0b2, 3.20.0, 3.20.1, 3.21.0, 3.22.0, 3.22.1b1, 3.22.1)
ERROR: No matching distribution found for gradio==3.23
[notice] A new release of pip available: 22.2.1 -> 23.0.1
[notice] To update, run: C:\Users\minotaur\stable-diffusion-webui\venv\Scripts\python.exe -m pip install –upgrade pip
Hello, I think default pypi index server you connected to is not up-to-date. You can try:
1. You can try setting up your network VPN connection in a way that it will be using a different one (I cannot advise on how).
2. Use the release build which supposedly contains everything. You can find the link in the FAQ.
TLDR: Install the same Python version from the Microsoft Store.
Had the same problem, for some reason Windows didn’t recognise Python even tho I added it to PATH as well during installation via the .exe file following the tutorial, but it worked instantly after installing it via Microsoft Store. Who knows why…
Dear Andrew:
I just got an idea and I want to test it which is to try stable diffusion inside ( Windows Sandbox ).
I know that there is a configuration for windows sandbox in order to run it with vGPU (virtualized GPU) and I adjusted it.
I already have a nividia gu RTX 3080 at my laptop and working fine with stable diffusion .
After installing the stable diffusion within windows sandbox it gives me the following below issue:
hope that you could help me regarding this matter …..
venv “C:\Users\WDAGUtilityAccount\Desktop\stable diffusion\stable-diffusion-webui\venv\Scripts\Python.exe”
Python 3.10.6 (tags/v3.10.6:9c7b4bd, Aug 1 2022, 21:53:49) [MSC v.1932 64 bit (AMD64)]
Commit hash: 955df7751eef11bb7697e2d77f6b8a6226b21e13
Traceback (most recent call last):
File “C:\Users\WDAGUtilityAccount\Desktop\stable diffusion\stable-diffusion-webui\launch.py”, line 351, in
prepare_environment()
File “C:\Users\WDAGUtilityAccount\Desktop\stable diffusion\stable-diffusion-webui\launch.py”, line 256, in prepare_environment
run_python(“import torch; assert torch.cuda.is_available(), ‘Torch is not able to use GPU; add –skip-torch-cuda-test to COMMANDLINE_ARGS variable to disable this check'”)
File “C:\Users\WDAGUtilityAccount\Desktop\stable diffusion\stable-diffusion-webui\launch.py”, line 121, in run_python
return run(f'”{python}” -c “{code}”‘, desc, errdesc)
File “C:\Users\WDAGUtilityAccount\Desktop\stable diffusion\stable-diffusion-webui\launch.py”, line 97, in run
raise RuntimeError(message)
RuntimeError: Error running command.
Command: “C:\Users\WDAGUtilityAccount\Desktop\stable diffusion\stable-diffusion-webui\venv\Scripts\python.exe” -c “import torch; assert torch.cuda.is_available(), ‘Torch is not able to use GPU; add –skip-torch-cuda-test to COMMANDLINE_ARGS variable to disable this check'”
Error code: 1
stdout:
stderr: Traceback (most recent call last):
File “”, line 1, in
AssertionError: Torch is not able to use GPU; add –skip-torch-cuda-test to COMMANDLINE_ARGS variable to disable this check
Press any key to continue . . .
Hi, looks like the Sandbox is not able to use your GPU. Using GPU in virtual machines can be done but requires setup
Dear Andrew:
In stead of downloading this big file “torch-1.13.1+cu117-cp310-cp310-win_amd64.whl” (2Gb) , I downloaded it once and I just want to know where I can put that file and use “pip install torch-1.13.1+cu117-cp310-cp310-win_amd64.whl“.
# does I put it inside the venv folder ?
Regards.
You can put it in venv. There should be a script folder and a pip binary inside. You can use that pip to install it.
PS it will only be downloaded once in standard install. So there should be no difference.
hi,I am a newbie of stable-diffusion. I want to know that why did not you recommend to download v2 of stable-diffusion in this article.
Hi, the v2 base model is not as widely used as v1, and is harder to get good results.
I installed python following your guide, but running webui-user gives me this…
“Couldn’t launch python
exit code: 9009
stderr:
Python was not found;”
so wait, you need to have an nvidia GPU to do any of this? that would’ve been good to know at the beginning…
Yes you need an nvidia GPU. It is written in the beginning of the tutorial. For your command, it seems you didn’t add python to path during installation.
my thing still doesn’t work after putting the “path” option and having a NVDIA gpu. I still get the same error.
Try installing the same version of python from Microsoft Store.
Just a quick follow up question – if I already have the “torch-1.13.1+cu117-cp310-cp310-win_amd64.whl” on my hard drive, is there anyway I could install it?
The installation is in the venv folder. You will need to enter that virtual environment and use “pip install torch-1.13.1+cu117-cp310-cp310-win_amd64.whl“
If you don’t understand what I was talking about, it is better to just follow the standard installation process…
Thank you Sir!
Hi there) do you happen to know how to fix this?
ERROR: Exception:
Traceback (most recent call last):
File “F:\stable-diffusion-webui-master\venv\lib\site-packages\pip\_vendor\urllib3\response.py”, line 435, in _error_catcher
yield
File “F:\stable-diffusion-webui-master\venv\lib\site-packages\pip\_vendor\urllib3\response.py”, line 516, in read
data = self._fp.read(amt) if not fp_closed else b””
File “F:\stable-diffusion-webui-master\venv\lib\site-packages\pip\_vendor\cachecontrol\filewrapper.py”, line 90, in read
data = self.__fp.read(amt)
File “C:\Users\Administrator\AppData\Local\Programs\Python\Python310\lib\http\client.py”, line 465, in read
s = self.fp.read(amt)
File “C:\Users\Administrator\AppData\Local\Programs\Python\Python310\lib\socket.py”, line 705, in readinto
return self._sock.recv_into(b)
File “C:\Users\Administrator\AppData\Local\Programs\Python\Python310\lib\ssl.py”, line 1274, in recv_into
return self.read(nbytes, buffer)
File “C:\Users\Administrator\AppData\Local\Programs\Python\Python310\lib\ssl.py”, line 1130, in read
return self._sslobj.read(len, buffer)
ssl.SSLError: [SSL: DECRYPTION_FAILED_OR_BAD_RECORD_MAC] decryption failed or bad record mac (_ssl.c:2548)
During handling of the above exception, another exception occurred:
Traceback (most recent call last):
File “F:\stable-diffusion-webui-master\venv\lib\site-packages\pip\_internal\cli\base_command.py”, line 167, in exc_logging_wrapper
status = run_func(*args)
File “F:\stable-diffusion-webui-master\venv\lib\site-packages\pip\_internal\cli\req_command.py”, line 247, in wrapper
return func(self, options, args)
File “F:\stable-diffusion-webui-master\venv\lib\site-packages\pip\_internal\commands\install.py”, line 369, in run
requirement_set = resolver.resolve(
File “F:\stable-diffusion-webui-master\venv\lib\site-packages\pip\_internal\resolution\resolvelib\resolver.py”, line 92, in resolve
result = self._result = resolver.resolve(
File “F:\stable-diffusion-webui-master\venv\lib\site-packages\pip\_vendor\resolvelib\resolvers.py”, line 481, in resolve
state = resolution.resolve(requirements, max_rounds=max_rounds)
File “F:\stable-diffusion-webui-master\venv\lib\site-packages\pip\_vendor\resolvelib\resolvers.py”, line 348, in resolve
self._add_to_criteria(self.state.criteria, r, parent=None)
File “F:\stable-diffusion-webui-master\venv\lib\site-packages\pip\_vendor\resolvelib\resolvers.py”, line 172, in _add_to_criteria
if not criterion.candidates:
File “F:\stable-diffusion-webui-master\venv\lib\site-packages\pip\_vendor\resolvelib\structs.py”, line 151, in __bool__
return bool(self._sequence)
File “F:\stable-diffusion-webui-master\venv\lib\site-packages\pip\_internal\resolution\resolvelib\found_candidates.py”, line 155, in __bool__
return any(self)
File “F:\stable-diffusion-webui-master\venv\lib\site-packages\pip\_internal\resolution\resolvelib\found_candidates.py”, line 143, in
return (c for c in iterator if id(c) not in self._incompatible_ids)
File “F:\stable-diffusion-webui-master\venv\lib\site-packages\pip\_internal\resolution\resolvelib\found_candidates.py”, line 47, in _iter_built
candidate = func()
File “F:\stable-diffusion-webui-master\venv\lib\site-packages\pip\_internal\resolution\resolvelib\factory.py”, line 206, in _make_candidate_from_link
self._link_candidate_cache[link] = LinkCandidate(
File “F:\stable-diffusion-webui-master\venv\lib\site-packages\pip\_internal\resolution\resolvelib\candidates.py”, line 297, in __init__
super().__init__(
File “F:\stable-diffusion-webui-master\venv\lib\site-packages\pip\_internal\resolution\resolvelib\candidates.py”, line 162, in __init__
self.dist = self._prepare()
File “F:\stable-diffusion-webui-master\venv\lib\site-packages\pip\_internal\resolution\resolvelib\candidates.py”, line 231, in _prepare
dist = self._prepare_distribution()
File “F:\stable-diffusion-webui-master\venv\lib\site-packages\pip\_internal\resolution\resolvelib\candidates.py”, line 308, in _prepare_distribution
return preparer.prepare_linked_requirement(self._ireq, parallel_builds=True)
File “F:\stable-diffusion-webui-master\venv\lib\site-packages\pip\_internal\operations\prepare.py”, line 438, in prepare_linked_requirement
return self._prepare_linked_requirement(req, parallel_builds)
File “F:\stable-diffusion-webui-master\venv\lib\site-packages\pip\_internal\operations\prepare.py”, line 483, in _prepare_linked_requirement
local_file = unpack_url(
File “F:\stable-diffusion-webui-master\venv\lib\site-packages\pip\_internal\operations\prepare.py”, line 165, in unpack_url
file = get_http_url(
File “F:\stable-diffusion-webui-master\venv\lib\site-packages\pip\_internal\operations\prepare.py”, line 106, in get_http_url
from_path, content_type = download(link, temp_dir.path)
File “F:\stable-diffusion-webui-master\venv\lib\site-packages\pip\_internal\network\download.py”, line 147, in __call__
for chunk in chunks:
File “F:\stable-diffusion-webui-master\venv\lib\site-packages\pip\_internal\cli\progress_bars.py”, line 53, in _rich_progress_bar
for chunk in iterable:
File “F:\stable-diffusion-webui-master\venv\lib\site-packages\pip\_internal\network\utils.py”, line 63, in response_chunks
for chunk in response.raw.stream(
File “F:\stable-diffusion-webui-master\venv\lib\site-packages\pip\_vendor\urllib3\response.py”, line 573, in stream
data = self.read(amt=amt, decode_content=decode_content)
File “F:\stable-diffusion-webui-master\venv\lib\site-packages\pip\_vendor\urllib3\response.py”, line 509, in read
with self._error_catcher():
File “C:\Users\Administrator\AppData\Local\Programs\Python\Python310\lib\contextlib.py”, line 153, in __exit__
self.gen.throw(typ, value, traceback)
File “F:\stable-diffusion-webui-master\venv\lib\site-packages\pip\_vendor\urllib3\response.py”, line 446, in _error_catcher
raise SSLError(e)
pip._vendor.urllib3.exceptions.SSLError: [SSL: DECRYPTION_FAILED_OR_BAD_RECORD_MAC] decryption failed or bad record mac (_ssl.c:2548)
Hi, it could be related to your internet connection. Try restarting your PC and switching to another WIFI or landline if possible.
Hello Andrew. Is it passible to instal the webui on second hard drive (D:) and not on the system hard drive (C:) with windows ? I ask because I have much more space on the second hard drive. thanks in advance.
Yes, as long as you have the same permission.
After I installed dreambooth, got the error message. What should I do?
Startup time: 0.4s (list extensions: 0.1s, create ui: 0.1s).
Closing server running on port: 7860
Restarting UI…
Exception importing api
Traceback (most recent call last):
File “C:\Users\USERNAME\stable-diffusion-webui\extensions\sd_dreambooth_extension\scripts\api.py”, line 27, in
from dreambooth.dataclasses.db_config import from_file, DreamboothConfig
File “C:\Users\USERNAME\stable-diffusion-webui\extensions\sd_dreambooth_extension\dreambooth\dataclasses\db_config.py”, line 10, in
from dreambooth.utils.image_utils import get_scheduler_names # noqa
File “C:\Users\USERNAME\stable-diffusion-webui\extensions\sd_dreambooth_extension\dreambooth\utils\image_utils.py”, line 11, in
from diffusers.schedulers import KarrasDiffusionSchedulers
ModuleNotFoundError: No module named ‘diffusers’
Error loading script: main.py
Traceback (most recent call last):
File “C:\Users\USERNAME\stable-diffusion-webui\modules\scripts.py”, line 248, in load_scripts
script_module = script_loading.load_module(scriptfile.path)
File “C:\Users\USERNAME\stable-diffusion-webui\modules\script_loading.py”, line 11, in load_module
module_spec.loader.exec_module(module)
File “”, line 883, in exec_module
File “”, line 241, in _call_with_frames_removed
File “C:\Users\USERNAME\stable-diffusion-webui\extensions\sd_dreambooth_extension\scripts\main.py”, line 7, in
from dreambooth.dataclasses.db_config import (
File “C:\Users\USERNAME\stable-diffusion-webui\extensions\sd_dreambooth_extension\dreambooth\dataclasses\db_config.py”, line 10, in
from dreambooth.utils.image_utils import get_scheduler_names # noqa
File “C:\Users\USERNAME\stable-diffusion-webui\extensions\sd_dreambooth_extension\dreambooth\utils\image_utils.py”, line 11, in
from diffusers.schedulers import KarrasDiffusionSchedulers
ModuleNotFoundError: No module named ‘diffusers’
Running on local URL: http://127.0.0.1:7860
To create a public link, set `share=True` in `launch()`.
Error executing callback app_started_callback for C:\Users\USERNAME\stable-diffusion-webui\extensions\sd_dreambooth_extension\scripts\api.py
Traceback (most recent call last):
File “C:\Users\USERNAME\stable-diffusion-webui\modules\script_callbacks.py”, line 107, in app_started_callback
c.callback(demo, app)
File “C:\Users\USERNAME\stable-diffusion-webui\extensions\sd_dreambooth_extension\scripts\api.py”, line 524, in dreambooth_api
model_cfg: DreamboothConfig = Body(description=”The config to save”),
NameError: name ‘DreamboothConfig’ is not defined
Startup time: 0.4s (list extensions: 0.1s, create ui: 0.1s).
I couldn’t get it to work the last time I tried. You can ask for help on their github page.
If you dont have an nvidia gpu like me (I have a 1GB integrated intel GPU), that might be the reason why you are getting that ‘error’. But adding that skip cuda code should skip it. For me the next problem was that I have a shitty spotty suspicious and slow internet connection, which when running stable diffusion ‘webui-user.bat’ it will not work because it keeps trying to do some updates that cant be updated with a shitty internet connection. So the solution is to run it completely offline from beginning to end and avoid the updates which is triggered every time you run ‘webui-user.bat’. But to run it completely offline you have to obtain a file that makes it run offline completely from start to finish, which for me made stable diffusion work. Its take 5 to 10 min to generate an image for me and it runs on CPU instead… Otherwise i dont know what your problem is without any explaination of what your issue is after adding –skip-torch-cuda-test.
“ANDREW LOWKEY GOATED FR ONG” Andrew, you are modestly the Greatest Of All Time ‘ ed for real, on god.
Hi, I got an issue where it says, Torch is not able to use GPU; add –skip-torch-cuda-test to COMMANDLINE_ARGS variable to disable this check. I’ve tried every ways to fixed it from github forums, but still didn’t work
Hi, it was not able to find a GPU. Does your machine has an nvidia GPU?
ANDREW LOWKEY GOATED FR ONG
I don’t understand 4 out of the 5 words of your comment, but I hope this is a compliment?
When downloading the 1.5 (2.1 is currently the latest) do you need to download v1-inference.yaml and rename it to v1-5-pruned-emaonly.yaml?
No
Thanks for this great guide, I found it helpful. My major deviation I made was to use Chocolaty to install python and git, which I think was ultimately easier and has the benefit of being able to install all sorts of useful software.
I used the steps here to install Chocolaty https://chocolatey.org/install
Then from an Administrative Powershell, I installed the needed apps
choco install git
choco install python3 –version=3.10.6
This omits the heavy cygwin environment that is completely unnecessary.
The other thing I did differently is I run everything from a PowerShell prompt instead of cmd.exe, but I don’t that that makes any difference. Being a unix fan, I greatly prefer PowerShell-core (within Microsoft Terminal) over cmd.exe. You can get (Powershell-core from choco with “choco install powershell-core”).
Thanks for the write-up!
Thanks Andrew, I did end up trying that. In the end I deleted my stable-diffusion dir and cloned auto1111 to my directory and then it started working again.
Hi Andrew, Thanks for the great content on your site! I’ve also run into a problem with stable diffusion. I was originally looking at how to do a fresh install online, but it doesn’t look like there is a way. So I am tackling the issues I am running into. Thanks!
Here is the log:
Already up to date.
venv “C:\Users\jorda\Documents\Stable Diffusion\stable-diffusion-webui\venv\Scripts\Python.exe”
Python 3.10.6 (tags/v3.10.6:9c7b4bd, Aug 1 2022, 21:53:49) [MSC v.1932 64 bit (AMD64)]
Commit hash: 27e319dc4f09a2f040043948e5c52965976f8491
Installing requirements for Web UI
Error running install.py for extension extensions\sd_dreambooth_extension.
Command: “C:\Users\jorda\Documents\Stable Diffusion\stable-diffusion-webui\venv\Scripts\python.exe” “extensions\sd_dreambooth_extension\install.py”
Error code: 1
stdout: loading Dreambooth reqs from C:\Users\jorda\Documents\Stable Diffusion\stable-diffusion-webui\extensions\sd_dreambooth_extension\requirements.txt
Checking Dreambooth requirements.
WARNING: overwriting existing torch/torchvision installation!
Checking torch and torchvision versions
stderr: Traceback (most recent call last):
File “C:\Users\jorda\Documents\Stable Diffusion\stable-diffusion-webui\extensions\sd_dreambooth_extension\install.py”, line 21, in
run(f'”{sys.executable}” -m {torch_cmd}’, “Checking torch and torchvision versions”, “Couldn’t install torch”)
File “C:\Users\jorda\Documents\Stable Diffusion\stable-diffusion-webui\launch.py”, line 105, in run
raise RuntimeError(message)
RuntimeError: Couldn’t install torch.
Command: “C:\Users\jorda\Documents\Stable Diffusion\stable-diffusion-webui\venv\Scripts\python.exe” -m pip install torch==1.12.1+cu116 torchvision==0.13.1+cu116 –extra-index-url https://download.pytorch.org/whl/cu116
Error code: 1
stdout: Looking in indexes: https://pypi.org/simple, https://download.pytorch.org/whl/cu116
Collecting torch==1.12.1+cu116
Using cached https://download.pytorch.org/whl/cu116/torch-1.12.1%2Bcu116-cp310-cp310-win_amd64.whl (2388.4 MB)
Collecting torchvision==0.13.1+cu116
Using cached https://download.pytorch.org/whl/cu116/torchvision-0.13.1%2Bcu116-cp310-cp310-win_amd64.whl (2.6 MB)
Requirement already satisfied: typing-extensions in c:\users\jorda\documents\stable diffusion\stable-diffusion-webui\venv\lib\site-packages (from torch==1.12.1+cu116) (4.5.0)
Requirement already satisfied: requests in c:\users\jorda\documents\stable diffusion\stable-diffusion-webui\venv\lib\site-packages (from torchvision==0.13.1+cu116) (2.25.1)
Requirement already satisfied: numpy in c:\users\jorda\documents\stable diffusion\stable-diffusion-webui\venv\lib\site-packages (from torchvision==0.13.1+cu116) (1.23.3)
Requirement already satisfied: pillow!=8.3.*,>=5.3.0 in c:\users\jorda\documents\stable diffusion\stable-diffusion-webui\venv\lib\site-packages (from torchvision==0.13.1+cu116) (9.4.0)
Requirement already satisfied: idna=2.5 in c:\users\jorda\documents\stable diffusion\stable-diffusion-webui\venv\lib\site-packages (from requests->torchvision==0.13.1+cu116) (2.10)
Requirement already satisfied: urllib3=1.21.1 in c:\users\jorda\documents\stable diffusion\stable-diffusion-webui\venv\lib\site-packages (from requests->torchvision==0.13.1+cu116) (1.26.15)
Requirement already satisfied: certifi>=2017.4.17 in c:\users\jorda\documents\stable diffusion\stable-diffusion-webui\venv\lib\site-packages (from requests->torchvision==0.13.1+cu116) (2022.12.7)
Requirement already satisfied: chardet=3.0.2 in c:\users\jorda\documents\stable diffusion\stable-diffusion-webui\venv\lib\site-packages (from requests->torchvision==0.13.1+cu116) (4.0.0)
Installing collected packages: torch, torchvision
Attempting uninstall: torch
Found existing installation: torch 1.13.1
Uninstalling torch-1.13.1:
Successfully uninstalled torch-1.13.1
stderr: ERROR: Could not install packages due to an OSError: [WinError 5] Access is denied: ‘C:\\Users\\jorda\\Documents\\Stable Diffusion\\stable-diffusion-webui\\venv\\Lib\\site-packages\\~.rch\\lib\\asmjit.dll’
Check the permissions.
Launching Web UI with arguments:
C:\Users\jorda\Documents\Stable Diffusion\stable-diffusion-webui\venv\lib\site-packages\torchvision\io\image.py:13: UserWarning: Failed to load image Python extension: [WinError 127] The specified procedure could not be found
warn(f”Failed to load image Python extension: {e}”)
Preloading Dreambooth!
No module ‘xformers’. Proceeding without it.
==============================================================================
You are running torch 1.12.1+cu116.
The program is tested to work with torch 1.13.1.
To reinstall the desired version, run with commandline flag –reinstall-torch.
Beware that this will cause a lot of large files to be downloaded, as well as
there are reports of issues with training tab on the latest version.
Use –skip-version-check commandline argument to disable this check.
==============================================================================
Error loading script: main.py
Traceback (most recent call last):
File “C:\Users\jorda\Documents\Stable Diffusion\stable-diffusion-webui\modules\scripts.py”, line 248, in load_scripts
script_module = script_loading.load_module(scriptfile.path)
File “C:\Users\jorda\Documents\Stable Diffusion\stable-diffusion-webui\modules\script_loading.py”, line 11, in load_module
module_spec.loader.exec_module(module)
File “”, line 883, in exec_module
File “”, line 241, in _call_with_frames_removed
File “C:\Users\jorda\Documents\Stable Diffusion\stable-diffusion-webui\extensions\sd_dreambooth_extension\scripts\main.py”, line 3, in
from dreambooth import conversion, dreambooth
File “C:\Users\jorda\Documents\Stable Diffusion\stable-diffusion-webui\extensions\sd_dreambooth_extension\dreambooth\conversion.py”, line 27, in
from dreambooth.dreambooth import get_db_models
File “C:\Users\jorda\Documents\Stable Diffusion\stable-diffusion-webui\extensions\sd_dreambooth_extension\dreambooth\dreambooth.py”, line 10, in
from dreambooth.train_dreambooth import main
File “C:\Users\jorda\Documents\Stable Diffusion\stable-diffusion-webui\extensions\sd_dreambooth_extension\dreambooth\train_dreambooth.py”, line 24, in
from diffusers import AutoencoderKL, DDIMScheduler, DDPMScheduler, StableDiffusionPipeline, UNet2DConditionModel
File “C:\Users\jorda\Documents\Stable Diffusion\stable-diffusion-webui\venv\lib\site-packages\diffusers\__init__.py”, line 55, in
from .pipelines import (
File “C:\Users\jorda\Documents\Stable Diffusion\stable-diffusion-webui\venv\lib\site-packages\diffusers\pipelines\__init__.py”, line 18, in
from .dance_diffusion import DanceDiffusionPipeline
File “C:\Users\jorda\Documents\Stable Diffusion\stable-diffusion-webui\venv\lib\site-packages\diffusers\pipelines\dance_diffusion\__init__.py”, line 1, in
from .pipeline_dance_diffusion import DanceDiffusionPipeline
File “C:\Users\jorda\Documents\Stable Diffusion\stable-diffusion-webui\venv\lib\site-packages\diffusers\pipelines\dance_diffusion\pipeline_dance_diffusion.py”, line 21, in
from ..pipeline_utils import AudioPipelineOutput, DiffusionPipeline
File “C:\Users\jorda\Documents\Stable Diffusion\stable-diffusion-webui\venv\lib\site-packages\diffusers\pipelines\pipeline_utils.py”, line 63, in
from transformers.utils import SAFE_WEIGHTS_NAME as TRANSFORMERS_SAFE_WEIGHTS_NAME
ImportError: cannot import name ‘SAFE_WEIGHTS_NAME’ from ‘transformers.utils’ (C:\Users\jorda\Documents\Stable Diffusion\stable-diffusion-webui\venv\lib\site-packages\transformers\utils\__init__.py)
Loading weights [3b60d3dec9] from C:\Users\jorda\Documents\Stable Diffusion\stable-diffusion-webui\models\Stable-diffusion\jordAI.ckpt
Creating model from config: C:\Users\jorda\Documents\Stable Diffusion\stable-diffusion-webui\configs\v1-inference.yaml
LatentDiffusion: Running in eps-prediction mode
DiffusionWrapper has 859.52 M params.
Applying cross attention optimization (Doggettx).
Textual inversion embeddings loaded(0):
Model loaded in 10.0s (load weights from disk: 5.5s, create model: 0.6s, apply weights to model: 1.0s, apply half(): 0.9s, move model to device: 0.9s, load textual inversion embeddings: 1.2s).
Running on local URL: http://127.0.0.1:7860
Hi, there are some permission issues in your venv directory. You can try deleting it and rerunning webui-user.bat
Got same problem, but reinstalling did not help
What’s the error message? try installing in home directory if you didn’t.
Hey Great Work from you man!
Unfortuanitly i have a Problem, the Program is saying that i have a Memory Problem but i have enought storage left…. I have a 4Ram and 64 bit PC Do you have any Help?
Thank you in Advance!
ERROR: Exception:
Traceback (most recent call last):
File “C:\Users\\stable-diffusion-webui\venv\lib\site-packages\pip\_internal\cli\base_command.py”, line 160, in exc_logging_wrapper
status = run_func(*args)
File “C:\Users\stable-diffusion-webui\venv\lib\site-packages\pip\_internal\cli\req_command.py”, line 247, in wrapper
return func(self, options, args)
File “C:\Users\i\stable-diffusion-webui\venv\lib\site-packages\pip\_internal\commands\install.py”, line 419, in run
requirement_set = resolver.resolve(
File “C:\Users\\stable-diffusion-webui\venv\lib\site-packages\pip\_internal\resolution\resolvelib\resolver.py”, line 92, in resolve
result = self._result = resolver.resolve(
File “C:\Users\\stable-diffusion-webui\venv\lib\site-packages\pip\_vendor\resolvelib\resolvers.py”, line 481, in resolve
state = resolution.resolve(requirements, max_rounds=max_rounds)
File “C:\Users\leoni\stable-diffusion-webui\venv\lib\site-packages\pip\_vendor\resolvelib\resolvers.py”, line 348, in resolve
self._add_to_criteria(self.state.criteria, r, parent=None)
File “C:\Users\\stable-diffusion-webui\venv\lib\site-packages\pip\_vendor\resolvelib\resolvers.py”, line 172, in _add_to_criteria
if not criterion.candidates:
File “C:\Users\\stable-diffusion-webui\venv\lib\site-packages\pip\_vendor\resolvelib\structs.py”, line 151, in __bool__
return bool(self._sequence)
File “C:\Users\\stable-diffusion-webui\venv\lib\site-packages\pip\_internal\resolution\resolvelib\found_candidates.py”, line 155, in __bool__
return any(self)
File “C:\Users\\stable-diffusion-webui\venv\lib\site-packages\pip\_internal\resolution\resolvelib\found_candidates.py”, line 143, in
return (c for c in iterator if id(c) not in self._incompatible_ids)
File “C:\Users\\stable-diffusion-webui\venv\lib\site-packages\pip\_internal\resolution\resolvelib\found_candidates.py”, line 47, in _iter_built
candidate = func()
File “C:\Users\stable-diffusion-webui\venv\lib\site-packages\pip\_internal\resolution\resolvelib\factory.py”, line 206, in _make_candidate_from_link
self._link_candidate_cache[link] = LinkCandidate(
File “C:\Users\\stable-diffusion-webui\venv\lib\site-packages\pip\_internal\resolution\resolvelib\candidates.py”, line 297, in __init__
super().__init__(
File “C:\Users\\stable-diffusion-webui\venv\lib\site-packages\pip\_internal\resolution\resolvelib\candidates.py”, line 162, in __init__
self.dist = self._prepare()
File “C:\Users\\stable-diffusion-webui\venv\lib\site-packages\pip\_internal\resolution\resolvelib\candidates.py”, line 231, in _prepare
dist = self._prepare_distribution()
File “C:\Users\\stable-diffusion-webui\venv\lib\site-packages\pip\_internal\resolution\resolvelib\candidates.py”, line 308, in _prepare_distribution
return preparer.prepare_linked_requirement(self._ireq, parallel_builds=True)
File “C:\Users\\stable-diffusion-webui\venv\lib\site-packages\pip\_internal\operations\prepare.py”, line 491, in prepare_linked_requirement
return self._prepare_linked_requirement(req, parallel_builds)
File “C:\Users\\stable-diffusion-webui\venv\lib\site-packages\pip\_internal\operations\prepare.py”, line 536, in _prepare_linked_requirement
local_file = unpack_url(
File “C:\Users\\stable-diffusion-webui\venv\lib\site-packages\pip\_internal\operations\prepare.py”, line 166, in unpack_url
file = get_http_url(
File “C:\Users\stable-diffusion-webui\venv\lib\site-packages\pip\_internal\operations\prepare.py”, line 107, in get_http_url
from_path, content_type = download(link, temp_dir.path)
File “C:\Users\\stable-diffusion-webui\venv\lib\site-packages\pip\_internal\network\download.py”, line 134, in __call__
resp = _http_get_download(self._session, link)
File “C:\Users\\stable-diffusion-webui\venv\lib\site-packages\pip\_internal\network\download.py”, line 117, in _http_get_download
resp = session.get(target_url, headers=HEADERS, stream=True)
File “C:\Users\\stable-diffusion-webui\venv\lib\site-packages\pip\_vendor\requests\sessions.py”, line 600, in get
return self.request(“GET”, url, **kwargs)
File “C:\Users\\stable-diffusion-webui\venv\lib\site-packages\pip\_internal\network\session.py”, line 518, in request
return super().request(method, url, *args, **kwargs)
File “C:\Users\\stable-diffusion-webui\venv\lib\site-packages\pip\_vendor\requests\sessions.py”, line 587, in request
resp = self.send(prep, **send_kwargs)
File “C:\Users\\stable-diffusion-webui\venv\lib\site-packages\pip\_vendor\requests\sessions.py”, line 701, in send
r = adapter.send(request, **kwargs)
File “C:\Users\\stable-diffusion-webui\venv\lib\site-packages\pip\_vendor\cachecontrol\adapter.py”, line 48, in send
cached_response = self.controller.cached_request(request)
File “C:\Users\\stable-diffusion-webui\venv\lib\site-packages\pip\_vendor\cachecontrol\controller.py”, line 155, in cached_request
resp = self.serializer.loads(request, cache_data, body_file)
File “C:\Users\\stable-diffusion-webui\venv\lib\site-packages\pip\_vendor\cachecontrol\serialize.py”, line 95, in loads
return getattr(self, “_loads_v{}”.format(ver))(request, data, body_file)
File “C:\Users\\stable-diffusion-webui\venv\lib\site-packages\pip\_vendor\cachecontrol\serialize.py”, line 186, in _loads_v4
cached = msgpack.loads(data, raw=False)
File “C:\Users\\stable-diffusion-webui\venv\lib\site-packages\pip\_vendor\msgpack\fallback.py”, line 123, in unpackb
unpacker.feed(packed)
File “C:\Users\\stable-diffusion-webui\venv\lib\site-packages\pip\_vendor\msgpack\fallback.py”, line 381, in feed
self._buffer.extend(view)
MemoryError
Hello, 4GB of RAM is likely not enough to run SD. You can consider using google colab.
Hi could you help me please? I get an error “stderr: C:\Program Files\Inkscape\bin\python.exe: No module named pip” when clicking the webui-user.bat.
Hi, it appears that you were using a python that installed by another program. The best is to uninstall inscape, and any other python versions previously installed. Then install python 3.10
hi, can you help me with something? it says that it couldn’t install open_clip. how to fix pls?
it works now idk why, but now it tells me that it…
RuntimeError: Couldn’t clone Taming Transformers.
Command: “git” clone “https://github.com/CompVis/taming-transformers.git” “repositories\taming-transformers”
Error code: 128
stdout:
stderr: Cloning into ‘repositories\taming-transformers’…
error: RPC failed; curl 56 Recv failure: Connection was reset
error: 1596 bytes of body are still expected
fetch-pack: unexpected disconnect while reading sideband packet
fatal: early EOF
fatal: fetch-pack: invalid index-pack output
help
Hi, it appears you cannot access github.com, where the repository is hosted.
so what should I do? should i just clone it manually? idk how to do that tho
Hi, you can test visiting github.com. Find a way to fix the connect if you are blocked from it (which I cannot advise on how).
You can also try clone as you suggested. Then comment out the lines that try to clone taming transformers.
I’m getting an error torch.cuda out of memory. It is using GPU 0 instead of 1. The solution from research is to add:
Set ‘CUDA_VISIBLE_DEVICES=1’
My question is which config file, and where in that file to add this argument? Or is there a way to force the application to use GPU 1 in Windows 10 (no disabling GPU 0)?
Thanks!
Got the answer from here:
https://github.com/AUTOMATIC1111/stable-diffusion-webui/issues/1742#issuecomment-1429476506
venv “C:\Users\Hugo Lessa\stable-diffusion-webui\venv\Scripts\Python.exe”
No Python at ‘”C:\Users\Hugo Lessa\AppData\Local\Programs\Python\Python311\python.exe’
First i installed de last python version, so i unistall it and install the correct one. But this message appear when i start webui user bat
Hi, you can try deleting the venv directory and run webui-user.bat
uninstall current python version
AND
Install from Microsoft Store Hint: Double check if installation was successfull 😉
AND
Remove venv
AND
run webui-user.bat again
was the solution for me.
He
Any chance someone put this v1-5-pruned-emaonly.ckpt in a torrent, the download rate from South America is 150kb/sec we need that as p2p or in another server.
Yes most ckpts are on torrent. You can use aria2c. See the google colab notebook in the quick start guide for code examples.
Sorry but how does one get the torrent or find it? I havent heard of aria2c before and I’m not really sure how it works and how it connects with ‘the google colab notebook in the quick start guide’ you said afterwards and that I have open. I just wanted to download v1-5-pruned-emaonly.ckpt as a torrent to finish this tutorial: https://www.youtube.com/watch?v=3cvP7yJotUM&t=19s
It’s a command-line torrent tool. I used it in the colab notebook, so you can copy the command line arguments if you want.
That’s the only experience in torrent I have.
Creating venv in directory C:\Users\щщ\stable-diffusion-webui\venv using python “C:\Users\∙∙\AppData\Local\Programs\Python\Python310\python.exe”
Unable to create venv in directory “C:\Users\…..\stable-diffusion-webui\venv”
exit code: 3
stderr:
doesen`t working…i erased the webui folder…same fault again.
Iam not satisfied.
Hi, I did some google search for you and could be related to this issue
https://github.com/AUTOMATIC1111/stable-diffusion-webui/issues/7358
Your username may be of special characters that python doesn’t like.Try installing on a path without special characters, or use colab notebook my site provided in Quick Start Guide.
venv “C:\Users\31704\stable-diffusion-webui\venv\Scripts\Python.exe”
Python 3.10.6 (tags/v3.10.6:9c7b4bd, Aug 1 2022, 21:53:49) [MSC v.1932 64 bit (AMD64)]
Commit hash: 0cc0ee1bcb4c24a8c9715f66cede06601bfc00c8
Traceback (most recent call last):
File “C:\Users\31704\stable-diffusion-webui\launch.py”, line 360, in
prepare_environment()
File “C:\Users\31704\stable-diffusion-webui\launch.py”, line 272, in prepare_environment
run_python(“import torch; assert torch.cuda.is_available(), ‘Torch is not able to use GPU; add –skip-torch-cuda-test to COMMANDLINE_ARGS variable to disable this check'”)
File “C:\Users\31704\stable-diffusion-webui\launch.py”, line 129, in run_python
return run(f'”{python}” -c “{code}”‘, desc, errdesc)
File “C:\Users\31704\stable-diffusion-webui\launch.py”, line 105, in run
raise RuntimeError(message)
RuntimeError: Error running command.
Command: “C:\Users\31704\stable-diffusion-webui\venv\Scripts\python.exe” -c “import torch; assert torch.cuda.is_available(), ‘Torch is not able to use GPU; add –skip-torch-cuda-test to COMMANDLINE_ARGS variable to disable this check'”
Error code: 1
stdout:
stderr: C:\Users\31704\stable-diffusion-webui\venv\lib\site-packages\torch\cuda\__init__.py:88: UserWarning: CUDA initialization: The NVIDIA driver on your system is too old (found version 10020). Please update your GPU driver by downloading and installing a new version from the URL: http://www.nvidia.com/Download/index.aspx Alternatively, go to: https://pytorch.org to install a PyTorch version that has been compiled with your version of the CUDA driver. (Triggered internally at ..\c10\cuda\CUDAFunctions.cpp:109.)
return torch._C._cuda_getDeviceCount() > 0
Traceback (most recent call last):
File “”, line 1, in
AssertionError: Torch is not able to use GPU; add –skip-torch-cuda-test to COMMANDLINE_ARGS variable to disable this check
请按任意键继续. . .
please help me
Hi,
Looks like the error message has provided the solution:
The NVIDIA driver on your system is too old (found version 10020). Please update your GPU driver by downloading and installing a new version from the URL: http://www.nvidia.com/Download/index.aspx Alternatively, go to: https://pytorch.org to install a PyTorch version that has been compiled with your version of the CUDA driver.
when I double click on webui-user.bat it returns me this error:
venv “E:\SD\stable-diffusion-webui\venv\Scripts\Python.exe”
Python 3.10.6 (tags/v3.10.6:9c7b4bd, Aug 1 2022, 21:53:49) [MSC v.1932 64 bit (AMD64)]
Commit hash: 0cc0ee1bcb4c24a8c9715f66cede06601bfc00c8
Installing gfpgan
Traceback (most recent call last):
File “E:\SD\stable-diffusion-webui\launch.py”, line 360, in
prepare_environment()
File “E:\SD\stable-diffusion-webui\launch.py”, line 275, in prepare_environment
run_pip(f”install {gfpgan_package}”, “gfpgan”)
File “E:\SD\stable-diffusion-webui\launch.py”, line 137, in run_pip
return run(f'”{python}” -m pip {args} –prefer-binary{index_url_line}’, desc=f”Installing {desc}”, errdesc=f”Couldn’t install {desc}”)
File “E:\SD\stable-diffusion-webui\launch.py”, line 105, in run
raise RuntimeError(message)
RuntimeError: Couldn’t install gfpgan.
Command: “E:\SD\stable-diffusion-webui\venv\Scripts\python.exe” -m pip install git+https://github.com/TencentARC/GFPGAN.git@8d2447a2d918f8eba5a4a01463fd48e45126a379 –prefer-binary
Error code: 1
stdout: Collecting git+https://github.com/TencentARC/GFPGAN.git@8d2447a2d918f8eba5a4a01463fd48e45126a379
Cloning https://github.com/TencentARC/GFPGAN.git (to revision 8d2447a2d918f8eba5a4a01463fd48e45126a379) to c:\users\zoid\appdata\local\temp\pip-req-build-nqdkt3oj
stderr: Running command git clone –filter=blob:none –quiet https://github.com/TencentARC/GFPGAN.git ‘C:\Users\Zoid\AppData\Local\Temp\pip-req-build-nqdkt3oj’
fatal: unable to access ‘https://github.com/TencentARC/GFPGAN.git/’: Failed to connect to github.com port 443 after 21065 ms: Couldn’t connect to server
error: subprocess-exited-with-error
git clone –filter=blob:none –quiet https://github.com/TencentARC/GFPGAN.git ‘C:\Users\Zoid\AppData\Local\Temp\pip-req-build-nqdkt3oj’ did not run successfully.
exit code: 128
See above for output.
note: This error originates from a subprocess, and is likely not a problem with pip.
what can i do?
Hi, it says your PC cannot connect to github. Check to see if you can go here: https://github.com/TencentARC/GFPGAN.git
If you can, it was likely a temporary issue. You can try again.
Hi, I was wondering what I could do if my installation is stuck on this.
venv “C:\Users\matth\stable-diffusion-webui\venv\Scripts\Python.exe”
Python 3.10.6 (tags/v3.10.6:9c7b4bd, Aug 1 2022, 21:53:49) [MSC v.1932 64 bit (AMD64)]
Commit hash: 65995a2ea38a1a0afd06cb508a4f65fd0d3a1743
Installing gfpgan
It does not move past this stage and I followed the instructions as much as I could, any help would be much appreciated.
Sorry I don’t have any experience in this issue. Please google and see if others have the same issue.
venv “C:\Users\pc\stable-diffusion-webui\venv\Scripts\Python.exe”
Python 3.10.6 (tags/v3.10.6:9c7b4bd, Aug 1 2022, 21:53:49) [MSC v.1932 64 bit (AMD64)]
Commit hash: 65995a2ea38a1a0afd06cb508a4f65fd0d3a1743
Installing torch and torchvision
C:\Users\pc\stable-diffusion-webui\venv\Scripts\python.exe: No module named pip
Traceback (most recent call last):
File “C:\Users\pc\stable-diffusion-webui\launch.py”, line 360, in
prepare_environment()
File “C:\Users\pc\stable-diffusion-webui\launch.py”, line 269, in prepare_environment
run(f'”{python}” -m {torch_command}’, “Installing torch and torchvision”, “Couldn’t install torch”, live=True)
File “C:\Users\pc\stable-diffusion-webui\launch.py”, line 89, in run
raise RuntimeError(f”””{errdesc or ‘Error running command’}.
RuntimeError: Couldn’t install torch.
Command: “C:\Users\pc\stable-diffusion-webui\venv\Scripts\python.exe” -m pip install torch==1.13.1+cu117 torchvision==0.14.1+cu117 –extra-index-url https://download.pytorch.org/whl/cu117
Error code: 1
Press any key to continue . . .
hi !
really need help with what`s happening above, thanks!
There seems to be no pip installed in your Python
Try running the command in cmd
C:\Users\pc\stable-diffusion-webui\venv\Scripts\python.exe -m ensurepip –upgrade
venv “C:\Users\Chris\stable-diffusion-webui\venv\Scripts\Python.exe”
Python 3.10.6 (tags/v3.10.6:9c7b4bd, Aug 1 2022, 21:53:49) [MSC v.1932 64 bit (AMD64)]
Commit hash: ea9bd9fc7409109adcd61b897abc2c8881161256
Installing requirements for Web UI
Launching Web UI with arguments:
No module ‘xformers’. Proceeding without it.
Loading weights [cc6cb27103] from C:\Users\Chris\stable-diffusion-webui\models\Stable-diffusion\v1-5-pruned-emaonly.ckpt
Creating model from config: C:\Users\Chris\stable-diffusion-webui\configs\v1-inference.yaml
LatentDiffusion: Running in eps-prediction mode
DiffusionWrapper has 859.52 M params.
Applying cross attention optimization (Doggettx).
Textual inversion embeddings loaded(0):
Model loaded in 3.3s (load weights from disk: 0.8s, create model: 0.4s, apply weights to model: 0.4s, apply half(): 0.6s, move model to device: 0.4s, load textual inversion embeddings: 0.6s).
Running on local URL: http://127.0.0.1:7860
To create a public link, set `share=True` in `launch()`.
Traceback (most recent call last):
File “C:\Users\Chris\stable-diffusion-webui\launch.py”, line 361, in
start()
File “C:\Users\Chris\stable-diffusion-webui\launch.py”, line 356, in start
webui.webui()
File “C:\Users\Chris\stable-diffusion-webui\webui.py”, line 232, in webui
app.add_middleware(GZipMiddleware, minimum_size=1000)
File “C:\Users\Chris\stable-diffusion-webui\venv\lib\site-packages\starlette\applications.py”, line 135, in add_middleware
raise RuntimeError(“Cannot add middleware after an application has started”)
RuntimeError: Cannot add middleware after an application has started
Press any key to continue . . .
Can’t seem to get it to work. RTX 4090, Ryzen 7900x.
Not your fault — there’s a bug in AUTOMATIC1111 right now. Hope they resolve soon.
There’s a workaround in the following discussion
https://github.com/AUTOMATIC1111/stable-diffusion-webui/issues/7714#issuecomment-1426058038
Hello, i follow every step exactly, but at step 5, after run the webui-user.bat, following happened:
Couldn’t launch python
exit code: 9009
stderr:
Python konnte nicht gefunden werden. F・ren Sie die Verkn・fung ohne Argumente aus, um sie ・er den Microsoft Store zu installieren, oder deaktivieren Sie diese Verkn・fung unter
Launch unsuccessful. Exiting.
Drücken Sie eine beliebige Taste . . .
Have someone an idea?
Best regards
Hi, looks like there’s a problem with your python install. Did you check “Add Python 3.10 to PATH” during install?
I followed the steps exactly, but i don’t have webui-user.bat file. Only these…https://gyazo.com/a66069de7ba44aef8b2c315cfb496ae6
Could one of these be correct, but just named differently?
Hi, it is one of the webui-user. You will need to find out which one…. The reason it is not showing is file name extension is hidden.
You can try showing file name extension
https://support.microsoft.com/en-us/windows/common-file-name-extensions-in-windows-da4a4430-8e76-89c5-59f7-1cdbbc75cb01
It’s run smooth ! thanks a lot
btw I’ve problem with sd2 model but 1.5 is fine
Great!
It should work with v2 models. Have you follow instructions, esp copying and naming the config file for the model correctly? See
https://stable-diffusion-art.com/install-stable-diffusion-2-1/
venv “C:\Users\user\stable-diffusion-webui\venv\Scripts\Python.exe”
Python 3.10.6 (tags/v3.10.6:9c7b4bd, Aug 1 2022, 21:53:49) [MSC v.1932 64 bit (AMD64)]
Commit hash: 226d840e84c5f306350b0681945989b86760eXXX
Installing gfpgan
Traceback (most recent call last):
File “C:\Users\user\stable-diffusion-webui\launch.py”, line 360, in
prepare_environment()
File “C:\Users\user\stable-diffusion-webui\launch.py”, line 275, in prepare_environment
run_pip(f”install {gfpgan_package}”, “gfpgan”)
File “C:\Users\user\stable-diffusion-webui\launch.py”, line 137, in run_pip
return run(f'”{python}” -m pip {args} –prefer-binary{index_url_line}’, desc=f”Installing {desc}”, errdesc=f”Couldn’t install {desc}”)
File “C:\Users\user\stable-diffusion-webui\launch.py”, line 105, in run
raise RuntimeError(message)
RuntimeError: Couldn’t install gfpgan.
Command: “C:\Users\user\stable-diffusion-webui\venv\Scripts\python.exe” -m pip install git+https://github.com/TencentARC/GFPGAN.git@8d2447a2d918f8eba5a4a01463fd48e45126a379 –prefer-binary
Error code: 1
stdout: Collecting git+https://github.com/TencentARC/GFPGAN.git@8d2447a2d918f8eba5a4a01463fd48e45126a379
Cloning https://github.com/TencentARC/GFPGAN.git (to revision 8d2447a2d918f8eba5a4a01463fd48e45126a379) to c:\users\beiji\appdata\local\temp\pip-req-build-k1zuu77u
stderr: Running command git clone –filter=blob:none –quiet https://github.com/TencentARC/GFPGAN.git ‘C:\Users\beiji\AppData\Local\Temp\pip-req-build-k1zuu77u’
fatal: unable to access ‘https://github.com/TencentARC/GFPGAN.git/’: Recv failure: Connection was reset
fatal: could not fetch fa702eeacff13fe8475b0e102a8b8c37602f3963 from promisor remote
warning: Clone succeeded, but checkout failed.
You can inspect what was checked out with ‘git status’
and retry with ‘git restore –source=HEAD :/’
error: subprocess-exited-with-error
git clone –filter=blob:none –quiet https://github.com/TencentARC/GFPGAN.git ‘C:\Users\beiji\AppData\Local\Temp\pip-req-build-k1zuu77u’ did not run successfully.
exit code: 128
See above for output.
note: This error originates from a subprocess, and is likely not a problem with pip.
[notice] A new release of pip available: 22.2.1 -> 23.0
[notice] To update, run: C:\Users\user\stable-diffusion-webui\venv\Scripts\python.exe -m pip install –upgrade pip
I stuck at installing gfpgan…. what can I do?
It complained you had modified the gfpgan folder. You can try removing it and restart.
I find myself puzzled. Upon initially running the webui.bat file, the Command Prompt listing progressed to a notice of a new release of pip available: 22.2.1 -> 22.3.1; from there, as I recall it, it then reached the point of the line “Cloning Taming Transformers into repositories\taming-transformers…” and did not continue further. Subsequently, I updated to the 22.3.1, and ran webui.bat again, to come upon this:
venv “C:\Users\USER\stable-diffusion-webui\venv\Scripts\Python.exe”
Python 3.10.6 (tags/v3.10.6:9c7b4bd, Aug 1 2022, 21:53:49) [MSC v.1932 64 bit (AMD64)]
Commit hash: 7a14c8ab45da8a681792a6331d48a88dd684a0a9
Traceback (most recent call last):
File “C:\Users\USER\stable-diffusion-webui\launch.py”, line 324, in
prepare_environment()
File “C:\Users\USER\stable-diffusion-webui\launch.py”, line 265, in prepare_environment
git_clone(taming_transformers_repo, repo_dir(‘taming-transformers’), “Taming Transformers”, taming_transformers_commit_hash)
File “C:\Users\USER\stable-diffusion-webui\launch.py”, line 120, in git_clone
current_hash = run(f'”{git}” -C “{dir}” rev-parse HEAD’, None, f”Couldn’t determine {name}’s hash: {commithash}”).strip()
File “C:\Users\USER\stable-diffusion-webui\launch.py”, line 74, in run
raise RuntimeError(message)
RuntimeError: Couldn’t determine Taming Transformers’s hash: 24268930bf1dce879235a7fddd0b2355b84d7ea6.
Command: “git” -C “repositories\taming-transformers” rev-parse HEAD
Error code: 128
stdout: HEAD
stderr: fatal: ambiguous argument ‘HEAD’: unknown revision or path not in the working tree.
Use ‘–‘ to separate paths from revisions, like this:
‘git […] — […]’
Press any key to continue . . .
This seems as though I’m overlooking something or managed to make a mistake somewhere, but what the issue is, I can’t say. Thus, any insight would be appreciated.
The pip upgrade is optional. I think they suppose you to run webui-user.bat. You can try deleting and recloning the webui folder. Then run webui.bat again to see if you can get pass taming transformers.
I’ve tried to launch stable diffusion a few times and this is the error I get.
Couldn’t launch python
exit code: 9009
stderr:
Python was not found; run without arguments to install from the Microsoft Store, or disable this shortcut from Settings > Manage App Execution Aliases.
Launch unsuccessful. Exiting.
Press any key to continue . . .
I have the minimum PC requirements, Git, Python 3.10.6, and I selected add python to path.
Open the command prompt (cmd). Type python. Do you see python is launch?
Are you running webui-user.bat?
Thanks for the help. Took a few hours but it finished. No error this time but the text is different from that of the guide’s and I am unsure of what to do here:
Python 3.10.6 (tags/v3.10.6:9c7b4bd, Aug 1 2022, 21:53:49) [MSC v.1932 64 bit (AMD64)]
Commit hash: 48a15821de768fea76e66f26df83df3fddf18f4b
Installing torch and torchvision
Looking in indexes: https://pypi.org/simple, https://download.pytorch.org/whl/cu117
Collecting torch==1.13.1+cu117
Using cached https://download.pytorch.org/whl/cu117/torch-1.13.1%2Bcu117-cp310-cp310-win_amd64.whl (2255.4 MB)
Collecting torchvision==0.14.1+cu117
Using cached https://download.pytorch.org/whl/cu117/torchvision-0.14.1%2Bcu117-cp310-cp310-win_amd64.whl (4.8 MB)
Collecting typing-extensions
Using cached typing_extensions-4.4.0-py3-none-any.whl (26 kB)
Collecting pillow!=8.3.*,>=5.3.0
Using cached Pillow-9.4.0-cp310-cp310-win_amd64.whl (2.5 MB)
Collecting requests
Using cached requests-2.28.2-py3-none-any.whl (62 kB)
Collecting numpy
Using cached numpy-1.24.1-cp310-cp310-win_amd64.whl (14.8 MB)
Collecting certifi>=2017.4.17
Using cached certifi-2022.12.7-py3-none-any.whl (155 kB)
Collecting charset-normalizer=2
Using cached charset_normalizer-3.0.1-cp310-cp310-win_amd64.whl (96 kB)
Collecting urllib3=1.21.1
Using cached urllib3-1.26.14-py2.py3-none-any.whl (140 kB)
Collecting idna=2.5
Using cached idna-3.4-py3-none-any.whl (61 kB)
Installing collected packages: charset-normalizer, urllib3, typing-extensions, pillow, numpy, idna, certifi, torch, requests, torchvision
Successfully installed certifi-2022.12.7 charset-normalizer-3.0.1 idna-3.4 numpy-1.24.1 pillow-9.4.0 requests-2.28.2 torch-1.13.1+cu117 torchvision-0.14.1+cu117 typing-extensions-4.4.0 urllib3-1.26.14
Installing gfpgan
Installing clip
Installing open_clip
Cloning Stable Diffusion into repositories\stable-diffusion-stability-ai…
Cloning Taming Transformers into repositories\taming-transformers…
Cloning K-diffusion into repositories\k-diffusion…
Cloning CodeFormer into repositories\CodeFormer…
Cloning BLIP into repositories\BLIP…
Installing requirements for CodeFormer
Installing requirements for Web UI
Launching Web UI with arguments:
No module ‘xformers’. Proceeding without it.
No checkpoints found. When searching for checkpoints, looked at:
– file C:\Users\TT\Downloads\sd.webui\webui\model.ckpt
– directory C:\Users\TT\Downloads\sd.webui\webui\models\Stable-diffusion
Can’t run without a checkpoint. Find and place a .ckpt file into any of those locations. The program will exit.
Press any key to continue . . .
Terminate batch job (Y/N)?
It’s missing the model file. You will need to follow something similar to STEP 4, but putting the model file in \sd.webui\webui\models\Stable-diffusion instead.
Do I just open cmd and enter that or is there more? also are there any risks in dooing this or has it already been tried?
Yes just open cmd and run. Then try run.bat again.
But if you are not comfortable fixing bugs on your system, you should run in Colab.
Sorry for responding so late. It froze my screen for about 40 minutes and just finished.
Here is the error I got:
ERROR: Exception:
Traceback (most recent call last):
File “C:\Users\TT\Downloads\sd.webui\system\python\lib\site-packages\pip\_internal\cli\base_command.py”, line 160, in exc_logging_wrapper
status = run_func(*args)
File “C:\Users\TT\Downloads\sd.webui\system\python\lib\site-packages\pip\_internal\cli\req_command.py”, line 247, in wrapper
return func(self, options, args)
File “C:\Users\TT\Downloads\sd.webui\system\python\lib\site-packages\pip\_internal\commands\install.py”, line 400, in run
requirement_set = resolver.resolve(
File “C:\Users\TT\Downloads\sd.webui\system\python\lib\site-packages\pip\_internal\resolution\resolvelib\resolver.py”, line 92, in resolve
result = self._result = resolver.resolve(
File “C:\Users\TT\Downloads\sd.webui\system\python\lib\site-packages\pip\_vendor\resolvelib\resolvers.py”, line 481, in resolve
state = resolution.resolve(requirements, max_rounds=max_rounds)
File “C:\Users\TT\Downloads\sd.webui\system\python\lib\site-packages\pip\_vendor\resolvelib\resolvers.py”, line 348, in resolve
self._add_to_criteria(self.state.criteria, r, parent=None)
File “C:\Users\TT\Downloads\sd.webui\system\python\lib\site-packages\pip\_vendor\resolvelib\resolvers.py”, line 172, in _add_to_criteria
if not criterion.candidates:
File “C:\Users\TT\Downloads\sd.webui\system\python\lib\site-packages\pip\_vendor\resolvelib\structs.py”, line 151, in __bool__
return bool(self._sequence)
File “C:\Users\TT\Downloads\sd.webui\system\python\lib\site-packages\pip\_internal\resolution\resolvelib\found_candidates.py”, line 155, in __bool__
return any(self)
File “C:\Users\TT\Downloads\sd.webui\system\python\lib\site-packages\pip\_internal\resolution\resolvelib\found_candidates.py”, line 143, in
return (c for c in iterator if id(c) not in self._incompatible_ids)
File “C:\Users\TT\Downloads\sd.webui\system\python\lib\site-packages\pip\_internal\resolution\resolvelib\found_candidates.py”, line 47, in _iter_built
candidate = func()
File “C:\Users\TT\Downloads\sd.webui\system\python\lib\site-packages\pip\_internal\resolution\resolvelib\factory.py”, line 206, in _make_candidate_from_link
self._link_candidate_cache[link] = LinkCandidate(
File “C:\Users\TT\Downloads\sd.webui\system\python\lib\site-packages\pip\_internal\resolution\resolvelib\candidates.py”, line 297, in __init__
super().__init__(
File “C:\Users\TT\Downloads\sd.webui\system\python\lib\site-packages\pip\_internal\resolution\resolvelib\candidates.py”, line 162, in __init__
self.dist = self._prepare()
File “C:\Users\TT\Downloads\sd.webui\system\python\lib\site-packages\pip\_internal\resolution\resolvelib\candidates.py”, line 231, in _prepare
dist = self._prepare_distribution()
File “C:\Users\TT\Downloads\sd.webui\system\python\lib\site-packages\pip\_internal\resolution\resolvelib\candidates.py”, line 308, in _prepare_distribution
return preparer.prepare_linked_requirement(self._ireq, parallel_builds=True)
File “C:\Users\TT\Downloads\sd.webui\system\python\lib\site-packages\pip\_internal\operations\prepare.py”, line 491, in prepare_linked_requirement
return self._prepare_linked_requirement(req, parallel_builds)
File “C:\Users\TT\Downloads\sd.webui\system\python\lib\site-packages\pip\_internal\operations\prepare.py”, line 536, in _prepare_linked_requirement
local_file = unpack_url(
File “C:\Users\TT\Downloads\sd.webui\system\python\lib\site-packages\pip\_internal\operations\prepare.py”, line 166, in unpack_url
file = get_http_url(
File “C:\Users\TT\Downloads\sd.webui\system\python\lib\site-packages\pip\_internal\operations\prepare.py”, line 107, in get_http_url
from_path, content_type = download(link, temp_dir.path)
File “C:\Users\TT\Downloads\sd.webui\system\python\lib\site-packages\pip\_internal\network\download.py”, line 134, in __call__
resp = _http_get_download(self._session, link)
File “C:\Users\TT\Downloads\sd.webui\system\python\lib\site-packages\pip\_internal\network\download.py”, line 117, in _http_get_download
resp = session.get(target_url, headers=HEADERS, stream=True)
File “C:\Users\TT\Downloads\sd.webui\system\python\lib\site-packages\pip\_vendor\requests\sessions.py”, line 600, in get
return self.request(“GET”, url, **kwargs)
File “C:\Users\TT\Downloads\sd.webui\system\python\lib\site-packages\pip\_internal\network\session.py”, line 518, in request
return super().request(method, url, *args, **kwargs)
File “C:\Users\TT\Downloads\sd.webui\system\python\lib\site-packages\pip\_vendor\requests\sessions.py”, line 587, in request
resp = self.send(prep, **send_kwargs)
File “C:\Users\TT\Downloads\sd.webui\system\python\lib\site-packages\pip\_vendor\requests\sessions.py”, line 701, in send
r = adapter.send(request, **kwargs)
File “C:\Users\TT\Downloads\sd.webui\system\python\lib\site-packages\pip\_vendor\cachecontrol\adapter.py”, line 48, in send
cached_response = self.controller.cached_request(request)
File “C:\Users\TT\Downloads\sd.webui\system\python\lib\site-packages\pip\_vendor\cachecontrol\controller.py”, line 155, in cached_request
resp = self.serializer.loads(request, cache_data, body_file)
File “C:\Users\TT\Downloads\sd.webui\system\python\lib\site-packages\pip\_vendor\cachecontrol\serialize.py”, line 95, in loads
return getattr(self, “_loads_v{}”.format(ver))(request, data, body_file)
File “C:\Users\TT\Downloads\sd.webui\system\python\lib\site-packages\pip\_vendor\cachecontrol\serialize.py”, line 186, in _loads_v4
cached = msgpack.loads(data, raw=False)
File “C:\Users\TT\Downloads\sd.webui\system\python\lib\site-packages\pip\_vendor\msgpack\fallback.py”, line 125, in unpackb
ret = unpacker._unpack()
File “C:\Users\TT\Downloads\sd.webui\system\python\lib\site-packages\pip\_vendor\msgpack\fallback.py”, line 590, in _unpack
ret[key] = self._unpack(EX_CONSTRUCT)
File “C:\Users\TT\Downloads\sd.webui\system\python\lib\site-packages\pip\_vendor\msgpack\fallback.py”, line 590, in _unpack
ret[key] = self._unpack(EX_CONSTRUCT)
File “C:\Users\TT\Downloads\sd.webui\system\python\lib\site-packages\pip\_vendor\msgpack\fallback.py”, line 544, in _unpack
typ, n, obj = self._read_header()
File “C:\Users\TT\Downloads\sd.webui\system\python\lib\site-packages\pip\_vendor\msgpack\fallback.py”, line 486, in _read_header
obj = self._read(n)
File “C:\Users\TT\Downloads\sd.webui\system\python\lib\site-packages\pip\_vendor\msgpack\fallback.py”, line 403, in _read
ret = self._buffer[i : i + n]
MemoryError
WARNING: There was an error checking the latest version of pip.
Traceback (most recent call last):
File “C:\Users\TT\Downloads\sd.webui\webui\launch.py”, line 324, in
prepare_environment()
File “C:\Users\TT\Downloads\sd.webui\webui\launch.py”, line 233, in prepare_environment
run(f'”{python}” -m {torch_command}’, “Installing torch and torchvision”, “Couldn’t install torch”, live=True)
File “C:\Users\TT\Downloads\sd.webui\webui\launch.py”, line 58, in run
raise RuntimeError(f”””{errdesc or ‘Error running command’}.
RuntimeError: Couldn’t install torch.
Command: “C:\Users\TT\Downloads\sd.webui\system\python\python.exe” -m pip install torch==1.13.1+cu117 torchvision==0.14.1+cu117 –extra-index-url https://download.pytorch.org/whl/cu117
Error code: 2
Press any key to continue . . .
I think its a bug in pip. If you are comfortable using command prompt, open cmd and run
C:\Users\TT\Downloads\sd.webui\system\python\python.exe -m pip install --upgrade pip
and try run.bat again.
If you still have problem, you can always use A1111 with the Colab notebook in the Quick Start Guide.
Thanks for the response. I have 8 gb of ram, i5-7400 CPU, and gtx 1660 super.
Do I do anything with the file after unzipping it like putting it into the stable diffusion folder, or do I just click run.bat without doing anything else?
Hi Mike, you can put the unzipped folder anywhere you want. You can just double click run.bat
Thanks for the guide. I followed it step by step but I keep coming across the same error when I click “webui-user.bat”:
ERROR: Exception:
Traceback (most recent call last):
File “C:\Users\TT\Downloads\stable-diffusion-webui\venv\lib\site-packages\pip\_internal\cli\base_command.py”, line 167, in exc_logging_wrapper
status = run_func(*args)
File “C:\Users\TT\Downloads\stable-diffusion-webui\venv\lib\site-packages\pip\_internal\cli\req_command.py”, line 247, in wrapper
return func(self, options, args)
File “C:\Users\TT\Downloads\stable-diffusion-webui\venv\lib\site-packages\pip\_internal\commands\install.py”, line 369, in run
requirement_set = resolver.resolve(
File “C:\Users\TT\Downloads\stable-diffusion-webui\venv\lib\site-packages\pip\_internal\resolution\resolvelib\resolver.py”, line 92, in resolve
result = self._result = resolver.resolve(
File “C:\Users\TT\Downloads\stable-diffusion-webui\venv\lib\site-packages\pip\_vendor\resolvelib\resolvers.py”, line 481, in resolve
state = resolution.resolve(requirements, max_rounds=max_rounds)
File “C:\Users\TT\Downloads\stable-diffusion-webui\venv\lib\site-packages\pip\_vendor\resolvelib\resolvers.py”, line 348, in resolve
self._add_to_criteria(self.state.criteria, r, parent=None)
File “C:\Users\TT\Downloads\stable-diffusion-webui\venv\lib\site-packages\pip\_vendor\resolvelib\resolvers.py”, line 172, in _add_to_criteria
if not criterion.candidates:
File “C:\Users\TT\Downloads\stable-diffusion-webui\venv\lib\site-packages\pip\_vendor\resolvelib\structs.py”, line 151, in __bool__
return bool(self._sequence)
File “C:\Users\TT\Downloads\stable-diffusion-webui\venv\lib\site-packages\pip\_internal\resolution\resolvelib\found_candidates.py”, line 155, in __bool__
return any(self)
File “C:\Users\TT\Downloads\stable-diffusion-webui\venv\lib\site-packages\pip\_internal\resolution\resolvelib\found_candidates.py”, line 143, in
return (c for c in iterator if id(c) not in self._incompatible_ids)
File “C:\Users\TT\Downloads\stable-diffusion-webui\venv\lib\site-packages\pip\_internal\resolution\resolvelib\found_candidates.py”, line 47, in _iter_built
candidate = func()
File “C:\Users\TT\Downloads\stable-diffusion-webui\venv\lib\site-packages\pip\_internal\resolution\resolvelib\factory.py”, line 206, in _make_candidate_from_link
self._link_candidate_cache[link] = LinkCandidate(
File “C:\Users\TT\Downloads\stable-diffusion-webui\venv\lib\site-packages\pip\_internal\resolution\resolvelib\candidates.py”, line 297, in __init__
super().__init__(
File “C:\Users\TT\Downloads\stable-diffusion-webui\venv\lib\site-packages\pip\_internal\resolution\resolvelib\candidates.py”, line 162, in __init__
self.dist = self._prepare()
File “C:\Users\TT\Downloads\stable-diffusion-webui\venv\lib\site-packages\pip\_internal\resolution\resolvelib\candidates.py”, line 231, in _prepare
dist = self._prepare_distribution()
File “C:\Users\TT\Downloads\stable-diffusion-webui\venv\lib\site-packages\pip\_internal\resolution\resolvelib\candidates.py”, line 308, in _prepare_distribution
return preparer.prepare_linked_requirement(self._ireq, parallel_builds=True)
File “C:\Users\TT\Downloads\stable-diffusion-webui\venv\lib\site-packages\pip\_internal\operations\prepare.py”, line 438, in prepare_linked_requirement
return self._prepare_linked_requirement(req, parallel_builds)
File “C:\Users\TT\Downloads\stable-diffusion-webui\venv\lib\site-packages\pip\_internal\operations\prepare.py”, line 483, in _prepare_linked_requirement
local_file = unpack_url(
File “C:\Users\TT\Downloads\stable-diffusion-webui\venv\lib\site-packages\pip\_internal\operations\prepare.py”, line 165, in unpack_url
file = get_http_url(
File “C:\Users\TT\Downloads\stable-diffusion-webui\venv\lib\site-packages\pip\_internal\operations\prepare.py”, line 106, in get_http_url
from_path, content_type = download(link, temp_dir.path)
File “C:\Users\TT\Downloads\stable-diffusion-webui\venv\lib\site-packages\pip\_internal\network\download.py”, line 134, in __call__
resp = _http_get_download(self._session, link)
File “C:\Users\TT\Downloads\stable-diffusion-webui\venv\lib\site-packages\pip\_internal\network\download.py”, line 117, in _http_get_download
resp = session.get(target_url, headers=HEADERS, stream=True)
File “C:\Users\TT\Downloads\stable-diffusion-webui\venv\lib\site-packages\pip\_vendor\requests\sessions.py”, line 600, in get
return self.request(“GET”, url, **kwargs)
File “C:\Users\TT\Downloads\stable-diffusion-webui\venv\lib\site-packages\pip\_internal\network\session.py”, line 518, in request
return super().request(method, url, *args, **kwargs)
File “C:\Users\TT\Downloads\stable-diffusion-webui\venv\lib\site-packages\pip\_vendor\requests\sessions.py”, line 587, in request
resp = self.send(prep, **send_kwargs)
File “C:\Users\TT\Downloads\stable-diffusion-webui\venv\lib\site-packages\pip\_vendor\requests\sessions.py”, line 701, in send
r = adapter.send(request, **kwargs)
File “C:\Users\TT\Downloads\stable-diffusion-webui\venv\lib\site-packages\pip\_vendor\cachecontrol\adapter.py”, line 48, in send
cached_response = self.controller.cached_request(request)
File “C:\Users\TT\Downloads\stable-diffusion-webui\venv\lib\site-packages\pip\_vendor\cachecontrol\controller.py”, line 155, in cached_request
resp = self.serializer.loads(request, cache_data, body_file)
File “C:\Users\TT\Downloads\stable-diffusion-webui\venv\lib\site-packages\pip\_vendor\cachecontrol\serialize.py”, line 95, in loads
return getattr(self, “_loads_v{}”.format(ver))(request, data, body_file)
File “C:\Users\TT\Downloads\stable-diffusion-webui\venv\lib\site-packages\pip\_vendor\cachecontrol\serialize.py”, line 186, in _loads_v4
cached = msgpack.loads(data, raw=False)
File “C:\Users\TT\Downloads\stable-diffusion-webui\venv\lib\site-packages\pip\_vendor\msgpack\fallback.py”, line 123, in unpackb
unpacker.feed(packed)
File “C:\Users\TT\Downloads\stable-diffusion-webui\venv\lib\site-packages\pip\_vendor\msgpack\fallback.py”, line 381, in feed
self._buffer.extend(view)
MemoryError
[notice] A new release of pip available: 22.2.1 -> 22.3.1
[notice] To update, run: C:\Users\TT\Downloads\stable-diffusion-webui\venv\Scripts\python.exe -m pip install –upgrade pip
Traceback (most recent call last):
File “C:\Users\TT\Downloads\stable-diffusion-webui\launch.py”, line 324, in
prepare_environment()
File “C:\Users\TT\Downloads\stable-diffusion-webui\launch.py”, line 233, in prepare_environment
run(f'”{python}” -m {torch_command}’, “Installing torch and torchvision”, “Couldn’t install torch”, live=True)
File “C:\Users\TT\Downloads\stable-diffusion-webui\launch.py”, line 58, in run
raise RuntimeError(f”””{errdesc or ‘Error running command’}.
RuntimeError: Couldn’t install torch.
Command: “C:\Users\TT\Downloads\stable-diffusion-webui\venv\Scripts\python.exe” -m pip install torch==1.13.1+cu117 torchvision==0.14.1+cu117 –extra-index-url https://download.pytorch.org/whl/cu117
Error code: 2
Press any key to continue . . .
Yours seems to be an error in pip. It’s out of memory for some reason. How much RAM is there on your PC?
I haven’t tested it yet, but you can try downloading the zip file to see if that works for you.
https://github.com/AUTOMATIC1111/stable-diffusion-webui/releases/tag/v1.0.0-pre
It is supposed to work after unzip and run run.bat
I have tried several times to get this install working but xformers module persists not being found, I have tried solutions like adding –xformers or the force install command to the arg to no effect, I am running windows 10 LTSC 2021 and have the other 1 click install Stable Diffusion working fine.
Creating venv in directory E:\stable-diffusion-webui\venv using python “E:\stable-diffusion-ui\profile\AppData\Local\Programs\Python\Python310\python.exe”
venv “E:\stable-diffusion-webui\venv\Scripts\Python.exe”
Python 3.10.6 (tags/v3.10.6:9c7b4bd, Aug 1 2022, 21:53:49) [MSC v.1932 64 bit (AMD64)]
Commit hash:
Installing torch and torchvision
Installing gfpgan
Installing clip
Installing open_clip
Cloning Stable Diffusion into repositories\stable-diffusion-stability-ai…
Cloning Taming Transformers into repositories\taming-transformers…
Cloning K-diffusion into repositories\k-diffusion…
Cloning CodeFormer into repositories\CodeFormer…
Cloning BLIP into repositories\BLIP…
Installing requirements for CodeFormer
Installing requirements for Web UI
Launching Web UI with arguments:
No module ‘xformers’. Proceeding without it.
LatentDiffusion: Running in eps-prediction mode
DiffusionWrapper has 859.52 M params.
Calculating sha256 for E:\stable-diffusion-webui\models\Stable-diffusion\sd-v1-5.ckpt: e1441589a6f3c5a53f5f54d0975a18a7feb7cdf0b0dee276dfc3331ae376a053
Loading weights [e1441589a6] from E:\stable-diffusion-webui\models\Stable-diffusion\sd-v1-5.ckpt
Applying cross attention optimization (Doggettx).
Textual inversion embeddings loaded(0):
Model loaded in 9.6s (0.3s create model, 8.2s load weights).
Checkpoint sd-v1-5.ckpt [e1441589a6] not found; loading fallback sd-v1-5.ckpt [e1441589a6]
Running on local URL: http://127.0.0.1:7860
To create a public link, set `share=True` in `launch()`.
The xformers warning message displays whenever you don’t use xformers.
I don’t see your command line arguments, but you should be running webui-user.bat with argument –xformers to enable xformers. You should be able to verify you are really using it from the standard output. E.g., mine looks like
Python 3.10.7 (tags/v3.10.7:6cc6b13, Sep 5 2022, 14:08:36) [MSC v.1933 64 bit (AMD64)]
Commit hash: 5265918b4620b2049dfab53a0d43db3f0d4bfc0d
Installing requirements for Web UI
Launching Web UI with arguments: –listen –xformers –gradio-img2img-tool color-sketch –medvram
LatentDiffusion: Running in eps-prediction mode
DiffusionWrapper has 859.52 M params.
ok, so now i got here. i do have an nvida gpu
venv “C:\Users\щщ\stable-diffusion-webui\venv\Scripts\Python.exe”
Python 3.10.6 (tags/v3.10.6:9c7b4bd, Aug 1 2022, 21:53:49) [MSC v.1932 64 bit (AMD64)]
Commit hash: b165e341e70300f66c8a77b9383041f4147b24a8
Traceback (most recent call last):
File “C:\Users\щщ\stable-diffusion-webui\launch.py”, line 316, in
prepare_environment()
File “C:\Users\щщ\stable-diffusion-webui\launch.py”, line 228, in prepare_environment
run_python(“import torch; assert torch.cuda.is_available(), ‘Torch is not able to use GPU; add –skip-torch-cuda-test to COMMANDLINE_ARGS variable to disable this check'”)
File “C:\Users\щщ\stable-diffusion-webui\launch.py”, line 89, in run_python
return run(f'”{python}” -c “{code}”‘, desc, errdesc)
File “C:\Users\щщ\stable-diffusion-webui\launch.py”, line 65, in run
raise RuntimeError(message)
RuntimeError: Error running command.
Command: “C:\Users\щщ\stable-diffusion-webui\venv\Scripts\python.exe” -c “import torch; assert torch.cuda.is_available(), ‘Torch is not able to use GPU; add –skip-torch-cuda-test to COMMANDLINE_ARGS variable to disable this check'”
Error code: 1
stdout:
stderr: C:\Users\\stable-diffusion-webui\venv\lib\site-packages\torch\cuda\__init__.py:83: UserWarning: CUDA initialization: CUDA driver initialization failed, you might not have a CUDA gpu. (Triggered internally at ..\c10\cuda\CUDAFunctions.cpp:109.)
return torch._C._cuda_getDeviceCount() > 0
Traceback (most recent call last):
File “”, line 1, in
AssertionError: Torch is not able to use GPU; add –skip-torch-cuda-test to COMMANDLINE_ARGS variable to disable this check
If you have an nvidia GPU, it could be that had cpu version of pytorch installed previously. You can try uninstalling ALL pythons from your systems, delete the webui folder and restart the install process.
hi. what i actually did is downloaded phyton after getting other steps done cause i thought i should have had it already. maybe this affects
Creating venv in directory C:\Users\щщ\stable-diffusion-webui\venv using python “C:\Users\∙∙\AppData\Local\Programs\Python\Python310\python.exe”
Unable to create venv in directory “C:\Users\щщ\stable-diffusion-webui\venv”
exit code: 3
stderr:
The error message didn’t say what’s wrong. You can delete the webui folder and start from the git clone she.
this does not work for amd cards, couldve said that at the beginning of the guide…
My apologies. Will add.
what do i do
venv “C:\Users\meanm\stable-diffusion-webui\venv\Scripts\Python.exe”
Python 3.10.9 (tags/v3.10.9:1dd9be6, Dec 6 2022, 20:01:21) [MSC v.1934 64 bit (AMD64)]
Commit hash: ff6a5bcec1ce25aa8f08b157ea957d764be23d8d
Installing torch and torchvision
Traceback (most recent call last):
File “C:\Users\meanm\stable-diffusion-webui\launch.py”, line 307, in
prepare_environment()
File “C:\Users\meanm\stable-diffusion-webui\launch.py”, line 218, in prepare_environment
run(f'”{python}” -m {torch_command}’, “Installing torch and torchvision”, “Couldn’t install torch”)
File “C:\Users\meanm\stable-diffusion-webui\launch.py”, line 64, in run
raise RuntimeError(message)
RuntimeError: Couldn’t install torch.
Command: “C:\Users\meanm\stable-diffusion-webui\venv\Scripts\python.exe” -m pip install torch==1.12.1+cu113 torchvision==0.13.1+cu113 –extra-index-url https://download.pytorch.org/whl/cu113
Error code: 1
stdout:
stderr: C:\Users\meanm\stable-diffusion-webui\venv\Scripts\python.exe: No module named pip
Try
C:\Users\meanm\stable-diffusion-webui\venv\Scripts\python.exe -m ensurepip –upgrade
it said it cant run on my pc does this only work on nvidia gpu, i have a cpu integrated gpu
Yes you will need a discrete graphic card for this. You can always use Google Colab. There’s a Colab notebook available in the Quick Start Guide.
https://andrewongai.gumroad.com/l/stable_diffusion_quick_start
What do i do
venv “C:\Users\pc\stable-diffusion-webui\venv\Scripts\Python.exe”
Python 3.10.6 (tags/v3.10.6:9c7b4bd, Aug 1 2022, 21:53:49) [MSC v.1932 64 bit (AMD64)]
Commit hash: 82725f0ac439f7e3b67858d55900e95330bbd326
Traceback (most recent call last):
File “C:\Users\pc\stable-diffusion-webui\launch.py”, line 307, in
prepare_environment()
File “C:\Users\pc\stable-diffusion-webui\launch.py”, line 221, in prepare_environment
run_python(“import torch; assert torch.cuda.is_available(), ‘Torch is not able to use GPU; add –skip-torch-cuda-test to COMMANDLINE_ARGS variable to disable this check'”)
File “C:\Users\pc\stable-diffusion-webui\launch.py”, line 88, in run_python
return run(f'”{python}” -c “{code}”‘, desc, errdesc)
File “C:\Users\pc\stable-diffusion-webui\launch.py”, line 64, in run
raise RuntimeError(message)
RuntimeError: Error running command.
Command: “C:\Users\pc\stable-diffusion-webui\venv\Scripts\python.exe” -c “import torch; assert torch.cuda.is_available(), ‘Torch is not able to use GPU; add –skip-torch-cuda-test to COMMANDLINE_ARGS variable to disable this check'”
Error code: 1
stdout:
stderr: Traceback (most recent call last):
File “”, line 1, in
AssertionError: Torch is not able to use GPU; add –skip-torch-cuda-test to COMMANDLINE_ARGS variable to disable this check
Do you have a nvdia GPU?
Thank you, Andrew, running it on python 3.10 indeed solved my issue (had to adapt venv.cfg to stop looking for 3.11, and then all was wonderful). Thanks for the guide and the help!
Have installed the latest python version, now it seems torch won’t install, saying
Could not find a version that satisfies the requirement torch==1.12.1+cu113 (from versions: none)
ERROR: No matching distribution found for torch==1.12.1+cu113
The web suggests downgrading python to an old version for which there is no more installer. Or is 1.12.1 no longer the right version of torch?
Don’t use the latest python. Follow the python section in the guide and use 3.10
Thanks for the excellent guide. It worked perfectly and I was able to launch Automatic1111. Then I closed everything to add the –xformer line you mentioned. Now I get a wall of error messages when it tries to launch (see below). I removed the –xformer line and it still comes up with the error.
Any suggestions?
Error messages:
File “C:\Users\xxxx\Documents\A1111 Web UI Autoinstaller\stable-diffusion-webui\launch.py”, line 307, in start()
File “C:\Users\xxxx\Documents\A1111 Web UI Autoinstaller\stable-diffusion-webui\launch.py”, line 298, in start import webui
File “C:\Users\xxxx\Documents\A1111 Web UI Autoinstaller\stable-diffusion-webui\webui.py”, line 13, in from modules.call_queue import wrap_queued_call, queue_lock, wrap_gradio_gpu_call
File “C:\Users\xxxxx\Documents\A1111 Web UI Autoinstaller\stable-diffusion-webui\modules\call_queue.py”, line 7, in from modules import shared
File “C:\Users\xxxx\Documents\A1111 Web UI Autoinstaller\stable-diffusion-webui\modules\shared.py”, line 243, in prompt_styles = modules.styles.StyleDatabase(styles_filename)
File “C:\Users\xxxx\Documents\A1111 Web UI Autoinstaller\stable-diffusion-webui\modules\styles.py”, line 50, in __init__ for row in reader:
File “C:\Users\xxxx\AppData\Local\Programs\Python\Python310\lib\csv.py”, line 110, in __next__ self.fieldnames
File “C:\Users\xxxx\AppData\Local\Programs\Python\Python310\lib\csv.py”, line 97, in fieldnames self._fieldnames = next(self.reader)
File “C:\Users\xxxx\AppData\Local\Programs\Python\Python310\lib\codecs.py”, line 322, in decode(result, consumed) = self._buffer_decode(data, self.errors, final)
File “C:\Users\xxxx\AppData\Local\Programs\Python\Python310\lib\encodings\utf_8_sig.py”, line 69, in _buffer_decode return codecs.utf_8_decode(input, errors, final)
UnicodeDecodeError: ‘utf-8’ codec can’t decode byte 0x92 in position 2067: invalid start byte
The error doesn’t seem to be be related to the –xformers argument. I think the csv file that stores keywords related to artists names is corrupted. If you are familiar with git, you can run the following command under the stable-diffusion-webui directory
git checkout -f
If not, you can delete the webui folder and start over.
Thanks … that seems to have worked.
I never would have figured that out 🙂
When I double click on webui-user.bat it returns me this error. I tried running this several times:
Python 3.11.1 (tags/v3.11.1:a7a450f, Dec 6 2022, 19:58:39) [MSC v.1934 64 bit (AMD64)]
Commit hash: 874b975bf8438b2b5ee6d8540d63b2e2da6b8dbd
Installing torch and torchvision
Traceback (most recent call last):
File “C:\Users\USERNAME\stable-diffusion-webui\launch.py”, line 306, in
prepare_environment()
File “C:\Users\USERNAME\stable-diffusion-webui\launch.py”, line 218, in prepare_environment
run(f'”{python}” -m {torch_command}’, “Installing torch and torchvision”, “Couldn’t install torch”)
File “C:\Users\USERNAME\stable-diffusion-webui\launch.py”, line 64, in run
raise RuntimeError(message)
RuntimeError: Couldn’t install torch.
Command: “C:\Users\USERNAME\stable-diffusion-webui\venv\Scripts\python.exe” -m pip install torch==1.12.1+cu113 torchvision==0.13.1+cu113 –extra-index-url https://download.pytorch.org/whl/cu113
Error code: 1
stdout: Looking in indexes: https://pypi.org/simple, https://download.pytorch.org/whl/cu113
stderr: ERROR: Could not find a version that satisfies the requirement torch==1.12.1+cu113 (from versions: none)
ERROR: No matching distribution found for torch==1.12.1+cu113
Hi Jason, you are using Python 3.11. You need 3.10. You will need to uninstall 3.11 and any other versions. And then install 3.10.
when I double click on webui-user.bat it returns me this error:
Remainder of file ignored
Traceback (most recent call last):
File “C:\Users\user_name\anaconda3\lib\runpy.py”, line 15, in
import importlib.util
File “C:\Users\user_name\anaconda3\lib\importlib\util.py”, line 2, in
from . import abc
ImportError: cannot import name ‘abc’ from ‘importlib’ (C:\Users\emret\anaconda3\lib\importlib\__init__.py)
Launch unsuccessful. Exiting.
There was a problem with AUTOMATIC1111’s repository on github. Try again to see if it works.
my cmd says: ‘git’ is not recognized as an internal or external command, operable program or batch file
Have you installed git? You may need to restart cmd after.