
Stable Diffusion is a text-to-image AI that can be run on personal computers like Mac M1, M2, M3, or M4. In this article, you will find a step-by-step guide for installing and running Stable Diffusion on Mac.
Here are the installation options I will go through in this article.
- AUTOMATIC1111 – Best features but a bit harder to install.
- Draw Things – Easiest to install with a good set of features.
- Diffusers – Easiest to install, but with not many features.
- DiffusionBee – Easy to install but with a smaller set of functions.
Alternatively, run Stable Diffusion on Google Colab using AUTOMATIC1111 Stable Diffusion WebUI. Check the Quick Start Guide for details.
Read this install guide to install Stable Diffusion on a Windows PC.
Think Diffusion offers fully managed AUTOMATIC1111 online without setup. They offer our readers an extra 20% credit. (Affiliated link — a earn a small commission.)
Table of Contents
Hardware requirements
For reasonable speed, you will need a Mac with Apple Silicon (M1 or M2).
Recommended CPUs are: M1, M1 pro, M1 max, M2, M2 pro and M2 max. In addition to the efficient cores, the performance cores are important for Stable Diffusion’s performance.
The computer’s form factor doesn’t really matter. It can be a Macbook Air, Macbook Pro, Mac Mini, iMac, Mac Studio, or Mac Pro.
Ideally, your machine will have 16 GB of memory or more.
Stable Diffusion, like many AI models, runs slower on Mac. A similarly priced Windows PC with a dedicated GPU will deliver an image faster.
Draw Things App
Install Instructions
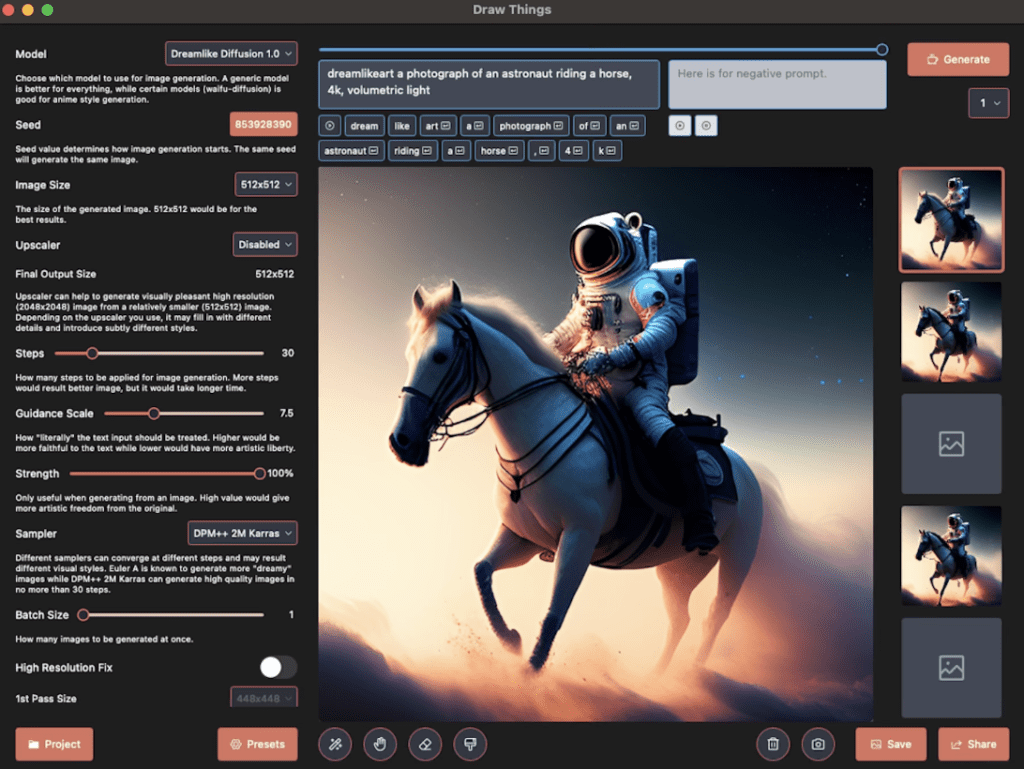
Draw Things is an Apple App that can be installed on iPhones, iPad, and Macs. Installing it is no different from installing any other App.
It supports a pretty extensive list of models out of the box and a reasonable set of customizations you can make. It also supports inpainting.
Pros and Cons of Draw Things App
Pros
- Easy to install
- A good set of features
Cons
- Features are not as extensive as AUTOMATIC1111
Diffusers App
Install Instructions
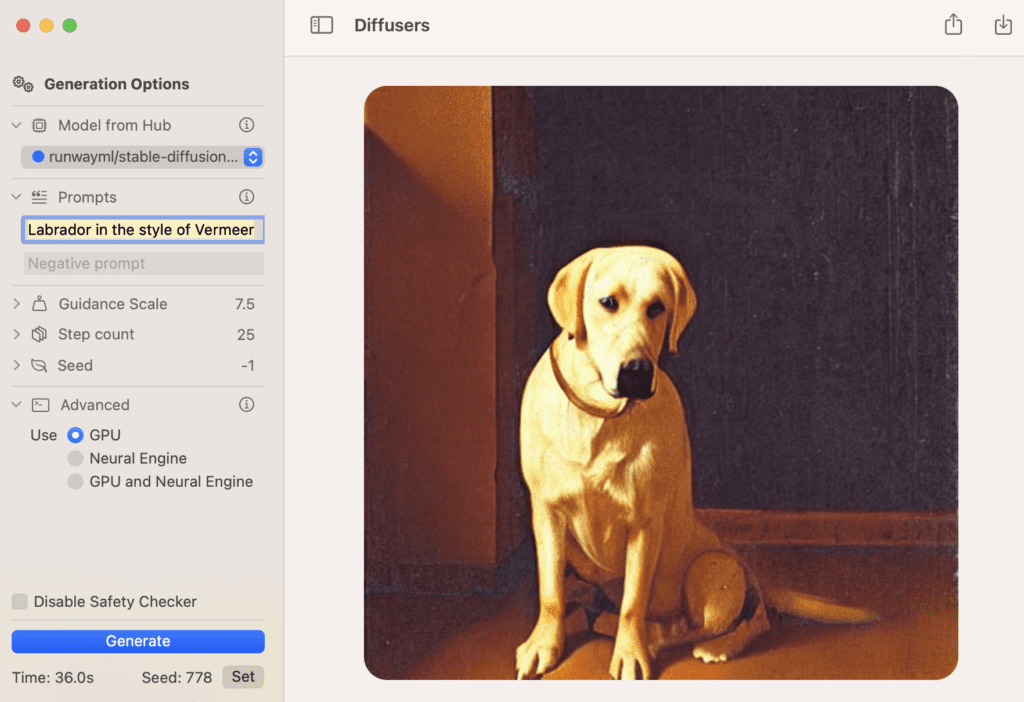
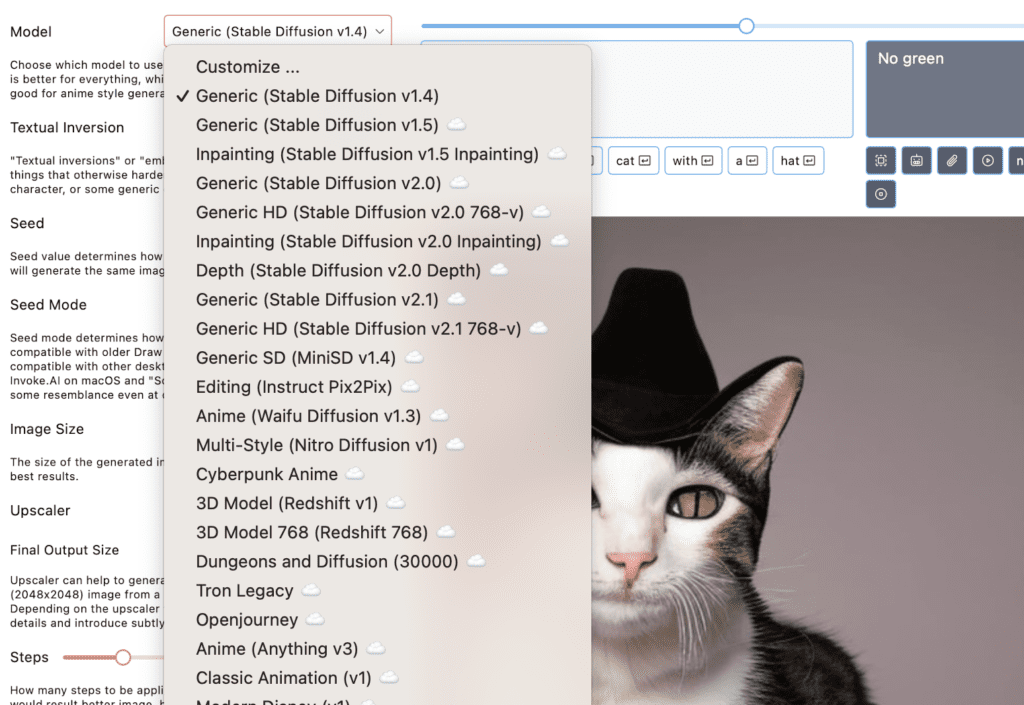
Diffusers is a Mac app made by Hugging Face, the place where many Stable Diffusion models are hosted. You can install the app using the link below.
Customizations and available models are pretty limited.
Pros and Cons of Diffusers App
Pros:
- Easy to install.
Cons:
- Very limited models and features.
DiffusionBee
In this section, you will learn how to install and run DiffusionBee on Mac step-by-step.
Install DiffusionBee on Mac
DiffusionBee is one of the easiest ways to run Stable Diffusion on Mac. Its installation process is no different from any other app.
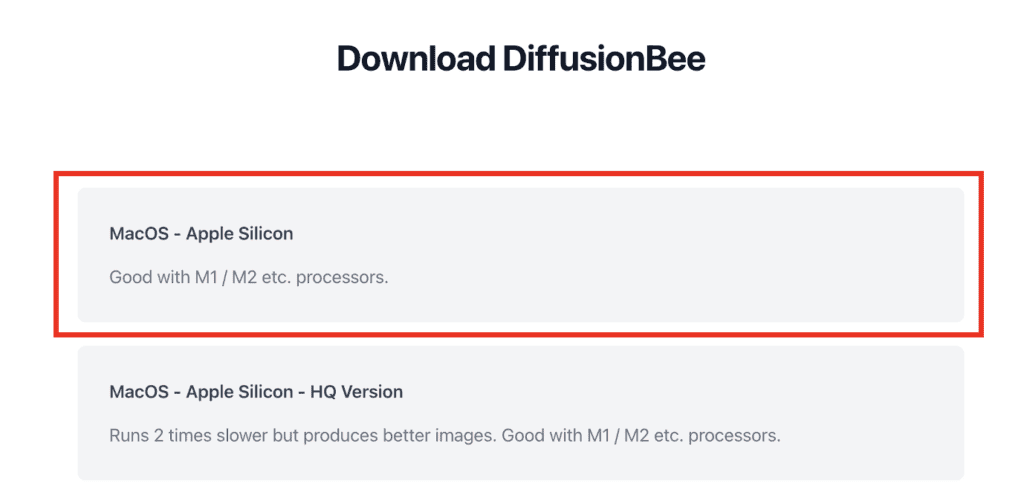
Step 1: Go to DiffusionBee’s download page and download the installer for MacOS – Apple Silicon. A dmg file should be downloaded.
Step 2: Double-click to run the downloaded dmg file in Finder. The following windows will show up.
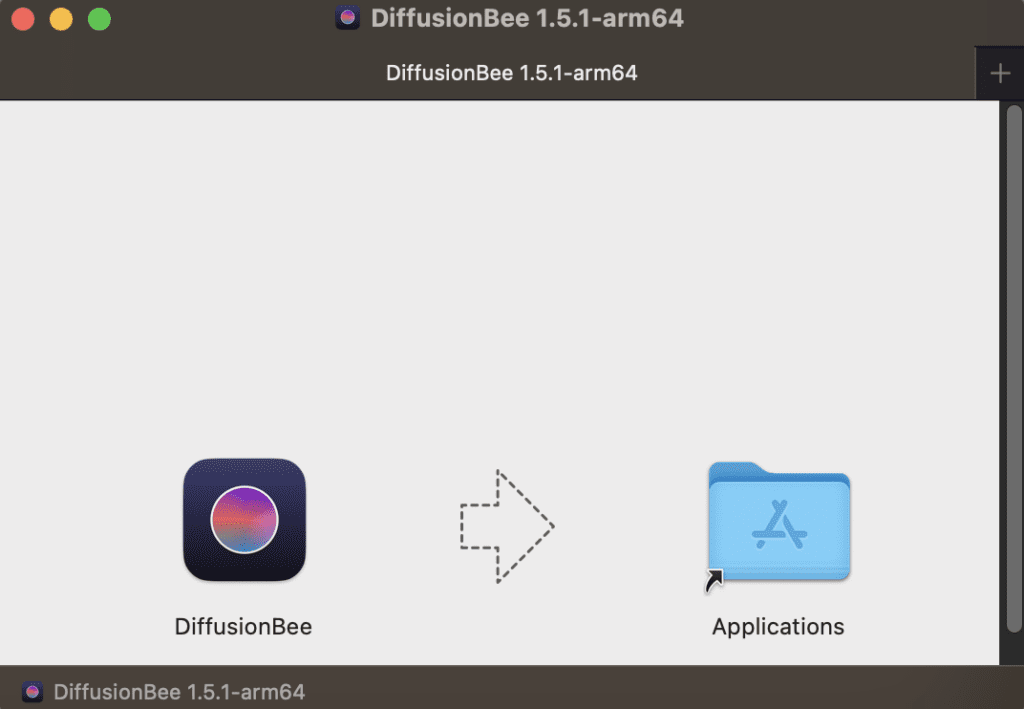
Step 3: Drag the DiffusionBee icon on the left to the Applications folder on the right. Installation is now complete!
Run DiffusionBee on Mac
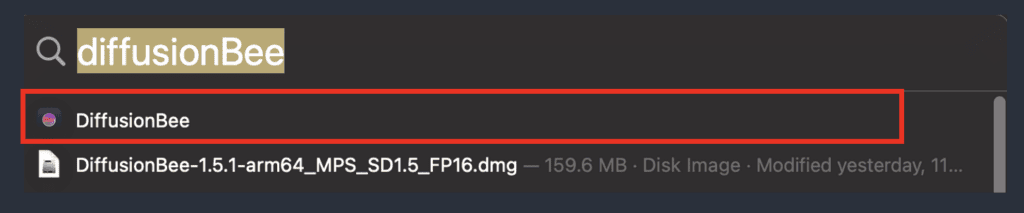
You can use the spotlight search bar to start StableBee. Press command + spacebar to bring up spotlight search. Type “DiffusionBee” and press return to start DiffusionBee.
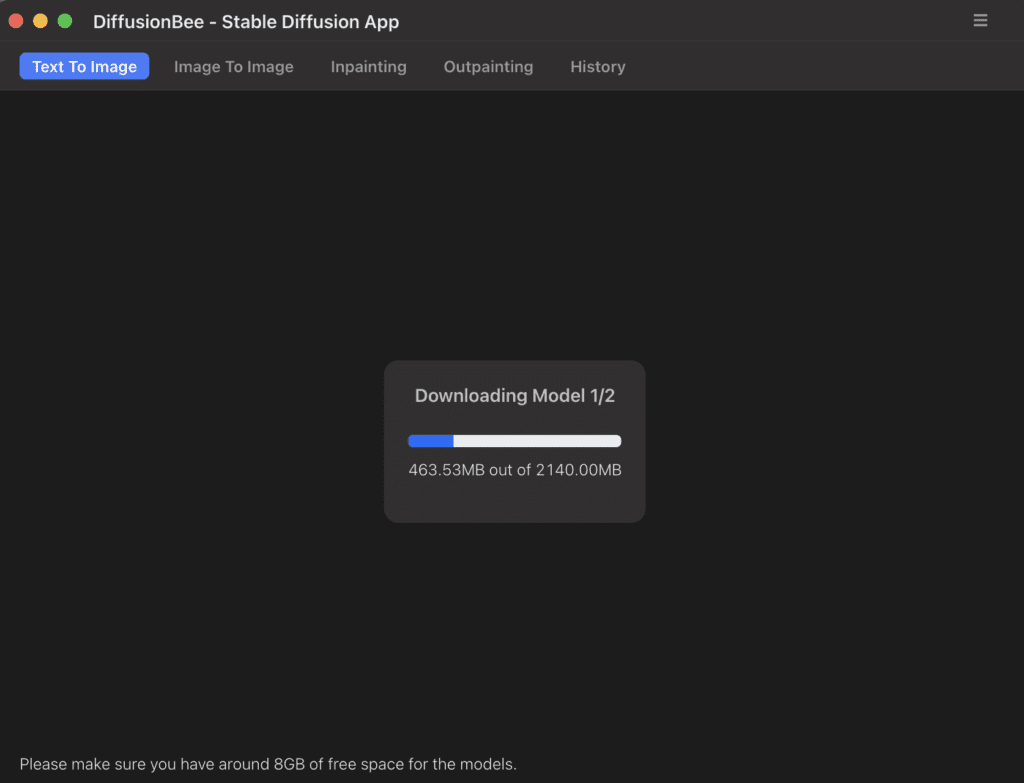
It will download some models when it starts for the very first time.
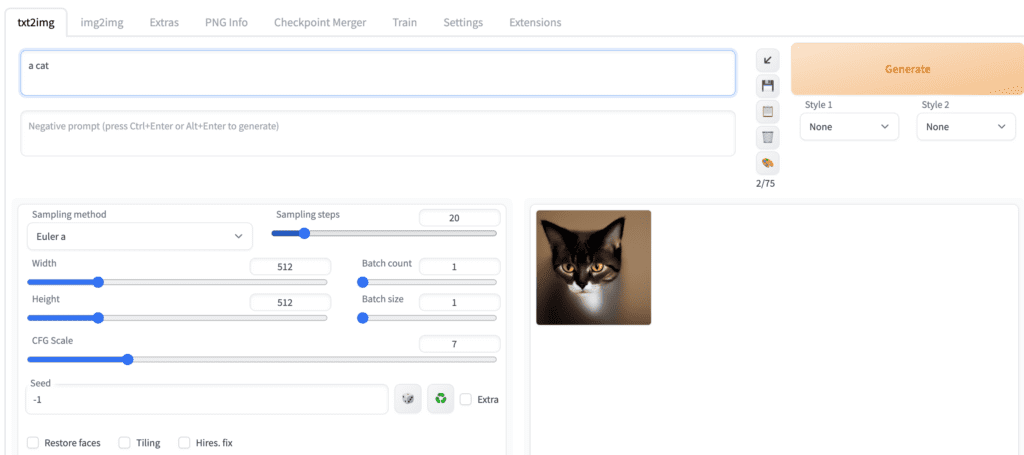
After it is done, you can start using Stable Diffusion! Let’s try putting the prompt “a cat” in the prompt box and hit Generate.
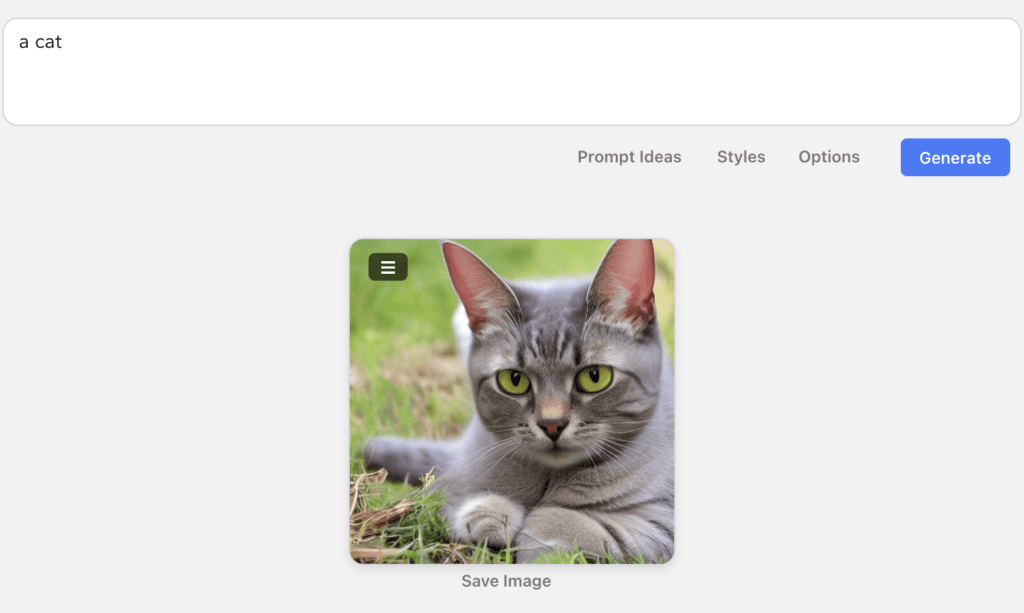
Works pretty well! You can click the option button to customize your images such as image size and CFG scale.
Go to the Next Step section to see what to do next.
Pros and Cons of DiffusionBee
Pros
- Installation is relatively easy
Cons
- Features are a bit lacking.
AUTOMATIC1111
This section shows you how to install and run AUTOMATIC1111 on Mac step-by-step.
DiffusionBee is easy to install, but the functionality is pretty limited. If you are (or aspire to be) an advanced user, you will want to use an advanced GUI like AUTOMATIC1111. You will need this GUI if you want to follow my tutorials.
System requirement
You should have an Apple Silicon M1 or M2, with at least 8GB RAM.
Your MacOS version should be at least 12.3. Click the Apple icon on the top left and click About this Mac. Update your MacOS before if necessary.
Install AUTOMATIC1111 on Mac
Step 1: Install Homebrew
Install Homebrew, a package manager for Mac, if you haven’t already. Open the Terminal app, type the following command, and press return.
/bin/bash -c "$(curl -fsSL https://raw.githubusercontent.com/Homebrew/install/HEAD/install.sh)"If this is the first time you install brew, it should show the NEXT STEPS to add brew to the path. Something like this: (Yours may be different)
==> Next steps:
- Add Homebrew to your PATH in /Users/$USER/.zprofile:
    echo 'eval $(/opt/homebrew/bin/brew shellenv)' >> /Users/$USER/.zprofile
    eval $(/opt/homebrew/bin/brew shellenv)
These are TWO additional commands you need to run.
echo 'eval $(/opt/homebrew/bin/brew shellenv)' >> /Users/$USER/.zprofileeval $(/opt/homebrew/bin/brew shellenv)After running them you should be able to use brew in the terminal. Test by typing “brew” and press enter. It should show you an usage example.
Step 2: Install the required packages
Install a few required packages. Open a new terminal and run the following command
brew install [email protected] git wgetStep 3: Clone the webui repository
Clone the AUTOMATIC1111 repository by running the following command in the terminal
git clone https://github.com/AUTOMATIC1111/stable-diffusion-webuiA new folder stable-diffusion-webui should be created under your home directory.
Step 4: Switch to dev branch
Update Jan 2026: The current master branch stops working. You need to use the dev branch.
In the terminal, switch to the installation directory.
cd ~/stable-diffusion-webuiRun the following command to switch to the dev branch.
git checkout devRun AUTOMATIC1111 on Mac
Follow the steps in this section to start AUTOMATIC1111 GUI for Stable Diffusion.
In the terminal, run the following command.
./webui.shIt will take a while to run it for the first time because it will install a bunch of stuff and download a checkpoint model.
When it is done, you should see a message “Running on local URL…”. This is the URL to access AUTOMATIC1111.
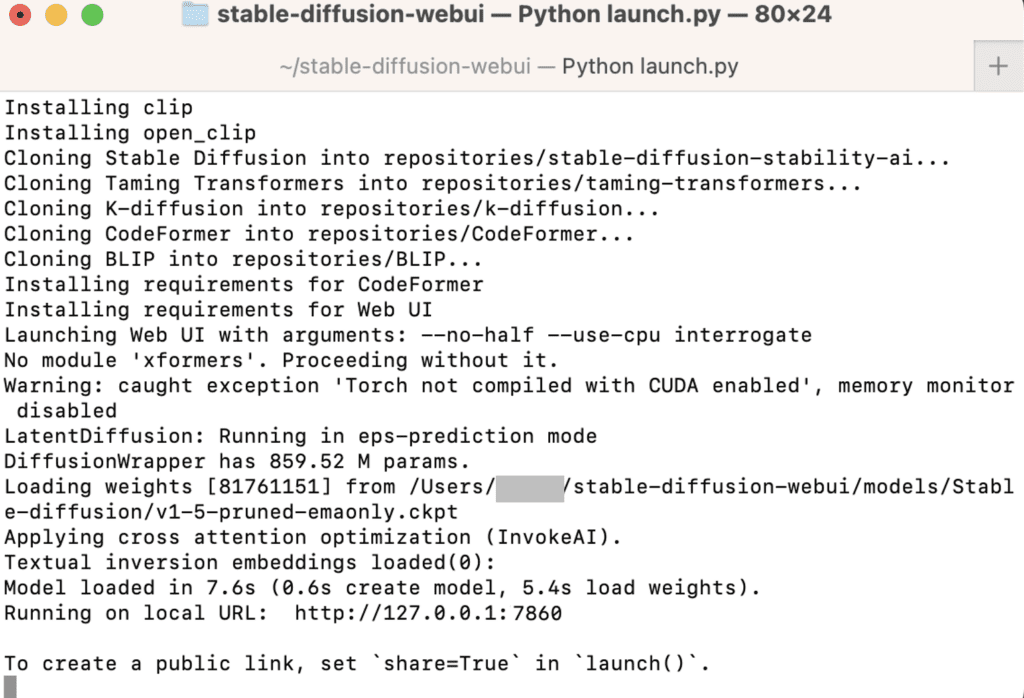
The WebUI page should be opened automatically. If not, open a web browser and click the following URL to start Stable Diffusion.
http://127.0.0.1:7860/You should see the AUTOMATIC1111 GUI. Put in a prompt “a cat” and press Generate to test using the GUI.
Close the terminal when you are done. Follow the steps in this section the next time when you want to run Stable Diffusion.
Updating AUTOMATIC1111 Web-UI
Your AUTOMATIC1111 won’t be automatically updated. You will miss new features if you don’t upgrade it periodically. However, there’s always a risk of breaking things every time you update.
To update AUTOMATIC1111, first open the Terminal App.
Go into the AUTOMATIC1111 Web-UI’s folder.
cd ~/stable-diffusion-webuiLastly, update the software by pulling the latest codes.
git pullRun AUTOMATIC1111 to see if it’s working properly. If you experience issues, delete the venv folder inside the stable-diffusion-webui folder and restart again.
Pros and Cons of AUTOMATIC1111
Pros
- Best features among all apps
Cons
- Difficult to install if you are not tech-savvy.
Frequently Asked Questions
Does AUTOMATIC1111 on Mac support SDXL?
Yes! You will need to update your AUTOMATIC1111 if you have not done it recently. Just do a git pull. See the SDXL tutorial for downloading the model.
I got the error “urllib.error.URLError: <urlopen error [SSL: CERTIFICATE_VERIFY_FAILED] certificate verify failed: unable to get local issuer certificate (_ssl.c:997)>” when generating images
Press Command+Space to bring up Spotlight search.
Search for
Install Certificates.command
Open and run it. If will tell you which Python version you ran. Make sure you have run Python 3.10.
I got “RuntimeError: Cannot add middleware after an application has started”
If you get the following error:
File “/Users/XXXXX/stable-diffusion-webui/venv/lib/python3.10/site-packages/starlette/applications.py”, line 139, in add_middleware
raise RuntimeError(“Cannot add middleware after an application has started”)
RuntimeError: Cannot add middleware after an application has started
This is caused by an outdated fastapi package. Run the following command in the webui folder.
./venv/bin/python -m pip install --upgrade fastapi==0.90.1I got RuntimeError: “LayerNormKernelImpl” not implemented for ‘Half’
Start the webUI with the following command.
./webui.sh --precision full --no-halfWhen running v2-1_768-ema-pruned.ckpt model, the I got the error: “modules.devices.NansException: A tensor with all NaNs was produced in Unet. This could be either because there’s not enough precision to represent the picture, or because your video card does not support half type. Try setting the “Upcast cross attention layer to float32″ option in Settings > Stable Diffusion or using the –no-half commandline argument to fix this. Use –disable-nan-check commandline argument to disable this check.”
Start webUI with the following command to remove this error.
./webui.sh --no-halfHowever, as of July 2023, the v2.1 768 model does not produce sensible images.
I encountered the error “zsh: command not found: brew”.
You need to add brew to path. Follow the NEXT STEPS displayed after installing brew. Related discussion.
Next Steps
Now you can run Stable Diffusion; below are some suggestions on what to learn next.
- Check out how to build good prompts.
- Check out this article to learn what the parameters in GUI mean.
- Download some new models and have fun!
Followed the instructions and it all worked perfectly. The one problem I am finding is the text to image results are atrocious. I have copied prompt from other images, tried writing my own using the Prompt Guide in this series, nothing seems to generate an image anywhere near what it should. Any ideas??
I’ve been running SD on my M1 Mac using A1111 and webui for several months and suddenly adetailer doesn’t work any more. I click the check box but no check mark appears and the images I create are clearly not using adetailer. Any suggestions?
Hello! I followed the instructions to install AUTOMATIC1111 on a Mac M1.
I first find an issue that some other guy reported: the generate button give me an error Connection errored out, then I press interrupt, was, then it work. But as soon as I closed the terminal if I try to go to http://127.0.0.1:7860/ in the browser it failed. Nothing opened. Is that solid solution for that? Also can I follow the courses by using Draw Things? I asked because this annoying kind of stuff that reminds me at the time I used “Windows” when before focusing on what I need to do I had to fix a billion of bugs… well I really don’t miss that frustration. thank you very much
Update on my Error connection time out. I have found that when I get the error, if I click on Interrupt and wait for the Generate button to come back, it will work. Next image I try to create the same error returns. Hit interrupt, wait for Generate button, and it works.
So I can get it to work every other time. That’s strange.
I have a good amount of expertise with UNIX and Mac OS. I followed the Mac instructions to the letter and I am getting Error:Connection timed out. I have a Mac with an M3 processor and 16 gB of RAM. I have a fast and stable cable internet connection. Any ideas would be appreciated.
Hi Andrew,
I am trying to install AUTOMATIC1111 on Mac (M3 chip, 18gb ram), but at the last step when I run “./webui.sh” command at “Installing clip proccess” I receive the following error. Any help is appreciated:
Installing clip
Traceback (most recent call last):
File “/Users/***/stable-diffusion-webui/launch.py”, line 53, in
main()
File “/Users/***/stable-diffusion-webui/launch.py”, line 44, in main
prepare_environment()
File “/Users/***/stable-diffusion-webui/modules/launch_utils.py”, line 426, in prepare_environment
run_pip(f”install {clip_package}”, “clip”)
File “/Users/***/stable-diffusion-webui/modules/launch_utils.py”, line 142, in run_pip
return run(f'”{python}” -m pip {command} –prefer-binary{index_url_line}’, desc=f”Installing {desc}”, errdesc=f”Couldn’t install {desc}”, live=live)
File “/Users/***/stable-diffusion-webui/modules/launch_utils.py”, line 114, in run
raise RuntimeError(“\n”.join(error_bits))
RuntimeError: Couldn’t install clip.
Command: “/Users/***/stable-diffusion-webui/venv/bin/python” -m pip install https://github.com/openai/CLIP/archive/d50d76daa670286dd6cacf3bcd80b5e4823fc8e1.zip –prefer-binary
Error code: 1
stdout: Collecting https://github.com/openai/CLIP/archive/d50d76daa670286dd6cacf3bcd80b5e4823fc8e1.zip
Using cached https://github.com/openai/CLIP/archive/d50d76daa670286dd6cacf3bcd80b5e4823fc8e1.zip (4.3 MB)
Installing build dependencies: started
Installing build dependencies: finished with status ‘done’
Getting requirements to build wheel: started
Getting requirements to build wheel: finished with status ‘error’
stderr: error: subprocess-exited-with-error
× Getting requirements to build wheel did not run successfully.
│ exit code: 1
╰─> [17 lines of output]
Traceback (most recent call last):
File “/Users/***/stable-diffusion-webui/venv/lib/python3.10/site-packages/pip/_vendor/pyproject_hooks/_in_process/_in_process.py”, line 389, in
main()
File “/Users/***/stable-diffusion-webui/venv/lib/python3.10/site-packages/pip/_vendor/pyproject_hooks/_in_process/_in_process.py”, line 373, in main
json_out[“return_val”] = hook(**hook_input[“kwargs”])
File “/Users/***/stable-diffusion-webui/venv/lib/python3.10/site-packages/pip/_vendor/pyproject_hooks/_in_process/_in_process.py”, line 143, in get_requires_for_build_wheel
return hook(config_settings)
File “/private/var/folders/hz/tckffc316c709r4n_1td4blc0000gp/T/pip-build-env-e6ebp4xl/overlay/lib/python3.10/site-packages/setuptools/build_meta.py”, line 333, in get_requires_for_build_wheel
return self._get_build_requires(config_settings, requirements=[])
File “/private/var/folders/hz/tckffc316c709r4n_1td4blc0000gp/T/pip-build-env-e6ebp4xl/overlay/lib/python3.10/site-packages/setuptools/build_meta.py”, line 301, in _get_build_requires
self.run_setup()
File “/private/var/folders/hz/tckffc316c709r4n_1td4blc0000gp/T/pip-build-env-e6ebp4xl/overlay/lib/python3.10/site-packages/setuptools/build_meta.py”, line 520, in run_setup
super().run_setup(setup_script=setup_script)
File “/private/var/folders/hz/tckffc316c709r4n_1td4blc0000gp/T/pip-build-env-e6ebp4xl/overlay/lib/python3.10/site-packages/setuptools/build_meta.py”, line 317, in run_setup
exec(code, locals())
File “”, line 3, in
ModuleNotFoundError: No module named ‘pkg_resources’
[end of output]
note: This error originates from a subprocess, and is likely not a problem with pip.
ERROR: Failed to build ‘https://github.com/openai/CLIP/archive/d50d76daa670286dd6cacf3bcd80b5e4823fc8e1.zip’ when getting requirements to build wheel
I had the same error.. I had tried to install it via pinokio too but had the same error there.. but I have click on ask Ask Ai button of the pinokio and I login with codex and it fixed the error and it’s working now! Hope that helps
Asking to log in to githup – but not accepting user/password
_________________
Launching launch.py…
################################################################
Python 3.10.19 (main, Oct 9 2025, 15:25:03) [Clang 17.0.0 (clang-1700.3.19.1)]
Version: v1.10.1
Commit hash: 82a973c04367123ae98bd9abdf80d9eda9b910e2
Cloning Stable Diffusion into /Users/user11/stable-diffusion-webui/repositories/stable-diffusion-stability-ai…
Cloning into ‘/Users/user11/stable-diffusion-webui/repositories/stable-diffusion-stability-ai’…
Username for ‘https://github.com’: [email protected]
Password for ‘https://charleslingak%[email protected]’:
remote: Invalid username or token. Password authentication is not supported for Git operations.
fatal: Authentication failed for ‘https://github.com/Stability-AI/stablediffusion.git/’
Traceback (most recent call last):
File “/Users/user11/stable-diffusion-webui/launch.py”, line 48, in
main()
File “/Users/user11/stable-diffusion-webui/launch.py”, line 39, in main
prepare_environment()
File “/Users/user11/stable-diffusion-webui/modules/launch_utils.py”, line 412, in prepare_environment
git_clone(stable_diffusion_repo, repo_dir(‘stable-diffusion-stability-ai’), “Stable Diffusion”, stable_diffusion_commit_hash)
File “/Users/user11/stable-diffusion-webui/modules/launch_utils.py”, line 192, in git_clone
run(f'”{git}” clone –config core.filemode=false “{url}” “{dir}”‘, f”Cloning {name} into {dir}…”, f”Couldn’t clone {name}”, live=True)
File “/Users/user11/stable-diffusion-webui/modules/launch_utils.py”, line 116, in run
raise RuntimeError(“\n”.join(error_bits))
RuntimeError: Couldn’t clone Stable Diffusion.
Command: “git” clone –config core.filemode=false “https://github.com/Stability-AI/stablediffusion.git” “/Users/user11/stable-diffusion-webui/repositories/stable-diffusion-stability-ai”
Error code: 128
user11@Charless-Mini stable-diffusion-webui %
Hi, I have updated the instruction. Please follow step 4 to resolve the issue.
I have 2.4 GHz 8-Core Intel Core i9. Am I out of luck?
sorry you are
Hi Andrew,
my terminal has been stuck on downloading huggingface at 78% for over an hour now
“Downloading: “https://huggingface.co/runwayml/stable-diffusion…… ”
My internet connection is up and running, i’ve got enough free space.
Should i start over or let it run in the background until it resolves itself?
Thanks in advance! Also for the easy to follow guide!
Yes, please start over. it shouldn’t take long.
How do I fix this
PermissionError: [Errno 13] Permission denied: ‘/Users/username/.cache/huggingface/token’
try deleting the huggingface folder
hello Andrew, I am new to using Terminal and AI, here is the error message I found after completing step 3 and run AUTOMATIC1111 :
-bash: cd: /Users/lolacharpentier/stable-diffusion-webui: No such file or directory
-bash: ./webui.sh: No such file or directory
Can you help me ? Thanks !
cd stands for ‘change directory’. If there is nowhere to go at the address you give, it gives the error you get.
To check if the folder is there, you can type ‘dir’ or ‘ls’ to see the folders in your location.
If there is a ‘stable-diffusion-webui’ folder in your location;
you can enter it by typing ‘cd stable-diffusion-webui’.
if not; either you are in the wrong folder or the git clone process may not have worked properly.
You can use ‘cd FOLDER_NAME’ to switch between folders. you can type ‘cd …’ to go to the previous folder
I recently Installed Automatic111 on another Mac but the interface is different.
See picture below. I don’t see a the buttons as in the top image. What can be wrong?
https://imgur.com/a/Vs3V3Kn
Hi Andrew!
I just installed Automatic on M2, all works fine, but when I swap between models and VAEs, something is wrong and the images rendered was with glitches, I need to reinstall automatic again, but when I change from a model to other, the bug is the same T_T
any error messages?
Awesome guide! If we need to free up space, is there a rough guide to uninstall automatic1111? Or can we infer this from the installation guide?
Sorry, saw that you had already responded to this question (delete stable-diffusion-webui folder)
👍
I was able to successfully install and run Stable Diffusion on my M1 Macbook Air following your instructions! The image quality is amazing and the performance is surprisingly good. Thank you for this brilliant guide, it saved me a lot of headaches
You are welcome!
Hi Andrew,
I’ve installed SD on my M2, and text2img prompt runs fine. But when I’m trying to run an img2img prompt, inpainting, I’m getting this error.
NotImplementedError: convolution_overrideable not implemented. You are likely triggering this with tensor backend other than CPU/CUDA/MKLDNN, if this is intended, please use TORCH_LIBRARY_IMPL to override this function
Could you please help with this?
I ran into this too using A1111 on an M3 Max. I found I had to run “./webui.sh –no-half” to use img2img at all. –no-half completely disables half-precision computing, so everything runs at fp32 instead of (faster) fp16. So I’d only recommend using –no-half when you need to use img2img, otherwise run A1111 without it.
Here are my “standard” command arguments saved in my webui-user.sh file:
export COMMANDLINE_ARGS=”–skip-torch-cuda-test –upcast-sampling –no-half-vae –opt-sub-quad-attention –use-cpu interrogate”
which are optimized for running A1111 on Apple Silicon in 2025.
Then just manually add “–no-half” on the “./webui.sh” invocation when you’re using img2img. Or of course, if you always want to run A1111 in full precision, you can add the command to your webui-user.sh file (and bear with slower gens in txt2img).
If anyone knows of a fix for this, let me know! 🙂
Hi,
I have a problem. When adding additional downloaded models to folder, A1111 stops working. It tries to evaluate the new model, processing it for a few minutes, but than nothing works. If I delete all, but the default one (1.5), UI works again normally.
seems the new models you download were corrupted.
I can’t generate or select a checkpoint on my macbook M2. It says “Stable diffusion model failed to load
Loading weights [b87b3dfc2f] from /Users/theaccofg/Desktop/stable-diffusion-webui/models/Stable-diffusion/realisticLazyMixNSFW_v10.safetensors
Creating model from config: /Users/theaccofg/Desktop/stable-diffusion-webui/configs/v1-inference.yaml
loading stable diffusion model: TypeError
Traceback (most recent call last):
File “/Users/theaccofg/Desktop/stable-diffusion-webui/modules/processing.py”, line 832, in process_images
sd_models.reload_model_weights()
File “/Users/theaccofg/Desktop/stable-diffusion-webui/modules/sd_models.py”, line 860, in reload_model_weights
sd_model = reuse_model_from_already_loaded(sd_model, checkpoint_info, timer)
File “/Users/theaccofg/Desktop/stable-diffusion-webui/modules/sd_models.py”, line 793, in reuse_model_from_already_loaded
send_model_to_cpu(sd_model)
File “/Users/theaccofg/Desktop/stable-diffusion-webui/modules/sd_models.py”, line 662, in send_model_to_cpu
if m.lowvram:
AttributeError: ‘NoneType’ object has no attribute ‘lowvram'”
I’ve seen this error but it didn’t affect image generation. You can try redownloading the model, or reinstalling the whole thing again.
hi! i’m stucked 🙁
when i try generate anything it gives me this:
SafetensorError: Error while deserializing header: MetadataIncompleteBuffer
no idea what to do!
seems your checkpoint file is corrupted. Check if your setup works for other checkpoint files. Redownload the checkpoint.
Hello – I’ve been (intensely) using SD daily for over a year on an M2 Mac (96gb RAM), and had no major issues I haven’t been able to solve, until last night. What was odd is that it happened kind of out of the blue, with no changes to any setting. I’m using Auto1111 (updated to v1.8 two weeks ago), Python 3.11.4, and everything has been without a hitch until, when relaunching Terminal (using: cd ~/stable-diffusion-webui;./webui.sh –no-half) SD would not launch and I got this:
TypeError: Cannot convert a MPS Tensor to float64 dtype as the MPS framework doesn’t support float64. Please use float32 instead. Stable diffusion model failed to load
I have tried many fixes, but none have worked. I also went into Settings are toggled back and forth between checking float32 again, but neither setting worked. Do you have any guidance on how to fix this? Thanks very much for any insight you can provide.
By the way, I followed your guidance to the previous post, and nothing you suggested worked. I am already using Python 3.11.
Hello and thank you every much for this tutorial.
I keep getting the following error when launching with these parameters on my M1 Pro 32GB MAC running 13.2.1:
./webui.sh –skip-torch-cuda-test –upcast-sampling –no-half-vae –use-cpu interrogate
TypeError: Cannot convert a MPS Tensor to float64 dtype as the MPS framework doesn’t support float64. Please use float32 instead.
Stable diffusion model failed to load
What is odd is that the first time I followed these directions it worked and I was able to load realcartoon3d model and generate a bunch of images. I came back a few days later and I started getting an error when doing img2img:
TypeError: Cannot convert a MPS Tensor to float64 dtype as the MPS framework doesn’t support float64. Please use float32 instead.
So I wiped everything and started over and even redownloaded the model from scratch. Do you have any suggestions to fix this or what I might be doing wrong?
Not so sure as its all working for me on M1. You can check:/try
– Are you using python 3.10.x?
– Try running without arguments ./webui.sh
– Clone webui all over again.
im running the webui on my macbook pro with m1 pro. ive been having some issues with installing xformers. this is the message i get:
ld: warning: ignoring file build/temp.macosx-10.9-x86_64-cpython-39/xformers/csrc/attention/autograd/matmul.o, building for macOS-arm64 but attempting to link with file built for macOS-x86_64
ld: warning: ignoring file build/temp.macosx-10.9-x86_64-cpython-39/xformers/csrc/attention/attention.o, building for macOS-arm64 but attempting to link with file built for macOS-x86_64
ld: warning: ignoring file build/temp.macosx-10.9-x86_64-cpython-39/xformers/csrc/attention/cpu/matmul.o, building for macOS-arm64 but attempting to link with file built for macOS-x86_64
ld: warning: ignoring file build/temp.macosx-10.9-x86_64-cpython-39/xformers/csrc/attention/cpu/sddmm.o, building for macOS-arm64 but attempting to link with file built for macOS-x86_64
ld: warning: ignoring file build/temp.macosx-10.9-x86_64-cpython-39/xformers/csrc/attention/cpu/sparse_softmax.o, building for macOS-arm64 but attempting to link with file built for macOS-x86_64
ld: warning: ignoring file build/temp.macosx-10.9-x86_64-cpython-39/xformers/csrc/attention/cpu/spmm.o, building for macOS-arm64 but attempting to link with file built for macOS-x86_64
ld: warning: ignoring file build/temp.macosx-10.9-x86_64-cpython-39/xformers/csrc/attention/matmul.o, building for macOS-arm64 but attempting to link with file built for macOS-x86_64
ld: warning: ignoring file build/temp.macosx-10.9-x86_64-cpython-39/xformers/csrc/attention/sparse_softmax.o, building for macOS-arm64 but attempting to link with file built for macOS-x86_64
ld: warning: ignoring file build/temp.macosx-10.9-x86_64-cpython-39/xformers/csrc/attention/spmm.o, building for macOS-arm64 but attempting to link with file built for macOS-x86_64
ld: warning: ignoring file build/temp.macosx-10.9-x86_64-cpython-39/xformers/csrc/boxing_unboxing.o, building for macOS-arm64 but attempting to link with file built for macOS-x86_64
ld: warning: ignoring file build/temp.macosx-10.9-x86_64-cpython-39/xformers/csrc/attention/sddmm.o, building for macOS-arm64 but attempting to link with file built for macOS-x86_64
ld: warning: ignoring file build/temp.macosx-10.9-x86_64-cpython-39/xformers/csrc/swiglu/swiglu_op.o, building for macOS-arm64 but attempting to link with file built for macOS-x86_64
ld: warning: ignoring file build/temp.macosx-10.9-x86_64-cpython-39/xformers/csrc/swiglu/swiglu_packedw.o, building for macOS-arm64 but attempting to link with file built for macOS-x86_64
ld: warning: ignoring file /Users/a216/opt/anaconda3/lib/python3.9/site-packages/torch/lib/libc10.dylib, building for macOS-arm64 but attempting to link with file built for macOS-x86_64
ld: warning: ignoring file /Users/a216/opt/anaconda3/lib/python3.9/site-packages/torch/lib/libtorch_cpu.dylib, building for macOS-arm64 but attempting to link with file built for macOS-x86_64
ld: warning: ignoring file /Users/a216/opt/anaconda3/lib/python3.9/site-packages/torch/lib/libtorch_python.dylib, building for macOS-arm64 but attempting to link with file built for macOS-x86_64
ld: warning: ignoring file /Users/a216/opt/anaconda3/lib/python3.9/site-packages/torch/lib/libtorch.dylib, building for macOS-arm64 but attempting to link with file built for macOS-x86_64
ld: warning: ignoring file /Users/a216/opt/anaconda3/lib/libc++.dylib, building for macOS-arm64 but attempting to link with file built for macOS-x86_64
ld: unsupported tapi file type ‘!tapi-tbd’ in YAML file ‘/Library/Developer/CommandLineTools/SDKs/MacOSX14.sdk/usr/lib/libSystem.tbd’ for architecture arm64
clang++: error: linker command failed with exit code 1 (use -v to see invocation)
error: command ‘/opt/homebrew/Cellar/llvm/17.0.6_1/bin/clang++’ failed with exit code 1
[end of output]
ive tried getting chatGPT to help me however at this stage it says the problem is too specific for it. any idea how to solve it?
first, you should use python 3.10
And xformers is not supported on mac.
Any ideas what can be wrong here. I use M2 pro with 16gb, trying to render image in img2img using controlnet and sdxl. It renders for an HOUR and after it crashes with this: “RuntimeError: MPS backend out of memory (MPS allocated: 16.44 GB, other allocations: 1.67 GB, max allowed: 18.13 GB). Tried to allocate 69.58 MB on private pool. Use PYTORCH_MPS_HIGH_WATERMARK_RATIO=0.0 to disable upper limit for memory allocations (may cause system failure).”
you can try the
--medvram-sdxloption. But in general, support for Mac is a bit lagging.Any chance you have a version of the webui.sh script using pyenv virtualenv instead of venv?
sorry i don’t
Excellent article Andrew! Maybe you can write one on how to store the working files (models, extensions, etc) on an external disk. I wanted to save space on my Macbook’s internal hard drive, so I wanted to move as much of SD as I could to my external disk. But as a non-coder, I had quite a hard time finding info on how to make this move.
I eventually found this article which helped (indirectly): https://www.howtogeek.com/297721/how-to-create-and-use-symbolic-links-aka-symlinks-on-a-mac/
Would be great if you could create a more problem-specific article here to help your community. Great job and keep up the good work! =)
RuntimeError: Placeholder storage has not been allocated on MPS device!
It gives me this when I tried to select the checkpoint on the top left corner in the web ui
Try changing the webui arguments
https://github.com/Mikubill/sd-webui-controlnet/issues/1128
This is working on my M1
--skip-torch-cuda-test --upcast-sampling --no-half-vae --use-cpu interrogateThanks a lot!
Interesting, I didn’t go to that page when I did the search hmmm
So I ran the install process for A1111 because I jacked up mine, and I got a new error I thought I should make you aware about.
“note: This error originates from a subprocess, and is likely not a problem with pip.
error: legacy-install-failure
× Encountered error while trying to install package.
╰─> lmdb
note: This is an issue with the package mentioned above, not pip.
hint: See above for output from the failure.
[notice] A new release of pip is available: 23.0.1 -> 23.3.2
[notice] To update, run: pip install –upgrade pip”
This seems to have been a change in the last week or so, but this command takes care of it
cd ~/stable-diffusion-webui;./webui.sh –no-half –use-pep517
it will fail to run but will finish the install . Next if you run the regular command
cd ~/stable-diffusion-webui;./webui.sh –no-half
it runs without issue. I don’t know how long this issue will last but I thought I would mention it just in case someone runs into the issue from now until the issue is fixed.
Andrew, thanks so much for the detailed instructions on how to install AUTOMATIC1111 on my M1 Mac. As far as I can tell, the installation process went flawlessly. Yet, the results are totally unexpected and unrelated to the txt2img prompt. Following your example “a cat”, produces a nightmarish image. In fact, any text input does the same. Any clues as to what could be causing this? Thanks.
Try deleting the checkpoint file and reinstall. Make sure the file size is in GBs.
Hi, I’m trying to install AUTOMATIC1111 on my Mac M1.
It stops at step 2, when I run: brew install cmake protobuf rust [email protected] git wget
It gives me: zsh: command not found: brew
Could someone help me?
Thanks
Same here
There are two additional steps after running brew. I added to the instructions above.
Are any/all of these installation methods considered “local” installation, or are they all 3rd party with strict licensing BS? I read that running SD locally comes with a wide-open license agreement that grants users the rights to “use, copy, modify, merge, publish, distribute, sublicense, and/or sell copies of the art created by Stable Diffusion.” So… second question is: where do I find the licensing agreement for local installation/use of SD?
Hi, these are GUI that uses SD so it may have additional licence that use the GUI software. This is the original SD license https://github.com/CompVis/stable-diffusion/blob/main/LICENSE
A con to add for the Automatic 1111 is that it runs MUCH slower than the other app-based solutions. This is due to automatic 1111 using python environment rather than the native Swift. An image generation can go from 45 sec to 15 sec. This is something to consider if you don’t need all the bleeding edge bells and whistles of A1111. Draw Things can cover most use cases.
Got this error after following all your instructions.
Macbook Air M1, 8GB, OS 13.4
Any ideas?
Warning: caught exception ‘Torch not compiled with CUDA enabled’, memory monitor disabled
Loading weights [cc6cb27103] from /Users/jorgemadrigal/stable-diffusion-webui/models/Stable-diffusion/v1-5-pruned-emaonly.ckpt
Running on local URL: http://127.0.0.1:7860
To create a public link, set `share=True` in `launch()`.
Startup time: 129.4s (prepare environment: 74.0s, import torch: 10.5s, import gradio: 6.3s, setup paths: 10.2s, initialize shared: 0.1s, other imports: 26.8s, setup codeformer: 0.1s, load scripts: 0.4s, create ui: 0.2s, gradio launch: 0.7s).
Creating model from config: /Users/jorgemadrigal/stable-diffusion-webui/configs/v1-inference.yaml
-[IOGPUMetalCommandBuffer validate]:215: failed assertion `commit an already committed command buffer’
./webui.sh: line 255: 2634 Abort trap: 6 “${python_cmd}” -u “${LAUNCH_SCRIPT}” “$@”
jorgemadrigal@jorges-air stable-diffusion-webui %
Seems to be related: https://github.com/AUTOMATIC1111/stable-diffusion-webui/issues/13159
I have successfully installed by following your steps on my M2 Mac Mini but if I try to generate “a cat” I got this error:
“OSError: Can’t load tokenizer for ‘openai/clip-vit-large-patch14’. If you were trying to load it from ‘https://huggingface.co/models’, make sure you don’t have a local directory with the same name. Otherwise, make sure ‘openai/clip-vit-large-patch14’ is the correct path to a directory containing all relevant files for a CLIPTokenizer tokenizer.”
No Idea what this mean and Google did not help me really. I only see, that I’m not the only one with that problem. And I also have no Idea where is that path or where I got the file who is missed to put it on the right direction.
Any Idea?
This error message is strange. You shouldn’t be loading anything from huggingface. Are you on the tx2img page in A1111?
Yes. And after reading another Tutorial wirh the info around downloading a model resource from higgingface, I also place a model File to the installation. Problem is still the same.
I recommend starting all over following this article.
Hello, Andrew!
I hope you can help me fix this problem!
When I click generate the program gives this error
TypeError: Trying to convert BFloat16 to the MPS backend but it does not have support for that dtype.
I use mac M1
What’s your MacOS version? It needs to be at least 12.3
13.4
Hey Andrew,
So I’ve followed your tutorials extensively and have been an extremely avid user of Midjourney for a while.
Been trying to download SD on my Mac but it’s been a massive pain.
Your tutorial worked except everytime I try to generate it says ‘connection errored out’ on the web portal
Is there absolutely any way I can
1. Get fast generations locally
2. Just use the system properly without errors
Mucho gracias for your great work
Eager to hear from you.
There could be many unforeseen issues running SD locally. I cannot comment without seeing the error message on the terminal.
But generally using Mac is not ideally because the whole thing is optimized around NVIDIA GPU. For fast local generation, the best option is to get a windows PC with a 4 series NVIDIA card.
Hi there! After following instructions on an Intel MacBook Pro, I’m getting this error four times: “Error
Connection errored out.” when I write a prompt and click on “Generate”. Any suggestion? Many thanks!
Greetings,
Thanks for your tutorial. I haven’t got it working yet. I have this error, if you could help me i would be inmensely thankful. Everything is okay, but when it gets to the following line:
File “/Users/luis/stable-diffusion-webui/venv/lib/python3.10/site-packages/transformers/utils/import_utils.py”, line 1088, in _get_module
Then it shows this:
raise RuntimeError(
RuntimeError: Failed to import transformers.models.auto because of the following error (look up to see its traceback):
dlopen(/Users/luis/stable-diffusion-webui/venv/lib/python3.10/site-packages/sentencepiece/_sentencepiece.cpython-310-darwin.so, 2): Symbol not found: ____chkstk_darwin
Referenced from: /Users/luis/stable-diffusion-webui/venv/lib/python3.10/site-packages/sentencepiece/_sentencepiece.cpython-310-darwin.so
Expected in: /usr/lib/libSystem.B.dylib
in /Users/luis/stable-diffusion-webui/venv/lib/python3.10/site-packages/sentencepiece/_sentencepiece.cpython-310-darwin.so
I look forward for an answer, thanks a lot!
Btw I have macOS 10.13.6 high sierra and i cannot upgrade no more since my mac is old (mid 2012). This has caused me a lot of trouble, like not being able to install the latest xcode or some installs just like this one. This happens to me in this step:
cd ~/stable-diffusion-webui;./webui.sh –no-half
Please i would love to use this in my mac. Help would be inmensely appreciated.
You will need macOS 12.3 or higher.
1. M1
2. Extensions folder is empty
i have such error on my macbook m1 max
RuntimeError: “upsample_nearest2d_channels_last” not implemented for ‘Half’
but before that everything worked more or less
Try starting with
./webui.sh --no-halfhow can i unistall properly all this things from my m1 mac?
deleting the stable-diffusion-webui folder will do.
I got the same error:
../../scipy/meson.build:159:9: ERROR: Dependency “OpenBLAS” not found, tried pkgconfig, framework and cmake
did you find a solution?
brew install openblas
then open a new terminal window and run:
export LDFLAGS=”-L/opt/homebrew/opt/openblas/lib”
export CPPFLAGS=”-I/opt/homebrew/opt/openblas/include”
export PKG_CONFIG_PATH=”/opt/homebrew/opt/openblas/lib/pkgconfig”
./webui.sh –no-half
Hi Andrew, thank you for your help.
i have followed your instructions step by step.
still stuck by collecting scikit-image..
https://docs.google.com/document/d/1G9ZgonGmw2lSQXZkATEGaEnB_TMw4V0ZuaTU6hMJ7kY/edit?usp=sharing
Thank you one more time !
..Scipy
I just re-install on Mac M1. It works successfully. I don’t see scikit-image being installed.
Few questions:
1. Can you confirm you are using M1 or M2?
2. Confirm there’s no extensions installed. ie. Delete all folders in the extensions folder.
Thank you for your help 🙂
https://docs.google.com/document/d/1oIrzvFlWeEeFy9TunkO11jR86hb0K5F1fDecR2RJTw8/edit?usp=sharing
Try running “git pull” to update your webui. Delete the venv folder and run webui.sh again.
If that doesn’t work, try removing folders in extensions and restart the above process.
Wow thank you very muche for your answer :
################################################################
Install script for stable-diffusion + Web UI
Tested on Debian 11 (Bullseye)
################################################################
################################################################
Running on juliensallerin user
################################################################
################################################################
Repo already cloned, using it as install directory
################################################################
################################################################
Create and activate python venv
################################################################
################################################################
Launching launch.py…
################################################################
Python 3.10.6 (v3.10.6:9c7b4bd164, Aug 1 2022, 17:13:48) [Clang 13.0.0 (clang-1300.0.29.30)]
Version: v1.5.1
Commit hash: 68f336bd994bed5442ad95bad6b6ad5564a5409a
Installing gfpgan
Traceback (most recent call last):
File “/Users/juliensallerin/stable-diffusion-webui/launch.py”, line 39, in
main()
File “/Users/juliensallerin/stable-diffusion-webui/launch.py”, line 30, in main
prepare_environment()
File “/Users/juliensallerin/stable-diffusion-webui/modules/launch_utils.py”, line 320, in prepare_environment
run_pip(f”install {gfpgan_package}”, “gfpgan”)
File “/Users/juliensallerin/stable-diffusion-webui/modules/launch_utils.py”, line 136, in run_pip
return run(f'”{python}” -m pip {command} –prefer-binary{index_url_line}’, desc=f”Installing {desc}”, errdesc=f”Couldn’t install {desc}”, live=live)
File “/Users/juliensallerin/stable-diffusion-webui/modules/launch_utils.py”, line 113, in run
raise RuntimeError(“\n”.join(error_bits))
RuntimeError: Couldn’t install gfpgan.
Command: “/Users/juliensallerin/stable-diffusion-webui/venv/bin/python3.10” -m pip install https://github.com/TencentARC/GFPGAN/archive/8d2447a2d918f8eba5a4a01463fd48e45126a379.zip –prefer-binary
Error code: 1
stdout: Collecting https://github.com/TencentARC/GFPGAN/archive/8d2447a2d918f8eba5a4a01463fd48e45126a379.zip
Using cached https://github.com/TencentARC/GFPGAN/archive/8d2447a2d918f8eba5a4a01463fd48e45126a379.zip (6.0 MB)
Installing build dependencies: started
Installing build dependencies: finished with status ‘done’
Getting requirements to build wheel: started
Getting requirements to build wheel: finished with status ‘done’
Installing backend dependencies: started
Installing backend dependencies: finished with status ‘done’
Preparing metadata (pyproject.toml): started
Preparing metadata (pyproject.toml): finished with status ‘done’
Collecting basicsr>=1.4.2 (from gfpgan==1.3.5)
Using cached basicsr-1.4.2.tar.gz (172 kB)
Installing build dependencies: started
Installing build dependencies: finished with status ‘done’
Getting requirements to build wheel: started
Getting requirements to build wheel: finished with status ‘done’
Installing backend dependencies: started
Installing backend dependencies: finished with status ‘done’
Preparing metadata (pyproject.toml): started
Preparing metadata (pyproject.toml): finished with status ‘done’
Collecting facexlib>=0.2.5 (from gfpgan==1.3.5)
Using cached facexlib-0.3.0-py3-none-any.whl (59 kB)
Collecting lmdb (from gfpgan==1.3.5)
Using cached lmdb-1.4.1.tar.gz (881 kB)
Installing build dependencies: started
Installing build dependencies: finished with status ‘done’
Getting requirements to build wheel: started
Getting requirements to build wheel: finished with status ‘done’
Preparing metadata (pyproject.toml): started
Preparing metadata (pyproject.toml): finished with status ‘done’
Requirement already satisfied: numpy in ./venv/lib/python3.10/site-packages (from gfpgan==1.3.5) (1.25.2)
Collecting opencv-python (from gfpgan==1.3.5)
Obtaining dependency information for opencv-python from https://files.pythonhosted.org/packages/32/a6/4321f0f30ee11d6d85f49251d417f4e885fe7638b5ac50b7e3c80cccf141/opencv_python-4.8.0.76-cp37-abi3-macosx_11_0_arm64.whl.metadata
Downloading opencv_python-4.8.0.76-cp37-abi3-macosx_11_0_arm64.whl.metadata (19 kB)
Collecting pyyaml (from gfpgan==1.3.5)
Obtaining dependency information for pyyaml from https://files.pythonhosted.org/packages/5b/07/10033a403b23405a8fc48975444463d3d10a5c2736b7eb2550b07b367429/PyYAML-6.0.1-cp310-cp310-macosx_11_0_arm64.whl.metadata
Downloading PyYAML-6.0.1-cp310-cp310-macosx_11_0_arm64.whl.metadata (2.1 kB)
Collecting scipy (from gfpgan==1.3.5)
Using cached scipy-1.11.2.tar.gz (56.0 MB)
Installing build dependencies: started
Installing build dependencies: finished with status ‘done’
Getting requirements to build wheel: started
Getting requirements to build wheel: finished with status ‘done’
Installing backend dependencies: started
Installing backend dependencies: finished with status ‘done’
Preparing metadata (pyproject.toml): started
Preparing metadata (pyproject.toml): finished with status ‘error’
stderr: error: subprocess-exited-with-error
× Preparing metadata (pyproject.toml) did not run successfully.
│ exit code: 1
╰─> [43 lines of output]
+ meson setup /private/var/folders/m4/9j34tlks2zq2_xrnkn5jnnxw0000gn/T/pip-install-6o1b36a3/scipy_364cf24d69844dad8d45f84a032eb618 /private/var/folders/m4/9j34tlks2zq2_xrnkn5jnnxw0000gn/T/pip-install-6o1b36a3/scipy_364cf24d69844dad8d45f84a032eb618/.mesonpy-ksiupg1j/build -Dbuildtype=release -Db_ndebug=if-release -Db_vscrt=md –native-file=/private/var/folders/m4/9j34tlks2zq2_xrnkn5jnnxw0000gn/T/pip-install-6o1b36a3/scipy_364cf24d69844dad8d45f84a032eb618/.mesonpy-ksiupg1j/build/meson-python-native-file.ini
The Meson build system
Version: 1.2.1
Source dir: /private/var/folders/m4/9j34tlks2zq2_xrnkn5jnnxw0000gn/T/pip-install-6o1b36a3/scipy_364cf24d69844dad8d45f84a032eb618
Build dir: /private/var/folders/m4/9j34tlks2zq2_xrnkn5jnnxw0000gn/T/pip-install-6o1b36a3/scipy_364cf24d69844dad8d45f84a032eb618/.mesonpy-ksiupg1j/build
Build type: native build
Project name: SciPy
Project version: 1.11.2
C compiler for the host machine: cc (clang 13.0.0 “Apple clang version 13.0.0 (clang-1300.0.29.30)”)
C linker for the host machine: cc ld64 711
C++ compiler for the host machine: c++ (clang 13.0.0 “Apple clang version 13.0.0 (clang-1300.0.29.30)”)
C++ linker for the host machine: c++ ld64 711
Cython compiler for the host machine: cython (cython 0.29.36)
Host machine cpu family: aarch64
Host machine cpu: aarch64
Program python found: YES (/Users/juliensallerin/stable-diffusion-webui/venv/bin/python3.10)
Found pkg-config: /opt/homebrew/bin/pkg-config (0.29.2)
Run-time dependency python found: YES 3.10
Program cython found: YES (/private/var/folders/m4/9j34tlks2zq2_xrnkn5jnnxw0000gn/T/pip-build-env-o3n9g62l/overlay/bin/cython)
Compiler for C supports arguments -Wno-unused-but-set-variable: NO
Compiler for C supports arguments -Wno-unused-function: YES
Compiler for C supports arguments -Wno-conversion: YES
Compiler for C supports arguments -Wno-misleading-indentation: YES
Library m found: YES
Fortran compiler for the host machine: gfortran (gcc 13.1.0 “GNU Fortran (Homebrew GCC 13.1.0) 13.1.0”)
Fortran linker for the host machine: gfortran ld64 711
Compiler for Fortran supports arguments -Wno-conversion: YES
Checking if “-Wl,–version-script” : links: NO
Program pythran found: YES (/private/var/folders/m4/9j34tlks2zq2_xrnkn5jnnxw0000gn/T/pip-build-env-o3n9g62l/overlay/bin/pythran)
Found CMake: /opt/homebrew/bin/cmake (3.27.4)
WARNING: CMake Toolchain: Failed to determine CMake compilers state
Run-time dependency xsimd found: NO (tried pkgconfig, framework and cmake)
Run-time dependency threads found: YES
Library npymath found: YES
Library npyrandom found: YES
pybind11-config found: YES (/private/var/folders/m4/9j34tlks2zq2_xrnkn5jnnxw0000gn/T/pip-build-env-o3n9g62l/overlay/bin/pybind11-config) 2.10.4
Run-time dependency pybind11 found: YES 2.10.4
Run-time dependency openblas found: NO (tried pkgconfig, framework and cmake)
Run-time dependency openblas found: NO (tried pkgconfig, framework and cmake)
../../scipy/meson.build:159:9: ERROR: Dependency “OpenBLAS” not found, tried pkgconfig, framework and cmake
A full log can be found at /private/var/folders/m4/9j34tlks2zq2_xrnkn5jnnxw0000gn/T/pip-install-6o1b36a3/scipy_364cf24d69844dad8d45f84a032eb618/.mesonpy-ksiupg1j/build/meson-logs/meson-log.txt
[end of output]
note: This error originates from a subprocess, and is likely not a problem with pip.
error: metadata-generation-failed
× Encountered error while generating package metadata.
╰─> See above for output.
note: This is an issue with the package mentioned above, not pip.
hint: See above for details.
zsh: command not found: –no-half
When i launch for the first time webui.sh
It stops when installing Installing gfpgan
× Preparing metadata (pyproject.toml) did not run successfully.
│ exit code: 1
╰─> [43 lines of output]
Do you know how to fix it?
i try for several days to fix it.
Any help would be appreciate ^^
Can you post the full error message? there should be something informative before that.
Very low quality results, very disappointing, especially since I couldn’t find it in the Apple Store. I’m always very hesitant downloading un-approved software, now I wish I hadn’t downloaded it.
I can’t seem to run the model. When to try to run ./webui.sh –no-half, I get an error:
—————-
File “/Users/mark./Dev/stable-diffusion-webui/venv/lib/python3.10/site-packages/omegaconf/basecontainer.py”, line 73, in _get_child
child = self._get_node(
File “/Users/mark./Dev/stable-diffusion-webui/venv/lib/python3.10/site-packages/omegaconf/dictconfig.py”, line 480, in _get_node
raise ConfigKeyError(f”Missing key {key!s}”)
omegaconf.errors.ConfigAttributeError: Missing key model
full_key: model
object_type=dict
Stable diffusion model failed to load
—————-
Also, earlier in the build process it says: “Warning: caught exception ‘Torch not compiled with CUDA enabled’, memory monitor disabled”
Any ideas how it could be resolved?
The CUDA warning is normal. You don’t use CUDA on Mac.
You can try deleting the venv folder and try running it again.
It does
Thank you
This may be a dumb question but how might we uninstall AUTOMATIC1111?
Do we need to use a bunch of terminal commands to do this – or is as simple as just deleting the “stable-diffusion-webui” folder?
Thank you.
You can just delete the stable-diffusion-webui folder.
Hi Andrew! Thanks for this great guide. Now that SDXL 1.0 is out, is there anything we have to change in this guide to install AUTOMATIC1111 (with the latest SD XL 1.0)?
Unfortunately, A1111 on Mac doesn’t support SDXL yet.
at the end of a111 instructions you say “Follow the steps in this section the next time when you want to run Stable Diffusion.” does that mean i have to do everything all over again everytime i want to use it? or do i simply need to go to http://127.0.0.1:7860/
You will need to have webui.bat running when you go to that URL. If you don’t close the terminal and keep webui.bat running, you can simply go to the URL.
I use Mac mini m2 , with automatic1111 I can use image2image to generate batch and multiple images to make video , but it take 5min for every frame (image) , I want to use my m2 hardware to generate, with beediffusion its super fast and use m2 to render, but I can’t generate multiple images like the web version..
-can I use the automatic1111 web ui but with my m2 for rendering?
A1111 is using the M2 but perhaps less optimized for Mac. You can also try Invoke AI
SD WebUI on 16GB M1 pro chip is EXTREMELY SLOW, takes 32.5sec to generate a single image. Is this expected?
should be faster. Perhaps your RAM was used up by other programs and it needs to swap memory. Try restarting your machine and run SD again.
Here is a log of the terminal messages:
Downloading certifi-2023.5.7-py3-none-any.whl (156 kB)
|████████████████████████████████| 156 kB 71.2 MB/s
Collecting mpmath>=0.19
Downloading mpmath-1.3.0-py3-none-any.whl (536 kB)
|████████████████████████████████| 536 kB 10.6 MB/s
Installing collected packages: mpmath, MarkupSafe, urllib3, typing-extensions, sympy, networkx, jinja2, idna, filelock, charset-normalizer, certifi, torch, requests, pillow, numpy, torchvision
Successfully installed MarkupSafe-2.1.3 certifi-2023.5.7 charset-normalizer-3.2.0 filelock-3.12.2 idna-3.4 jinja2-3.1.2 mpmath-1.3.0 networkx-3.1 numpy-1.25.1 pillow-10.0.0 requests-2.31.0 sympy-1.12 torch-2.0.1 torchvision-0.15.2 typing-extensions-4.7.1 urllib3-2.0.3
WARNING: You are using pip version 21.2.4; however, version 23.2 is available.
You should consider upgrading via the ‘/Users/perfultec/stable-diffusion-webui/venv/bin/python3.10 -m pip install –upgrade pip’ command.
Installing gfpgan
Installing clip
Installing open_clip
Cloning Stable Diffusion into /Users/perfultec/stable-diffusion-webui/repositories/stable-diffusion-stability-ai…
Traceback (most recent call last):
File “/Users/perfultec/stable-diffusion-webui/launch.py”, line 38, in
main()
File “/Users/perfultec/stable-diffusion-webui/launch.py”, line 29, in main
prepare_environment()
File “/Users/perfultec/stable-diffusion-webui/modules/launch_utils.py”, line 299, in prepare_environment
git_clone(stable_diffusion_repo, repo_dir(‘stable-diffusion-stability-ai’), “Stable Diffusion”, stable_diffusion_commit_hash)
File “/Users/perfultec/stable-diffusion-webui/modules/launch_utils.py”, line 153, in git_clone
run(f'”{git}” clone “{url}” “{dir}”‘, f”Cloning {name} into {dir}…”, f”Couldn’t clone {name}”)
File “/Users/perfultec/stable-diffusion-webui/modules/launch_utils.py”, line 107, in run
raise RuntimeError(“\n”.join(error_bits))
RuntimeError: Couldn’t clone Stable Diffusion.
Command: “git” clone “https://github.com/Stability-AI/stablediffusion.git” “/Users/perfultec/stable-diffusion-webui/repositories/stable-diffusion-stability-ai”
Error code: 128
stderr: Cloning into ‘/Users/perfultec/stable-diffusion-webui/repositories/stable-diffusion-stability-ai’…
fatal: unable to access ‘https://github.com/Stability-AI/stablediffusion.git/’: HTTP/2 stream 1 was not closed cleanly before end of the underlying stream
Can you help? I have no idea what is going wrong with it.!!!
It complains your computer cannot access github.com with https. You can try putting the that https address on a browser.
Thank you, Andrew! I am a complete tech ignorant, just an artist who uses AI for inspiration. Following your instructions, I installed Stable Diffusion and the AUTOMATIC1111 gui on my Mac M1 at the first try, and it works like a dream. You are a wonderful instructor. I bought your book.
Thank you!
Hi, I got error when trying to install the step 2 of automatic1111.
brew install cmake protobuf rust [email protected] git wget
zsh: command not found: brew
Please help me to solve this problem. Thank you.
Have you installed homebrew in step1? You can try running the step 1 command again. maybe there was an error message.
thanks reply! I solved the problem already after I instal SD one more time.
Hi there, I wonder how to install sdxl on Mac ? Do you have any tips for it ?
Hi Andrew, I notice Step 4 is missing. Can you please confirm this omission is correct?
Thanks, Choon.
my bad; I didn’t know how to count 🙂 corrected. The original steps are correct.
It works. Thanks very much.
Hello, I have a Mac studio M1. The install looks to work. I was able to generate a cat. But I had the message : WARNING: You are using pip version 21.2.4; however, version 23.1.2 is available.
You should consider upgrading via the ‘/Users/——-/stable-diffusion-webui/venv/bin/python3 -m pip install –upgrade pip’ command.
Is it important to upgrading pip version ? If it is, how can i do ?
No, you can ignore the warning.
Hello! Thanks a lot for this tut!
When I’m trying to load v2-1_768-ema-pruned.ckpt it will give me this error
.. linear.py”, line 114, in forward
return F.linear(input, self.weight, self.bias)
RuntimeError: expected scalar type Float but found Half
I’m on a Mac M1. Doing some research it seems I should install a Pytorch nighlty version or somenthing. I did that but not solved my issue.
Any ideas
You can run with
--no-halfargument to suppress this error (See FAQ above). But the v2.1 768 model doesn’t seem to work on Mac.Hello,
I am trying out Automatic1111 on a Mac, but have run into a problem. The install seemed to go well and I am able to run the UI in a Firefox browser, but when I try the “Cat” test, I don’t get any image, just what I believe is a noise pattern.
Here is a log of the terminal messages:
********************************************
taoling@Mei-Ling ~ % cd ~/stable-diffusion-webui;./webui.sh
### ################################################################
### Install script for stable-diffusion + Web UI
### Tested on Debian 11 (Bullseye)
### ################################################################
### ################################################################ Running on taoling user ################################################################
### ################################################################ Repo already cloned, using it as install directory ################################################################
### ################################################################ Create and activate python venv ################################################################
### ################################################################
### Launching launch.py… ################################################################
### Python 3.10.12 (main, Jun 15 2023, 07:13:36) [Clang 14.0.3 (clang-1403.0.22.14.1)] Version: v1.3.2
### Commit hash: baf6946e06249c5af9851c60171692c44ef633e0
### Installing requirements
### Launching Web UI with arguments: —skip-torch-cuda-test —upcast-sampling —no-half-vae —use-cpu interrogate
### No module ‘xformers’. Proceeding without it.
### Warning: caught exception ‘Torch not compiled with CUDA enabled’, memory monitor disabled
### Loading weights [cc6cb27103] from /Users/taoling/stable-diffusion-webui/models/Stable-diffusion/v1-5-pruned-emaonly.ckpt Running on local URL: http://127.0.0.1:7860
### To create a public link, set `share=True` in `launch()`.
### Startup time: 8.1s (import torch: 2.1s, import gradio: 1.8s, import ldm: 0.5s, other imports: 2.5s, load scripts: 0.6s, cr eate ui: 0.3s, gradio launch: 0.2s).
### Creating model from config: /Users/taoling/stable-diffusion-webui/configs/v1-inference.yaml
### LatentDiffusion: Running in eps-prediction mode
### DiffusionWrapper has 859.52 M params.
### Applying optimization: InvokeAI… done.
### Textual inversion embeddings loaded(0):
### Model loaded in 5.1s (load weights from disk: 2.3s, create model: 0.5s, apply weights to model: 0.9s, apply half(): 0.6s, move model to device: 0.8s).
### 100%|█████████████████████████████████████████████████████████████████████████████████████| 20/20 [00:09<00:00, 2.05it/s] Total progress: 100%|█████████████████████████████████████████████████████████████████████| 20/20 [00:07<00:00, 2.51it/s] Total progress: 100%|█████████████████████████████████████████████████████████████████████| 20/20 [00:07<00:00, 2.67it/s]
The last three line seem to be the progress meters that run after I enter the "A cat" prompt and click generate. But the image that is generated is a noise pattern that is never resolved into the image of a cat. So the application technically IS running, but no image is created by Stable Diffusion.
I'm running this on a Retina 5K, 27-inch, 2020 iMac with an intel i9 10 core and an AMD Radeon Pro 5700 XT with 16 GB ram . The mac CPU is running with 64 GB ram. MacOS level is 13.4.1 (22F82) Ventura.
Before trying Automatic1111, I tried the DiffusionBee UI and that does work. But some time around February, I had a similar problem with DiffusionBee. The app had been running just fine, creating images as it should, but after release 13.1 or 13.2 (I'm not exactly sure) I got the same problem. The UI started generating just noise. The developer (Divam Gupta, I believe) looked into the matter and issued a new release with a fix and the problem went away. DiffusionBee starting generating image just fine once again.
Do I need to load some additional upgrades for Autimatic1111? Or could it be something else? Any thoughts would be greatly appreciated.
Thanks much.
Hi, it needs Apple Silicon (M1/M2) so I am not sure if it runs correctly on an Intel CPU. You can consider Colab: https://stable-diffusion-art.com/automatic1111-colab/
Hi, Andrew.
Really nice site and absolutely helpful, thanks.
In case of having installed everything and finally don’t use it nevermore locally, do you know which commands we would need in order to uninstall all?
Thanks in advance and all the best to you and your projects
You can delete the whole stable-diffusion-webui folder.
This is the easiest and clearest I’ve seen on how to install A1111 on the Mac, especially the links one can copy-paste. Will be following this when my new Mac arrives. Thank you for a great job in creating this guide.
You sir are a god! Solved it for me
Hi there, I’m having trouble with this same error message (RuntimeError: “upsample_nearest2d_channels_last” not implemented for ‘Half’).
Could you please elaborate on “Try adding –no-half when you run webui.sh”? Where does one add it? How does one “run webui.sh”?
Thanks in advance!
Hi, In terminal App, go into the stable-diffusion-webui folder, run
./webui.sh --no-halfYou should see a confirmation in print out:
Launching Web UI with arguments: --no-half --skip-torch-cuda-test --upcast-sampling --no-half-vae --use-cpu interrogate
Your link for “Download some new models and have fun!” is wrong. what’s the correct link, please?
Ah, corrected.
Its great instruction but I need your HELP!! I waited for long time and can’t see any URL so I try to open the page directly and try to generate an image but it’s fail! May I know what I can do at this moment? Thanks!!!
Model loaded in 8.4s (calculate hash: 2.4s, load weights from disk: 0.7s, create model: 3.9s, apply weights to model: 0.4s, apply half(): 0.3s, move model to device: 0.6s, load textual inversion embeddings: 0.1s).
0%| | 0/20 [00:05<?, ?it/s]
Error completing request
Arguments: ('task(uzkeldhmrdy7n67)', 'cat', '', [], 20, 0, False, False, 1, 1, 7, -1.0, -1.0, 0, 0, 0, False, 512, 512, False, 0.7, 2, 'Latent', 0, 0, 0, 0, '', '', [], 0, False, False, 'positive', 'comma', 0, False, False, '', 1, '', [], 0, '', [], 0, '', [], True, False, False, False, 0) {}
Traceback (most recent call last):
File "/Users/tsangkevin/stable-diffusion-webui/modules/call_queue.py", line 57, in f
res = list(func(*args, **kwargs))
File "/Users/tsangkevin/stable-diffusion-webui/modules/call_queue.py", line 37, in f
res = func(*args, **kwargs)
File "/Users/tsangkevin/stable-diffusion-webui/modules/txt2img.py", line 57, in txt2img
processed = processing.process_images(p)
File "/Users/tsangkevin/stable-diffusion-webui/modules/processing.py", line 610, in process_images
…..
The first part is normal — it should stop there.
The problem is error during generation. The error message seems to be incomplete. Please paste the full message.
Mochi Diffusion on mac is fast and uses the Neural Engine.
When I finish installing, open it:web http://127.0.0.1:7860 ,Page always Show processing,I can’t do anything. I don’t know how to solve it.。github Someone gave feedback on the same problem.:https://github.com/AUTOMATIC1111/stable-diffusion-webui/issues/10793。
以下是运行cd ~/stable-diffusion-webui;./webui.sh后:
################################################################
Install script for stable-diffusion + Web UI
Tested on Debian 11 (Bullseye)
################################################################
################################################################
Running on simonamadeus user
################################################################
################################################################
Repo already cloned, using it as install directory
################################################################
################################################################
Create and activate python venv
################################################################
################################################################
Launching launch.py…
################################################################
Python 3.10.9 (main, Mar 1 2023, 12:20:14) [Clang 14.0.6 ]
Version: v1.3.0
Commit hash: 20ae71faa8ef035c31aa3a410b707d792c8203a3
Installing requirements
Launching Web UI with arguments: –skip-torch-cuda-test –upcast-sampling –no-half-vae –use-cpu interrogate
/Users/simonamadeus/stable-diffusion-webui/modules/mac_specific.py:51: UserWarning: torch.cumsum supported by MPS on MacOS 13+, please upgrade (Triggered internally at /Users/runner/work/pytorch/pytorch/pytorch/aten/src/ATen/native/mps/operations/UnaryOps.mm:264.)
cumsum_needs_int_fix = not torch.Tensor([1,2]).to(torch.device(“mps”)).equal(torch.ShortTensor([1,1]).to(torch.device(“mps”)).cumsum(0))
No module ‘xformers’. Proceeding without it.
Warning: caught exception ‘Torch not compiled with CUDA enabled’, memory monitor disabled
Loading weights [cc6cb27103] from /Users/simonamadeus/stable-diffusion-webui/models/Stable-diffusion/v1-5-pruned-emaonly.ckpt
Running on local URL: http://127.0.0.1:7860
To create a public link, set `share=True` in `launch()`.
Startup time: 2.7s (import torch: 0.8s, import gradio: 0.6s, import ldm: 0.3s, other imports: 0.5s, load scripts: 0.2s, create ui: 0.2s).
Creating model from config: /Users/simonamadeus/stable-diffusion-webui/configs/v1-inference.yaml
LatentDiffusion: Running in eps-prediction mode
DiffusionWrapper has 859.52 M params.
Applying optimization: InvokeAI… done.
Textual inversion embeddings loaded(0):
Model loaded in 20.3s (load weights from disk: 2.0s, create model: 0.7s, apply weights to model: 8.5s, apply half(): 7.8s, move model to device: 1.1s).
The gradio UI seems to be running so you should at least see the GUI on your browser. I don’t know what’s wrong either.
You can try
– using a different browser
– Remove vpn or proxy settings if any.
Thanks Reply,Unfortunately it still doesn’t work,Unfortunately it still doesn’t work
There is a way on git:try this startup argument
–no-gradio-queue
Can solve this problem, share it with everyone, now my Mac startup argument share with everyone cd ~/stable-diffusion-webui;./webui.sh –no-half –no-gradio-queue
The only problem is that it is too slow, 6 minutes for a picture
SD is slow on Mac. Try windows or Colab.
Hi I’m using Python 3.10.0, but still got this problem. Below is the error message:
Error completing request
Arguments: (‘task(es1qnibtjns5d1h)’, ‘cat’, ”, [], 20, 0, False, False, 1, 1, 7, -1.0, -1.0, 0, 0, 0, False, 512, 512, False, 0.7, 2, ‘Latent’, 0, 0, 0, [], 0, , False, False, ‘positive’, ‘comma’, 0, False, False, ”, 1, ”, [], 0, ”, [], 0, ”, [], True, False, False, False, 0, None, False, 50) {}
Traceback (most recent call last):
File “/Users/p1323593/stable-diffusion-webui/modules/call_queue.py”, line 57, in f
res = list(func(*args, **kwargs))
File “/Users/p1323593/stable-diffusion-webui/modules/call_queue.py”, line 37, in f
res = func(*args, **kwargs)
File “/Users/p1323593/stable-diffusion-webui/modules/txt2img.py”, line 56, in txt2img
processed = process_images(p)
File “/Users/p1323593/stable-diffusion-webui/modules/processing.py”, line 526, in process_images
res = process_images_inner(p)
File “/Users/p1323593/stable-diffusion-webui/extensions/sd-webui-controlnet/scripts/batch_hijack.py”, line 42, in processing_process_images_hijack
return getattr(processing, ‘__controlnet_original_process_images_inner’)(p, *args, **kwargs)
File “/Users/p1323593/stable-diffusion-webui/modules/processing.py”, line 680, in process_images_inner
samples_ddim = p.sample(conditioning=c, unconditional_conditioning=uc, seeds=seeds, subseeds=subseeds, subseed_strength=p.subseed_strength, prompts=prompts)
File “/Users/p1323593/stable-diffusion-webui/modules/processing.py”, line 907, in sample
samples = self.sampler.sample(self, x, conditioning, unconditional_conditioning, image_conditioning=self.txt2img_image_conditioning(x))
File “/Users/p1323593/stable-diffusion-webui/modules/sd_samplers_kdiffusion.py”, line 377, in sample
samples = self.launch_sampling(steps, lambda: self.func(self.model_wrap_cfg, x, extra_args={
File “/Users/p1323593/stable-diffusion-webui/modules/sd_samplers_kdiffusion.py”, line 251, in launch_sampling
return func()
File “/Users/p1323593/stable-diffusion-webui/modules/sd_samplers_kdiffusion.py”, line 377, in
samples = self.launch_sampling(steps, lambda: self.func(self.model_wrap_cfg, x, extra_args={
File “/Users/p1323593/stable-diffusion-webui/venv/lib/python3.10/site-packages/torch/utils/_contextlib.py”, line 115, in decorate_context
return func(*args, **kwargs)
File “/Users/p1323593/stable-diffusion-webui/repositories/k-diffusion/k_diffusion/sampling.py”, line 145, in sample_euler_ancestral
denoised = model(x, sigmas[i] * s_in, **extra_args)
File “/Users/p1323593/stable-diffusion-webui/venv/lib/python3.10/site-packages/torch/nn/modules/module.py”, line 1501, in _call_impl
return forward_call(*args, **kwargs)
File “/Users/p1323593/stable-diffusion-webui/modules/sd_samplers_kdiffusion.py”, line 135, in forward
x_out = self.inner_model(x_in, sigma_in, cond=make_condition_dict([cond_in], image_cond_in))
File “/Users/p1323593/stable-diffusion-webui/venv/lib/python3.10/site-packages/torch/nn/modules/module.py”, line 1501, in _call_impl
return forward_call(*args, **kwargs)
File “/Users/p1323593/stable-diffusion-webui/repositories/k-diffusion/k_diffusion/external.py”, line 114, in forward
eps = self.get_eps(input * c_in, self.sigma_to_t(sigma), **kwargs)
File “/Users/p1323593/stable-diffusion-webui/repositories/k-diffusion/k_diffusion/external.py”, line 140, in get_eps
return self.inner_model.apply_model(*args, **kwargs)
File “/Users/p1323593/stable-diffusion-webui/modules/sd_hijack_utils.py”, line 17, in
setattr(resolved_obj, func_path[-1], lambda *args, **kwargs: self(*args, **kwargs))
File “/Users/p1323593/stable-diffusion-webui/modules/sd_hijack_utils.py”, line 26, in __call__
return self.__sub_func(self.__orig_func, *args, **kwargs)
File “/Users/p1323593/stable-diffusion-webui/modules/sd_hijack_unet.py”, line 45, in apply_model
return orig_func(self, x_noisy.to(devices.dtype_unet), t.to(devices.dtype_unet), cond, **kwargs).float()
File “/Users/p1323593/stable-diffusion-webui/repositories/stable-diffusion-stability-ai/ldm/models/diffusion/ddpm.py”, line 858, in apply_model
x_recon = self.model(x_noisy, t, **cond)
File “/Users/p1323593/stable-diffusion-webui/venv/lib/python3.10/site-packages/torch/nn/modules/module.py”, line 1501, in _call_impl
return forward_call(*args, **kwargs)
File “/Users/p1323593/stable-diffusion-webui/repositories/stable-diffusion-stability-ai/ldm/models/diffusion/ddpm.py”, line 1335, in forward
out = self.diffusion_model(x, t, context=cc)
File “/Users/p1323593/stable-diffusion-webui/venv/lib/python3.10/site-packages/torch/nn/modules/module.py”, line 1501, in _call_impl
return forward_call(*args, **kwargs)
File “/Users/p1323593/stable-diffusion-webui/repositories/stable-diffusion-stability-ai/ldm/modules/diffusionmodules/openaimodel.py”, line 802, in forward
h = module(h, emb, context)
File “/Users/p1323593/stable-diffusion-webui/venv/lib/python3.10/site-packages/torch/nn/modules/module.py”, line 1501, in _call_impl
return forward_call(*args, **kwargs)
File “/Users/p1323593/stable-diffusion-webui/repositories/stable-diffusion-stability-ai/ldm/modules/diffusionmodules/openaimodel.py”, line 86, in forward
x = layer(x)
File “/Users/p1323593/stable-diffusion-webui/venv/lib/python3.10/site-packages/torch/nn/modules/module.py”, line 1501, in _call_impl
return forward_call(*args, **kwargs)
File “/Users/p1323593/stable-diffusion-webui/repositories/stable-diffusion-stability-ai/ldm/modules/diffusionmodules/openaimodel.py”, line 115, in forward
x = F.interpolate(x, scale_factor=2, mode=”nearest”)
File “/Users/p1323593/stable-diffusion-webui/venv/lib/python3.10/site-packages/torch/nn/functional.py”, line 3931, in interpolate
return torch._C._nn.upsample_nearest2d(input, output_size, scale_factors)
RuntimeError: “upsample_nearest2d_channels_last” not implemented for ‘Half’
Try adding
--no-halfwhen you run webui.shHelp?
RuntimeError: “LayerNormKernelImpl” not implemented for ‘Half’
Python 3.10.11 (main, Apr 7 2023, 07:31:31) [Clang 14.0.0 (clang-1400.0.29.202)]
Version: v1.2.1
Commit hash: 89f9faa63388756314e8a1d96cf86bf5e0663045
Installing requirements
Launching Web UI with arguments: –skip-torch-cuda-test –upcast-sampling –no-half-vae –use-cpu interrogate
No module ‘xformers’. Proceeding without it.
Warning: caught exception ‘Torch not compiled with CUDA enabled’, memory monitor disabled
Loading weights [cc6cb27103] from /Users/harrison/stable-diffusion-webui/models/Stable-diffusion/v1-5-pruned-emaonly.ckpt
Running on local URL: http://127.0.0.1:7860
To create a public link, set `share=True` in `launch()`.
Startup time: 7.9s (import torch: 2.3s, import gradio: 2.0s, import ldm: 0.6s, other imports: 1.5s, setup codeformer: 0.1s, load scripts: 0.7s, create ui: 0.6s, gradio launch: 0.1s).
Creating model from config: /Users/harrison/stable-diffusion-webui/configs/v1-inference.yaml
LatentDiffusion: Running in eps-prediction mode
DiffusionWrapper has 859.52 M params.
Applying cross attention optimization (InvokeAI).
Textual inversion embeddings loaded(0):
Model loaded in 12.7s (load weights from disk: 4.2s, create model: 0.9s, apply weights to model: 5.3s, apply half(): 2.2s).
Error completing request
Arguments: (‘task(fj7zyha6pm7lx3f)’, ‘sun\n’, ”, [], 20, 0, False, False, 1, 1, 7, -1.0, -1.0, 0, 0, 0, False, 512, 512, False, 0.7, 2, ‘Latent’, 0, 0, 0, [], 0, False, False, ‘positive’, ‘comma’, 0, False, False, ”, 1, ”, [], 0, ”, [], 0, ”, [], True, False, False, False, 0) {}
Traceback (most recent call last):
File “/Users/harrison/stable-diffusion-webui/modules/call_queue.py”, line 57, in f
res = list(func(*args, **kwargs))
File “/Users/harrison/stable-diffusion-webui/modules/call_queue.py”, line 37, in f
res = func(*args, **kwargs)
File “/Users/harrison/stable-diffusion-webui/modules/txt2img.py”, line 56, in txt2img
processed = process_images(p)
File “/Users/harrison/stable-diffusion-webui/modules/processing.py”, line 526, in process_images
res = process_images_inner(p)
File “/Users/harrison/stable-diffusion-webui/modules/processing.py”, line 669, in process_images_inner
uc = get_conds_with_caching(prompt_parser.get_learned_conditioning, negative_prompts, p.steps * step_multiplier, cached_uc)
File “/Users/harrison/stable-diffusion-webui/modules/processing.py”, line 608, in get_conds_with_caching
cache[1] = function(shared.sd_model, required_prompts, steps)
File “/Users/harrison/stable-diffusion-webui/modules/prompt_parser.py”, line 140, in get_learned_conditioning
conds = model.get_learned_conditioning(texts)
File “/Users/harrison/stable-diffusion-webui/repositories/stable-diffusion-stability-ai/ldm/models/diffusion/ddpm.py”, line 669, in get_learned_conditioning
c = self.cond_stage_model(c)
File “/Users/harrison/stable-diffusion-webui/venv/lib/python3.10/site-packages/torch/nn/modules/module.py”, line 1501, in _call_impl
return forward_call(*args, **kwargs)
File “/Users/harrison/stable-diffusion-webui/modules/sd_hijack_clip.py”, line 229, in forward
z = self.process_tokens(tokens, multipliers)
File “/Users/harrison/stable-diffusion-webui/modules/sd_hijack_clip.py”, line 254, in process_tokens
z = self.encode_with_transformers(tokens)
File “/Users/harrison/stable-diffusion-webui/modules/sd_hijack_clip.py”, line 302, in encode_with_transformers
outputs = self.wrapped.transformer(input_ids=tokens, output_hidden_states=-opts.CLIP_stop_at_last_layers)
File “/Users/harrison/stable-diffusion-webui/venv/lib/python3.10/site-packages/torch/nn/modules/module.py”, line 1501, in _call_impl
return forward_call(*args, **kwargs)
File “/Users/harrison/stable-diffusion-webui/venv/lib/python3.10/site-packages/transformers/models/clip/modeling_clip.py”, line 811, in forward
return self.text_model(
File “/Users/harrison/stable-diffusion-webui/venv/lib/python3.10/site-packages/torch/nn/modules/module.py”, line 1501, in _call_impl
return forward_call(*args, **kwargs)
File “/Users/harrison/stable-diffusion-webui/venv/lib/python3.10/site-packages/transformers/models/clip/modeling_clip.py”, line 721, in forward
encoder_outputs = self.encoder(
File “/Users/harrison/stable-diffusion-webui/venv/lib/python3.10/site-packages/torch/nn/modules/module.py”, line 1501, in _call_impl
return forward_call(*args, **kwargs)
File “/Users/harrison/stable-diffusion-webui/venv/lib/python3.10/site-packages/transformers/models/clip/modeling_clip.py”, line 650, in forward
layer_outputs = encoder_layer(
File “/Users/harrison/stable-diffusion-webui/venv/lib/python3.10/site-packages/torch/nn/modules/module.py”, line 1501, in _call_impl
return forward_call(*args, **kwargs)
File “/Users/harrison/stable-diffusion-webui/venv/lib/python3.10/site-packages/transformers/models/clip/modeling_clip.py”, line 378, in forward
hidden_states = self.layer_norm1(hidden_states)
File “/Users/harrison/stable-diffusion-webui/venv/lib/python3.10/site-packages/torch/nn/modules/module.py”, line 1501, in _call_impl
return forward_call(*args, **kwargs)
File “/Users/harrison/stable-diffusion-webui/venv/lib/python3.10/site-packages/torch/nn/modules/normalization.py”, line 190, in forward
return F.layer_norm(
File “/Users/harrison/stable-diffusion-webui/venv/lib/python3.10/site-packages/torch/nn/functional.py”, line 2515, in layer_norm
return torch.layer_norm(input, normalized_shape, weight, bias, eps, torch.backends.cudnn.enabled)
RuntimeError: “LayerNormKernelImpl” not implemented for ‘Half’
Try starting webui with these additional arguments
./webui.sh --precision full --no-half
I’m getting same error and I’m running web.sh on terminal. Is there anything else needed to install to get rid of this RuntimeError: “LayerNormKernelImpl” not implemented for ‘Half’
It seems that you were not using webui.sh because it should set the
--no-halfargument to avoid this error. By any chance you have run another file?After installing Homebrew you need the environment variable PATH by using these commands:
(echo; echo ‘eval “$(/opt/homebrew/bin/brew shellenv)”‘) >> /Users/bobpuffer/.zprofile
and
eval “$(/opt/homebrew/bin/brew shellenv)”
the strange thing is, I did update to 3.10 and i double checked in terminal, and it is still showing v3.9 in the error message. Thanks for taking a look, either way — I appreciate it.
I ve run into the same error, Do let me now if you ve found a solution!
Hi Andrew, I’m a very non-code savvy user. Everything good on the install, but every time a try to generate from a prompt or an image, I get an error message and python crashes. It gives me an error code and says dispatch queue: cache queue
Crashed thread has been 9, 10 or 12 – not sure if that matters
Mac mini M1, for reference. Any help greatly appreciated
Please post the full error message.
Translated Report (Full Report Below)
————————————-
Process: Python [19056]
Path: /Library/Developer/CommandLineTools/Library/Frameworks/Python3.framework/Versions/3.9/Resources/Python.app/Contents/MacOS/Python
Identifier: com.apple.python3
Version: 3.9.6 (3.9.6)
Build Info: python3-124000000000000~2119
Code Type: ARM-64 (Native)
Parent Process: zsh [19019]
Responsible: Terminal [19017]
User ID: 501
Date/Time: 2023-05-11 17:47:20.7164 -0400
OS Version: macOS 12.6.2 (21G320)
Report Version: 12
Anonymous UUID: E9DB3E39-5E53-F2D8-0806-4B010E226D9F
Sleep/Wake UUID: CB029746-6E7A-4A39-B1C7-56B0CED23F85
Time Awake Since Boot: 10000 seconds
Time Since Wake: 252 seconds
System Integrity Protection: enabled
Crashed Thread: 12 Dispatch queue: cache queue
Exception Type: EXC_CRASH (SIGABRT)
Exception Codes: 0x0000000000000000, 0x0000000000000000
Exception Note: EXC_CORPSE_NOTIFY
Application Specific Information:
abort() called
Thread 12 Crashed:: Dispatch queue: cache queue
0 libsystem_kernel.dylib 0x1925ead98 __pthread_kill + 8
1 libsystem_pthread.dylib 0x19261fee0 pthread_kill + 288
2 libsystem_c.dylib 0x19255a340 abort + 168
3 MetalPerformanceShadersGraph 0x1f6f47080 0x1f68af000 + 6914176
4 MetalPerformanceShadersGraph 0x1f6f46eb4 0x1f68af000 + 6913716
5 MetalPerformanceShadersGraph 0x1f6c6fd14 0x1f68af000 + 3935508
6 MetalPerformanceShadersGraph 0x1f68b9950 0x1f68af000 + 43344
7 MetalPerformanceShadersGraph 0x1f692b5e4 0x1f68af000 + 509412
8 MetalPerformanceShadersGraph 0x1f6928624 0x1f68af000 + 497188
9 MetalPerformanceShadersGraph 0x1f68d1170 0x1f68af000 + 139632
10 MetalPerformanceShadersGraph 0x1f68d0bc8 0x1f68af000 + 138184
11 MetalPerformanceShadersGraph 0x1f6927b68 0x1f68af000 + 494440
12 MetalPerformanceShadersGraph 0x1f69366ec 0x1f68af000 + 554732
13 MetalPerformanceShadersGraph 0x1f69395b0 0x1f68af000 + 566704
14 libtorch_cpu.dylib 0x1468ba22c invocation function for block in at::native::batch_norm_mps_out(at::Tensor const&, c10::optional const&, c10::optional const&, c10::optional const&, c10::optional const&, bool, double, double, at::Tensor&, at::Tensor&, at::Tensor&) + 1288
15 libtorch_cpu.dylib 0x14685f8b4 invocation function for block in at::native::mps::MPSGraphCache::CreateCachedGraph(std::__1::basic_string<char, std::__1::char_traits, std::__1::allocator > const&, at::native::mps::MPSCachedGraph* () block_pointer) + 216
16 libdispatch.dylib 0x19245c1b4 _dispatch_client_callout + 20
17 libdispatch.dylib 0x19246b414 _dispatch_lane_barrier_sync_invoke_and_complete + 56
18 libtorch_cpu.dylib 0x14684d9c0 at::native::mps::MPSGraphCache::CreateCachedGraph(std::__1::basic_string<char, std::__1::char_traits, std::__1::allocator > const&, at::native::mps::MPSCachedGraph* () block_pointer) + 160
19 libtorch_cpu.dylib 0x1468b8688 at::native::batch_norm_mps_out(at::Tensor const&, c10::optional const&, c10::optional const&, c10::optional const&, c10::optional const&, bool, double, double, at::Tensor&, at::Tensor&, at::Tensor&) + 3240
20 libtorch_cpu.dylib 0x1468ba708 at::native::batch_norm_mps(at::Tensor const&, c10::optional const&, c10::optional const&, c10::optional const&, c10::optional const&, bool, double, double) + 436
21 libtorch_cpu.dylib 0x1430209e4 at::_ops::native_batch_norm::call(at::Tensor const&, c10::optional const&, c10::optional const&, c10::optional const&, c10::optional const&, bool, double, double) + 412
22 libtorch_cpu.dylib 0x1468bede8 at::native::layer_norm_mps(at::Tensor const&, c10::ArrayRef, c10::optional const&, c10::optional const&, double) + 1092
23 libtorch_cpu.dylib 0x144dcb760 c10::impl::wrap_kernel_functor_unboxed_<c10::impl::detail::WrapFunctionIntoFunctor_<c10::CompileTimeFunctionPointer<std::__1::tuple (c10::DispatchKeySet, at::Tensor const&, c10::ArrayRef, c10::optional const&, c10::optional const&, double), &(torch::autograd::VariableType::(anonymous namespace)::native_layer_norm(c10::DispatchKeySet, at::Tensor const&, c10::ArrayRef, c10::optional const&, c10::optional const&, double))>, std::__1::tuple, c10::guts::typelist::typelist<c10::DispatchKeySet, at::Tensor const&, c10::ArrayRef, c10::optional const&, c10::optional const&, double> >, std::__1::tuple (c10::DispatchKeySet, at::Tensor const&, c10::ArrayRef, c10::optional const&, c10::optional const&, double)>::call(c10::OperatorKernel*, c10::DispatchKeySet, at::Tensor const&, c10::ArrayRef, c10::optional const&, c10::optional const&, double) + 1564
24 libtorch_cpu.dylib 0x143016b50 at::_ops::native_layer_norm::call(at::Tensor const&, c10::ArrayRef, c10::optional const&, c10::optional const&, double) + 356
25 libtorch_cpu.dylib 0x142a46bb4 at::native::layer_norm_symint(at::Tensor const&, c10::ArrayRef, c10::optional const&, c10::optional const&, double, bool) + 144
26 libtorch_cpu.dylib 0x1431b8204 at::_ops::layer_norm::call(at::Tensor const&, c10::ArrayRef, c10::optional const&, c10::optional const&, double, bool) + 364
27 libtorch_python.dylib 0x108410aa4 torch::autograd::THPVariable_layer_norm(_object*, _object*, _object*) + 852
28 Python3 0x1057dd360 0x105758000 + 545632
29 Python3 0x105797ee8 _PyObject_MakeTpCall + 360
30 Python3 0x1058796d0 0x105758000 + 1185488
31 Python3 0x105876d58 _PyEval_EvalFrameDefault + 23836
32 Python3 0x10587a3d4 0x105758000 + 1188820
33 Python3 0x105798678 _PyFunction_Vectorcall + 236
34 Python3 0x1058795e8 0x105758000 + 1185256
35 Python3 0x105876d58 _PyEval_EvalFrameDefault + 23836
36 Python3 0x105798730 0x105758000 + 263984
37 Python3 0x10579a924 0x105758000 + 272676
38 Python3 0x10587704c _PyEval_EvalFrameDefault + 24592
39 Python3 0x10587a3d4 0x105758000 + 1188820
40 Python3 0x105798678 _PyFunction_Vectorcall + 236
41 Python3 0x105797d10 _PyObject_FastCallDictTstate + 272
42 Python3 0x105798a58 _PyObject_Call_Prepend + 148
43 Python3 0x1057fde4c 0x105758000 + 679500
44 Python3 0x105797ee8 _PyObject_MakeTpCall + 360
45 Python3 0x1058796d0 0x105758000 + 1185488
46 Python3 0x105876d58 _PyEval_EvalFrameDefault + 23836
47 Python3 0x10587a3d4 0x105758000 + 1188820
48 Python3 0x105798678 _PyFunction_Vectorcall + 236
49 Python3 0x10579a810 0x105758000 + 272400
50 Python3 0x105798320 PyVectorcall_Call + 144
51 Python3 0x10587704c _PyEval_EvalFrameDefault + 24592
52 Python3 0x10587a3d4 0x105758000 + 1188820
53 Python3 0x105798678 _PyFunction_Vectorcall + 236
54 Python3 0x105797c8c _PyObject_FastCallDictTstate + 140
55 Python3 0x105798a58 _PyObject_Call_Prepend + 148
56 Python3 0x1057fde4c 0x105758000 + 679500
57 Python3 0x105797ee8 _PyObject_MakeTpCall + 360
58 Python3 0x1058796d0 0x105758000 + 1185488
59 Python3 0x105876e50 _PyEval_EvalFrameDefault + 24084
60 Python3 0x10587a3d4 0x105758000 + 1188820
61 Python3 0x105798678 _PyFunction_Vectorcall + 236
62 Python3 0x10579a810 0x105758000 + 272400
63 Python3 0x105798320 PyVectorcall_Call + 144
64 Python3 0x10587704c _PyEval_EvalFrameDefault + 24592
65 Python3 0x10587a3d4 0x105758000 + 1188820
66 Python3 0x105798678 _PyFunction_Vectorcall + 236
67 Python3 0x105797c8c _PyObject_FastCallDictTstate + 140
68 Python3 0x105798a58 _PyObject_Call_Prepend + 148
69 Python3 0x1057fde4c 0x105758000 + 679500
70 Python3 0x105797ee8 _PyObject_MakeTpCall + 360
71 Python3 0x1058796d0 0x105758000 + 1185488
72 Python3 0x105876e50 _PyEval_EvalFrameDefault + 24084
73 Python3 0x10587a3d4 0x105758000 + 1188820
74 Python3 0x105798678 _PyFunction_Vectorcall + 236
75 Python3 0x10579a810 0x105758000 + 272400
76 Python3 0x105798320 PyVectorcall_Call + 144
77 Python3 0x10587704c _PyEval_EvalFrameDefault + 24592
78 Python3 0x10587a3d4 0x105758000 + 1188820
79 Python3 0x105798678 _PyFunction_Vectorcall + 236
80 Python3 0x105797c8c _PyObject_FastCallDictTstate + 140
81 Python3 0x105798a58 _PyObject_Call_Prepend + 148
82 Python3 0x1057fde4c 0x105758000 + 679500
83 Python3 0x105797ee8 _PyObject_MakeTpCall + 360
84 Python3 0x1058796d0 0x105758000 + 1185488
85 Python3 0x105876e50 _PyEval_EvalFrameDefault + 24084
86 Python3 0x10587a3d4 0x105758000 + 1188820
87 Python3 0x105798678 _PyFunction_Vectorcall + 236
88 Python3 0x10579a810 0x105758000 + 272400
89 Python3 0x105798320 PyVectorcall_Call + 144
90 Python3 0x10587704c _PyEval_EvalFrameDefault + 24592
91 Python3 0x10587a3d4 0x105758000 + 1188820
92 Python3 0x105798678 _PyFunction_Vectorcall + 236
93 Python3 0x105797c8c _PyObject_FastCallDictTstate + 140
94 Python3 0x105798a58 _PyObject_Call_Prepend + 148
95 Python3 0x1057fde4c 0x105758000 + 679500
96 Python3 0x105797ee8 _PyObject_MakeTpCall + 360
97 Python3 0x1058796d0 0x105758000 + 1185488
98 Python3 0x105876e50 _PyEval_EvalFrameDefault + 24084
99 Python3 0x105798730 0x105758000 + 263984
100 Python3 0x10579a810 0x105758000 + 272400
101 Python3 0x1058795e8 0x105758000 + 1185256
102 Python3 0x105876d58 _PyEval_EvalFrameDefault + 23836
103 Python3 0x105798730 0x105758000 + 263984
104 Python3 0x10579a810 0x105758000 + 272400
105 Python3 0x1058795e8 0x105758000 + 1185256
106 Python3 0x105876d58 _PyEval_EvalFrameDefault + 23836
107 Python3 0x10587a3d4 0x105758000 + 1188820
108 Python3 0x105798678 _PyFunction_Vectorcall + 236
109 Python3 0x10579a924 0x105758000 + 272676
110 Python3 0x10587704c _PyEval_EvalFrameDefault + 24592
111 Python3 0x10587a3d4 0x105758000 + 1188820
112 Python3 0x105798678 _PyFunction_Vectorcall + 236
113 Python3 0x105797d10 _PyObject_FastCallDictTstate + 272
114 Python3 0x105798a58 _PyObject_Call_Prepend + 148
115 Python3 0x1057fde4c 0x105758000 + 679500
116 Python3 0x105797ee8 _PyObject_MakeTpCall + 360
117 Python3 0x1058796d0 0x105758000 + 1185488
118 Python3 0x105876d58 _PyEval_EvalFrameDefault + 23836
119 Python3 0x105798730 0x105758000 + 263984
120 Python3 0x10579a810 0x105758000 + 272400
121 Python3 0x1058795e8 0x105758000 + 1185256
122 Python3 0x105876d58 _PyEval_EvalFrameDefault + 23836
123 Python3 0x105798730 0x105758000 + 263984
124 Python3 0x1058795e8 0x105758000 + 1185256
125 Python3 0x105876dd4 _PyEval_EvalFrameDefault + 23960
126 Python3 0x10587a3d4 0x105758000 + 1188820
127 Python3 0x105798678 _PyFunction_Vectorcall + 236
128 Python3 0x1058795e8 0x105758000 + 1185256
129 Python3 0x105876dd4 _PyEval_EvalFrameDefault + 23960
130 Python3 0x10587a3d4 0x105758000 + 1188820
131 Python3 0x105798678 _PyFunction_Vectorcall + 236
132 Python3 0x1058795e8 0x105758000 + 1185256
133 Python3 0x105876dd4 _PyEval_EvalFrameDefault + 23960
134 Python3 0x105798730 0x105758000 + 263984
135 Python3 0x1058795e8 0x105758000 + 1185256
136 Python3 0x105876dd4 _PyEval_EvalFrameDefault + 23960
137 Python3 0x10587a3d4 0x105758000 + 1188820
138 Python3 0x105798678 _PyFunction_Vectorcall + 236
139 Python3 0x10587704c _PyEval_EvalFrameDefault + 24592
140 Python3 0x10587a3d4 0x105758000 + 1188820
141 Python3 0x105798678 _PyFunction_Vectorcall + 236
142 Python3 0x10587704c _PyEval_EvalFrameDefault + 24592
143 Python3 0x10587a3d4 0x105758000 + 1188820
144 Python3 0x105798678 _PyFunction_Vectorcall + 236
145 Python3 0x105890be0 0x105758000 + 1280992
146 Python3 0x1057dcacc 0x105758000 + 543436
147 Python3 0x105877064 _PyEval_EvalFrameDefault + 24616
148 Python3 0x105798730 0x105758000 + 263984
149 Python3 0x1058795e8 0x105758000 + 1185256
150 Python3 0x105876d34 _PyEval_EvalFrameDefault + 23800
151 Python3 0x105798730 0x105758000 + 263984
152 Python3 0x1058795e8 0x105758000 + 1185256
153 Python3 0x105876d34 _PyEval_EvalFrameDefault + 23800
154 Python3 0x105798730 0x105758000 + 263984
155 Python3 0x10579a89c 0x105758000 + 272540
156 Python3 0x105917db0 0x105758000 + 1834416
157 Python3 0x1058c6d24 0x105758000 + 1502500
158 libsystem_pthread.dylib 0x19262026c _pthread_start + 148
159 libsystem_pthread.dylib 0x19261b08c thread_start + 8
mm… haven’t seen this before.
One thing I just notice is you are running python 3.9
Please upgrade and make sure you are running 3.10
I found the answer — needed to add “–no-half” and “–use-cpu all” as command line arguments in webui-user.sh. thanks again for the guide!
Great! A quick note: You are supposed to run webui.sh on Mac. These two parameters should have already been called if you use it.
Hi, thanks for the great tutorial. I’m interested to try running SD on an older 2012 iMac with Monterrey 12.6.3. I don’t expect great performance but would like to tinker! Have all prerequisites installed but am getting this error on launching the webui.sh script:
“return t.to(device, dtype if t.is_floating_point() or t.is_complex() else None, non_blocking)
RuntimeError: MPS backend out of memory (MPS allocated: 361.28 MB, other allocations: 496.40 MB, max allowed: 870.40 MB). Tried to allocate 28.12 MB on private pool. Use PYTORCH_MPS_HIGH_WATERMARK_RATIO=0.0 to disable upper limit for memory allocations (may cause system failure).”
I may have found some information online relating to coda and pytorch, but it’s beyond my understanding at the moment… I’ll keep digging, but any suggestions would be appreciated!
thank you!
It WORKS! Thanks a lot:)
Hi Andrew! Thanks for the tutorial. I got it working all the way to the GUI displaying in-browser. But when I try a test prompt, it says:
RuntimeError: “upsample_nearest2d_channels_last” not implemented for ‘Half’
Any ideas? Running on M1 MBP.
I am running the command cd ~/stable-diffusion-webui;./webui.sh
If I try cd ~/stable-diffusion-webui;./webui.sh –no-half, I get the error launch.py: error: unrecognized arguments: –no-half
I am using the latest version of Python.
Hi, the latest version of python may not be supported. Please try python 3.10
+1
Getting the same error message
Hey Andrew, I have installed m1 max without any problems, but MB is overheating and the fan is running loudly while generating someting in SD. Frankly, I am worried that it will shorten the life of the computer. Do you have any advice on this? I have a desktop with a rtx 2080, do you think I should work on it? but I’m going to sell my desktop soon.
sorry my MB has a 32gb memory
Hi, welcome to the site. Using Apple machines to run SD is not always ideal because it doesn’t have an nvidia GPU. It works but works a lot harder.
It should not be bad on RTX 2080. May as well be faster than your Mac.
Hi Andrew! Got this when I tried to run auto1111:
################################################################
Install script for stable-diffusion + Web UI
Tested on Debian 11 (Bullseye)
################################################################
################################################################
Running on apple user
################################################################
################################################################
Repo already cloned, using it as install directory
################################################################
################################################################
Create and activate python venv
################################################################
################################################################
Launching launch.py…
################################################################
Python 3.10.11 (main, Apr 7 2023, 07:24:53) [Clang 14.0.0 (clang-1400.0.29.202)]
Commit hash: 22bcc7be428c94e9408f589966c2040187245d81
Installing open_clip
Traceback (most recent call last):
File “/Users/apple/stable-diffusion-webui/launch.py”, line 355, in
prepare_environment()
File “/Users/apple/stable-diffusion-webui/launch.py”, line 269, in prepare_environment
run_pip(f”install {openclip_package}”, “open_clip”)
File “/Users/apple/stable-diffusion-webui/launch.py”, line 129, in run_pip
return run(f'”{python}” -m pip {args} –prefer-binary{index_url_line}’, desc=f”Installing {desc}”, errdesc=f”Couldn’t install {desc}”)
File “/Users/apple/stable-diffusion-webui/launch.py”, line 97, in run
raise RuntimeError(message)
RuntimeError: Couldn’t install open_clip.
Command: “/Users/apple/stable-diffusion-webui/venv/bin/python3.10” -m pip install git+https://github.com/mlfoundations/open_clip.git@bb6e834e9c70d9c27d0dc3ecedeebeaeb1ffad6b –prefer-binary
Error code: 1
stdout: Collecting git+https://github.com/mlfoundations/open_clip.git@bb6e834e9c70d9c27d0dc3ecedeebeaeb1ffad6b
Cloning https://github.com/mlfoundations/open_clip.git (to revision bb6e834e9c70d9c27d0dc3ecedeebeaeb1ffad6b) to /private/var/folders/hy/jch7z_l94yzftrd0wnrq_6dr0000gn/T/pip-req-build-hr9dyiav
stderr: Running command git clone –filter=blob:none –quiet https://github.com/mlfoundations/open_clip.git /private/var/folders/hy/jch7z_l94yzftrd0wnrq_6dr0000gn/T/pip-req-build-hr9dyiav
致命错误:无法访问 ‘https://github.com/mlfoundations/open_clip.git/’:Recv failure: Operation timed out
致命错误:无法从承诺者远程获取 c7314f628364953cf84836c57d192ba6108bf224
警告:克隆成功,但是检出失败。
您可以通过 ‘git status’ 检查哪些已被检出,然后使用命令
‘git restore –source=HEAD :/’ 重试
error: subprocess-exited-with-error
× git clone –filter=blob:none –quiet https://github.com/mlfoundations/open_clip.git /private/var/folders/hy/jch7z_l94yzftrd0wnrq_6dr0000gn/T/pip-req-build-hr9dyiav did not run successfully.
│ exit code: 128
╰─> See above for output.
note: This error originates from a subprocess, and is likely not a problem with pip.
[notice] A new release of pip is available: 23.0.1 -> 23.1.1
[notice] To update, run: pip install –upgrade pip
Any way to help?
Thank you so much!
The main error is : 致命错误:无法访问 ‘https://github.com/mlfoundations/open_clip.git/’:Recv failure: Operation timed out
It seems like you cannot visit this URL. try it on your browser and find a way to access…
Working!!!! A huge thanks to you! 🙂
Hi! Thanks for your help!
This is what I get when trying to update fastapi:
Usage:
/Users/me/stable-diffusion-webui/venv/bin/python -m pip install [options] [package-index-options] …
/Users/me/stable-diffusion-webui/venv/bin/python -m pip install [options] -r [package-index-options] …
/Users/me/stable-diffusion-webui/venv/bin/python -m pip install [options] [-e] …
/Users/me/stable-diffusion-webui/venv/bin/python -m pip install [options] [-e] …
/Users/me/stable-diffusion-webui/venv/bin/python -m pip install [options] …
no such option: -u
The site automatically changed two short dashes to one long…. Let’s try again.
./venv/bin/python -m pip install --upgrade fastapi==0.90.1Here is the complete log: Not sure if you are referring to something else…
Launching launch.py…
################################################################
Python 3.10.11 (main, Apr 7 2023, 07:31:31) [Clang 14.0.0 (clang-1400.0.29.202)]
Commit hash: 310b71f669e4f2cea11b023c47f7ffedd82ab464
Installing requirements for Web UI
Launching Web UI with arguments: –no-half –use-cpu interrogate –reinstall-torch
Warning: caught exception ‘Torch not compiled with CUDA enabled’, memory monitor disabled
No module ‘xformers’. Proceeding without it.
LatentDiffusion: Running in eps-prediction mode
DiffusionWrapper has 859.52 M params.
Loading weights [81761151] from /Users/dominick/stable-diffusion-webui/models/Stable-diffusion/v1-5-pruned-emaonly.ckpt
Applying cross attention optimization (InvokeAI).
Textual inversion embeddings loaded(0):
Model loaded.
Running on local URL: http://127.0.0.1:7860
To create a public link, set `share=True` in `launch()`.
Traceback (most recent call last):
File “/Users/dominick/stable-diffusion-webui/launch.py”, line 307, in
start()
File “/Users/dominick/stable-diffusion-webui/launch.py”, line 302, in start
webui.webui()
File “/Users/dominick/stable-diffusion-webui/webui.py”, line 172, in webui
app.add_middleware(GZipMiddleware, minimum_size=1000)
File “/Users/dominick/stable-diffusion-webui/venv/lib/python3.10/site-packages/starlette/applications.py”, line 139, in add_middleware
raise RuntimeError(“Cannot add middleware after an application has started”)
RuntimeError: Cannot add middleware after an application has started
MacBook-Pro:stable-diffusion-webui dominick$
Try upgrade fastapi. In the webui directory, run:
./venv/bin/python -m pip install –upgrade fastapi==0.90.1
Try, and the error is still there…
Can you post your arguments to webui? it’s a print out during startup.
Thanks I’ll try!
Hello, I’m having the same problem.
Error completing request
Arguments: (‘task(7ciuh5z2e0q2h54)’, ‘cat\n’, ”, [], 20, 0, False, False, 1, 1, 7, -1.0, -1.0, 0, 0, 0, False, 512, 512, True, 0.7, 2, ‘Latent’, 0, 0, 0, [], 0, False, False, ‘positive’, ‘comma’, 0, False, False, ”, 1, ”, 0, ”, 0, ”, True, False, False, False, 0) {}
Traceback (most recent call last):
File “/Users/nick/stable-diffusion-webui/modules/call_queue.py”, line 56, in f
res = list(func(*args, **kwargs))
File “/Users/nick/stable-diffusion-webui/modules/call_queue.py”, line 37, in f
res = func(*args, **kwargs)
File “/Users/nick/stable-diffusion-webui/modules/txt2img.py”, line 56, in txt2img
processed = process_images(p)
File “/Users/nick/stable-diffusion-webui/modules/processing.py”, line 503, in process_images
res = process_images_inner(p)
File “/Users/nick/stable-diffusion-webui/modules/processing.py”, line 642, in process_images_inner
uc = get_conds_with_caching(prompt_parser.get_learned_conditioning, negative_prompts, p.steps, cached_uc)
File “/Users/nick/stable-diffusion-webui/modules/processing.py”, line 587, in get_conds_with_caching
cache[1] = function(shared.sd_model, required_prompts, steps)
File “/Users/nick/stable-diffusion-webui/modules/prompt_parser.py”, line 140, in get_learned_conditioning
conds = model.get_learned_conditioning(texts)
File “/Users/nick/stable-diffusion-webui/repositories/stable-diffusion-stability-ai/ldm/models/diffusion/ddpm.py”, line 669, in get_learned_conditioning
c = self.cond_stage_model(c)
File “/Users/nick/stable-diffusion-webui/venv/lib/python3.10/site-packages/torch/nn/modules/module.py”, line 1130, in _call_impl
return forward_call(*input, **kwargs)
File “/Users/nick/stable-diffusion-webui/modules/sd_hijack_clip.py”, line 229, in forward
z = self.process_tokens(tokens, multipliers)
File “/Users/nick/stable-diffusion-webui/modules/sd_hijack_clip.py”, line 254, in process_tokens
z = self.encode_with_transformers(tokens)
File “/Users/nick/stable-diffusion-webui/modules/sd_hijack_clip.py”, line 302, in encode_with_transformers
outputs = self.wrapped.transformer(input_ids=tokens, output_hidden_states=-opts.CLIP_stop_at_last_layers)
File “/Users/nick/stable-diffusion-webui/venv/lib/python3.10/site-packages/torch/nn/modules/module.py”, line 1130, in _call_impl
return forward_call(*input, **kwargs)
File “/Users/nick/stable-diffusion-webui/venv/lib/python3.10/site-packages/transformers/models/clip/modeling_clip.py”, line 811, in forward
return self.text_model(
File “/Users/nick/stable-diffusion-webui/venv/lib/python3.10/site-packages/torch/nn/modules/module.py”, line 1130, in _call_impl
return forward_call(*input, **kwargs)
File “/Users/nick/stable-diffusion-webui/venv/lib/python3.10/site-packages/transformers/models/clip/modeling_clip.py”, line 721, in forward
encoder_outputs = self.encoder(
File “/Users/nick/stable-diffusion-webui/venv/lib/python3.10/site-packages/torch/nn/modules/module.py”, line 1130, in _call_impl
return forward_call(*input, **kwargs)
File “/Users/nick/stable-diffusion-webui/venv/lib/python3.10/site-packages/transformers/models/clip/modeling_clip.py”, line 650, in forward
layer_outputs = encoder_layer(
File “/Users/nick/stable-diffusion-webui/venv/lib/python3.10/site-packages/torch/nn/modules/module.py”, line 1130, in _call_impl
return forward_call(*input, **kwargs)
File “/Users/nick/stable-diffusion-webui/venv/lib/python3.10/site-packages/transformers/models/clip/modeling_clip.py”, line 378, in forward
hidden_states = self.layer_norm1(hidden_states)
File “/Users/nick/stable-diffusion-webui/venv/lib/python3.10/site-packages/torch/nn/modules/module.py”, line 1130, in _call_impl
return forward_call(*input, **kwargs)
File “/Users/nick/stable-diffusion-webui/venv/lib/python3.10/site-packages/torch/nn/modules/normalization.py”, line 189, in forward
return F.layer_norm(
File “/Users/nick/stable-diffusion-webui/venv/lib/python3.10/site-packages/torch/nn/functional.py”, line 2503, in layer_norm
return torch.layer_norm(input, normalized_shape, weight, bias, eps, torch.backends.cudnn.enabled)
RuntimeError: “LayerNormKernelImpl” not implemented for ‘Half’
cd ~/stable-diffusion-webui;./webui.sh –skip-torch-cuda-test –precision full –no-half
Hi!
I’m running into these 2 problems:
1- Warning: caught exception ‘Torch not compiled with CUDA enabled’, memory monitor disabled
No module ‘xformers’. Proceeding without it.
2- File “/usr/local/lib/python3.10/site-packages/starlette/applications.py”, line 139, in add_middleware
raise RuntimeError(“Cannot add middleware after an application has started”)
RuntimeError: Cannot add middleware after an application has started
Any help would be greatly appreciated!
Thanks,
Hi, the first warning is normal — nothing to worry about.
the second one was a bug from fastai. it should have been fixed. You can try doing a “git pull” in the webui directory to retrieve the latest code. Then delete the venv folder and run again.
Ran into the same issue. Try running the script with arguments ‘ –precision full –no-half
Source: https://huggingface.co/CompVis/stable-diffusion-v1-4/discussions/64
Btw, It’s not necessary downloading model separately. It will be downloaded when you run web UI for the first time.
Ah, good to know. Thanks.
So unsurprisingly it was me ! I thought I was on the last version of Monterey , I wasn’t , Updated that to the last version , Ran SD again & it worked.
Slow but it gets there , I really have to say thank you because I wouldn’t have got this far without your very clear instructions , today’s the first time I’ve ever dowloaded code from github !
My new problem is I installed the Deforum extension , that doesn’t want to work !
It starts to generate the video then Python completely crashes.
I’m fairly sure it’s something to do with this :
You are running torch 1.12.1.
The program is tested to work with torch 1.13.1.
To reinstall the desired version, run with commandline flag –reinstall-torch.
Beware that this will cause a lot of large files to be downloaded, as well as
there are reports of issues with training tab on the latest version.
I found a post on Reddit which says to edit the webui-user.bat file adding
set COMMANDLINE_ARGS=”–reinstall-torch” (are those “”meant to be there ? I’ve tried both ! )
delete the venv folder and run again .
It reloads everything each time I delete that folder , I was hoping I might get something as simple as press 1 to install torch 1.13.1 but no , it’s not happening …
This is the reddit post with the exact same issue I’ve now got .
https://www.reddit.com/r/StableDiffusion/comments/10m48dv/how_do_i_reinstall_torch_to_get_to_1131/
Don’t suppose you know the magic words to update torch to 1.13.1 do you ?
sorry to be a hassle & thank you .
Sorry I haven’t encountered this problem before so I cannot suggest a solution.
So I’ve Installed Homebrew, the packages , cloned the repo etc . Stable Diffusion model is where it should be. I can run the WebUI but when I input txt I get this error (mac mini M1 8gig Monterey 12.2.1)
Do any clever people have any advice to offer ? This is all new to me ..
Error completing request
Arguments: (‘task(c8nzucb8gosp6ez)’, ‘A portrait of a man with no mouth trying to scream , his face is wired to the computer mother board behind him , highly detailed, digital painting, artstation, concept art, smooth, sharp focus, illustration, art by artgerm and greg rutkowski and alphonse mucha’, ‘ugly, tiling, poorly drawn hands, poorly drawn feet, poorly drawn face, out of frame, extra limbs, disfigured, deformed, body out of frame, bad anatomy, watermark, signature, cut off, low contrast, underexposed, overexposed, bad art, beginner, amateur, distorted face’, [], 20, 0, False, False, 1, 1, 7, -1.0, -1.0, 0, 0, 0, False, 512, 512, False, 0.7, 2, ‘Latent’, 0, 0, 0, [], 0, False, False, ‘positive’, ‘comma’, 0, False, False, ”, 1, ”, 0, ”, 0, ”, True, False, False, False, 0) {}
Traceback (most recent call last):
File “/Users/simonlord/stable-diffusion-webui/modules/call_queue.py”, line 56, in f
res = list(func(*args, **kwargs))
File “/Users/simonlord/stable-diffusion-webui/modules/call_queue.py”, line 37, in f
res = func(*args, **kwargs)
File “/Users/simonlord/stable-diffusion-webui/modules/txt2img.py”, line 56, in txt2img
processed = process_images(p)
File “/Users/simonlord/stable-diffusion-webui/modules/processing.py”, line 503, in process_images
res = process_images_inner(p)
File “/Users/simonlord/stable-diffusion-webui/modules/processing.py”, line 642, in process_images_inner
uc = get_conds_with_caching(prompt_parser.get_learned_conditioning, negative_prompts, p.steps, cached_uc)
File “/Users/simonlord/stable-diffusion-webui/modules/processing.py”, line 587, in get_conds_with_caching
cache[1] = function(shared.sd_model, required_prompts, steps)
File “/Users/simonlord/stable-diffusion-webui/modules/prompt_parser.py”, line 140, in get_learned_conditioning
conds = model.get_learned_conditioning(texts)
File “/Users/simonlord/stable-diffusion-webui/repositories/stable-diffusion-stability-ai/ldm/models/diffusion/ddpm.py”, line 669, in get_learned_conditioning
c = self.cond_stage_model(c)
File “/Users/simonlord/stable-diffusion-webui/venv/lib/python3.10/site-packages/torch/nn/modules/module.py”, line 1130, in _call_impl
return forward_call(*input, **kwargs)
File “/Users/simonlord/stable-diffusion-webui/modules/sd_hijack_clip.py”, line 229, in forward
z = self.process_tokens(tokens, multipliers)
File “/Users/simonlord/stable-diffusion-webui/modules/sd_hijack_clip.py”, line 254, in process_tokens
z = self.encode_with_transformers(tokens)
File “/Users/simonlord/stable-diffusion-webui/modules/sd_hijack_clip.py”, line 302, in encode_with_transformers
outputs = self.wrapped.transformer(input_ids=tokens, output_hidden_states=-opts.CLIP_stop_at_last_layers)
File “/Users/simonlord/stable-diffusion-webui/venv/lib/python3.10/site-packages/torch/nn/modules/module.py”, line 1130, in _call_impl
return forward_call(*input, **kwargs)
File “/Users/simonlord/stable-diffusion-webui/venv/lib/python3.10/site-packages/transformers/models/clip/modeling_clip.py”, line 811, in forward
return self.text_model(
File “/Users/simonlord/stable-diffusion-webui/venv/lib/python3.10/site-packages/torch/nn/modules/module.py”, line 1130, in _call_impl
return forward_call(*input, **kwargs)
File “/Users/simonlord/stable-diffusion-webui/venv/lib/python3.10/site-packages/transformers/models/clip/modeling_clip.py”, line 721, in forward
encoder_outputs = self.encoder(
File “/Users/simonlord/stable-diffusion-webui/venv/lib/python3.10/site-packages/torch/nn/modules/module.py”, line 1130, in _call_impl
return forward_call(*input, **kwargs)
File “/Users/simonlord/stable-diffusion-webui/venv/lib/python3.10/site-packages/transformers/models/clip/modeling_clip.py”, line 650, in forward
layer_outputs = encoder_layer(
File “/Users/simonlord/stable-diffusion-webui/venv/lib/python3.10/site-packages/torch/nn/modules/module.py”, line 1130, in _call_impl
return forward_call(*input, **kwargs)
File “/Users/simonlord/stable-diffusion-webui/venv/lib/python3.10/site-packages/transformers/models/clip/modeling_clip.py”, line 378, in forward
hidden_states = self.layer_norm1(hidden_states)
File “/Users/simonlord/stable-diffusion-webui/venv/lib/python3.10/site-packages/torch/nn/modules/module.py”, line 1130, in _call_impl
return forward_call(*input, **kwargs)
File “/Users/simonlord/stable-diffusion-webui/venv/lib/python3.10/site-packages/torch/nn/modules/normalization.py”, line 189, in forward
return F.layer_norm(
File “/Users/simonlord/stable-diffusion-webui/venv/lib/python3.10/site-packages/torch/nn/functional.py”, line 2503, in layer_norm
return torch.layer_norm(input, normalized_shape, weight, bias, eps, torch.backends.cudnn.enabled)
RuntimeError: “LayerNormKernelImpl” not implemented for ‘Half’
That’s new to me too. Webui has not been stable after recent changes. Perhaps you can try checking out the code from like 2 weeks ago.
No module ‘xformers’. Proceeding without it.
==============================================================================
You are running torch 1.12.1.
The program is tested to work with torch 1.13.1.
To reinstall the desired version, run with commandline flag –reinstall-torch.
Beware that this will cause a lot of large files to be downloaded, as well as
there are reports of issues with training tab on the latest version.
Use –skip-version-check commandline argument to disable this check.
==============================================================================
Loading weights [c6bbc15e32] from /Users/chenchanghai/stable-diffusion-webui/models/Stable-diffusion/sd-v1-5-inpainting.ckpt
Creating model from config: /Users/chenchanghai/stable-diffusion-webui/configs/v1-inpainting-inference.yaml
LatentInpaintDiffusion: Running in eps-prediction mode
DiffusionWrapper has 859.54 M params.
Failed to create model quickly; will retry using slow method.
LatentInpaintDiffusion: Running in eps-prediction mode
DiffusionWrapper has 859.54 M params.
loading stable diffusion model: JSONDecodeError
Traceback (most recent call last):
File “/Users/chenchanghai/stable-diffusion-webui/webui.py”, line 139, in initialize
modules.sd_models.load_model()
File “/Users/chenchanghai/stable-diffusion-webui/modules/sd_models.py”, line 438, in load_model
sd_model = instantiate_from_config(sd_config.model)
File “/Users/chenchanghai/stable-diffusion-webui/repositories/stable-diffusion-stability-ai/ldm/util.py”, line 89, in instantiate_from_config
return get_obj_from_str(config[“target”])(**config.get(“params”, dict()))
File “/Users/chenchanghai/stable-diffusion-webui/repositories/stable-diffusion-stability-ai/ldm/models/diffusion/ddpm.py”, line 1650, in __init__
super().__init__(concat_keys, *args, **kwargs)
File “/Users/chenchanghai/stable-diffusion-webui/repositories/stable-diffusion-stability-ai/ldm/models/diffusion/ddpm.py”, line 1515, in __init__
super().__init__(*args, **kwargs)
File “/Users/chenchanghai/stable-diffusion-webui/repositories/stable-diffusion-stability-ai/ldm/models/diffusion/ddpm.py”, line 563, in __init__
self.instantiate_cond_stage(cond_stage_config)
File “/Users/chenchanghai/stable-diffusion-webui/repositories/stable-diffusion-stability-ai/ldm/models/diffusion/ddpm.py”, line 630, in instantiate_cond_stage
model = instantiate_from_config(config)
File “/Users/chenchanghai/stable-diffusion-webui/repositories/stable-diffusion-stability-ai/ldm/util.py”, line 89, in instantiate_from_config
return get_obj_from_str(config[“target”])(**config.get(“params”, dict()))
File “/Users/chenchanghai/stable-diffusion-webui/repositories/stable-diffusion-stability-ai/ldm/modules/encoders/modules.py”, line 103, in __init__
self.tokenizer = CLIPTokenizer.from_pretrained(version)
File “/Users/chenchanghai/stable-diffusion-webui/venv/lib/python3.10/site-packages/transformers/tokenization_utils_base.py”, line 1801, in from_pretrained
return cls._from_pretrained(
File “/Users/chenchanghai/stable-diffusion-webui/venv/lib/python3.10/site-packages/transformers/tokenization_utils_base.py”, line 1956, in _from_pretrained
tokenizer = cls(*init_inputs, **init_kwargs)
File “/Users/chenchanghai/stable-diffusion-webui/venv/lib/python3.10/site-packages/transformers/models/clip/tokenization_clip.py”, line 323, in __init__
self.encoder = json.load(vocab_handle)
File “/Users/chenchanghai/anaconda3/lib/python3.10/json/__init__.py”, line 293, in load
return loads(fp.read(),
File “/Users/chenchanghai/anaconda3/lib/python3.10/json/__init__.py”, line 346, in loads
return _default_decoder.decode(s)
File “/Users/chenchanghai/anaconda3/lib/python3.10/json/decoder.py”, line 337, in decode
obj, end = self.raw_decode(s, idx=_w(s, 0).end())
File “/Users/chenchanghai/anaconda3/lib/python3.10/json/decoder.py”, line 353, in raw_decode
obj, end = self.scan_once(s, idx)
json.decoder.JSONDecodeError: Unterminated string starting at: line 1 column 35818 (char 35817)
“I don’t know what to do to solve these problems. I’ve been trying for a whole day, but these problems still persist and I keep getting error messages. Do you have any solutions to solve them?”
I think you accidentally changed a text file in the directory. Try in terminal “git checkout -f” in the webui directory.
Thank you!
Will AUTOMATIC1111 work on Mac Mini M2 (8GB)? And if not, will it work on Mac Mini M2 Pro (16GB)?
Not sure about 8GB. Can be slow because of swap memory. 16GB will definitely work.
There is a problem when I use stable diffusion.
I have installed the stable diffusion, but when I generate the picture, there is an exception dialog, as follows:
Something went wrong Expecting value: line 1 column 1 (char 0)
Haven’t seen this one before but perhaps you have accidentally changed a file? Try do a fresh git clone.
Hello! thanks for this post… but i have a problem i can’t solve yet. When i try to run the “cd ~/stable-diffusion-webui;./webui.sh”
this error appears and no matter what i do it wont go, any suggestions on how to fix it?
Screenshot of the error:
https://ibb.co/tXdfL91
Hi, I haven’t seen this before. The only thing I can think of is you can check if your OS is update-to-date. I install it successfully on MacOS 13.2.1.
If that’s not the issue, you can visit a1111’s github page and ask for help there.
Hi Andrew,
Thanks for the tutorial. It installed ok but when I try to prompt I get this error:
RuntimeError: “LayerNormKernelImpl” not implemented for ‘Half’
It’s making me think it’s. not configured for M1 processors…?
Thanks for any help you can offer
Hi, I just tested installing on a M1 and it works. A few pointers
1. Did you run webui.sh? It should call a macos script which specifies a “no half” argument.
2. Any error message when you run webui.sh?
Hello Andrew ! I’ve got this error after launching launch.py:
File”/usr/local/Cellar/[email protected]/3.10.10/Frameworks/Python.framework/Versions/3.10/lib/python3.10/importlib/__init__.py”, line 126, in import_module
return _bootstrap._gcd_import(name[level:], package, level)
ImportError: dlopen(/Users/anna/stable-diffusion-webui/venv/lib/python3.10/site-packages/cv2/cv2.abi3.so, 2): Symbol not found: _VTRegisterSupplementalVideoDecoderIfAvailable
Referenced from: /Users/anna/stable-diffusion-webui/venv/lib/python3.10/site-packages/cv2/.dylibs/libavcodec.59.37.100.dylib (which was built for Mac OS X 11.0)
Expected in: /System/Library/Frameworks/VideoToolbox.framework/Versions/A/VideoToolbox
in /Users/anna/stable-diffusion-webui/venv/lib/python3.10/site-packages/cv2/.dylibs/libavcodec.59.37.100.dylib
Looks like is missing a file. Any clue why?
Thanks !
It seems that your Mac OS is outdated. It’s looking for something available in OS 11 or higher.
Andrew,
Thank you for putting this together! I followed your instructions (but maybe failed) and I’m getting a change directory error:
./webui.sh: line 105: cd: /home/2022mac14/: No such file or directory
ERROR: Can’t cd to /home/2022mac14/, aborting…%
Yet there is a directory – any help is appreciated (clearly a noob)
Hi Rich, the error message looks wrong — the directory should be the stable-diffusion-webui, not your home dir. There’s a chance that something was wrong before this step. You can try restart install the whole thing again.
Everytime I try running it local on my mac book pro I get the following message and the terminal basically stays like this indefinitely for hours. I have no idea how to fix it.
==> ./configure –prefix=/usr/local/Cellar/rust/1.67.0 –enable-vendor –set rus
==> make
Haven’t seen this error. I would try reinstall.
Hi!
I posted a plea for help a while ago
Disregard!
Figured it out!
Thank you very much!!!
David
Greetings;
New at trying to run SD locally on my M2 MacBook… Not new with SD.
Following is the echo after running the command to do the original initialization/setup etc:
——–clipped just after ‘No module ‘xformers’. Proceeding without it.
You are running torch 1.12.1.
The program is tested to work with torch 1.13.1.
To reinstall the desired version, run with commandline flag –reinstall-torch.
Beware that this will cause a lot of large files to be downloaded.
((What directory do I need to be in to successfully run the –reinstall-torch command?))
==============================================================================
Loading weights [b97a0e0676] from /Users/davidfisher/stable-diffusion-webui/models/Stable-diffusion/v1-5-pruned-emaonly.ckpt.download/v1-5-pruned-emaonly.ckpt
Error verifying pickled file from /Users/davidfisher/stable-diffusion-webui/models/Stable-diffusion/v1-5-pruned-emaonly.ckpt.download/v1-5-pruned-emaonly.ckpt:
Traceback (most recent call last):
File “/Users/davidfisher/stable-diffusion-webui/modules/safe.py”, line 81, in check_pt
with zipfile.ZipFile(filename) as z:
File “/opt/homebrew/Cellar/[email protected]/3.10.9/Frameworks/Python.framework/Versions/3.10/lib/python3.10/zipfile.py”, line 1267, in __init__
self._RealGetContents()
File “/opt/homebrew/Cellar/[email protected]/3.10.9/Frameworks/Python.framework/Versions/3.10/lib/python3.10/zipfile.py”, line 1334, in _RealGetContents
raise BadZipFile(“File is not a zip file”)
zipfile.BadZipFile: File is not a zip file
During handling of the above exception, another exception occurred:
Traceback (most recent call last):
File “/Users/davidfisher/stable-diffusion-webui/modules/safe.py”, line 135, in load_with_extra
check_pt(filename, extra_handler)
File “/Users/davidfisher/stable-diffusion-webui/modules/safe.py”, line 102, in check_pt
unpickler.load()
_pickle.UnpicklingError: persistent IDs in protocol 0 must be ASCII strings
—–> !!!! The file is most likely corrupted !!!! <—–
You can skip this check with –disable-safe-unpickle commandline argument, but that is not going to help you.
loading stable diffusion model: AttributeError
Traceback (most recent call last):
File "/Users/davidfisher/stable-diffusion-webui/webui.py", line 103, in initialize
modules.sd_models.load_model()
File "/Users/davidfisher/stable-diffusion-webui/modules/sd_models.py", line 370, in load_model
state_dict = get_checkpoint_state_dict(checkpoint_info, timer)
File "/Users/davidfisher/stable-diffusion-webui/modules/sd_models.py", line 228, in get_checkpoint_state_dict
res = read_state_dict(checkpoint_info.filename)
File "/Users/davidfisher/stable-diffusion-webui/modules/sd_models.py", line 214, in read_state_dict
sd = get_state_dict_from_checkpoint(pl_sd)
File "/Users/davidfisher/stable-diffusion-webui/modules/sd_models.py", line 187, in get_state_dict_from_checkpoint
pl_sd = pl_sd.pop("state_dict", pl_sd)
AttributeError: 'NoneType' object has no attribute 'pop'
Stable diffusion model failed to load, exiting
———
I hate doing this to you but I'm basically stuck.
Hi David, you will need to edit the file webui-macos-env.sh
There’s a line like
export COMMANDLINE_ARGS=”–skip-torch-cuda-test –use-cpu interrogate”
You can add –reinstall-torch to it
If it does it, you will need to remove it before running again.