Do you want to create large images with Stable Diffusion with a lot of details? You will need to use an upscaler. In this post, you will learn 3 methods to upscale images.
- AI upscalers
- SD upscale
- ControlNet tile upscale
You will see a comparison and learn about the pros and cons of these methods.
You may want to learn the basics of upscalers if you are not familiar with the topic.
Table of Contents
Software
We will use AUTOMATIC1111 Stable Diffusion GUI to perform upscaling. You can use this GUI on Windows, Mac, or Google Colab.
We will need the Ultimate SD Upscale and ControlNet extensions for the last method.
Colab users
If you use the Colab Notebook provided by the site, all you need to do is to select ControlNet and Ultimate SD Upscale extensions before starting the notebook.

Windows or Mac users
Installing Ultimate SD upscale extension
Ultimate SD upscale is an extension offering functions similar to the built-in SD Upscale script but with some advanced options.
To install Ultimate SD upscale in AUTOMATIC1111:
- Navigate to the Extensions page.
2. Select the Install from URL tab.
3. Put the following URL in the URL for extension’s repository field.
https://github.com/Coyote-A/ultimate-upscale-for-automatic11114. Click the Install button.
5. Wait for the confirmation message saying the extension is successfully installed.
6. Restart AUTOMATIC1111.

If the installation is successful, you should see Ultimate SD upscale available in the Script dropdown menu at the bottom of the img2img page.

Installing ControlNet Extension
ControlNet is an extension that gives you extra control over your image generations. See the ControlNet tutorial to learn more.
To install Ultimate SD upscale in AUTOMATIC1111:
- Navigate to the Extensions page.
2. Select the Install from URL tab.
3. Put the following URL in the URL for extension’s repository field.
https://github.com/Mikubill/sd-webui-controlnet4. Click the Install button.
5. Wait for the confirmation message saying the extension is installed.
6. Restart AUTOMATIC1111.
7. Visit the ControlNet models page.
8. Download all model files (filename ending with .pth). If you don’t want to download all of them, you can just download the tile model (The one ends with _tile) for this tutorial.
9. Put the model file(s) in the ControlNet extension’s model directory.
stable-diffusion-webui\extensions\sd-webui-controlnet\models10. Restart AUTOMATIC1111.
You should see the ControlNet section on the txt2img page. The tile model should be available for selection in the Model dropdown menu. Press the refresh button next to the menu if you don’t see it.
Input image
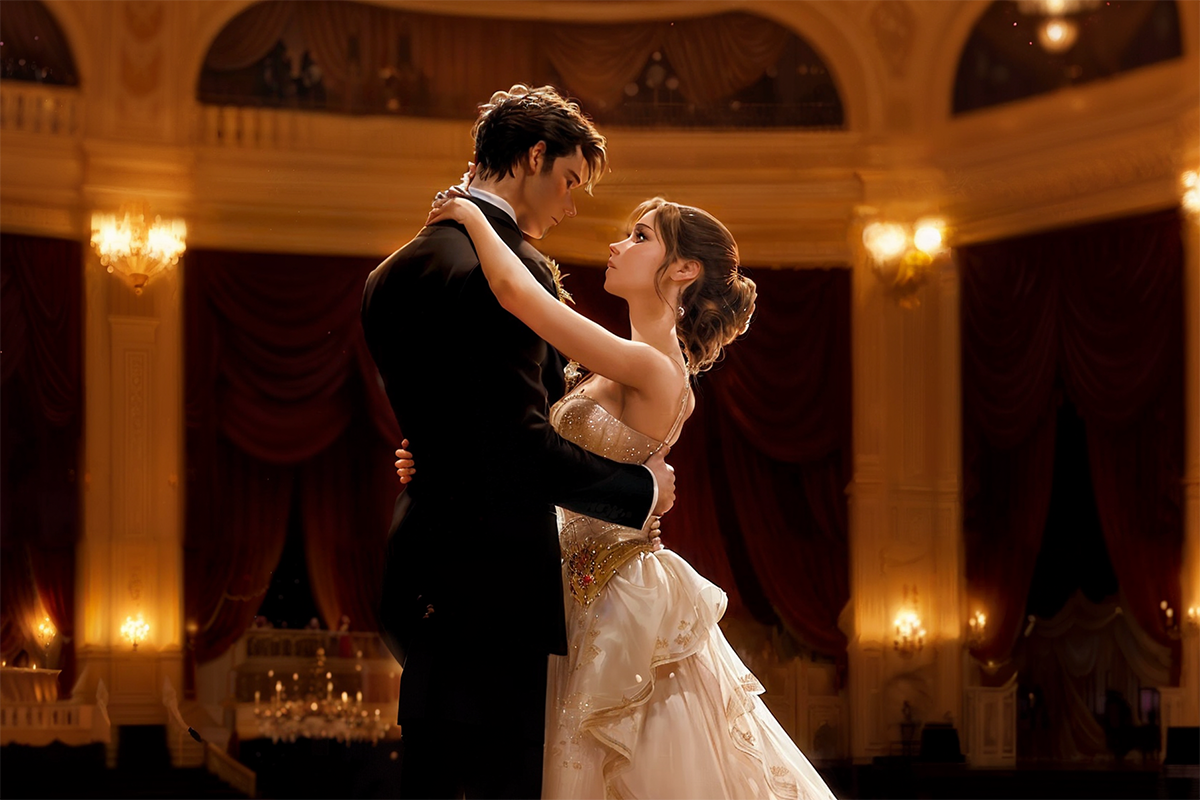
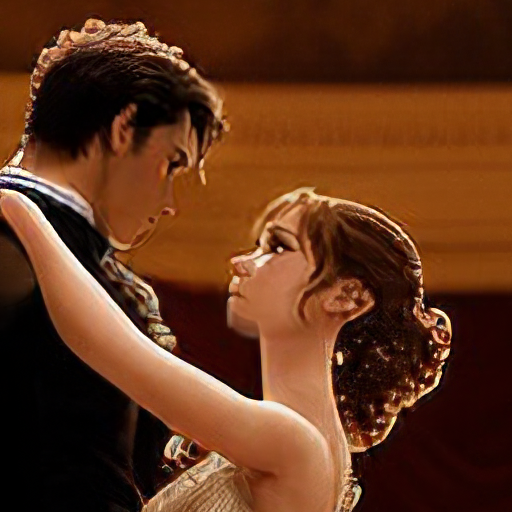
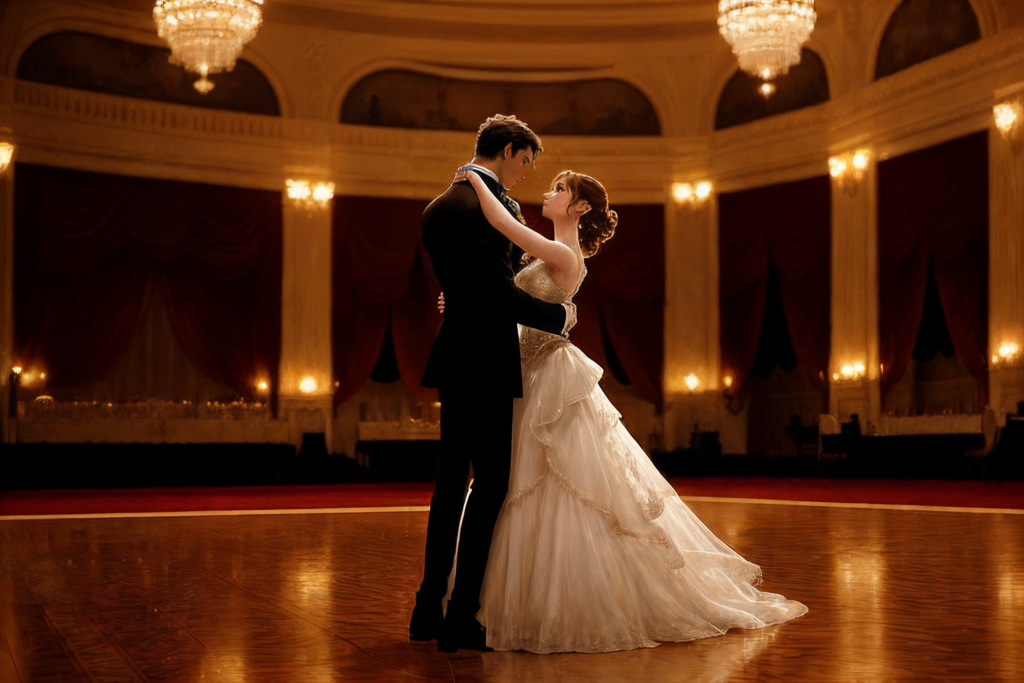
We will use the following image generated by Stable Diffusion.

Model: Lyriel v1.5
Prompt and negative prompt:
“The Last Dance”: In a grand ballroom, our star-crossed lovers share a dance. Time seems to slow as they waltz, lost in each other’s eyes. Unbeknownst to them, this will be their final moment together before fate intervenes.
(I got this prompt from GPT-4)
disfigured, deformed
The original size is pretty small (768×512 pixels). Let’s enlarge it 4x to 3,072×2,048 pixels. We will test with three upscaling methods.
- AI Upscaler
- SD Upscale
- ControlNet tile upscale
Method 1: AI Upscaler
An AI Upscaler is an AI model trained to enlarge photos and fill in details so that the image can stay sharp. This is the basic way to upscale images in AUTOMATIC1111.
- In AUTOMATIC1111, navigate to the Extras page.
2. Upload the image to the image canvas.
3. Set Resize to 4. (Enlarge the image by 4x.)
4. Select an upscaler in Upscaler 1. I used Universal Upscaler v2, but you can use any. (See instructions to download and install new upscalers here)
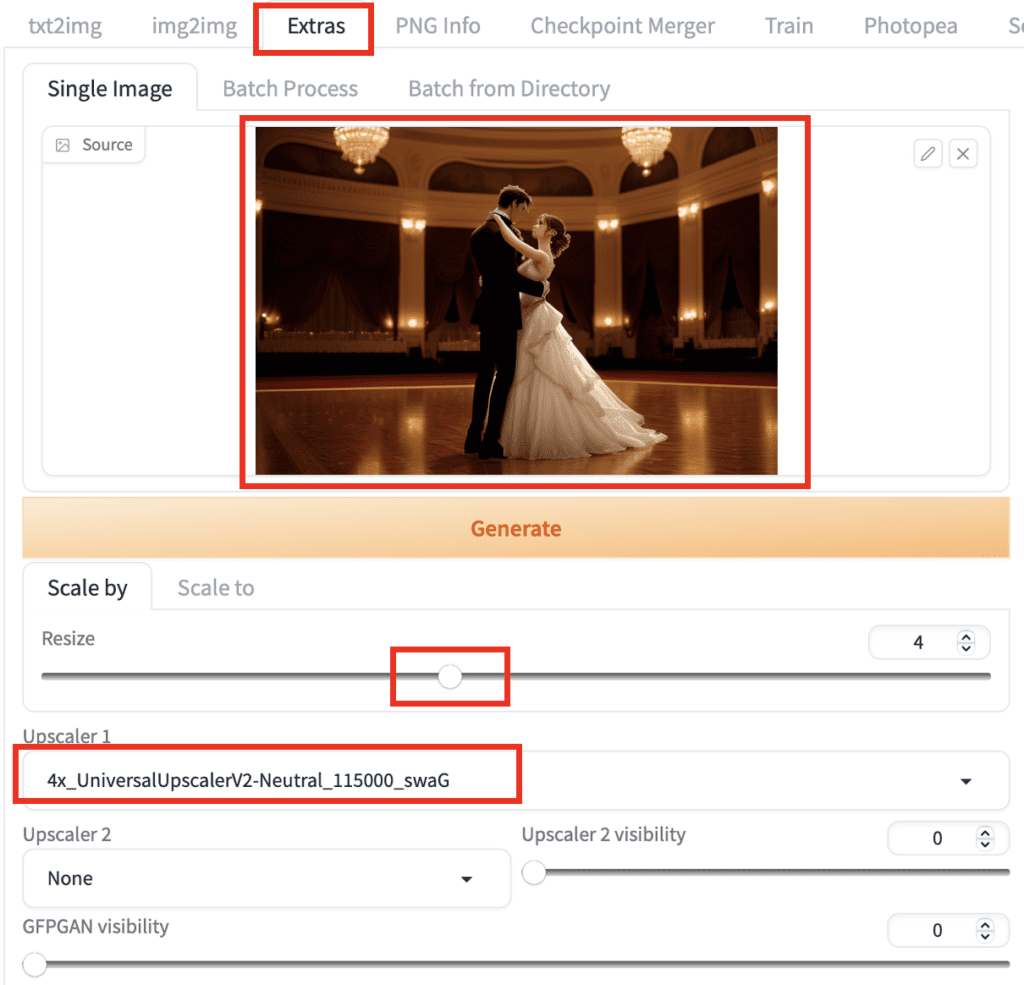
5. Click Generate.
After a short while, you will see the upscaled image on the output window on the right.
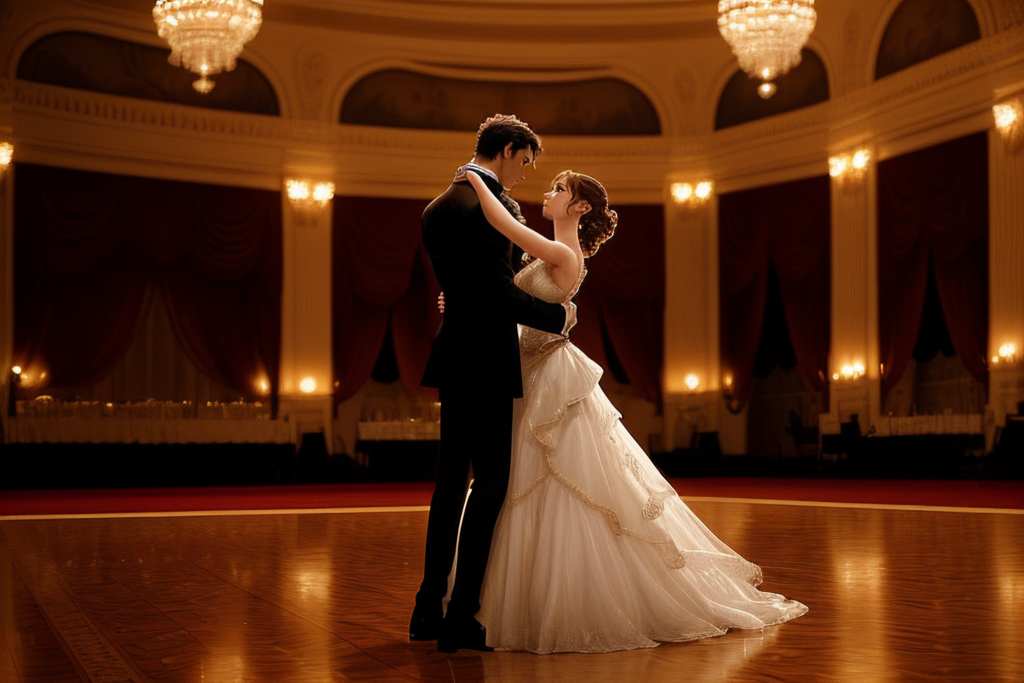
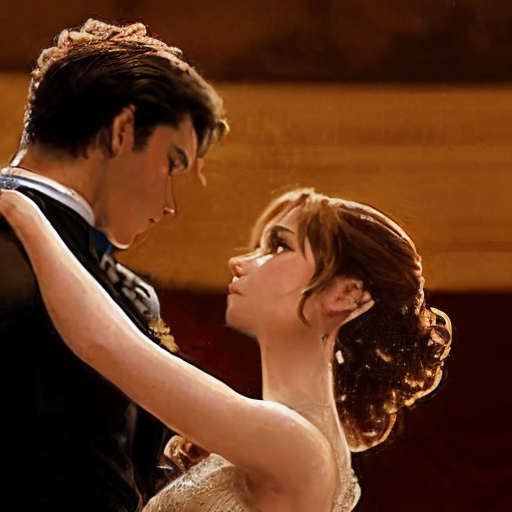
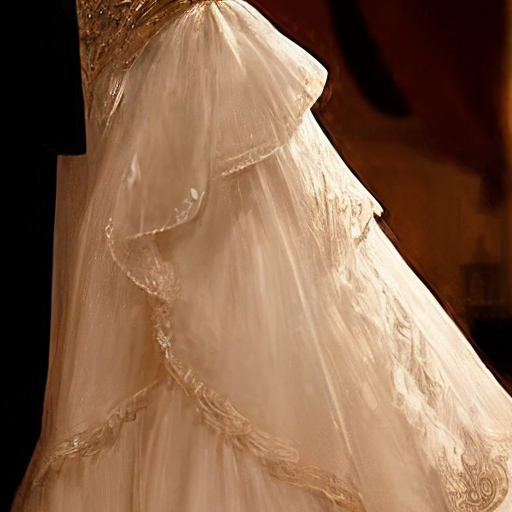
Let’s see how it goes. Let’s first look at the dress.

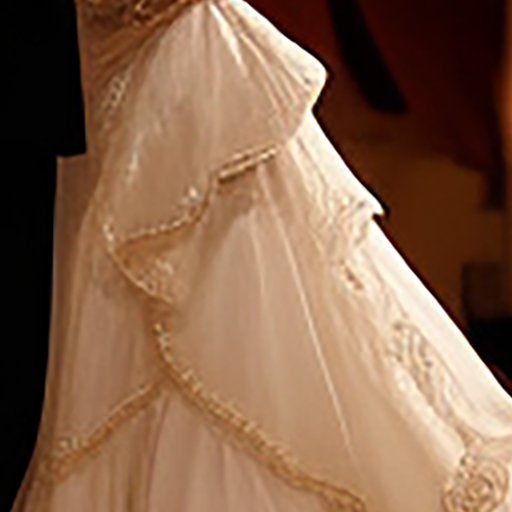
It’s doing a decent job of faithfully filling in the details of the dress.
But the woman’s face will need some enhancement beyond what this upscaler can do.

For sure, you can turn on face restoration, which uses another AI model to restore faces. But because the model is not trained with this particular style, it could introduce artifacts and make faces look unnatural.
Method 2: SD Upscale
Is there any way to fix the face without using face restoration?
First of all, the face is kind of like that in the original image. That’s why we got what we got when scaling it up.
But what if you are OK with more changes since the original image is computer-generated anyway? You can perform an additional round of image-to-image to regenerate details.
This is exactly what the SD upscale script does.
The benefits of this method are
- New zoom-in details can be generated with the same model and prompt.
- Remove artifacts introduced by the AI upscaler.
You can use the SD Upscale script on the img2img page in AUTOMATIC1111 to easily perform both AI upscaling and SD img2img in one go. The script performs Stable Diffusion img2img in small tiles, so it works with low VRAM GPU cards.
Step-by-step guide
Follow these steps to perform SD upscale.
- On the img2img page, upload the image to Image Canvas.
2. Put in the original prompt and the negative prompt. You can use “highly detailed” if you don’t have the original prompt.
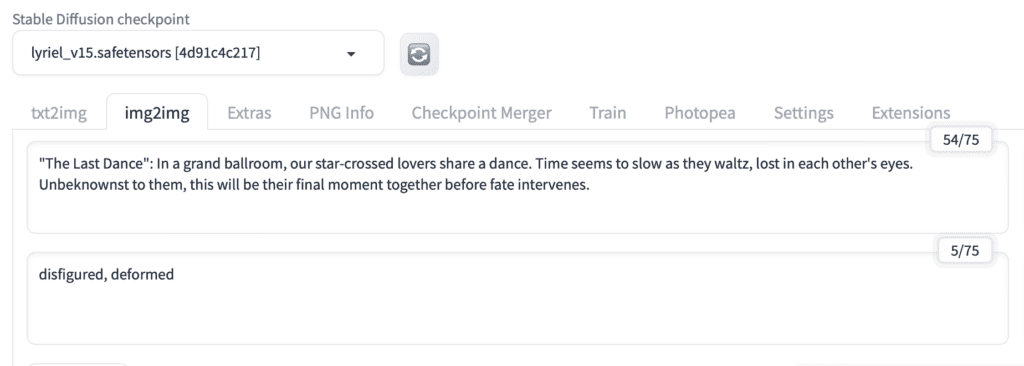
Alternative 1: If you just generated the image on the txt2img page, click the Send to img2img button. The image and prompts will be populated automatically.
Alternative 2: If you have a generated image saved in your local storage, you can upload it to the PNG info page. You should see all the information for generating this image, including the prompts and models. Click Send to img2img. The image and prompts will be populated automatically.
3. In the Stable Diffusion checkpoint dropdown menu, Select the model you originally used when generating this image
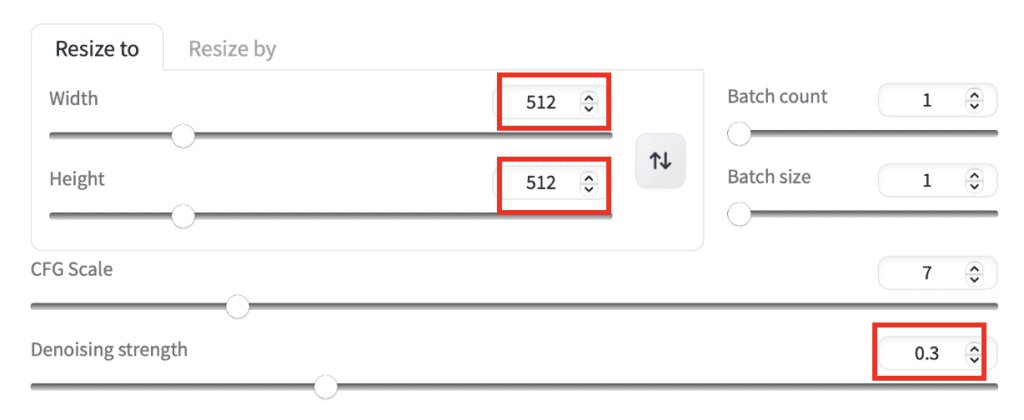
3. Set both the image width and height to 512. This is the tile size to be used for SD upscale.
4. Set denoising strength to 0.3. A higher value will result in more details and recovery, but you should not set it higher than 0.4. Otherwise, you will see artifacts.
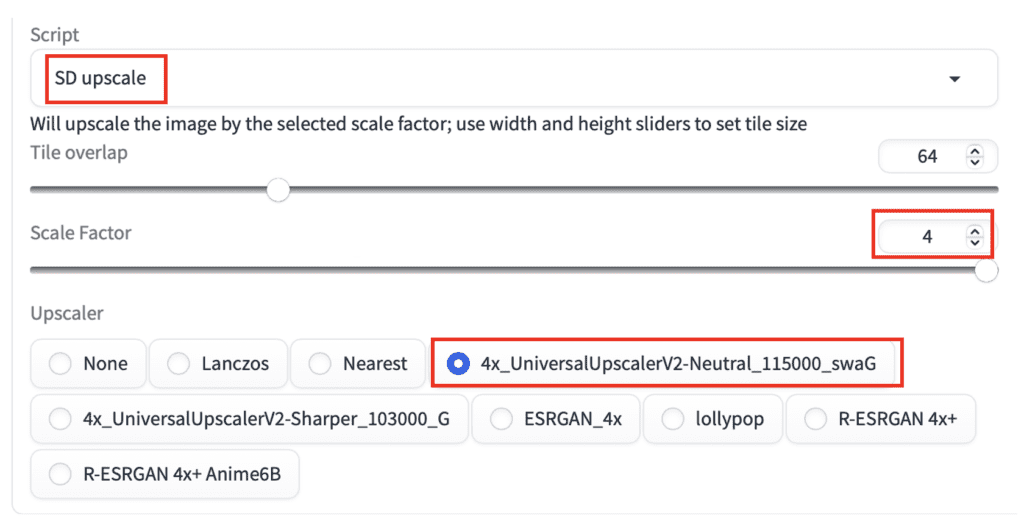
5. Find the Script dropdown menu near the button of the img2img page. Select SD upscale.
6. Set the Scale Factor to 4 for scaling up 4x.
7. Select an Upscaler. I selected the same upscaler used in the previous method. But you can select ESRGAN or R-ESRGAN if you don’t have it.
8. Click Generate.
Result
This is what I got.
The hardwood floor has a lot of details, thanks to Stable Diffusion img2img.
Now let’s compare the face.
Nice improvement! SD upscale fixes the faces without introducing artifacts.
Let’s inspect the dress, shall we?
They have slightly more details too.
You can experiment with the following parameters.
- Sampling steps: Setting to higher, e.g. 50 – 100, can result in more details.
- Sampling method. The details can be different, especially with ancestral samplers.
- Denosing strength. Controls how much detail to add. The workable range is between 0.1 and 0.4 for this method.
- Seed: Change the details.
The level of detail is controlled by the denoising strength parameter. As I said earlier, this method breaks down if you set it higher than 0.4 because Stable Diffusion will change the image too much. You will start to see artifacts.
Is there any way to increase the denoising strength without sacrificing the original composition? Mmmm… This sounds awfully similar to the function of an extension that copies the composition from a reference image…
That’s right. The solution is using ControlNet!
Method 3: ControlNet tile upscale
ControlNet tile is a ControlNet model for regenerating image details. If the local image details does not match the prompt, it will ignore the prompt and fill in the local details. This behavior makes it ideal for upscaling in tiles, so it works with a low VRAM setup.
You will need to install Ultimate SD Upscale and ControlNet extensions in order to use this method. Follow the instructions in the Software section if you haven’t done so already.
I have no idea why this method doesn’t work with the built-in SD Upscale script. It should, but it doesn’t.
Step-by-step guide
To perform ControlNet tile upscale:
- Navigate to the img2img page in AUTOMATIC1111.
2. Upload your image to the img2img canvas.
3. Put in the original prompt and the negative prompt. You can use “highly detailed” if you don’t have the original prompt.
Alternative 1: If you just generated the image on the txt2img page, you can click the Send to img2img button. The image and prompts will be populated automatically on the img2img page.
Alternative 2: If you have a generated image saved in your local image, upload it to the PNG info page. You should see all the information for generating this image, including the prompts and models. Click Send to img2img. The image and prompts will be populated automatically. on the img2img page.
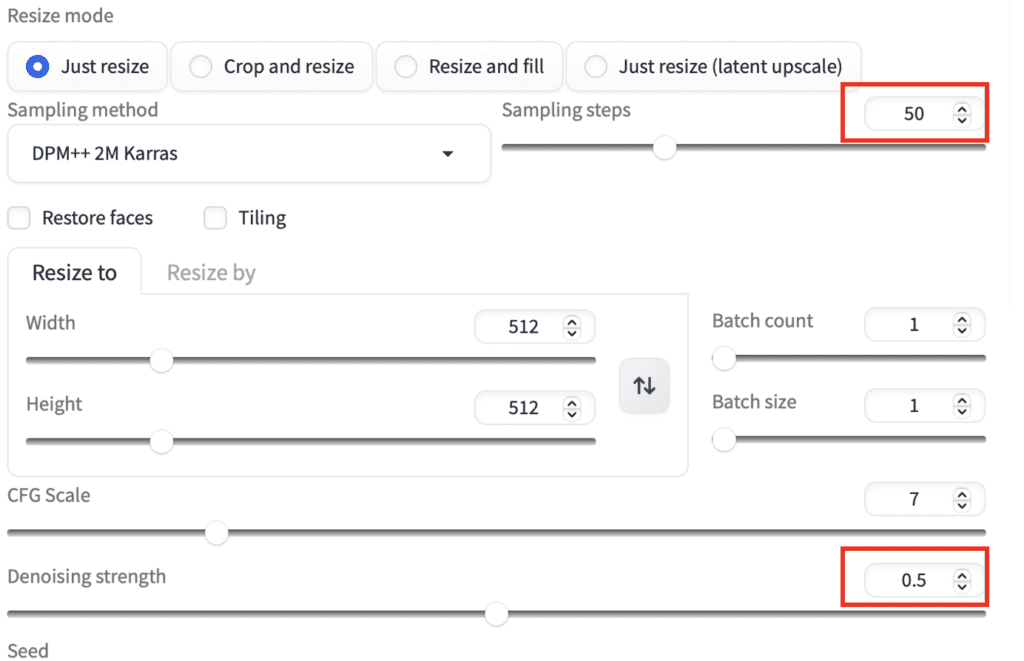
4. Set Sampling steps to 50.
5. Set Denoising strength to 0.5.
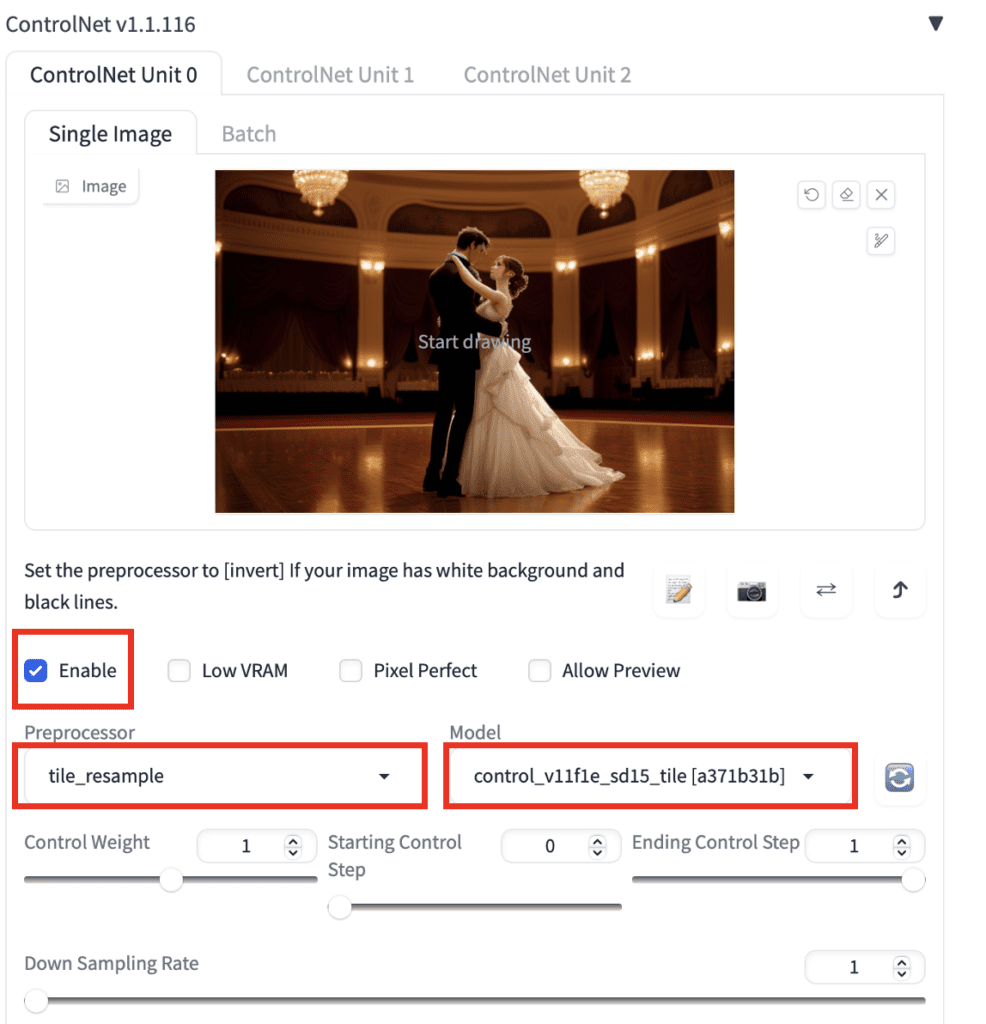
The following steps are for the ControlNet section.
6. Upload the same original image to ControlNet’s image canvas.
7. Select Enable to enable the ControlNet extension.
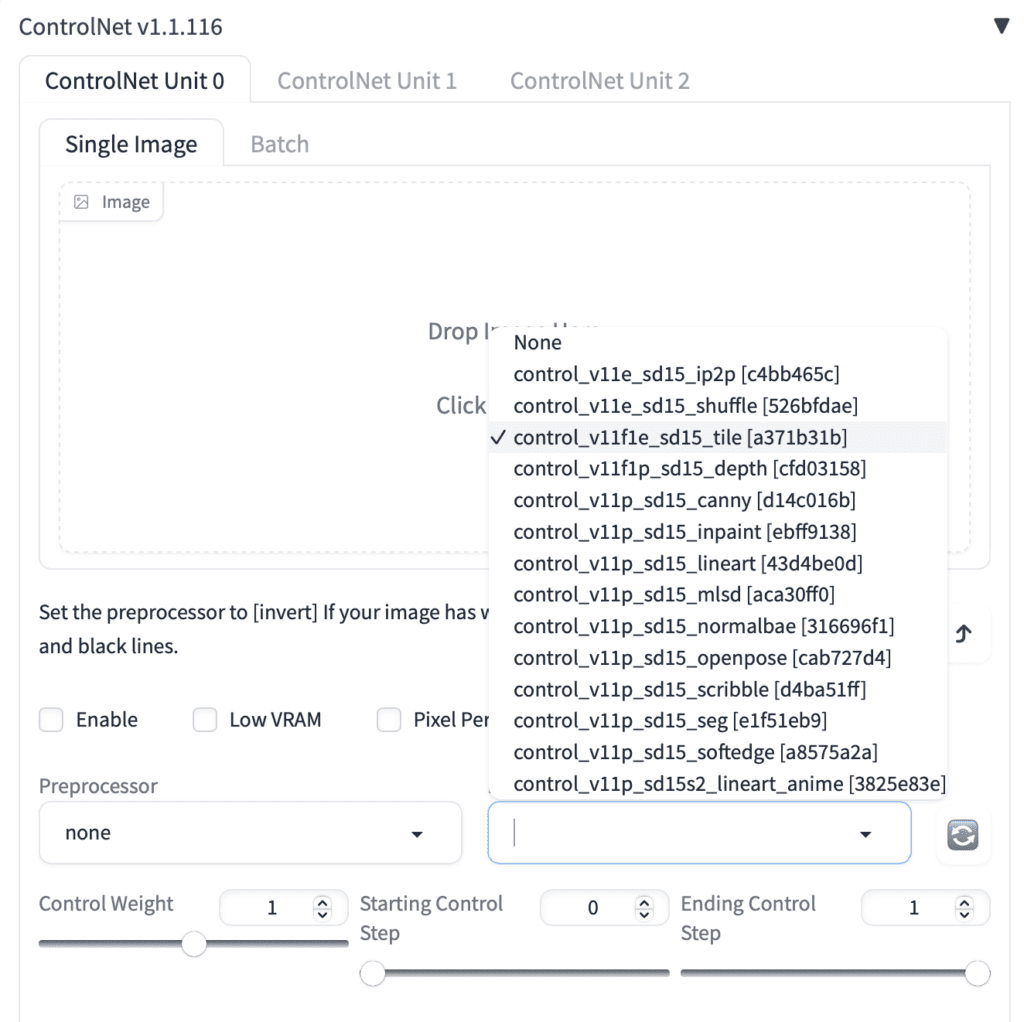
8. Select tile_resample in the Preprocessor dropdown menu.
9. Select control_v…_sd15_tile in the Model dropdown menu.
The following steps are for the Ultimate SD Upscale extension.
10. In the Script dropdown menu near the bottom of the page, select Ultimate SD Upscale.
11. In the Target size type dropdown menu, select Scale from image size.
12. Set the Scale to 4.
13. Select an Upscaler. I used the Universal Upscaler v2. But you can select ESRGAN or R-ESRGAN for a generic upscaler.

14. Confirm the Tile width is 512 and height is 0. This will use 512×512 tiles during upscaling.
15. Click Generate.
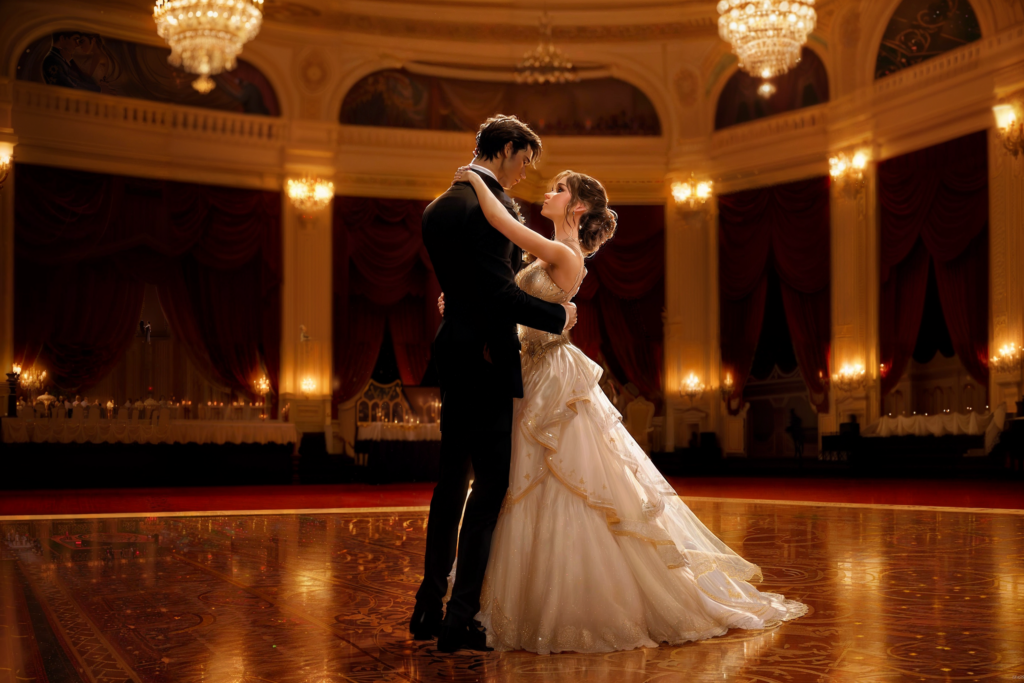
Results
Here’s the upscaled image.
Let’s zoom in and compare.
Here are the faces.
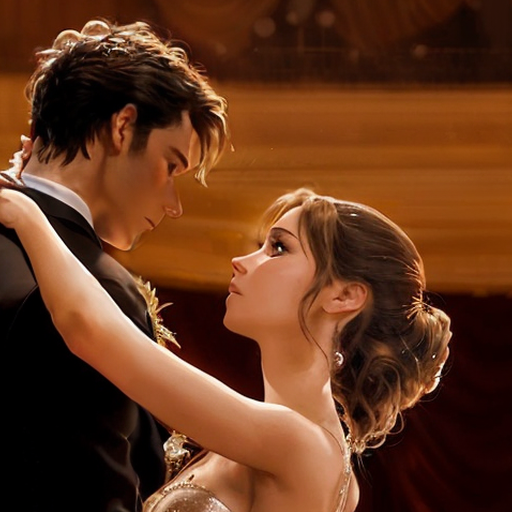
Amazing! The quality of ControlNet tile upscaling is nothing short of life-changing. The faces and hairs are so clearly rendered with lots of detail.
Now let’s inspect the dress.

It blew my mind to see how much detail is added!
The downside of this method is perhaps too much detail is added. It could change the image in a way that it is no longer a faithful scale-up of the original. But it depends on your goal.
Parameter adjustments
You can experiment with the following parameters.
- Denoising strength: Lower it to reduce the amount of detail added. The highest reasonable value is 0.5, in my experience.
- Downsampling rate (ControlNet): Control how much downsampling is done to the control tile. Increasing this value makes the control image more blurry. The more burry the control image, the more liberty the model has in making up the details.


- Sampling steps: Increasing the number of steps tends to improve details and sharpness.
- Sampling method: Like SD Upscale, the sampler can play a role in the final details.
- Seed: Change the seed to change the details.
- Seam fix (Ultimate SD Upscale): Enable if you feel you can see the 512×512 tiles. This option runs an extra round of upscaling along the boundaries of the tiles.
Tips
If you see artifacts such as extra objects, try reducing the denoising strength or increasing the down-sampling rate.
Which one should you use?
Out of the three upscaling options — AI upscale, SD Upscale and ControlNet tile upscale, which one should you use?
Before getting to the recommendations, I would argue that the use cases of SD upscale and ControlNet tile upscale are similar. ControlNet tile upscale is superior. There would not be a case that you would want to use SD upscale instead of ControlNet tile upscale.
So it comes down to 2 choices: (1) AI upscaler, and (2) ControlNet tile upscale.
Since you would normally upscale the image with AI upscale before the ControlNet tile operation, essentially, it comes down to whether to perform an additional image-to-image with ControlNet tile conditioning.
If you are working with real photos or fidelity is important to you, you may want to forego ControlNet tile and use only an AI upscaler. There are a multitude of AI upscalers you can use for different types of images.
In fact, even these AI upscalers make up details, so use them wisely.
ControlNet tile upscale is the way to go if you are ok or even prefer to add details. This applies to images generated with Stable Diffusion or other AI image generators.
I don’t know why, but the third method did not work for me. I have a feeling that the system did not divide the image into tiles but instead worked with the whole picture. Could you please check?
Good morning
I did some tests and for an image representing a painting ControlNet removes the “brush strokes” and smoothes the image. The best I found is “ESRGAN_4x”. Is there an upscaler specializing in paints? Thanks
You will need to find an upscaler that matches the particular style of painting. See https://openmodeldb.info/
I tried some photos I took on my phone. Lots of small details are improved greatly but no matter what I do, faces and other body parts look cartoonish or like oil painting. I tried many models, all of them do this. Any way to fix it?
you can try realistic models like realistic vision.
I tried using ControlNet upscale with SDXL and with a LoRA of a person, and because of the LoRA the rescaler puts the face in every tile, how can I solve this? I need the LoRA to refine and upscale the original face, but not to place the face on every tile. Is anyone else having this problem?. Thanks.
Best regards.
Jesus.
You can try a lower denoising strength.
> If you see artifacts such as extra objects, try reducing the denoising strength or increasing the down-sampling rate.
Shouldn’t it be decreasing the down-sampling rate? Earlier you also mentioned:
> Increasing this value makes the control image more blurry. The more burry the control image, the more liberty the model has in making up the details.
More blurry making it to have something to do correctly instead of making things up to do.
Thank you very much for the 3 methods! Now I would like to ask: I get the same results with ComfyUI in 5 seconds, versus 30mn for the A11111 ui – same hardware. Is anyone having better results?
30 mins seems way to long.
After installing the ControlNet Extension, I encountered difficulties launching AUTOMATIC1111 the following day. However, upon removing the extension’s folder, everything returned to normal.Why would this happen,thanks a lot.
controlnet extension has a big update. You will need to update your A1111, install controlnet and delete the venv folder.
Thanks for this great tutorial and all your excellent work. One question: now that XL is there, with a native resolution of 1024×1024, my normal way of generating cool new backdrops (my main AI use case 🙂 ) doesn’t work anymore, as 4x upscalers generate too big images for my purpose. Currently trying to render for my wide screen monitor at 1536×640 and then upscaling 2.3 fold, but I’m not sure how good the upscalers are at that and how they work (do they upscale by 4 and then algorithmically downscale to 2.3?)
If you could shed some light on non-4x-upscaling with SD, that would be totally cool 🙂
Both approaches seem to be valid if that’s the image size you need.
Great reviews, Thumb up.
I used and liked a controlnet tile ways. but it makes me annoying a bit.
i used to made many image with (T2I)
but if i want to use controlnet tile ways, i have to put it one by one to (I2I)
Do you know how can i use controlnet tile in T2I not in I2I
or
any ways to make this job easier?
regards.
Try the batch function in img2img.
Yes i saw people get that too, you just have to delete the prompt when you upscale you rpicture. For example if you upscale from 1024 to 4096, and your 1024 image seems good and you just want to upscale it, then delete the prompt.
Somehow when I use this method I get replicating images in the tile upscaled image.
For example I have an image of cleoptra and there is a pyramid in the background. When I use the tile upscale, there is a little cleoptra in the pyramid in the background. Its not visible, I just see it during the upscaling process. I didnt had this issue with another picture but now its pretty common.
Lowering the denoising strength may help.
Can you add TiledDiffusion + ControlNet / TiledDiffusion + StableSR to comparison? https://www.reddit.com/r/StableDiffusion/comments/13pa2uh/a_simple_comparison_of_4_latest_image_upscaling/
For “Method 3: ControlNet tile upscale”, I think you should put in a warning that even 0.5 may be too strong for the denoising strength. I started to see some strange artifacts at 0.4. At 0.5, I began to see extra heads added to my image (it’s great for horror effects, though).
LoL. Great idea. Added, thanks.
Hello, Andrew, after resizing by SD Upscale + ControlNet method, the resulting image turns out to be too smooth, blurry, except for some areas, such as the model’s face. I would like to keep the original roughness. Can you give any advice on settings? 🙂
It’s hard to advise without see the before and after.
But you can try reducing the denoising strength.
If original texture is important to you, maybe this method is not a suitable choice. You can explore AI upscale only.
I’m pretty much using the third option and I continually get artifacts no matter what my Noise and CFG are set to. Running 50 samples and a variety of models but still can’t get rid of the artifacts that look like little lights. I scale up and fix in Gimp and then scale up again but still get the little lights. Have played with my prompt but nada. Inpainting doesn’t get rid of them either. Ideas?
You can try lowering the denoising strength and increasing the downsampling rate in ControlNet tile.
I did find some success using the Batch Process function in the Extensions tab. Not as much flexibility as the img2img tab, as far as choosing which upscaling model to use, but there are decent options.
Hello — thank you for all your tutorials. I have a technical problem: I’m unable to batch upscale. I’m using A1111 on a Macbook.
The UI Batch function says “Process images in a directory on the same machine where the server is running” and it has a text field for me to enter the input directory.
(The UI also says “Use an empty output directory to save pictures normally instead of writing to the output directory.”)
The filepath that I paste in looks like this: “/Users/myname/MyDrive/AI_PICS/outputs/”
The error that comes back is always the same:
“FileNotFoundError: [Errno2] No such file of directory: ‘/Users… [etc — the filepath]
Any idea what I’m doing wrong? I’ve tried all kinds of things including moving the file folder to the Desktop, making sure all file and folder names have no spaces, etc.
I drag the folder from the Finder into the text box. That way you’re sure to get the correct path without any typos.
None of the methods works properly. If you make 8k+ image, import to photoshop, add extra curves layer and play with them, you will see, that images are tiled.
Thanks for this step by step guide. So much clearer and honest than anything else I’ve found!
One question: to use Ultimate SD Upscaler (3rd option), do you have to install the controlnet tile model as well, or does the Ultimate SD Upscaler work on its own?
Hi, yes, you will need to download the controlnet tile model in controlnet extension.
I tried to do batch process with controlnet tile + ultimate sd upscale script, but it only generates the first image and stops there. any idea how to solve this issue?
You will need to go to the plugin’s page and ask. That has something to do with their code.
FYI – dont try to upscale an image that has transparency – it adds weird artefacts on the transparent parts
That controlnet upscale is insane!!! Mind blown.
Thank you! The article is very detailed and useful! This is so far the best article about upscale images I’ve seen!
Thank you for your kind words!
Amazing! thanks for sharing!
4x-UltrasharpUpscaler is the best script out there. Use that for step 13. Do 2x and generate. Put that newly generated image into img2img and controlnet and do 2x again. You will be pleased.
Thanks!