Stable Diffusion WebUI (AUTOMATIC1111 or A1111 for short) is the de facto GUI for advanced users. Thanks to the passionate community, most new features come to this free Stable Diffusion GUI first. But it is not the easiest software to use. Documentation is lacking. The extensive list of features it offers can be intimidating.
This guide will teach you how to use AUTOTMATIC1111 GUI. You can use it as a tutorial. There are plenty of examples you can follow step-by-step.
You can also use this guide as a reference manual. Skip through it and see what is there. Come back to it when you actually need to use a feature.
You will see many examples to demonstrate the effect of a setting because I believe this is the only way to make it clear.
Table of Contents
Download and install Stable Diffusion WebUI
You can use Stable Diffusion WebUI on Windows, Mac, or Google Colab.
Read the Quick Start Guide to decide which Stable Diffusion to use.
Check out some useful extensions for beginners.
Text-to-image tab
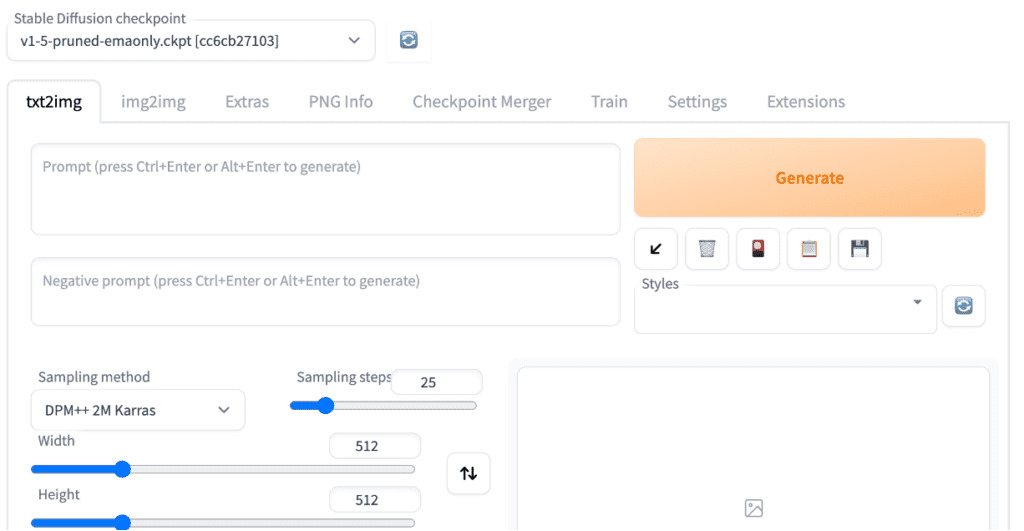
You will see the txt2img tab when you first start the GUI. This tab does the most basic function of Stable Diffusion: turning a text prompt into images.
Basic usage
These are the settings you may want to change if this is your first time using AUTOMATIC1111.
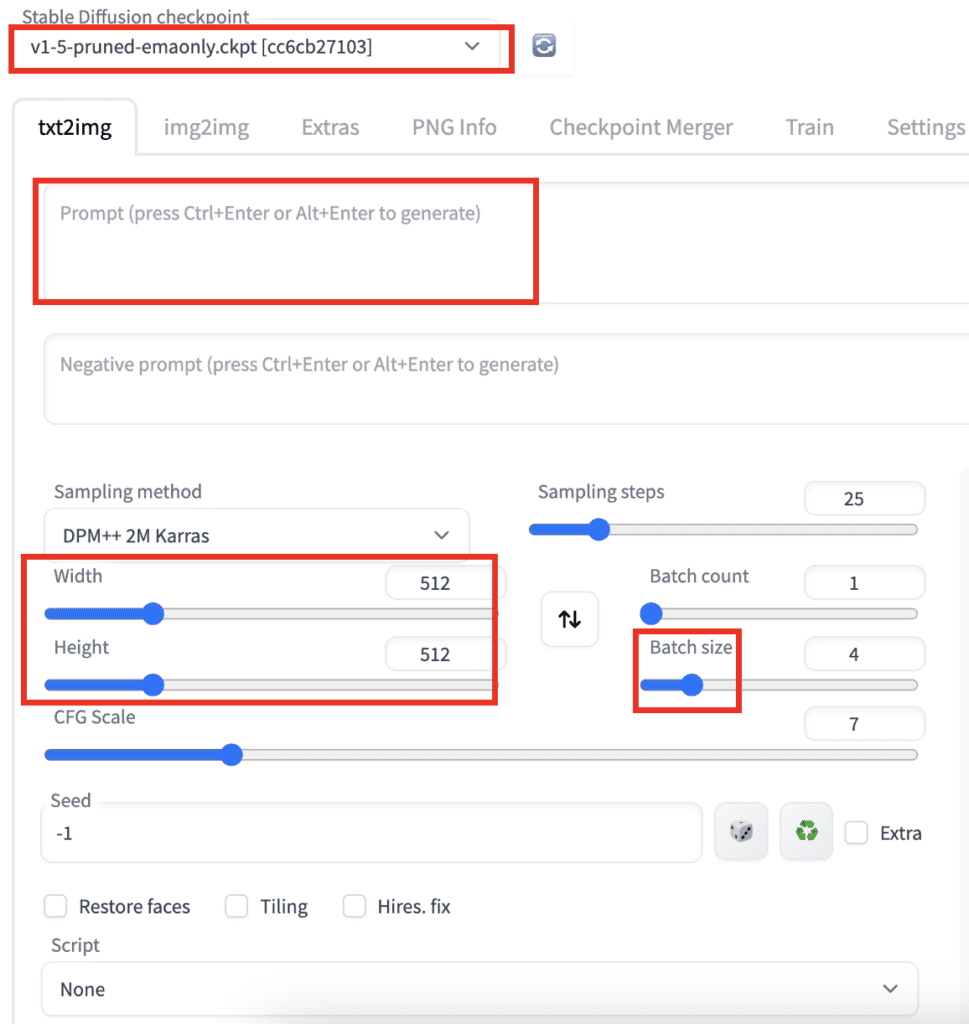
Stable Diffusion Checkpoint: Select the model you want to use. First-time users can use the v1.5 base model.
Prompt: Describe what you want to see in the images. Below is an example. See the complete guide for prompt building for a tutorial.
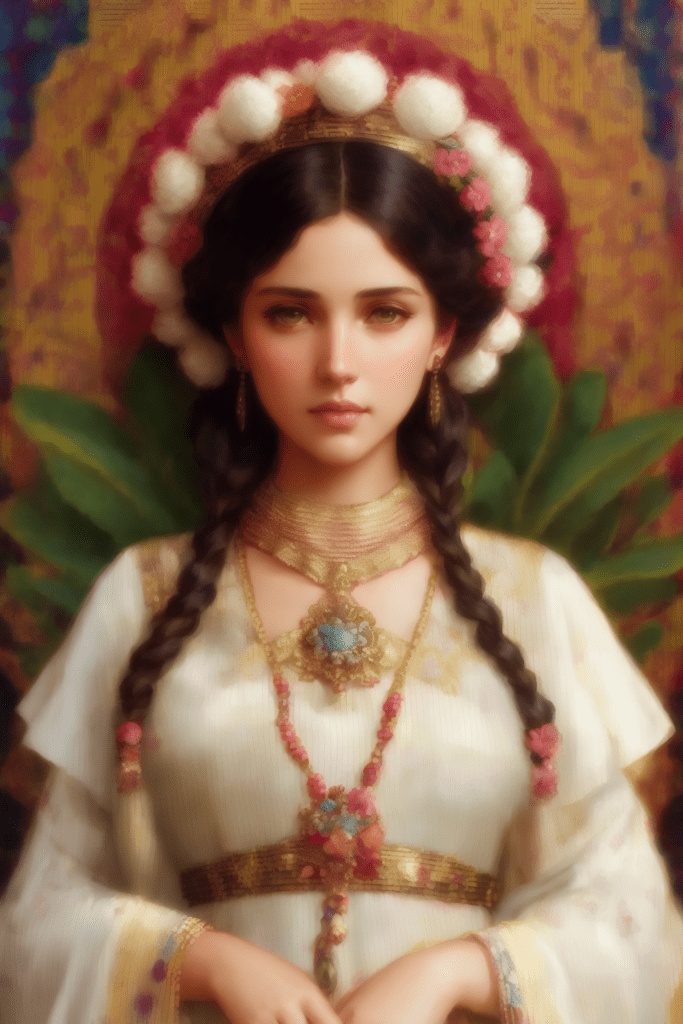
A surrealist painting of a cat by Salvador Dali
Width and height: The size of the output image. You should set at least one side to 512 pixels when using a v1 model. For example, set the width to 512 and the height to 768 for a portrait image with a 2:3 aspect ratio.
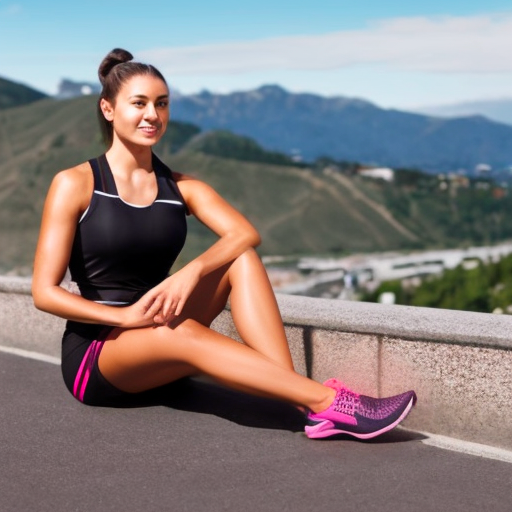
Batch size: Number of images to be generated each time. You want to generate at least a few when testing a prompt because each one will differ.
Finally, hit the Generate button. After a short wait, you will get your images!
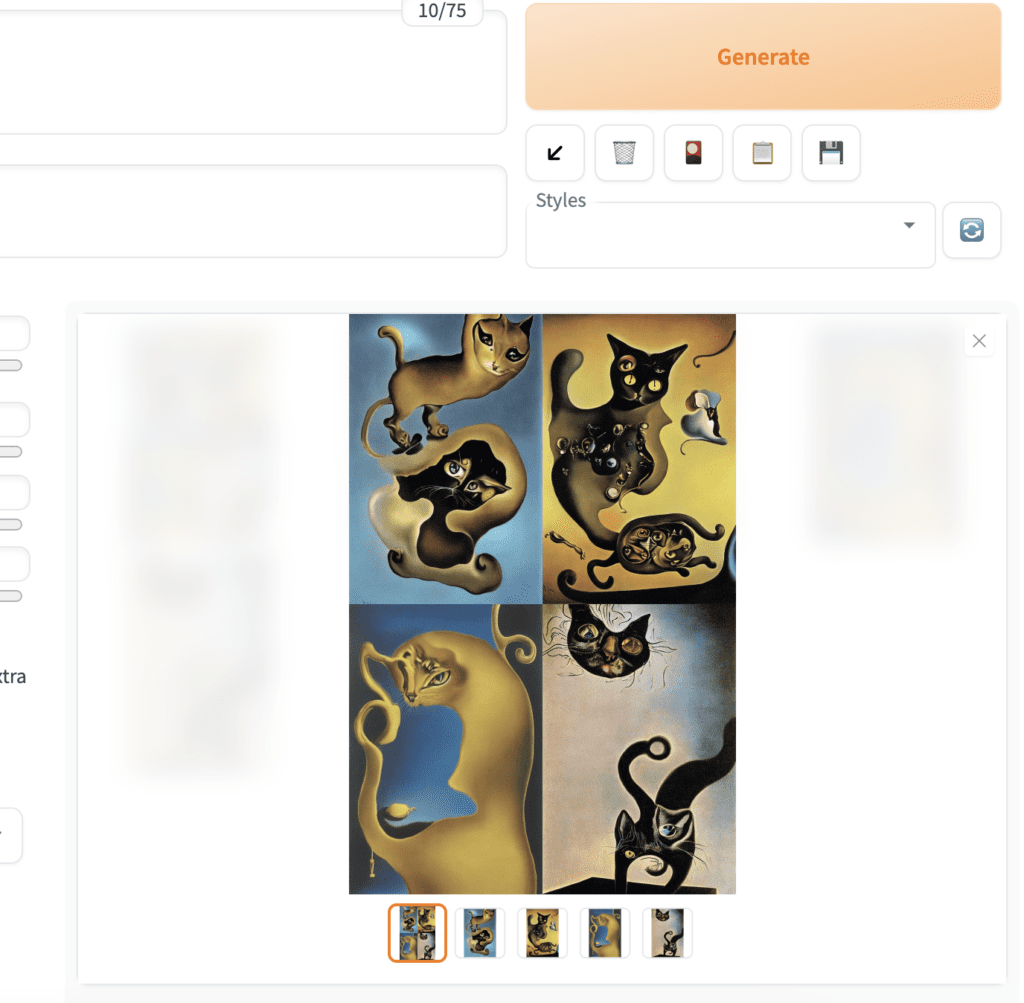
By default, you will get an additional image of composite thumbnails.
You can save an image to your local storage. First, select the image using the thumbnails below the main image canvas. Right-click the image to bring up the context menu. You should have options to save the image or copy the image to the clipboard.
That’s all you need to know for the basics! The rest of this section explains each function in more detail.
Image generation parameters
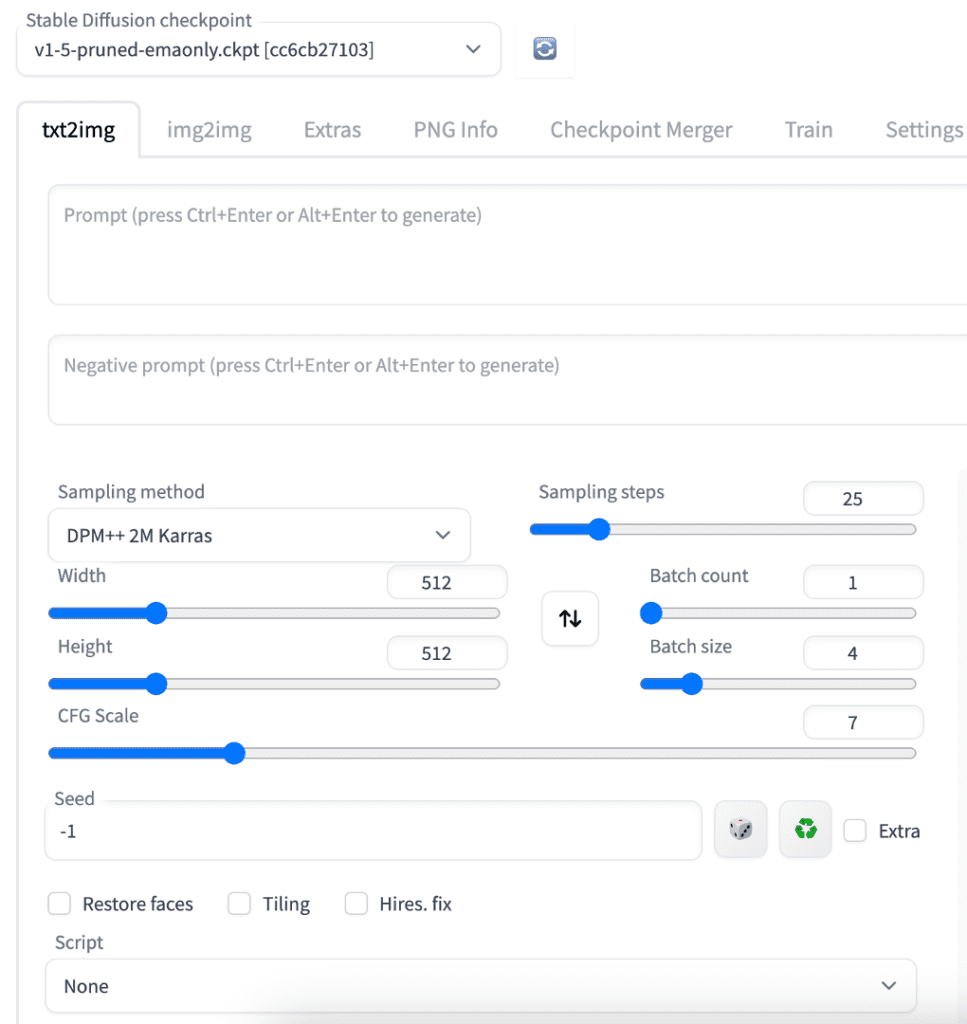
Stable Diffusion checkpoint is a dropdown menu for selecting models. You need to put model files in the folder stable-diffusion-webui > models > Stable-diffusion. See more about installing models.
The refresh button next to the dropdown menu is for refreshing the list of models. It is used when you have just put a new model in the model folder and wish to update the list.
Prompt text box: Put what you want to see in the images. Be detailed and specific. Use some try-and-true keywords. You can find a short list here or a more extensive list in the prompt generator.
Negative Prompt text box: Put what you don’t want to see. You should use a negative prompt when using v2 models. You can use a universal negative prompt. See this article for details.
Sampling method: The algorithm for the denoising process. I use DPM++ 2M Karras because it balances speed and quality well. See this section for more details. You may want to avoid any ancestral samplers (The ones with an a) because their images are unstable even at large sampling steps. This made tweaking the image difficult.
Sampling steps: Number of sampling steps for the denoising process. The more the better, but it also takes longer. 25 steps work for most cases.
Width and height: The size of the output image. You should set at least one side to 512 pixels for v1 models. For example, set the width to 512 and the height to 768 for a portrait image with a 2:3 aspect ratio. Set at least one side to 768 when using the v2-768px model.
Batch count: Number of times you run the image generation pipeline.
Batch size: Number of images to generate each time you run the pipeline.
The total number of images generated equals the batch count times the batch size. You would usually change the batch size because it is faster. You will only change the batch count if you run into memory issues.
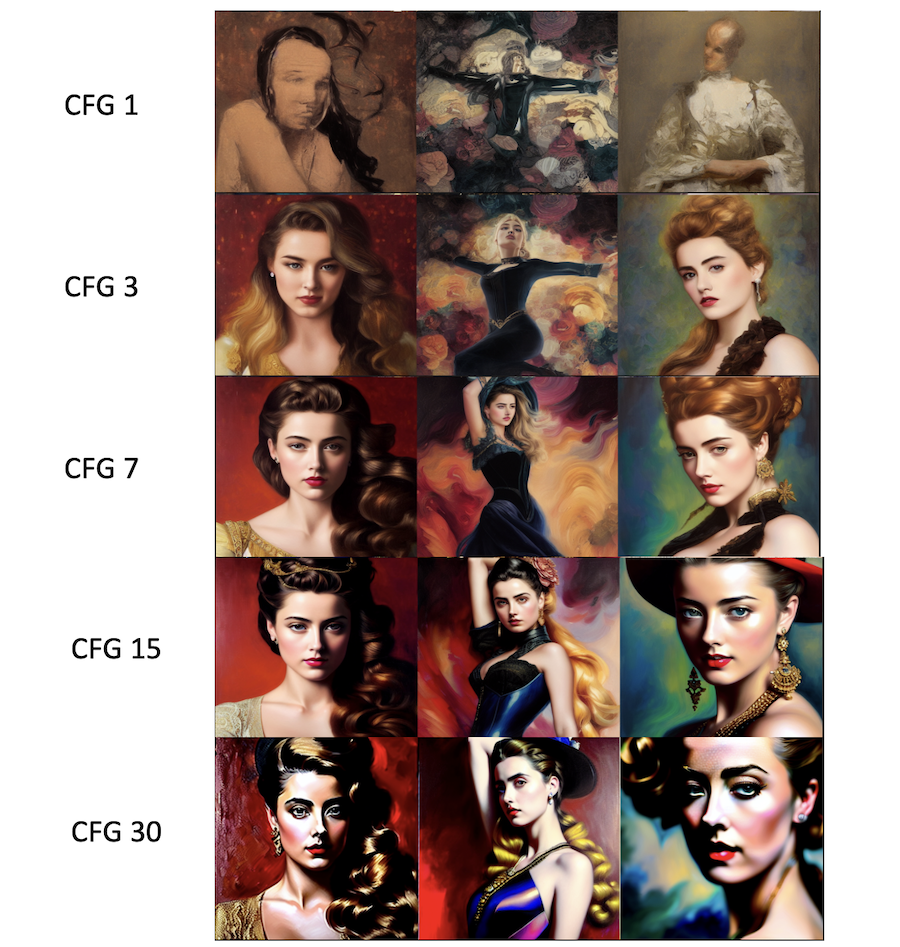
CFG scale: Classifier Free Guidance scale is a parameter to control how much the model should respect your prompt.
1 – Mostly ignore your prompt.
3 – Be more creative.
7 – A good balance between following the prompt and freedom.
15 – Adhere more to the prompt.
30 – Strictly follow the prompt.
The images below show the effect of changing CFG with fixed seed values. You don’t want to set CFG values too high or too low. Stable Diffusion will ignore your prompt if the CFG value is too low. The color of the images will be saturated when it is too high.
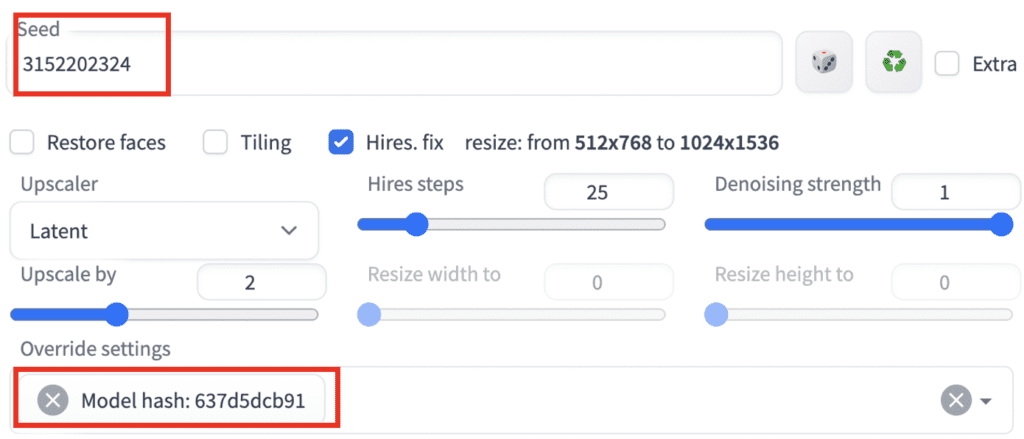
Seed
Seed: The seed value used to generate the initial random tensor in the latent space. Practically, it controls the content of the image. Each image generated has its own seed value. AUTOMATIC1111 will use a random seed value if it is set to -1.
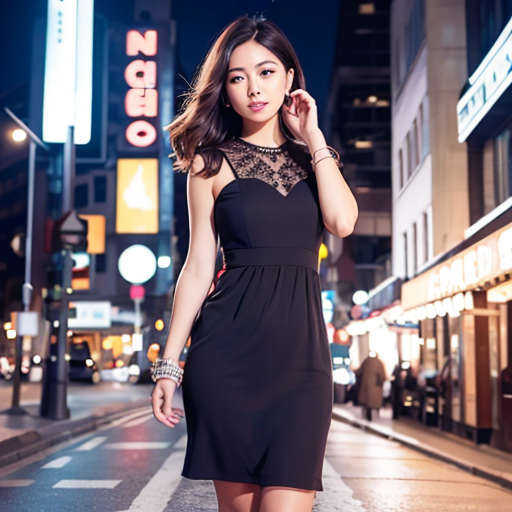
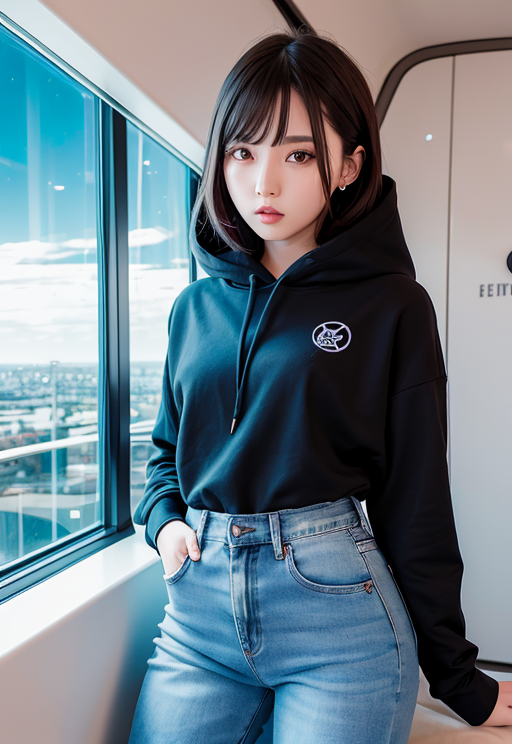
A common reason to fix the seed is to fix the content of an image and tweak the prompt. Let’s say I generated an image using the following prompt.
photo of woman, dress, city night background
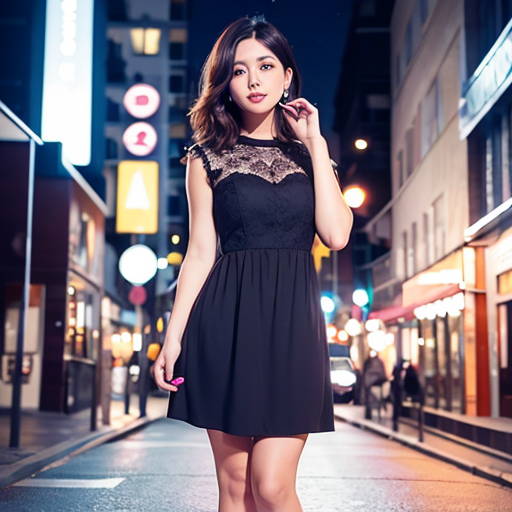
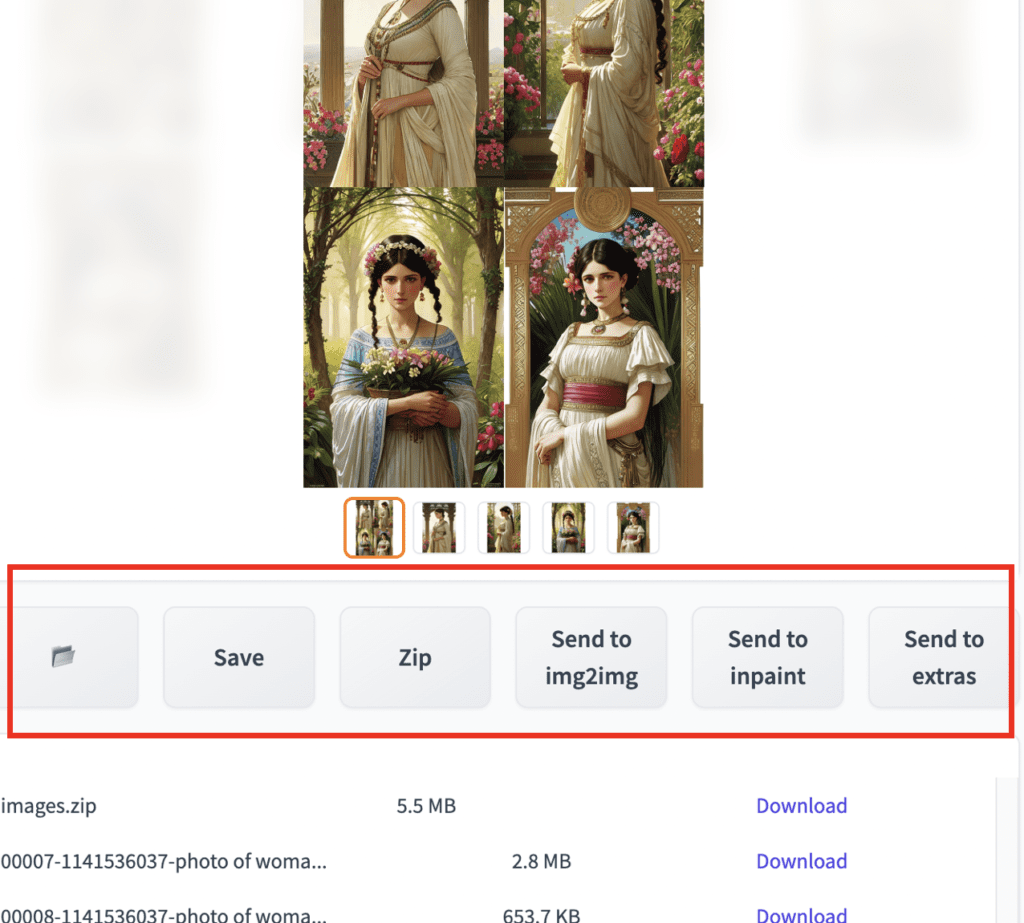
I like this image and want to tweak the prompt to add bracelets to her wrists. You will set the seed to the value of this image. The seed value is in the log message below the image canvas.
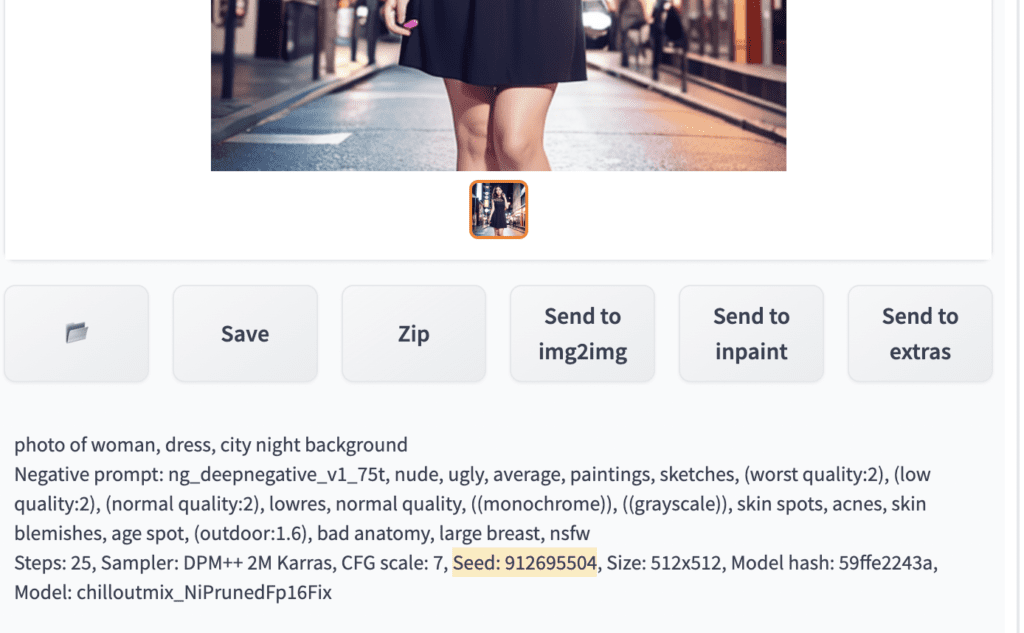
Copy this value to the seed value input box. Or use the recycle button to copy the seed value.

Now add the term “bracelet” to the prompt
photo of woman, dress, city night background, bracelet
You get a similar picture with bracelets on her wrists.
The scene could completely change because some keywords are strong enough to alter the composition. You may experiment with swapping in a keyword at a later sampling step.
Use the dice icon to set the seed back to -1 (random).

Extra seed options
Checking the Extra option will reveal the Extra Seed menu.
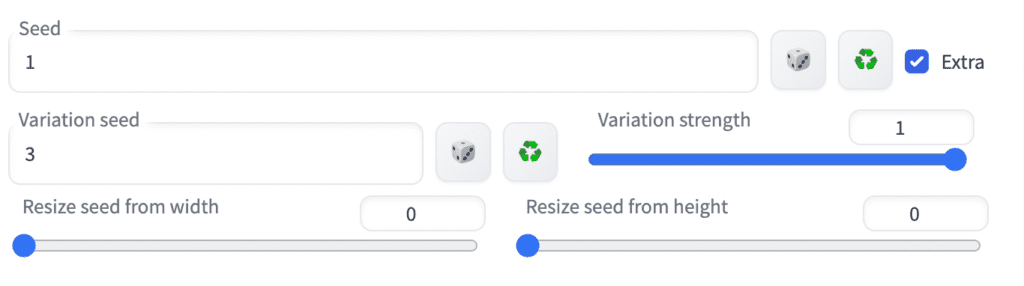
Variation seed: An additional seed value you want to use.
Variation strength: Degree of interpolation between the seed and the variation seed. Setting it to 0 uses the seed value. Setting it to 1 uses the variation seed value.
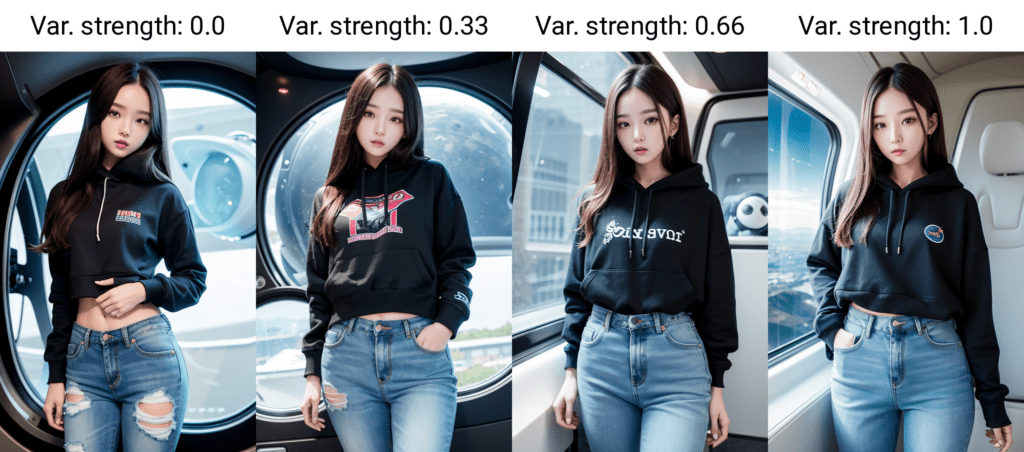
Here’s an example. Let’s say you have generated 2 images from the same prompt and settings. They have their own seed values, 1 and 3.
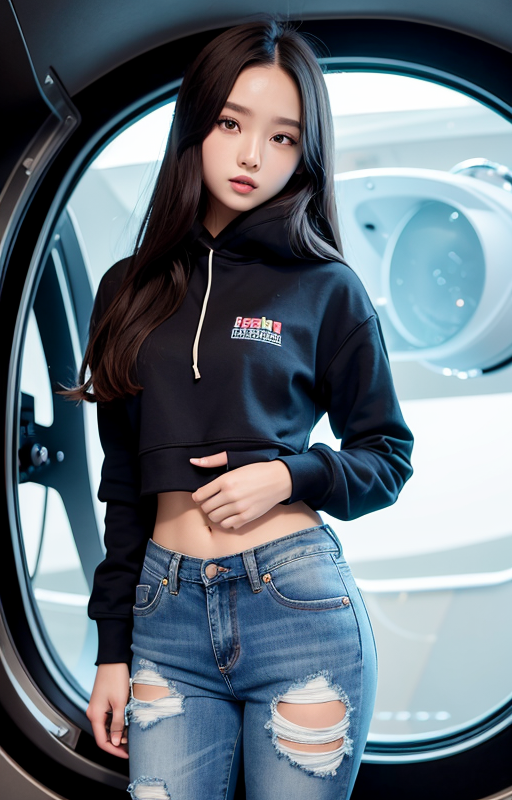
You want to generate a blend of these two images. You would set the seed to 1, the variation seed to 3, and adjust the variation strength between 0 and 1. In the experiment below, variation strength allows you to produce a transition of image content between the two seeds. The girl’s pose and background change gradually when the variation strength increases from 0 to 1.
Resize seed from width/height: Images will change dramatically if you change the image size, even if you use the same seed. This setting tries to fix the content of the image when resizing the image. You will put the new size in width and height sliders and the width and height of the original image here. Put the original seed value in the seed input box. Set variation strength to 0 to ignore the variation seed.
Let’s say you like this image, which is 512×800 with a seed value of 3.
The composition will change drastically when you change the image size, even when keeping the same seed value.
You will get something much closer to the original one with the new size when you turn on the resize seed from height and width settings. They are not perfectly identical, but they are close.
Restore faces
Restore faces applies an additional model trained for restoring defects on faces. Below are before and after examples.

You must specify which face restoration model to use before using Restore Faces. First, visit the Settings tab. Navigate to the Face restoration section. Select a face restoration model. CodeFormer is a good choice. Set CodeFormer weight to 0 for maximal effect. Remember to click the Apply settings button to save the settings!
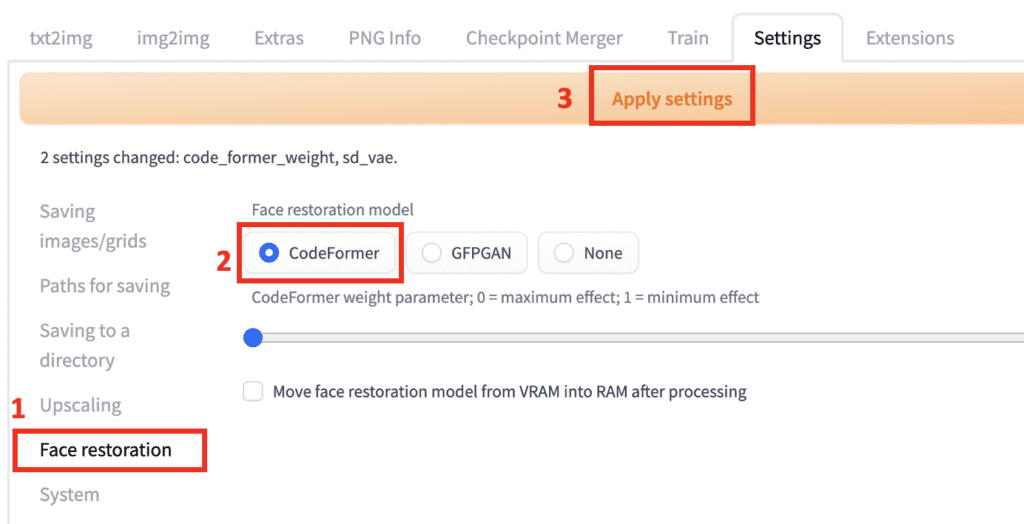
Go back to the txt2img tab. Check Restore Faces. The face restoration model will be applied to every image you generate.
You may want to turn off face restoration if you find that the application affects the style on the faces. Alternatively, you can increase the CodeFormer weight parameter to reduce the effect.
Tiling
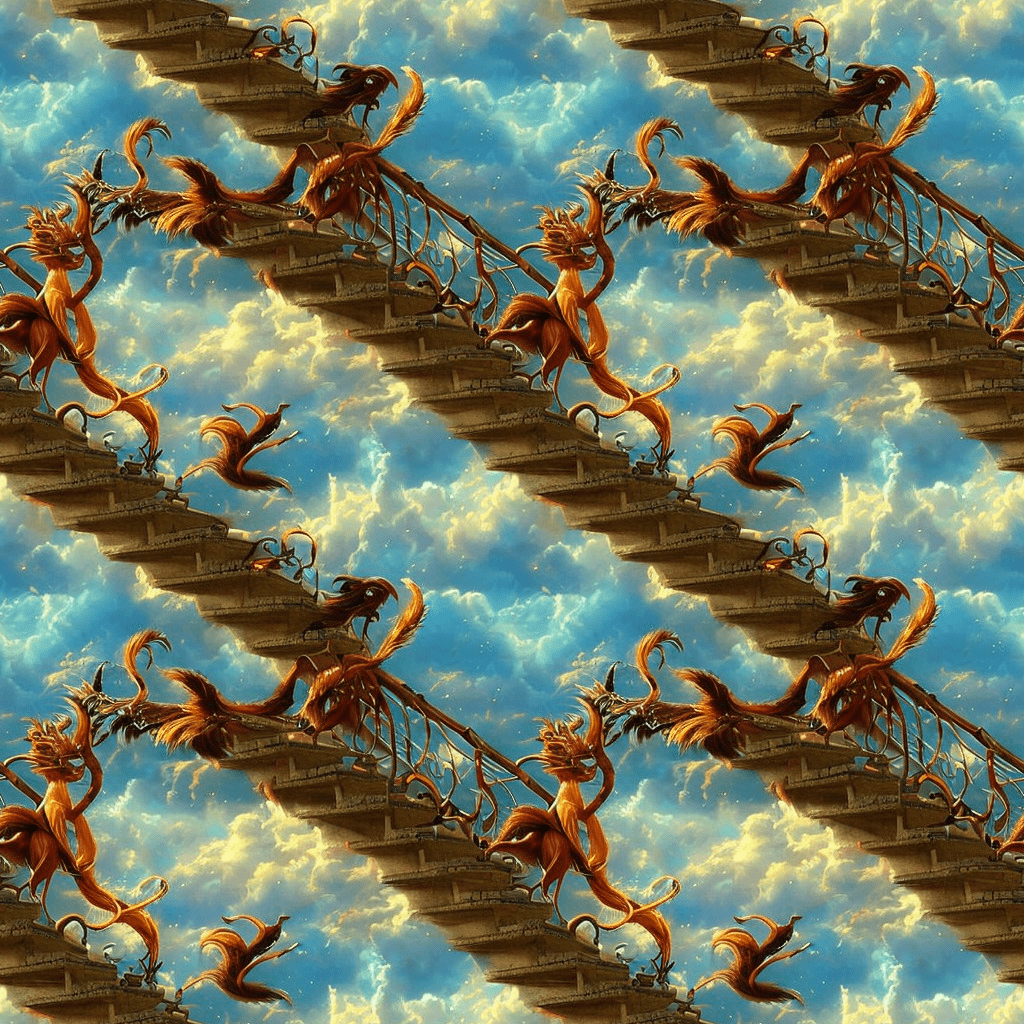
You can use Stable Diffusion WebUI to create a repeating pattern like a wallpaper.
Note: The Tiling checkbox is now on the Settings page.
Use the Tiling option to produce a periodic image that can be tiled. Below is an example.
flowers pattern
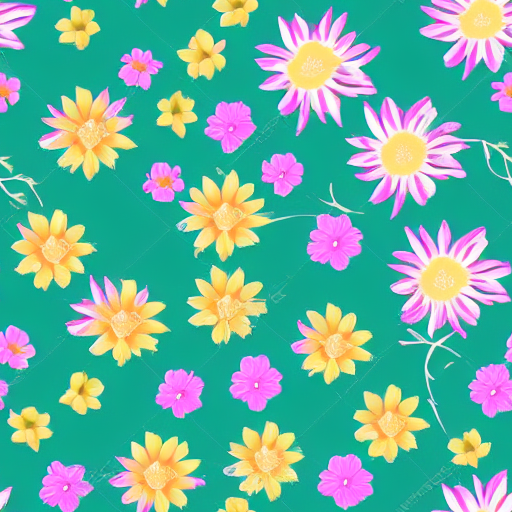
This image can be tiled like wallpaper.
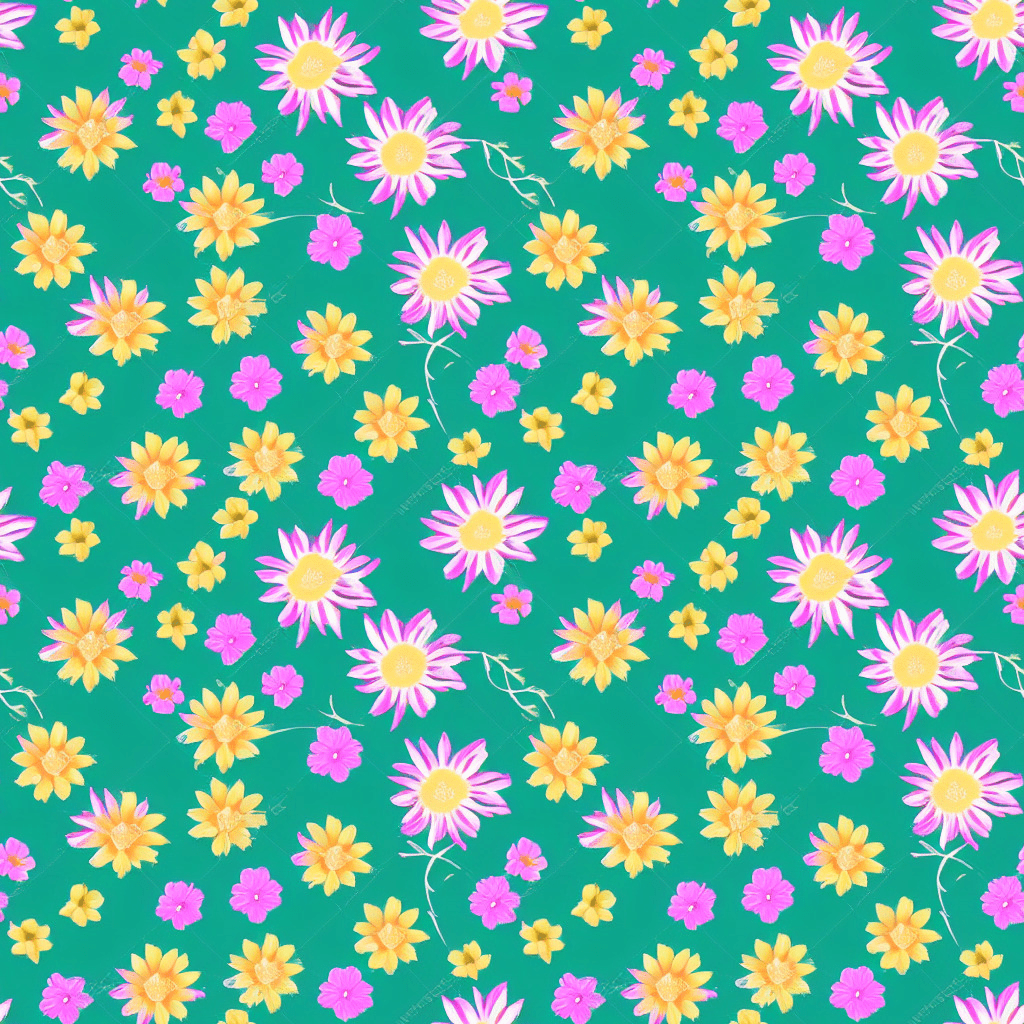
The true treasure of using Stable Diffusion is allowing you to create tiles of any images, not just traditional patterns. All you need is to come up with a text prompt.
Hires. fix.
The high-resolution fix option applies an upsacler to enlarge your image. You need this because the native resolution of Stable Diffusion is 512 pixels (or 768 pixels for certain v2 models). The image is too small for many usages.
Why can’t you just set the width and height to higher, like 1024 pixels? Deviating from the native resolution would affect compositions and create problems like generating images with two heads.
So, you must first generate a small image of 512 pixels on either side. Then scale it up to a bigger one.
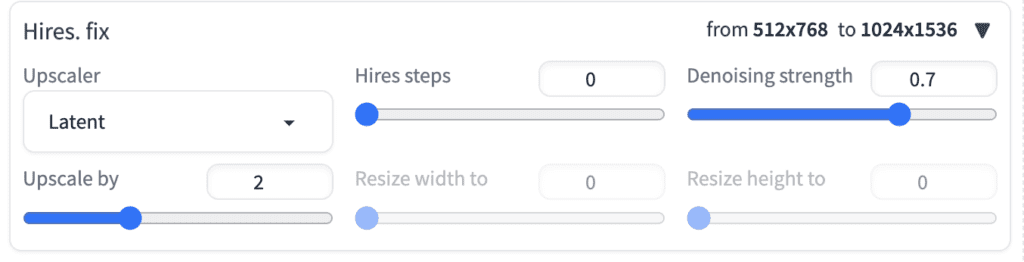
Click Hires. fix to enable the high-resolution fix.
Upscaler: Choose an upscaler to use. See this article for a primer.
The various Latent upscaler options scale the image in the latent space. It is done after the sampling steps of the text-to-image generation. The process is similar to image-to-image.
Other options are a mix of traditional and AI upscalers. See the AI upscaler article for details.
Hires steps: Only applicable to latent upscalers. It is the number of sampling steps after upscaling the latent image.
Denoising strength: Only applicable to latent upscalers. This parameter has the same meaning as in image-to-image. It controls the noise added to the latent image before performing the Hires sampling steps.
Now, let’s look at the effect of upscaling the image below to 2x, using latent as the upscaler.
For some reason, it must be larger than 0.5 to get a sharp image. Setting it too high will change the image a lot.
The benefit of using a latent upscaler is the lack of upscaling artifacts other upscalers like ESRGAN may introduce. The decoder of Stable Diffusion produces the image, ensuring the style is consistent. The drawback is it would change the images to some extent, depending on the value of denoising strength.
The upscale factor controls how many times larger the image will be. For example, setting it to 2 scales a 512-by-768 pixel image to 1024-by-1536 pixels.
Alternatively, you can specify the values of “resize width to” and “resize height to” to set the new image size.
You can avoid the troubles of setting the correct denoising strength by using an AI upscalers like ESRGAN. In general, separating the txt2img and the upscaling into two steps gives you more flexibility. I don’t use the high-resolution fix option but use the Extra page to do upscaling instead.
From left to right:
- Read the last parameters: It will populate all fields so that you will generate the same images when pressing the Generate button. Note that the seed and the model override will be set. If this is not what you want, set the seed to -1 and remove the override.
2. Trash icon: Delete the current prompt and the negative prompt.
3. Model icon: Show extra networks. This button is for inserting hypernetworks, embeddings, and LoRA phrases into the prompt.
You can use the following two buttons to load and save a prompt and a negative prompt. The set is called a style. It can be a short phrase like an artist’s name, or it can be a full prompt.
4. Load style: You can select multiple styles from the style dropdown menu below. Use this button to insert them into the prompt and the negative prompt.
5. Save style: Save the prompt and the negative prompt. You will need to name the style.
Image file actions
You will find a row of buttons for performing various functions on the images generated. From left to right…
Open folder: Open the image output folder. It may not work for all systems.
Save: Save an image. After clicking, it will show a download link below the buttons. It will save all images if you select the image grid.
Zip: Zip up the image(s) for download.
Send to img2img: Send the selected image to the img2img tab.
Send to inpainting: Send the selected image to the inpainting tab in the img2img tab.
Send to extras: Send the selected image to the Extras tab.
Img2img tab
The img2img tab is where you use the image-to-image functions. Most users would visit this tab for inpainting and turning an image into another.
Image-to-image
An everyday use case in the img2img tab is to do… image-to-image. You can create new images that follow the composition of the base image.
Step 1: Drag and drop the base image to the img2img tab on the img2img page.
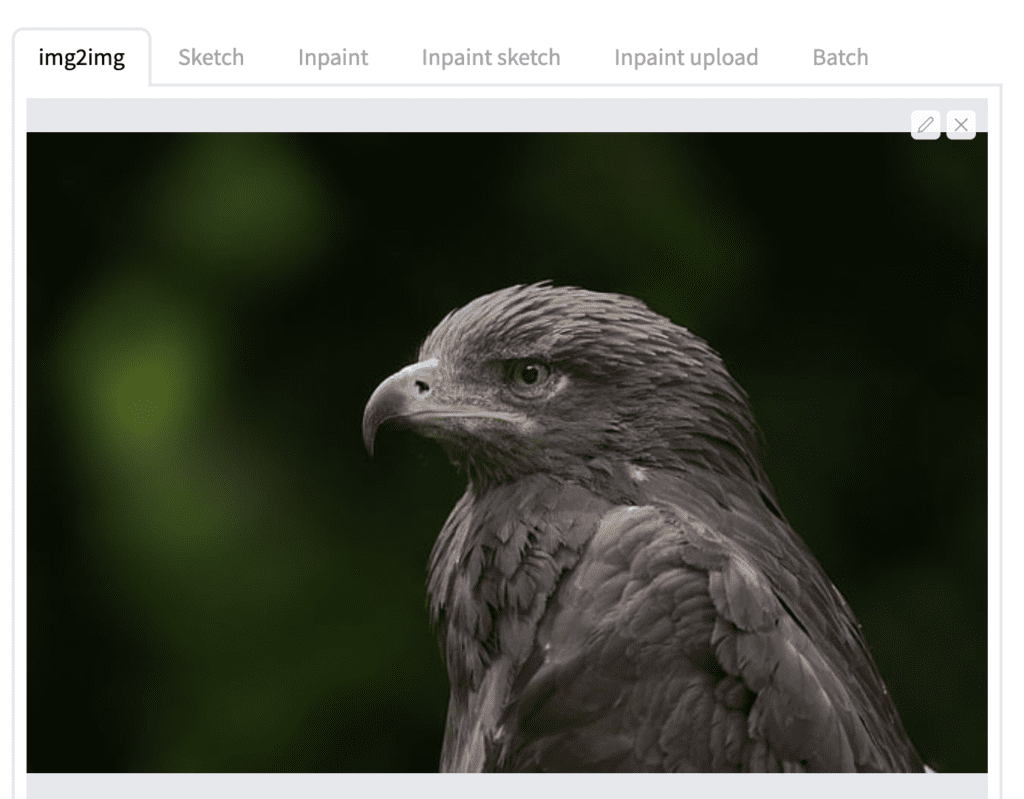
Step 2: Adjust width or height, so the new image has the same aspect ratio. You should see a rectangular frame in the image canvas indicating the aspect ratio. In the above landscape image, I set the width to 760 while keeping the height at 512.
Step 3: Set the sampling method and sampling steps. I typically use DPM++ 2M Karass with 25 steps.
Step 4: Set batch size to 4.
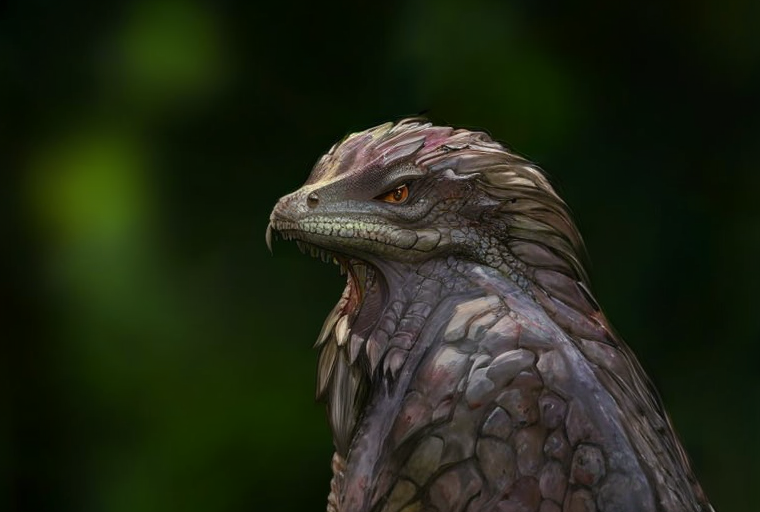
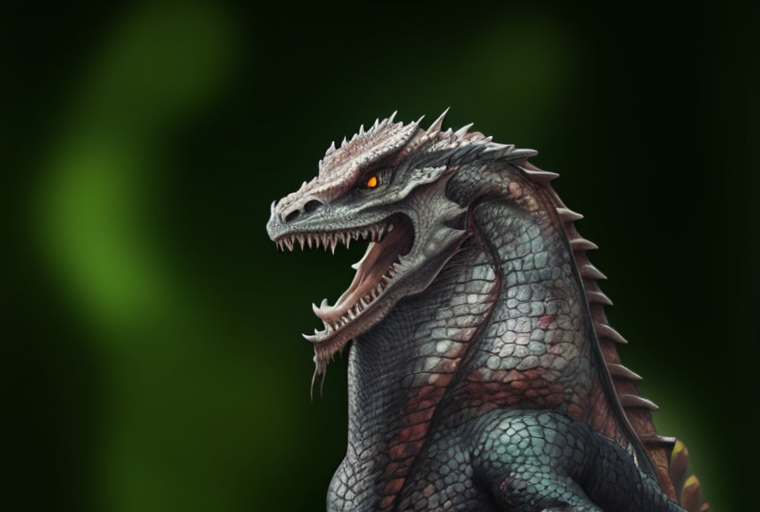
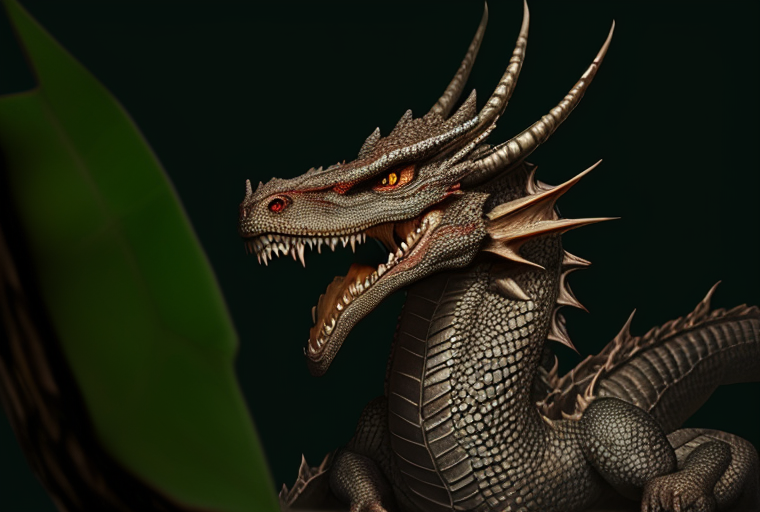
Step 5: Write a prompt for the new image. I will use the following prompt.
A photorealistic illustration of a dragon
Step 6: Press the Generate button to generate images. Adjust denoising strength and repeat. Below are images with varying denoising strengths.
Many settings are shared with txt2img. I am only going to explain the new ones.
Resize mode: If the aspect ratio of the new image is not the same as that of the input image, there are a few ways to reconcile the difference.
- “Just resize” scales the input image to fit the new image dimension. It will stretch or squeeze the image.
- “Crop and resize” fits the new image canvas into the input image. The parts that don’t fit are removed. The aspect ratio of the original image will be preserved.
- “Resize and fill” fits the input image into the new image canvas. The extra part is filled with the average color of the input image. The aspect ratio will be preserved.
- “Just resize (latent upscale)” is similar to “Just resize”, but the scaling is done in the latent space. Use denoising strength larger than 0.5 to avoid blurry images.
Denoising strength: Control how much the image will change. Nothing changes if it is set to 0. New images don’t follow the input image if it is set to 1. 0.75 is a good starting point that have a good amount of changes.
You can use the built-in script poor man’s outpainting: For extending an image. See the outpainting guide.
Sketch
Instead of uploading an image, you can sketch the initial picture. You should enable the color sketch tool using the following argument when starting the webui. (It is already enabled in the Google Colab notebook in the Quick Start Guide)
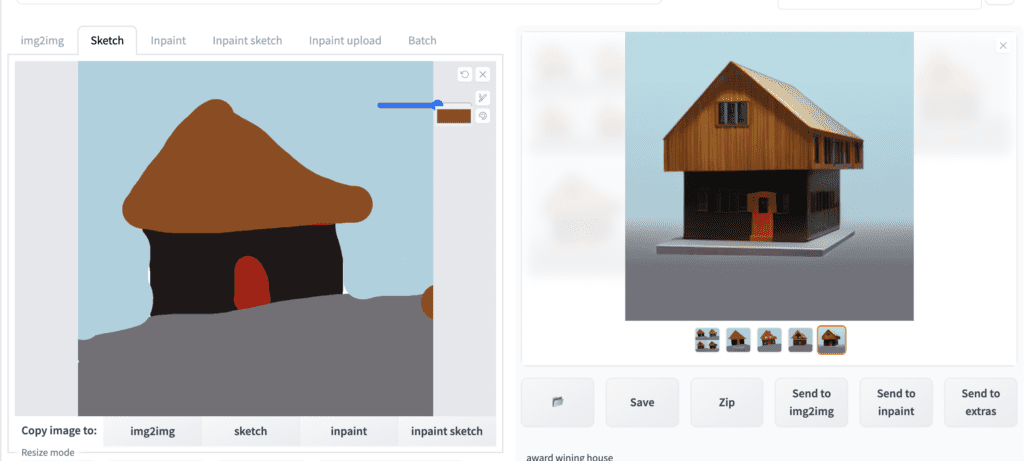
--gradio-img2img-tool color-sketchStep 1: Navigate to sketch tab on the img2img page.
Step 2: Upload a background image to the canvas. You can use the black or white backgrounds below.
Step 3: Sketch your creation. With color sketch tool enabled, you should be able to sketch in color.
Step 4: Write a prompt.
award wining house
Step 5: Press Generate.
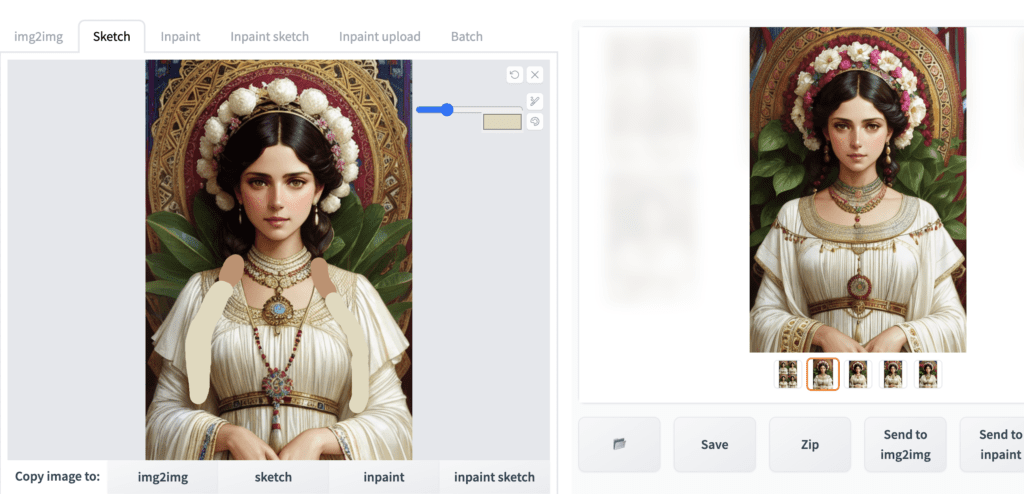
You don’t have to draw something from scratch. You can use the sketch function to modify an image. Below is an example of removing the braids by painting them over and doing a round of image-to-image. Use the eye dropper tool to pick a color from the surrounding areas.
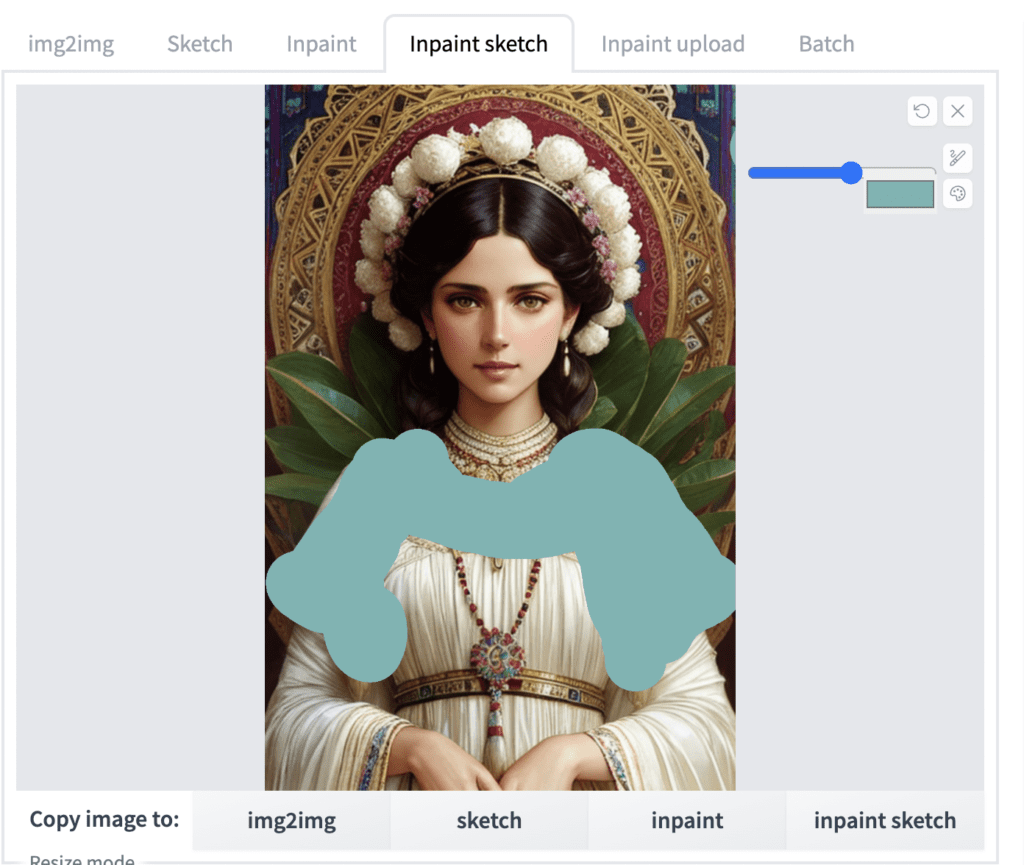
Inpainting
Perhaps the most used function in the img2img tab is inpainting. You generated an image you like in the txt2img tab. But there’s a minor defect, and you want to regenerate it.
Let’s say you have generated the following image in the txt2img tab. You want to regenerate the face because it is garbled. You can use the Send to inpaint button to send an image from the txt2img tab to the img2img tab.
You should see your image when switching to the Inpaint tab of the img2img page. Use the paintbrush tool to create a mask over the area to be regenerated.

Parameters like image sizes have been set correctly because you used the “Send to inpaint” function. You usually would adjust
- denoising strength: Start at 0.75. Increase to change more. Decrease to change less.
- Mask content: original
- Mask Mode: Inpaint masked
- Batch size: 4
Press the Generate button. Pick the one you like.
Zoom and pan in inpainting
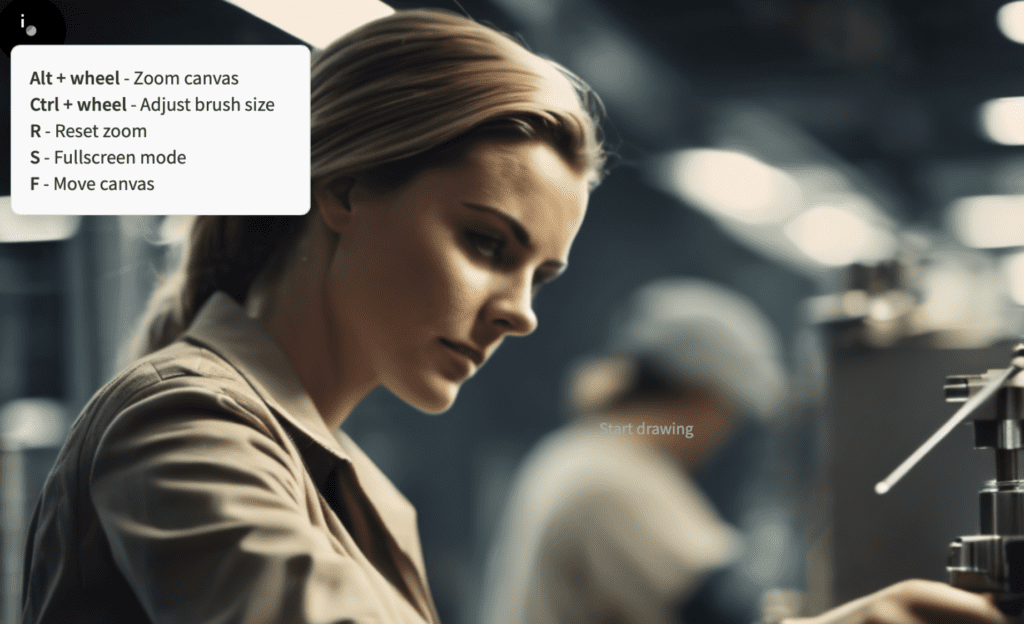
Do you have difficulty in inpainting a small area? Hover over the information icon in the top left corner to see keyboard shortcuts for zoom and pan.
- Alt + Wheel / Opt + Wheel: Zoom in and out.
- Ctrl + Wheel: Adjust the brush size.
- R: Reset zoom.
- S: Enter/Exit full screen.
- Hold F and move the cursor to pan.
These shortcuts also work in Sketch and Inpaint Sketch.
Inpaint sketch
Inpaint sketch combines inpainting and sketch. It lets you paint like in the sketch tab but only regenerates the painted area. The unpainted area is unchanged. Below is an example.
Inpaint upload
Inpaint upload lets you upload a separate mask file instead of drawing it.
Batch
Batch lets you inpaint or perform image-to-image for multiple images.
Get prompt from an image
AUTOMATIC1111’s Interogate CLIP button takes the image you upload to the img2img tab and guesses the prompt. It is useful when you want to work on images you don’t know the prompt. To get a guessed prompt from an image:
Step 1: Navigate to the img2img page.
Step 2: Upload an image to the img2img tab.
Step 3: Click the Interrogate CLIP button.
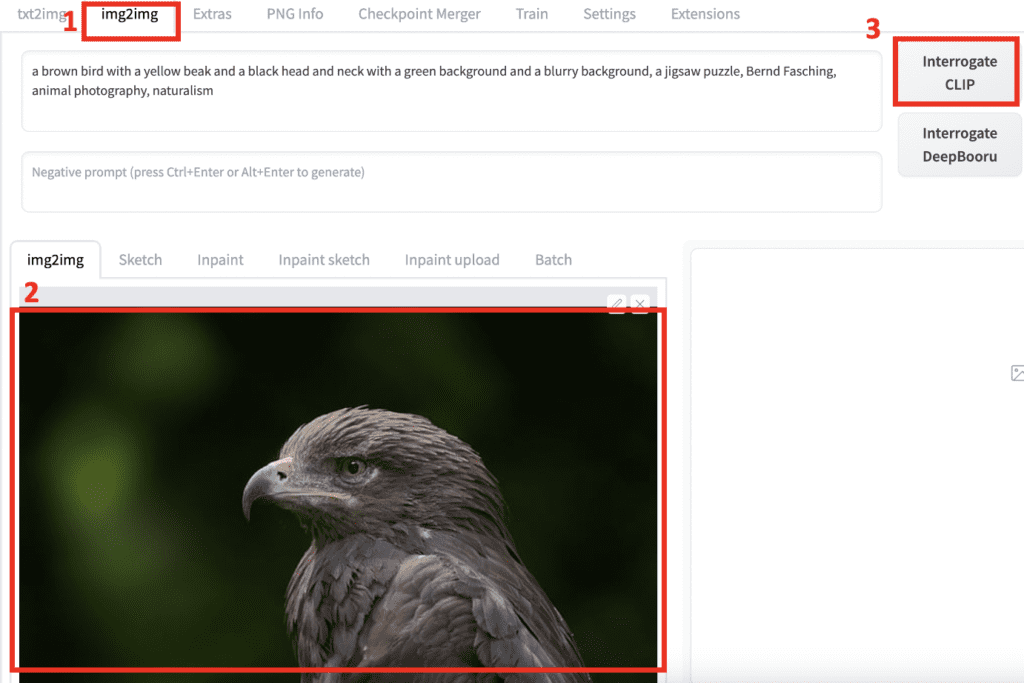
A prompt will show up in the prompt text box.
The Interrogate DeepBooru button offers a similar function, except it is designed for anime images.
Upscaling
You will go to the Extra page for scaling up an image. Why do you need AUTOMATIC1111 to enlarge an image? You can use an AI upscaler that is usually unavailable on your PC. Instead of paying for an AI upscaling service, you can do it for free here.
Basic Usage
Follow these steps to upscale an image.
Step 1: Navigate to the Extra page.
Step 2: Upload an image to the image canvas.
Step 3: Set the Scale by factor under the resize label. The new image will be this many times larger on each side. For example, a 200×400 image will become 800×1600 with a scale factor of 4.
Step 4: Select Upscaler 1. A popular general-purpose AI upscaler is R-ESRGAN 4x+.
Step 5: Press Generate. You should get a new image on the right.
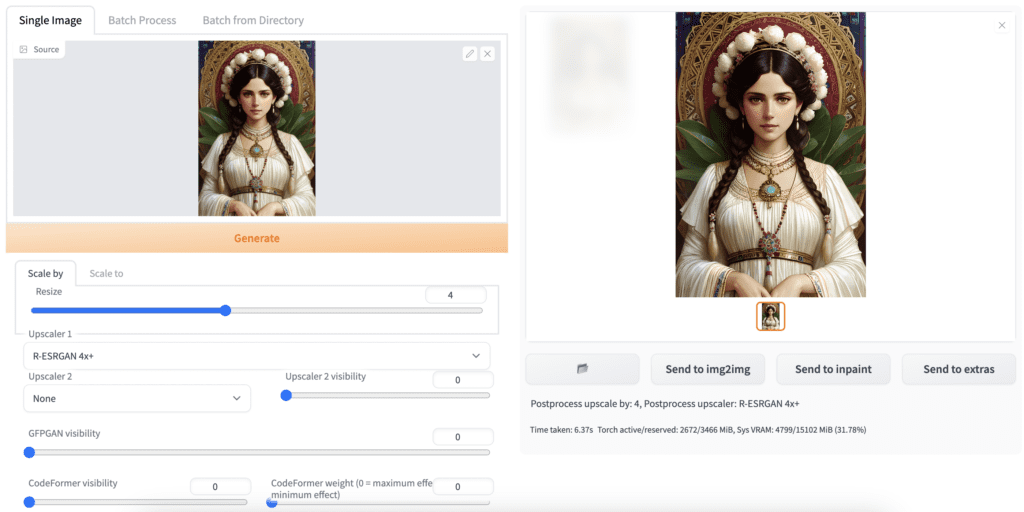
Make sure to inspect the new image at full resolution. For example, you can open the new image in a new tab and disable auto-fit. Upscalers could produce artifacts that you might overlook if it is shrunk.
Even if you don’t need 4x larger, for example, it can still enlarge it to 4x and resize it later. This could help improve sharpness.
Scale to: Instead of setting a scale factor, you can specify the dimensions to resize in the “scale to” tab.
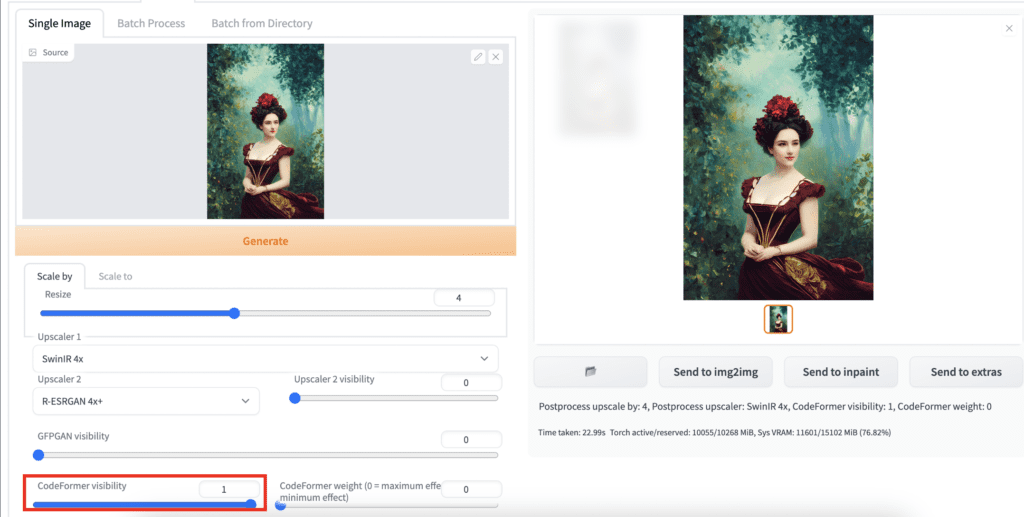
Upscalers
AUTOMATIC1111 offers a few upscalers by default.
Upscalers: The Upscaler dropdown menu lists several built-in options. You can also install your own. See the AI upscaler article for instructions.
Lanczos and Nearest are old-school upscalers. They are not as powerful but the behavior is predictable.
ESRGAN, R-ESRGAN, ScuNet, and SwinIR are AI upscalers. They can literally make up content to increase resolution. Some are trained for a particle style. The best way to find out if they work for your image is to test them out. I may sound like a broken record now, but make sure to look at the image closely at full resolution.
Upscaler 2: Sometimes, you want to combine the effect of two upscalers. This option lets you combine the results of two upscalers. The amount of blending is controlled by the Upscaler 2 Visibility slider. A higher value shows upscaler 2 more.
Can’t find the upscaler you like? You can install additional upscalers from the model library. See installation instructions.
Face Restoration
You can optionally restore faces in the upscaling process. Two options are available: (1) GFPGAN, and (2) CodeFormer. Set the visibility of either one of them to apply the correction. As a rule of thumbnail, you should set the lowest value you can get away with so that the style of the image is not affected.
PNG Info
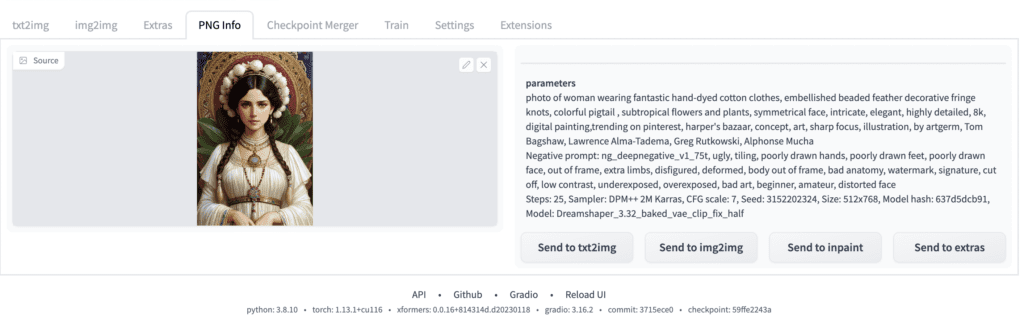
Many Stable Diffusion GUIs, including AUTOMATIC1111, write generation parameters to the image png file. This is a convenient function to get back the generation parameters quickly.
If AUTOMATIC1111 generates the image, you can use the Send to buttons to quickly copy the parameters to various pages.
It is useful when you find an image on the web and want to see if the prompt is left in the file.
This function could be helpful even for an image that is not generated. You can quickly send the image and its dimension to a page.
Installing extensions
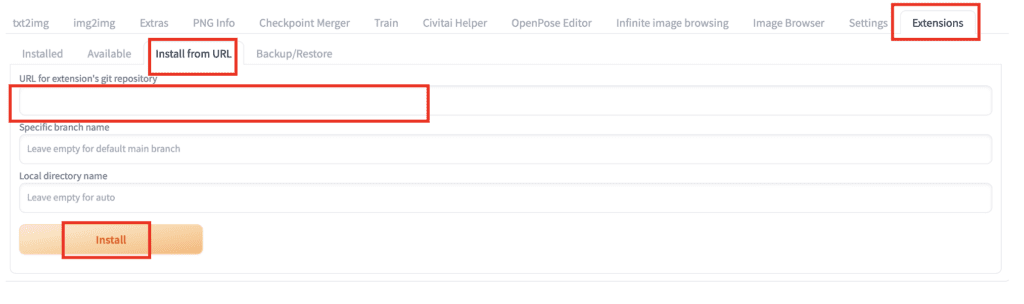
To install an extension in
- Start AUTOMATIC1111 Web-UI normally.
2. Navigate to the Extension Page.
3. Click the Install from URL tab.
4. Enter the extension’s URL in the URL for extension’s git repository field.
5. Wait for the confirmation message that the installation is complete.
6. Restart AUTOMATIC1111. (Tips: Don’t use the Apply and Restart button. It doesn’t work sometimes. Close and Restart Stable Diffusion WebUI completely)
Updating an extension
Extensions need to be updated regularly to get bug fixes or new functionality. To update an extension:
- Go to the Extensions page.
- Click Installed tab.
- Click Check for updates.
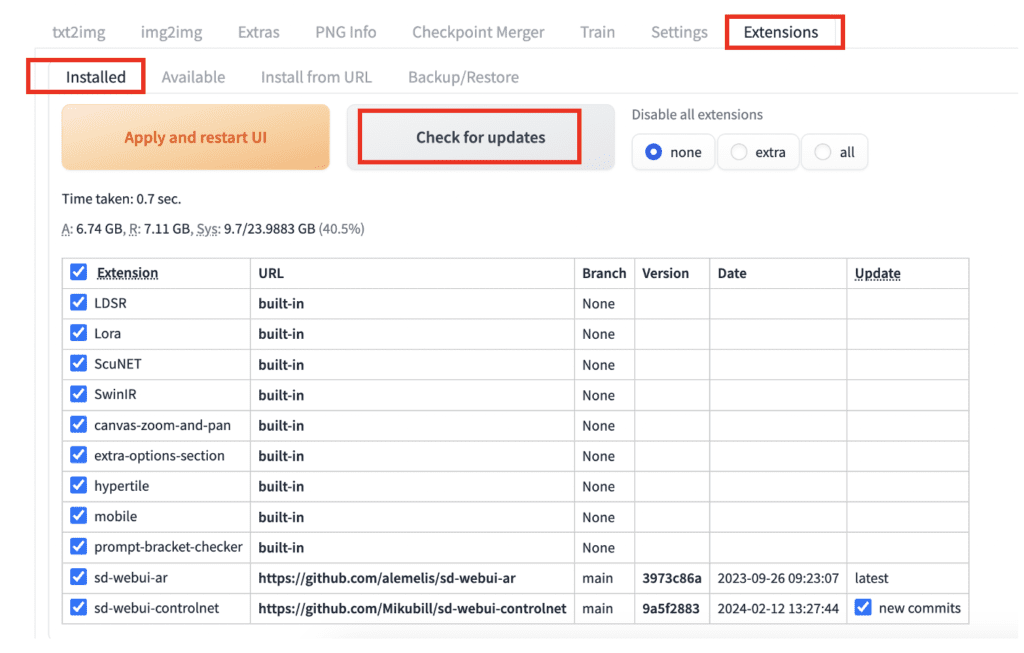
If an update to an extension is available, you will see a new commits checkbox in the Update column.
Leave the checkbox checked for the extensions you wish to update.
Click Apply and Restart UI to update the extensions.
You may need to restart the AUTOMATIC1111 server manually for it to work.
Applying Styles in Stable Diffusion WebUI
A common question is applying a style to the AI-generated images in Stable Diffusion WebUI. There are a few ways.
Prompts
Using prompts alone can achieve amazing styles, even using a base model like Stable Diffusion v1.5 or SDXL. For example, see over a hundred styles achieved using prompts with the SDXL model.
If you prefer a more automated approach to applying styles with prompts, you can use the SDXL Style Selector extension to add style keywords to your prompt.
Checkpoint Models
Thousands of custom checkpoint models fine-tuned to generate various styles are freely available. Go find them on Civitai or Huggingface.
Lora, LyCORIS, embedding and hypernetwork
Lora, LyCORIS, embedding, and hypernetwork models are small files that modify a checkpoint model. They can be used to achieve different styles. Again, find them on Civitai or Huggingface.
Checkpoint merger
AUTOMATIC1111’s checkpoint merger is for combining two or more models. You can combine up to 3 models to create a new model. It is usually for mixing the styles of two or more models. However, the merge result is not guaranteed. It could sometimes produce undesirable artifacts.
Primary model (A, B, C): The input models. The merging will be done according to the formula displayed. The formula will change according to the interpolation method selected.
Interpolation methods:
- No interpolation: Use model A only. This is for file conversion or replacing the VAE.
- Weighted sum: Merge two models A and B, with multiplier weight M applying to B. The formula is A * (1 – M) + B * M.
- Add difference: Merge three models using the formula A + (B – C) * M.
Checkpoint format
- ckpt: The original checkpoint model format.
- safetensors: SafeTensors is a new model format developed by Hugging Face. It is safe because, unlike ckpt models, loading a Safe Tensor model won’t execute any malicious codes even if they are in the model.
Bake in VAE: Replace the VAE decoder with the one selected. It is for replacing the original one with a better one released by Stability.
Train
The Train page is for training models. It currently supports textual inversion (embedding) and hypernetwork. I don’t have good luck using AUTOMATIC1111 for training, so I will not cover this section.
Settings
There is an extensive list of settings on AUTOMATIC1111’s setting page. I won’t be able to go through them individually in this article. Here are some you want to check.
Make sure to click Apply settings after changing any settings.
Face Restoration
Make sure to select the default face restoration method. CodeFormer is a good one.
Stable Diffusion
Download and select a VAE released by Stability to improve eyes and faces in v1 models.
Quick Settings
Quick Settings
You can enable custom shortcuts on the top.
On the Settings page, click Show All Pages on the left panel.
Search the word Quicksettings gets you to the Quick Setting field.
There are a lot of settings available for selection. For example, the following enables shortcuts for Clip Skip and custom image output directories.

After saving the settings and reloading the Web-UI, you will see the new shortcuts at the top of the page.

The custom output directories come in handy for organizing the images.
Here is the list of Quick settings that are useful to enable
- CLIP_stop_at_last_layers
- sd_vae
- outdir_txt2img_samples
- outdir_img2img_samples
These tutorials are wonderful. I’ve just started getting into this, running locally on Windows 10 (64 GB of RAM) with a fairly wimpy NVidia 2070 with 4 GB. Everything has been going fantastic, so I decided to up the ante and bought a new video card. Oops. I bought a GeForce RTX NVidia 5070 with 16 GB at a good price. However, now when I try to run SD, no matter what model I’m using, I receive the same message after a couple of seconds.
RuntimeError: CUDA error: no kernel image is available for execution on the device CUDA kernel errors might be asynchronously reported at some other API call, so the stacktrace below might be incorrect. For debugging consider passing CUDA_LAUNCH_BLOCKING=1. Compile with `TORCH_USE_CUDA_DSA` to enable device-side assertions.
I did remove the old drivers and installed the latest, along with re-installing CUDA. I am at a loss as to what to do here. I am a retired programmer and am very willing and able to make any changes necessary to fix this. Thanks.
The 5000 series card is not well supported by A1111. But you should be able to find an alternative installation method to use.
Hi Andrew,
Many thanks for your priceless efforts! Automatic1111 used to function untill some time ago. Now, when I try to use it, the Terminal process ceases, saying “NameError: name ‘Replicate’ is not defined” and Terminal returns to prompt. I deleted the repositories en venv, did a git pull and tried to start over. Same result…. Can you help out?
Thank you!
Wim Heijs
Its a a recent issue in transformer. You need to downgrade it like discussed below.
https://github.com/huggingface/transformers/issues/38269#issuecomment-2899522669
Hello Andrew,
I’m not an expert on this. Could you show me what to do?
Thank you.
I was running, the 2024/12/19 Automatic1111 when it failed. I pulled the latest version and I get this error when I’m running it. Could be pilot error, but all I did was pull the new notebook and ran it.
/content/stable-diffusion-webui
WEBUI ARGUMENTS: –gradio-img2img-tool color-sketch –enable-insecure-extension-access –gradio-queue –share –gradio-auth “a”:”a” –disable-model-loading-ram-optimization –opt-sdp-attention
Python 3.10.12 (main, Jan 17 2025, 14:35:34) [GCC 11.4.0]
Version: v1.9.3
Commit hash: 1c0a0c4c26f78c32095ebc7f8af82f5c04fca8c0
Installing sd-webui-infinite-image-browsing requirement: python-dotenv
Installing sd-webui-infinite-image-browsing requirement: av
Installing sd-webui-infinite-image-browsing requirement: lxml
Launching Web UI with arguments: –gradio-img2img-tool color-sketch –enable-insecure-extension-access –gradio-queue –share –gradio-auth a:a –disable-model-loading-ram-optimization –opt-sdp-attention
Traceback (most recent call last):
File “/content//stable-diffusion-webui/launch.py”, line 48, in
main()
File “/content//stable-diffusion-webui/launch.py”, line 44, in main
start()
File “/content/stable-diffusion-webui/modules/launch_utils.py”, line 465, in start
import webui
File “/content/stable-diffusion-webui/webui.py”, line 13, in
initialize.imports()
File “/content/stable-diffusion-webui/modules/initialize.py”, line 17, in imports
import pytorch_lightning # noqa: F401
File “/usr/local/lib/python3.10/dist-packages/pytorch_lightning/__init__.py”, line 35, in
from pytorch_lightning.callbacks import Callback # noqa: E402
File “/usr/local/lib/python3.10/dist-packages/pytorch_lightning/callbacks/__init__.py”, line 14, in
from pytorch_lightning.callbacks.batch_size_finder import BatchSizeFinder
File “/usr/local/lib/python3.10/dist-packages/pytorch_lightning/callbacks/batch_size_finder.py”, line 24, in
from pytorch_lightning.callbacks.callback import Callback
File “/usr/local/lib/python3.10/dist-packages/pytorch_lightning/callbacks/callback.py”, line 25, in
from pytorch_lightning.utilities.types import STEP_OUTPUT
File “/usr/local/lib/python3.10/dist-packages/pytorch_lightning/utilities/types.py”, line 27, in
from torchmetrics import Metric
File “/usr/local/lib/python3.10/dist-packages/torchmetrics/__init__.py”, line 37, in
from torchmetrics import functional # noqa: E402
File “/usr/local/lib/python3.10/dist-packages/torchmetrics/functional/__init__.py”, line 14, in
from torchmetrics.functional.audio._deprecated import _permutation_invariant_training as permutation_invariant_training
File “/usr/local/lib/python3.10/dist-packages/torchmetrics/functional/audio/__init__.py”, line 14, in
from torchmetrics.functional.audio.pit import permutation_invariant_training, pit_permutate
File “/usr/local/lib/python3.10/dist-packages/torchmetrics/functional/audio/pit.py”, line 22, in
from torchmetrics.utilities import rank_zero_warn
File “/usr/local/lib/python3.10/dist-packages/torchmetrics/utilities/__init__.py”, line 14, in
from torchmetrics.utilities.checks import check_forward_full_state_property
File “/usr/local/lib/python3.10/dist-packages/torchmetrics/utilities/checks.py”, line 26, in
from torchmetrics.metric import Metric
File “/usr/local/lib/python3.10/dist-packages/torchmetrics/metric.py”, line 43, in
from torchmetrics.utilities.plot import _AX_TYPE, _PLOT_OUT_TYPE, plot_single_or_multi_val
File “/usr/local/lib/python3.10/dist-packages/torchmetrics/utilities/plot.py”, line 26, in
import matplotlib
File “/usr/local/lib/python3.10/dist-packages/matplotlib/__init__.py”, line 1296, in
rcParams[‘backend’] = os.environ.get(‘MPLBACKEND’)
File “/usr/local/lib/python3.10/dist-packages/matplotlib/__init__.py”, line 771, in __setitem__
raise ValueError(f”Key {key}: {ve}”) from None
ValueError: Key backend: ‘module://matplotlib_inline.backend_inline’ is not a valid value for backend; supported values are [‘gtk3agg’, ‘gtk3cairo’, ‘gtk4ag
fixed.
Hello,
Super smooth install – nice!
Trying to generate just the simplest images for now using text to /or image to image. No matter what I do though, the UI always produces a solid gray image.
https://www.loom.com/share/053f403f659a42218d6b38096428b871?sid=33c12e8e-3b05-45e4-803e-8965922130ba
You can try redownloading the model https://huggingface.co/stable-diffusion-v1-5/stable-diffusion-v1-5/blob/main/v1-5-pruned-emaonly.safetensors
Is there anybody in here???
my bad, your reply didn’t show up till I replied again, mush have had to refresh the page. thanks I’ll check out the link
Thanks for the guide. Without it i walked blind among errors, now everything works great!
Btw, question – is it possible to set custom path to models folder (checkpoint/lora/etc)? i installed it on my C: ssd drive to speed up, but probably soon will run out of space there.
And if not – is it possible to just move whole “stable-diffusion-webui” folder – or i have to reinstall it in different location to work properly?
How do I update webUI? It keeps defaulting me to 1.8.0 and it keeps giving me an error that it can’t find 1.9.3 on the git.
You normally do “git pull” in command prompt under webui’s folder.
When I type the “git pull” command I get this error in MacOs.
fatal: ‘/private/var/folders/zd/wqtml46s0fj925f5rjb3v7mh0000gn/T/AppTranslocation/59675B1E-A998-49D7-9ACD-D2E180571554/d/Install Web UI.app/Contents/Resources/web-ui-installer/bundles/stable-diffusion-webui.bundle’ does not appear to be a git repository
fatal: Could not read from remote repository.
You have used a different installation method. You will see to look at the doc of your original method to see how to update.
This guide follows the official method: https://stable-diffusion-art.com/install-windows/
What about macOS?
Here you go: https://stable-diffusion-art.com/install-mac/
I initially skipped this article since I use Android GUI’s like SDAI FOSS and Open Stable Diffusion, but there’s much here which new Stable Diffusion students NEED to know regardless of which GUI they use, so this article is about more than Automatic1111.
Also, one of the first things you do is recommend Google. Google is evil. You know this. Everyone knows this. Resist the dark side, Andrew.
I hear you. This site, like many small online businesses, is a victim. However, I am aiming to provide information, not passing along my judgements.
I have managed to successfully install Automatic1111 and start experimenting with it. In future I am looking to potentially train a model that can clean up product photography shots (remove dust/scratches/unwanted data eg barcodes etc). Is this something you think would be possible to do? If so where is the best place to start in learning how to train a model?
You can try using a realistic model with inpainting to see if you get what you want. Another option is img2img with a low denoising strength.
Hi Andrew
I installed the style selector on Automatic 1111, just as I installed all my other extensions. At start up, I get this message appearing.
(style database not found: c:/users/93939347/stable-diffusion-webui/styles.csv)
I tried to install it again with no luck. Any idea what went wrong there?
styles.csv is an optional file for saving prompts. It is part of the A1111 base installation and has nothing to do with the extension.
Below my generated gifs in in the information block where it tells everything about how it was made it has info on the time it took and ram info. Can you explain what this section is telling? A: R: syst: GB:
Thanks
I cannot see the image.
I believe someone else posed this question as well: Can we install SD on an external drive? On Windows, like most software, it installs to the C drive by default, eating up space on my internal drive. If so I will reinstall. Thanks!
Yes.
I run Automatic111 successfully on my Mac.
But is it possible to run it from an external SSD because the Models eat up my hard drive.
Or is it possible to store the models on the external SSD?
Yes.
thanks. How?
You can add the following argument to the webui.sh command
--ckpt-dir "/path/to/model"Thanks Andrew I will dive into it.
I fixed it. Made a symbolic link on the SSD from the “models” map I copied here and deleted the models map from my HD.
symlink is what I use because I have multiple A1111 installed!
Interestingly, a symlink .diffisionbee folder doesn’t work if the suffix ‘symlink’ is left attached. The Github utility to add one in the services menu does add it, whereas n -s / doesn’t. Removing it manually fixes the issue if done immediately; if not, a new fresh installation at ~user occurs.
Yes, two alternative strategies. , 1 is easy. 2 is more complex
1. Use LightRoom and create a new folder for your work on the external. Locate the .difussionbee/images folder and add it to Lightroom Library as a source (you need Shift Command Period to see it.) Once done simply move all your images from the .diffusionbee/images daily to your external folder. Or you can use any similar method. This will leave models in the user folder so watch you don’t add too many.
2. This method makes a working alias of the entire folder once moved, that is now in the external back, into the ~ user folder: . use Shift Command Period to make the invisible visible. Locate the .diffusionbee folder in ~user folder. Movie it to your external.
In this example, my external is called ‘8 TB RAID 0 SSD’ so use the example to enter your own external’s make appropriately.
Run Terminal and use this: n -s /Volumes/8\ TB\ RAID\ 0\ SSD/.diffusionbee ~/.diffusionbee
My temp fixes until Andrew does this at the installation end, was for Diffusionbee, but the exact same workarounds work for Automattic1111.
Should we be installing the Nvidia CUDA Toolkit for Nvidia cards – to assist with performance? I have a Windows 11 PC, using an RTX 4090 graphics card. Is there a preferred version to install – 12 or 11?
I have installed and I am using succesfully AUTOMATIC111 on IMAC.
I have an external SSD drive is there any way to configure it as output drive for the images generated by stable diffusion ?
yes, you can set the output folder on the Settings page.
I’m using Automatic 1111 v. 1.6.0 and I made a change to “Save copy of large images as JPG
(if the file size is above the limit, or either width or height are above the limit)” in the Saving Images/Grids setting. After I applied the setting it gave a message that 1 change was made to Export for 4chan. What does this mean? Are generated images being exported to 4chan?? Thanks for taking the time to read this and providing a resource to learn about stable diffusion.
Interesting. For whatever reason, the internal flag is called “export_for_4chan”. Nothing concerning from the source code.
https://github.com/search?q=repo%3AAUTOMATIC1111%2Fstable-diffusion-webui%20export_for_4chan&type=code
Thanks for the reply. Hopefully, as you say, it shouldn’t be anything concerning.
I just upgraded to v1.6 of Automatic1111, and all of my saved prompts transferred over, but now I only see 2 buttons below the Generate button. The arrow and the trash can. The clipboard and save icons are missing, so now I can’t create more or quick use my old saved prompts. Am I missing something?
The new v1.6 UI is confusing IMO. You click the pen icon to create new prompts.
The prompt is in use as long as it is selected, but you don’t see them in prompt.
You can edit or apply them with the extra buttons in the pen icon menu.
Perhaps you can help me. I’m running SD 1.5 Automatic 1111 locally and just installed the loopback wave script available on Github, and the required FFMpeg. Everything runs fine until it gets to the video creation where upon I receive this: “Could find no file with path ‘outputs/img2img-images\loopback-wave\loopback-2749707688\2023-10-07\%d.png’ and index in the range 0-4 [in#0 @ 000001ae4b8ca3c0] Error opening input: No such file or directory Error opening input file outputs/img2img-images\loopback-wave\loopback-2749707688\2023-10-07\%d.png. Error opening input files: No such file or directory”. I know the problem is a setting in the settings tab, but I don’t know where and/or how to correct. Any ideas? Thank you Andrew.
Mmm, this seems to be an issue with the script. Suggest to ask for help in the github project page.
Can anyone help me??, After i generate image, the image won’t show up to the canvas, the canvas just blank. But the image is generated to the output folder. Any help appreciated thx.
How do I install and use it on Windows 11?
You can follow this guide.
Help,
First time trying A1111, and I can’t get an image generation. With a simple prompt I get this message:
RuntimeError: “LayerNormKernelImpl” not implemented for ‘Half’
I can’t find what to do.
You must be on Mac? Try starting with
./webui.sh --halfThanks for very useful posts
Here is an error in inpaint section
“denoising strength: Start at 0.75. Decrease to change more. Increase to change less.”
should be exactly the opposite.
Ah, I don’t know what I was thinking! thanks!!!
Thanks for writing this super helpful guide – much appreciated!
Hello SIM! Please feel free to ask in https://discord.com/channels/1010980909568245801/1011670677906010132
The image ‘grids’ are just a collection of your results. You can use them in some advanced cases to do image-to-prompt accuracy testing (e.g. you give your grid of images, your settings, and see how accurately the process can be ‘reversed’, so if you started with a prompt, and it made a batch, you’d want all the images of that batch to more accurately reverse the process) but you don’t -have- to save them unless you plan on doing something like this in the future.
Please also feel free to DM for any specific troubleshooting (on Discord – Phae#4894)
Thank you very much for these detailed guides in readable written form. I am a bit older and the video tutorials are always a hassle, pause and write something down to emulate. It is a relieve to find a comprehensive guide in this form here. Thanks again.
I have a question regarding the use of the image grids that can be generated as well in the process. Is there any practical use for those grids? The picture files are saved along with a separate txt file for the settings, so I am wondering if I should keep having them save as well. I am asking because I don’t know if I am running maybe into something I don’t know yet lol and wish I would have saved them now. Hope you get what I mean.
Thanks for any info on this.
Regards,
Sim
They are just for an overview of all images generated so you don’t need to browse through them.
RuntimeError: CUDA error: an illegal memory access was encountered
CUDA kernel errors might be asynchronously reported at some other API call, so the stacktrace below might be incorrect.
For debugging consider passing CUDA_LAUNCH_BLOCKING=1.
Compile with `TORCH_USE_CUDA_DSA` to enable device-side assertions.
Hi there, I got this error recently. Not too sure what the problem is
Sorry for the question, Andrew. I don’t know if this is the place to raise it: is there a way to get the prompt (+ parameters) of a non-SD generated image (a photo fom the Internet, for example), so that if we put again the exact words in the prompt and the same parameters, SD produces it exactly the same image as the original? A kind of img2prompt I suppose. Thank you very much.
The best you can do is to use the “Interogate CLIP” in img2img page. See
https://stable-diffusion-art.com/automatic1111/#Get_prompt_from_an_image
You will need to add keywords and use an appropriate model to get a close result.
Thank you very much. I’ll try!
Hi I am new to stable diffusion and I think it’s so amazing. I am wondering, what’s the difference between the hi-res fix and the upscaler from the extras tab?
Hi! I am currently getting this error message:
Building wheels for collected packages: pycairo
Building wheel for pycairo (pyproject.toml): started
Building wheel for pycairo (pyproject.toml): finished with status ‘error’
Failed to build pycairo
stderr: error: subprocess-exited-with-error
× Building wheel for pycairo (pyproject.toml) did not run successfully.
│ exit code: 1
╰─> See above for output.
note: This error originates from a subprocess, and is likely not a problem with pip.
ERROR: Failed building wheel for pycairo
ERROR: Could not build wheels for pycairo, which is required to install pyproject.toml-based projects
Warning: Failed to install svglib, some preprocessors may not work.
Installing sd-webui-controlnet requirement: fvcore
not sure whats happening
Are you running locally or on colab? Please comment on the appropriate page.
“A short comment to express my immense gratitude. It is thanks to people like you that progress and advancement are within everyone’s reach. The work put into this guide is tremendous, and I cannot find enough words to thank you. We are living in an extraordinary time where mutual support, exploration, and innovation are at the core of our lives. I am eager to see what the generation of images will bring to the world. We are the pioneers of a new era
Thank you. Very encouraging!
Hey,
I receive only PNG in outputs folder not a video. How can I get a video at the end when the system finishes generating. I use deforum section.
Hi, check the command prompt windows. There should be an error message.
I keep trying to use this program and all i get is about 60% done, and it gives me this error
OutOfMemoryError: CUDA out of memory. Tried to allocate 512.00 MiB (GPU 0; 4.00 GiB total capacity; 3.04 GiB already allocated; 0 bytes free; 3.37 GiB reserved in total by PyTorch) If reserved memory is >> allocated memory try setting max_split_size_mb to avoid fragmentation. See documentation for Memory Management and PYTORCH_CUDA_ALLOC_CONF
Time taken: 7m 3.20sTorch active/reserved: 3368/3454 MiB, Sys VRAM: 4096/4096 MiB (100.0%)
I’m not sure what to do, since I’ve only had my laptop for about three weeks.
Your video card is out of memory. Try rebooting or reduce image size/batch size.
“You can use AUTOMATIC1111 on Google Colab, Windows, or Mac. Read the Quick Start Guide to decide what Stable Diffusion to use if you are new to it.”
It should say, “Read the Quick Start Guide to decide which Stable Diffusion to use.”
This is a very complete beginner’s guide, I re-shared it as I will probably consult it many many times in the coming weeks. Thanks for writing this.