A recent Reddit post showcased a series of artistic QR codes created with Stable Diffusion. Those QR codes were generated with a custom-trained ControlNet model. Just like another day in the Stable Diffusion community, people have quickly figured out how to generate QR codes with Stable Diffusion WITHOUT a custom model.
QR code, short for Quick Response code, is a common way to encode text or URL in a 2D image. You can typically use your phone’s camera app to read the code.
In this post, you will learn how to generate QR codes like these.
We will study a few ways to generate QR codes with Stable Diffusion.
- Use a QR Code Control Model with text-to-image.
- Use the tile Control Model with image-to-image.
- Use a QR Code Control Model with image-to-image.
Method 1 is easier to control, and the color comes out brighter. But not all prompts work.
Method 2 allows a wider range of prompts but could have color issues.
Method 3 produces image quality between methods 1 and 2.
Table of Contents
- Software
- Generating QR code
- Method 1: Generate a QR code with a QR control model in text-to-image
- Method 2: Generate a QR code with the tile resample model in image-to-image
- Step 1: Select a checkpoint model.
- Step 2: Enter a prompt and a negative prompt.
- Step 3: Upload the QR code to the img2img canvas.
- Step 4: Enter the following image-to-image settings.
- Step 5: Upload the QR code to ControlNet‘s image canvas.
- Step 6: Enter the following ControlNet settings.
- Step 7: Press Generate.
- Tips
- Method 3: Generate a QR code with the QR control model in image-to-image
- Other prompts
- Some interesting reads
Software
We will use AUTOMATIC1111 Stable Diffusion GUI to create QR codes. You can use this GUI on Google Colab, Windows, or Mac.
You will need the ControlNet extension installed. Follow this tutorial to install.
If you are using our Colab Notebook, simply select ControlNet at startup.
Generating QR code
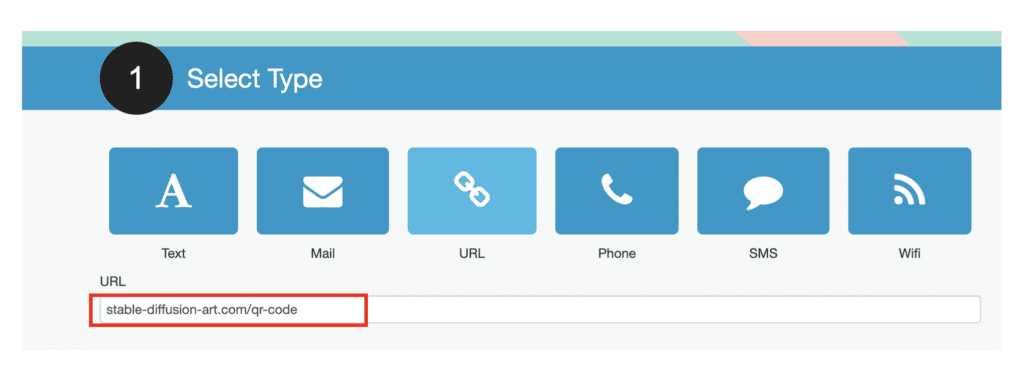
You will first need a QR Code. To increase your chance of success, use a QR code that meets the following criteria.
- Use a high fault tolerance setting (30%).
- Have a white margin around the QR Code (the quiet zone).
- Use the most basic square fill with a black-and-white pattern.
- Avoid using generators that introduce a thin white line between black elements.
We will use this QR Code generator in this tutorial.
Step 1: Select the text type and enter the text for the QR code.
Step 2: Set fault tolerance to 30%.
Step 3: Press Generate.
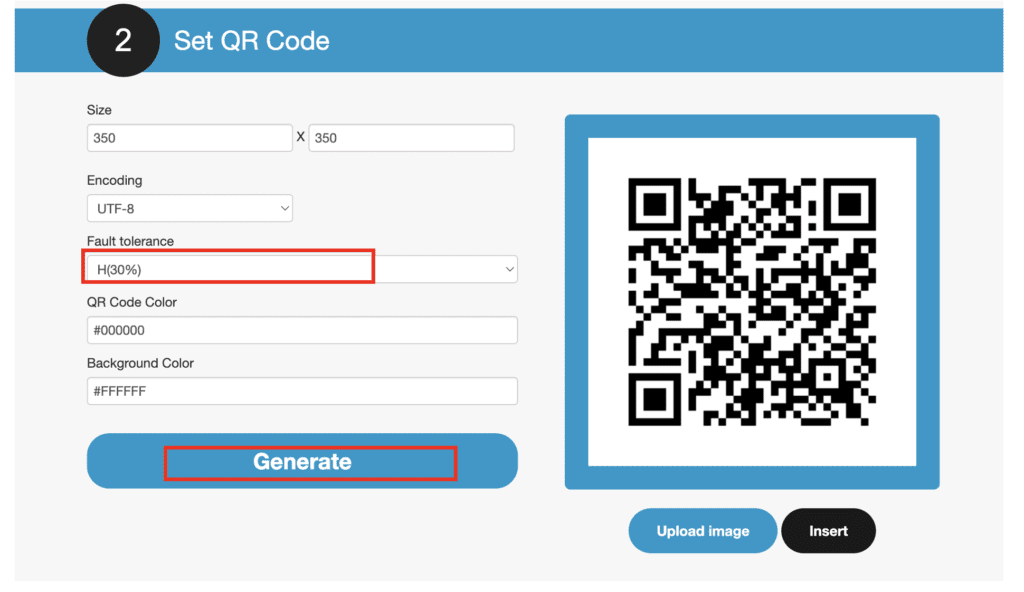
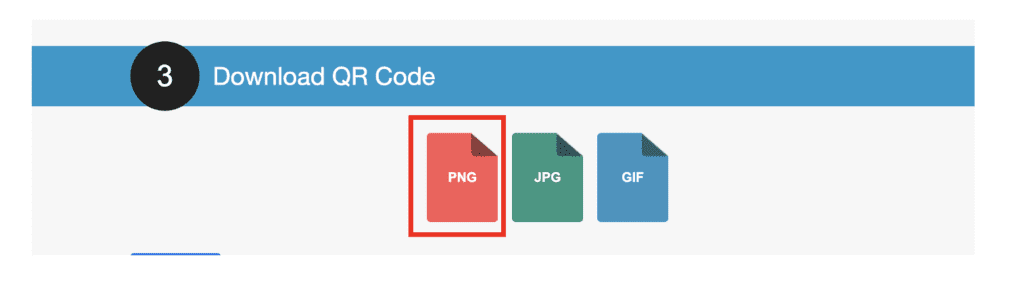
Step 4: Download the QR Code as a PNG file.
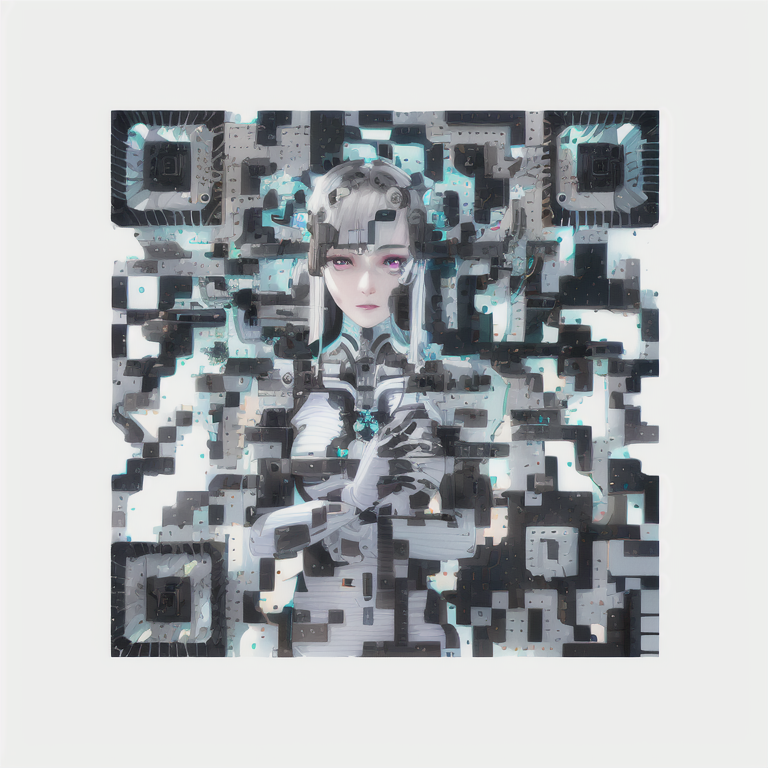
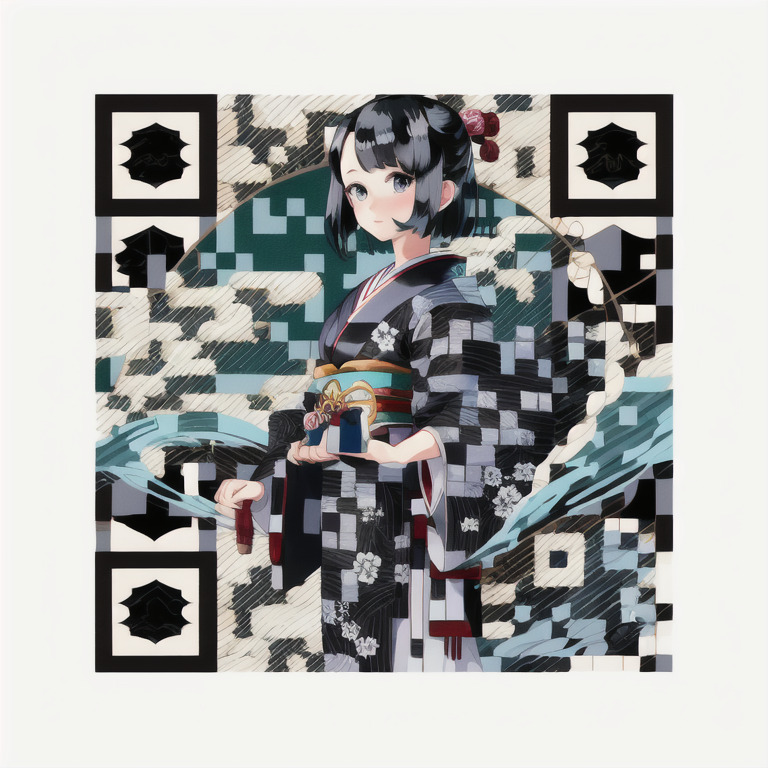
Method 1: Generate a QR code with a QR control model in text-to-image
This method requires you to download a ControlNet model trained for decorating QR codes. We have two choices.
Step 1: Install the QR Code Control Model.
We will use QR code Pattern v2.
Download the ControlNet Model and put it in the following folder.
stable-diffusion-webui\models\ControlNetStep 2: Enter the text-to-image setting
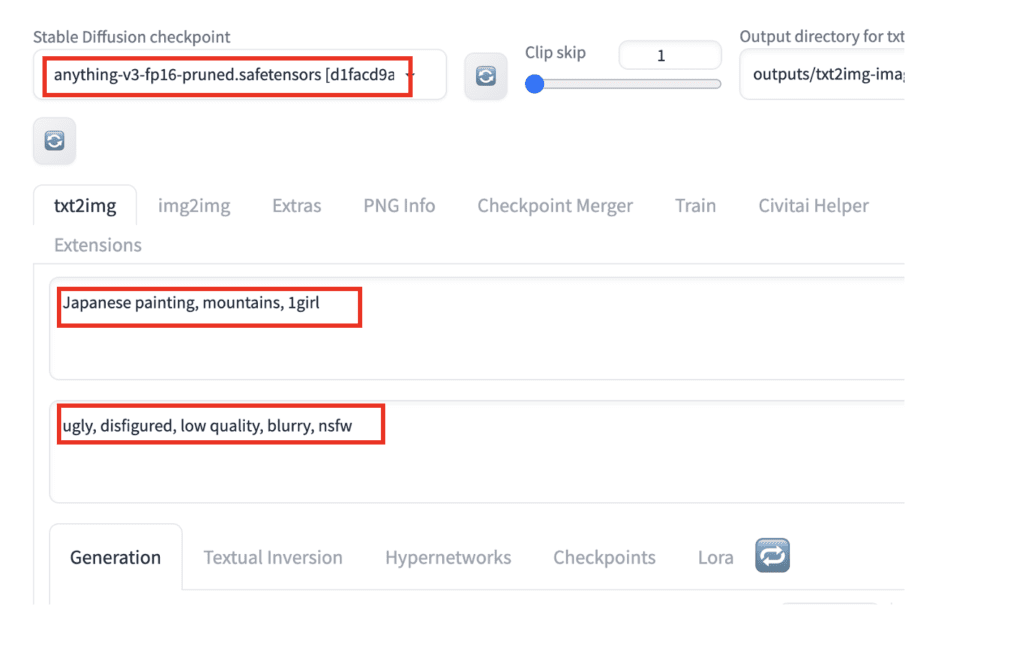
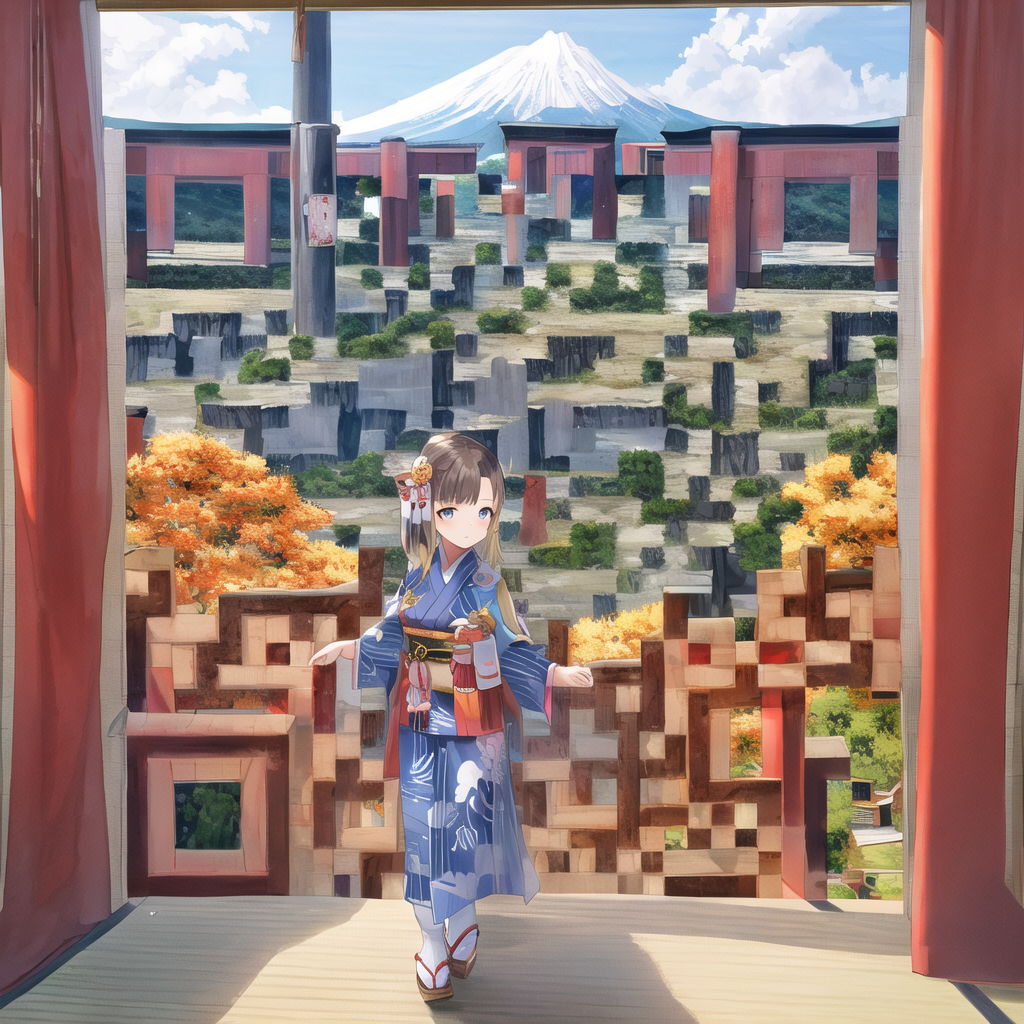
Stable Diffusion checkpoint: Anything v3
The prompt is quite important to your success. Some prompts blend naturally with your QR Code.
Prompt:
Japanese painting, mountains, 1girl
ugly, disfigured, low quality, blurry, nsfw
- Sampling Method: DPM++ 2M Karras
- Sampling Step: 20
- Hires Fix: On – Upscaler: Latent. Upscale by 2. Denoising strength: 0.7
- Width: 512
- Height: 512
- CFG Scale: 7

Step 3: Enter ControlNet Setting
On the text2img page, expand the ControlNet section. You should see an empty image canvas under ControlNet Unit 0 > Single Image.
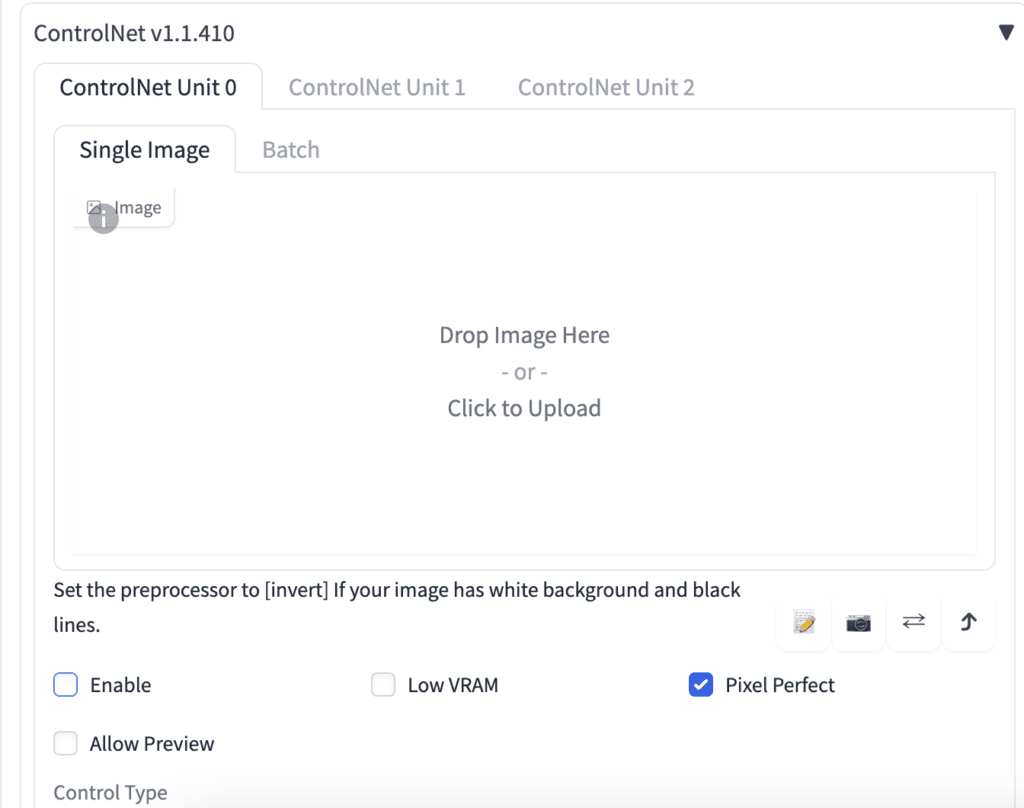
Upload the QR code to the Image Canvas.
Enable: Yes
Pixel Perfect: Yes
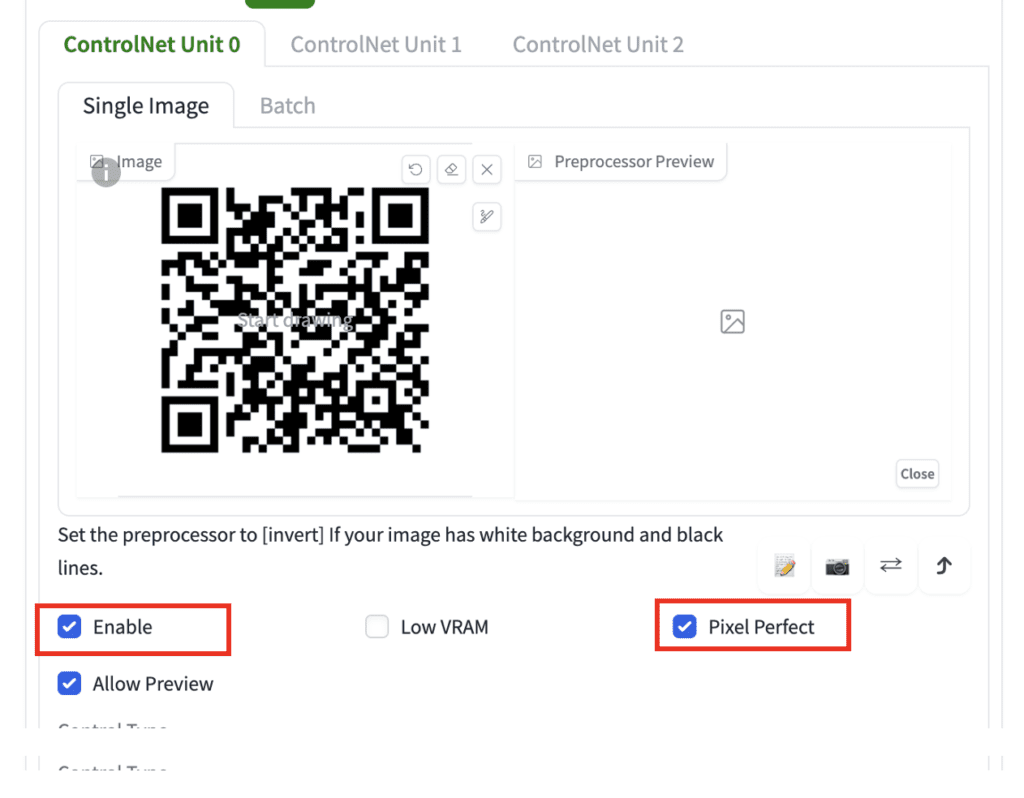
ControlNet Model: controlnetQRPatternQR_v2Sd15
Control Weight: 1.1 (This needs to be adjusted for each prompt)
Control Mode: Balanced
Resize Mode: Crop and Resize

Step 4: Press Generate
You should get 1024×1024 beautiful QR codes like these:
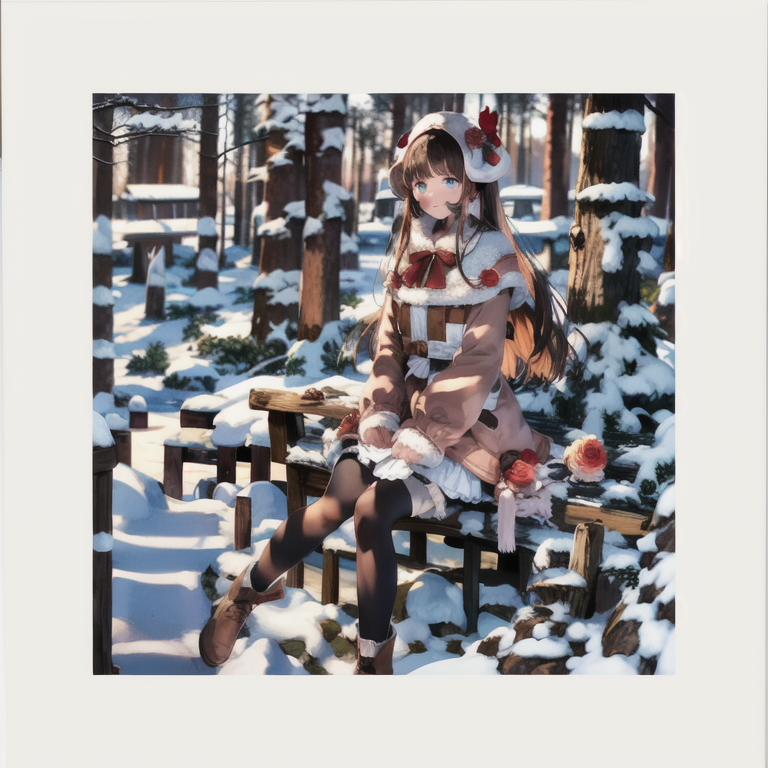
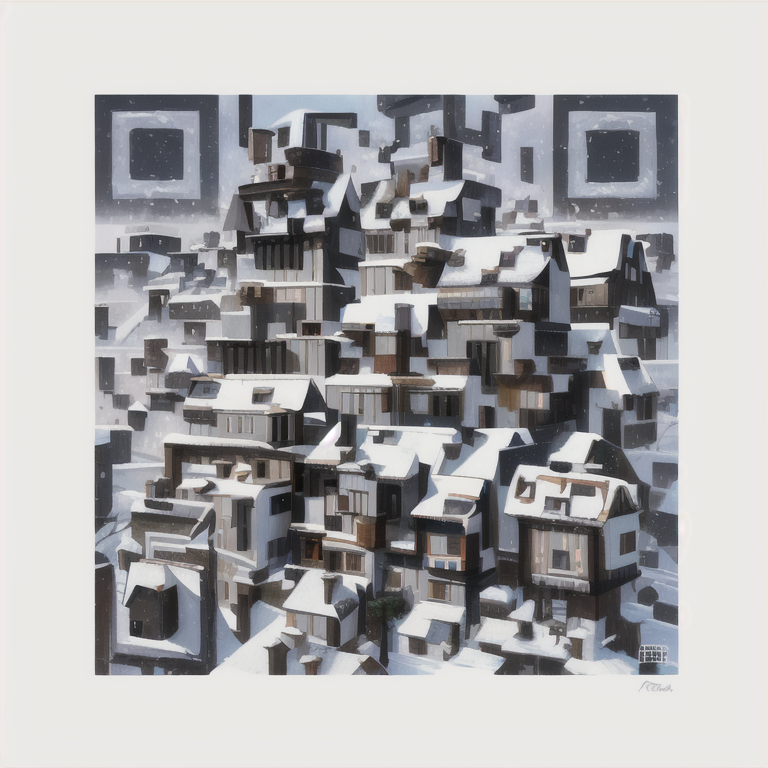
Method 2: Generate a QR code with the tile resample model in image-to-image
This method starts with generating an image similar to the QR Code using img2img. But this is not enough to produce a valid QR Code. ControlNet is turned on during the sampling steps to imprint the QR code onto the image. Near the end of the sampling steps, ControlNet is turned off to improve the consistency of the image.
In AUTOMATIC1111 WebUI, navigate to the Img2img page.
Step 1: Select a checkpoint model.
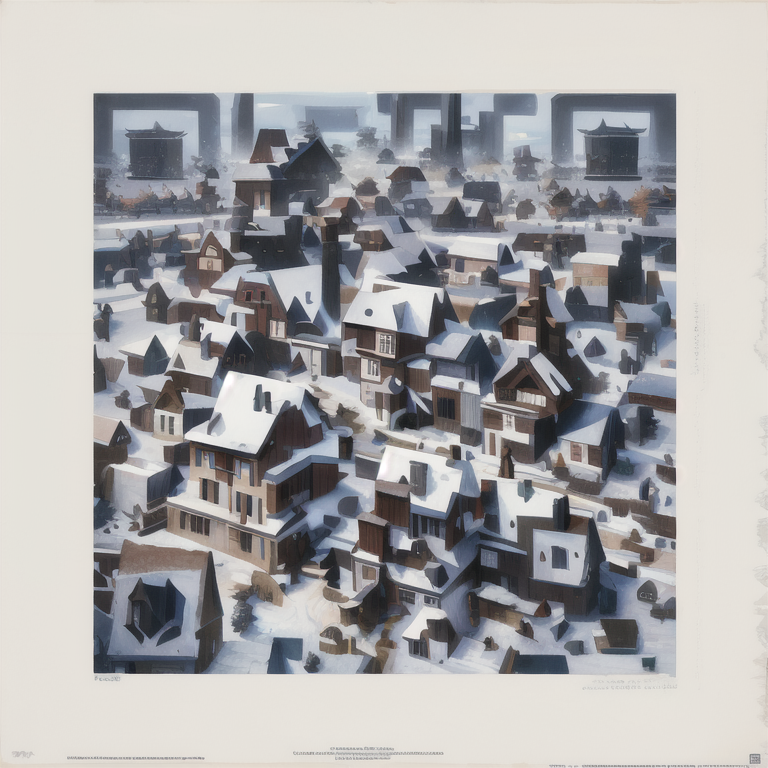
We will use GhostMix.
Step 2: Enter a prompt and a negative prompt.
The prompt is quite important to your success. Some prompts blend naturally with your QR Code.
We will use the following prompt.
a cubism painting of a town with a lot of houses in the snow with a sky background, Andreas Rocha, matte painting concept art, a detailed matte painting
And the following negative prompt.
ugly, disfigured, low quality, blurry, nsfw
Step 3: Upload the QR code to the img2img canvas.
Step 4: Enter the following image-to-image settings.
- Resize mode: Just resize
- Sampling method: DPM++2M Karras
- Sampling step: 50
- Width: 768
- Height: 768
- CFG Scale: 7
- Denoising strength: 0.75
Step 5: Upload the QR code to ControlNet‘s image canvas.
Step 6: Enter the following ControlNet settings.
- Enable: Yes
- Control Type: Tile
- Preprocessor: tile_resample
- Model: control_xxx_tile
- Control Weight: 0.87
- Starting Control Step: 0.23
- Ending Control Step: 0.9
Step 7: Press Generate.
Step 6: Check the QR code with your phone. Make sure to check with different sizes on the screen. Some tend to have issues when they are large.
You won’t get a functional QR Code with every single image. The success rate is about one in four. Generate more images and check for the keepers.
Tips
QR codes with shorter text have a higher success rate because the patterns are simpler.
Not all QR codes work the same. Some could be marginally working and can only be read at a certain distance.
Some prompts blend more naturally with QR codes. For example, the prompt for generating houses with snow on rooftops you saw previously blends well with QR codes simply because they share similar visual elements.
The working parameters can be different for different models and prompts. You must adjust the following parameter slightly to blend the QR Code and the prompt well.
- Denoising strength: Decrease to have the initial composition follows the QR code more. But you will only see the QR code if you reduce it too much. It is typically set higher than 0.7.
- Control Weight: Decrease to show the prompt more.
- Starting Control Step: Increase to show the prompt more.
- Ending Control Step: Decrease to stop the ControlNet earlier so that the QR code and the image can blend more naturally.
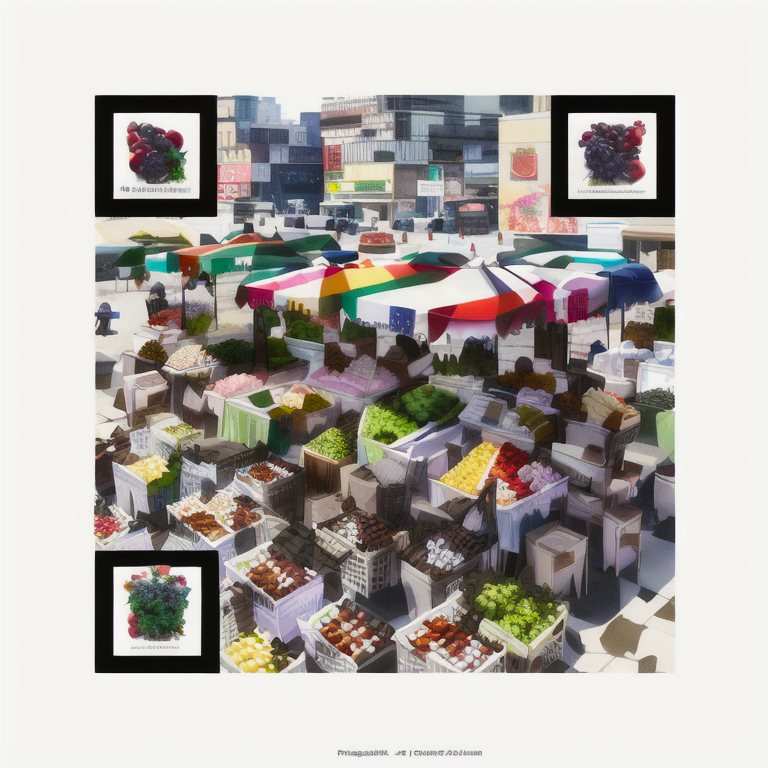
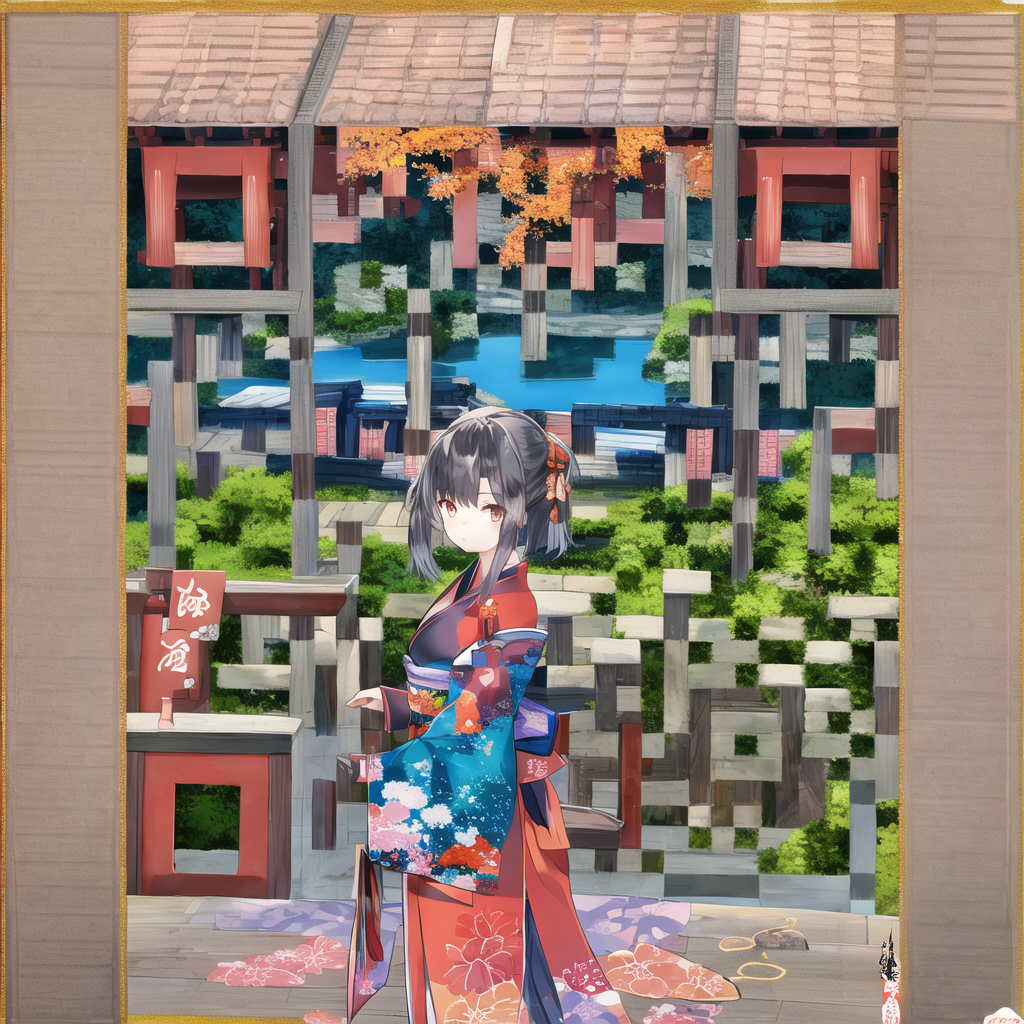
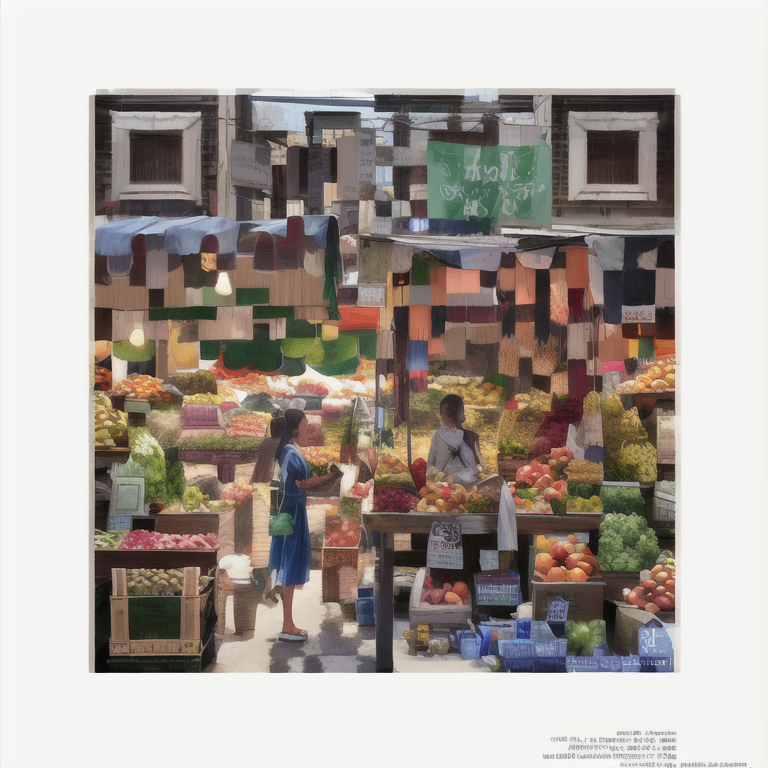
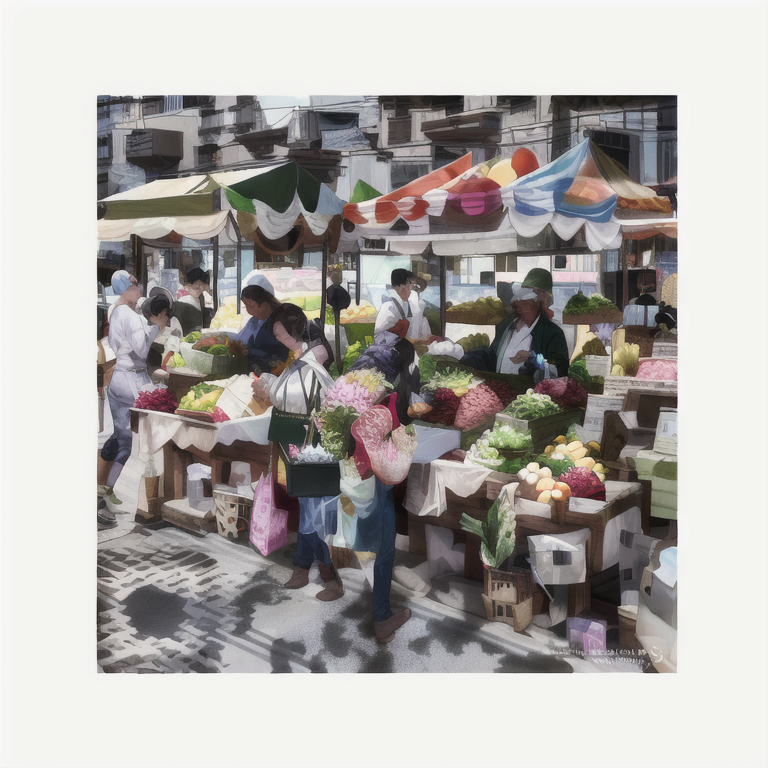
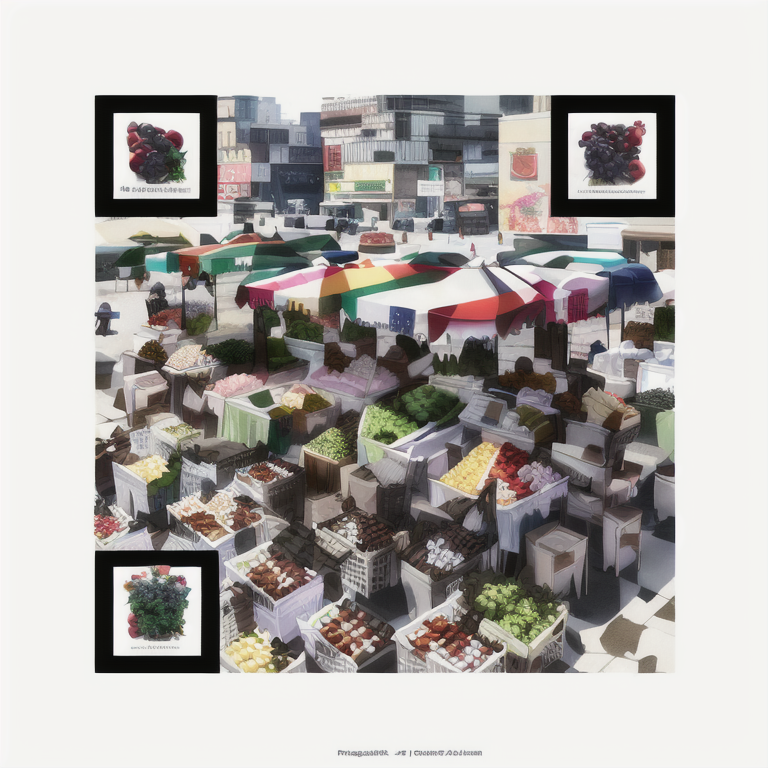
Method 3: Generate a QR code with the QR control model in image-to-image
This method is very similar to Method 2, except we chose the QR Pattern v2 model instead of the tile Control Model. Here are the parameters.
Prompt:
A photo-realistic rendering of a busy market, ((street vendors, fruits, vegetable, shops)), (Photorealistic:1.3), (Highly detailed:1.2), (Natural light:1.2), art inspired by Architectural Digest, Vogue Living, and Elle Decor
Negative prompt:
ugly, disfigured, low quality, blurry, nsfw
- Enable: Yes
- Control Type: All
- Preprocessor: None
- Model: controlnetQRPatternQR_v2Sd15
- Control Weight: 1
- Starting Control Step: 0.12 (Adjust for different prompts)
- Ending Control Step: 1
Here’s what we got:
Other prompts
In Snow
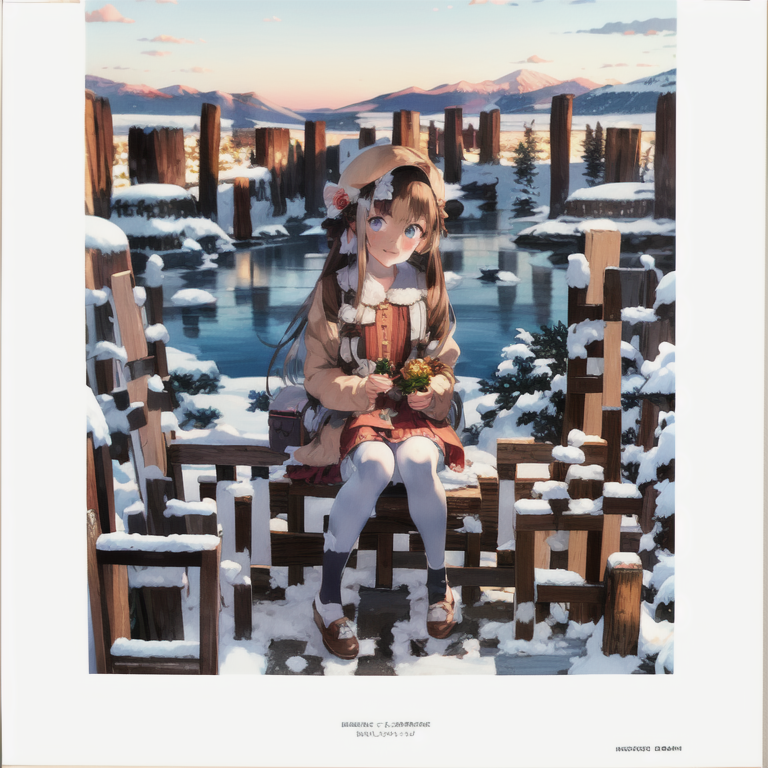
masterpiece, best quality, winter, snow field, smile, blush, 1girl, bangs, blue eyes, blunt bangs, bonnet, brown footwear, brown hair, red dress, frills, fruit, full body, hat, long hair, long sleeves, looking at viewer, black pantyhose, red flower, red rose, rose, shoes, sitting, solo, sky, sunset, mountain, forest, lake,
EasyNegative, (worst quality:2), (low quality:2), (normal quality:2) verybadimagenegative_v1.3
Method 3
Model: Ghost Mix
Start Control Step: 0.12
Ending Control Step: 1
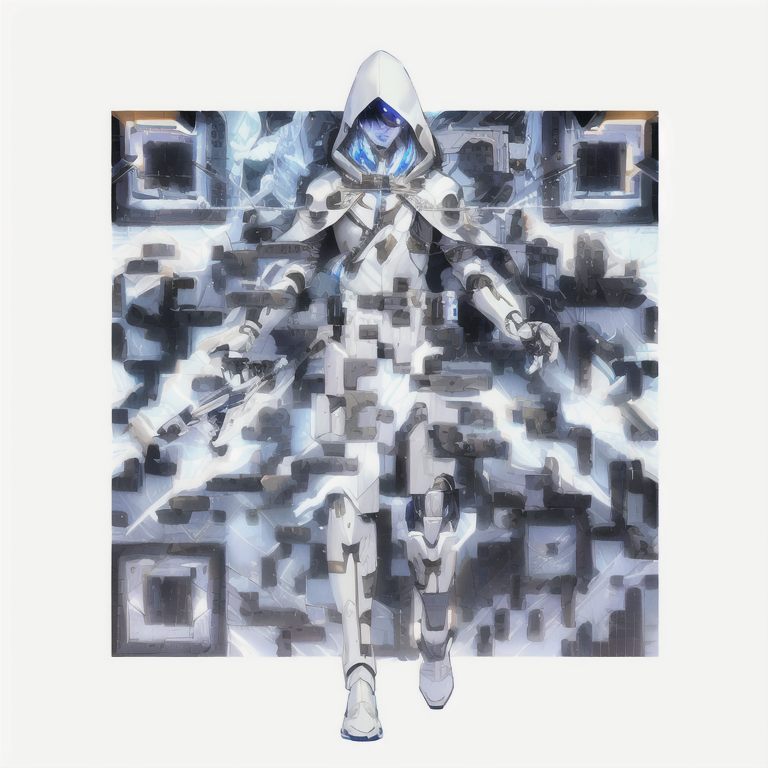
Mechanical girl
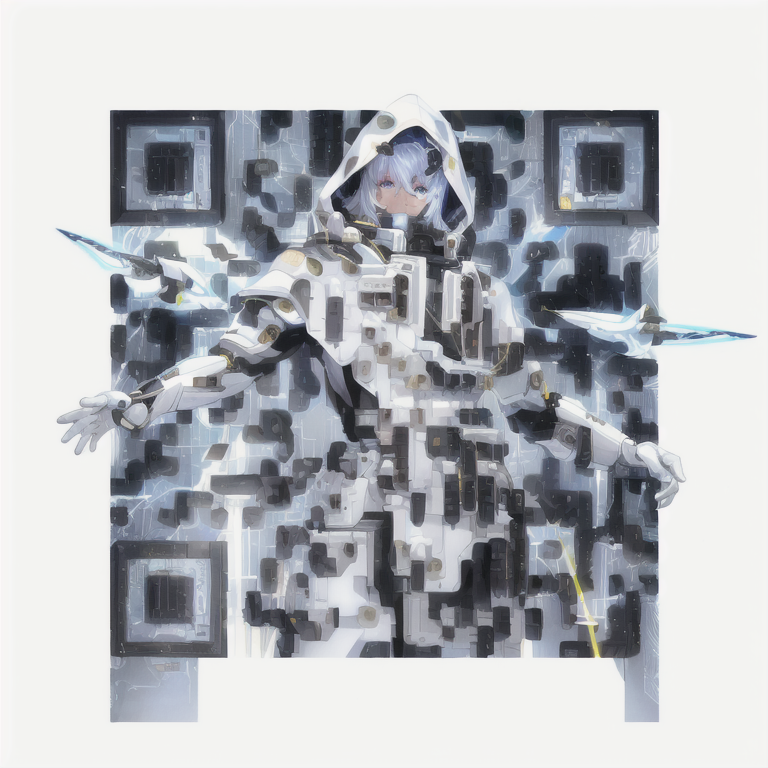
Method 2
1mechanical girl,ultra realistic details, portrait, global illumination, shadows, octane render, 8k, ultra sharp,intricate, ornaments detailed, cold colors, metal, egypician detail, highly intricate details, realistic light, trending on cgsociety, glowing eyes, facing camera, neon details, machanical limbs,blood vessels connected to tubes,mechanical vertebra attaching to back,mechanical cervial attaching to neck,sitting,wires and cables connecting to head
ugly, disfigured, low quality, blurry
Denoising strength: 0.75
Control weight: 1
Starting Control Step: 0.23
Ending Control Step: 0.7
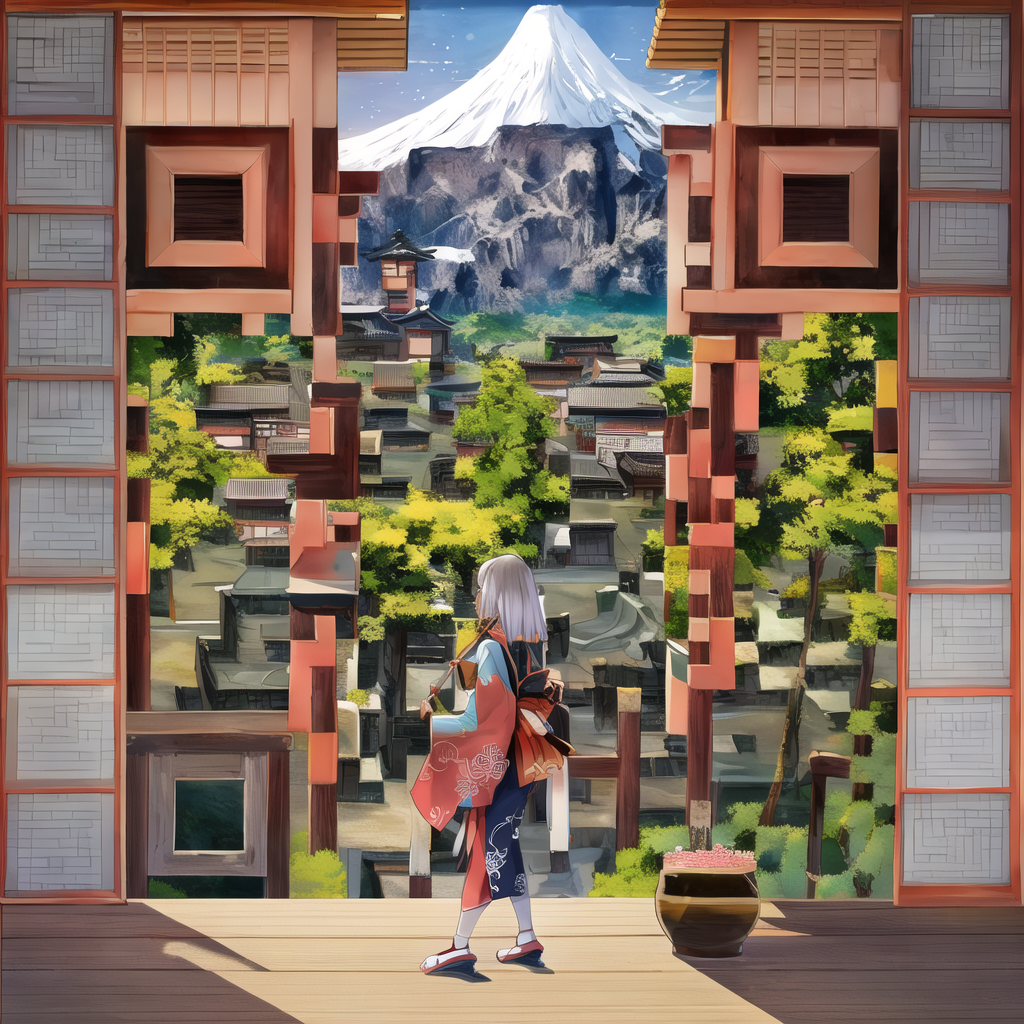
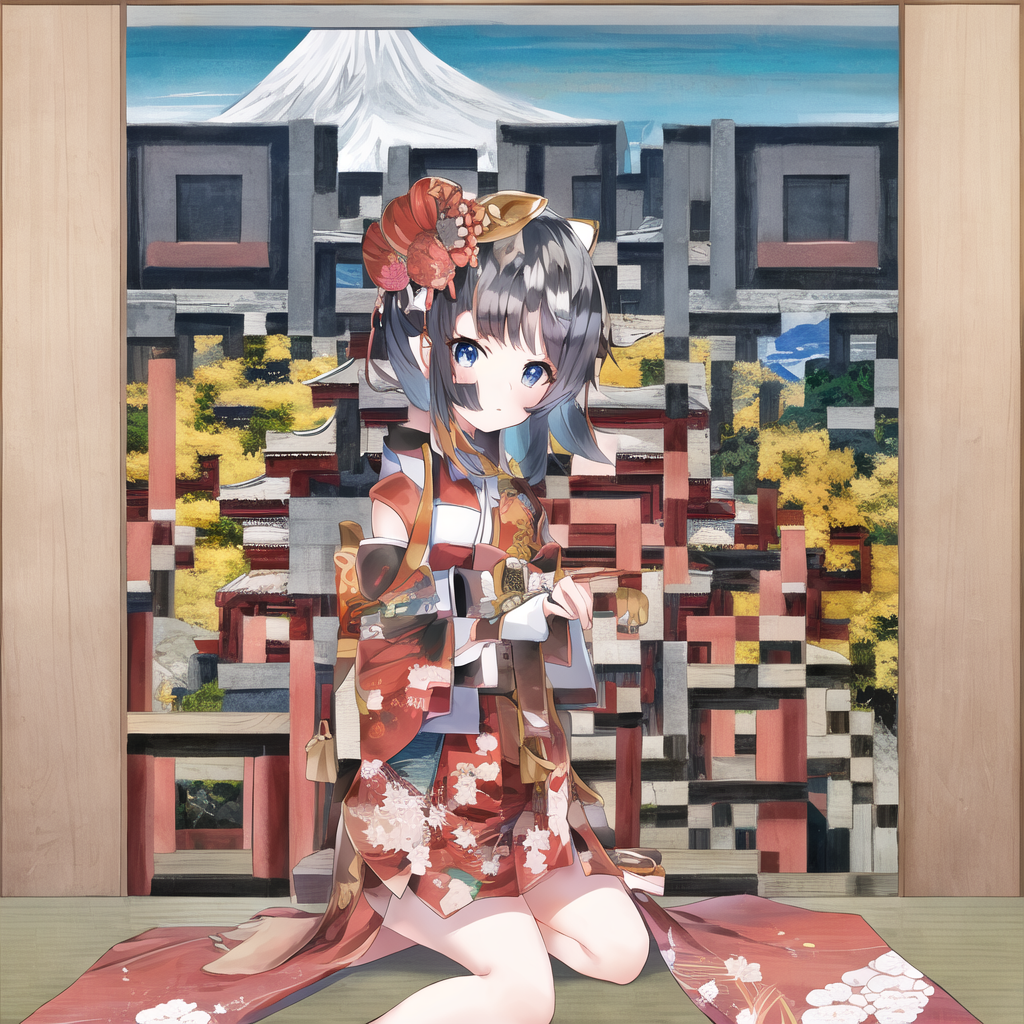
Japanese girl
Japanese painting, mountains, 1girl
ugly, disfigured, low quality, blurry, nsfw
Method 1
Control Weight: 1.1
Method 2
Denoising strength: 0.75
Control weight: 1
Starting Control Step: 0.23
Ending Control Step: 0.9

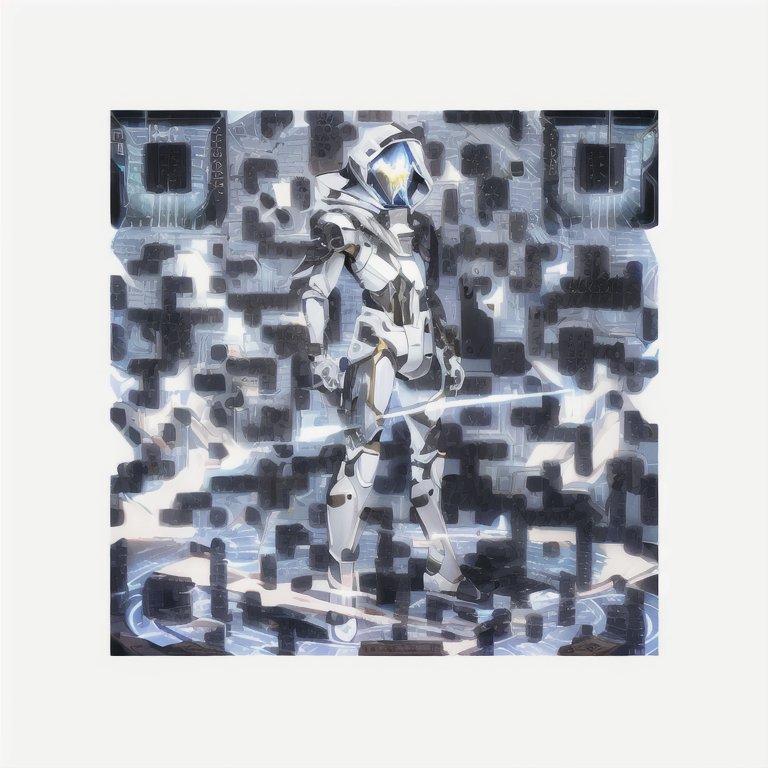
Robot
light, futobot, cyborg, ((masterpiece),(best quality),(ultra-detailed), (full body:1.2), 1male, solo, hood up, upper body, mask, 1boy, male focus,white gloves, cloak, long sleeves, spaceship, lightning, hires
ugly, disfigured, low quality, blurry
Method 2
Denoising strength: 0.75
Control weight: 1
Starting Control Step: 0.24
Ending Control Step: 0.9
Outdoor market
A photo-realistic rendering of a busy market, ((street vendors, fruits, vegetable, shops)), (Photorealistic:1.3), (Highly detailed:1.2), (Natural light:1.2), art inspired by Architectural Digest, Vogue Living, and Elle Decor
ugly, disfigured, low quality, blurry, nsfw
Denoising strength: 0.75
Control weight: 0.87
Starting Control Step: 0.23
Ending Control Step: 0.9
How many tries you guys run before being satisfied? I mean, I created like 10 options, but they aren’t as good as the ones in the post.
Hi, great tutorial! Would love to see an updated version of this that uses Flux in ComfyUI.
Noted!
I’m trying to use the method 2. I set 50 steps and the render starts. I can see it producing a good image from the preview, but after completing the first 50 steps it starts again with 50 others steps, but this second time is 10 time slower.. and after 4-5 hours of rendering i got a crash. Do you know if its possibile to skip the second 50 steps?
Your machine seems to run out of memory. I don’t think there’s a second processing step in that method.
All of these codes scan immediately for me (I use QRBot on iPhone). Kind of like magic really. I’m honestly amazed these even work! Great tutorial, thanks Andrew.
Hi there,
I’ve followed exactly steps by steps from installing SD to here, however, when I try to generate the image, an error message “RuntimeError: “log_vml_cpu” not implemented for ‘Half’ ” hit this. I’ve gone through reddit & github for solutions, but it still not works. Was wondering if you’ve seen the same error before? If so, how do you get it resolved? thanks.
None of the QR codes in this article work on any of my Samsung phones (I have 5 different recent models).
Samsung’s phones use a visual detection AI model to decide what you are looking at, and offer things like night mode, portrait, food, text scan etc. when they think they recognise a scenario.
In the case of some of these artistic (read ‘obfuscated’) QR codes the phone never goes into QR scan mode, so it’s not automatically detected.
Install any QR reader from Google Play and you’ll find most scan immediately without an issue.
In the light of all of these things becoming more popular, I wonder if Samsung will modify their algorithm to scan for QR codes against images that don’t visually appear to be QR codes, just to get around this issue.
Apple devices are far more tolerant, and generally recognise and scan them immediately.
hi – can i use this with my own image? instead of generating one?
I’m not aware of a method.
Hi,
Will this work for a 3GB GPU?
I haven’t tried but 3GB seems a bit too low for using controlnet.
Where do you find the .ckpt of revanimated? I’m only seeing the .safetensors format. Can that be used with the google colab hosted version?
both .ckpt and .safetensors can be used interchangeably.
Hey, thanks for the post! Managed to make some good QR codes
Do you know how I can turn an image i have to a QR code though? Where should I put it? Control net part?
“bla” = whatever the latest version is 🙂
https://huggingface.co/ioclab/ioc-controlnet
So, where can I download the control_bla_brightness model? I searched over the internet and I got nothing but a link to this blog post..
The leodobre method:
1. Install qrencode to generate the qr code. Use the highest error correction level, actually invert the colors to create a more beautiful image.
qrencode –foreground=”FFFFFF” –background=”000000″ –level=H -o qrsmol.png “https://stable-diffusion-art.com/qr-code/”
2. Install imagemagick to quickly resize the qr code.
magick convert qrsmol.png -resize 512×512 qrbig.png
3. Use a checkpoint model like revanimated, actually use blurry in your positive prompt, because it will blend the qr code with the image.
There’s no need for img2img. In txt2img use keywords like:
blurry, blurry_background, blurry_foreground, depth_of_field
4. Settings:
The default ones (Euler a, 20 steps, 512×512, cfg 7)
5. Enable controlnet unit 0 and 1, upload the qr code in them.
Settings for unit 0: tile_resample, control_bla_tile, weight: 0.5, starting step: 0.15, ending step: 0.5
Settings for unit 1: inpaint_global_harmonious, control_bla_brightness, weight: 0.5, starting step: 0.5, ending step: 0.9
6. That’s it. Here’s a sample result for the outdoor market, scan it:
https://imgur.com/a/FQ34Uxg
I couldn’t find it either but the updated sd15_tile works great
Hi, This is Regan. I am currently operating a Chinese AI blog named Baihai IDP.
Please allow me to translate this blog post into Chinese.
I am very interested in the content of your blog post. I believe that the information in it would be of great benefit to a wider audience if it were translated into Chinese.
I would be sure to include a link to the original blog post and your name as the author. I would also be happy to provide you with a copy of the translated post for your records.
I hope you will consider my request and I look forward to hearing from you.
Awesome guide! I was unfortunately not able to replicate any of your results with those exact inputs and parameters but a different QR code. I suspect that optimal parameter are very sensible to the length of the encoded string. Mine was a lot shorter and the same configuration yielded much less change from the original input image.
Use a second pane in ControlNet unit (ControlNet Unit 1) (Try with control type: tile if you want image to be close to your original image or with control type: depth if you want the generated image to resemble the outlines and depth info from the original image)
Example video with results: https://www.youtube.com/watch?v=1NE_rdnGJnY
For future souls trying to achieve the same results: my problem was the image size. Before I was using 512px and no joy, somehow we must use the size proposed in the article (no clue why).
Other sizes also work but the parameters are different.
Wonderful, can’t wait to try this and implement this in my projects!
Great article, however I could only find preprocessor as openpose but couldn’t find control_openpose-fp16 in model, I downloaded openpose model from hugging face as well as adapters. Am i missing somethign?
Hi all,
Do you know if there is a way to make a cool QR like this ones but with an existing image? We have a pet and what to do it with it and transform to a 3D like the ones in here.
Follow the instructions in the README file for the ControNet module: https://github.com/Mikubill/sd-webui-controlnet/blob/main/README.md (Download models section).
worked for me first try with the recommended settings:
a cubism painting of a town with a lot of houses in the snow with a sky background, Andreas Rocha, matte painting concept art, a detailed matte painting
Negative prompt: ugly, disfigured, low quality, blurry, nsfw
Steps: 50, Sampler: DPM++ 2M Karras, CFG scale: 7, Seed: 3904050964, Size: 768×768, Model hash: e3edb8a26f, Model: ghostmix_v20Bakedvae, Denoising strength: 0.75, ControlNet: “preprocessor: tile_resample, model: control_v11f1e_sd15_tile [a371b31b], weight: 0.87, starting/ending: (0.23, 0.9), resize mode: Crop and Resize, pixel perfect: False, control mode: Balanced, preprocessor params: (-1, 1, -1)”, Version: v1.3.2
Worked for me first try with all the recommended settings:
a cubism painting of a town with a lot of houses in the snow with a sky background, Andreas Rocha, matte painting concept art, a detailed matte painting
Negative prompt: ugly, disfigured, low quality, blurry, nsfw
Steps: 50, Sampler: DPM++ 2M Karras, CFG scale: 7, Seed: 3904050964, Size: 768×768, Model hash: e3edb8a26f, Model: ghostmix_v20Bakedvae, Denoising strength: 0.75, ControlNet: “preprocessor: tile_resample, model: control_v11f1e_sd15_tile [a371b31b], weight: 0.87, starting/ending: (0.23, 0.9), resize mode: Crop and Resize, pixel perfect: False, control mode: Balanced, preprocessor params: (-1, 1, -1)”, Version: v1.3.2
Hey you have model twice, i couldn’t find ghostmix_v20Bakedvae,
Trying to follow your guide, but i don’t have the control_xxx_tile model option – where do I get this? I only have control_v11p_sd15_canny and control_v11p_sd15_open_pose
No matter how much I play with the parameters (denoise as low as 0.55, Control Weight as high as 1.5, etc.), I can’t achieve a working Qr, even if some “look” Qr-y enough to give some hope…
My guess is that either SD is blowing up the error correction or not preserving the fixed pattern required to decode.
Bummer 🙁
Great Job! Love from Creator of GhostMix!
Great model! thanks.
This YouTube tutorial works really good! Tha ks for the comment.
I was able to get the qr code working. Straight to the point. Cheers mate. ?
I have made it work but I cant seem to get colorful images.. always black and white.. any tips?
try edit this file:stable-diffusion-webui\webui-user.bat
at line 6: set COMMANDLINE_ARGS=–lowvram –precision full –no-half –disable-nan-check
Hi, try
1. a different prompt and/or model.
2. Increasing starting control step
3. Decreasing ending control step
4. Increasing denoising strength
Negative promp: black and white
Anyone that has working results, can you post your seed’s Stable Diffusion is deterministic, so if we use the same settings and seed and prompt, we should get same results.
I have made a step-by-step tutorial here. https://youtu.be/XRNQKjhEcyc
“Step 1: Select a checkpoint model. We will use GhostMix.”
No idea what to do here. I downloaded the file from the link but where should I put it?
Hi, see
https://stable-diffusion-art.com/models/#How_to_install_and_use_a_model
Figured it out, path is: “stable-diffusion-webui\models\Stable-diffusion”.
not working
none of your examples, neither my generated qrs actually work :-/
All the examples worked just fine.
Same issue, none work. Im using an S9 Android phone, just the camera to scan the QR no special app… how about you. I can make them work if I photoshop them a little but that defeats the point.
Hi, you can follow the guideline in the Tips section to let the QR code show more. I only tested on my iphone.
Mmmm.. They all work on my iphone. Some phones can only read when zoomed out a bit so that it is smaller on screen.
None except the bare QR code work on my Pixel 6. Would appreciate any tips on how to get phones to recognize any of these cool looking artistic QR codes.
Try follow the tips section to show the QR code more.
Where can I find “Model: control_xxx_tile” from controlnet? There is no model here. Thank you.
https://huggingface.co/lllyasviel/ControlNet-v1-1/tree/main – hold on
how to install control_xxx_tile module from this repo?
just download file then put them to this path: stable-diffusion-webui\extensions\sd-webui-controlnet\models
thank you ! it works
but where is the path –“stable-diffusion-webui\extensions\sd-webui-controlnet\models”, if i use colab
What is the name of the model? I cannot see it anywhere in that location. Thanks.