
Deforum is a tool for creating animation videos with Stable Diffusion. You only need to provide the text prompts and settings for how the camera moves.
In this article, we will go through the steps of making this deforum video.
This post is for beginners who have not made a deforum video before. You will learn
- What deforum is.
- How to install the deforum extension on AUTOMATIC1111 Stable Diffusion.
- The basic settings.
- How to create your first deforum video step-by-step.
Table of Contents
What is deforum?
Deforum is open-source and free software for making animations. It uses Stable Diffusion’s image-to-image function to generate a series of images and stitches them together to create a video.
It applies small transformations to an image frame and uses the image-to-image function to create the next frame. Since the change between frames is small, it creates the perception of a continuous video.
How to install deforum?
You will first install the deforum extension in AUTOMATIC1111 Stable Diffusion WebUI. You can use this GUI on Windows, Mac, or Google Colab.
Use deforum on Google Colab
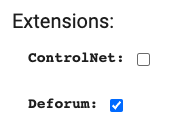
If you use the Colab notebook in the Quick Start Guide, check the Deforum extension before starting AUTOMATIC1111.
That’s it!
You should see the Deforum tab in AUTOMATIC1111 GUI after startup.
Installing deforum on Windows or Mac
Follow these instructions to install deforum if you run AUTOMATIC1111 locally on Windows or Mac.
To install an extension in AUTOMATIC1111 Stable Diffusion WebUI:
- Start AUTOMATIC1111 Web-UI normally.
2. Navigate to the Extension Page.
3. Click the Install from URL tab.
4. Enter the following URL in the URL for extension’s git repository field.
https://github.com/deforum-art/sd-webui-deforum5. Click the Install button.
6. Wait for the confirmation message that the installation is complete.
7. Restart AUTOMATIC1111. You should see the Deforum tab after restarting the AUTOMATIC1111 GUI.
Generate a test video
This step is optional but will give you an overview of where to find the settings we will use.
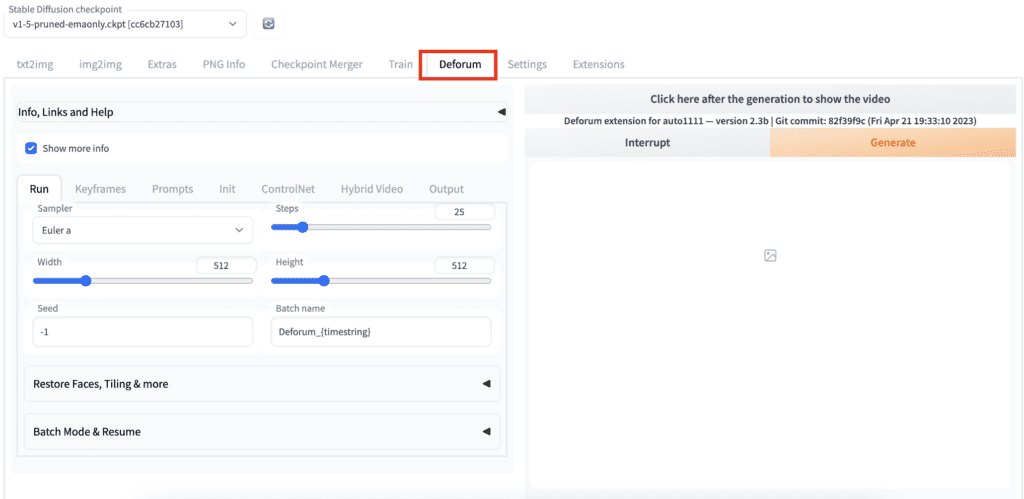
Step 1: In AUTOMATIC1111 GUI, Navigate to the Deforum page.
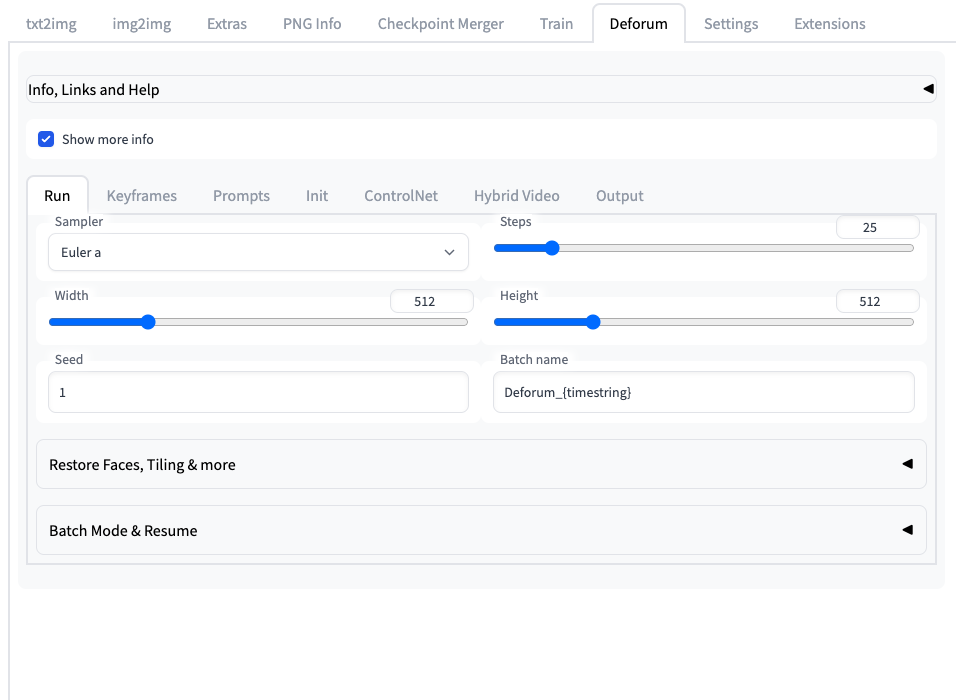
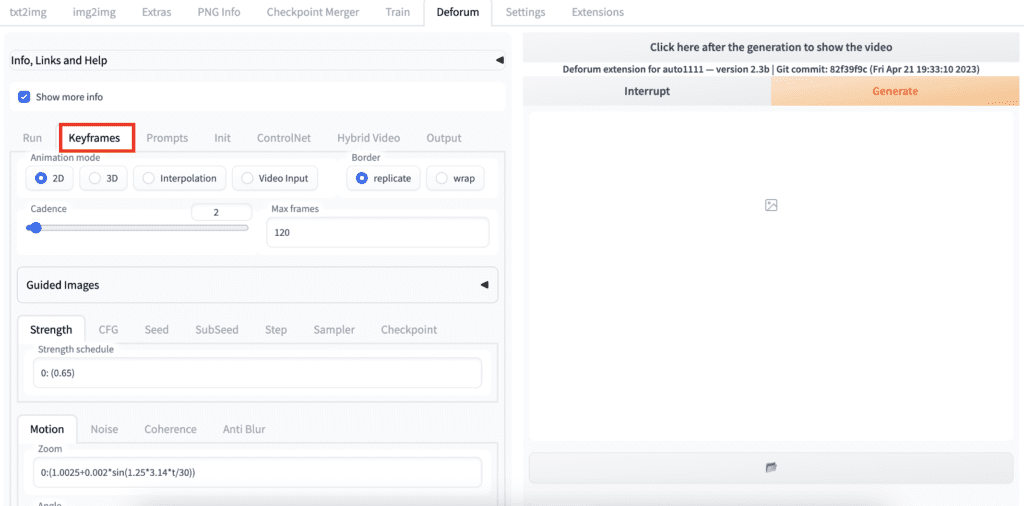
Step 2: Navigate to the keyframes tab.
- You will see a Motion tab on the bottom half of the page. Here’s where you will set the camera parameters.
- Max frames are the number of frames of your video. Higher value makes the video longer.
You can use the default values.
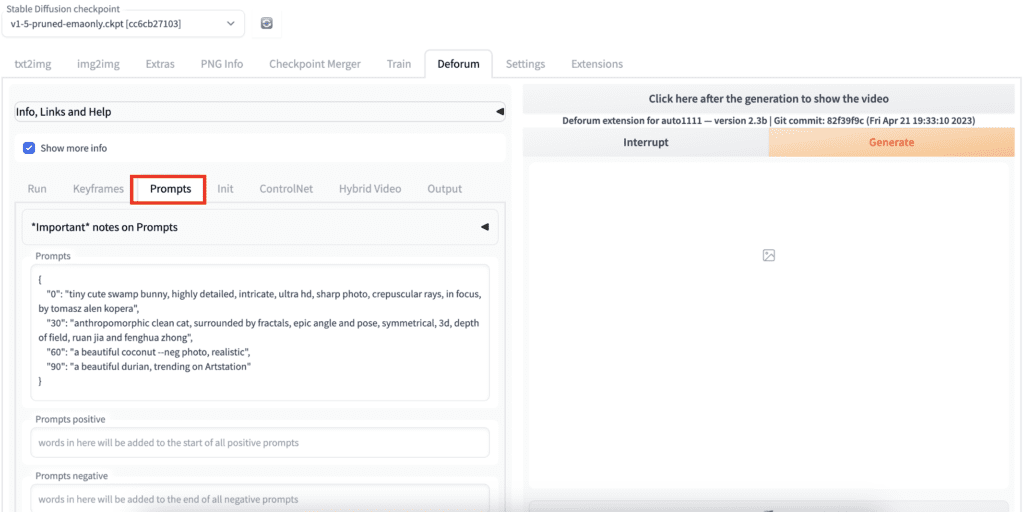
Step 3: Navigate to the Prompts tab. You will see a list of prompts with a number in front of each of them. The number is the frame that the prompt becomes effective.
For the prompts below, it will use the first prompt at the beginning of the video. It will then switch to using the second prompt in at 30th frame, and the third prompt at the 60th frame, and the fourth prompt at the 90th frame.
You can leave the prompts as they are.
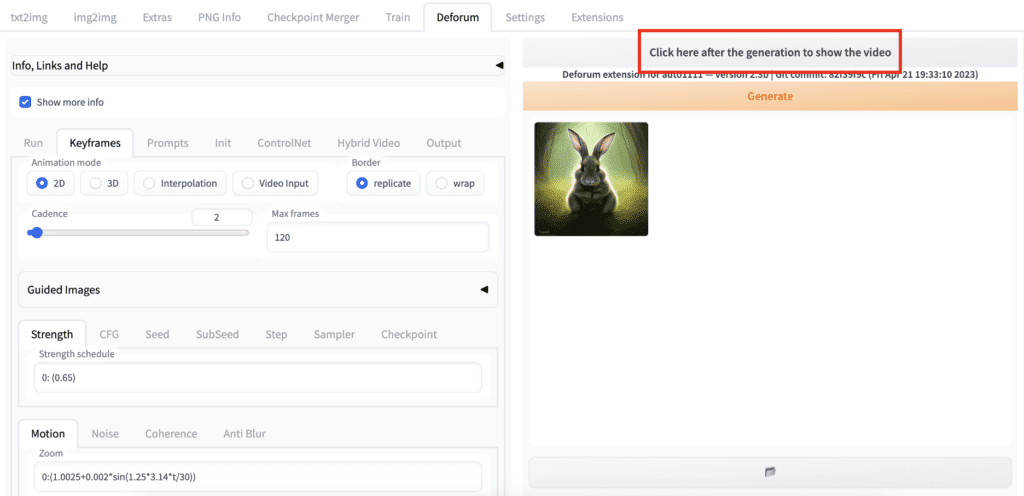
Step 4: Click on Generate to start generating a video.

Step 5: When it is done, click on the button above the Generate button to see the video.
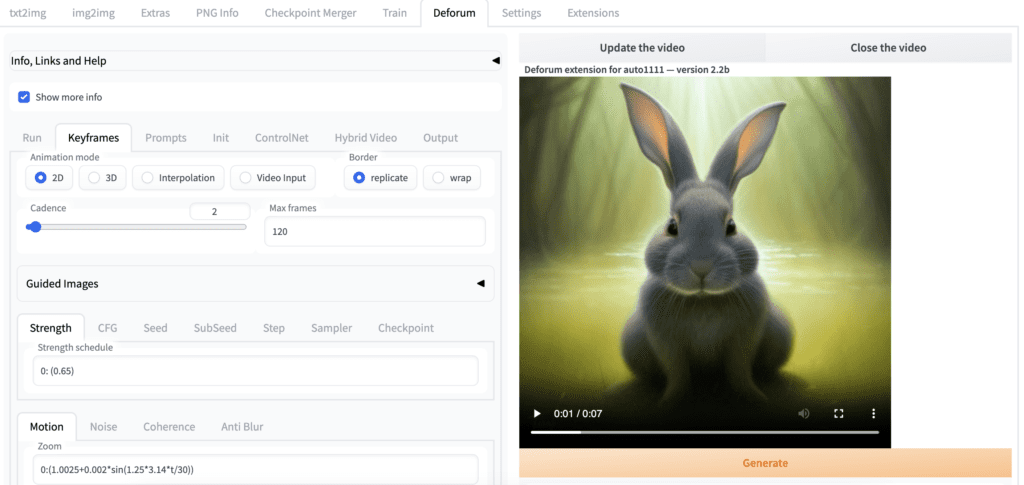
You can save the video to your local storage by clicking the three vertical dots in the bottom right corner. Or you can find your video in the output directory under the img2img-images folder.
Basic settings (with examples)
We will first go through the two most important settings
- Motions (2D and 3D)
- Prompts
It’s important to understand what Deforum can do before going through the step-by-step examples for creating videos.
In this section, you will see examples of changing one parameter while keeping everything else fixed. These are the building blocks of your video.
By combining them and turning them on and off at different times, you can create stunning visual effects.
Motion settings
Motion settings are some of the most used options in Deforum. You can make a decent video by simply changing them and the prompts. So you should have a good grasp of how motion settings work and what they can do.
Let’s cover the two most used animation modes
- 2D – treat the images as 2D and perform various transformations like zoom and rotation to create an illusion of motion.
- 3D – treat the images as a view of a 3D scene. You can move the camera’s viewport in any 3D operation.
2D motion settings
2D Zoom
Use the zoom function to zoom in or out of the image. Use a zoom value larger than 1 to zoom in and less than 1 to zoom out.
The further away the value is from 1, the faster the zoom is.
By default, the zoom is focused at the center. You can control the focus by setting Transform Center X and Transform Center Y. We will cover them in a few scrolls down.


2D Angle
Use a 2D Angle to rotate the images. A positive value rotates the image counterclockwise, and a negative value rotates the image clockwise.
A larger value rotates the image faster.
By default, the rotation is around the center of the image. You can control the center of rotation by setting Transform Center X and Transform Center Y. We will cover them in a few scrolls down.

2D Translation X
Use Translation X to move the image sideways. Use a positive value to move the image to the right and a negative value to move the image to the left.
2D Translation Y
Use Translation Y to move the camera up and down. Use a positive value to move the image down and a negative value to move the image up.
2D Transform Center
Transform Center is for changing the focal point of zoom and/or rotation.
The default value is 0.5 for both X and Y, which is the center of the image. (X, Y) = (0, 0) is the top left corner, and (1, 1) is the bottom right corner. See the following diagram for other common locations.
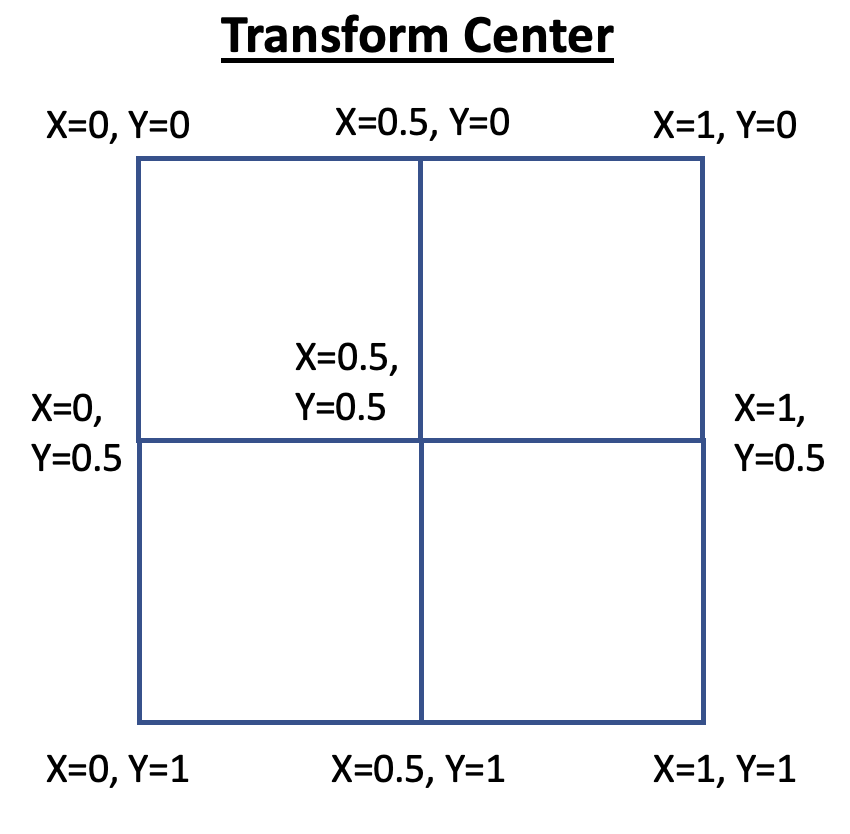
You can specify values less than 0 or larger than 1. They will be outside of the image.
Below are two examples of zooming in at the top left corner (0, 0) and the bottom right (1, 1).
2D Perspective flip
Perspective flip performs 3D-like transformations to the image to create some cool effects.
You will need to select Enable perspective flip to enable these options.


3D motion settings
3D motion is an alternative to 2D motion. Think of it as you are holding a camera. You can move and rotate the camera any way you want.
3D Translation X
Translation X moves the camera sideways. A positive value moves the camera to the right. A negative value moves the camera to the left.
3D Translation Y
Translation Y moves the camera up and down. Using a positive value moves the camera up. A negative value moves the camera down.
3D Translation Z
Translation Z in 3D is similar to zoom in 2D motions.
3D rotation X
Rotation X rotates the camera about the X-axis.

3D rotation Y
Rotation Y rotates the camera about the Y-axis.
3D rotation Z
Rotation Z rotates the camera about the Z-axis.

Motion schedule
The motion settings are put in with the form
frame1:(value1), frame2:(value2), frame3:(value3), ...Each entry consists of two numbers: The frame number it takes effect and the motion’s value. The frame and value of each entry have to be separated by a colon, and the value has to be bracketed.
You always need an entry for frame 0.
You can have as many entries as you want.
It’s important to note that when you have two or more entries, it means interpolation between the two frames.
For example, the following formula used in zoom means gradually increasing the zoom value from 1 to 1.02 over the first 100 frames and decreasing the zoom value back to 1 over the next 100 frames.
0:(1), 100:(1.02), 200:(1)
If you want a new zoom value to take effect starting the 100th frame, you can write something like:
0:(1), 99:(1), 100:(1.02), 150:(1.02), 151:(1), 200:(1)
This formula will apply the zoom effect only between frames 100 and 150.
Each setting has its motion schedule.
Zoom: 0:(1)
Angle: 0:(0)
Transform Center X: 0:(0.5)
Transform Center Y: 0:(1)
Translate X: 0:(0)
Translate Y: 0:(5), 60:(0)
Tips: cannot just write 180:(5). Write 0:(0), 180:(5). The first entry has to be for the 0th frame.
A step-by-step example
Step 1: Generate an initial image
The initial image is one of the few things you have total control over in a deforum video. It is arguably the most important because it sets the tone and color for the rest of the animation.
Take your time to generate a good starting image in the txt2img tab.
In this example, I used the following prompt.
portrait of henry cavill as james bond, casino, key art, sprinting, palm trees, highly detailed, digital painting, artstation, concept art, cinematic lighting, sharp focus, illustration, by gaston bussiere alphonse mucha
And this negative prompt.
deformed, disfigured
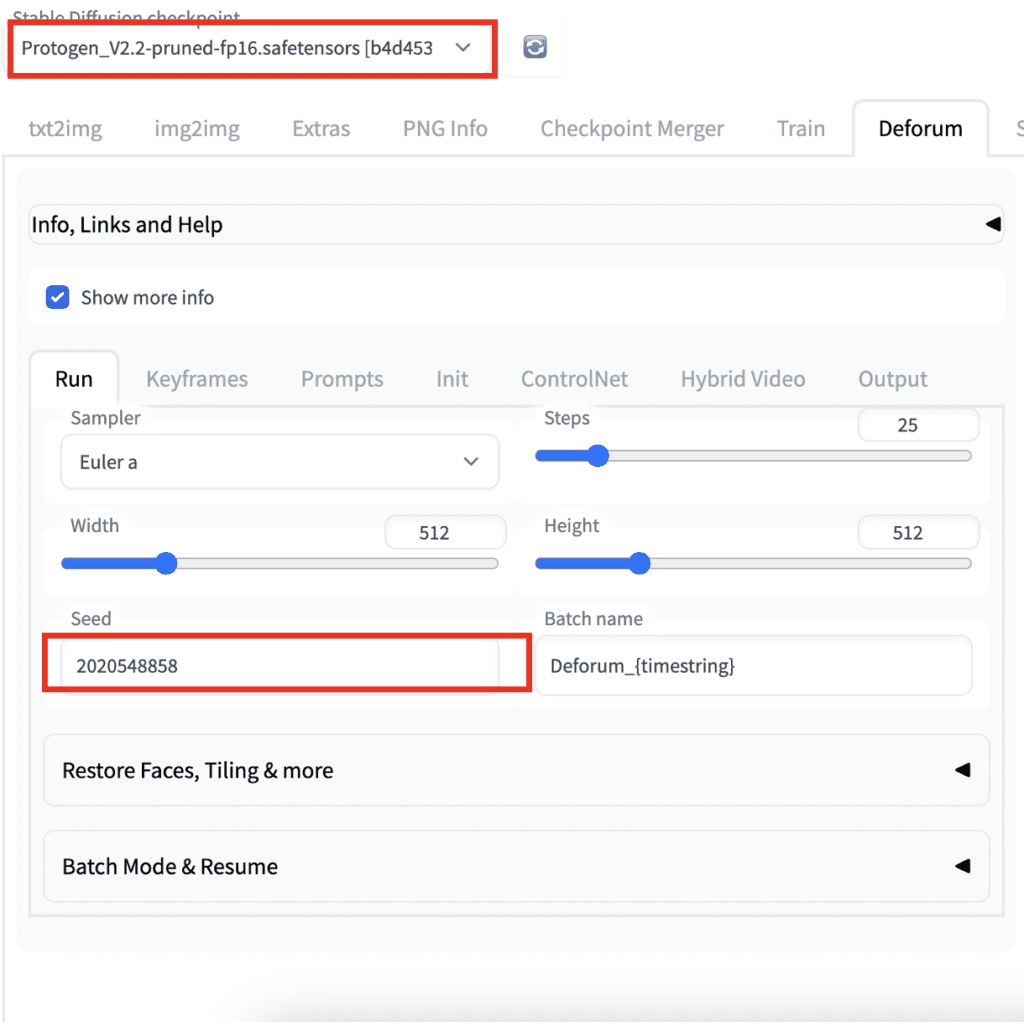
Set the seed to random (-1).
I used the Protogen v2.2 model to bring out a photorealistic illustration style.
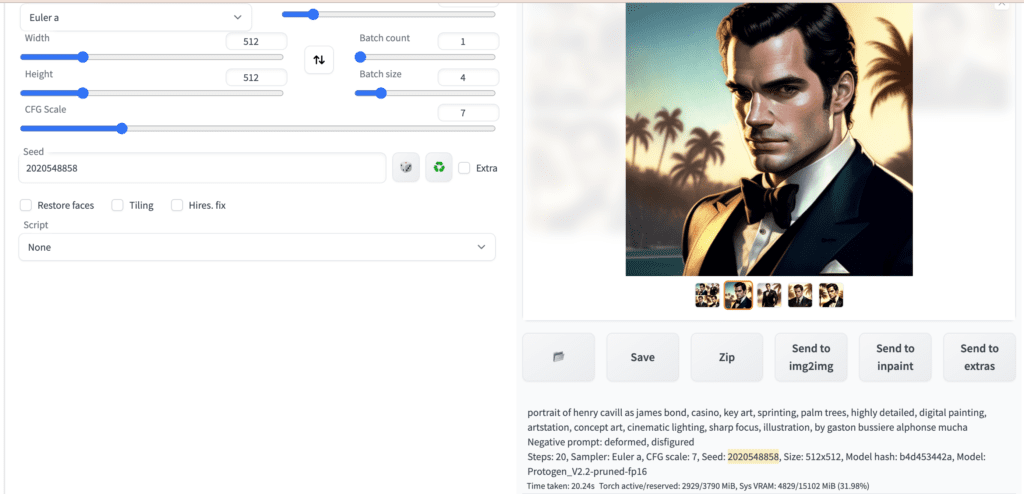
Note down the seed value (highlighted in the screenshot above) once you see an image you like.
Step 2: Generate the first segment of the video
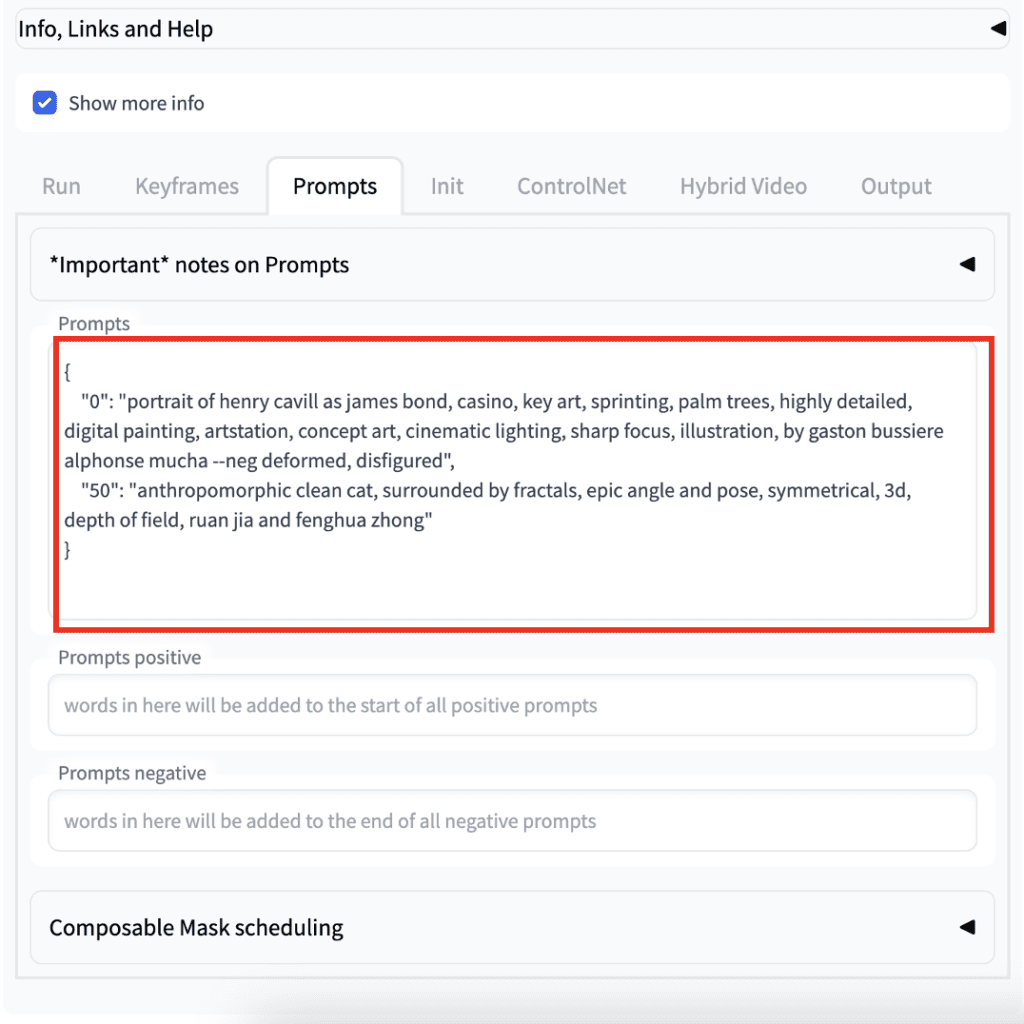
Enter the prompt in the Prompts tab. I decided to reuse the 2nd prompt in the default prompts. The prompts are
{
    "0": "portrait of henry cavill as james bond, casino, key art, sprinting, palm trees, highly detailed, digital painting, artstation, concept art, cinematic lighting, sharp focus, illustration, by gaston bussiere alphonse mucha --neg deformed, disfigured",
    "50": "anthropomorphic clean cat, surrounded by fractals, epic angle and pose, symmetrical, 3d, depth of field, ruan jia and fenghua zhong"
}
The prompt is switched to describing a cat in the 50th frame.
Now go to the Run tab.
- Select the Protogen model.
- Set the seed to 2020548858. Fixing the seed lets you start with the same image every time so you can keep building on the same video.
Since I have my James Bond facing left in the initial image, it is nice to have the camera moving right. We will use the 3D animation model.
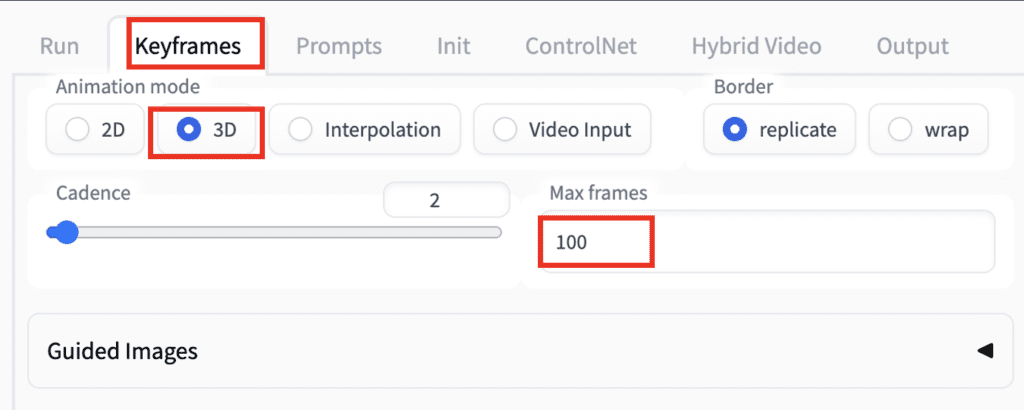
In the Keyframes tab,
- Select the 3D Animation mode.
- Set Max frames to 100. This is for generating enough frames to see the first two prompts
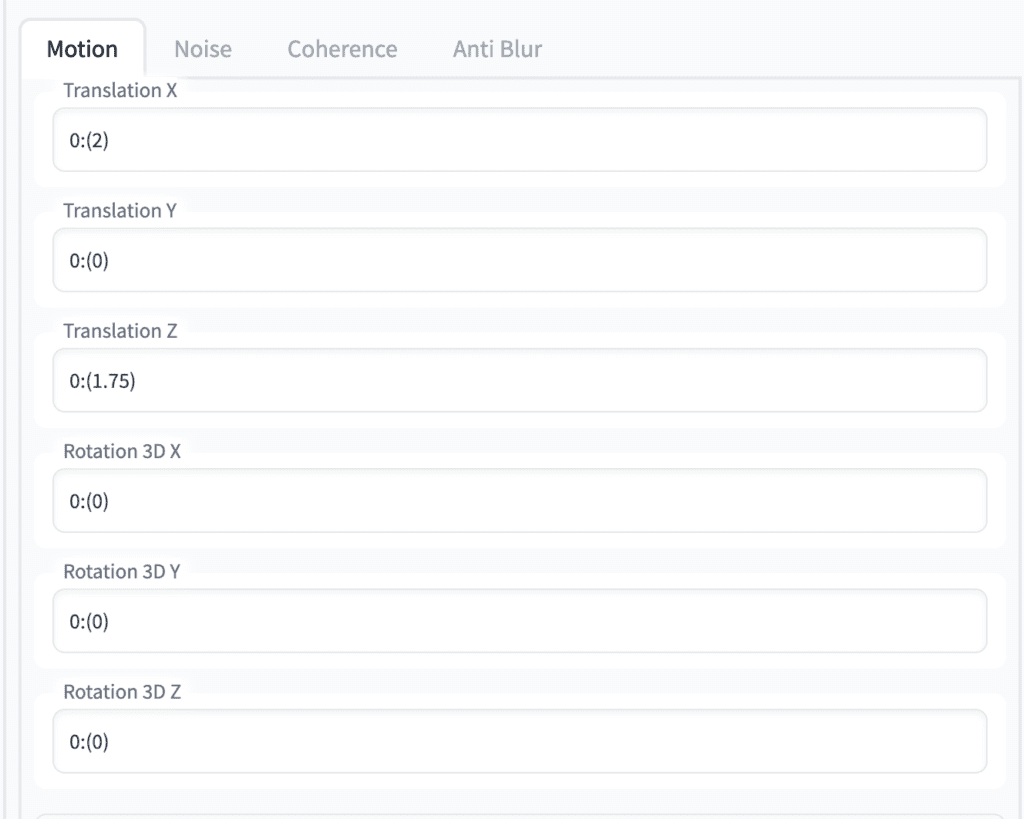
In the Motion tab down below, set:
- Translation X to
0:(2). This is for moving the camera to the right. - Translation Z to
0:(1.75). This is for zooming in at a bit slower rate.
Keep the rest 0:(0) for doing nothing.
Press Generate to start making the video.
This is the video so far.
The camera is moving in the way we expected. James Bond transitioned to a fractal cat nicely.
So far so good.
Step 3: Add the next prompt
Now brainstorm the next prompt in the txt2img tab.
I decided it would be nice to transition to a space scene. This is the final deforum prompt.
{
    "0": "portrait of henry cavill as james bond, casino, key art, sprinting, palm trees, highly detailed, digital painting, artstation, concept art, cinematic lighting, sharp focus, illustration, by gaston bussiere alphonse mucha --neg deformed, disfigured",
    "50": "anthropomorphic clean cat, surrounded by fractals, epic angle and pose, symmetrical, 3d, depth of field, ruan jia and fenghua zhong",
    "90": "giant floating space station, futuristic, star war style, highly detailed, beautiful machine aesthetic, in space, galaxies, dark deep space <lora:epiNoiseoffset_v2:1> --neg bad art, amateur"
}
(I used the epi_noiseoffset LoRA model modifier in the third prompt. See the LoRA tutorial for details.)
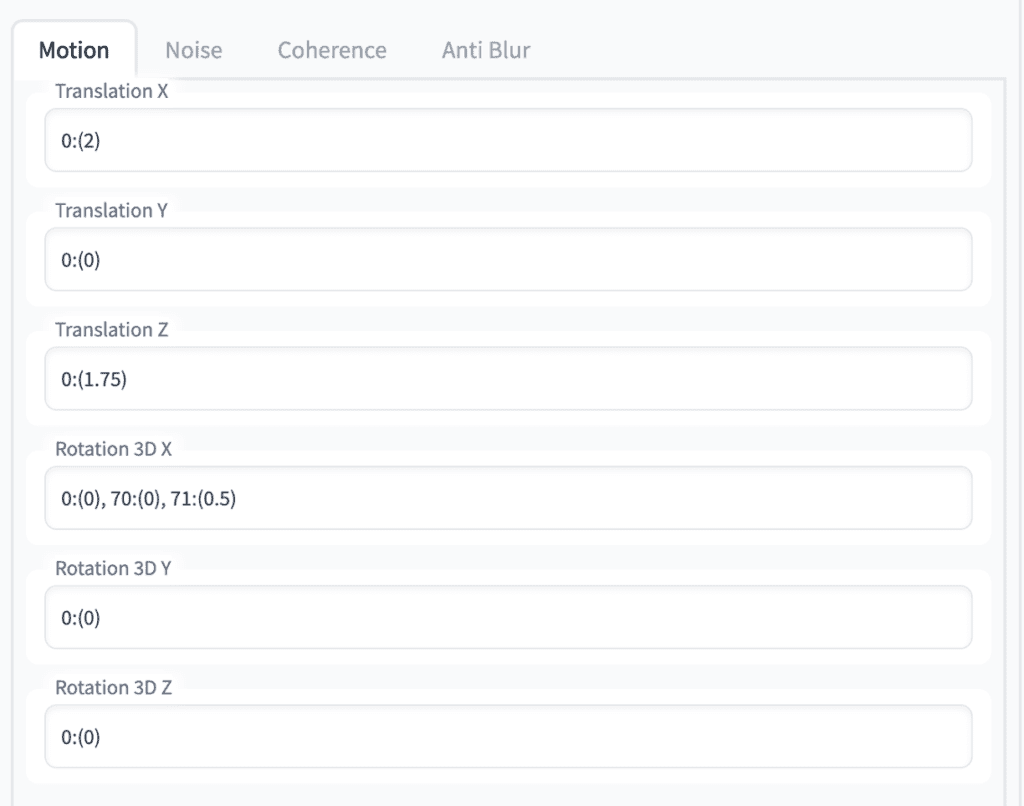
Setting the following parameters
- Max frames to 250.
- Rotation 3D X to
0:(0), 70:(0), 71:(0.5). This adds a change of rotation at frame 71.
The rest of the settings are kept the same. Below are the final motion settings.
Press Generate.
We get the final video.
You will typically spend a lot of time messing with the motion and prompts to achieve the exact effect you want.
You can repeat this step and add as many prompts as you want.
Tips
- Prompts with a large subject work better than scenes with many small objects.
- The small details will frequently change. This is just how image-to-image works. So prompts with patterns (like a fractal) or imaginative subjects tend to work better as the second and later prompts.
- If you see artifacts during a prompt transition, shifting the frame of the prompt by a few frames may eliminate the artifact.
- Make an animated gif by using the Ouput option Make GIF.
- Use Delete Imgs option in Output options to delete the intermediate images automatically and only keep the video.
- Add a soundtrack by using the output option Add a soundtrack.
Useful Resources
- FizzleDorf’s Animation Guide – Deforum – A comprehensive guide on parameters and settings.
- Animation Video Examples Gallery – Video examples of some parameters.
- Official deforum site
- Quick Guide to deforum – Mostly about the deforum Colab Notebook but you will also find explanations of parameters.
- Deforum Discord – A good page to ask for help and see what others are making.
- Create Amazing Videos With AI (Deforum Deep-Dive) – The creator of Deforum
Is there a way to provide additional keyframes to guide the video generation process? Something like a combination of Generative AI and morphing?
I’m so tired, I still have no way to create videos on AWS.
It has something wrong with ffmpeg, so neither Deforum, AnimateDiff,… can run.
Even though I tried following many instructions, ChatGPT,… But they all failed to solve the problem.
The general error is: when it comes to the video connection, it will fail and cannot be used. Do you have any suggestions? Thank you.
whats the error msg?
Basically, it doesn’t report any errors, it just keeps giving errors, so I don’t have an error code to copy. I recorded a video, in this video, around the 46th second Deforum shows an error; At the end of the video, AnimateDiff shows an error:
https://drive.google.com/drive/u/3/folders/1ZOiaA8iCjce5eY9eygGGDilWInkwiZJZ
In addition, I have attached photos of the settings on the A1111, ffmpeg -version information,
Thank you very much for your reply!
Well here are my AWS parameters:
AMI: NVIDIA Deep Learning Base AMI 2023.09.1-676eed8d-dcf5-4784-87d7-0de463205c17
g5.2xlarge
Security groups are similar to your instructions.
Storage capacity is 300gb
Hope it helps you understand better.
I did a quick test on my aws setup with deforum and it is working.
If you are comfortable in tinkering, you can print out the cmd variable and run it in command line.
https://github.com/deforum-art/sd-webui-deforum/blob/5d63a339dbec8d476657a1f672a4eeb6dc79ed37/scripts/deforum_helpers/video_audio_utilities.py#L229
Mine is:
['/home/ubuntu/stable-diffusion-webui/venv/lib/python3.10/site-packages/imageio_ffmpeg/binaries/ffmpeg-linux64-v4.2.2', '-y', '-r', '15.0', '-start_number', '0', '-i', '/home/ubuntu/stable-diffusion-webui/outputs/img2img-images/Deforum_20240707235638/20240707235638_%09d.png', '-frames:v', '120', '-c:v', 'libx264', '-vf', 'fps=15.0', '-pix_fmt', 'yuv420p', '-crf', '17', '-preset', 'slow', '-pattern_type', 'sequence', '-vcodec', 'libx264', '/home/ubuntu/stable-diffusion-webui/outputs/img2img-images/Deforum_20240707235638/20240707235638.mp4']Hope this helps.
sorry but I still don’t understand ==’, I tried a few other ways and it just stood there for an hour and didn’t turn into a video. On a windows computer, I can run and create videos normally. Hope you can help me understand a little better. Thank you.
My suggested troubleshooting requires inserting a print statement in the code to see what your command is. From my test, the program that stitches the images together is ffmpeg that’s installed in the virtual environment. It is not a global executable in my aws; typing ffmpeg in the terminal doesn’t call it.
If you are not into troubleshooting (which is informative to pinpoint the issue), you can first try deleting the venv folder inside stable-diffusion-webui. It will reinstall everything next time you launch a1111.
If it still doesn’t work, it could be caused by a conflict in extensions. You can start a new A1111 installation and test only installing deforum. It should work.
No no this is json semantics. Comma should be after all strings in the list.
hi! why does the video from deforum (Mac,2D) not get into img2img(there only png) and also the video cannot be viewed and there are no three dots.After generation it looks like a picture?
Check if there’s any error message in the terminal.
It’s a comma after your prompt, don’t leave any unnecessary commas to separate the prompts
How do I reload an old project? And I saved the settings.
I just get error on the webui.
This is the setting I want to retrieve and I push the button of “load all settings”
/outputs/img2img-images/Deforum_20230523184914/20230523184914_settings.txt
And this error in console
Error: no “view” mailcap rules found for type “inode/directory”
/usr/bin/xdg-open: 869: www-browser: not found
/usr/bin/xdg-open: 869: links2: not found
/usr/bin/xdg-open: 869: elinks: not found
/usr/bin/xdg-open: 869: links: not found
/usr/bin/xdg-open: 869: lynx: not found
/usr/bin/xdg-open: 869: w3m: not found
xdg-open: no method available for opening ‘outputs/img2img-images’
reading custom settings from /outputs/img2img-images/Deforum_20230523184914/20230523184914_settings.txt
The custom settings file does not exist. The values will be unchanged.
reading custom video settings from /outputs/img2img-images/Deforum_20230523184914/20230523184914_settings.txt
The custom video settings file does not exist. The values will be unchanged.
reading custom video settings from /outputs/img2img-images/Deforum_20230523184914/20230523184914_settings.txt
The custom video settings file does not exist. The values will be unchanged.
Traceback (most recent call last):
File “/usr/local/lib/python3.10/dist-packages/gradio/routes.py”, line 337, in run_predict
output = await app.get_blocks().process_api(
File “/usr/local/lib/python3.10/dist-packages/gradio/blocks.py”, line 1013, in process_api
inputs = self.preprocess_data(fn_index, inputs, state)
File “/usr/local/lib/python3.10/dist-packages/gradio/blocks.py”, line 911, in preprocess_data
processed_input.append(block.preprocess(inputs[i]))
File “/usr/local/lib/python3.10/dist-packages/gradio/components.py”, line 1127, in preprocess
return self.choices.index(x)
ValueError: 1 is not in list
Error: ‘list index out of range’. Check your schedules/ init values please. Also make sure you don’t have a backwards slash in any of your PATHs – use / instead of . Full error message is in your terminal/ cli.
multiple people have filed this issue on forums I have the same issue and there is nobody to actually assist with these glitches only programmers or in this field know: I already run into the JSON validator and the prompt is completely valid so its not that, and I also changed the \ into / in the INIT (on the side note: they make it so user-friendly its as if they don’t want you to use it) Thank you Deeply if there is Anyone to assist Us while not talking in Programmer Language… I run a Intel core i9 32gig ram gamecomputer
Thank you so much! now it works! the file path was not correct
Nevermind! I see the that I had a faulty comma.
Hey there. I have the exact same problem but I can’t find where that “extra comma” is. Where did you find it?
I get this error but my prompt is validated by json validator?
User friendly error message:
Error: Expecting property name enclosed in double quotes: line 6 column 1 (char 304). Check your prompts with a JSON validator please.
Deforum extension for auto1111 webui, v2.4b
Git commit: c4283464 (Tue May 16 09:50:02 2023)
*START OF TRACEBACK*
Traceback (most recent call last):
File “/content/stable-diffusion-webui/extensions/deforum/scripts/deforum.py”, line 70, in run_deforum
args_loaded_ok, root, args, anim_args, video_args, parseq_args, loop_args, controlnet_args = deforum_args.process_args(args_dict, i)
File “/content/stable-diffusion-webui/extensions/deforum/scripts/deforum_helpers/args.py”, line 1150, in process_args
root.animation_prompts = json.loads(args_dict_main[‘animation_prompts’])
File “/usr/lib/python3.10/json/__init__.py”, line 346, in loads
return _default_decoder.decode(s)
File “/usr/lib/python3.10/json/decoder.py”, line 337, in decode
obj, end = self.raw_decode(s, idx=_w(s, 0).end())
File “/usr/lib/python3.10/json/decoder.py”, line 353, in raw_decode
obj, end = self.scan_once(s, idx)
json.decoder.JSONDecodeError: Expecting property name enclosed in double quotes: line 6 column 1 (char 304)
*END OF TRACEBACK*
User friendly error message:
Error: Expecting property name enclosed in double quotes: line 6 column 1 (char 304). Check your prompts with a JSON validator please.
Hello!
I’m trying google colab with deforum and controlnet… but when I put a video (mp4, avi, or mov) copying the image link to google drive to ControlNet Input Video/Image Path, I get this error: Error:
Error: ‘Video file format ‘com/file/d/19p5izdnbkk3raoyg5pospfhtwgob-h4g/view?usp=sharing’ not supported. Supported formats are: [‘mov’, ‘mpeg’, ‘mp4’, ‘m4v’, ‘avi’, ‘mpg’, ‘webm’]’. Check your schedules/init values please. Also make sure you don’t have a backwards slash in any of your PATHs – use / instead of \. Full error message is in your terminal/cli.
I don’t understand why it doesn’t work, any ideas? thank you so much!
Hi, it seems the URL was not resolved correctly. This likely has something to do with deforum itself. You can try downloading the video, put it in google drive and give a path to it.
For example, if your put the video coolvid.mp4 in the folder “myvideos” in Google drive, the path would be
/content/drive/MyDrive/myvideos/coolvid.mp4
It works perfectly now. Thank you very much for your help!
When I try the images do not stick to the initial one but other are generated.
I try the below prompt:
{
“0”: “ape holding on a tree, in focus, front view, national geographic, outdoors, nature, bush, animal, tree, field, forest, day, leaf, jungle”,
“70”: “indigenous human holding a spear in hand, realistic, national geographic, on focus”,
“140”: “night worrier man wearing metal customs, Sword, national geographic, on focus”,
“210”: “a human king man wearing cape and holding a Scepter in hand, ultra hd, on focus, Super realistic, highly detailed, sharp photo”
}
And set the seed as in the tutorial but different images are generated.
When I try, it appears: ImportError: cannot import name ‘FormColumn’ from ‘modules.ui_components’ (/content/stable-diffusion-webui/modules/ui_components.py)
Hi, should be working now. Please look for the updated notebook with May 23 update.
The extension had updates that broke compatibility.
Sorry, I’m using the Colab notebook in the Quick Start Guide, check the Deforum extension before starting AUTOMATIC1111, but I don’t see the Deforum tab in AUTOMATIC1111 GUI after startup. Thank you very much!
Andrew I solved adding: –disable-nan-check to the command line args (exactly what the error message said), thank you again for your help! I’m enjoying the application!!!
Ah, didn’t expect this will resolve the issue. Thanks for reporting back!
User friendly error message:
Error: A tensor with all NaNs was produced in Unet. This could be either because there’s not enough precision to represent the picture, or because your video card does not support half type.
how do i adjust the model to use a different numerical precision, such as single precision (32-bit) or double precision (64-bit).
See my suggestions to Andrew who has the same issue.
I think the issue is unlikely due to precisions. There’s something else wrong.
Hi Andrew, thank you very much for your reply, I did what the error message suggested but I had the same results, here is my webui-user.bat:
@echo off
set PYTHON=
set GIT=
set VENV_DIR=
set COMMANDLINE_ARGS=–xformers –medvram
call webui.bat
Thank you again for your help!
Hi, something to try:
1. Update the deforum extension, close A1111 completely and start.
2. What model do you use? Try the base v1.5 model and run with all default settings in deforum.
deforum is just a bunch of img2img, you can also test to see if img2img works on your setup.
Hi Andrew, I get the following error when I try to generate the demo video: A tensor with all NaNs was produced in Unet. This could be either because there’s not enough precision to represent the picture, or because your video card does not support half type. Try setting the “Upcast cross attention layer to float32” option in Settings > Stable Diffusion or using the –no-half commandline argument to fix this. Use –disable-nan-check commandline argument to disable this check.
I have Win 10 64 bit, Nvidia GTX 1650 Super
Have you done what the error message suggested?
What are your command arguments in webui-user.bat?
Hi, is it true that 3D mode won’t work in m1 Macs as it needs Nvidia to work? It crashes each and every time I try to render a 3D animation, Thanks!
Hello! How many RAM have your mac book? Is it m1pro ver?
Hi, I confirmed that 3D mode didn’t work on M1.
Look at the error message at your console. You should see it trying to download a model file but failed.
Downloading: “https://github.com/intel-isl/DPT/releases/download/1_0/dpt_large-midas-2f21e586.pt” to /Users/XXXXX/stable-diffusion-webui/models/Deforum/dpt_large-midas-2f21e586.pt
What you need to do putting that download URL in your browser to download this file and save as the following name.
/Users/XXXXX/stable-diffusion-webui/models/Deforum/dpt_large-midas-2f21e586.pt
hi i did everything you said. everything is ok . but i want to upload my video and deforum it. Can you explain how can i do it?
OK, perhaps another tutorial!
Hey I’m beginner from generate images and videos with deforum stable difussion, the trending video in tiktok called “astral jump” is makes with deforum right? Any tips or any prompts and motion prompts for create it them?? Is better option with web ui deforum automatic 1111? Thanks
If my search result is correct, it is a pretty typical deforum video. It’s done mostly with the zoom in motion in either 2D or 3D.
I think it would help to use a model with a realistic painting style, like dreamshaper. It should be enough to describe the objects in the prompt.
Works now thank you!
Hello, I have a problem, if I try the 3D mode it crashes, and the console says that I don’t have a file called AdaBins_nyu.pt
Maybe related: https://huggingface.co/spaces/stabilityai/stable-diffusion/discussions/15265
Why does it always crash when converting 3D video
What’s the error message? You should see it in the terminal.
hey im getting error messages for trying to run the 3D model. everything works for me in 2D but i get this error message.
TypeError: Cannot convert a MPS Tensor to float64 dtype as the MPS framework doesn’t support float64. Please use float32 instead.
Hi, please reach out to the extension’s page for help.
https://github.com/deforum-art/sd-webui-deforum/issues
The Deforum FAQ says they don’t support Macs. This bug: https://github.com/deforum-art/sd-webui-deforum/issues/394 ends rather ubruptly with the self-assigned dev saying none of the devs have a Mac and then he unassigns himself. I’ve confirmed the code they thought fixed it didn’t.
Thank you!
Thank you, well done, a website that taught me a lot.
Concerning the movies on SD, I expect the function which will attenuate the micro changes with each image creation, a kind of stronger gravity between images, which is not yet the case, even with a fixed seed.
You can lower the denoising strength but it will also reduce the effect.
Thank you for your great work!
I have a great request for articles on:
– training LoRA models in Dreambooth(?) with trigger keyword (will it be possible in Atomatic1111?)
– creating a smooth, consistent animation from sequences of frames and prompts (using img2img, ControlNet)?
OK, adding to the list…
Excellent! I’m looking for this tutorial for long time.
** FFMPEG DID NOT STITCH ANY VIDEO ** Error: FFmpeg not found. Please make sure you have a working ffmpeg path under ‘ffmpeg location’ parameter.
I had this problem too! Did you find a solution?
i have the same problem!
Is it solved?
very nice!
It is great! Thank you very much!