Text-to-video is the challenging task of turning a text description into a video. Diffusion-based text-to-video model is improving at a rapid speed. Now, these models become usable and can be run locally on your machine. In this post, you will learn a few ways to convert a text prompt to a video.
- AnimateDiff
- ModelScope
- Deforum
Table of Contents
Software
We will use AUTOMATIC1111 Stable Diffusion GUI. You can use this GUI on Windows, Mac, or Google Colab.
Check out the Quick Start Guide if you are new to Stable Diffusion.
1. AnimateDiff
(See the detailed guide for using AnimateDiff)
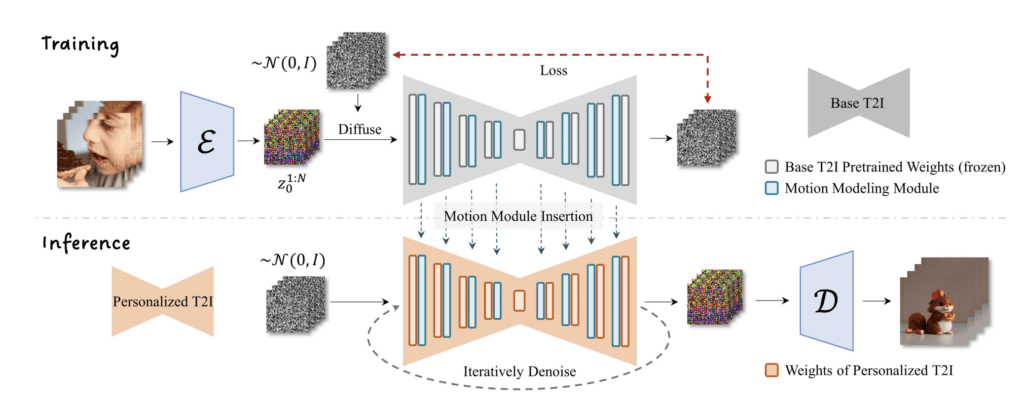
AnimateDiff is a text-to-video module for Stable Diffusion. It was trained by feeding short video clips to a motion model to learn how the next video frame should look like. Once this prior is learned, animateDiff injects the motion module to the noise predictor U-Net of a Stable Diffusion model to produce a video based on a text description.
So, you can’t really control what happens in the video. They come from what the model learned from the training data.
You can use AnimateDiff with any Stable Diffusion checkpoint model and LoRA.
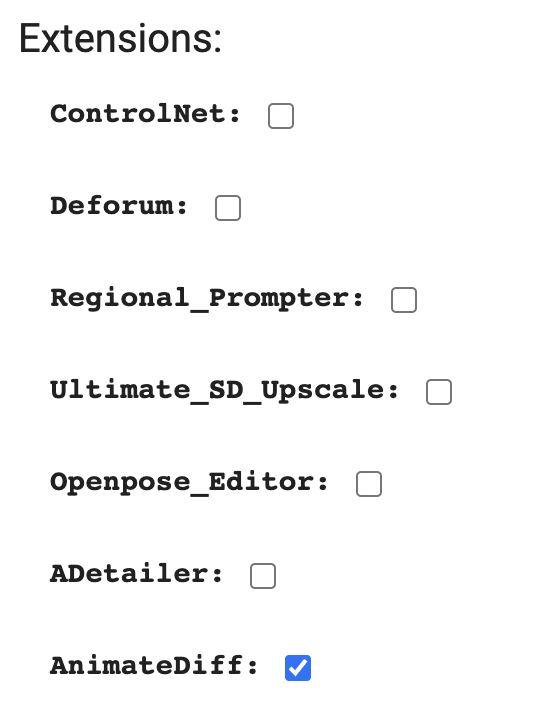
Installing the AnimateDiff extension
Google Colab Notebook
Installing the AnimateDiff extension on our Stable Diffusion Colab notebook is easy. All you need to do is to select the AnimateDiff extension,
Windows or Mac
Follow these steps to install the AnimateDiff extension in AUTOMATIC1111.
- Start AUTOMATIC1111 Web-UI normally.
2. Navigate to the Extension Page.
3. Click the Install from URL tab.
4. Enter the following URL in the URL for extension’s git repository field.
https://github.com/continue-revolution/sd-webui-animatediff5. Wait for the confirmation message that the installation is complete.
6. Download the AnimateDiff motion models and save it in stable-diffusion-webui > extensions > sd-webui-animatediff > model folder.
Direct download link for v1.5 v2 motion model:
https://huggingface.co/guoyww/animatediff/resolve/main/mm_sd_v15_v2.ckptDirect download link for v1.4 motion model:
https://huggingface.co/guoyww/animatediff/resolve/main/mm_sd_v14.ckptDirect download link for v1.5 motion model:
https://huggingface.co/guoyww/animatediff/resolve/main/mm_sd_v15.ckpt7. Restart Web-UI.
Using AnimateDiff
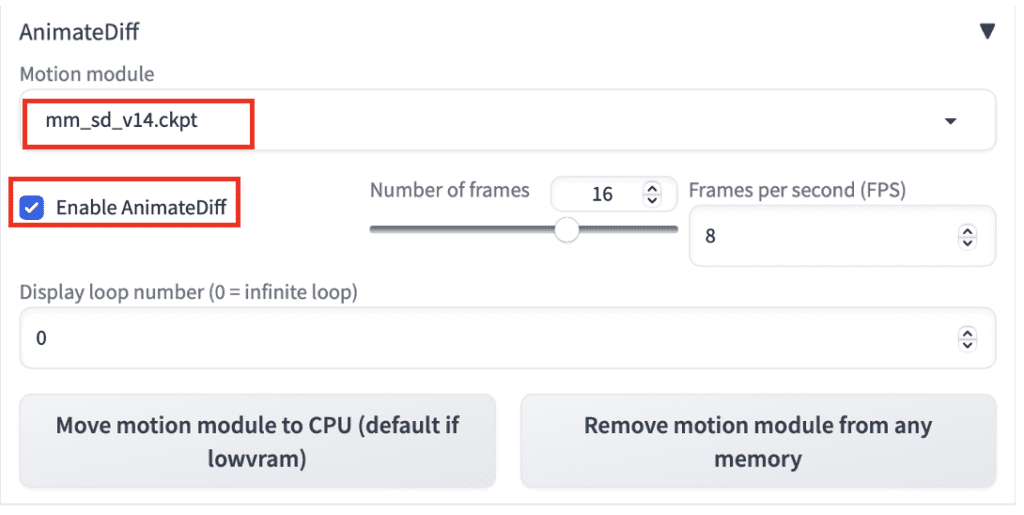
To use AnimateDiff in AUTOMATIC1111, navigate to the txt2img page. In the AnimateDiff section,
- Enable AnimateDiff: Yes
- Motion Module: There are two motion modules you can choose from. The v1.4 model creates more motion, but the v1.5 model creates clearer animations.
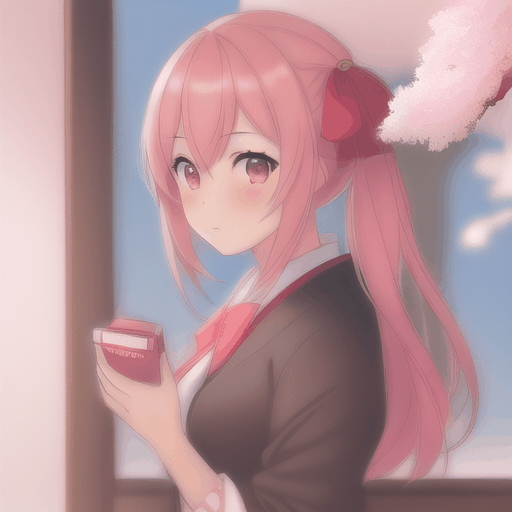
Then write a prompt and a negative prompt as usual. For example
1girl, looking at viewer, anime, cherry blossoms
disfigured, deformed, ugly
You can select any v1 model. Let’s use the Anything v3 model for this example.
CFG: 15 (It is VERY IMPORTANT to set it to a high value 10 – 25)
Sampler: DPM++2M Karass
Here are animations from the v1.4 and v1.5 motion models.
Generally, you will see the v1.4 motion model producing more motion and the v1.5 model producing clearer images.
Tips
Here are a few tips for you to increase your chance of success.
- Increase the CFG scale if you get a gray-looking image. You typically need it to be between 10 and 25.
- Try switching the motion module (v1.4 and v1.5) if you see watermarks on images.
- You can use LoRA with AnimateDiff.
- Keep the number of frames to 16 for optimal performance because this is the number it is trained.
- You WILL need to cherry-pick to get good videos. Generate more!
- Change the prompt if you get two short videos in one.
Example prompts and settings
Waves
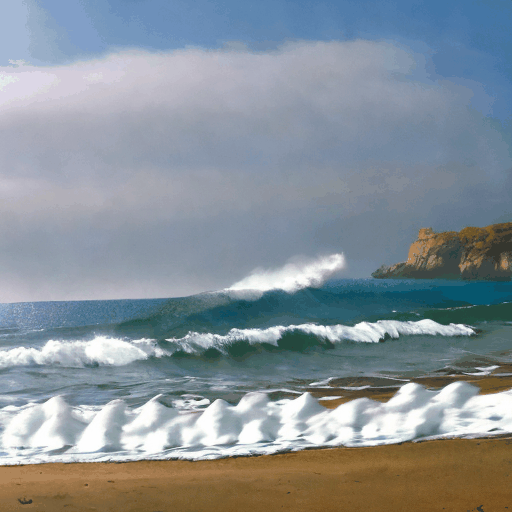
Prompt:
A beautiful beach, waves
Negative prompt:
watermark, letters
CFG Scale: 20
Model: Dreamshaper 5
Motion module: v1.4
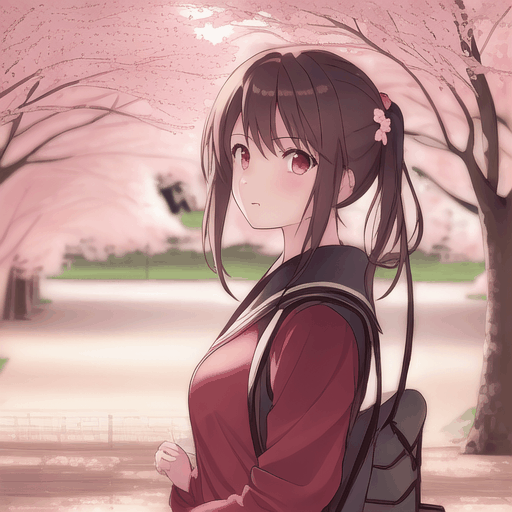
Girl in red sweater
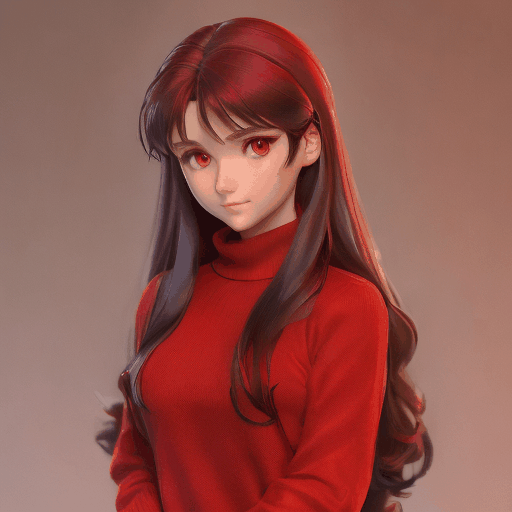
Prompt:
1girl, tohsaka rin, solo, long hair, sweater, red sweater, looking at viewer, walking <lora:3DMM_V12:1>
Negative prompt:
disfigured, deformed, ugly
CFG Scale: 16
Model: Rev Animated
Motion module: v1.4
Realistic woman

Prompt:
close up photo of young woman, highlight hair, sitting outside restaurant, wearing dress, rim lighting, studio lighting, looking at the camera, dslr, ultra quality, sharp focus, tack sharp, dof, film grain, Fujifilm XT3, crystal clear, 8K UHD, highly detailed glossy eyes, high detailed skin, skin pores
Negative prompt
disfigured, ugly, bad, immature, cartoon, anime, 3d, painting, b&w
CFG Scale: 15
Model: Realistic Vision
Motion module: v1.4
2. ModelScope
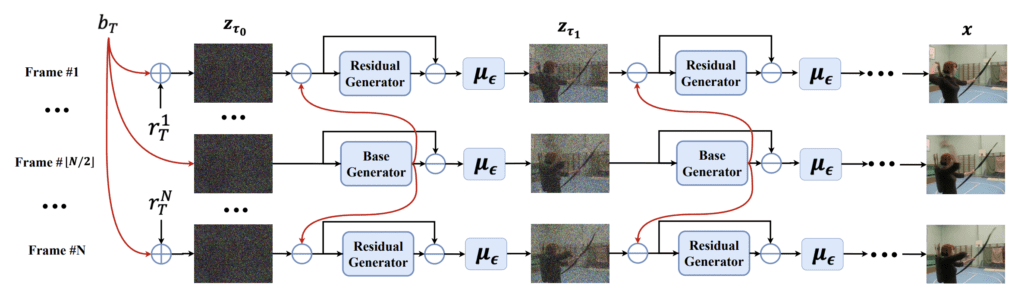
ModelScope is a diffusion-based text-to-video model. The idea behind the model is the observation that the frames of a video are mostly similar. ModeScope is a latent diffusion model. So the first frame starts as a latent noise tensor, the same as Stable Diffusion’s text-to-image. The innovation is that the model decomposes the noise into two parts: (1) the base noise and (2) the residual noise. The base noise is shared across ALL frames. The residual noise varies in each frame.
Use this ModelScope demo if you don’t want to install the extension in AUTOMATIC1111.
Installing ModelScope in AUTOMATIC1111
You will need to install the text2video extension. Follow these steps to install the extension in AUTOMATIC1111.
Google Colab
Installing the text2video extension on our Stable Diffusion Google Colab notebook is easy. All you need to do is to select the text2video extension.

Windows and Mac
- Start AUTOMATIC1111 Web-UI normally.
2. Navigate to the Extension Page.
3. Click the Install from URL tab.
4. Enter the following URL in the URL for extension’s git repository field.
https://github.com/kabachuha/sd-webui-text2video5. Wait for the confirmation message that the installation is complete.
6. Restart webUI completely. (By restarting the terminal.)
NOTE: If you encounter an error related to importing tqdm, you will need to reinstall a specific version of tqdm. Run the following command in the Terminal App inside stable-diffusion-webui
Windows:
.\venv\Scripts\pip.exe install tqdm==4.65.0Mac:
./venv/bin/pip install tqdm==4.65.07. Create the model folders. You need to create the folder structure.
stable-diffusion-webui\models\text2video\t2vIn other words, create the model text2videomodels folder. Then create the folder t2v inside the text2video
Download the text-to-video model files here and put them in the t2v folder. You will need the following 4 files
- VQGAN_autoencoder.pth
- configuration.json
- open_clip_pytorch_model.bin
- text2video_pytorch_model.pth
That’s a lot of work! But that’s it… for now.
Using ModelScope
To use ModelScope, navigate to the txt2video page in AUTOMATIC1111.

Model type: ModelScope
Model: t2v
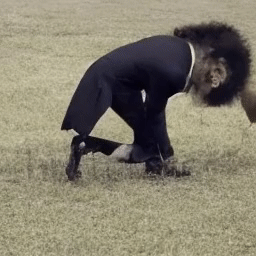
Prompt: Write a prompt to describe the video. Not all prompts work. If you don’t see what you write, try other prompts. I used
a lion and a man in a suit fighting
Adjust Frames to control the length of the video. I used 100 in this example.
Press Generate and wait for it to complete. Click Update the video. This is what I got.
Modelscope prompt examples
Here’s one:
a female model
Here’s another one:
1girl, smiling, looking at viewer ,beautiful symmetrical face, nose, mouth, sharp focus, 8k
Negative prompt:
text, watermark, copyright, blurry, nsfw, frame, border, ugly, disfigured
Not the Hollywood-quality movie clips you expected? Yeah, this is what we can do for now. At least it produces temporal and spatial consistency across frames.
img2vid
There’s no documentation I can find for the img2vid function. But I found it quite useful for directing the initial frame and hence the whole video.
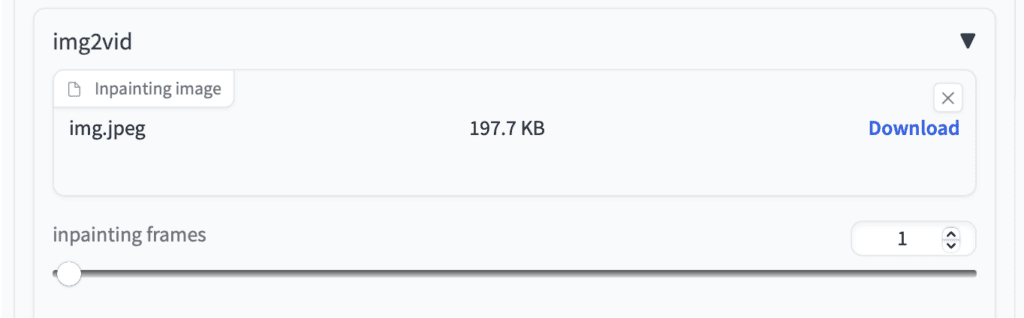
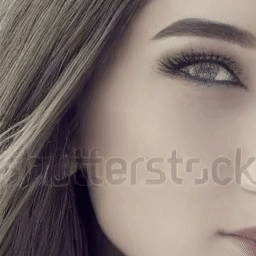
Modelscope tends to generate a face that is too close up. See the video above generated with the 1girl prompt.
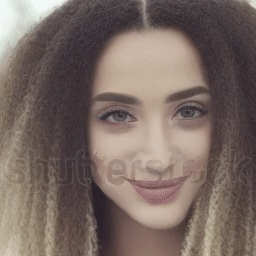
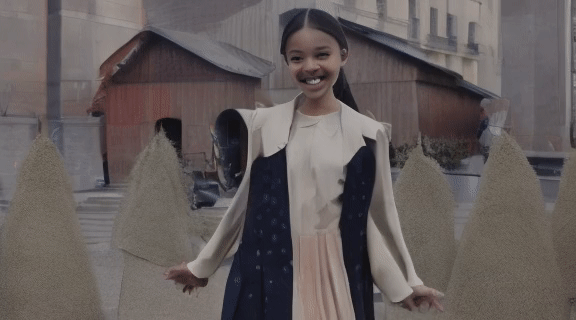
Uploading a proper woman portrait in the Inpainting image canvas and setting the inpainting frames to 1. You get a much better-composed video of a woman smiling.
Fine-tuned models
Just like Stable Diffusion, there are fine-tuned models for Modelscope. They are created with additional training. You can find a list of fine-tuned models here.
Zeroscope: Watermark-free text-to-video
You may have noticed watermarks on some of the videos generated with the Modelscope base model. There’s a fine-tuned model to resolve this issue: Zeroscope v2.
First, let’s download the model.
1. Create the new folder stable-diffusion-webui > models > text2video > zeroscope_v2_576w.
2. You need 4 files in this folder. The first two can be found here. The other two can be downloaded from the Modelscope base model’s repository. (Or copy over from the base model’s folder)
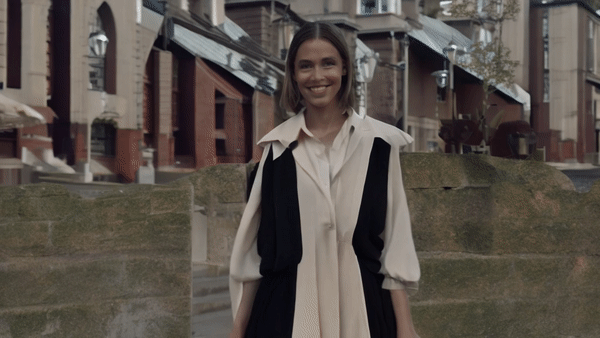
Now let’s generate a video with the new model. This model generates videos with 576 x 320 pixels.
- Model Type: ModelScope
- Model: zeroscope_v2_576w
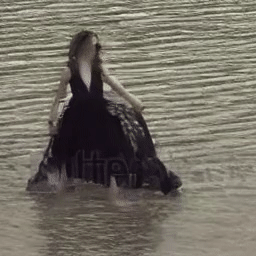
- Prompt:
1girl, smiling, looking at viewer ,beautiful symmetrical face, nose, mouth, sharp focus, 8k
- Negative prompt:
text, watermark, copyright, blurry, nsfw, frame, border, ugly, disfigured
- Width: 576 (You have to use this width and height)
- Height: 320
- Frame: 30
Press Generate. Here’s what I got. Higher resolution and no more watermark on the video!
Upscaling the video with Zeroscope v2 XL
You can make the video larger by doing a video-to-video. It is kind of the same as image-to-image, except now you are transforming a video into another video.
Zeroscope v2 XL is an upscaler model to enlarge a video created by the Zeroscope v2 576 model.
But first, let’s install the model.
1. Create a new folder stable-diffusion-webui > models > text2video > zeroscope_v2_XL
2. You need 4 files in this folder. The first two can be found here. The other two can be downloaded from the Modelscope base model’s repository. (Or copy over from the base model’s folder)
To upscale a video with the Zeroscope v2 XL model, switch to the vid2vid tab.
Select the model: Zeroscope_v2_XL.
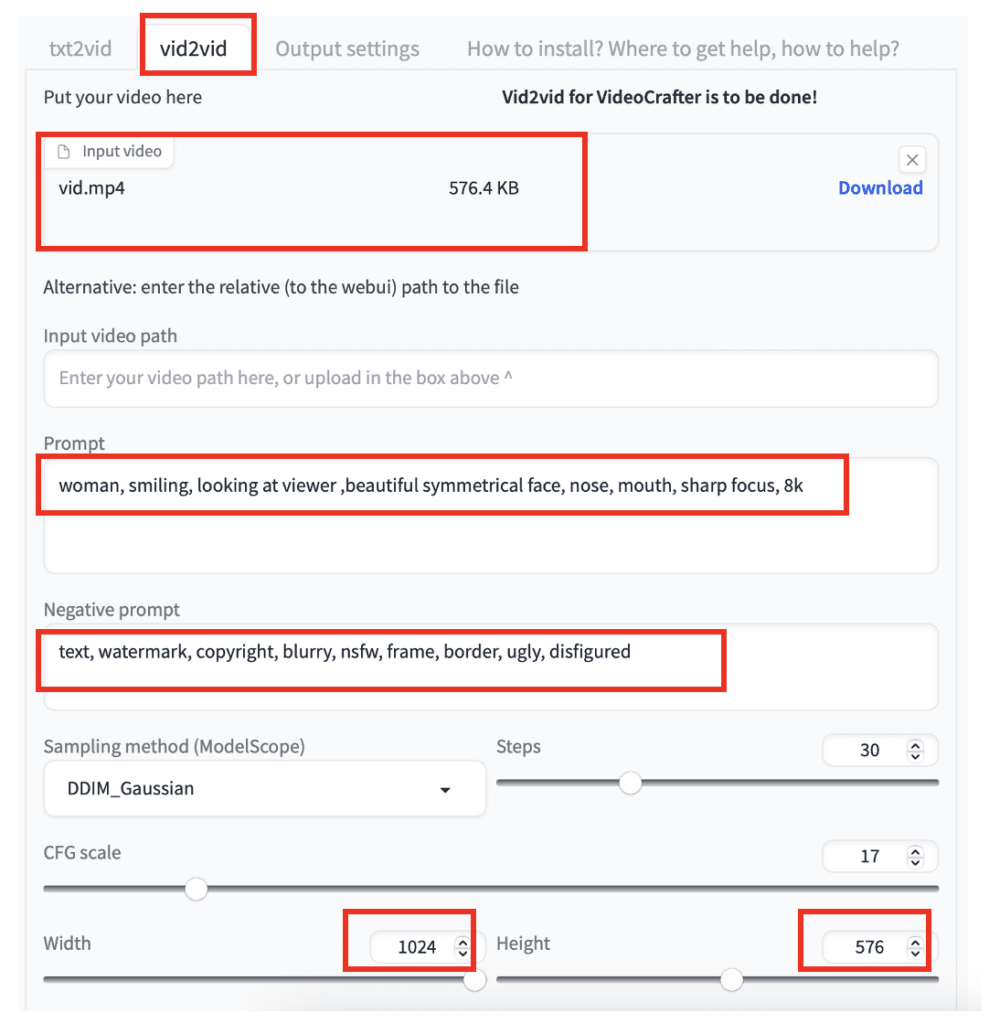
Upload the video you previously generated with Zeroscope v2 576w to the Input video canvas.
Enter a prompt and a negative prompt. You can reuse the same prompt.
Set width to 1024 and height to 576. (IMPORTANT: You must use these dimensions)
Set Frames to 30.
Set denoising strength to 0.7
Set vid2vid start frame to 1. (This helps to preserve the original video)
Press Generate.
Here’s the HD video:
Tips
- Stay with 256×256 video size for the base model. Other sizes don’t work well. Similarly, stay with the default resolutions for the fine-tuned model.
- As in prompting Stable Diffusion models, describe what you want to SEE in the video. But some subjects just don’t work. Don’t be too hang up and move on to other keywords.
3. Deforum
Deforum generates videos using Stable Diffusion models. It achieves video consistency through img2img across frames. Since the input are multiple text prompts, it qualifies as a text-to-video pipeline.
Read the Deforum tutorial.
Additional resources
A Dive into Text-to-Video Models – A good overview of the state of the art of text-to-video AI models.
ModelScope Text To Video Demo – Use ModelScope base model on the Web (Long wait time).
Text2Video-Zero Demo – Text2Video-Zero is another text2video AI.
pschaldenbrand/text2video – Text-to-video demo for “Towards Real-Time Text2Video via CLIP-Guided, Pixel-Level Optimization.”
SlideShare is now one of the best platforms to share documents, presentations, infographics and educational content over many different subjects.
This is a fantastic overview of the evolving text-to-video space—especially for creators eager to experiment locally without relying solely on cloud solutions. AnimateDiff’s integration into the Stable Diffusion pipeline is particularly exciting, as it brings motion generation closer to everyday users. The fact that it works with AUTOMATIC1111’s GUI makes it super accessible. Looking forward to seeing how these tools evolve—text-to-video is no longer just a research concept, it’s becoming a practical creative asset.
Nothing happens, just sets there.
The tool is absolutely amazing! I tried the tool and it is highly recommended. This Free text to video converter tool can do wonders! Thanks alot for the sharing!
Wow, this is amazing! I’ve been looking for a free and easy way to convert text to video, and Stable Diffusion’s text2video tool looks like exactly what I need. I can’t wait to try it out and see the high-quality videos I can create. Thank you for sharing this valuable resource!
After all that BS the connection keeps timing out when I enter the extension link to https://github.com/kabachuha/sd-webui-text2video
I hate technology
hello and thank you for this website! im attempting to use modelscope on my m1 mac and the terminal reads this error:
text2video — The model selected is: t2v (ModelScope-like)00:54<00:00, 2.55s/it]
text2video extension for auto1111 webui
Git commit: 01e41fd4 (Sun Sep 3 09:45:42 2023)
Starting text2video
Pipeline setup
config namespace(framework='pytorch', task='text-to-video-synthesis', model={'type': 'latent-text-to-video-synthesis', 'model_args': {'ckpt_clip': 'open_clip_pytorch_model.bin', 'ckpt_unet': 'text2video_pytorch_model.pth', 'ckpt_autoencoder': 'VQGAN_autoencoder.pth', 'max_frames': 16, 'tiny_gpu': 1}, 'model_cfg': {'unet_in_dim': 4, 'unet_dim': 320, 'unet_y_dim': 768, 'unet_context_dim': 1024, 'unet_out_dim': 4, 'unet_dim_mult': [1, 2, 4, 4], 'unet_num_heads': 8, 'unet_head_dim': 64, 'unet_res_blocks': 2, 'unet_attn_scales': [1, 0.5, 0.25], 'unet_dropout': 0.1, 'temporal_attention': 'True', 'num_timesteps': 1000, 'mean_type': 'eps', 'var_type': 'fixed_small', 'loss_type': 'mse'}}, pipeline={'type': 'latent-text-to-video-synthesis'})
Traceback (most recent call last):
File "/Users/theweesquirmins/Desktop/stable-diffusion-webui/extensions/sd-webui-text2video/scripts/t2v_helpers/render.py", line 30, in run
vids_pack = process_modelscope(args_dict, args)
File "/Users/theweesquirmins/Desktop/stable-diffusion-webui/extensions/sd-webui-text2video/scripts/modelscope/process_modelscope.py", line 66, in process_modelscope
pipe = setup_pipeline(args.model)
File "/Users/theweesquirmins/Desktop/stable-diffusion-webui/extensions/sd-webui-text2video/scripts/modelscope/process_modelscope.py", line 32, in setup_pipeline
return TextToVideoSynthesis(get_model_location(model_name))
File "/Users/theweesquirmins/Desktop/stable-diffusion-webui/extensions/sd-webui-text2video/scripts/modelscope/t2v_pipeline.py", line 114, in __init__
self.diffusion = Txt2VideoSampler(self.sd_model, shared.device, betas=betas)
File "/Users/theweesquirmins/Desktop/stable-diffusion-webui/extensions/sd-webui-text2video/scripts/samplers/samplers_common.py", line 102, in __init__
self.sampler = self.get_sampler(sampler_name, betas=self.betas)
File "/Users/theweesquirmins/Desktop/stable-diffusion-webui/extensions/sd-webui-text2video/scripts/samplers/samplers_common.py", line 152, in get_sampler
sampler = Sampler.init_sampler(self.sd_model, betas=betas, device=self.device)
File "/Users/theweesquirmins/Desktop/stable-diffusion-webui/extensions/sd-webui-text2video/scripts/samplers/samplers_common.py", line 87, in init_sampler
return self.Sampler(sd_model, betas=betas, **kwargs)
File "/Users/theweesquirmins/Desktop/stable-diffusion-webui/extensions/sd-webui-text2video/scripts/samplers/uni_pc/sampler.py", line 12, in __init__
self.register_buffer('alphas_cumprod', to_torch(model.alphas_cumprod))
File "/Users/theweesquirmins/Desktop/stable-diffusion-webui/extensions/sd-webui-text2video/scripts/samplers/uni_pc/sampler.py", line 17, in register_buffer
attr = attr.to(torch.device("cuda"))
File "/Users/theweesquirmins/Desktop/stable-diffusion-webui/extensions/sd_dreambooth_extension/dreambooth/shared.py", line 291, in tensor_to_fix
return orig_tensor_to(self, *args, **kwargs)
File "/Users/theweesquirmins/Desktop/stable-diffusion-webui/modules/sd_hijack_utils.py", line 17, in
setattr(resolved_obj, func_path[-1], lambda *args, **kwargs: self(*args, **kwargs))
File “/Users/theweesquirmins/Desktop/stable-diffusion-webui/modules/sd_hijack_utils.py”, line 28, in __call__
return self.__orig_func(*args, **kwargs)
File “/Users/theweesquirmins/Desktop/stable-diffusion-webui/venv/lib/python3.10/site-packages/torch/cuda/__init__.py”, line 211, in _lazy_init
raise AssertionError(“Torch not compiled with CUDA enabled”)
AssertionError: Torch not compiled with CUDA enabled
Exception occurred: Torch not compiled with CUDA enabled
Seems like they don’t support Mac.
Where should I start… The fact that even a power computer with an Nvidia RTX 3060 breaks down with it is due to bad programming, but what’s worst is that text2video breaks images with a watermark. Another extension for the otherwise great KI Stable Diffusion pulls down. If you “programmers” can’t do better, play around with an x-box instead.
WARNING:root:Pretrained weights (D:\KI1\stable-diffusion-webui\models\text2video/zeroscope_v2_576w\open_clip_pytorch_model.bin) not found for model ViT-H-14.Available pretrained tags ([‘laion2b_s32b_b79k’].
Traceback (most recent call last):
File “D:\KI1\stable-diffusion-webui/extensions/sd-webui-text2video/scripts\t2v_helpers\render.py”, line 30, in run
vids_pack = process_modelscope(args_dict, args)
File “D:\KI1\stable-diffusion-webui/extensions/sd-webui-text2video/scripts\modelscope\process_modelscope.py”, line 65, in process_modelscope
pipe = setup_pipeline(args.model)
File “D:\KI1\stable-diffusion-webui/extensions/sd-webui-text2video/scripts\modelscope\process_modelscope.py”, line 31, in setup_pipeline
return TextToVideoSynthesis(get_model_location(model_name))
File “D:\KI1\stable-diffusion-webui/extensions/sd-webui-text2video/scripts\modelscope\t2v_pipeline.py”, line 136, in __init__
self.clip_encoder = FrozenOpenCLIPEmbedder(
File “D:\KI1\stable-diffusion-webui/extensions/sd-webui-text2video/scripts\modelscope\clip_hardcode.py”, line 74, in __init__
model, _, _ = open_clip.create_model_and_transforms(
File “D:\KI1\stable-diffusion-webui\ — no-half\lib\site-packages\open_clip\factory.py”, line 308, in create_model_and_transforms
model = create_model(
File “D:\KI1\stable-diffusion-webui\ — no-half\lib\site-packages\open_clip\factory.py”, line 234, in create_model
raise RuntimeError(error_str)
RuntimeError: Pretrained weights (D:\KI1\stable-diffusion-webui\models\text2video/zeroscope_v2_576w\open_clip_pytorch_model.bin) not found for model ViT-H-14.Available pretrained tags ([‘laion2b_s32b_b79k’].
Exception occurred: Pretrained weights (D:\KI1\stable-diffusion-webui\models\text2video/zeroscope_v2_576w\open_clip_pytorch_model.bin) not found for model ViT-H-14.Available pretrained tags ([‘laion2b_s32b_b79k’].
Diese Meldung erscheint bei dem Versuch mittels
Fine-tuned models
1. Create the new folder stable-diffusion-webui > models > text2video > zeroscope_v2_576w
mit den Einstellungen 576×320 etwas zu generieren!
(Verzeichnis und Dateien wie angegeben eingerichtet.
Was läuft falsch?
Check the folder “models/text2video/zeroscope_v2_576w”. It should have 4 files. Try redownloading if it indeed has.