Transforming videos into animation is never easier with Stable Diffusion AI. You will find step-by-step guides for 5 video-to-video techniques in this article. The best of all: You can run them FREE on your local machine!
- ControlNet-M2M script
- ControlNet img2img
- Mov2mov extension
- SD-CN Animation extension
- Temporal Kit
- AnimateDiff prompt travel
They all use a similar approach of transforming each video frame individually with the help of ControlNet.
At the end of the article, I will survey other video-to-video methods for Stable Diffusion.
Now you will see a sample video from each method. Below is the original video.

(Download this video here if you wish to use it in the tutorial.)
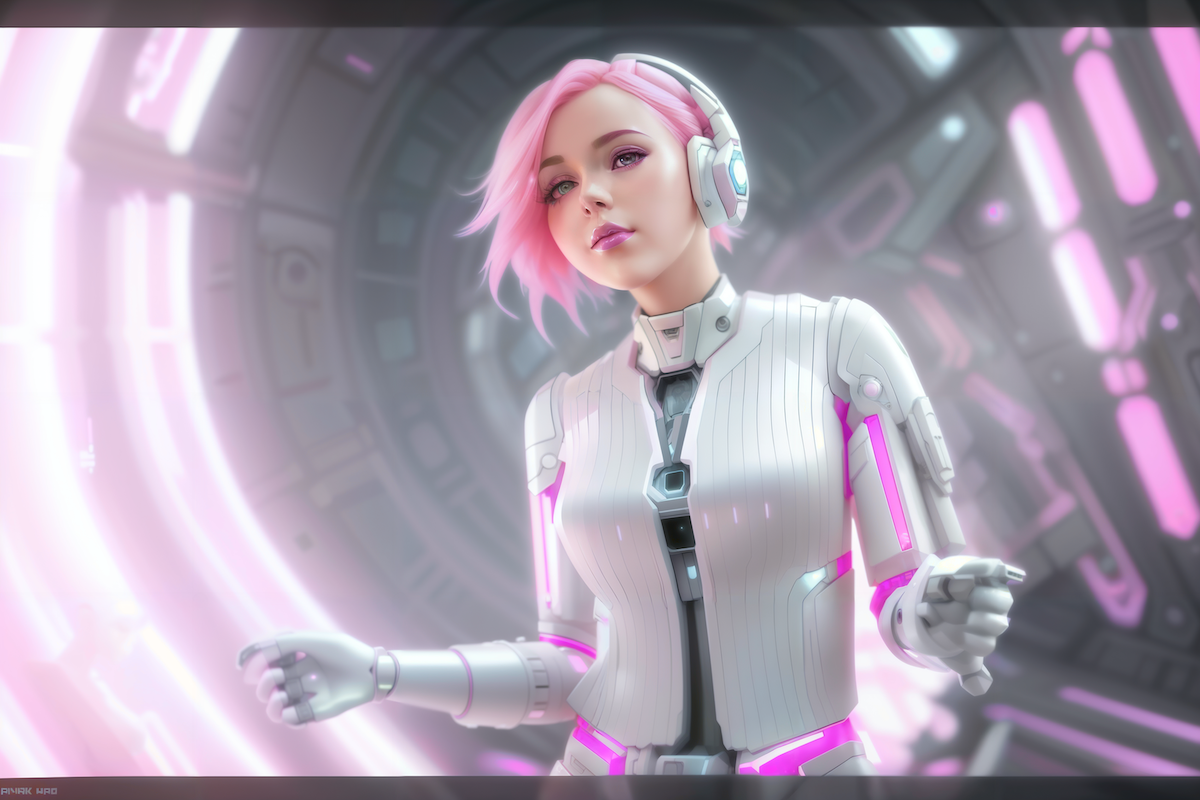
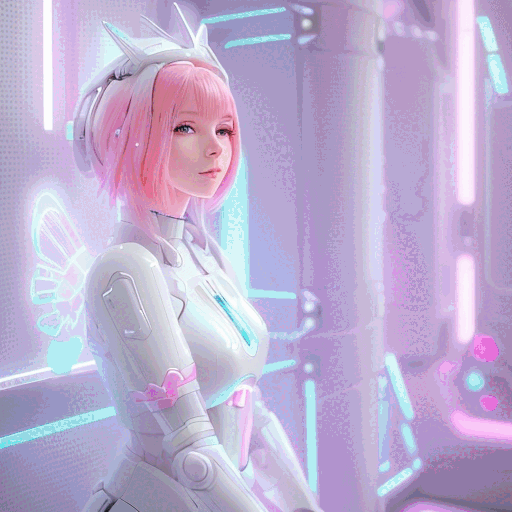
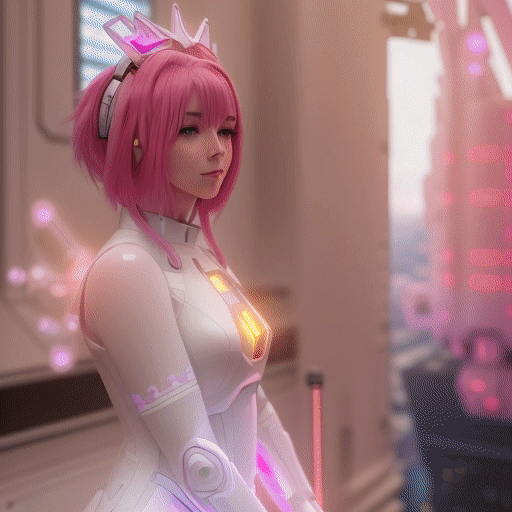
Below is an example of using method 1: ControlNet-M2M script method.

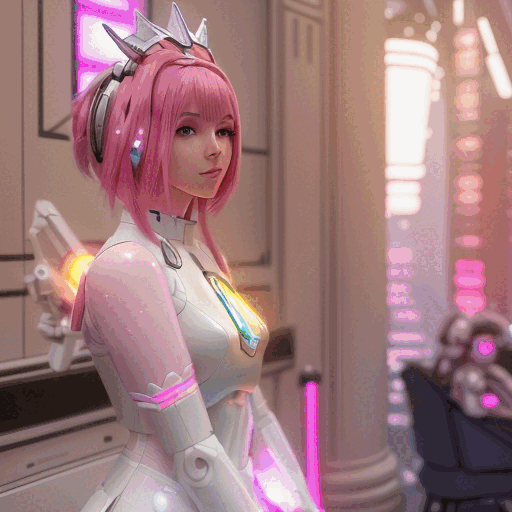
Below is an example of using method 2: ControlNet img2img.
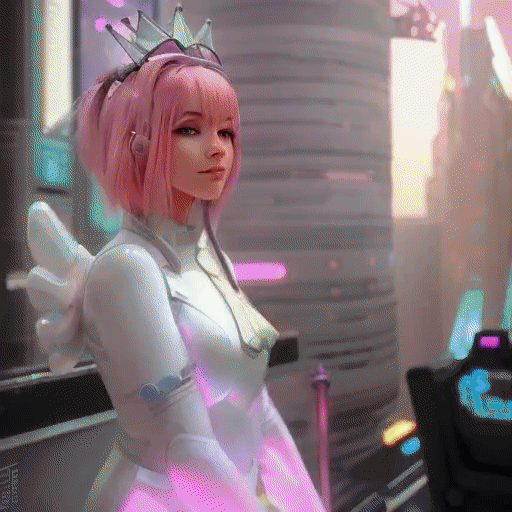
Below is an example of using method 3: mov2mov extension.

Below is an example of using method 4: SD-CN Animation extension.
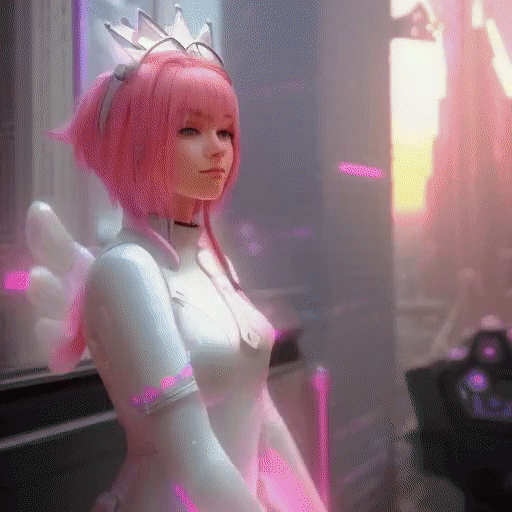
Here’s an example of Method 5: Temporal Kit.
Here’s an example of Method 6: AnimateDiff Prompt Travel.
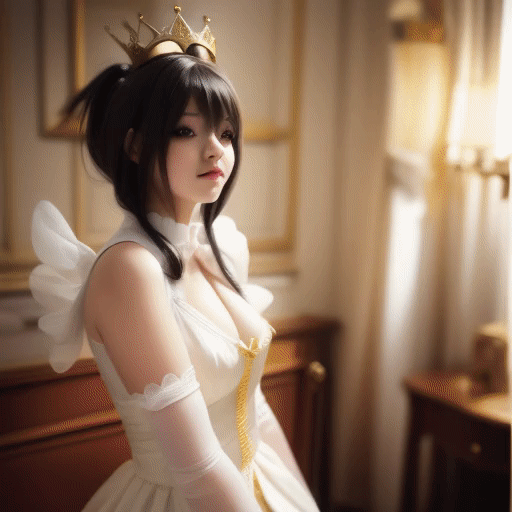
Table of Contents
Software
You will need AUTOMATIC1111 Stable Diffusion GUI. You can use this GUI on Windows, Mac, or Google Colab.
You will need to install the ControlNet extension. Follow the installation instructions in the ControlNet article.
Method 1: ControlNet m2m script
This video-to-video method is simpler to use but has a higher amount of flickering.
We will use the following video.
Use the following button to download the video if you wish to follow with the same video.
Step 1: Update A1111 settings
Before using the controlnet m2m script in AUTOMATIC1111, you must go to Settings > ControlNet. Select the following two options.
- Do not append detectmap to output: Yes
- Allow other script to control this extension: Yes

The first option disables saving the control image to the image output folder, so you can grab the frame images easier.
The second setting lets the controlnet m2m script feed the video frames to the ControlNet extension.
Click Apply Settings. Reload the Web-UI page.
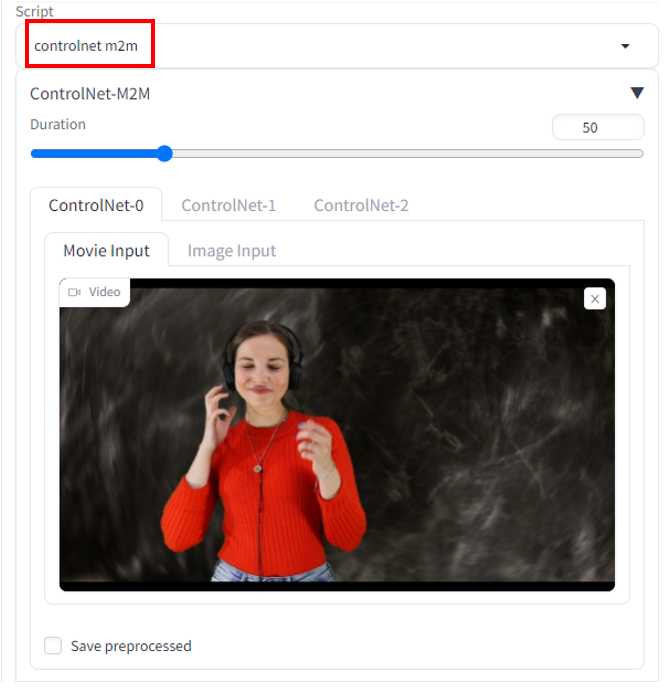
Step 2: Upload the video to ControlNet-M2M
In AUTOMATIC1111 Web-UI, navigate to the txt2img page.
In the Script dropdown menu, select the ControlNet m2m script.
Expand the ControlNet-M2M section.
Upload the mp4 video to the ControlNet-0 tab.
Step 3: Enter ControlNet setting
Expand the ControlNet section. Enter the following settings:
Enable: Yes
Pixel Perfect: Yes
Control Type: Lineart
Preprocessor: lineart realistic
Model: control_xxxx_lineart
Control weight: 0.6
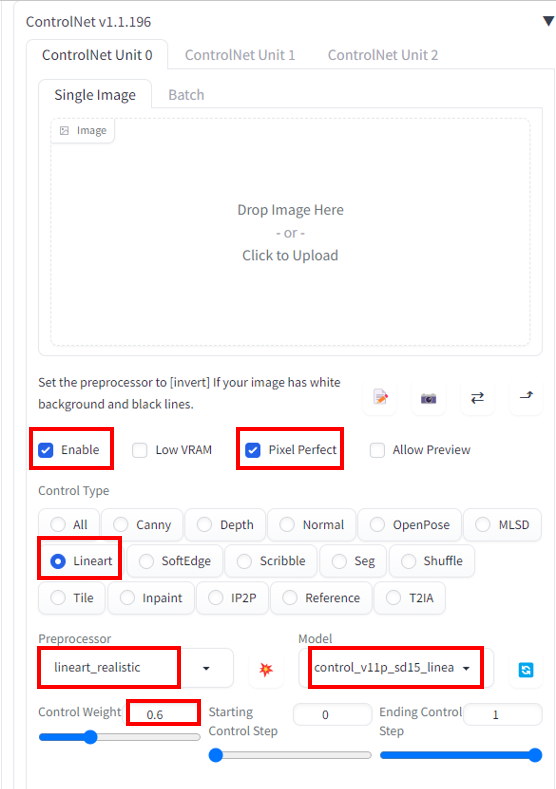
For your own videos, you will want to experiment with different control types and preprocessors.
Step 4: Enter txt2img settings
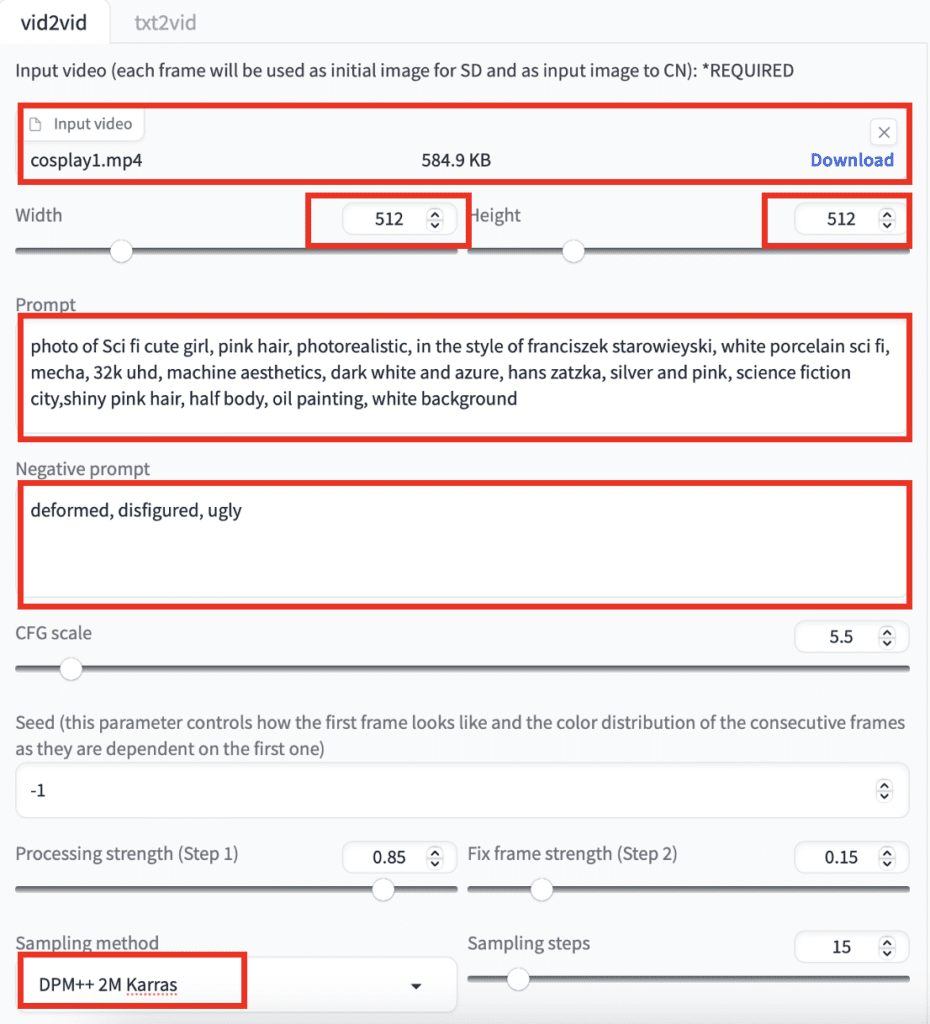
Select a model you wish to use in the Stable Diffusion checkpoint at the top of the page. I will use deliberate v2.
Come up with a prompt and a negative prompt. I will use the following:
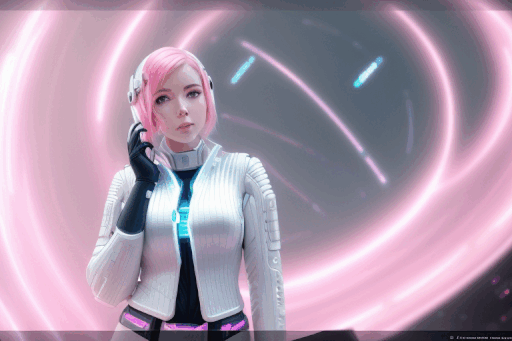
photo of Sci fi cute girl, pink hair, photorealistic, in the style of franciszek starowieyski, white porcelain sci fi, mecha, 32k uhd, machine aesthetics, dark white and azure, hans zatzka, silver and pink, science fiction city,shiny pink hair, half body, oil painting, white background
deformed, disfigured, ugly
Enter the following generation parameters:
Sampling method: Euler a
Sampling steps: 20
Width: 768
Height: 512
CFG Scale: 7
Seed: 100
The seed value needs to be fixed to reduce flickering. Changing the seed will change the background and the look of the character.
Click Generate.
Step 5: Make an animated GIF or mp4 video
The script converts the image with ControlNet frame-by-frame. You will find a series of png files in the txt2img output folder.
You have two options: (1) Combine the PNG files into an animated GIF, and (2) make an mp4 video.
Animated GIF
Use the EZGIF page to convert the png files to an animated GIF.
In the GIF option, set the Delay time to 5 (in 1/100 seconds) for 20 frames per second.
Here’s the final animated GIF.
MP4 video
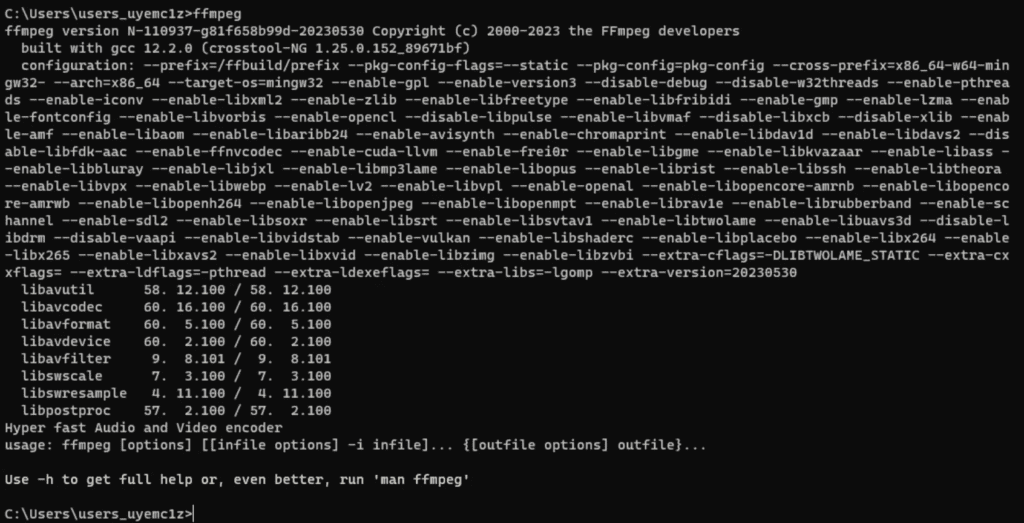
Use the following command to convert the png files to an MP4 video. (You will need to have ffmpeg installed on your local PC)
ffmpeg -framerate 20 -pattern_type glob -i '*.png' -c:v libx264 -pix_fmt yuv420p out.mp4A reader pointed out that the above command didn’t work on Windows and suggested the command below instead.
ffmpeg -framerate 20 -pattern_type sequence -start_number 00000 -i ‘%05d-100.png’ -c:v libx264 -pix_fmt yuv420p out.mp4Notes for ControlNet m2m script
Unfortunately, as of the time of writing, multiple ControlNet does NOT work with the m2m script. As we will see later, multiple ControlNet is a useful technique in reducing flickering. Hope future updates will rectify that.
Here’s another video transformed with ControlNet Line art realistic.
Experiment with different ControlNets to get different results. Here’s a video with the Tile resample.
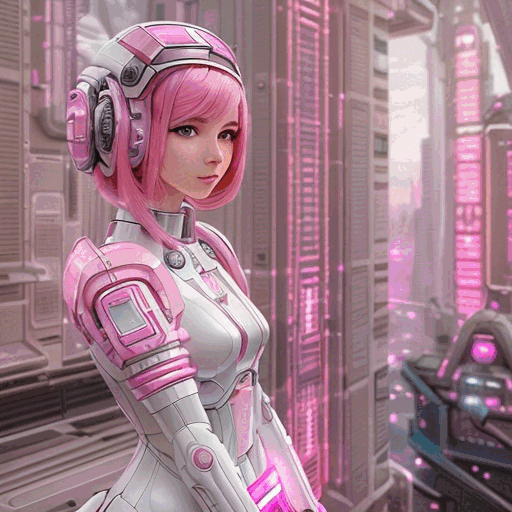
Method 2: ControlNet img2img
This video-to-video method converts a video to a series of images and then uses Stable Diffusion img2img with ControlNet to transform each frame.
Use the following button to download the video if you wish to follow with the same video.
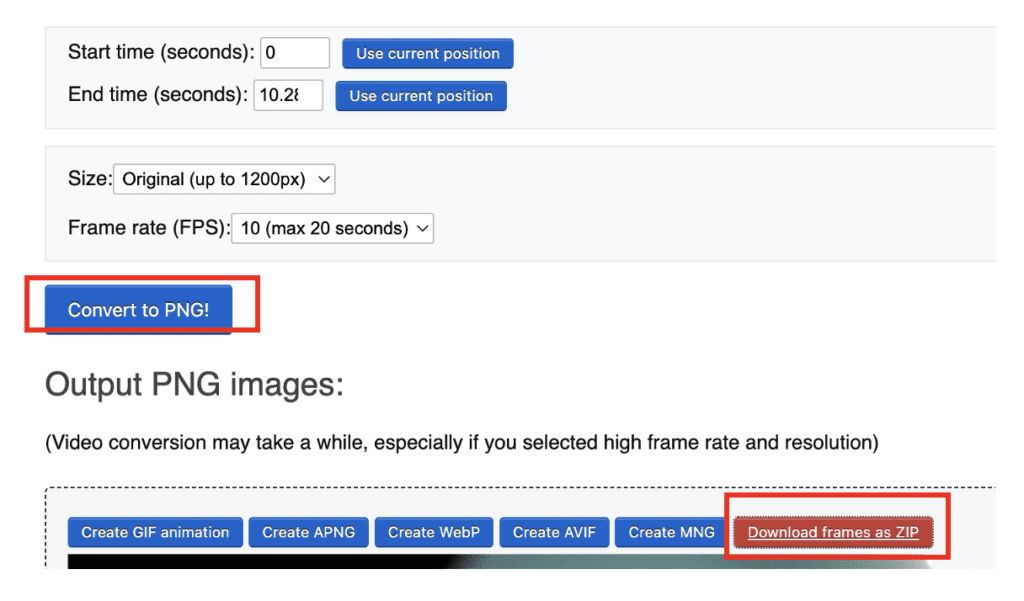
Step 1: Convert the mp4 video to png files
You can use the ezgif site to convert the mp4 video to png image files.
Upload the mp4 video file.
Use the following settings.
- Size: Original
- Frame rate: 10 fps
Click Convert to PNG!
Click Download frames as ZIP.
Extract the ZIP file to a folder of png image files.
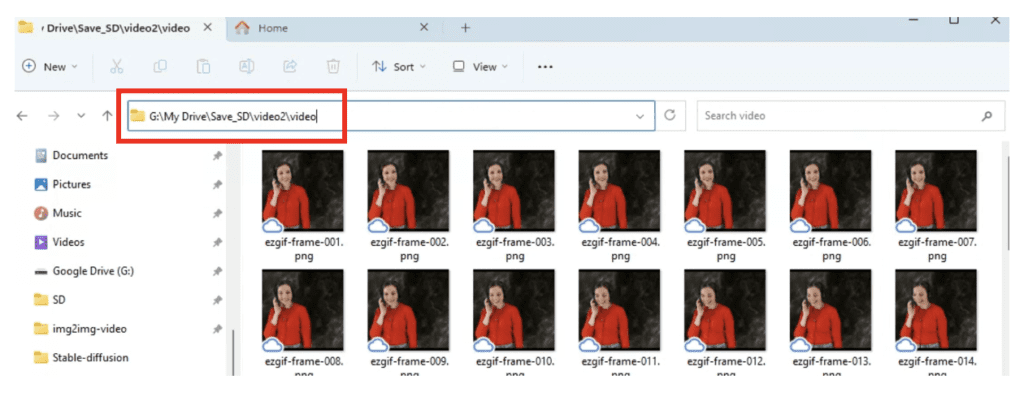
Rename the folder name as video. Now you should have a folder called video containing the png files.
Alternatively, below are the commands if you prefer to use the command line to convert the mp4 video to png files.
mkdir videoffmpeg -i girl_dance.mp4 -r 10 video/%05d.pngStep 2: Enter Img2img settings
You will need image-to-image and ControlNet settings to apply to each frame.
Now open AUTOMATIC1111.
We need some special settings for ControlNet. Go to the Settings page.
Click Show all pages on the left panel.
Search the text (Ctrl+F for Windows. Cmd+F for Mac) “Quicksettings list”. Add “initial_noise_multiplier” and “img2img_color_correction” to the list.
It should look like this:

Go to the top of the page. Click Apply settings and then Reload UI.
You should see two new settings: Noise multiplier for img2img and Apply color correction… on top of the page.

Set Noise multipler for img2img to 0.5. This scaling factor is applied to the random latent tensor for img2img. Lowering it reduces flickering.
Check Apply color correction… setting. This option is for matching the color of the original content. This helps color consistency across frames.
Now one more setting… Go to Settings > ControlNet. Select the following option.
- Do not append detectmap to output: Yes
Click Apply Settings. Reload the Web-UI.
Go to img2img page.
In the Stable Diffusion checkpoint at the top of the page, select a model you wish to use. I will use deliberate v2.
Come up with a prompt and a negative prompt. I will use:
photo of Sci fi cute girl, pink hair, photorealistic, in the style of franciszek starowieyski, white porcelain sci fi, mecha, 32k uhd, machine aesthetics, dark white and azure, hans zatzka, silver and pink, science fiction city,shiny pink hair, half body, oil painting
deformed, disfigured, ugly
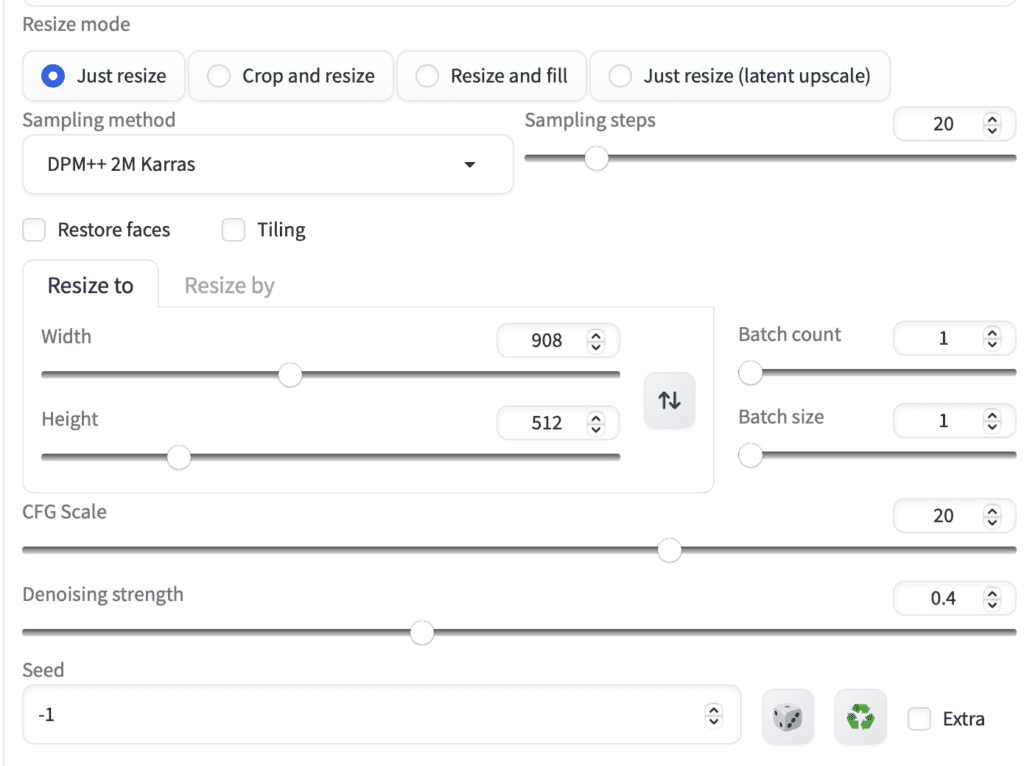
Upload one of the frames (i.e. the png files) to the img2img canvas.
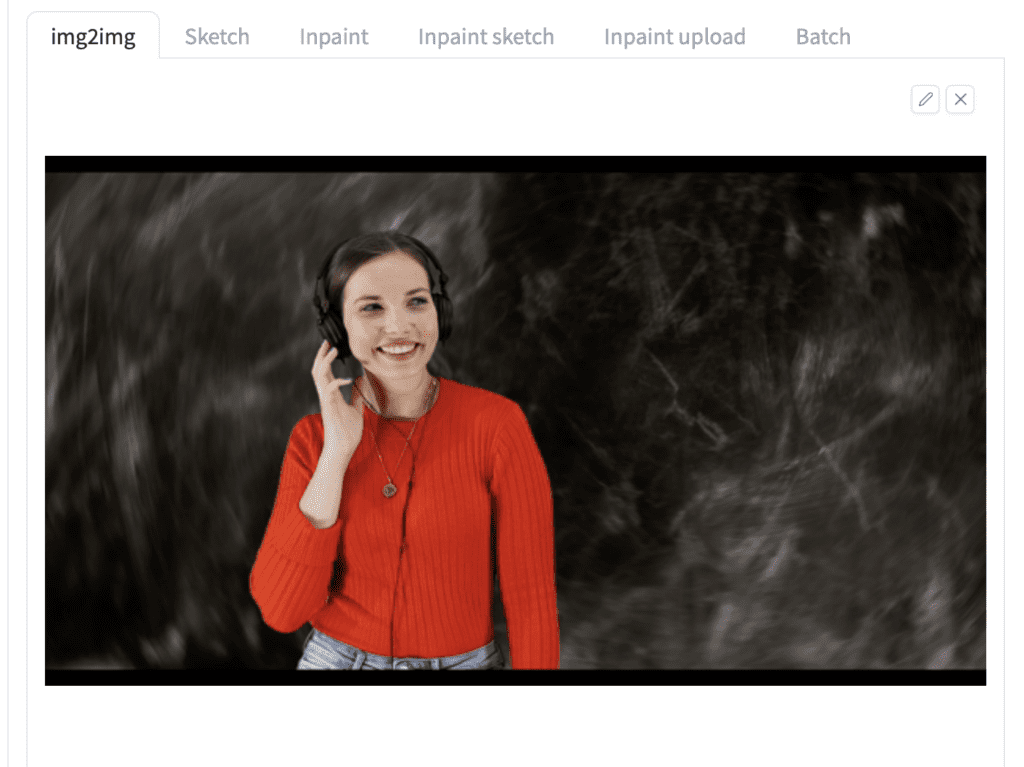
Resize mode: Just resize
Sampling method: DPM++ 2M Karras
Sampling Steps: 20
Width: 908 (This is set to maintain the aspect ratio of the video)
Height: 512 (The shorter dimension is fixed to 512)
CFG scale: 20 (Experiment with this. The higher you set, the more it follows the prompt.)
Denoising strength: 0.4 (Experiment with this. The higher you set, the more changes but also more flickering)
Seed: -1 (random)
Step 3: Enter ControlNet settings
Now go to the ControlNet section…
Upload the same frame to the image canvas.
Enable: Yes
Pixel Perfect: Yes
Allow Preview: Yes
Control Type: Lineart
Preprocessor: Lineart Realistic
Model: control_xxxx_lineart
(Experiment with the control type, preprocessor, and model. Many of them will work just as well. The goal is to see the details like eyes, mouth, hairstyle got outlined in the preview)
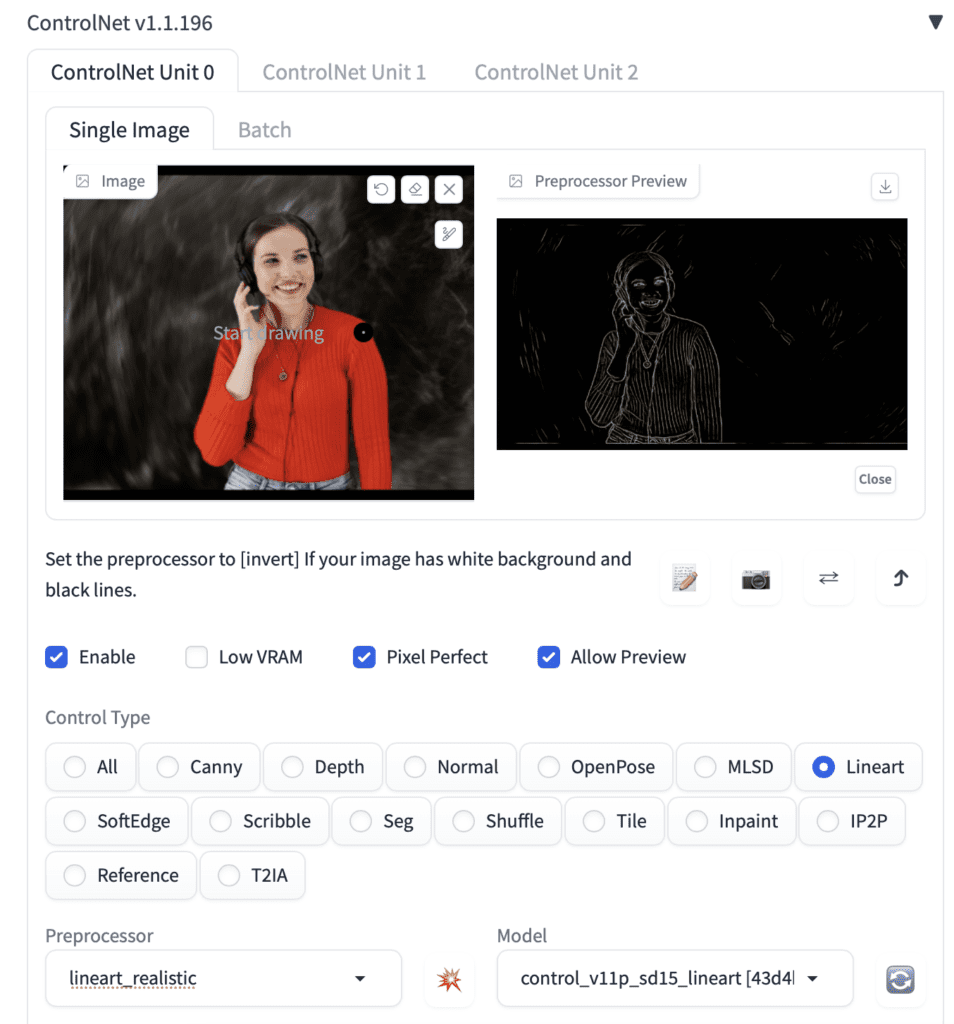
Control Weight: 0.6 (Lower it when you see color artifacts)
Step 4: Choose a seed
Press Generate to test the setting.
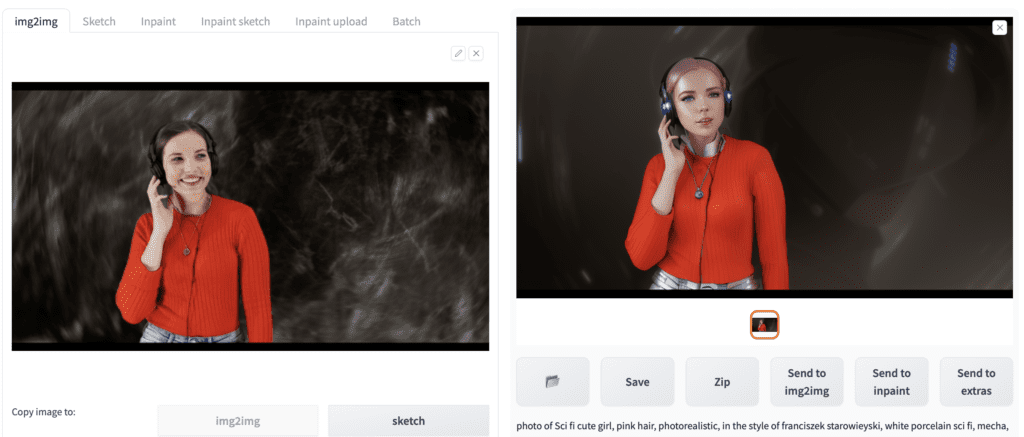
Select the image on the left panel once you are happy with the effect.
To fix the seed, click the recycle icon next to the Seed value box. You should see the value changes from -1 to a positive number.

Step 5: Batch img2img with ControlNet
Now with all the hard work, you have generated one frame… The goal is to apply the same setting to ALL frames. Luckily, you can do that with batch processing.
First, remove the reference image in the ControlNet section. This step is important. Otherwise, you will be using this reference image for all frames! Click the cross icon on the top right to remove the image.
Confirm you see the reference image removed, like the screenshot below.
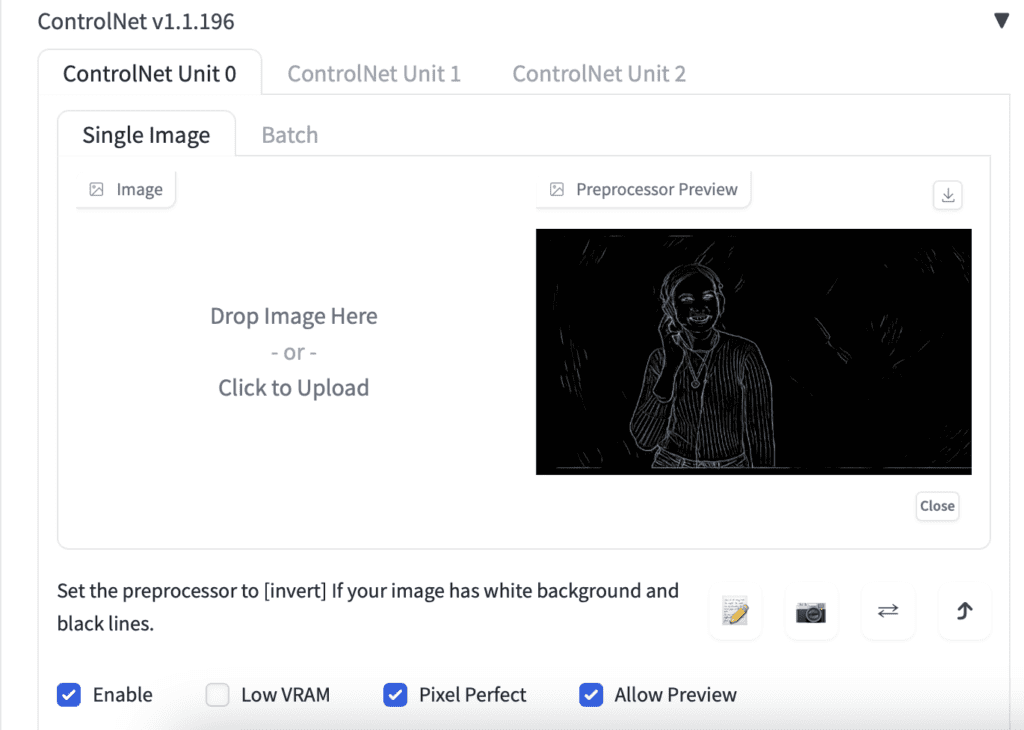
Keep the rest of the ControlNet settings untouched.
Now switch to the Batch tab on the Img2img page.
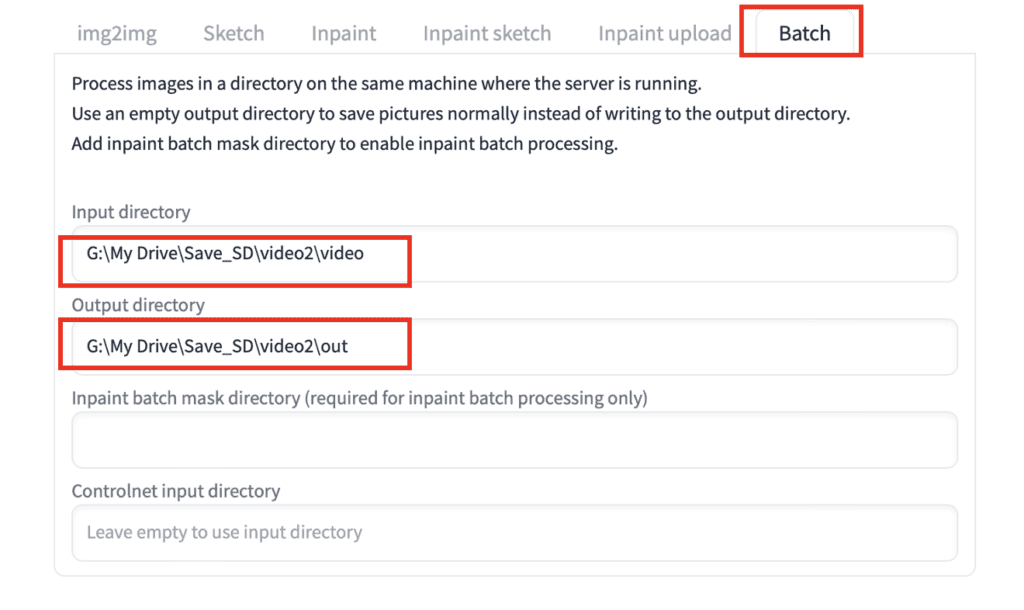
Enter the paths of the
- Input directory: The folder containing the PNG files of your video.
- Output directory: A new folder for your processed PNG files.
In Windows, the input directory is the folder location of the PNG files in File Explorer.
If you use Google Colab, copy the PNG files to your Google Drive and specify a path. The path can be found in the file explorer on the left and right-clicking a folder.
Click Generate to start the generation process.
Step 6: Convert the output PNG files to video or animated gif
Animated GIF
Use the EZGIF page to convert the png files to an animated GIF.
In the GIF option, set the Delay time to 10 (in 1/100 seconds) for 10 frames per second.
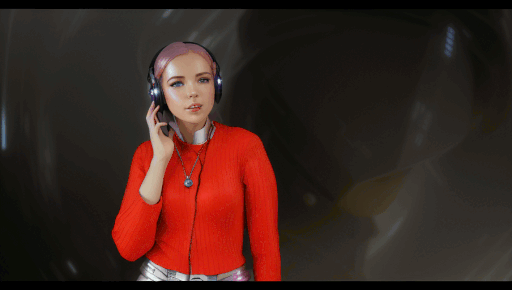
Here’s the video-to-video result (Denoising strength 0.5):
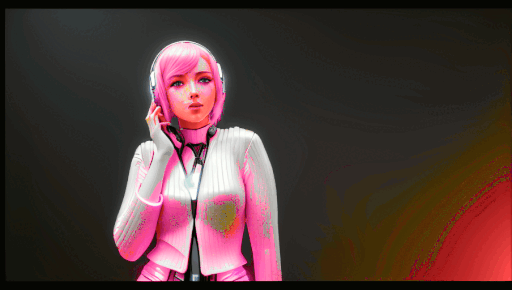
Increasing the denoising strength to 0.7 changes the video more but also increases flickering.
MP4 video
Use the following command to convert the png files to an MP4 video.
ffmpeg -framerate 10 -pattern_type glob -i '*.png' -c:v libx264 -pix_fmt yuv420p out.mp4Note on ControlNet img2img
This is probably the most laborious out of all video-to-video methods. The reason you want to use it is simple: To gain total control of the process.
You will see quite a few Youtubers advocate this method. I recommend Enigmatic_e‘s videos to learn more about this method (and, generally, video-making with Stable Diffusion). This video from Corridor Crew walks you through a laborious method that produces high-quality Stable Diffusion videos.
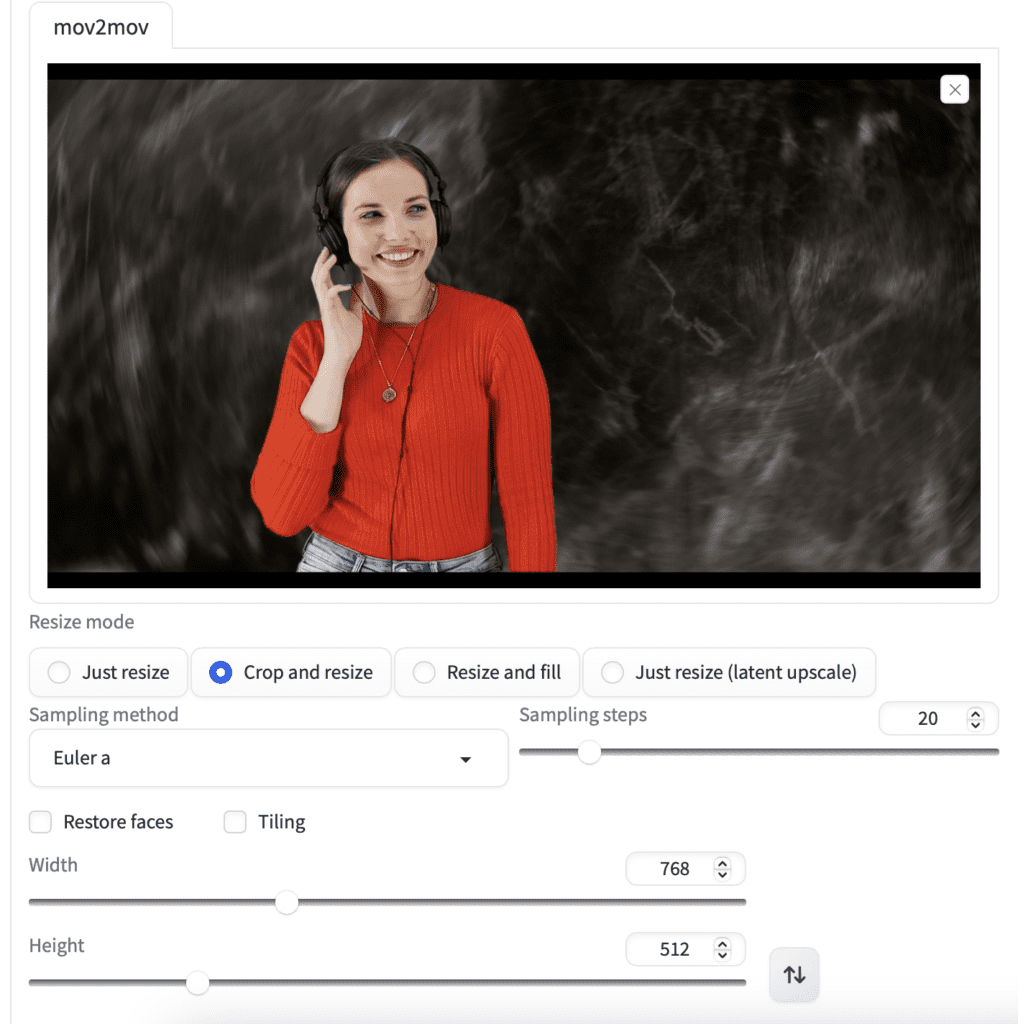
Method 3: Mov2mov extension
The Mov2mov extension automates many of the manual steps of video-to-video tasks.
Use the following button to download the video if you wish to follow with the same video.
Step 1: Install Mov2mov extension
In AUTOMATIC1111 Web-UI, navigate to the Extension page.
Select Install from URL tab.
In the URL for extension’s git repository field, enter
https://github.com/Scholar01/sd-webui-mov2movClick Install.
Completely close and restart the Web-UI.
Step 2: Enter mov2mov settings
You should see a new page called mov2mov.
Select a Stable Diffusion checkpoint in the dropdown menu at the page top. I used Deliberate v2.
Enter the prompt and the negative prompt.
photo of Sci fi cute girl, pink hair, photorealistic, in the style of franciszek starowieyski, white porcelain sci fi, mecha, 32k uhd, machine aesthetics, dark white and azure, hans zatzka, silver and pink, science fiction city,shiny pink hair, half body, oil painting, white background
deformed, disfigured, ugly
Upload the video by dropping it to the video canvas.
Resize mode: Crop and resize.
Set the width to 768 and the height to 512 for a landscape movie. (Adjust according for your own video)
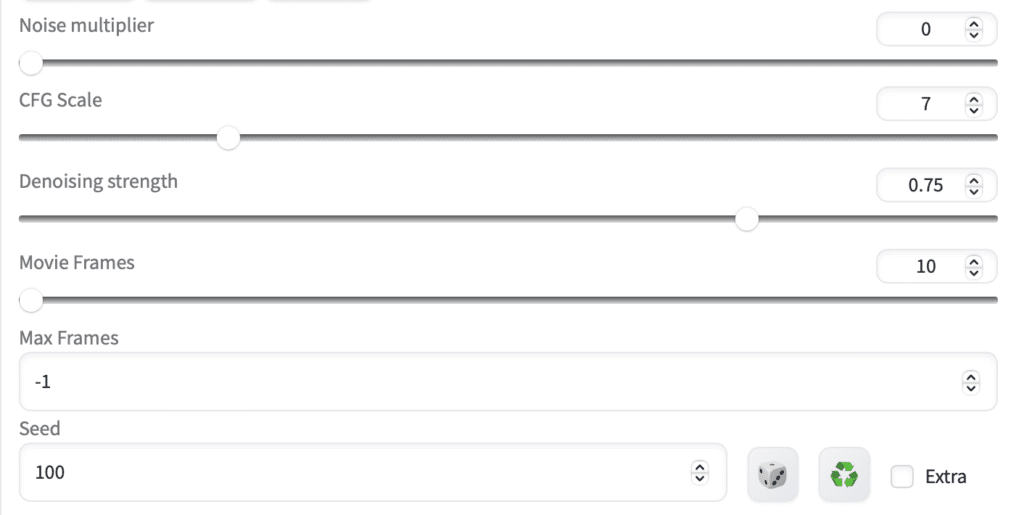
The extension has a nice slider for noise multiplier. Keep it at 0 to reduce flickering.
Adjust the CFG scale to control how much the prompt should be followed. (7 in this video)
Adjust the denoising strength to control how much the video should be changed. (0.75 in this video)
The Max frame is the total number of frames to be generated. Set to a low number e.g. 10 for initial testing. Set to -1 to generate a full-length video.
The seed determines the seed value of the FIRST frame. All frames will use the same seed value even if you set the seed to -1 (random).
Step 3: Enter ControlNet settings
Enter the following settings for ControlNet.
Enable: Yes
Pixel Perfect: Yes
Control Type: Lineart
Preprocessor: lineart_realistic
Model: control_xxxx_lineart (See installation instructions)
Control weight: 0.6
Important: Don’t upload a reference image. Mov2mov will use the current frame for the reference image.
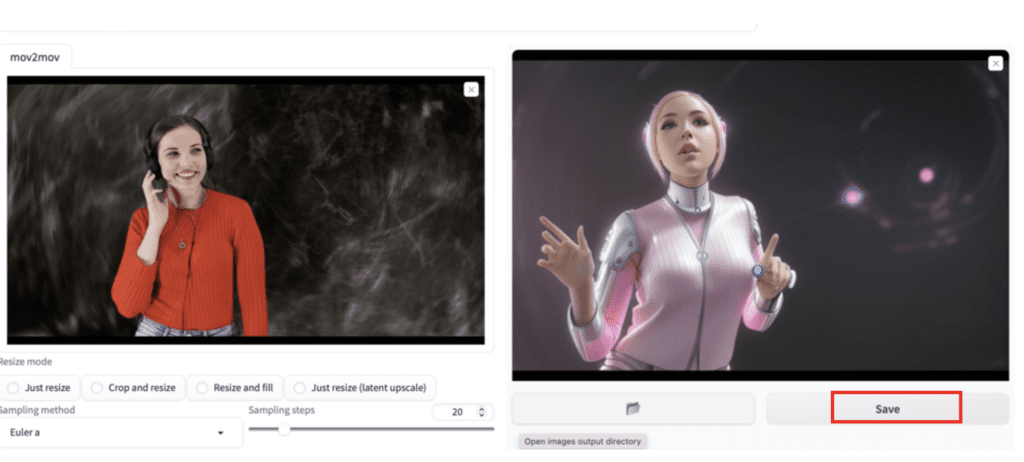
Step 4: Generate the video
Click Generate to start generating the video.
It will take a while… When it is down, your new video will appear on the right.
Click Save to save the video.
Go to the output/mov2mov-videos folder to find the video if it doesn’t show up.
Try a different Video Mode if there is an error.
If the video generation fails, make the video yourself from the image series. They are in the folder output/mov2mov-images. Follow this step to convert the images to a video.
Here’s the final video from Mov2mov.
Note for mov2mov
For some reason, deterministic samplers (e.g. Euler, LMS, DPM++2M Karras…) do NOT work well with this extension. Otherwise, it would be a good way to reduce flickering.
Method 4: SD-CN-Animation
SD-CN-Animation is an AUTOMATIC1111 extension that provides a convenient way to perform video-to-video tasks using Stable Diffusion.
SD-CN-Animation uses an optical flow model (RAFT) to make the animation smoother. The model tracks the movements of the pixels and creates a mask for generating the next frame.
Note that this extension does not work for all videos. For example, it produces poor results with the video used in the previous 3 methods. Presumably, it is because of its dark background.
So I switch to another video for this walkthrough.
Download this video here if you want to use it to follow this tutorial.
Step 1: Installing the extension
In AUTOMATIC1111 Web-UI, navigate to the Extension page.
Select Install from URL tab.
In the URL for extension’s git repository field, enter
https://github.com/volotat/SD-CN-AnimationClick Install.
Completely close and restart the Web-UI.
Step 2: Enter SD-CN-Animation parameters
In AUTOMATIC1111 Web-UI, navigate to the SD-CN-Animation page.
Make sure “Apply color correction to img2img results to match original colors.” is NOT selected. (If you have enabled this option when testing the previous method) This color correction affects the RAFT model and produces poor results.
Upload the mp4 video file to the Input video section.
Set the width to 512. Set to height to 512. (Adjust accordingly for your video.)
Set the Prompt to
photo of Sci fi cute girl, pink hair, photorealistic, in the style of franciszek starowieyski, white porcelain sci fi, mecha, 32k uhd, machine aesthetics, dark white and azure, hans zatzka, silver and pink, science fiction city,shiny pink hair, half body, oil painting, white background
Set the Negative Prompt to
deformed, disfigured, ugly
Set the sampling method to DPM++2M Karras.
Step 3: Enter ControlNet Settings
We will use 2 ControlNets. If you don’t see multiple ControlNet tabs, go to Settings > ControlNet to enable them.
For ControlNet Unit 0:
- Enable: Yes
- Pixel Perfect: Yes
- Control Type: Line Art
- Preprocessor: Line art realistic
- Model: control_xxxx_lineart
- Control weight: 0.6
DON’T upload an image.
Leave all other settings as the default.
For ControlNet Unit 1:
- Enable: Yes
- Pixel Perfect: Yes
- Control Type: Tile
- Preprocessor: Tile resample
- Model: control_xxxx_tile
- Control weight: 0.5
DON’T upload an image.
Leave all other settings as the default.
Step 4: Generate the video
Click Generate to start processing.
Once it is done, right-click on the video, and you will find an option to save it.
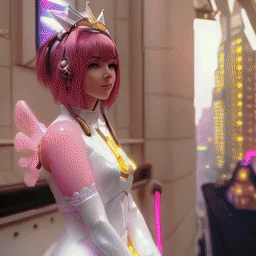
Here’s what I got.
Notes for SD-CN-Animation
I like the fact that this extension is quite polished. Things work without error. (My expectation in software engineering is low when using A1111…)
Make sure you have unchecked “Apply Color correction…” for img2img. Otherwise, you won’t get the best results.
All samplers work in this extension. Make sure to pick a deterministic sampler to reduce flickering. (See comments on flickering below)
Method 5: Temporal Kit
Temporal Kit implements several methods for video-to-video conversion. I’m only going to tell you the best one here.
The basic idea is to pick keyframes across the video (e.g. 16), stylize them with image-to-image, and use them as references to paint adjacent frames.
This method was pioneered by EbSynth, a computer program for painting videos. It was created before Stable Diffusion, but img2img capability in Stable Diffusion has given it a new life.
However, the result will be poor if you do image-to-image on individual frames. The reason is that the resulting images lack coherence.
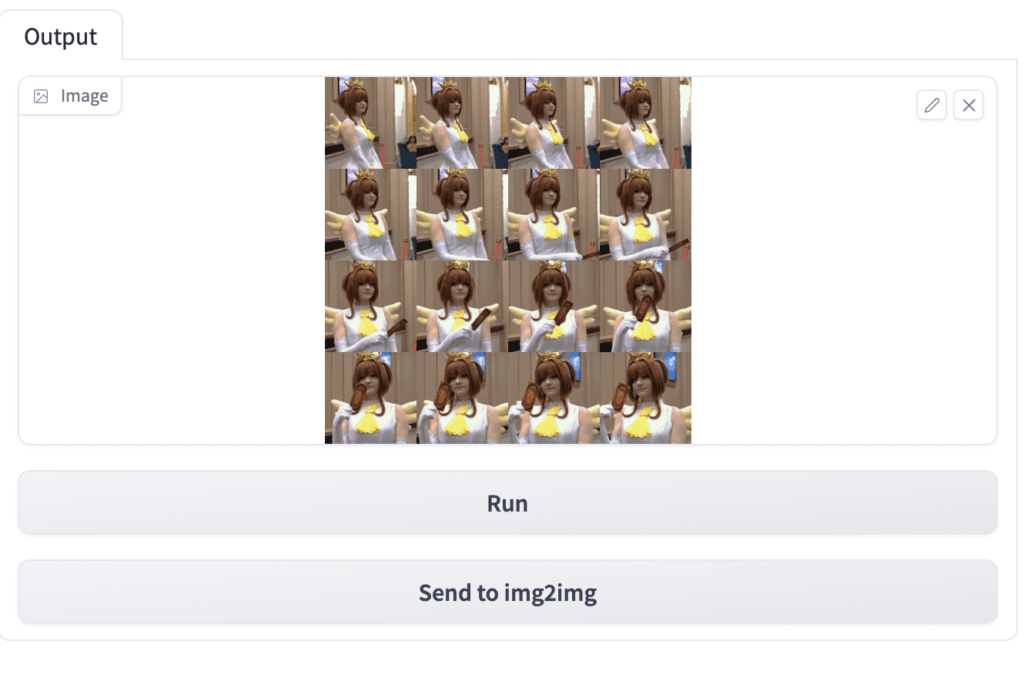
The trick is to transform ALL keyframes at once by stitching them together in one giant sheet. Like this:
We used to do it manually. But with Temporal Kit, you don’t have to.
Step 1: Install Temporal Kit extension
In AUTOMATIC1111 Web-UI, navigate to the Extension page.
Select Install from URL tab.
In the URL for extension’s git repository field, enter
https://github.com/CiaraStrawberry/TemporalKitClick Install.
Completely close and restart the Web-UI.
Step 2: Install FFmpeg
Visit FFmpeg’s download page and download the FFmpeg program for your platform.
It should be a zip file. After unzipping, you should see a file called ffmpeg or ffmpeg.exe. This is the FFmpeg program you need!
But to let Temporal Kit use it, you need to put it in the PATH so that it can be accessed anywhere, by everyone.
If you know what PATH means. Put it in one of the directories in the PATH.
Read on if not…
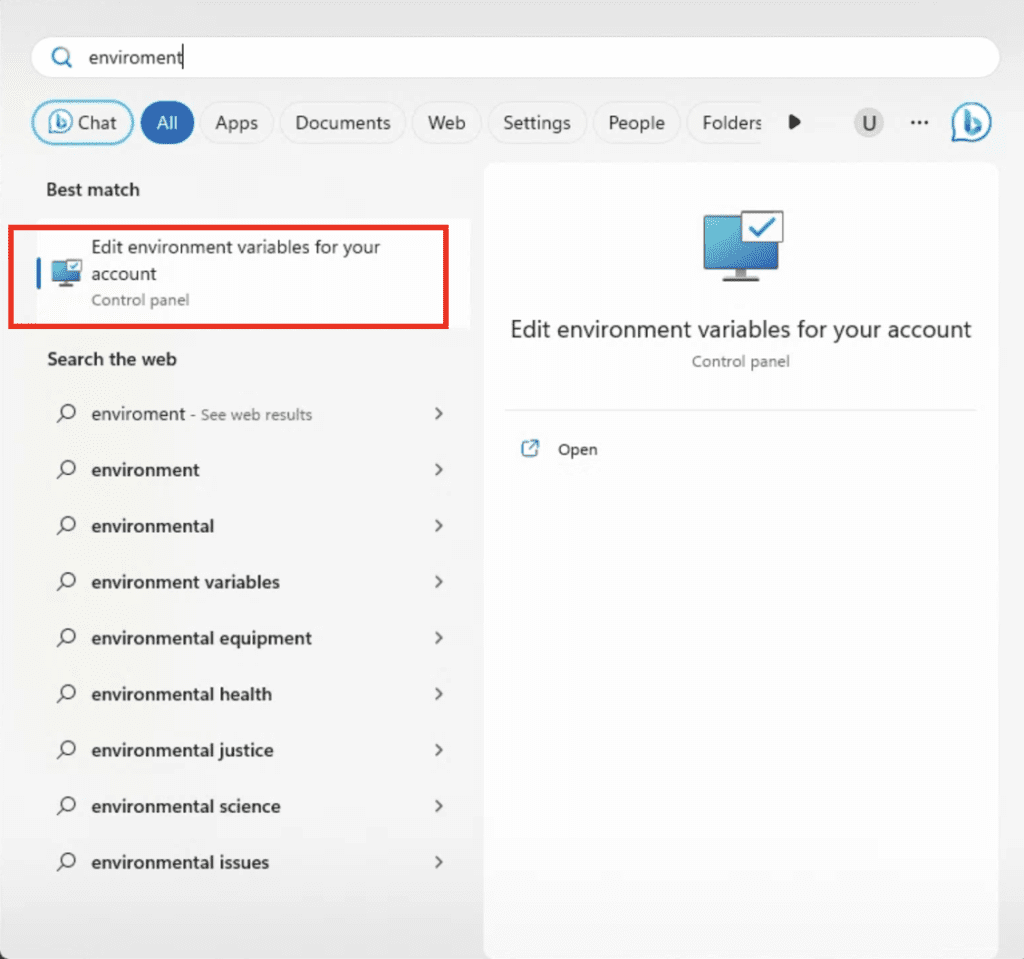
Windows
Press the Windows key. Type envirnoment and click the item “Edit environment variables for your account”.
Select PATH, and then Edit.
Add a new entry by clicking New and then type
%USERPROFILE%\binAfter adding, you should see the new entry of the above path.
Click OK to save and exit.
Open File Explorer. In the address bar, type
%USERPROFILE%And press Enter. You should have gone to your home folder.
Create a new folder called bin.
Test going there by putting the following in the address bar and press Enter.
%USERPROFILE%\binYou should be in your newly created folder bin.
Now put ffmpeg.exe in this folder, and you are all set. Now the file is in your PATH.
To test, open a command prompt by pressing the Windows key and type cmd. Press Enter.
In the command prompt, type
ffmpegand press Enter.
You should see ffmpeg’s help page.
Mac or Linux
Open the Terminal App.
Create a new folder bin in your home directory.
mkdir ~/binPut the ffmpeg file in the new directory. You can use Finder.
Edit .zprofile in your home directory.
Add the following line
export PATH=~/bin:$PATHStart a new Terminal and type
ffmpegYou should see the help page of ffmpeg displayed. This verifies FFmpeg is in your path.
Step 3: Enter Pre-processing parameters
In AUTOMATIC1111, Go to the Temporal Kit page.
Go to the Pre-Processing tab.
Upload your video to the Input video canvas. (Download this video if you want to use the same video to follow the tutorial.)
Next is to generate one giant sheet of keyframes. This sheet will go through img2img so that all keyframes will have the same style.
Set:
- Side: 4 (This is setting a 4×4 images grid)
- Height resolution: 2048 (Since each image is 512, 512×4 = 2048)
- frames per keyframe: 4 (How many frames each keyframe is responsible for)
- fps: 30
- EbSyth mode: Yes
- Target Folder: Put in a folder name path to wish to save this project to. E.g.
G:\temporalkit\test1
Click Run on the right panel. You should see a sheet of 4×4 keyframes generated.
Make sure these keyframes cover the whole video for your own video. Adjust those parameters if not.
If you encounter out of memory issue in the next img2img step, reduce the side or resolution parameters.
Click Save Settings if you are happy with the result.
Click Send to img2img.
Step 4: Perform Img2img on keyframes
Go to the Img2img page. The giant sheet of keyframes should already be in the image canvas.
Switch to the Batch tab.
Input directory: The name of your target directory with \input appended. E.g. G:\temporalkit\test1\input
Output directory: Similarly but with \output appended. Eg. G:\temporalkit\test1\output
The image size should be corrected and set automatically. (2048×2048).
Enter a prompt. I used
photo of Sci fi cute girl, pink hair, photorealistic, in the style of franciszek starowieyski, white porcelain sci fi, mecha, 32k uhd, machine aesthetics, dark white and azure, hans zatzka, silver and pink, science fiction city,shiny pink hair, half body, oil painting, white background
And a negative prompt:
deformed, disfigured, ugly
Sampling method: DPM++2M Karras
Sampling steps: 20
CFG scale: 7
Denoising strength: 0.5 (adjust accordingly)
In ControlNet (Unit 0) section, set:
- Enable: Yes
- Pixel Perfect: Yes
- ControlType: Tile
- Preprocessor: tile_resample
- Model: control_xxxx_tile
Press Generate. After it is done, you will find the image in the batch output folder.
Make sure to open the image in full size and inspect the details in full size. Make sure they look sharp and have a consistent style.
Step 5: Prepare EbSynth data
Now we need to generate data to put into EbSynth.
Go to Temporal-Kit page and switch to the Ebsynth-Process tab.
Input Folder: Put in the same target folder path you put in the Pre-Processing page. E.g. G:\temporalkit\test1
Click read last_settings. If your input folder is correct, the video and the settings will be populated.
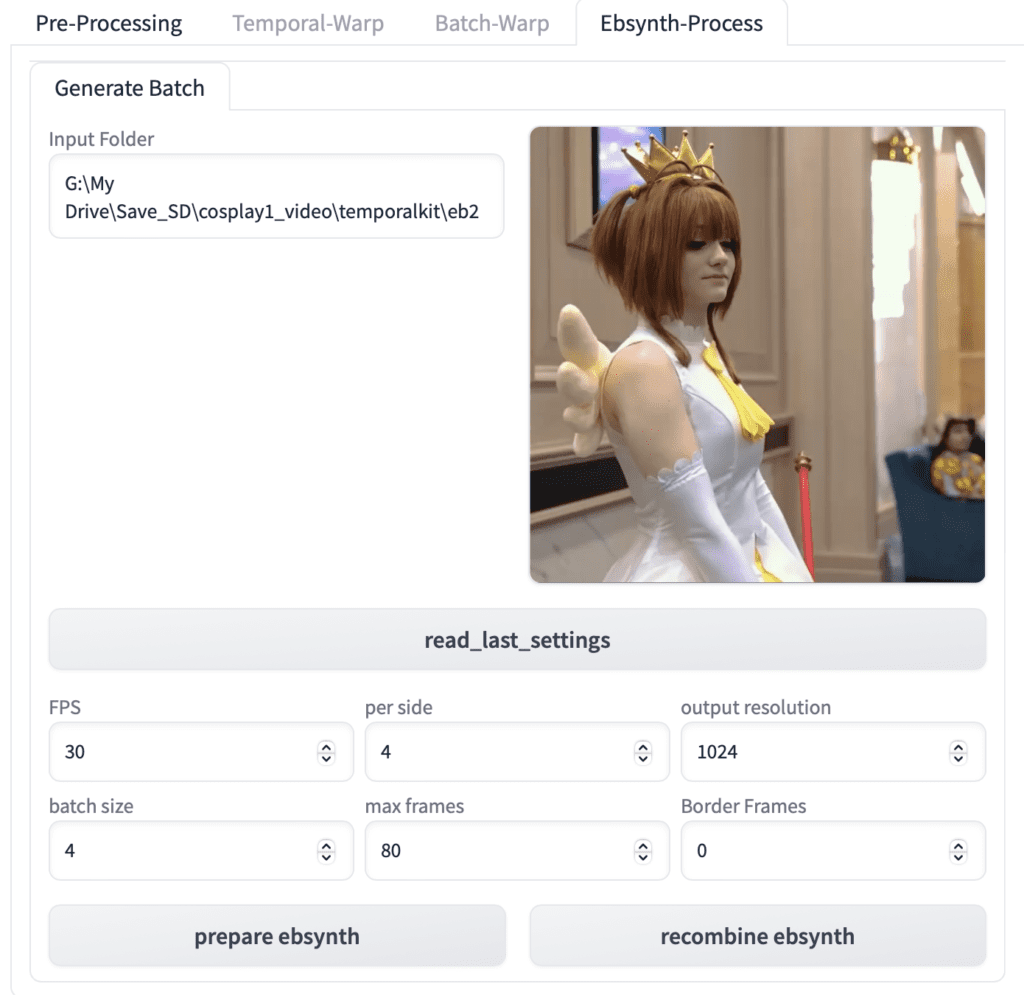
Click prepare ebsynth. After it is done, you should see the keys folder populated with your stylized keyframes, and the frames folder populated with your images.
Step 6: Process with EbSynth
Now open the EbSynth program.
Open the File Explorer and navigate to the project folder. You should folder like the ones showed below. We need the keys folder and the frames folder for EbSynth.
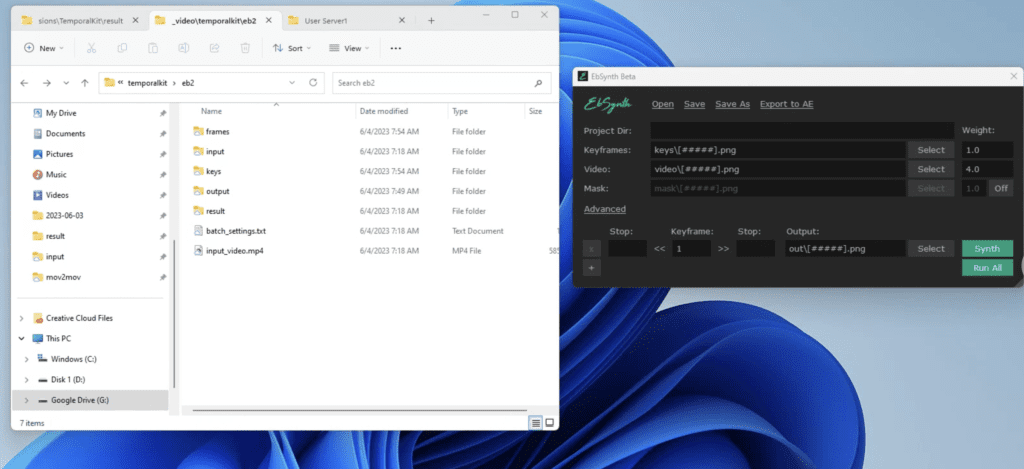
Drag the keys folder from the File Explorer and drop it to the Keyframes field in EbSynth.
Drag the frames folder from the File Explorer and drop it to the frames field in EbSynth.
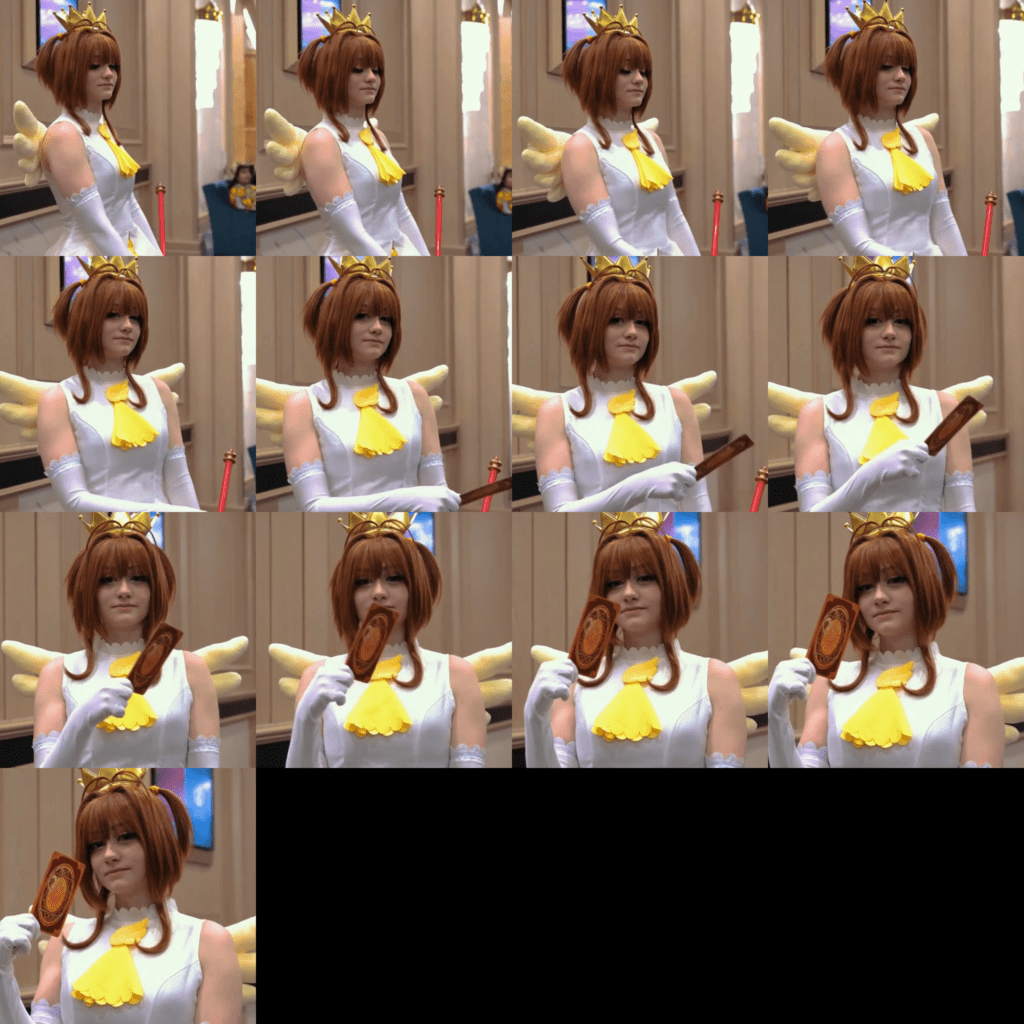
After these two steps, EbSynth should have populated with the correct settings with a bunch of Synth buttons. There is one row for each keyframe. Each keyframe acts as a reference and stylizes a certain number of frames.
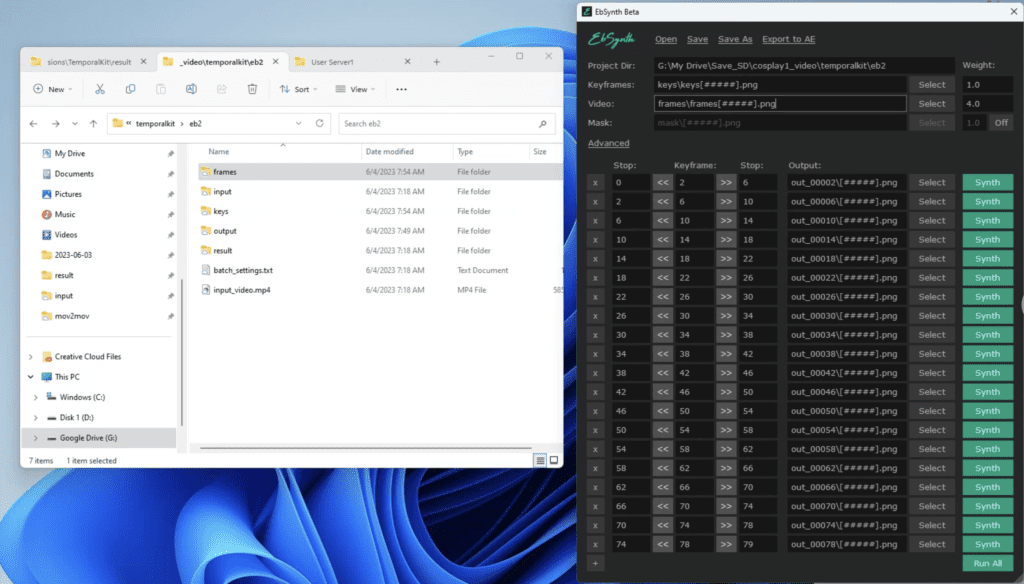
Click Run All and wait for them to complete.
When it is done, you should see a series of out_##### directories generated in the target project folder.
Step 7: Make the final video
Now go back to AUTOMATIC1111. You should still be on the Temporal Kit page and Ebsynth-Process tab.
Click recombine ebsynth and you are done!
Look how smooth the video is. With some tweaking, you can probably make it better!
Method 6: AnimateDiff Prompt Travel
AnimateDiff Prompt Travel is a video-to-video method that uses AnimateDiff to maintain frame-to-frame consistency, ControlNet to copy the motion of a reference video, and Stable Diffusion prompts to control content at different time points.
Using the lineart ControlNet method, it can be used to stylize a video. See the AnimateDiff Prompt Travel tutorial for setup details. Here’s the workflow in ComfyUI.
Here’s the video generated.
Variations
Multiple ControlNets
Experiment with Multiple ControlNet to further fix small details and reduce flickering.
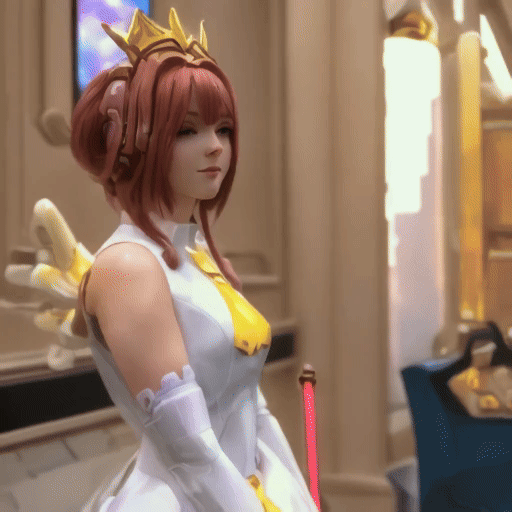
For example, you can add a second ControlNet to use reference only to fix the character’s look. I used a frame from a video generated before.
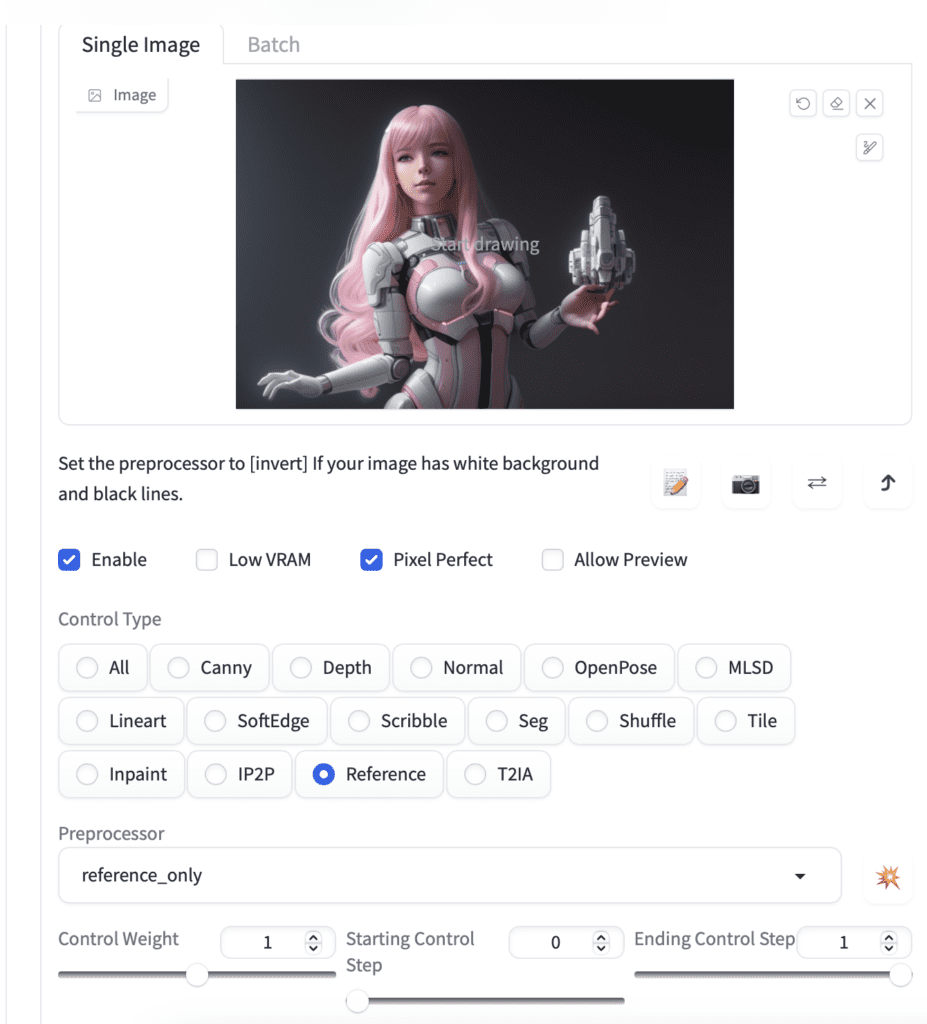
Here’s the video with lineart and reference-only ControlNets.
Other settings
Experiment with denoising strength for a trade-off between the amount of change and flickering.
Sometimes, the input video is too hard to process well with ControlNet. Try another one with a bigger and slow-moving subject.
Deflickering
Multiple ControlNet
Using multiple ControlNet to fix features in the video can significantly reduce flickering.
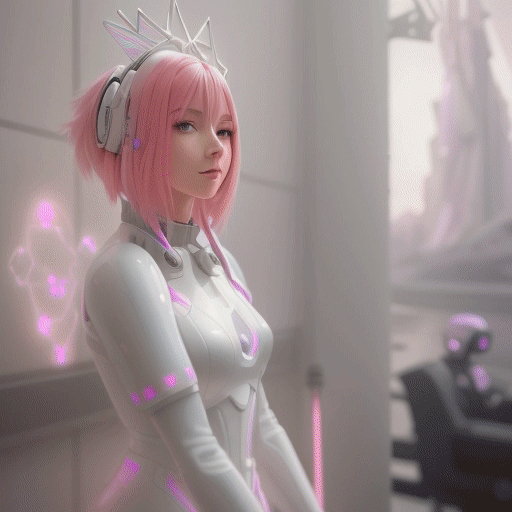
For example, this is with ONE ControlNet, Line art realistic.
What if we add one more ControlNet, the Tile Resample?
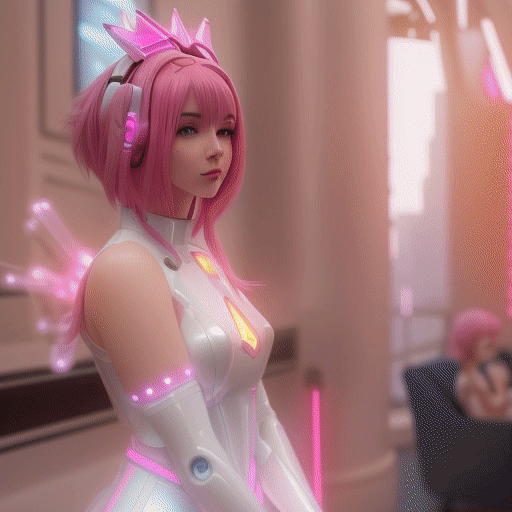
Not only it flickers less, but it also helps to preserve the color of the original video.
A similar degree of deflickering can be achieved by adding the Canny ControlNet.
The tradeoff is it is going to take longer to process a video. But I think its worth it!
Post-processing
Videos made using Stable Diffusion ControlNet still have some degree of flickering. Here are something you can do the flickering.
Da Vinci Resolve has a deflickering plugin you can easily apply to the Stable Diffusion video. Unfortunately, it is only available in the paid version (Studio).
If you are not prepared to shell out for that and are tech-savvy, use this deflickering model to process your videos.
deterministic samplers
Use a deterministic sampler to reduce flickering.
Below is using Euler a, a stochastic sampler. (Produced with SD-CN-animation.)
The video below uses the same settings except using DPM++2M Karas, a deterministic sampler.

Note her face and hair flicker less.
Some examples of deterministic samplers are
- Euler
- LMS
- Heun
- DPM++2M
- DPM++2M Karas
See the sampler article for an overview.
Other video-to-video Options
EbSynth
EBSynth is used to paint over a video, either manually or with AI image generators such as Stable Diffusion.
You will then dice the image back to 4 individual images and use them as keyframes in EbSynth.
The reason to go through this process is to improve the consistency across the keyframes. If the keyframes were transformed with img2img individually, they would normally have too much variation.
The EbSynth method is best to be executed with the Temporal Kit.
Deforum
Deforum has a video-to-video function with ControlNet. (Writing about this soon.)
Stable WarpFusion
Stable WarpFusion is a paid Colab Notebook that produces amazing video transformations with custom algorithms.
Andrew, this guide was incredibly helpful. I’ve been experimenting with Stable Diffusion video workflows for a few months, but your breakdown of the different video-to-video methods finally made the landscape much clearer.
The part that helped me most was how you explained the difference between approaches like AnimateDiff motion consistency, ControlNet motion copying, and prompt travel. I had previously tried AnimateDiff alone and couldn’t figure out why the motion sometimes felt generic. After reading your explanation about combining it with ControlNet to copy motion from a reference video, it suddenly made sense why that workflow produces much more believable animation.
Your explanation of the video-to-video workflow itself also clarified something that confused me early on: the idea that you’re essentially applying Stable Diffusion to each frame of an existing video while trying to maintain temporal consistency. Once I started thinking of it as a guided frame transformation rather than pure generation, the settings started to feel much less mysterious.
The m2m script no longer works and has not worked in a very long time I fear it is dead code. Are you aware of this?
Not sure. You can report the bug at their github page.
Hi,
possibly that question got asked/discussed already somewhere else, sorry for doubling:
Some Python + bash/bat scripts as source code in addition to all these GUI-based wrappers available, please?
Reasons:
– Streamlining, automation = Always having to click various options, reloading the GUI etc is very repetitive, cumbersome and time consuming. With a script I can hold all variable values as they are, avoids redundancy.
– Intel Arc 🙁 Aaaargh, I’ve been so stupid and buy a notebook with Intel Arc, 12 GB VRAM for cheap bucks sounded so cool .. I paid it back with loosing too much time, all those hazzles in debugging (especially in 2023), now even in mid 2024 Intel isn’t there where I thought they are.
Running then such Web UI adds to not being able to best most straight-forward see where’s a problem. Intel has OpenVino, wrappers for PyTorch, TF etc .. using any GitHub repo may or may not require some certain tweaks which one cannot apply using a GUI wrapper.
That said, would be awesome to have such wonderful tutorials additionally with (bash/bat+Python) source code for easier replication.
But a) would confuse non-programmers + b) some people won’t make money with it anymore 😉
All the best anyways,
Nasenbaer
yeah, running on intel works but requires some setup. I don’t expect everything to work. Using an nvidia card will save you a lot of time troubleshooting.
A1111 is inherently gui based. you can use its API interface for some functions.
HI
Is Mov 2 Mov working with google collab?
Everytime I try to run it, nothing happens..
Any experience with it?
Hi 🙂
First of all, Thank you for everything! love your stuff and it is so well documented and easy to follow! Much appreciated 🙂
I am trying to change a Video to a Video with a custom Prompt. can I add just a prompt to the conversion. For example if I would like to change my Video to a streetfighter style video. coould I just a a regular textprompt? Thanks for helping me out!
It can to some extent. It really depends on the video-to-video method. V2V is an advanced usage. The best is to experiment with it to see what works for which method.
Hello. I followed the exact steps for the first process using M2M script and am using all your settings, but I’m in Stable Diffusion sdxl, and I’m not sure if that is the issue. When I generate it begins making images like you would expect from the txtToimg, but it doesn’t seem to reference the video at all. Any help would be greatly appreciated!
controlnet in sdxl doesn’t work as well as sd. Canny is your best bet. Try it on the individual frame first. The settings I listed was for SD. It needs to be adjusted for SDXL
https://stable-diffusion-art.com/controlnet-sdxl/
The M2M script has not worked for a very long time now. It appears to have been abandoned.
Thanks for all these tutes. Learnt more in the last few weeks than a whole year of typing weird syntax into discord.
Question about SD-CN-Animation.
Every time i try and generate a video, the first frame is really stylised as per the model type etc. Looks great.
But each frame following that, the prompt seems to slide further and further away as the generated images sort of head back to the reference video in appearance. The start and the end of the output look like 2 utterly different sets of models, promots and settings.
Any ideas?
I didn’t recall encountering this issue. You can try reducing the control weights.
Hi, 1st tx for the tuto. I tried mov to mov but to find Deliberate v2 in the menu. I loaded one but not taken into account.
I think you should add the location of the ControlNet model on M2M method 3. I had to find the model, and load it in the correct location which is not the same location as for other models. Otherwise, works great!
great suggestion! thanks.
Hi ,
Big thank about all this beautiful tutorial.
I just bought your book.
I would like your opinion about video like this : https://www.instagram.com/p/Cw813cOP3nr/
I am surprised at the coherence of the images, I wonder if there is rotoscoping on the character. Do you think Temporal workflow is better approach to do this ?
Thanks !
It looks like using either animatediff or temporalkit, plus post processing.
Regarding my previous comment. I just found that someone forked the mov2mov extension to make it work with 1.6.0. https://stable-diffusion-art.com/video-to-video/#comment-2521
Try installing that and see how it goes! Hopefully it’ll be merged into the main branch soon.
After digging through the code, it seems like this issue came around when AUTOMATIC1111 1.6.0 was released. The error you and me are getting is because extensions\sd-webui-mov2mov\scripts\m2m_ui.py is trying to call “create_seed_inputs” from modules.ui but it isn’t defined in the modules\ui.py file.
Thankfully, you’re able to search the contents of all git commits with the following command:
git rev-list –all | xargs git grep
where is what you’re trying to search. If you’re on Windows xargs doesn’t work, so save this xargs.cmd file to C:\Windows and it’ll work.
https://github.com/DoctorLai/BatchUtils/blob/master/xargs.cmd
So, if you replace the expression with create_seed_inputs you’ll get the commit f898833ea38718e87b39ab090b2a2325638559cb which had it last. After browsing GitHub, I found that the parent commit was c9c8485bc1e8720aba70f029d25cba1c4abf2b5c which was the release for 1.5.2.
Later on, I also found this issue brought up here.
https://github.com/AUTOMATIC1111/stable-diffusion-webui/issues/13075
So it seems you’ll want to downgrade to 1.5.2 in order to take advantage of these extensions or wait until they’ve been updated by their authors. You could also try forking 1.6.0 to retroactively implement create_seed_inputs if you’re feeling adventurous.
M2M leaves me with a folder full of images that I can’t join. both ffmpeg lines you posted error.
mov2mov I love just so much flickering. Currently trying SD-CN first one kicked out a 3 second video from my 7 seconds that I gave it.
I think this tutorial is not for SD on google colab. please make tutorial for google collab as well
Sorry, problem with extension mov2mov
How to fix? thanks
*** Error loading script: m2m_ui.py
Traceback (most recent call last):
File “C:\Users\95450\stable-diffusion-webui\modules\scripts.py”, line 382, in load_scripts
script_module = script_loading.load_module(scriptfile.path)
File “C:\Users\95450\stable-diffusion-webui\modules\script_loading.py”, line 10, in load_module
module_spec.loader.exec_module(module)
File “”, line 883, in exec_module
File “”, line 241, in _call_with_frames_removed
File “C:\Users\95450\stable-diffusion-webui\extensions\sd-webui-mov2mov\scripts\m2m_ui.py”, line 12, in
from modules.ui import paste_symbol, clear_prompt_symbol, extra_networks_symbol, apply_style_symbol, save_style_symbol, \
ImportError: cannot import name ‘create_seed_inputs’ from ‘modules.ui’ (C:\Users\95450\stable-diffusion-webui\modules\ui.py)
Try deleting the venv folder and start webui.
If it doesn’t work, both the extension and A1111, delete venv and start webui.
I’m running into an Error with controlNet m2m. I set everything up just as you described, but I’m hitting the following error:
Traceback (most recent call last):
File “C:\ai\stable-diffusion-webui\modules\call_queue.py”, line 58, in f
res = list(func(*args, **kwargs))
File “C:\ai\stable-diffusion-webui\modules\call_queue.py”, line 37, in f
res = func(*args, **kwargs)
File “C:\ai\stable-diffusion-webui\modules\txt2img.py”, line 59, in txt2img
processed = modules.scripts.scripts_txt2img.run(p, *args)
File “C:\ai\stable-diffusion-webui\modules\scripts.py”, line 501, in run
processed = script.run(p, *script_args)
File “C:\ai\stable-diffusion-webui\extensions\sd-webui-controlnet\scripts\movie2movie.py”, line 127, in run
duration, = args[contents_num * arg_num:]
ValueError: not enough values to unpack (expected 1, got 0)
You can try updating both A1111 and movie2movie. Restart A1111 completely.
Did you manage to solve this . I am getting the same error. Installed everything from fresh.
First off, thank you so much for sharing your time and knowledge. It is much appreciated. There is not alot of info on vid2vid temporal workflow out there.This really helped me get started with temperalkit and then temperolnet.
I have been trying to use temporalnet2 for a bit now inside the temporalkit extension as of CiaraRowles’ instructions on huggingface, but have struggled to get desired results. There are no detailed instructions for an interested layman, nor are there tuts online anywhere.
If looking for a suggestion on future tutorials, I would like to suggest temporalnet2. It would be nice if there was at least 1 on the entirety of the web.
Respect, Appreciation and Love for the time and effort you put into all the easy to follow and descriptive tutorials you put out.
OK, I will take a look.
Could you please suggest a way in Method 5 using Google Colab?
You should be able to use the extension on Colab, but the preprocessed directory needs to be moved to your local computer for ebsynth.
I am trying out Temporal-Kit. I’ve attempted it a few times, but the ‘keys’ folder remains empty. I can see that the output folder contains the stylized versions of the images, and frames are being generated. However, there are no keys.
any other ways to turn all those image outputs into a video other than ffmpeg? I’ve been struggling with this for hours now. chatgpt says
‘It seems that the version of FFmpeg you have installed does not support the ‘glob’ pattern type for input filenames. This is why you’re getting the error “Pattern type ‘glob’ was selected but globbing is not supported by this libavformat build.’ so guessing this wont work for me at all.
Nvermind, I just used premiere pro instead. Order images by date ascending to flip them into the right order. Then paste them all into premire pro, shorten all the images down to shorter frames, hit play. done. for anyone struggling with ffmpeg, just try a different video editing program to achieve same result.
pleaae make a tutorial deforum vídeo to vídeo settings with controlnet
will get to it.
Thanks for updating the Article to add the alternative ffmpeg command needed for the first demo, Andrew. The same gllobbing issue affects the following ControlNet img2img tutorial. I successfully used this ffmpeg command in Windows for that one:
ffmpeg -framerate 10 -pattern_type sequence -start_number 00000 -i ‘%05d.png’ -c:v libx264 -pix_fmt yuv420p out.mp4
I’m working my way through every demo. Once again, big thanks for putting this together. I’m learning a lot.
I just completed the fourth one, SD-CN Animation extension. This wasn’t as smooth for me as you reported as I got lots of errors! Initially, errors reported a conflict with the roop extension I had installed. I disabled roop in the Extensions tab but I still got non-specific conflict errors on a re-run. So I disabled every extension I had installed (roop, mov2mov, deforum, canvas-zoom) and this time SD-CN Animation worked. My result matches yours very closely. Again, may be worth adding a note about disabling extensions if need be.
Now on to the last demo …
Glad that this is useful to you! This post took me a lot of time but video making didn’t seem to get as much attention as images.
These tutorials are amazing, Andrew.
The ffmpeg command given in the ControlNet-M2M script example to make an mp4 from the generated frames didn’t work for me using Windows. I believe that’s because globbing isn’t supported. Instead, I was able to use this sequence pattern_type. I ran this command after navigating to the output directory in a power shell:
ffmpeg -framerate 20 -pattern_type sequence -start_number 00000 -i ‘%05d-100.png’ -c:v libx264 -pix_fmt yuv420p out.mp4
Might be worth adding a note in the tutorial.
Thanks! Great addition to the article.
FFMPEG with mov2movs throws this error
[ERROR:[email protected]] global cap_ffmpeg_impl.hpp:2991 open Could not find encoder for codec_id=27, error: Encoder not found
[ERROR:[email protected]] global cap_ffmpeg_impl.hpp:3066 open VIDEOIO/FFMPEG: Failed to initialize VideoWriter
[ERROR:[email protected]] global cap.cpp:595 open VIDEOIO(CV_IMAGES): raised OpenCV exception:
And ezif wont generate the give after the upload nothing happens (first i thought it was bc file was over 100mb but i shortened it)
I use google collab
Would be nice if you have a solution for one of this two errors
You should go to their github page, report the error and see if they have a solution.
First option ran sixty minutes and erred at the end saying it couldn’t find the output directory, though it existed. Second ran as expected though I wasn’t pleased with the video quality. Mov2mov had problems retaining control type and resize and crop. Otherwise the third worked okay. DEFINITELY recommend test runs of 10-30 maximum frames. Looking forward to your post on Deforum mov2mov.
I get the following error on the first technique (after all the processing is done):
FileNotFoundError: [Errno 2] No such file or directory: ‘outputs/txt2img-images/controlnet-m2m’
That’s not a directory that’s been created by any of the programs or myself. When I create it the program runs without error but I get a gif in the ‘outputs/txt2img-images/controlnet-m2m’ folder and no png files.
That’s strange. It was ok on my Windows machine. Perhaps they didn’t support mac well.
To me, after creating the folder, manually, the process worked
I get the same
Wow. That’s a lot of work for the same bad result you could’ve gotten with just one extension: SD-CN Animation. Does most of that work for you. Also super easy to install since it’s available straight from the extensions tab.
Thank you for this
SD-CN isn’t compatible with Macs, making it a non-starter for me
I am running SD-CN on my Mac. It’s not using GPU and you have to change add this line in flow_utils.py to make it work -> RAFT_model.load_state_dict(torch.load(args.model, map_location=torch.device(‘cpu’)))
OK, added SD-CN Animation and comparison. Thanks!
Fairly rude comment. SD-CN Animation blows and it’s an equal amount of work. In fact only the Temporal method is truly effective and it does require effort.