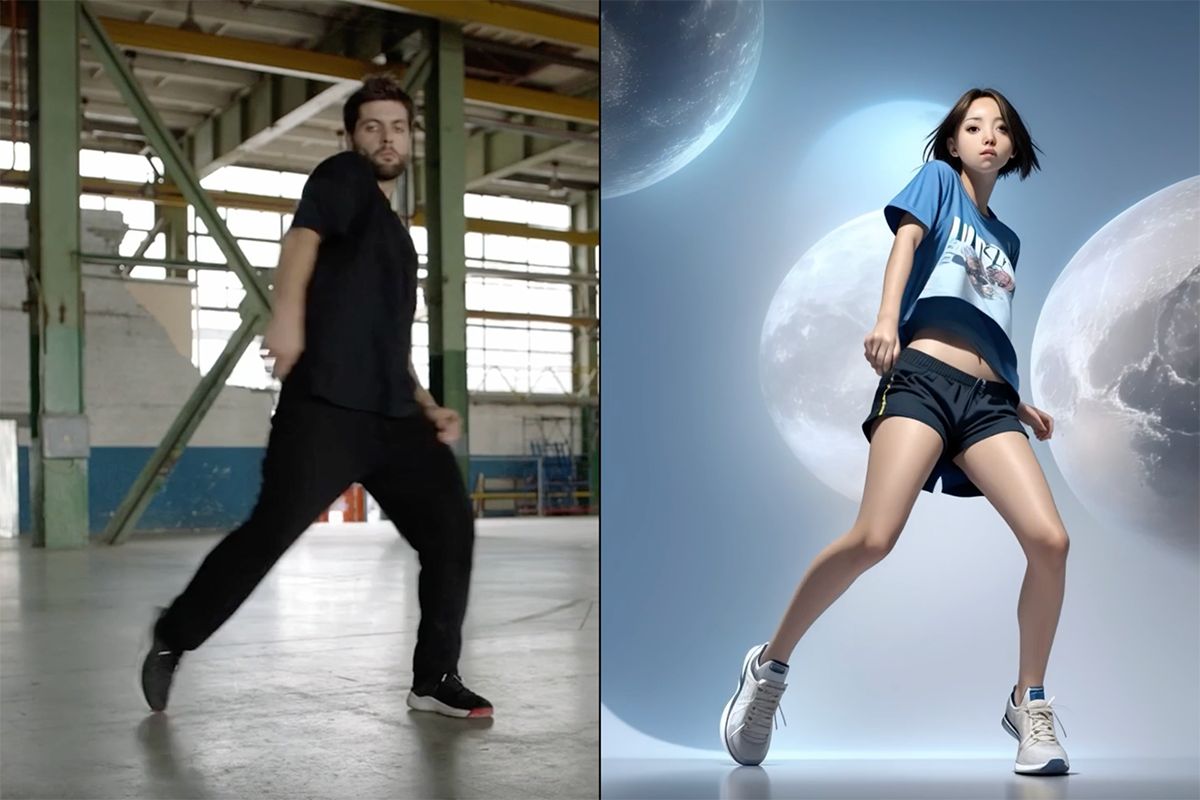
AnimateDiff Prompt Travel Video-to-video is a technique to generate a smooth and temporally consistent video with varying scenes using another video as a reference.
In this post, we will learn about
- The techniques behind AnimateDiff Prompt Travel Video-to-video
- A step-by-step guide to generating a video with ComfyUI.
This is the video you will learn to make:
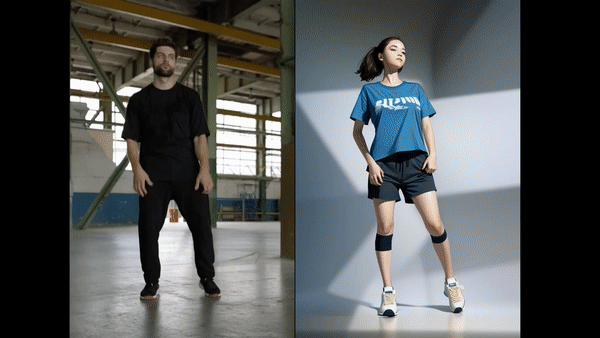
Table of Contents
How does AnimateDiff Prompt Travel work?
AnimateDiff generates motion videos with any Stable Diffusion models with amazing quality. It uses a motion control model to create motion with high temporal consistency. However, the motion is generic and limited.
What if we
- Use AnimaeDiff for temporal consistency
- Use ControlNet to copy the motion of a reference video
- Change the prompt at different time points to create a variety of scenes
These are the ideas behind AnimateDiff Prompt Travel video-to-video! It overcomes AnimateDiff’s weakness of lame motions and, unlike Deforum, maintains a high frame-to-frame consistency.
Software setup
We will use ComfyUI to generate the AnimateDiff Prompt Travel video. See the ComfyUI installation guide and the ComfyUI beginner’s guide if you are new to it.
You should have the ComfyUI Manager installed before you start with the tutorial.
Creating a ComfyUI AnimateDiff Prompt Travel video
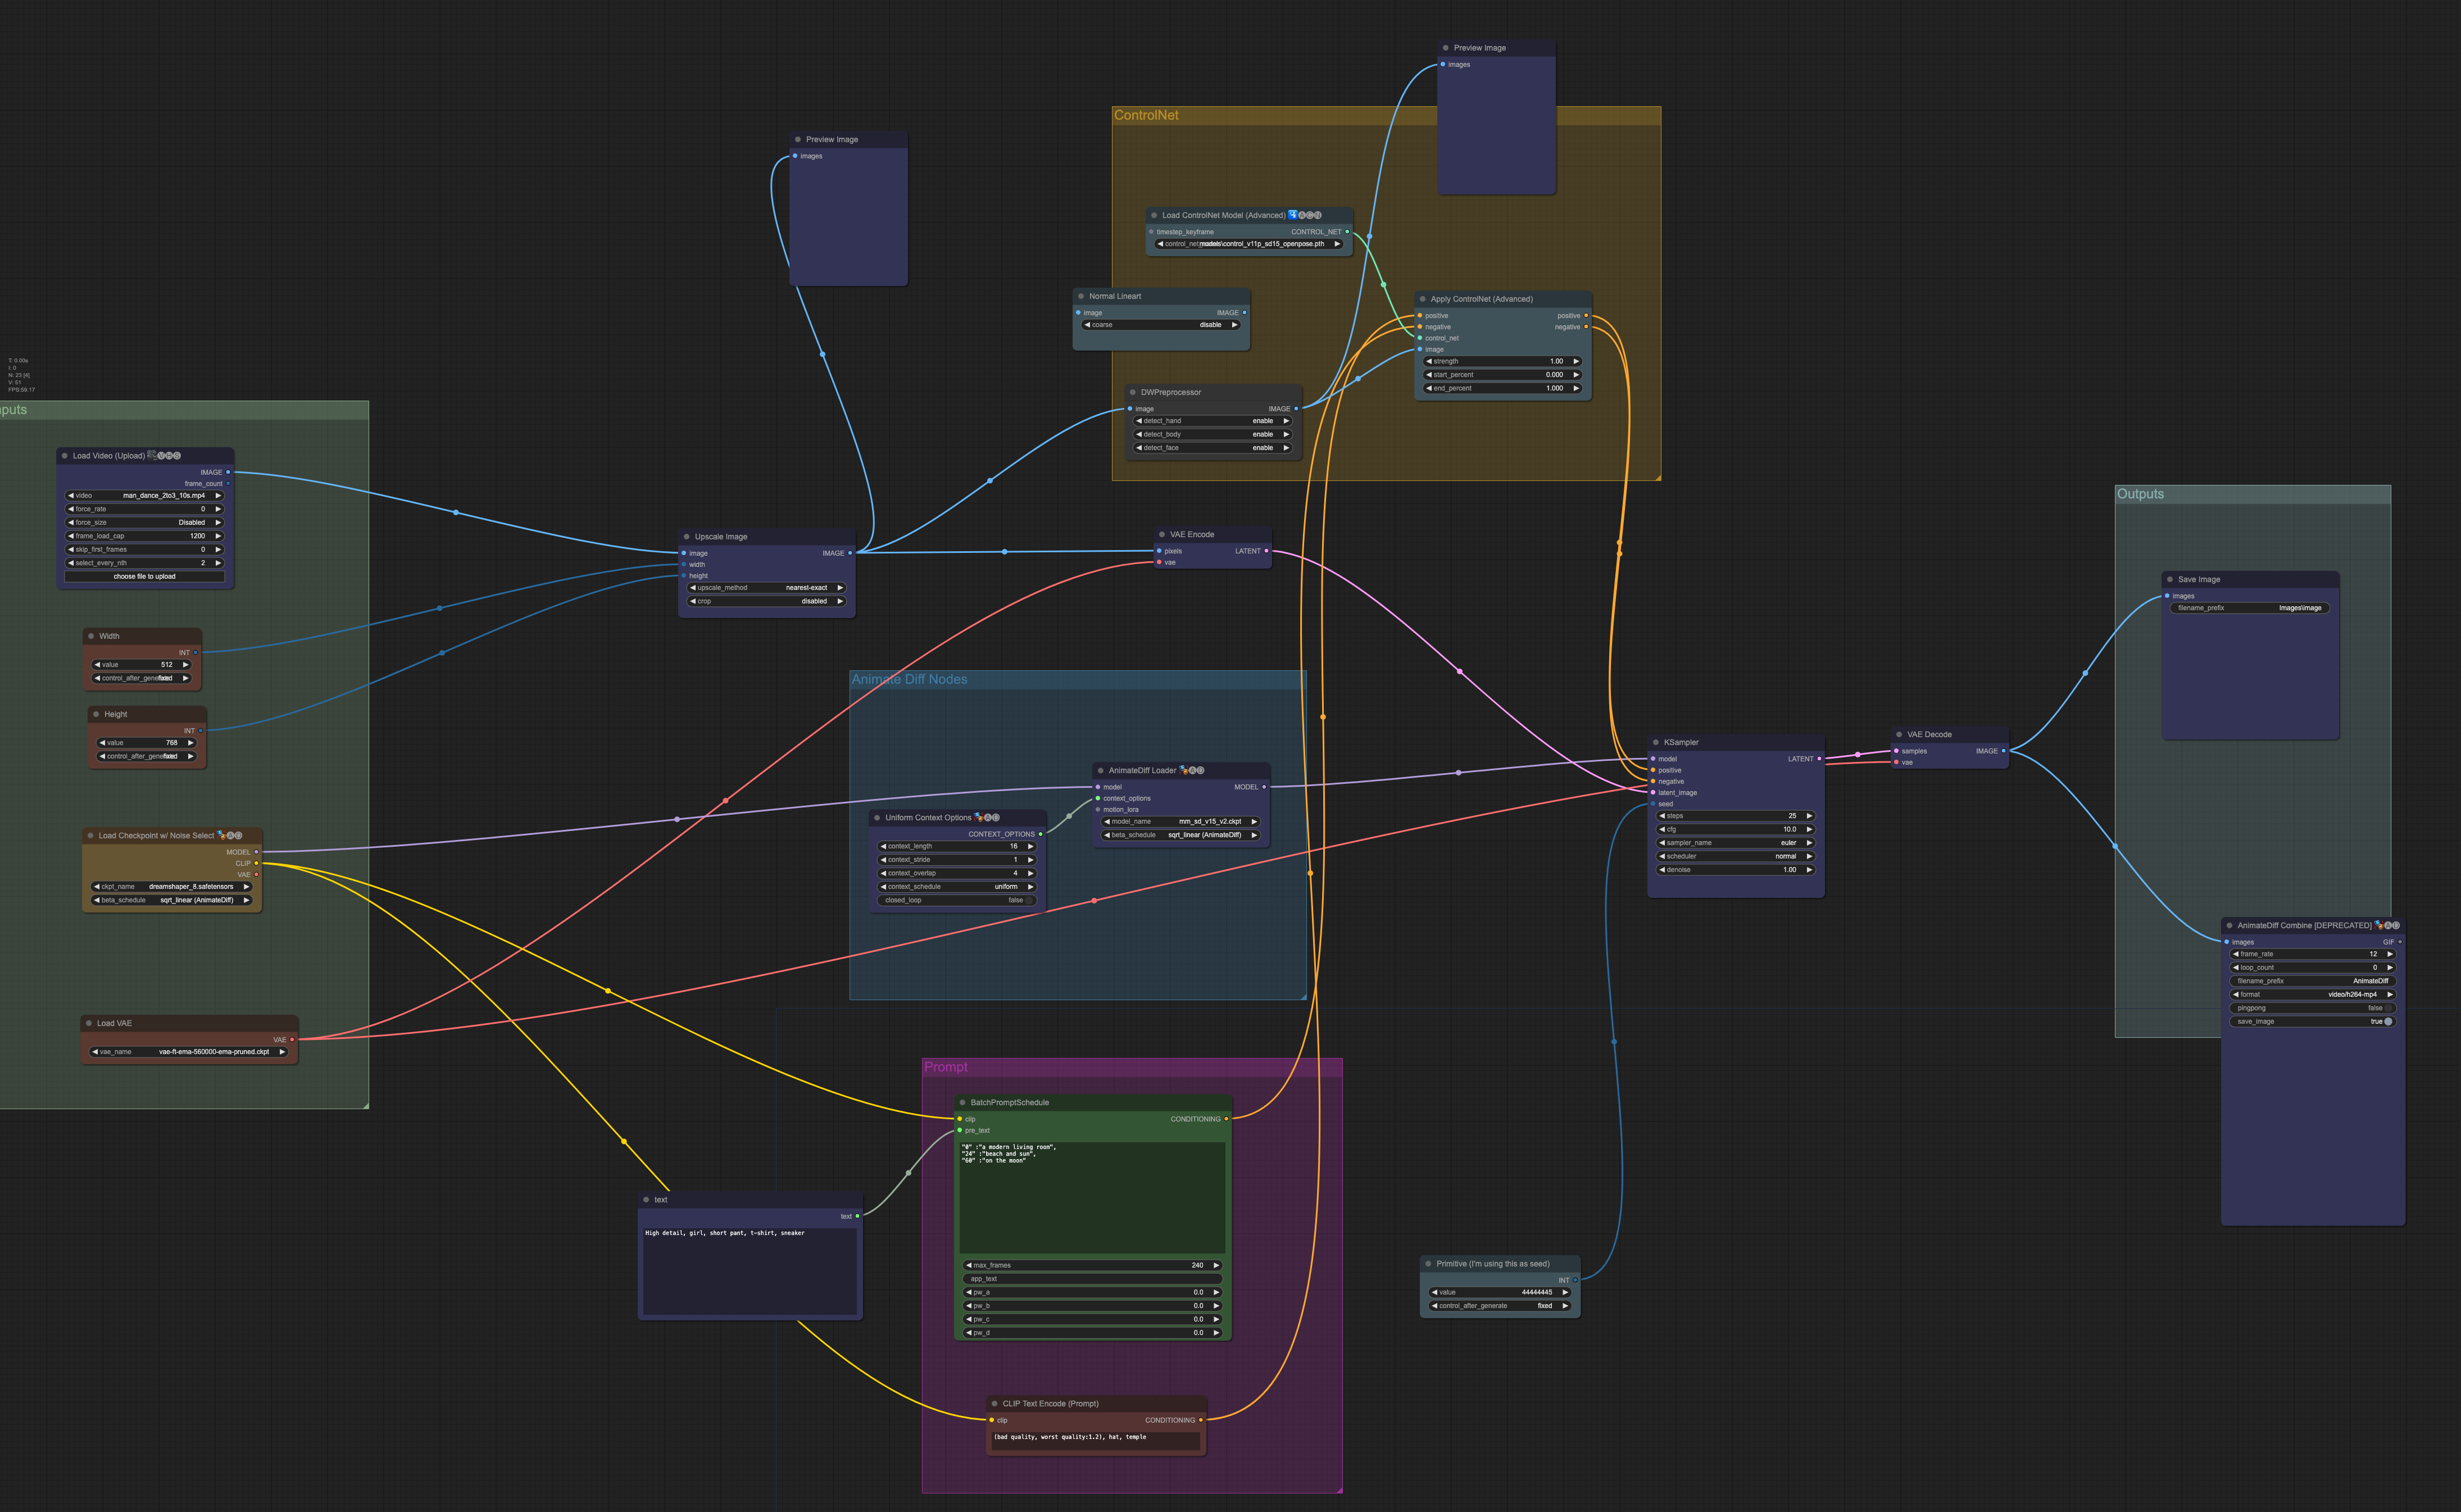
I will provide the ComfyUI workflow file in this section. The workflow does the following:
- Take a video as input
- Applies OpenPose preprocessor to the video frames to extract human poses
- Applies AnimateDiff motion model and ControlNet Openpose control model to each frame
- Supports prompt travel for specifying different prompts to different frames
- Saving the final video
I suggest you to follow this tutorial exactly to reproduce my result before changing for your own.
Step 1. Load the workflow file
A nice feature of ComfyUI is that sharing a workflow is relatively easy. (You will understand the relative part very soon…) The whole workflow is specified in a workflow JSON file.
Download the following workflow JSON file below.
Drag and drop it to CompfyUI’s browser page.
You should see the video-to-video workflow loaded.
Step 2: Install the missing nodes
You likely need to install a few missing nodes that are needed for this workflow. That’s why you need the ComfyUI manager to help you identify them.
Click the ComfyUI Manager button.
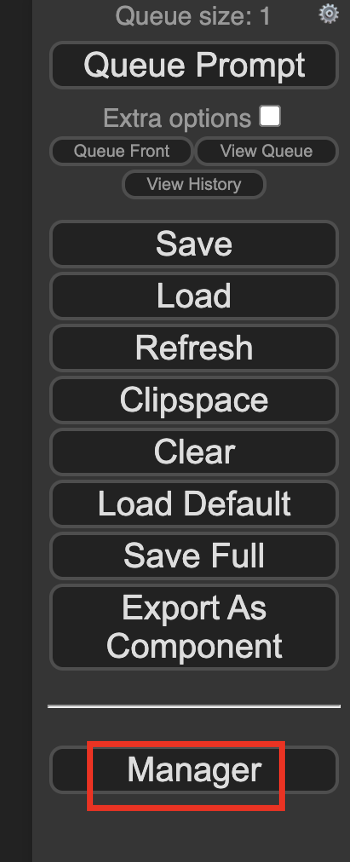
Then click Install Missing Custom Nodes. Install all missing nodes shown.
Update ComfyUI and all nodes by clicking Manager > Update All.
Restart ComfyUI and refresh the ComfyUI page.
Step 3: Select a checkpoint model
Download the checkpoint model Dreamshaper 8. Put the safetensors file in the folder ComfyUI > models > checkpoints.
Refresh the browser tab.
Find the node Load Checkpoint w/ Noise Select.
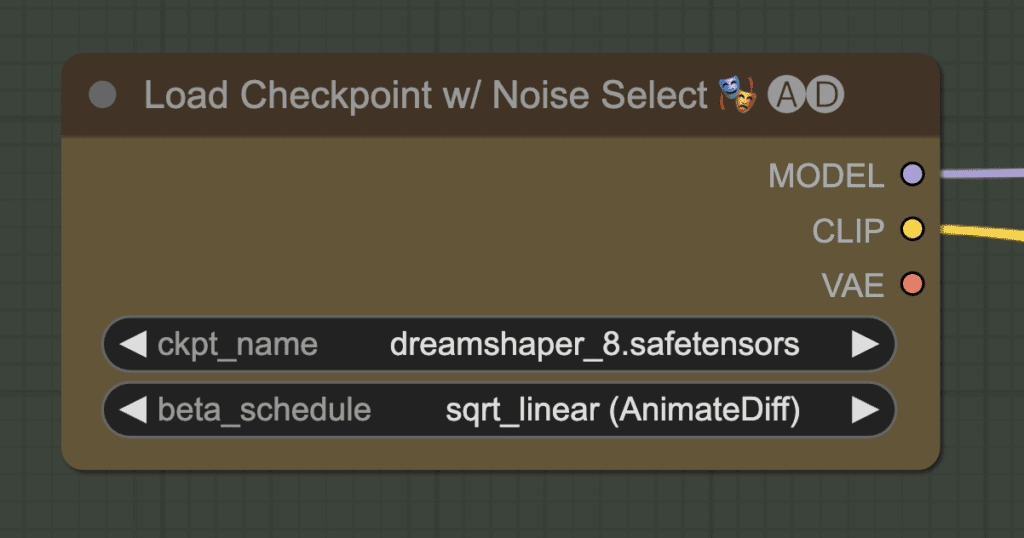
Click the ckpt_name dropdown menu and select dreamshaper_8.safetensors.
You can, of course, use a different model.
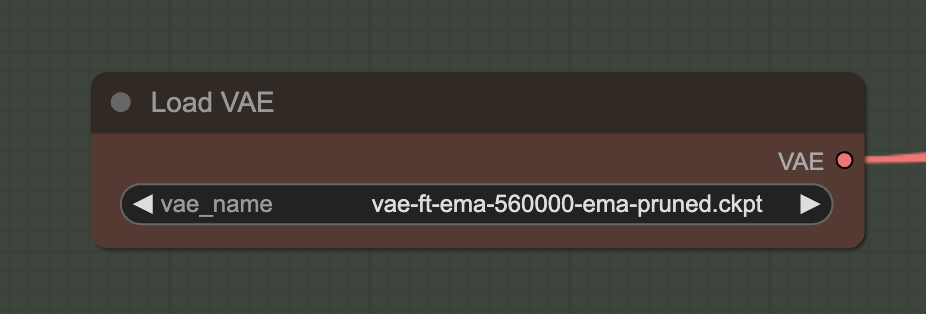
Step 4: Select a VAE
Download the VAE released by Stability AI. Put the file in the folder ComfyUI > models > vae.
Refresh the browser page.
In the Load VAE node, select the file you just downloaded.
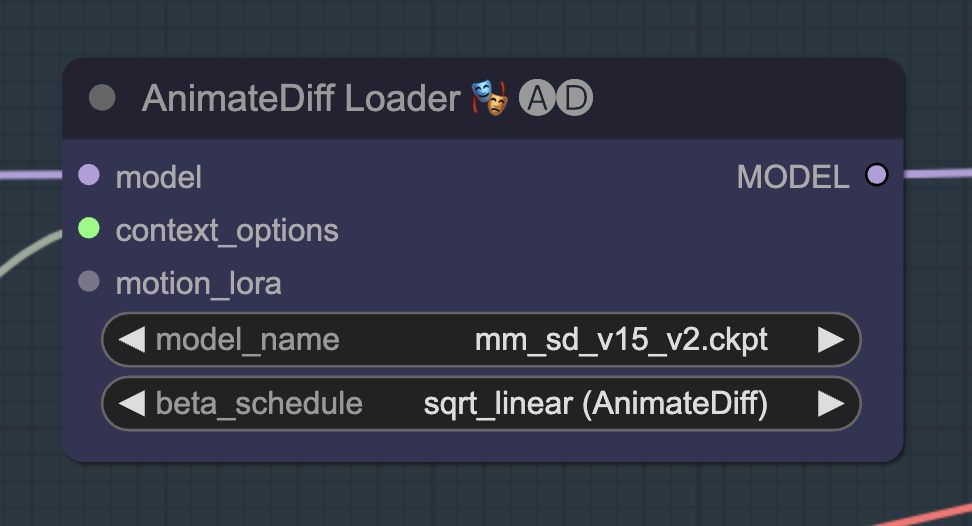
Step 5: Select the AnimateDiff motion module
Download the AnimateDiff v1.5 v2 motion model. Put it in the folder ComfyUI > custom_nodes > ComfyUI-AnimateDiff-Evolved > models.
Refresh the browser page.
In the AnimateDiff Loader node, Select mm_sd_v15_v2.ckpt in the model_name dropdown menu.
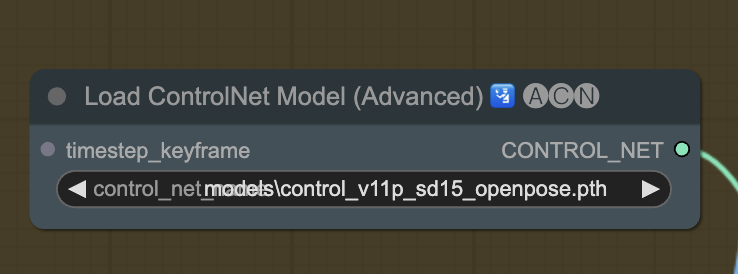
Step 6: Select Openpose ControlNet model
Download the openpose ControlNet model. Put the file in ComfyUI > models > controlnet.
Refresh the ComfyUI page.
In the Load ControlNet Model (Advanced), select control_v11p_sd15_openpose.pth in the dropdown menu.
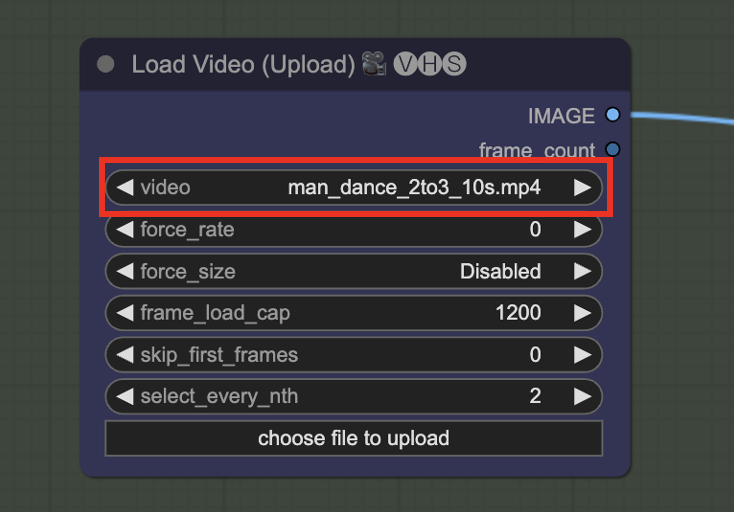
Step 7: Upload the reference video
You can use the following video as input to reproduce my example.
In the Load Video (Upload) node, click video and select the video you just downloaded.
Step 8: Generate the video
Now we are finally in the position to generate a video! Click Queue Prompt to start generating a video.
Watch the terminal console for errors.
It will spend most of the time in the KSampler node. There should be a progress bar indicating the progress. The progress bar is also in the terminal console.
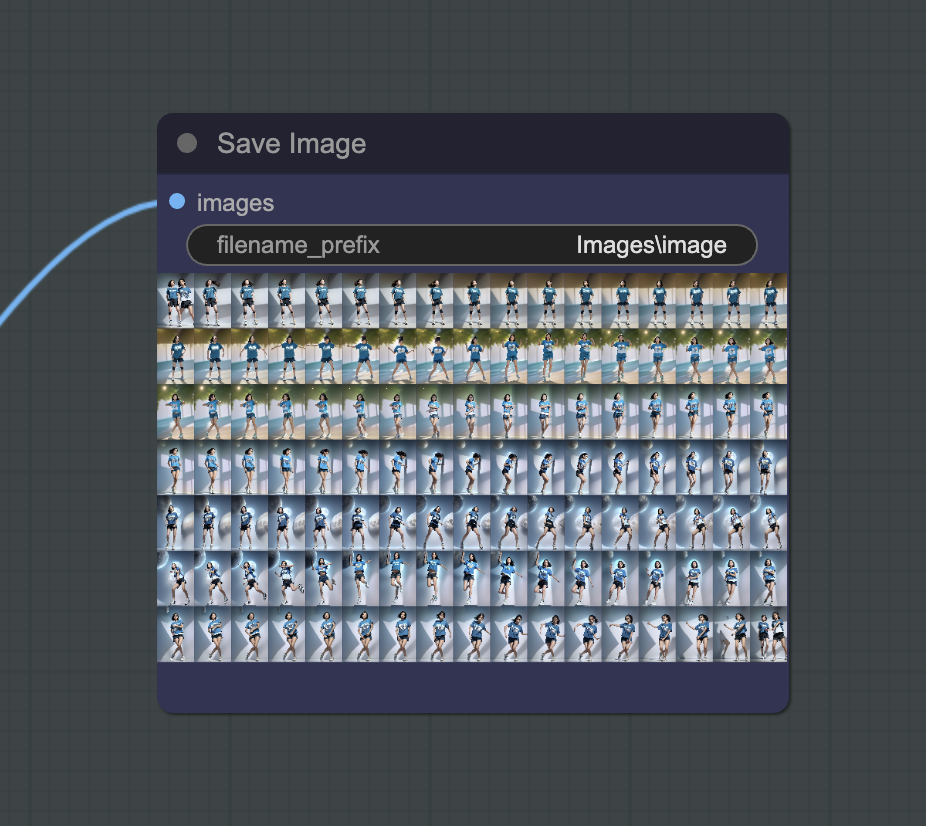
The progress bar will be gone when it is done, and you will see the video appearing in the AnimeDiff Combine node.
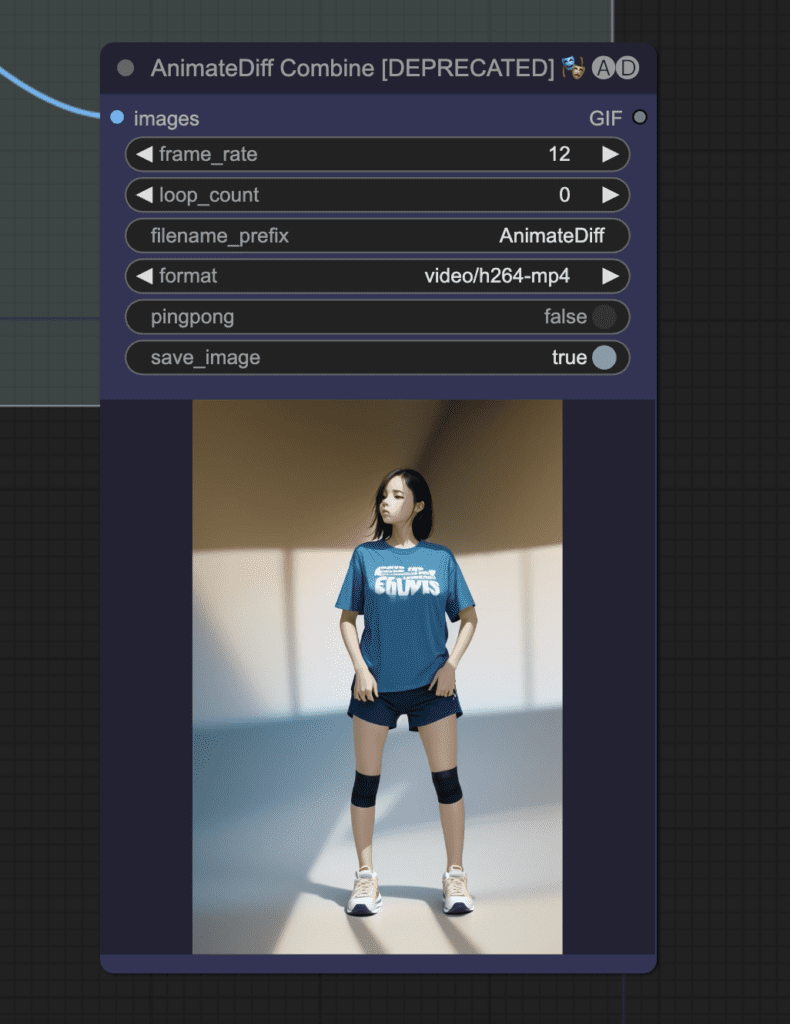
This is what you should get:
Troubleshooting
You can inspect output images from intermediate stages for troubleshooting.
You should see the extracted video frames in a node after Image Upscaling.

You should see the extracted Openpose control images in a node near the ControlNet area.
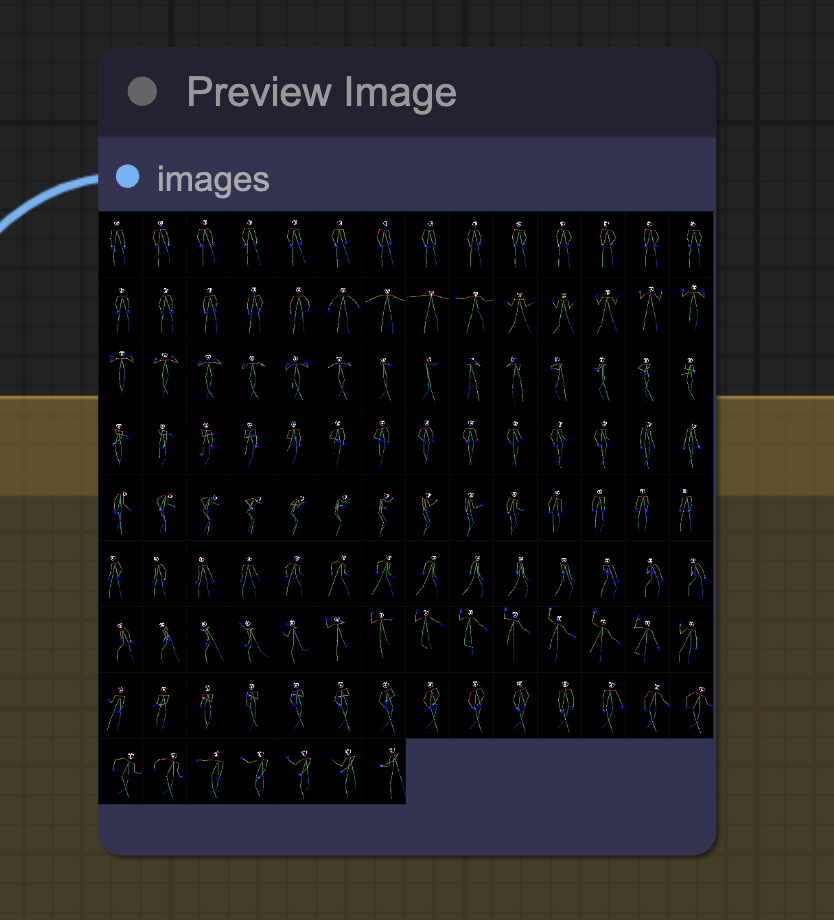
Above the output video, you should see all the frames of the output video. You can further process these images and combine them to form a video.
Customization
Generate a different video.
Change the seed value to generate a different video.

Prompts
Change the prompt prefix and prompt travel to change the subject and background.
The prompt at any frame always starts with the prompt prefix.
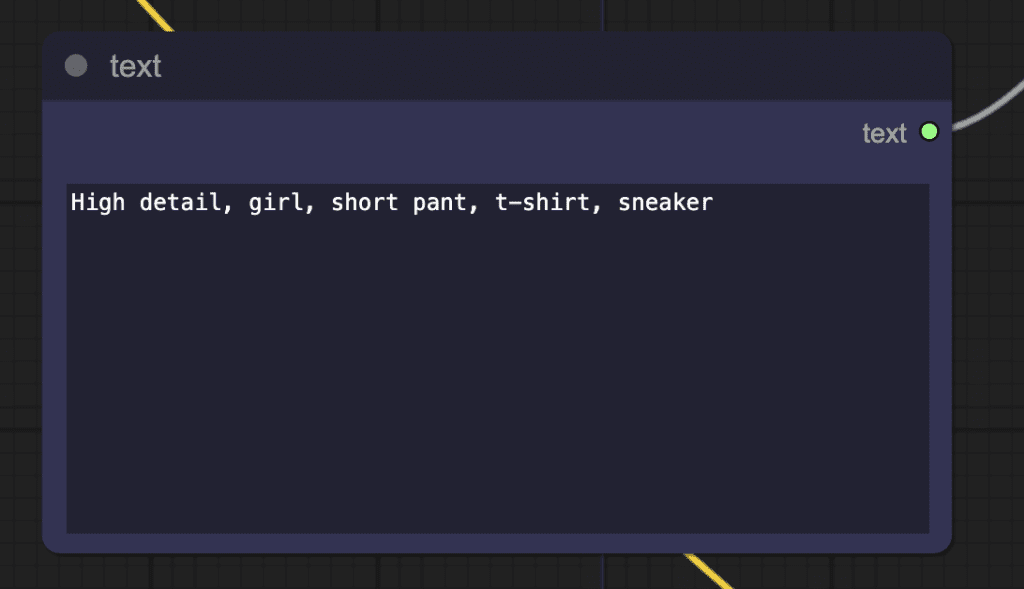
Then the prompt travel is added. The prompt is different at different frames.
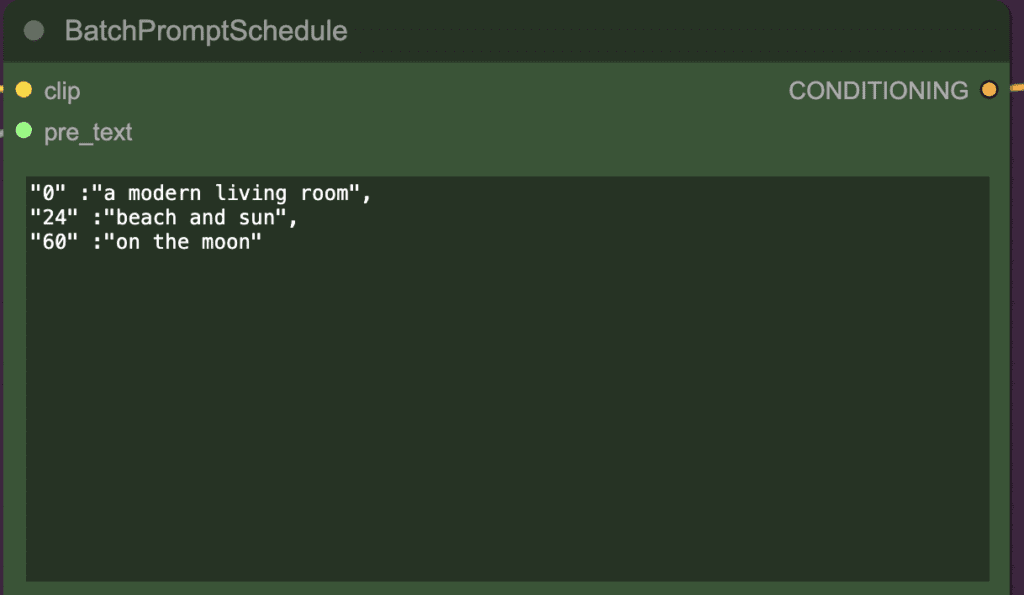
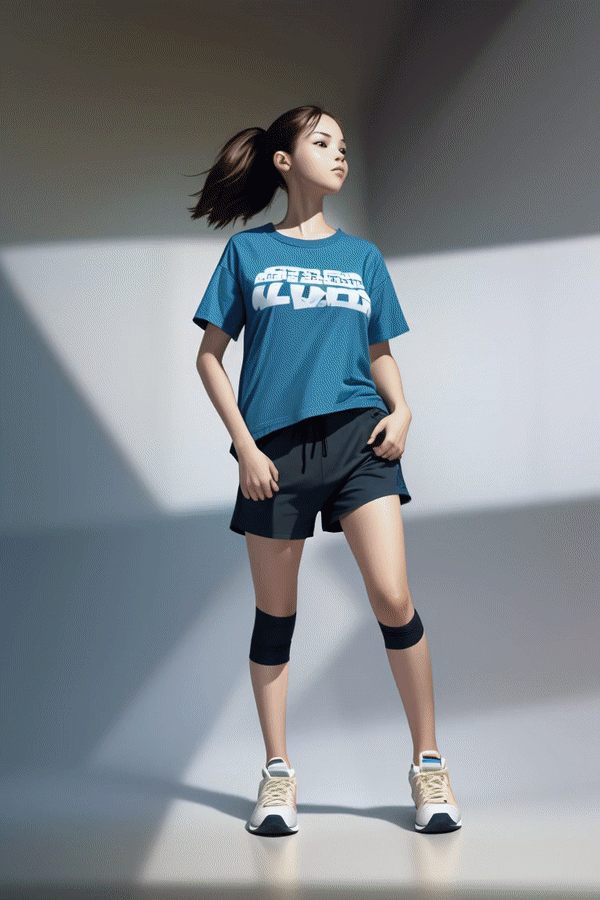
The above prompt settings mean:
In the frames 0 to 23, the prompt is
High detail, girl, short pant, t-shirt, sneaker, a modern living room
In the frames 24 to 59, the prompt is
High detail, girl, short pant, t-shirt, sneaker, beach and sun
In the frames 60 and onward, the prompt is
High detail, girl, short pant, t-shirt, on the moon
That’s why the background is changing in the video.
Video input settings
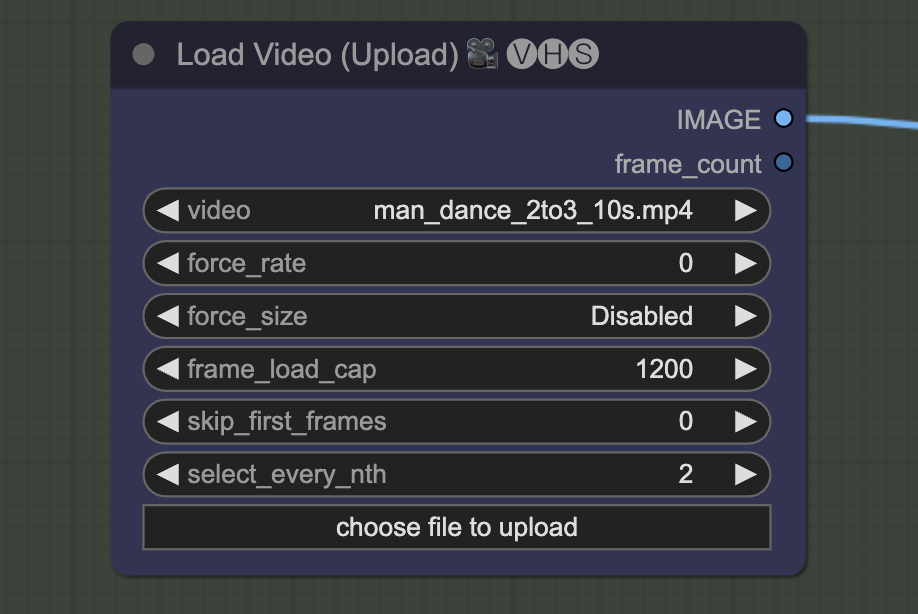
You can set the maximum number of frames you want to load by setting frame_load_cap.
Set select_every_nth to a value higher than 1 to skip frames and speed up rendering. You will need to set the final frame rate of the video accordingly.
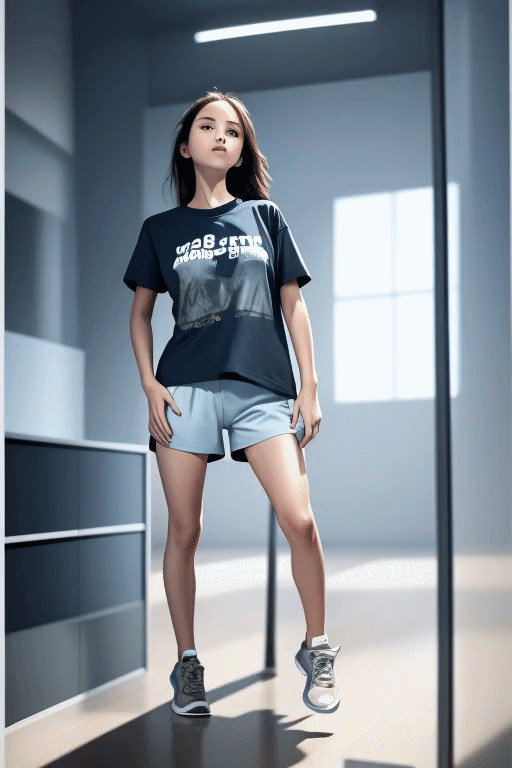
Tips for using AnimateDiff Prompt Travel
Faces
Make sure the faces of the original video are not too small. The workflow uses v1 models. The size of VAE of the v1 models is 512×512 pixels. It cannot paint faces that are too small.
If you must, you will need to increase the width and height of the video.
Below’s the same workflow with the image size increased to 768×1,152 pixels. The face is rendered much better.
Speeding up rendering
Reduce the maximum number of frames (frames_load_cap) in the video input box to set a cap for the length of the video. You especially want to limit it when you are testing settings, so you don’t need to wait too long.
You can also skip frames in the video by setting select_every_nth to other than 1. Setting it at 2 means using every other frame to speed up rendering, in the expense of smoothness.
Models
My experience is that not all checkpoint models are equal. A well-trained model works better with AnimateDiff. So if your model doesn’t work, try experimenting with different models.
Prompt
Since AnimateDiff is trained with a particular dataset, it just doesn’t understand the motion of some keywords in prompts. If you see weird effects, try to identify which keyword(s) give you trouble.
Along this line, it is better to start with a very simple prompt and add to it as needed.
Using Other ControlNets
You can experiment with other ControlNets. The benefit of using OpenPose is that the background is removed. Only the human pose is extracted. So, the background is free to be influenced by the prompt.
On the other hand, using Line art will extract lines for the subject and the background:
So, using line art for styling the video. Adding new elements through prompts is not necessarily easy.
Here’s the workflow ComfyUI JSON file for using line art:
Cropping the input video
You may want to crop the input video so that the person is larger. As mentioned above, Stable Diffusion won’t paint the faces and other details well when the person is too small.
You can use DaVinci Resolve, a free video editing software, to do that. Go to the Edit page and use the Transform function to crop and zoom in on the video.
Creating a side-by-side video
You may want to create a side-by-side video to compare the original and the output video. Many online software can do it for free or for a price. I used DaVinci Resolve. Likewise, it can be done through the Edit > Transform functions.
Hello, I have followed this tutorial and have combed the comments for this issue but to no avail.. I am recieving an error:
Using pytorch attention in VAE
Using pytorch attention in VAE
VAE load device: cuda:0, offload device: cpu, dtype: torch.bfloat16
CLIP/text encoder model load device: cuda:0, offload device: cpu, current: cpu, dtype: torch.float16
Requested to load SD1ClipModel
loaded completely 20519.242918777465 235.84423828125 True
!!! Exception during processing !!! torch.cat(): expected a non-empty list of Tensors
Traceback (most recent call last):
RuntimeError: torch.cat(): expected a non-empty list of Tensors
Please if you have time could you shed light onto this issue- i have tried updating comfy but no success
NVM 🙂 i fixed it- if someone else encounters this please change your end frame time in batch prompt schedule
my background drastically change every frame. it’s still the modern room but every frame is different.
How achieve smooth transition of background frames like on sample?
Error occurred when executing KSampler:
Allocation on device
File “F:\comfy ui\ComfyUI_windows_portable\ComfyUI\execution.py”, line 151, in recursive_execute
output_data, output_ui = get_output_data(obj, input_data_all)
File “F:\comfy ui\ComfyUI_windows_portable\ComfyUI\execution.py”, line 81, in get_output_data
return_values = map_node_over_list(obj, input_data_all, obj.FUNCTION, allow_interrupt=True)
File “F:\comfy ui\ComfyUI_windows_portable\ComfyUI\execution.py”, line 74, in map_node_over_list
results.append(getattr(obj, func)(**slice_dict(input_data_all, i)))
File “F:\comfy ui\ComfyUI_windows_portable\ComfyUI\nodes.py”, line 1344, in sample
return common_ksampler(model, seed, steps, cfg, sampler_name, scheduler, positive, negative, latent_image, denoise=denoise)
File “F:\comfy ui\ComfyUI_windows_portable\ComfyUI\nodes.py”, line 1314, in common_ksampler
samples = comfy.sample.sample(model, noise, steps, cfg, sampler_name, scheduler, positive, negative, latent_image,
File “F:\comfy ui\ComfyUI_windows_portable\ComfyUI\custom_nodes\ComfyUI-Impact-Pack\modules\impact\sample_error_enhancer.py”, line 22, in informative_sample
raise e
File “F:\comfy ui\ComfyUI_windows_portable\ComfyUI\custom_nodes\ComfyUI-Impact-Pack\modules\impact\sample_error_enhancer.py”, line 9, in informative_sample
return original_sample(*args, **kwargs) # This code helps interpret error messages that occur within exceptions but does not have any impact on other operations.
File “F:\comfy ui\ComfyUI_windows_portable\ComfyUI\custom_nodes\ComfyUI-AnimateDiff-Evolved\animatediff\sampling.py”, line 419, in motion_sample
latents = orig_comfy_sample(model, noise, *args, **kwargs)
File “F:\comfy ui\ComfyUI_windows_portable\ComfyUI\custom_nodes\ComfyUI-Advanced-ControlNet\adv_control\control_reference.py”, line 47, in refcn_sample
return orig_comfy_sample(model, *args, **kwargs)
File “F:\comfy ui\ComfyUI_windows_portable\ComfyUI\custom_nodes\ComfyUI-Advanced-ControlNet\adv_control\utils.py”, line 111, in uncond_multiplier_check_cn_sample
return orig_comfy_sample(model, *args, **kwargs)
File “F:\comfy ui\ComfyUI_windows_portable\ComfyUI\comfy\sample.py”, line 37, in sample
samples = sampler.sample(noise, positive, negative, cfg=cfg, latent_image=latent_image, start_step=start_step, last_step=last_step, force_full_denoise=force_full_denoise, denoise_mask=noise_mask, sigmas=sigmas, callback=callback, disable_pbar=disable_pbar, seed=seed)
File “F:\comfy ui\ComfyUI_windows_portable\ComfyUI\comfy\samplers.py”, line 761, in sample
return sample(self.model, noise, positive, negative, cfg, self.device, sampler, sigmas, self.model_options, latent_image=latent_image, denoise_mask=denoise_mask, callback=callback, disable_pbar=disable_pbar, seed=seed)
File “F:\comfy ui\ComfyUI_windows_portable\ComfyUI\comfy\samplers.py”, line 663, in sample
return cfg_guider.sample(noise, latent_image, sampler, sigmas, denoise_mask, callback, disable_pbar, seed)
File “F:\comfy ui\ComfyUI_windows_portable\ComfyUI\comfy\samplers.py”, line 650, in sample
output = self.inner_sample(noise, latent_image, device, sampler, sigmas, denoise_mask, callback, disable_pbar, seed)
File “F:\comfy ui\ComfyUI_windows_portable\ComfyUI\comfy\samplers.py”, line 629, in inner_sample
samples = sampler.sample(self, sigmas, extra_args, callback, noise, latent_image, denoise_mask, disable_pbar)
File “F:\comfy ui\ComfyUI_windows_portable\ComfyUI\comfy\samplers.py”, line 534, in sample
samples = self.sampler_function(model_k, noise, sigmas, extra_args=extra_args, callback=k_callback, disable=disable_pbar, **self.extra_options)
File “F:\comfy ui\ComfyUI_windows_portable\python_embeded\lib\site-packages\torch\utils\_contextlib.py”, line 115, in decorate_context
return func(*args, **kwargs)
File “F:\comfy ui\ComfyUI_windows_portable\ComfyUI\comfy\k_diffusion\sampling.py”, line 137, in sample_euler
denoised = model(x, sigma_hat * s_in, **extra_args)
File “F:\comfy ui\ComfyUI_windows_portable\ComfyUI\comfy\samplers.py”, line 272, in __call__
out = self.inner_model(x, sigma, model_options=model_options, seed=seed)
File “F:\comfy ui\ComfyUI_windows_portable\ComfyUI\comfy\samplers.py”, line 616, in __call__
return self.predict_noise(*args, **kwargs)
File “F:\comfy ui\ComfyUI_windows_portable\ComfyUI\comfy\samplers.py”, line 619, in predict_noise
return sampling_function(self.inner_model, x, timestep, self.conds.get(“negative”, None), self.conds.get(“positive”, None), self.cfg, model_options=model_options, seed=seed)
File “F:\comfy ui\ComfyUI_windows_portable\ComfyUI\custom_nodes\ComfyUI-AnimateDiff-Evolved\animatediff\sampling.py”, line 456, in evolved_sampling_function
cond_pred, uncond_pred = sliding_calc_conds_batch(model, [cond, uncond_], x, timestep, model_options)
File “F:\comfy ui\ComfyUI_windows_portable\ComfyUI\custom_nodes\ComfyUI-AnimateDiff-Evolved\animatediff\sampling.py”, line 593, in sliding_calc_conds_batch
sub_conds_out = calc_cond_uncond_batch_wrapper(model, sub_conds, sub_x, sub_timestep, model_options)
File “F:\comfy ui\ComfyUI_windows_portable\ComfyUI\custom_nodes\ComfyUI-AnimateDiff-Evolved\animatediff\sampling.py”, line 653, in calc_cond_uncond_batch_wrapper
return comfy.samplers.calc_cond_batch(model, conds, x_in, timestep, model_options)
File “F:\comfy ui\ComfyUI_windows_portable\ComfyUI\comfy\samplers.py”, line 218, in calc_cond_batch
output = model.apply_model(input_x, timestep_, **c).chunk(batch_chunks)
File “F:\comfy ui\ComfyUI_windows_portable\ComfyUI\custom_nodes\ComfyUI-Advanced-ControlNet\adv_control\utils.py”, line 63, in apply_model_uncond_cleanup_wrapper
return orig_apply_model(self, *args, **kwargs)
File “F:\comfy ui\ComfyUI_windows_portable\ComfyUI\comfy\model_base.py”, line 97, in apply_model
model_output = self.diffusion_model(xc, t, context=context, control=control, transformer_options=transformer_options, **extra_conds).float()
File “F:\comfy ui\ComfyUI_windows_portable\python_embeded\lib\site-packages\torch\nn\modules\module.py”, line 1532, in _wrapped_call_impl
return self._call_impl(*args, **kwargs)
File “F:\comfy ui\ComfyUI_windows_portable\python_embeded\lib\site-packages\torch\nn\modules\module.py”, line 1541, in _call_impl
return forward_call(*args, **kwargs)
File “F:\comfy ui\ComfyUI_windows_portable\ComfyUI\comfy\ldm\modules\diffusionmodules\openaimodel.py”, line 852, in forward
h = forward_timestep_embed(module, h, emb, context, transformer_options, time_context=time_context, num_video_frames=num_video_frames, image_only_indicator=image_only_indicator)
File “F:\comfy ui\ComfyUI_windows_portable\ComfyUI\custom_nodes\ComfyUI-AnimateDiff-Evolved\animatediff\sampling.py”, line 140, in forward_timestep_embed
x = layer(x, context, transformer_options)
File “F:\comfy ui\ComfyUI_windows_portable\python_embeded\lib\site-packages\torch\nn\modules\module.py”, line 1532, in _wrapped_call_impl
return self._call_impl(*args, **kwargs)
File “F:\comfy ui\ComfyUI_windows_portable\python_embeded\lib\site-packages\torch\nn\modules\module.py”, line 1541, in _call_impl
return forward_call(*args, **kwargs)
File “F:\comfy ui\ComfyUI_windows_portable\ComfyUI\comfy\ldm\modules\attention.py”, line 644, in forward
x = block(x, context=context[i], transformer_options=transformer_options)
File “F:\comfy ui\ComfyUI_windows_portable\python_embeded\lib\site-packages\torch\nn\modules\module.py”, line 1532, in _wrapped_call_impl
return self._call_impl(*args, **kwargs)
File “F:\comfy ui\ComfyUI_windows_portable\python_embeded\lib\site-packages\torch\nn\modules\module.py”, line 1541, in _call_impl
return forward_call(*args, **kwargs)
File “F:\comfy ui\ComfyUI_windows_portable\ComfyUI\comfy\ldm\modules\attention.py”, line 581, in forward
x = self.ff(self.norm3(x))
File “F:\comfy ui\ComfyUI_windows_portable\python_embeded\lib\site-packages\torch\nn\modules\module.py”, line 1532, in _wrapped_call_impl
return self._call_impl(*args, **kwargs)
File “F:\comfy ui\ComfyUI_windows_portable\python_embeded\lib\site-packages\torch\nn\modules\module.py”, line 1541, in _call_impl
return forward_call(*args, **kwargs)
File “F:\comfy ui\ComfyUI_windows_portable\ComfyUI\comfy\ldm\modules\attention.py”, line 84, in forward
return self.net(x)
File “F:\comfy ui\ComfyUI_windows_portable\python_embeded\lib\site-packages\torch\nn\modules\module.py”, line 1532, in _wrapped_call_impl
return self._call_impl(*args, **kwargs)
File “F:\comfy ui\ComfyUI_windows_portable\python_embeded\lib\site-packages\torch\nn\modules\module.py”, line 1541, in _call_impl
return forward_call(*args, **kwargs)
File “F:\comfy ui\ComfyUI_windows_portable\python_embeded\lib\site-packages\torch\nn\modules\container.py”, line 217, in forward
input = module(input)
File “F:\comfy ui\ComfyUI_windows_portable\python_embeded\lib\site-packages\torch\nn\modules\module.py”, line 1532, in _wrapped_call_impl
return self._call_impl(*args, **kwargs)
File “F:\comfy ui\ComfyUI_windows_portable\python_embeded\lib\site-packages\torch\nn\modules\module.py”, line 1541, in _call_impl
return forward_call(*args, **kwargs)
File “F:\comfy ui\ComfyUI_windows_portable\ComfyUI\comfy\ldm\modules\attention.py”, line 64, in forward
return x * F.gelu(gate)
Hmm. 4356s/it (on an nvidia 1070, fresh boot, updated everything, focus on terminal window.) Not really practical at that rate. Maybe it’d work better on a video smaller than 1080×1620? I’m a little disappointed, the A1111 tut for animatediff wasn’t working either (wouldn’t even show up in the webUI txt2img or img2img, fresh boot, firefox if that matters.) Oh well, I guess I’ll try to find some other tuts before I completely write it off. Looks like a promising technique if I could get it to work.
Great tutorial, as usual!
Im having trouble installing one of the nodes in your workflow though.
the DWPreprocessor
i get : (IMPORT FAILED) ComfyUI Nodes for Inference.Core
can someone help?
Andrew, Thanks for this. I got it to work. But I am not happy with result. Face is not consistent frame to frame. Some artifacts like extra arm for a second. Any tips on making the video come out smooth, non-jerky and consistent.
This is the limitation of this workflow. You can try this ComfyUI video workflow with face fix.
I get the following error when moving from the ControlNet to the AnimateDiff section of the workflow.
Error occurred when executing ControlNetLoaderAdvanced:
Weights only load failed. Re-running `torch.load` with `weights_only` set to `False` will likely succeed, but it can result in arbitrary code execution.Do it only if you get the file from a trusted source. WeightsUnpickler error: Unsupported operand 60
File “C:\T2I\ComfyUI_windows_portable\ComfyUI\execution.py”, line 151, in recursive_execute
output_data, output_ui = get_output_data(obj, input_data_all)
File “C:\T2I\ComfyUI_windows_portable\ComfyUI\execution.py”, line 81, in get_output_data
return_values = map_node_over_list(obj, input_data_all, obj.FUNCTION, allow_interrupt=True)
File “C:\T2I\ComfyUI_windows_portable\ComfyUI\execution.py”, line 74, in map_node_over_list
results.append(getattr(obj, func)(**slice_dict(input_data_all, i)))
File “C:\T2I\ComfyUI_windows_portable\ComfyUI\custom_nodes\ComfyUI-Advanced-ControlNet\adv_control\nodes.py”, line 90, in load_controlnet
controlnet = load_controlnet(controlnet_path, timestep_keyframe)
File “C:\T2I\ComfyUI_windows_portable\ComfyUI\custom_nodes\ComfyUI-Advanced-ControlNet\adv_control\control.py”, line 513, in load_controlnet
controlnet_data = comfy.utils.load_torch_file(ckpt_path, safe_load=True)
File “C:\T2I\ComfyUI_windows_portable\ComfyUI\comfy\utils.py”, line 20, in load_torch_file
pl_sd = torch.load(ckpt, map_location=device, weights_only=True)
File “C:\T2I\ComfyUI_windows_portable\python_embeded\lib\site-packages\torch\serialization.py”, line 1039, in load
raise pickle.UnpicklingError(UNSAFE_MESSAGE + str(e)) from None
It complains your controlnet model contains a malicious codes. Try redownload the file from a trusted source.
I downloaded it from the links here.
That’s the one should work. You can try downloading again.
https://huggingface.co/lllyasviel/ControlNet-v1-1/blob/main/control_v11p_sd15_openpose.pth
I tried using the file you linked above. This is the beginning of the error I get in the UI. There are more files listed in the UI error, and more in the terminal error:
Error occurred when executing ADE_AnimateDiffLoaderWithContext:
Weights only load failed. Re-running `torch.load` with `weights_only` set to `False` will likely succeed, but it can result in arbitrary code execution.Do it only if you get the file from a trusted source. WeightsUnpickler error: Unsupported operand 60
Hello!
I just downloaded the workflow and tried it. Added the missing custom nodes and am using the test video.
In the cmd prompt window that is still open it gets this far:
DWPose: Bbox 520.30ms
DWPose: Pose 94.70ms on 1 people
Prompt executed in 72.17 seconds
I can see the preview images and the controlnet images, but there are none main Output box by Save image.
It just seems to stop, but I don’t see any errrors.
Help?
Thanks,
V
I have noticed some Comfyui boxes have a red line around them. What does this mean?
When I started Comfyui up I saw:
Total VRAM 8188 MB, total RAM 15553 MB
Set vram state to: NORMAL_VRAM
Device: cuda:0 NVIDIA GeForce RTX 4070 Laptop GPU : cudaMallocAsync
VAE dtype: torch.bfloat16
Using pytorch cross attention
[AnimateDiffEvo] – ERROR – No motion models found. Please download one and place in: [‘C:\\Users\\vivek\\Python\\new_ComfyUI_windows_portable_nvidia_cu121_or_cpu\\ComfyUI_windows_portable\\ComfyUI\\custom_nodes\\ComfyUI-AnimateDiff-Evolved-main\\models’]
you know these workflows so much better when I actually READ what to do and download the right files and put them in the right place! IT WORKS!
(thnx 4 yer patience)
lol. Glad that it works for you!
Hi Veep Peep,
what are the changes you have made? my terminal is stuck with a similar logs
DWPose: Bbox 519.97ms
DWPose: Pose 95.51ms on 1 people
DWPose: Bbox 517.51ms
Prompt executed in 71.79 seconds
no progress after that
Hello, I used the configuration mentioned above, but when I switched to a different input video, the generated effects became quite unstable, especially the facial effects, which resulted in something resembling a ghost face. Are there any special configurations that I need to be aware of?
While I was able to run this wf recently, now I’m getting the following error:
\ComfyUI_windows_portable\ComfyUI\comfy\cldm\cldm.py”, line 295, in forward
assert y.shape[0] == x.shape[0]
AttributeError: ‘NoneType’ object has no attribute ‘shape’
Any ideas?
Not sure about this specific error. But when there are issues in comfyui, update all nodes and comfyui usually resolves it.
Experienced AUTO1111 artist here who finally dove into ComfyUI in the last 24 hours. Ran across this tutorial, and I got this working right out of the gate. Thanks for the great tutorial, and thanks for sharing your workflows and tips!
Is this can be done with Automatic 1111?
I get: (IMPORT FAILED) ComfyUI-VideoHelperSuite from installing the missing custom nodes. I tried to uninstall and install again, reload and refresh. Same error!
Is there anyway to clear out the videos from the input node? As I upload new ones, I see this node keeps the old ones too. Clear, refresh, etc. does not clear them, and I want to start fresh. Thanks.
The uploaded videos are saved in the input folder in comfyui. You can delete them to remove them from the list.
Hi Andrew. I ran this ComfyUI wf perfect to completion with no errors in the log. However no video was produced, I’m assuming because the AnimateDiff Combine [DEPRICATED] format reads ‘image/gif’ or ‘image/webp’ instead of ‘video/h264-mp4’. ‘video/h264-mp4’ is not an option in the drop down. What must I do to correct?
The last node is outdated. I updated the json file to v2 to use the recommended node.
Hi Andrew, I am getting an issue with the BatchPromptScheduler, not sure why it is throwing a list index out of range error:
ERROR:root:!!! Exception during processing !!!
ERROR:root:Traceback (most recent call last):
File “C:\Users\lawll\ComfyUI_windows_portable\ComfyUI\execution.py”, line 153, in recursive_execute
output_data, output_ui = get_output_data(obj, input_data_all)
File “C:\Users\lawll\ComfyUI_windows_portable\ComfyUI\execution.py”, line 83, in get_output_data
return_values = map_node_over_list(obj, input_data_all, obj.FUNCTION, allow_interrupt=True)
File “C:\Users\lawll\ComfyUI_windows_portable\ComfyUI\execution.py”, line 76, in map_node_over_list
results.append(getattr(obj, func)(**slice_dict(input_data_all, i)))
File “C:\Users\lawll\ComfyUI_windows_portable\ComfyUI\custom_nodes\ComfyUI_FizzNodes\ScheduledNodes.py”, line 124, in animate
pos_cur_prompt, pos_nxt_prompt, weight = interpolate_prompt_series(pos, max_frames, start_frame, pre_text, app_text, pw_a, pw_b, pw_c, pw_d, print_output)
File “C:\Users\lawll\ComfyUI_windows_portable\ComfyUI\custom_nodes\ComfyUI_FizzNodes\BatchFuncs.py”, line 79, in interpolate_prompt_series
if sorted_prompts[0][0] != “0”:
IndexError: list index out of range
In BatchPromptScheduler, it should remain “0”:”” at least, can’t remove everything, maybe problem caused by that.
Check you VAE model!
The prompt travel wasn’t working for me, but I got it to work by changing max_frames in the Batch Prompt Schedule node to 104 (the actual number of frames).
Thanks! for this tutorial. I have applied all the steps but still not getting the similar poses in generated video. Dont know what I am doing wrong. Can you please help.
Thank you for the tutorial. I tried this one and a lot of others and mode my own workflows, but always for some reason every 16 frames the picture changes drastically. For example the girl gets a completely different closing. What could help me with that?
the prompt maybe too long.
Hi, I’m also having trouble getting the background to animate, following this tutorial step-by-step and changing nothing, using the specified source input.
What a great tutorial, thanks so much! I’ve been looking for something like this.
I got everything working except the prompt travel. The background didn’t change. Any ideas?
I was also able to add face detailer into the pipeline to improve the face quality.
It’s an amazing tutorial.
I have the same problem the resulting video looks nice, but the background does not change at all.
does the prompt used in later frame changes the character? The workflow itself uses prompt travel. The prompt is interpolated between two time points.
Hi. I’m getting error …
The size of tensor a (1280) must match the size of tensor b (640) at non-singleton dimension 1
[AnimateDiffEvo] – INFO – Ejecting motion module mm_sd_v15_v2.ckpt version v2.
[AnimateDiffEvo] – INFO – Cleaning motion module from unet.
[AnimateDiffEvo] – INFO – Removing motion module mm_sd_v15_v2.ckpt from cache
ERROR:root:!!! Exception during processing !!!
ERROR:root:Traceback (most recent call last):
File “C:\ComfyUI_windows_portable\ComfyUI\execution.py”, line 153, in recursive_execute
output_data, output_ui = get_output_data(obj, input_data_all)
File “C:\ComfyUI_windows_portable\ComfyUI\execution.py”, line 83, in get_output_data
return_values = map_node_over_list(obj, input_data_all, obj.FUNCTION, allow_interrupt=True)
File “C:\ComfyUI_windows_portable\ComfyUI\execution.py”, line 76, in map_node_over_list
results.append(getattr(obj, func)(**slice_dict(input_data_all, i)))
File “C:\ComfyUI_windows_portable\ComfyUI\nodes.py”, line 1237, in sample
return common_ksampler(model, seed, steps, cfg, sampler_name, scheduler, positive, negative, latent_image, denoise=denoise)
File “C:\ComfyUI_windows_portable\ComfyUI\nodes.py”, line 1207, in common_ksampler
samples = comfy.sample.sample(model, noise, steps, cfg, sampler_name, scheduler, positive, negative, latent_image,
File “C:\ComfyUI_windows_portable\ComfyUI\custom_nodes\ComfyUI-AnimateDiff-Evolved\animatediff\sampling.py”, line 190, in animatediff_sample
return wrap_function_to_inject_xformers_bug_info(orig_comfy_sample)(model, *args, **kwargs)
File “C:\ComfyUI_windows_portable\ComfyUI\custom_nodes\ComfyUI-AnimateDiff-Evolved\animatediff\model_utils.py”, line 190, in wrapped_function
return function_to_wrap(*args, **kwargs)
File “C:\ComfyUI_windows_portable\ComfyUI\comfy\sample.py”, line 100, in sample
samples = sampler.sample(noise, positive_copy, negative_copy, cfg=cfg, latent_image=latent_image, start_step=start_step, last_step=last_step, force_full_denoise=force_full_denoise, denoise_mask=noise_mask, sigmas=sigmas, callback=callback, disable_pbar=disable_pbar, seed=seed)
File “C:\ComfyUI_windows_portable\ComfyUI\comfy\samplers.py”, line 691, in sample
return sample(self.model, noise, positive, negative, cfg, self.device, sampler(), sigmas, self.model_options, latent_image=latent_image, denoise_mask=denoise_mask, callback=callback, disable_pbar=disable_pbar, seed=seed)
File “C:\ComfyUI_windows_portable\ComfyUI\comfy\samplers.py”, line 597, in sample
samples = sampler.sample(model_wrap, sigmas, extra_args, callback, noise, latent_image, denoise_mask, disable_pbar)
File “C:\ComfyUI_windows_portable\ComfyUI\comfy\samplers.py”, line 557, in sample
samples = getattr(k_diffusion_sampling, “sample_{}”.format(sampler_name))(model_k, noise, sigmas, extra_args=extra_args, callback=k_callback, disable=disable_pbar, **extra_options)
File “C:\ComfyUI_windows_portable\python_embeded\lib\site-packages\torch\utils\_contextlib.py”, line 115, in decorate_context
return func(*args, **kwargs)
File “C:\ComfyUI_windows_portable\ComfyUI\comfy\k_diffusion\sampling.py”, line 137, in sample_euler
denoised = model(x, sigma_hat * s_in, **extra_args)
File “C:\ComfyUI_windows_portable\python_embeded\lib\site-packages\torch\nn\modules\module.py”, line 1518, in _wrapped_call_impl
return self._call_impl(*args, **kwargs)
File “C:\ComfyUI_windows_portable\python_embeded\lib\site-packages\torch\nn\modules\module.py”, line 1527, in _call_impl
return forward_call(*args, **kwargs)
File “C:\ComfyUI_windows_portable\ComfyUI\comfy\samplers.py”, line 274, in forward
out = self.inner_model(x, sigma, cond=cond, uncond=uncond, cond_scale=cond_scale, model_options=model_options, seed=seed)
File “C:\ComfyUI_windows_portable\python_embeded\lib\site-packages\torch\nn\modules\module.py”, line 1518, in _wrapped_call_impl
return self._call_impl(*args, **kwargs)
File “C:\ComfyUI_windows_portable\python_embeded\lib\site-packages\torch\nn\modules\module.py”, line 1527, in _call_impl
return forward_call(*args, **kwargs)
File “C:\ComfyUI_windows_portable\ComfyUI\comfy\samplers.py”, line 264, in forward
return self.apply_model(*args, **kwargs)
File “C:\ComfyUI_windows_portable\ComfyUI\comfy\samplers.py”, line 261, in apply_model
out = sampling_function(self.inner_model.apply_model, x, timestep, uncond, cond, cond_scale, model_options=model_options, seed=seed)
File “C:\ComfyUI_windows_portable\ComfyUI\custom_nodes\ComfyUI-AnimateDiff-Evolved\animatediff\sampling.py”, line 552, in sliding_sampling_function
cond, uncond = sliding_calc_cond_uncond_batch(model_function, cond, uncond, x, timestep, max_total_area, model_options)
File “C:\ComfyUI_windows_portable\ComfyUI\custom_nodes\ComfyUI-AnimateDiff-Evolved\animatediff\sampling.py”, line 534, in sliding_calc_cond_uncond_batch
sub_cond_out, sub_uncond_out = calc_cond_uncond_batch(model_function, sub_cond, sub_uncond, sub_x, sub_timestep, max_total_area, model_options)
File “C:\ComfyUI_windows_portable\ComfyUI\custom_nodes\ComfyUI-AnimateDiff-Evolved\animatediff\sampling.py”, line 432, in calc_cond_uncond_batch
output = model_function(input_x, timestep_, **c).chunk(batch_chunks)
File “C:\ComfyUI_windows_portable\ComfyUI\comfy\model_base.py”, line 65, in apply_model
model_output = self.diffusion_model(xc, t, context=context, control=control, transformer_options=transformer_options, **extra_conds).float()
File “C:\ComfyUI_windows_portable\python_embeded\lib\site-packages\torch\nn\modules\module.py”, line 1518, in _wrapped_call_impl
return self._call_impl(*args, **kwargs)
File “C:\ComfyUI_windows_portable\python_embeded\lib\site-packages\torch\nn\modules\module.py”, line 1527, in _call_impl
return forward_call(*args, **kwargs)
File “C:\ComfyUI_windows_portable\ComfyUI\comfy\ldm\modules\diffusionmodules\openaimodel.py”, line 636, in forward
h = apply_control(h, control, ‘output’)
File “C:\ComfyUI_windows_portable\ComfyUI\comfy\ldm\modules\diffusionmodules\openaimodel.py”, line 258, in apply_control
h += ctrl
RuntimeError: The size of tensor a (1280) must match the size of tensor b (640) at non-singleton dimension 1
I’m having this issue too and would really appreciate some help from anyone.
I have this warning and it takes very long time to run
“DWPose: Onnxruntime not found or doesn’t come with acceleration providers, switch to OpenCV with CPU device. DWPose might run very slowly
warnings.warn(“DWPose: Onnxruntime not found or doesn’t come with acceleration providers, switch to OpenCV with CPU device. DWPose might run very slowly”)”
How to fix it? Thanks
This is not an error, just how the workflow was built. It does take some time but try clearing out other programs from memory should help.
Hi, thanks for this, I have noticed select_every_nth is missing from the download workflows.
I am also having trouble with uploaded videos, when I try and add my own video, 20 seconds at 30fps it takes about 6 hours to process, when I tried yours only 30 minutes?
Hi! You can try updating your comfyui and nodes before loading the workflow. I think the workflow set an upscaling resolution, but not sure if it is ignored when you have a higher resolution video. Only the processing resolution and length should affect the processing time.
I know there’s a colab version and i don’t know if it works or not, i’ve noticed that AnimateDiff doesn’t always work in A1111. (I’m hellishly avoidant to use comfyUI even though by looking at it , it’s straight forward lol)
Either way this gave me some great ideas.
Thank you again!
Thanks for the great tutorial. When loading the workflow and after installing the missing custom nodes I get this error:
“When loading the graph, the following node types were not found:
– DWPreprocessor
– BatchPromptSchedule
..”
Any idea ?
DWPreprocessor comes from this node: https://github.com/Fannovel16/comfyui_controlnet_aux
BatchPromptSchedule come from this node: https://github.com/FizzleDorf/ComfyUI_FizzNodes
Make sure they are installed.
Even after installing these two nodes, the same error stating, “When loading the graph, the following node types were not found:
– DWPreprocessor
– BatchPromptSchedule” appears.
Any other solution. Please assist
*from the 2 links
Try updating comfyui and all nodes. Some nodes may not be updated manually if comfyui manager doesn’t work.
Yes, I have done that.
But, even now the manager still shows control net aux and fizz-nodes as missing nodes.
On clicking install, the manager pops out an
error.
Still
– DWPreprocessor
– BatchPromptSchedule
are quoted as missing nodes.
Andrew: What I think would help is if you could publish a check list of which nodes are required. That way we could check what we have against this list. As for me I got it to work initially, but all of a sudden it stopped working, no changes.
You can see the list of nodes in the workflow image or in the json file. It’s likely the nodes need to be updated.
I think I saw something like that before. Manager sometimes fails to upgrade the nodes or comfyui. Try go to individual nodes’s directory and do a git pull.
Almost there! I get this message after a while: I’m trying to generate a video with comfyUi and I get this message: Error occurred when executing BatchPromptSchedule:
‘float’ object is not subscriptable
File “C:\Users\CoolerMaster\Documents\ComfyUI_windows_portable\ComfyUI\execution.py”, line 153, in recursive_execute
output_data, output_ui = get_output_data(obj, input_data_all)
File “C:\Users\CoolerMaster\Documents\ComfyUI_windows_portable\ComfyUI\execution.py”, line 83, in get_output_data
return_values = map_node_over_list(obj, input_data_all, obj.FUNCTION, allow_interrupt=True)
File “C:\Users\CoolerMaster\Documents\ComfyUI_windows_portable\ComfyUI\execution.py”, line 76, in map_node_over_list
results.append(getattr(obj, func)(**slice_dict(input_data_all, i)))
File “C:\Users\CoolerMaster\Documents\ComfyUI_windows_portable\ComfyUI\custom_nodes\ComfyUI_FizzNodes\ScheduledNodes.py”, line 107, in animate
cur_prompt, nxt_prompt, weight = interpolate_prompt_series(animation_prompts, max_frames, pre_text,
File “C:\Users\CoolerMaster\Documents\ComfyUI_windows_portable\ComfyUI\custom_nodes\ComfyUI_FizzNodes\BatchFuncs.py”, line 127, in interpolate_prompt_series
prompt_weight_2[i], prompt_weight_3[i], prompt_weight_4[i])
Any idea? It seems that the batchfunc.py file’s code is creating the problem. Did you encounter that kind of issue (confusion typically arises when you’re trying to access an item from a non-iterable object, such as a float or an integer, as if it were an iterable like a list or a string)?
It seems you have incompatible versions of comfyui and node. Try updating both.
Unfortunately, I tried everything that I could (updated ComfyUI & node), rebooth etc. I still get this error message… So frustrating! “FizzNodes\BatchFuncs.py”, line 127, in interpolate_prompt_series
prompt_weight_2[i], prompt_weight_3[i], prompt_weight_4[i])
TypeError: ‘float’ object is not subscriptable”. Is there anything esle to try? Thank you
Hate to say this, but have you tried a fresh install?
I don’t see the manager button to load missing modules
problem solved, I didn’t install it
HI, I’m glad to see the question you raised. I have the same problem currently. It should be a single-precision problem with the graphics card. Mine is a p40 graphics card, which only supports single-precision and not half-precision, but I don’t know how to solve it. , can you tell me your solution to this problem, thank you
hi Andrew,
thanks for the guide!
I am getting an error while trying to load the workflow
TypeError: Cannot read properties of undefined (reading ‘1’)
at nodeType.onConfigure (http://127.0.0.1:8188/extensions/core/widgetInputs.js:161:46)
at LGraphNode.configure (http://127.0.0.1:8188/lib/litegraph.core.js:2549:18)
at LGraph.configure (http://127.0.0.1:8188/lib/litegraph.core.js:2240:26)
at ComfyApp.loadGraphData (http://127.0.0.1:8188/scripts/app.js:1230:15)
at reader.onload (http://127.0.0.1:8188/scripts/app.js:1538:10)
any ideas?
Mmm… haven’t seen this one. Can you try updating comfy, all nodes and restart? That’s all I can think of.
hello, I have most everything working but get the Ksampler error:
Use PYTORCH_MPS_HIGH_WATERMARK_RATIO=0.0 to disable upper limit for memory allocations (may cause system failure).
I’m using an M2 MAC…. is this tutorial not possible with hardware?
Not sure. I haven’t run this workflow on mac.
What is the system requirements and What hardware you using?
It should work on 12 GB VRAM
torch.cuda.OutOfMemoryError: Allocation on device 0 would exceed allowed memory. (out of memory)
Currently allocated : 22.75 GiB
Requested : 9.75 GiB
Device limit : 24.00 GiB
Free (according to CUDA): 0 bytes
— I get a cuda ” out of memory ” at the k – sampler as well.
This is on windows with 3090 / 24 Gb ram so curious to hear your vram specs ? Its trying to load the ” base ” ” controlnet ” models then crashes. Have latest ” comfyui ” ” animate-diff-evolved ” updates ..
It should use a bit more than 8GB. On my machine, it doesn’t use any VRAM until ksampler. By any chance you have existing processes consuming your vram? Try reboot.
Thanks for the quick response ..
I got it working using a newer ” open pose 1.1 ” model that was smaller. The k – sampler was consistently at 16.8 Gb vram for me. Might try updating it with T2I adapters for better performance ..
Recommend updating ” comfyui-fizznodes ” to latest ..
Which switches back the dim sampler input. Fixes the batch prompt scheduler for me , where it didn’t seem to be conditioning on those inputs. Then as a bonus the memory allocated is much lower now too ..
Hello Andrew, Thank you for the tutorial, I get this error after running it:
Error occurred when executing ADE_AnimateDiffLoaderWithContext:
invalid load key, ‘<'.
File "D:\Ai SD\Comfy UI\ComfyUI_windows_portable\ComfyUI\execution.py", line 153, in recursive_execute
output_data, output_ui = get_output_data(obj, input_data_all)
^^^^^^^^^^^^^^^^^^^^^^^^^^^^^^^^^^^^
File "D:\Ai SD\Comfy UI\ComfyUI_windows_portable\ComfyUI\execution.py", line 83, in get_output_data
return_values = map_node_over_list(obj, input_data_all, obj.FUNCTION, allow_interrupt=True)
…..
This is beyond my ability to advice. Pls go to their github page to ask the experts https://github.com/Kosinkadink/ComfyUI-AnimateDiff-Evolved/issues
Hello Andrew, sorry to trouble you again. I found that a lot of nodes were not connected and I think I figured them out, but can you tell me what plugs into the ‘VAE decode node’? Or better still, could you publish the finished spaghetti bowl?
Thank you,
Phil
Yeah that’s a better idea… I have replaced the screenshot below the download button as a workflow png. Hope this helps.
Thank you so much, that’s a huge help for me as I’m not used to the Comfy UI nodes. I really look froward to experimenting.
Phil
have you got it to work with AnimateDiff LoRA Loader yet? two of the add on’s you use support them I’m trying to figure out where to attach it.
Lora modifies checkpoint so you should be able to wire it up like any lora workworks.
Tysm, Andrew, seriously, bless you, I’ve been struggling to find anything on this for comfyui that made sense and your tutorials and guides are always life savers for me (a complete and total amateur) so again, a thousand times thank you. Can’t wait to try it, but got excited seeing the email alone 😀
Thanks Andrew! This looks amazing. Can’t wait to try it.
i’m getting an error concerning the mp4
Prompt outputs failed validation: Value not in list: format: ‘video/h264-mp4’ not in [‘image/gif’, ‘image/webp’]
ADE_AnimateDiffCombine:
– Value not in list: format: ‘video/h264-mp4’ not in [‘image/gif’, ‘image/webp’]
VHS_LoadVideo:
– Exception when validating inner node: LoadVideoUpload.VALIDATE_INPUTS() missing 1 required positional argument: ‘upload_to_directory’
This thread discusses the issue it sounds like it should be dealt with shortly:
https://github.com/Kosinkadink/ComfyUI-AnimateDiff-Evolved/issues/105
I’m getting 500 server errors trying to load the video into comfy UI; ive tried the file from several different folders, and can’t get it to accept the video. any ideas?
Have you installed all the missing nodes? 500 is a generic error.
At first glimpse the result looked amazing, but even on second sight, it is not consistent at all. The hair of the girl keeps changing, the face is almost frame-wise different, even the body proportions “flicker”. This is good enough for some meme gifs, but far, far away from any usable “movie generation quality” you’d get by mocap and some anime shades on a simple render output.
Always use the tool that best matches the requirement, I would like to think.
Did you notice that when the legs are crossed, it blends the legs and separates into two newly formed legs as if joined at the knees then separating, giving the appearance of one leg phasing through the other, forming two new legs. It can’t distinguish crossed legs if not enough contrast and compensates by phasing the legs together as one x-shaped appendage. So, proper lighting and initial contrast in clothing may be helpful.
Not yet perfect, but very interesting.
Many are excited because its already a big improvement compared to a few months ago. See comparison.
https://stable-diffusion-art.com/video-to-video/
And I am fully with you as far as a comparison goes!
However, I work in the industry and I tend to use the right tool for the job. This tool, for the moment, has way too many issues compared to other tools we do have available and that work more or less reliably.
To iterate, I am fascinated by the progress and the potential this has. What I can see, including stills made by all these tools, is not “overwhelming” but mere “aha … well, yeah, nice, let’s walk on and create something that stands the test of time instead.” 🙂
Not sure what you are trying to imply here. It’s very well known that SD tools, whatever available, are not at the same level as “industry” solutions. If there’s any SD tool that’s remotely at that level, it will be an immediate explosion. Remember that the content shown here are generated from white noise and a few sticks that represent roughly how to place the person in the middle. The fact that it can generate something close to what’s shown is already mind-blowing.
My ‘load video(upload)’ node spawned without being attached to anything. Could you please tell me which node it should be plugged in to? Many thanks for your interesting tutorials. I read them all. Phil
Hi Phil, “load video (upload)” should be connected to “upscale image”
Thank you Andrew. I’ll give that a try. Much appreciated.