
ComfyUI is a node-based user interface for Stable Diffusion. It’s gaining popularity among Stable Diffusion users. Developers and artists widely use it because it is highly configurable.
It is an excellent alternative to traditional Stable Diffusion GUIs like AUTOMATIC1111, Forge, and SD.Next.
This guide covers the installation of ComfyUI on both Windows and Mac. I also maintain a ComfyUI Colab notebook for running it online.
Refer to the Beginner’s Guide for instructions on using ComfyUI.
Table of Contents
Benefits of ComfyUI
Why use ComfyUI? It offers a different experience from other GUIs. ComfyUI stands out in the following areas.
1. Lightweight
Unlike other full-feature GUIs such as AUTOMATIC1111, ComfyUI only loads what is necessary. This results in lower memory usage and faster generations.
2. Flexible
ComfyUI is very configurable. You can easily generate two images with different CFG scales in a single workflow and compare the results.
3. You know what it is doing
If you have a good knowledge of how Stable Diffusion works, ComfyUI shows you precisely what it does. No more guesswork.
Instead of writing a description of what buttons to click, you can save a workflow and share it with someone else.
5. Good for prototyping
It’s a godsend for developers because you can prototype a workflow before coding it for production.
6. Cutting-edge workflows
AUTOMATIC1111 used to be the first GUI to implement the latest tools coming out from the research labs. But now, the software team is more cautious in pushing out new features.
ComfyUI has the benefit of being agile. Their node-based system allows many more users to wire up and share workflows. You can count on ComfyUI to use the latest goodies.
Alternative to local installation
Installing and maintaining ComfyUI locally is not easy. After a successful installation, you must keep the software and custom nodes up-to-date.
Check out Think Diffusion for a fully managed ComfyUI online service. They offer 20% extra credits to our readers. (and a small commission to support this site if you sign up)
Installing ComfyUI on Windows
Three options to install ComfyUI on Windows:
- ComfyUI Desktop
- Standalone zip
- Manual installation
If you are not a developer of ComfyUI, you should use options 1 or 2. Option 3 is for folks who like to tinker with code.
I will cover options 1 and 2 in this post. Consult this guide for option 3.
ComfyUI Desktop on Windows
The ComfyUI Desktop is easier to install and update. One of the drawbacks is that it is designed to be used in the same machine where you install it. You cannot access it from another machine, like the manual installation.
To install ComfyUI Desktop on Windows, you should have a discrete NVIDIA GPU card with at least 4 GB VRAM.
Step 1: Download the ComfyUI installer
Visit https://www.comfy.org/download and download the installer for Mac.

Step 2: Install the App
Double-click the downloaded file to install the App.
Step 3: Launch the app
Launch the app, and you should see the Welcome screen.
Click the Get Started button.
Step 4: Complete the setup in App
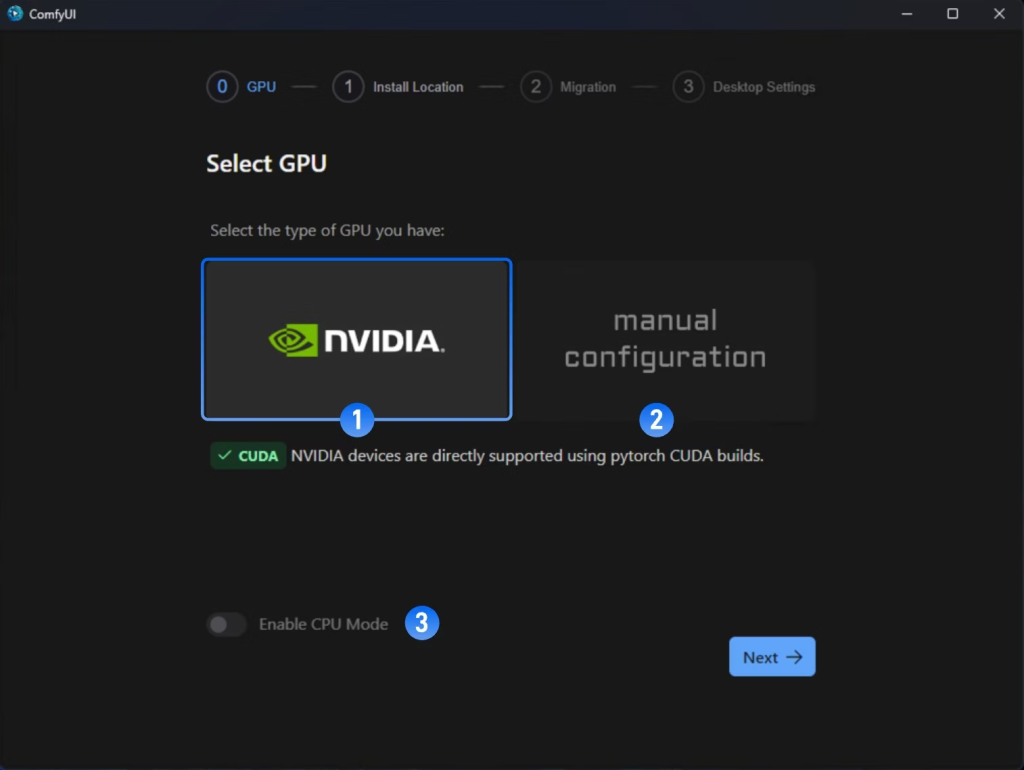
Select GPU:
- Nvidia GPU (Recommended): Automatically installs the required libraries.
- Manual Configuration: You must manually install and configure the Python environment. Don’t select this unless you know how to configure.
- Enable CPU Mode: Useful for Developers only.
Click Next.
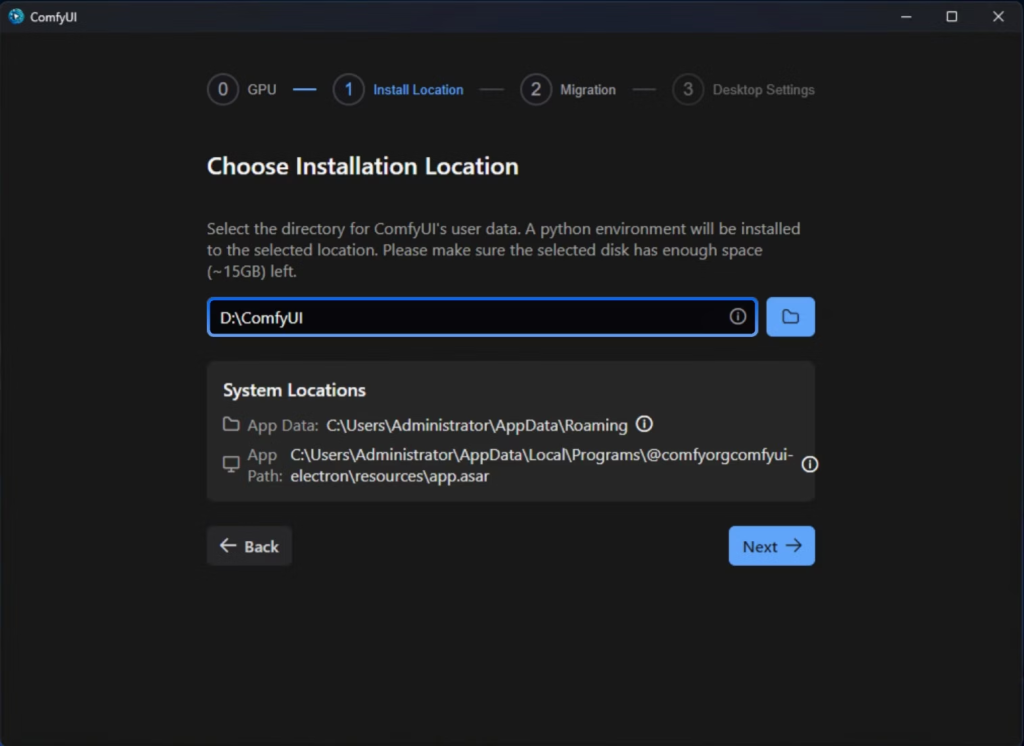
Choose Installation Location: Use the default location. Remember the folder path. You will put the downloaded model there.
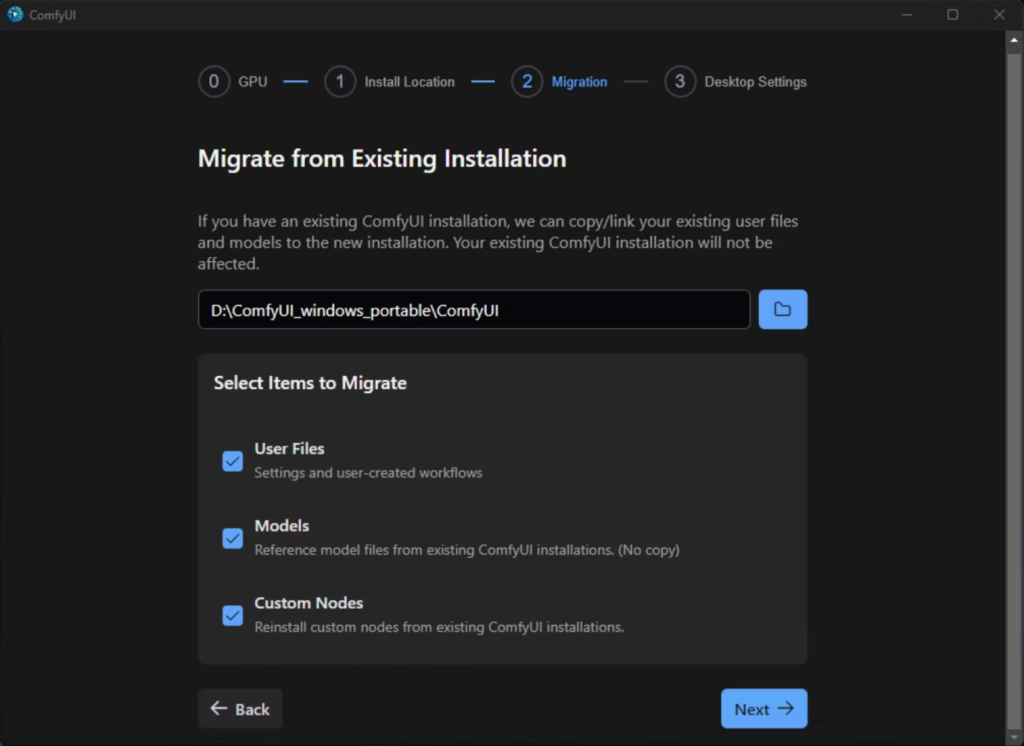
Migrate Existing Installation: Use this option only if you have previously installed ComfyUI and downloaded models. Leave it blank and press Next if this is your first time installing ComfyUI.
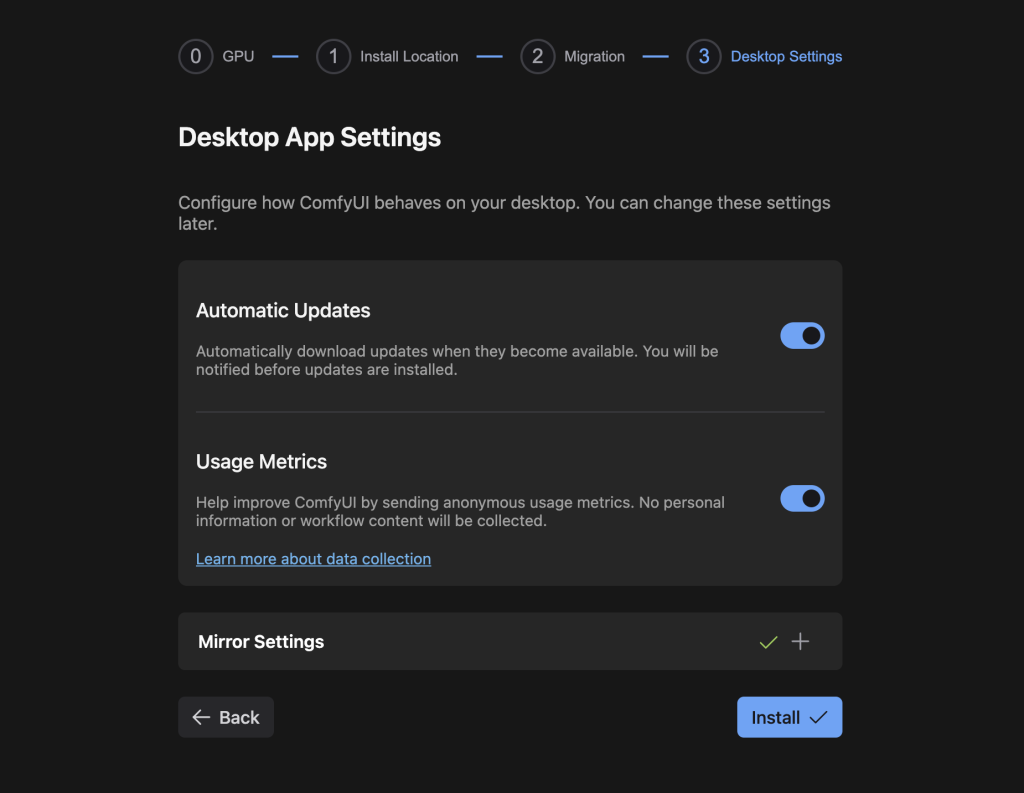
Desktop App Settings: Use the default settings and click Install.
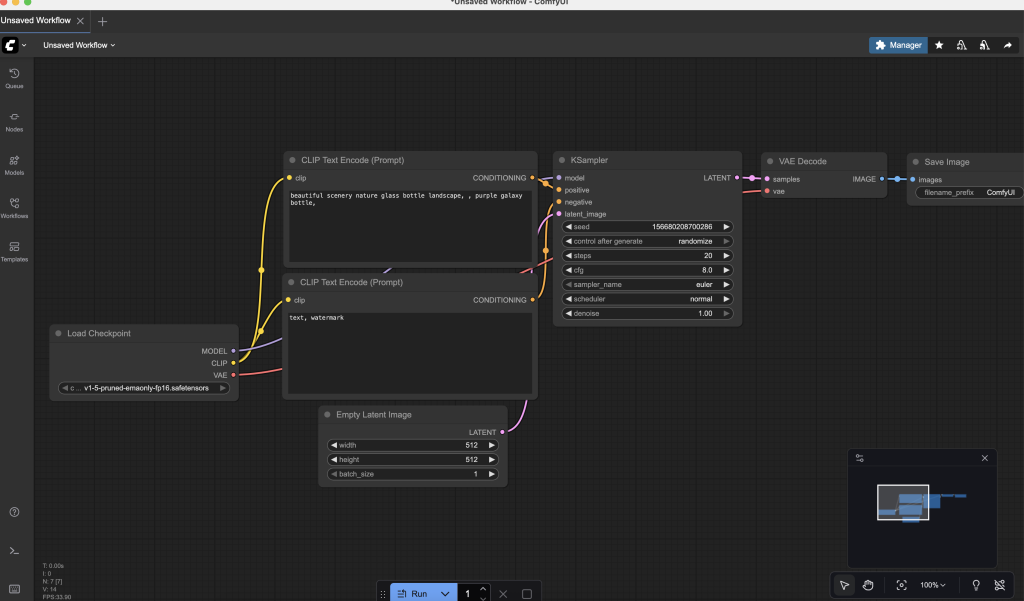
You should see the following default workflow if the installation is successful.
Installing with the standalone Zip on Windows
This option gives you all the functionalities of the manual installation and is easier to install. It comes with Git and Python, so you don’t need to worry about installing it.
Step 1: Install 7-Zip
You need the 7-zip software to uncompress ComfyUI’s zip file.
Download 7-zip on this page or use this direct download link.
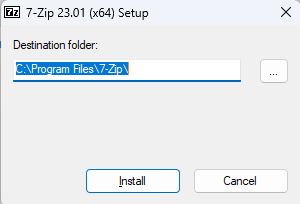
Double-click to run the downloaded exe file. Click Install to install 7-Zip on your PC.
Step 2: Download the standalone version of ComfyUI
Download ComfyUI with this direct download link.
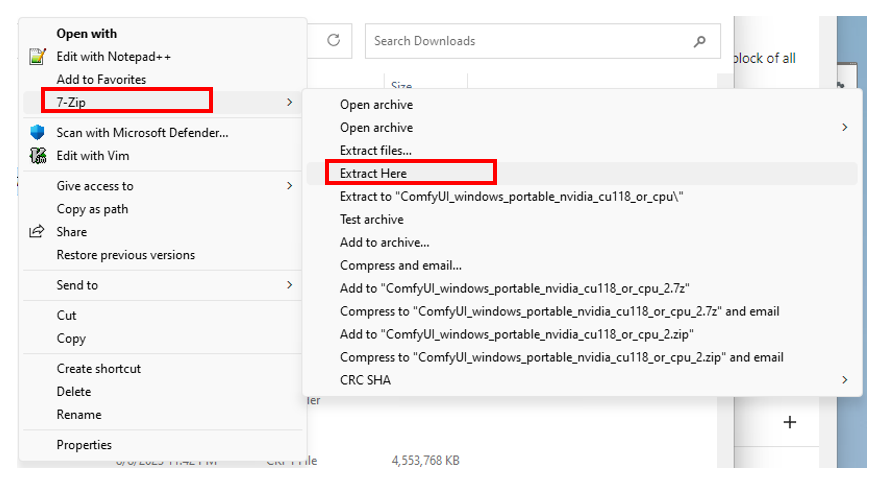
When it is done, right-click on the file ComfyUI_windows_portable_nvidia_cu118_or_cpu.7z, select Show More Options > 7-Zip > Extract Here.
Your PC should be working hard for a while. When it is done, there should be a new folder called ComfyUI_windows_portable.
Feel free to move this folder to a location you like.
Step 3: Download a checkpoint model
You need a checkpoint model to start using ComfyUI.
You have two options: (1) download a model, or (2) share models with other Stable Diffusion GUI such as AUTOMATIC1111.
Feel free to download any model. Here’s the download link for the DreamShaper 8 model.
Put the model in the folder
ComfyUI_windows_portable\ComfyUI\models\checkpointsStep 4: Start ComfyUI
If you have an Nvidia GPU: Double-click run_nvidia_gpu.bat to start ComfyUI.
If you don’t: Double-click run_cpu.bat to run ComfyUI slooowly…
ComfyUI should automatically start on your browser.
Updating ComfyUI on Windows
To update ComfyUI, double-click to run the file ComfyUI_windows_portable > update > update_comfyui.bat.
Installing ComfyUI on Mac
Installing ComfyUI on Mac is a bit more involved. You will need macOS 12.3 or higher for MPS acceleration support.
Click on the Apple icon at the top left corner and select About this Mac to check.
The following steps install ComfyUI in a virtual environment.
Step 1: Install Homebrew
Homebrew is a package manager for Mac. Open the Terminal app, paste the following command, and press return.
/bin/bash -c "$(curl -fsSL https://raw.githubusercontent.com/Homebrew/install/HEAD/install.sh)"Step 2: Install a few required packages
Open a new terminal and run the following command
brew install cmake protobuf rust [email protected] git wgetConfirm the Python version
python3 --versionIt should state Python 3.10.6.
Python 3.11.x and 3.12.x would also work.
Step 3: Clone ComfyUI
Clone the ComfyUI code on your local storage by running the following in Terminal.
git clone https://github.com/comfyanonymous/ComfyUIStep 3: Install ComfyUI
Now go into ComfyUI’s directory.
cd ComfyUICreate a virtual environment.
python3 -m venv venvInstall PyTorch in the virtual environment.
./venv/bin/pip install torch torchvision torchaudioInstall the required packages for CompfyUI.
./venv/bin/pip install -r requirements.txtStep 4. Download a stable diffusion model
You will need a model to run Stable Diffusion. Use the following link to download the v1.5 model.
Put the checkpoint model in the folder models/checkpoints.
Alternatively, run the following command to download the model.
wget -P models/checkpoints https://huggingface.co/runwayml/stable-diffusion-v1-5/resolve/main/v1-5-pruned-emaonly.ckptStep 5: Start ComfyUI
Start ComfyUI by running the following command.
./venv/bin/python main.pyUpdating ComfyUI on Mac
Run the following command in the comfyUI folder to update ComfyUI:
git pullGenerating an image
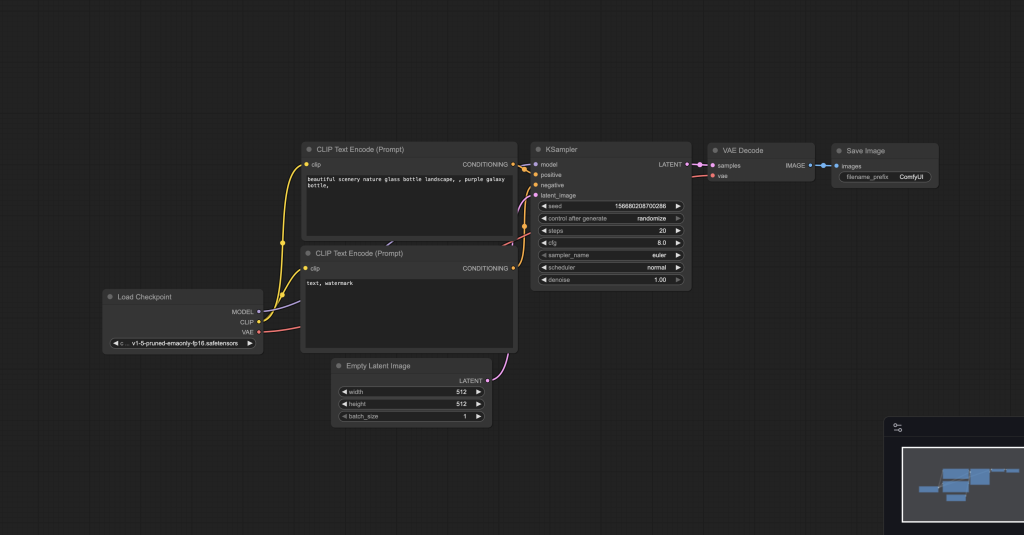
After starting ComfyUI for the very first time, you should see the default text-to-image workflow. It should look like this:
If you don’t see a workflow, click the ComfyUI icon on the top left and select Browse Templates.
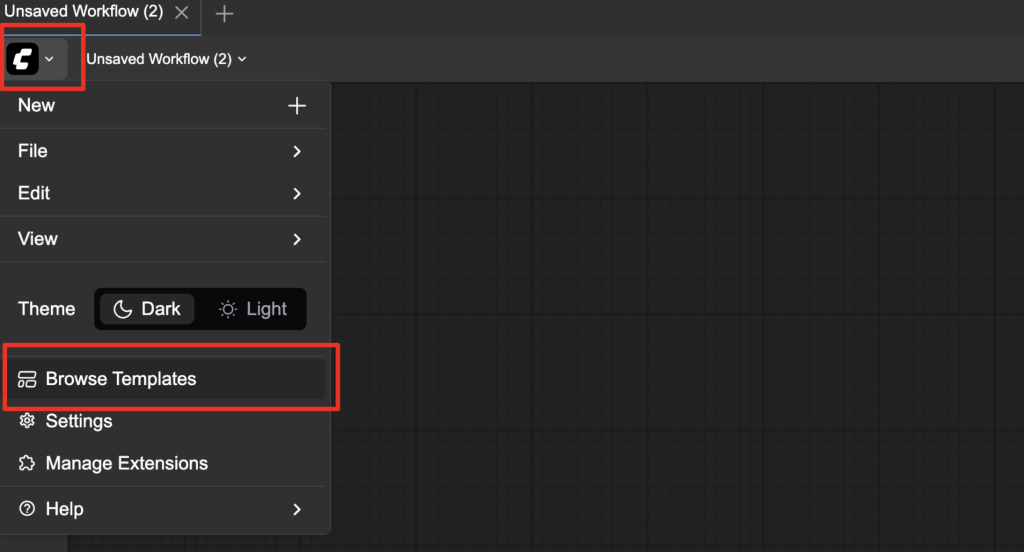
Select the Image Generation template.
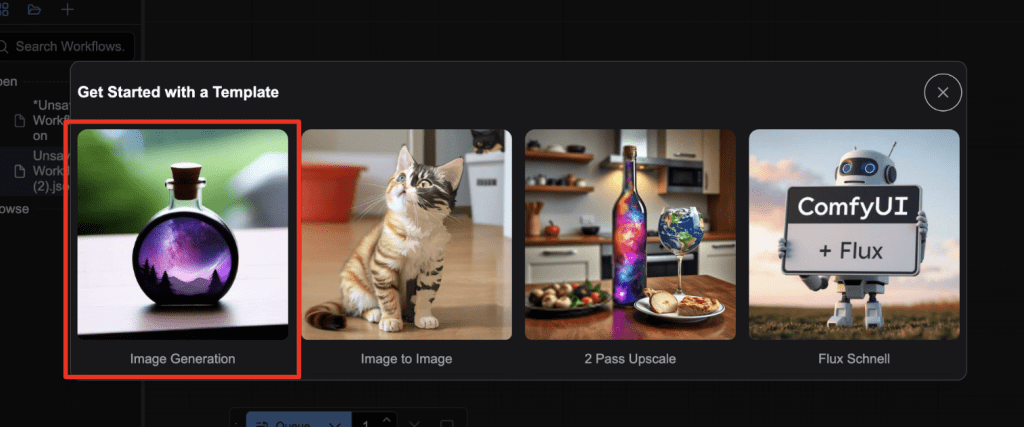
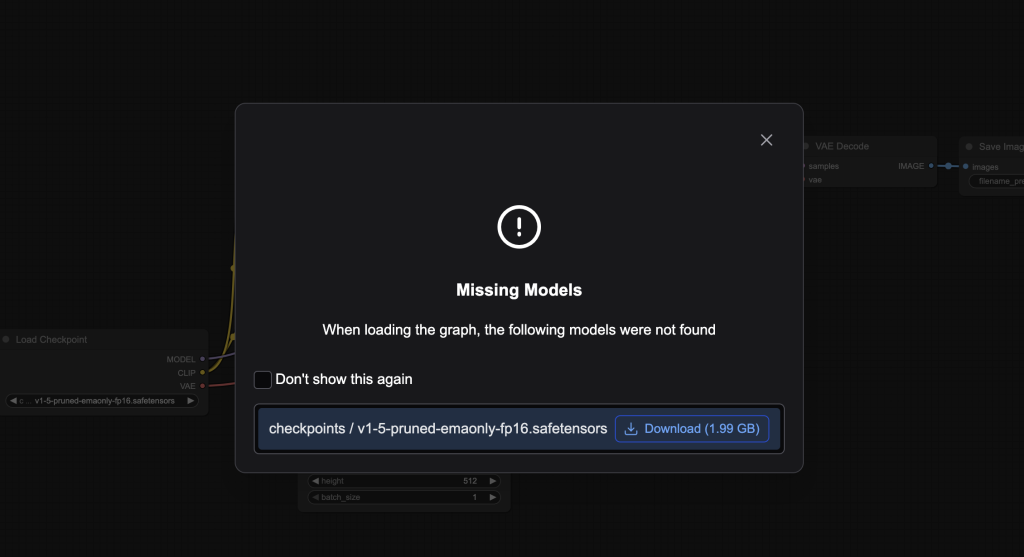
You will be prompted to download the Stable Diffusion v1.5 model.
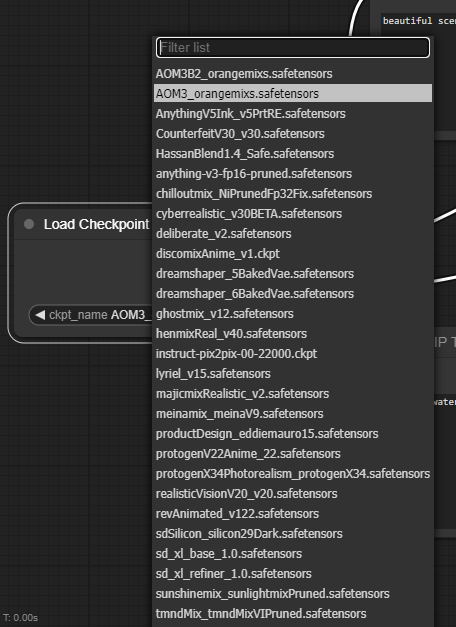
1. Selecting a model
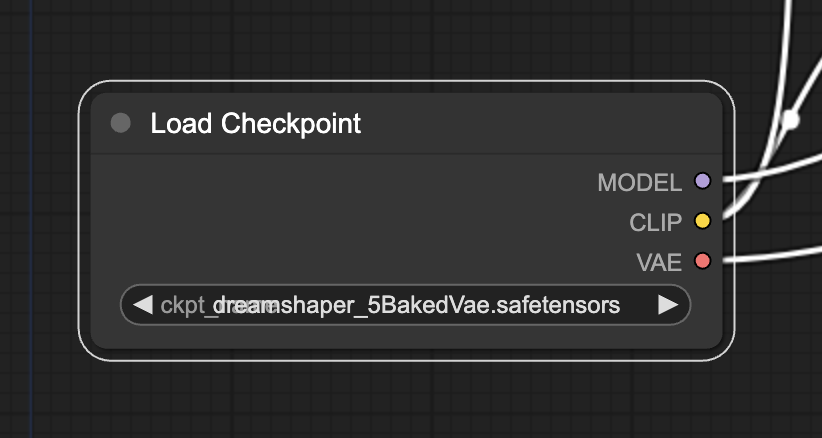
First, select a Stable Diffusion checkpoint model in the Load Checkpoint node. Click on the model name to show a list of available models.
If the node is too small, you can use the mouse wheel or pinch with two fingers on the touchpad to zoom in and out.
If clicking the model name does nothing, you may not have installed a checkpoint model or configured it to use your existing models in A1111. Go back to the installation section to address the issue first.
2. Enter a prompt and a negative prompt
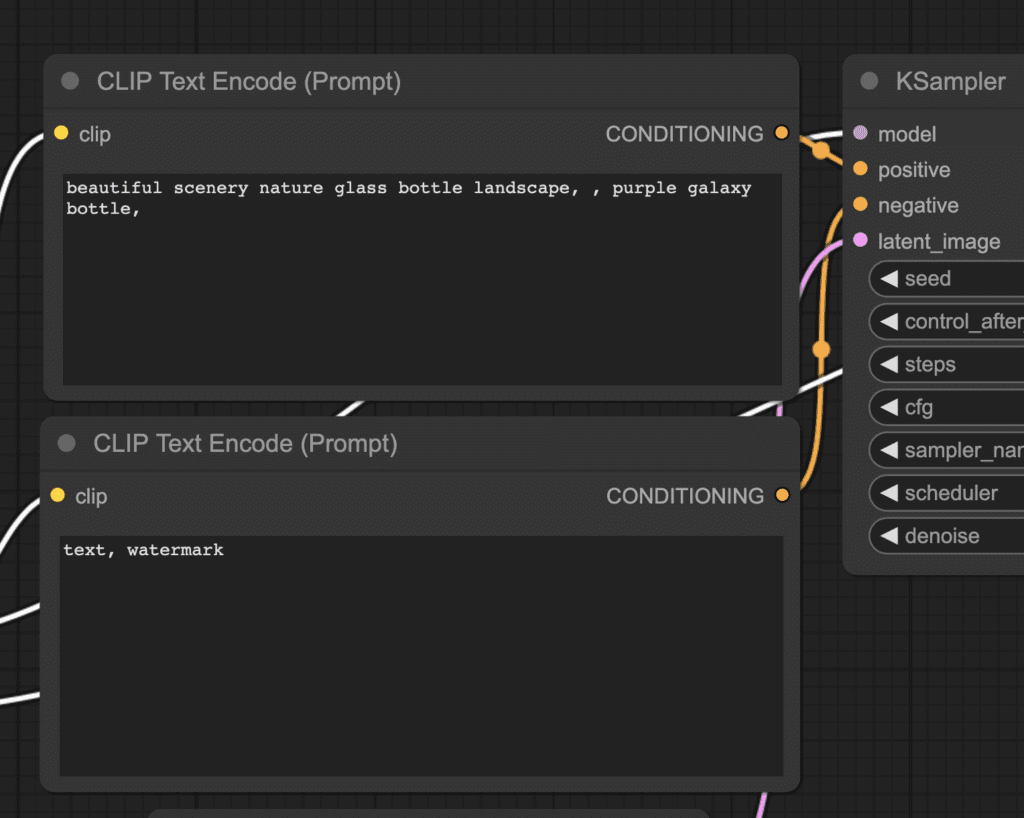
You should see two nodes with the label CLIP Text Encode (Prompt). Enter your prompt in the top one and your negative prompt in the bottom one.
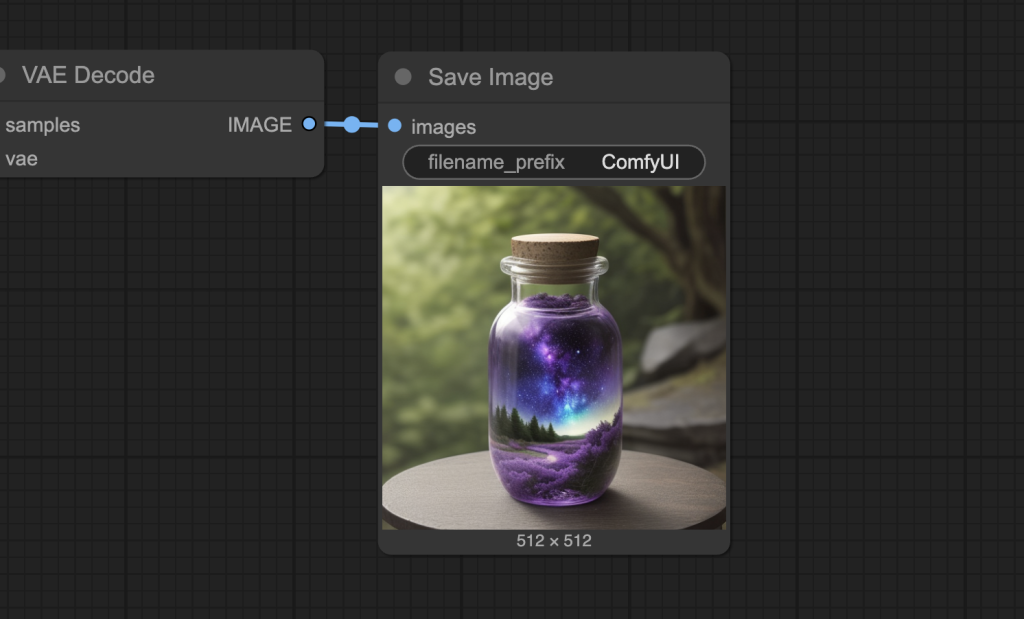
3. Generate an image
Click the Run button to run the workflow.

You should see a generated image matching your prompt.
Sharing models between AUTOMATIC1111 and ComfyUI
If you have AUTOMATIC1111 Stable Diffusiion WebUI installed on your PC, you should share the model files between AUTOMATIC1111 and ComfyUI. Otherwise, your hard drive will be full.
Copy the file ComfyUI_windows_portable > ComfyUI > extra_model_paths.yaml.example and save it as extra_model_paths.yaml.
Change the line:
base_path: path/to/stable-diffusion-webui/Replace path/to/stable-diffusion-webui/ to your actual path to it. E.g.
base_path: C:\Users\USERNAME\stable-diffusion-webuiRestart ComfyUI completely. If the configuration is correct, you should see the full list of your model by clicking the ckpt_name field in the Load Checkpoint node.
You can use this technique to share LoRA, textual inversions, etc, between AUTOMATIC1111 and ComfyUI.
Hi, thanks for the explanation. I read that Automatic111 and ComfyUi can coexist on the same PC. I’m very happy with Automatic111 and haven’t updated it because I’m afraid I’ll lose features or have the interface change beyond recognition (for me). If I also install ComfyUi (which needs to be updated regularly), will Automatic111 crash? I’m especially worried about Python updates or similar. Thanks for the support.
Hi you all beautiful people – I have a brief question. Will this work on an Apple MacBook Pro M4 Max or will it only work on an M1 or M2 chip?
Thank you!
Yes M4 works.
Thanks for the detailed instructions. Finally got ComfyUI up and running thanks to you. Looking forward to your next tutorial….
Is it possible to install this on a tablet- Galaxy tab A9
Hi Andrew! Thanks for sharing! I followed all your step, and getting error:
“Weights only load failed. This file can still be loaded, to do so you have two options, [1mdo those steps only if you trust the source of the checkpoint[0m.”
Do you have any idea about how to solve this? Thank you so much!
Not sure. can you post the full error message?
Impossible slow extracting ?
Please give a hint that the downloaded 7z file is marked as “it comes from a different system”. If you do not check the allow-checkbox in the file-properties then extracting is impossible and you’ll wait forever without any notice. (happened on windows)
How can I install the ComfyUI-Manager?
Found it on Github and how to install it
Found it on Github and how to install it. No more help needed, thanks.
Hi, i followed everything and installed everything, but when i open in nuke and try to queue a prompt i get the following error “name ‘bvfx_comfyuinuke’ is not defined, can you help me? Thanks
On Mac I get quite often a black picture generated. The first time works always, but then randomly I get only after calculation a blck piccture.
What could be the reason? Thanks
(M1 Mac with 64GB ram)
You shouldn’t have any issue with RAM on your setup. When you say getting a black image after working the first time, do you mean changing the seed and generate a new one? is there any error message on the console?
I cant seem to extract this file, convert_trajectory_transformer_original_pytorch_checkpoint_to_pytorch.py no matter how many times I try. download fresh copy same thing
sorted. if I want to remove Automatic111 can i just place the models in Confy Dir? if so what changes do I make?
you can put the model files in the models directory. There are subfolders for each model type.
This might not be your problem, but, be mindful that Windows has a very dumb file path limit of 256 characters. Sometimes extracting files will fail if they cross this limit. In the age of node_modules and the like, it’s really annoying. The solution would be to put it closer to the root of the drive so the path isn’t too long.
thank you bro
Mac m3
using “python3 -m venv venv” command
Would you consider making a colab version of this like your A1111 one?
I will think about it just that it takes time to maintain…
agree
i have got this error when i try to generate my first image, default one. i use m1 mac.
Error occurred when executing KSampler:
“upsample_nearest2d_channels_last” not implemented for ‘Half’
File “/Users/serkancolak/ComfyUI/execution.py”, line 151, in recursive_execute
output_data, output_ui = get_output_data(obj, input_data_all)
File “/Users/serkancolak/ComfyUI/execution.py”, line 81, in get_output_data
return_values = map_node_over_list(obj, input_data_all, obj.FUNCTION, allow_interrupt=True)
File “/Users/serkancolak/ComfyUI/execution.py”, line 74, in map_node_over_list
results.append(getattr(obj, func)(**slice_dict(input_data_all, i)))
File “/Users/serkancolak/ComfyUI/nodes.py”, line 1369, in sample
return common_ksampler(model, seed, steps, cfg, sampler_name, scheduler, positive, negative, latent_image, denoise=denoise)
File “/Users/serkancolak/ComfyUI/nodes.py”, line 1339, in common_ksampler
samples = comfy.sample.sample(model, noise, steps, cfg, sampler_name, scheduler, positive, negative, latent_image,
File “/Users/serkancolak/ComfyUI/comfy/sample.py”, line 100, in sample
samples = sampler.sample(noise, positive_copy, negative_copy, cfg=cfg, latent_image=latent_image, start_step=start_step, last_step=last_step, force_full_denoise=force_full_denoise, denoise_mask=noise_mask, sigmas=sigmas, callback=callback, disable_pbar=disable_pbar, seed=seed)
File “/Users/serkancolak/ComfyUI/comfy/samplers.py”, line 702, in sample
return sample(self.model, noise, positive, negative, cfg, self.device, sampler, sigmas, self.model_options, latent_image=latent_image, denoise_mask=denoise_mask, callback=callback, disable_pbar=disable_pbar, seed=seed)
File “/Users/serkancolak/ComfyUI/comfy/samplers.py”, line 607, in sample
samples = sampler.sample(model_wrap, sigmas, extra_args, callback, noise, latent_image, denoise_mask, disable_pbar)
File “/Users/serkancolak/ComfyUI/comfy/samplers.py”, line 545, in sample
samples = self.sampler_function(model_k, noise, sigmas, extra_args=extra_args, callback=k_callback, disable=disable_pbar, **self.extra_options)
File “/Users/serkancolak/ComfyUI/venv/lib/python3.10/site-packages/torch/utils/_contextlib.py”, line 115, in decorate_context
return func(*args, **kwargs)
File “/Users/serkancolak/ComfyUI/comfy/k_diffusion/sampling.py”, line 137, in sample_euler
denoised = model(x, sigma_hat * s_in, **extra_args)
File “/Users/serkancolak/ComfyUI/venv/lib/python3.10/site-packages/torch/nn/modules/module.py”, line 1511, in _wrapped_call_impl
return self._call_impl(*args, **kwargs)
File “/Users/serkancolak/ComfyUI/venv/lib/python3.10/site-packages/torch/nn/modules/module.py”, line 1520, in _call_impl
return forward_call(*args, **kwargs)
File “/Users/serkancolak/ComfyUI/comfy/samplers.py”, line 283, in forward
out = self.inner_model(x, sigma, cond=cond, uncond=uncond, cond_scale=cond_scale, model_options=model_options, seed=seed)
File “/Users/serkancolak/ComfyUI/venv/lib/python3.10/site-packages/torch/nn/modules/module.py”, line 1511, in _wrapped_call_impl
return self._call_impl(*args, **kwargs)
File “/Users/serkancolak/ComfyUI/venv/lib/python3.10/site-packages/torch/nn/modules/module.py”, line 1520, in _call_impl
return forward_call(*args, **kwargs)
File “/Users/serkancolak/ComfyUI/comfy/samplers.py”, line 270, in forward
return self.apply_model(*args, **kwargs)
File “/Users/serkancolak/ComfyUI/comfy/samplers.py”, line 267, in apply_model
out = sampling_function(self.inner_model, x, timestep, uncond, cond, cond_scale, model_options=model_options, seed=seed)
File “/Users/serkancolak/ComfyUI/comfy/samplers.py”, line 244, in sampling_function
out = calc_cond_batch(model, conds, x, timestep, model_options)
File “/Users/serkancolak/ComfyUI/comfy/samplers.py”, line 217, in calc_cond_batch
output = model.apply_model(input_x, timestep_, **c).chunk(batch_chunks)
File “/Users/serkancolak/ComfyUI/comfy/model_base.py”, line 97, in apply_model
model_output = self.diffusion_model(xc, t, context=context, control=control, transformer_options=transformer_options, **extra_conds).float()
File “/Users/serkancolak/ComfyUI/venv/lib/python3.10/site-packages/torch/nn/modules/module.py”, line 1511, in _wrapped_call_impl
return self._call_impl(*args, **kwargs)
File “/Users/serkancolak/ComfyUI/venv/lib/python3.10/site-packages/torch/nn/modules/module.py”, line 1520, in _call_impl
return forward_call(*args, **kwargs)
File “/Users/serkancolak/ComfyUI/comfy/ldm/modules/diffusionmodules/openaimodel.py”, line 885, in forward
h = forward_timestep_embed(module, h, emb, context, transformer_options, output_shape, time_context=time_context, num_video_frames=num_video_frames, image_only_indicator=image_only_indicator)
File “/Users/serkancolak/ComfyUI/comfy/ldm/modules/diffusionmodules/openaimodel.py”, line 48, in forward_timestep_embed
x = layer(x, output_shape=output_shape)
File “/Users/serkancolak/ComfyUI/venv/lib/python3.10/site-packages/torch/nn/modules/module.py”, line 1511, in _wrapped_call_impl
return self._call_impl(*args, **kwargs)
File “/Users/serkancolak/ComfyUI/venv/lib/python3.10/site-packages/torch/nn/modules/module.py”, line 1520, in _call_impl
return forward_call(*args, **kwargs)
File “/Users/serkancolak/ComfyUI/comfy/ldm/modules/diffusionmodules/openaimodel.py”, line 93, in forward
x = F.interpolate(x, size=shape, mode=”nearest”)
File “/Users/serkancolak/ComfyUI/venv/lib/python3.10/site-packages/torch/nn/functional.py”, line 4001, in interpolate
return torch._C._nn.upsample_nearest2d(input, output_size, scale_factors)
Hi there,
I am at stage 3, I am in the correct folder I believe .
When I enter “python -m venv venv” I get this error:
h-MBP-sl-dnyl:ComfyUI daniel$ python -m venv venv
-bash: python: command not found
Do you know what have gone wrong?
You don’t have python installed. Try to retry step 2 (which installs python 3.10) and see what’s wrong.
Hey, when I get to step 5 and try and run
./venv/bin/python main.py
i get ‘No such file or directory’
so i hit cd ComfyUI and then retype and I get a message, after a load of terminal jargon AssertionError: Torch not compiled with CUDA enabled
Where have I gone wrong? Can’t see anybody else having this issue!
Thanks.
I got the same issue
“C:\Users\Izaan\Downloads\ComfyUI_windows_portable_nvidia_cu121_or_cpu\ComfyUI_windows_portable\ComfyUI\.ci\windows_base_files>.\python_embeded\python.exe -s ComfyUI\main.py –cpu –windows-standalone-build
The system cannot find the path specified.
C:\Users\Izaan\Downloads\ComfyUI_windows_portable_nvidia_cu121_or_cpu\ComfyUI_windows_portable\ComfyUI\.ci\windows_base_files>pause
Press any key to continue . . .”
This issue pops up when i try to open anything. Even “run_cpu.bat” and even the “update_comfyui.bat”
the command seems wrong. The easiest way to fix it is likely reinstalling.
Thank you for everything here, this content is priceless !
I have issues updating ComfyUI within the virtual environnement on MAC M2 (ventura).
Error message :
—–
Your ComfyUI is too OUTDATED!!!
Keywords: PhotoMaker
Feature News:
[PhotoMaker] Built-in nodes supporting PhotoMaker have been added to ComfyUI. (_for_testing/photomaker)
Issue News:
ComfyUI: Unknown[-](1900-01-01)
Manager: V2.6
——
“Failed to update ComfyUI” within comfyUI manager
you can try updating comfyui and manager manually.
In command prompt:
cd ComfyUI

git pull

cd custom_nodes/ComfyUI-Manager

git pull
Help! I got it installed, and added a few models to sample. Ran the sample according to the guide above, and no matter which model I use, I get errors when executing the Ksampler:
Error occurred when executing KSampler:
CUDA error: invalid argument
CUDA kernel errors might be asynchronously reported at some other API call, so the stacktrace below might be incorrect.
For debugging consider passing CUDA_LAUNCH_BLOCKING=1.
Compile with `TORCH_USE_CUDA_DSA` to enable device-side assertions.
File “C:\Users\troy\Downloads\ComfyUI_windows_portable\ComfyUI\execution.py”, line 152, in recursive_execute
output_data, output_ui = get_output_data(obj, input_data_all)
File “C:\Users\troy\Downloads\ComfyUI_windows_portable\ComfyUI\execution.py”, line 82, in get_output_data
return_values = map_node_over_list(obj, input_data_all, obj.FUNCTION, allow_interrupt=True)
File “C:\Users\troy\Downloads\ComfyUI_windows_portable\ComfyUI\execution.py”, line 75, in map_node_over_list
results.append(getattr(obj, func)(**slice_dict(input_data_all, i)))
File “C:\Users\troy\Downloads\ComfyUI_windows_portable\ComfyUI\nodes.py”, line 1236, in sample
return common_ksampler(model, seed, steps, cfg, sampler_name, scheduler, positive, negative, latent_image, denoise=denoise)
File “C:\Users\troy\Downloads\ComfyUI_windows_portable\ComfyUI\nodes.py”, line 1206, in common_ksampler
samples = comfy.sample.sample(model, noise, steps, cfg, sampler_name, scheduler, positive, negative, latent_image,
File “C:\Users\troy\Downloads\ComfyUI_windows_portable\ComfyUI\comfy\sample.py”, line 97, in sample
samples = sampler.sample(noise, positive_copy, negative_copy, cfg=cfg, latent_image=latent_image, start_step=start_step, last_step=last_step, force_full_denoise=force_full_denoise, denoise_mask=noise_mask, sigmas=sigmas, callback=callback, disable_pbar=disable_pbar, seed=seed)
File “C:\Users\troy\Downloads\ComfyUI_windows_portable\ComfyUI\comfy\samplers.py”, line 785, in sample
return sample(self.model, noise, positive, negative, cfg, self.device, sampler(), sigmas, self.model_options, latent_image=latent_image, denoise_mask=denoise_mask, callback=callback, disable_pbar=disable_pbar, seed=seed)
File “C:\Users\troy\Downloads\ComfyUI_windows_portable\ComfyUI\comfy\samplers.py”, line 690, in sample
samples = sampler.sample(model_wrap, sigmas, extra_args, callback, noise, latent_image, denoise_mask, disable_pbar)
File “C:\Users\troy\Downloads\ComfyUI_windows_portable\ComfyUI\comfy\samplers.py”, line 630, in sample
samples = getattr(k_diffusion_sampling, “sample_{}”.format(sampler_name))(model_k, noise, sigmas, extra_args=extra_args, callback=k_callback, disable=disable_pbar, **extra_options)
File “C:\Users\troy\Downloads\ComfyUI_windows_portable\python_embeded\lib\site-packages\torch\utils\_contextlib.py”, line 115, in decorate_context
return func(*args, **kwargs)
File “C:\Users\troy\Downloads\ComfyUI_windows_portable\ComfyUI\comfy\k_diffusion\sampling.py”, line 137, in sample_euler
denoised = model(x, sigma_hat * s_in, **extra_args)
File “C:\Users\troy\Downloads\ComfyUI_windows_portable\python_embeded\lib\site-packages\torch\nn\modules\module.py”, line 1518, in _wrapped_call_impl
return self._call_impl(*args, **kwargs)
File “C:\Users\troy\Downloads\ComfyUI_windows_portable\python_embeded\lib\site-packages\torch\nn\modules\module.py”, line 1527, in _call_impl
return forward_call(*args, **kwargs)
File “C:\Users\troy\Downloads\ComfyUI_windows_portable\ComfyUI\comfy\samplers.py”, line 323, in forward
out = self.inner_model(x, sigma, cond=cond, uncond=uncond, cond_scale=cond_scale, cond_concat=cond_concat, model_options=model_options, seed=seed)
File “C:\Users\troy\Downloads\ComfyUI_windows_portable\python_embeded\lib\site-packages\torch\nn\modules\module.py”, line 1518, in _wrapped_call_impl
return self._call_impl(*args, **kwargs)
File “C:\Users\troy\Downloads\ComfyUI_windows_portable\python_embeded\lib\site-packages\torch\nn\modules\module.py”, line 1527, in _call_impl
return forward_call(*args, **kwargs)
File “C:\Users\troy\Downloads\ComfyUI_windows_portable\ComfyUI\comfy\k_diffusion\external.py”, line 125, in forward
eps = self.get_eps(input * c_in, self.sigma_to_t(sigma), **kwargs)
File “C:\Users\troy\Downloads\ComfyUI_windows_portable\ComfyUI\comfy\k_diffusion\external.py”, line 151, in get_eps
return self.inner_model.apply_model(*args, **kwargs)
File “C:\Users\troy\Downloads\ComfyUI_windows_portable\ComfyUI\comfy\samplers.py”, line 311, in apply_model
out = sampling_function(self.inner_model.apply_model, x, timestep, uncond, cond, cond_scale, cond_concat, model_options=model_options, seed=seed)
File “C:\Users\troy\Downloads\ComfyUI_windows_portable\ComfyUI\comfy\samplers.py”, line 285, in sampling_function
max_total_area = model_management.maximum_batch_area()
File “C:\Users\troy\Downloads\ComfyUI_windows_portable\ComfyUI\comfy\model_management.py”, line 579, in maximum_batch_area
memory_free = get_free_memory() / (1024 * 1024)
File “C:\Users\troy\Downloads\ComfyUI_windows_portable\ComfyUI\comfy\model_management.py”, line 555, in get_free_memory
stats = torch.cuda.memory_stats(dev)
File “C:\Users\troy\Downloads\ComfyUI_windows_portable\python_embeded\lib\site-packages\torch\cuda\memory.py”, line 256, in memory_stats
stats = memory_stats_as_nested_dict(device=device)
File “C:\Users\troy\Downloads\ComfyUI_windows_portable\python_embeded\lib\site-packages\torch\cuda\memory.py”, line 268, in memory_stats_as_nested_dict
return torch._C._cuda_memoryStats(device)
Seems to work when I run it under CPU.
what gpu do you have? It seems to have serious issue using the gpu. You can
– reboot
– reinstall and run the default workflow without installing any custom nodes.
On M2 Macbook Pro, I followed all the directions above. When I got to Create a virtual environment. python -m venv venv,
I got the error “Command Python not found.”
Searched my hard drive, and Python doesn’t exist.
How do I install Python? Was it supposed to have been installed by the first few commands?
it was supposed to be installed in step 2. you can run it again and see the error message if any.
Other commenters said that “Python3.10” would work.
It did for me.
FYI: as long as you do not try and us ComfyUI Manager you are OK. If you do find that you want to use Manager then you have to perform all the pip installs over again using the embedded python that comes with ComfyUI.
The execution path for the embedded python on a windows installation is ComfyUI_windows_portable\python_embeded
to execute the pip command use:
ComfyUI_windows_portable\python_embeded\python -m pip (your pip command goes here)
for Mac and Linux the backslash is replaced with a forward slash.
that first “us” was supposed to be “use”
Hi, after clicking “Queue Prompt” in ComfyUI I get error message as bellow. I haven’t found any solution so far. Has anybody an idea what’s wrong? MacBook Air M1, OS Sonoma 14.1.1.
Error occurred when executing CheckpointLoaderSimple:
the STRING opcode argument must be quoted
File “/Users/tomaszdajczak/ComfyUI/execution.py”, line 154, in recursive_execute output_data, output_ui = get_output_data(obj, input_data_all) File “/Users/tomaszdajczak/ComfyUI/execution.py”, line 84, in get_output_data return_values = map_node_over_list(obj, input_data_all, obj.FUNCTION, allow_interrupt=True) File “/Users/tomaszdajczak/ComfyUI/execution.py”, line 77, in map_node_over_list results.append(getattr(obj, func)(**slice_dict(input_data_all, i))) File “/Users/tomaszdajczak/ComfyUI/nodes.py”, line 476, in load_checkpoint out = comfy.sd.load_checkpoint_guess_config(ckpt_path, output_vae=True, output_clip=True, embedding_directory=folder_paths.get_folder_paths(“embeddings”)) File “/Users/tomaszdajczak/ComfyUI/comfy/sd.py”, line 434, in load_checkpoint_guess_config sd = comfy.utils.load_torch_file(ckpt_path) File “/Users/tomaszdajczak/ComfyUI/comfy/utils.py”, line 22, in load_torch_file pl_sd = torch.load(ckpt, map_location=device, pickle_module=comfy.checkpoint_pickle) File “/Users/tomaszdajczak/ComfyUI/venv/lib/python3.9/site-packages/torch/serialization.py”, line 1028, in load return _legacy_load(opened_file, map_location, pickle_module, **pickle_load_args) File “/Users/tomaszdajczak/ComfyUI/venv/lib/python3.9/site-packages/torch/serialization.py”, line 1246, in _legacy_load magic_number = pickle_module.load(f, **pickle_load_args)
Problem solved 🙂 I tried to use model imported via DrawThings. Safetensors models work.
when running ComfyUI (python3 main.py –cpu, as mine iMac 27′ Late 2013), I got message:
Total VRAM 24576 MB, total RAM 24576 MB
Set vram state to: DISABLED
Device: cpu
VAE dtype: torch.float32
Using split optimization for cross attention
Starting server
where I see other is his video says: Set vram state to: SHARED.
is there a possibility to set mine to SHARED ? Any help is appreciated.
you are running with cpu so the vram is disabled. you should run with nvidia gpu.
I was given a workflow I want to try out. Shouldn’t I be able to simple drag/drop it on top of whatever existing workflow to use it? Not working for me. I still get the existing workflow every time.
This should work with the latest comfyui. You can also use the load button. If it is a png file, read the metadata to confirm the workflow json is written there.
I’ve installed comfyUI per your instructions, but it seems it’s not able to access my Nvidia GPU. My laptop has an RTX 4060. Would that be able to be used?
C:\Users\anujs\AI\stable-diffusion-comfyui\ComfyUI_windows_portable>.\python_embeded\python.exe -s ComfyUI\main.py –windows-standalone-build
Traceback (most recent call last):
File “C:\Users\anujs\AI\stable-diffusion-comfyui\ComfyUI_windows_portable\ComfyUI\main.py”, line 72, in
import execution
File “C:\Users\anujs\AI\stable-diffusion-comfyui\ComfyUI_windows_portable\ComfyUI\execution.py”, line 11, in
import nodes
File “C:\Users\anujs\AI\stable-diffusion-comfyui\ComfyUI_windows_portable\ComfyUI\nodes.py”, line 20, in
import comfy.diffusers_load
File “C:\Users\anujs\AI\stable-diffusion-comfyui\ComfyUI_windows_portable\ComfyUI\comfy\diffusers_load.py”, line 4, in
import comfy.sd
File “C:\Users\anujs\AI\stable-diffusion-comfyui\ComfyUI_windows_portable\ComfyUI\comfy\sd.py”, line 5, in
from comfy import model_management
File “C:\Users\anujs\AI\stable-diffusion-comfyui\ComfyUI_windows_portable\ComfyUI\comfy\model_management.py”, line 114, in
total_vram = get_total_memory(get_torch_device()) / (1024 * 1024)
File “C:\Users\anujs\AI\stable-diffusion-comfyui\ComfyUI_windows_portable\ComfyUI\comfy\model_management.py”, line 83, in get_torch_device
return torch.device(torch.cuda.current_device())
File “C:\Users\anujs\AI\stable-diffusion-comfyui\ComfyUI_windows_portable\python_embeded\lib\site-packages\torch\cuda\__init__.py”, line 769, in current_device
_lazy_init()
File “C:\Users\anujs\AI\stable-diffusion-comfyui\ComfyUI_windows_portable\python_embeded\lib\site-packages\torch\cuda\__init__.py”, line 298, in _lazy_init
torch._C._cuda_init()
RuntimeError: No CUDA GPUs are available
C:\Users\anujs\AI\stable-diffusion-comfyui\ComfyUI_windows_portable>pause
It works out of the box in my case. You can try cloning the repro and installing manually, or get help from the comfyui repro.
1. make sure that you have already installed CUDA (from NVIDIA)
2. this version is compatiblle with CUDA version 11.8
The latest version of CUDA when I wrote this is 12.1
but I prefer like this version. because I don’t want to update my CUDA version
However Thanks to Admin.
if using homebrew on Mac, use command python3 and pip3
also, install nightly version of PyTorch for best performance
python3 -m venv venv
./venv/bin/pip3 install –pre torch torchvision torchaudio –index-url https://download.pytorch.org/whl/nightly/cpu
I downloaded the zip file and began extracting it, but I keep getting error messages during extraction that say, “Error 0x80070003: The system cannot find the path specified.” followed by things like “test_current_flow_betweenness_centrality_subset… Type: PYC File”, “_data_sparstity_utils.cpython-311.pyc … Type: PYC File”, _fake_quantize_per_tensor_affine_cachemask_tens… Type: H File”… and many more. How do I help ensure the system can find these specified paths?
gotta download and use 7-zip as they have it laid out above.
How to install stable diffusion and comfyui on linux? I begginner and use arch linux. I have gpu 3050 6G
I don’t cover linux installation. Pls go to their github page for guidance.
Mac User here:
When I’m running the “python -m venv venv” command , I’m getting this error “zsh: command not found: python”.
What am I doing wrong? I have followed every other step before it with no hassle.
Your python is not correctly installed. In the brew command, it may have shown error or other installation suggestions.
Had the same issue, the following command worked
python3.10 -m venv venv
Thanks! This worked for me on Mac
hey, I downloaded everything, I seems fine, but with when I generate it just happen to appear only a colourful noise picture? Nothing concrete visible! do I do anything wrong?
Quite a few people have reported this already. Unfortunately, I am not able to reproduce. Can you or anyone post a screenshot with all parameters visible? Messages on the terminal app would also be helpful.
I’m a noob dork so the sharing code thing took me a hot few minutes to realize you meant to open it up in notepad and change the line in there but I got it! Thanks as always for your super awesome instructions, you make me feel like I know what I’m doing lol
ah, I overlooked this. Will try to be crystal clear next time!
That’s for user “Ho”
Just remove the hole ComfyUi folder.
I have installed and configured comfy, but unable to create an image. every time its looks like some random dots.
Please see here :
https://pasteboard.co/gHdgmFjjQ1sy.png
You model likely to have issue. Check to make sure the file size is correct (>=2GB), or redownloading.
thanks for the reply. I re-downloaded the model, but the result is the same
I am also troubled, can not find the reason
Hi , where is the ‘requirements’ file for “Install the required packages for CompfyUI.” for MacOS ?
Thanks !
Hi, that step is for installing requiring packages that the requirements.txt file does not install, like python itself.
The requirements.txt file is in the comfyUI directory.
How to fully uninstall ComfyUI and all its components? Many thanks.
Delete the whole comfyui folder will do.
your first step is missing a close paren and a close quote…might confuse some.
sorry don’t understand
Ah, thanks!
Hi I am installing ComfyUI on mac mini m2, when I input the command “/venv/bin/python main.py” in macOS Terminal, en error message appears saying file not find. How to resolved it? Many thanks.
My bad. it was missing a dot in the beginning. The command is corrected in the article.
Im using the corrected notation and still get zsh: no such file or directory
looks like you don’t have the python file. go to venv > bin folder and make sure it is there. it is created with the python -m venv venv command.
Same problem here. I’ve checked bin folder, there is python, python3 and python3.10 file there.
Hello Andrew, do you have any workflows with Loras that isn’t too complicated? Thanks
Hi, I’m in process of writing the second part of the guide — using comfyui. A lora workflow is there.
Stay tuned.