
ComfyUI is a node-based GUI for Stable Diffusion. This tutorial is for someone who hasn’t used ComfyUI before. I will cover:
- Text-to-image
- Image-to-image
- SDXL workflow
- Inpainting
- Using LoRAs
- ComfyUI Manager – managing custom nodes in GUI.
- Impact Pack – a collection of useful ComfyUI nodes.
Table of Contents
What is ComfyUI?
ComfyUI is a node-based GUI for Stable Diffusion. By chaining different blocks (called nodes) together, you can construct an image generation workflow.
Some commonly used blocks are Loading a Checkpoint Model, entering a prompt, specifying a sampler, etc. ComfyUI breaks down a workflow into rearrangeable elements so you can easily make your own.
Installing ComfyUI
You will need a working ComfyUI to follow this guide.
See the installation guide for installing locally on Mac or Windows. If you don’t have the right hardware, you can also use my ComfyUI notebook on Google Colab.
Check out my courses on ComfyUI to level up your ComfyUI skills.
Check out Think Diffusion for a fully managed ComfyUI online service. They offer 20% extra credits to our readers. (and a small commission to support this site if you sign up)
ComfyUI vs AUTOMATIC1111
AUTOMATIC1111 is the de facto GUI for Stable Diffusion.
Should you use ComfyUI instead of AUTOMATIC1111? Here’s a comparison.
The benefits of using ComfyUI are:
- Lightweight: it runs fast.
- Flexible: very configurable.
- Transparent: The data flow is in front of you.
- Easy to share: Each file is a reproducible workflow.
- Good for prototyping: Prototyping with a graphic interface instead of coding.
The drawbacks of using ComfyUI are:
- Inconsistent interface: Each workflow may place the nodes differently. You need to figure out what to change.
- Too much detail: Average users don’t need to know how things are wired under the hood. (Isn’t it the whole point of using a GUI?)
Where to start?
The best way to learn ComfyUI is by going through examples. So, we will learn how to do things in ComfyUI in the simplest text-to-image workflow.
We will go through some basic workflow examples. After studying some essential ones, you will start to understand how to make your own.
At the end of this tutorial, you will have the opportunity to make a pretty involved one. The answer will be provided.
Basic controls
Use the mouse wheel or two-finger pinch to zoom in and out.
Drag and hold the dot of the input or output to form a connection. You can only connect between input and output of the same type.
Hold and drag with the left click to move around the workspace.
Press Ctrl-0 (Windows) or Cmd-0 (Mac) to show the Queue panel.
Text-to-image
Let’s first go through the simplest case: generating an image from text.
Classical, right?
By going through this example, you will also learn the idea before ComfyUI (It’s very different from Automatic1111 WebUI). As a bonus, you will know more about how Stable Diffusion works!
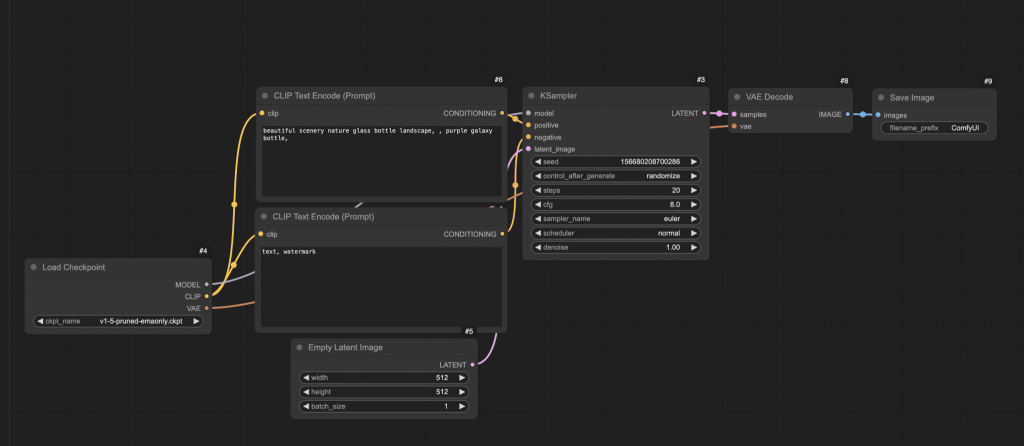
Generating your first image on ComfyUI
After starting ComfyUI for the very first time, you should see the default text-to-image workflow. It should look like this:
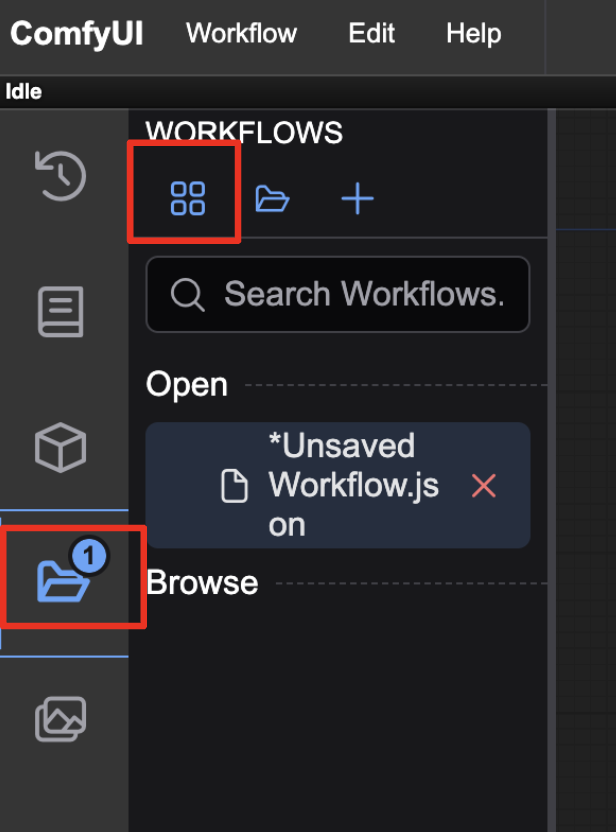
If you don’t see any workflow, click the Workflows icon on the left sidebar and click the Browse template button.
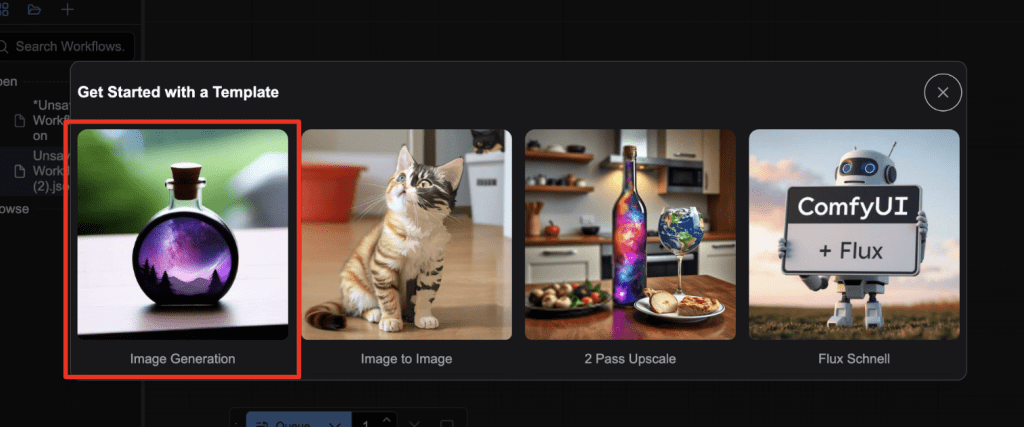
Select Image Generation.
You will see that the workflow is made with two basic building blocks: Nodes and edges.
Nodes are the rectangular blocks, e.g., Load Checkpoint, Clip Text Encoder, etc. Each node executes some code. If you have some programming experience, you can think of them as functions. Each node needs three things.
- Inputs are the texts and dots on the left that the wires come in.
- Outputs are the texts and dots on the right the wires go out.
- Parameters are the fields at the center of the block.
Edges are the wires connecting the outputs and the inputs between nodes.
That’s the whole idea! The rest are details.
Don’t worry if the jargon on the nodes looks daunting. We will walk through a simple example of using ComfyUI, introduce some concepts, and gradually move on to more complicated workflows.
Below is the simplest way you can use ComfyUI. You should be in the default workflow.
1. Selecting a model
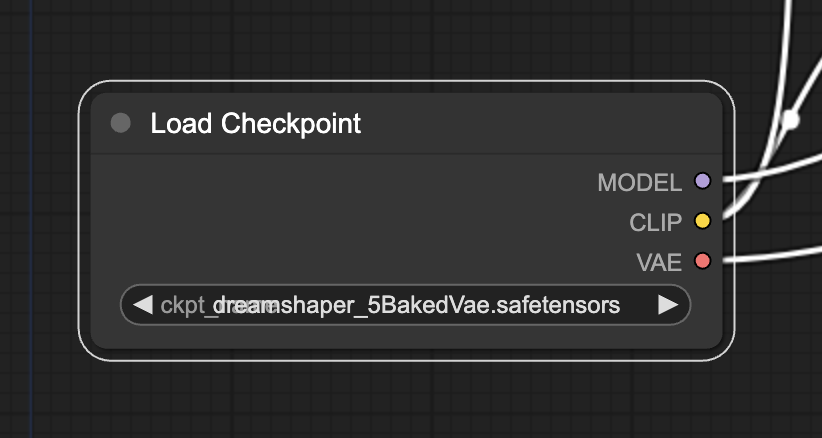
First, select a Stable Diffusion Checkpoint model in the Load Checkpoint node. Click on the model name to show a list of available models.
If the node is too small, you can zoom in and out using the mouse wheel or pinch with two fingers on the touchpad.
If clicking the model name does nothing, you may not have installed a model or configured it to use your existing models in A1111. Go back to the installation guide to fix it first.
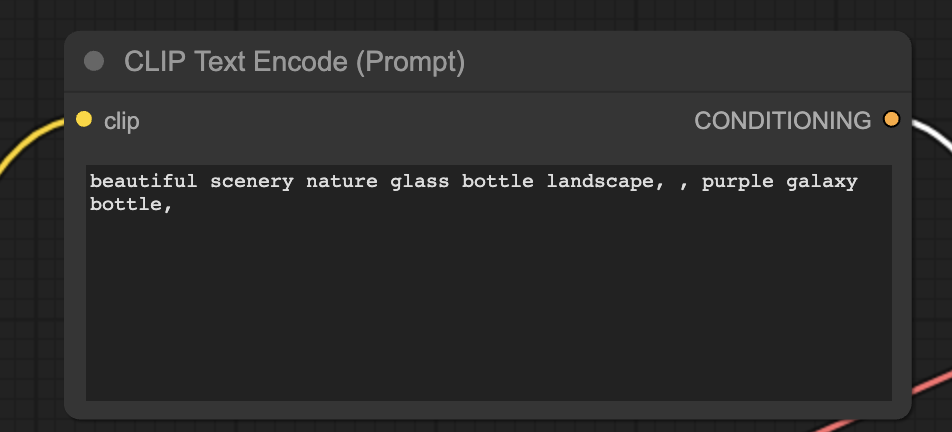
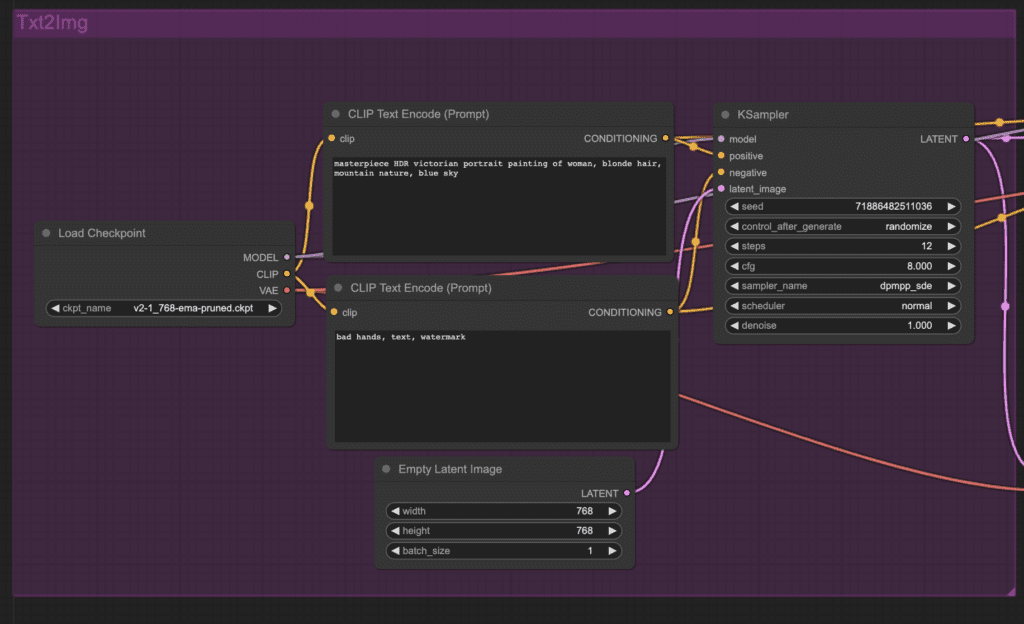
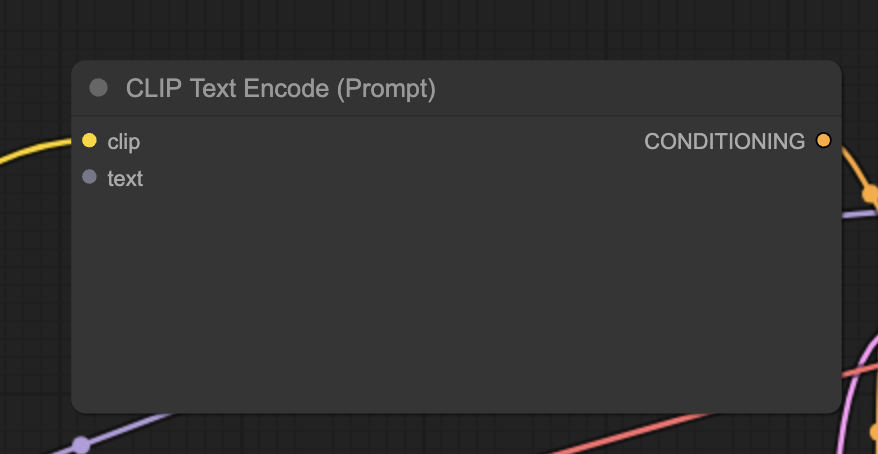
2. Enter a prompt and a negative prompt
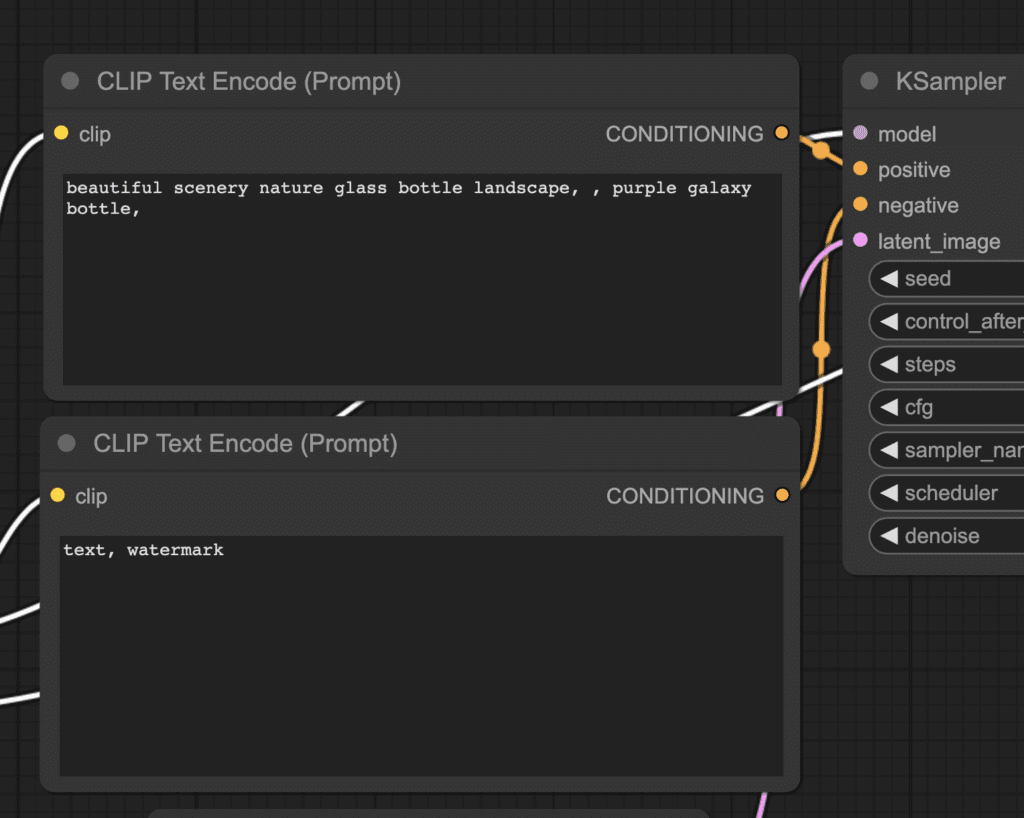
You should see two nodes labeled CLIP Text Encode (Prompt). Enter your prompt at the top and your negative prompt at the bottom.
The CLIP Text Enode node first converts the prompt into tokens and then encodes them into embeddings with the text encoder.
You can use the syntax (keyword:weight) to control the weight of the keyword. For example, (keyword:1.2) is used to increase its effect. (keyword:0.8) to decrease its effect.
Why is the top one the prompt? Look at the CONDITIONING output. It is connected to the positive input of the KSampler node. The bottom one is connected to the negative, so it is for the negative prompt.
3. Generate an image
Click Queue to run the workflow. After a short wait, the first image should be generated.

What has just happened?
The advantage of using ComfyUI is that it is very configurable. It is worth learning what each node does so you can use them to suit your needs.
You can skip the rest of this section if you are not interested in the theory.
Load Checkpoint node
Use the Load Checkpoint node to select a model. A Stable Diffusion model has three main parts:
- MODEL: The noise predictor model in the latent space.
- CLIP: The language model preprocesses the positive and the negative prompts.
- VAE: The Variational AutoEncoder converts the image between the pixel and the latent spaces.
The MODEL output connects to the sampler, where the reverse diffusion process is done.
The CLIP output connects to the prompts because the prompts need to be processed by the CLIP model before they are useful.
In text-to-image, VAE is only used in the last step: Converting the image from the latent to the pixel space. In other words, we are only using the decoder part of the autoencoder.
CLIP Text Encode
The CLIP text encode node gets the prompt and feeds it into the CLIP language model. CLIP is OpenAI’s language model, transforming each word in a prompt into embeddings.
Empty latent image

A text-to-image process starts with a random image in the latent space.
The size of the latent image is proportional to the actual image in the pixel space. So, if you want to change the size of the image, you change the size of the latent image.
You set the height and the width to change the image size in pixel space.
Here, you can also set the batch size, which is how many images you generate in each run.
KSampler
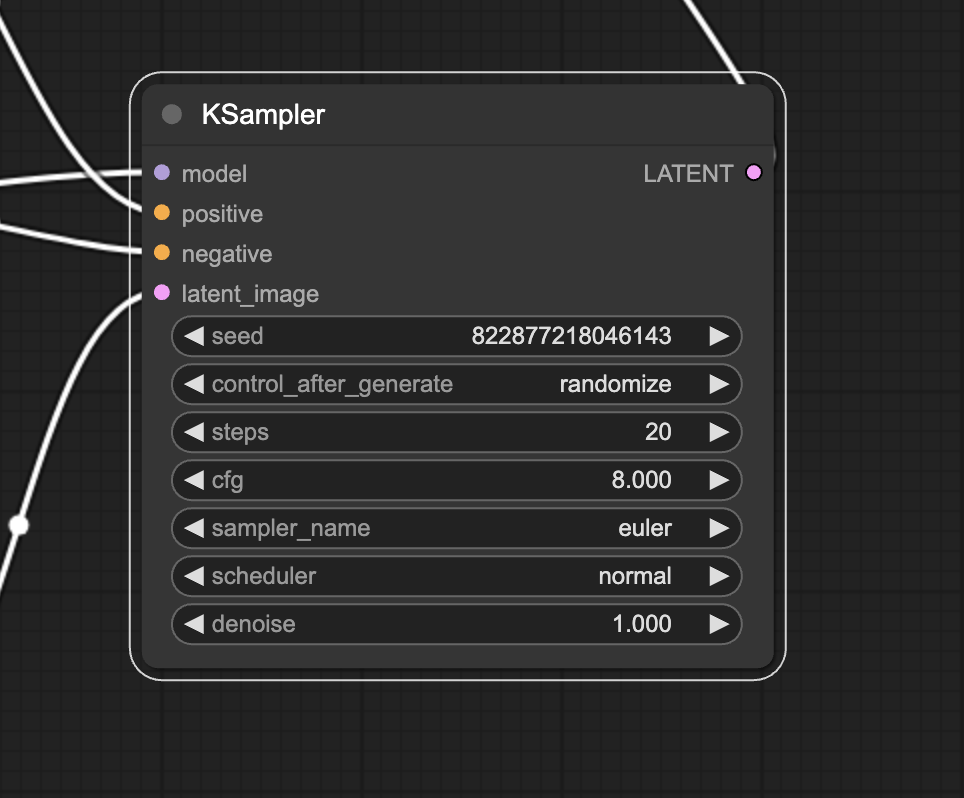
KSampler is at the heart of image generation in Stable Diffusion. A sampler denoises a random image into one that matches your prompt.
KSampler refers to samplers implemented in this code repository.
Here are the parameters in the KSampler node.
- Seed: The random seed value controls the initial noise of the latent image and, hence, the composition of the final image.
- Control_after_generation: How the seed should change after each generation. It can either be getting a random value (randomize), increasing by 1 (increment), decreasing by 1 (decrement), or unchanged (fixed).
- Step: Number of sampling steps. The higher, the fewer artifacts in the numerical process.
- Sampler_name: Here, you can set the sampling algorithm. Read the sampler article for a primer.
- Scheduler: Controls how the noise level should change in each step.
- Denoise: How much of the initial noise should be erased by the denoising process. 1 means all.
Image-to-image workflow
The Img2img workflow is another staple workflow in Stable Diffusion. It generates an image based on the prompt AND an input image.
You can adjust the denoising strength to control how much Stable Diffusion should follow the base image.
Download the image-to-image workflow
Drag and drop this workflow image to ComfyUI to load.
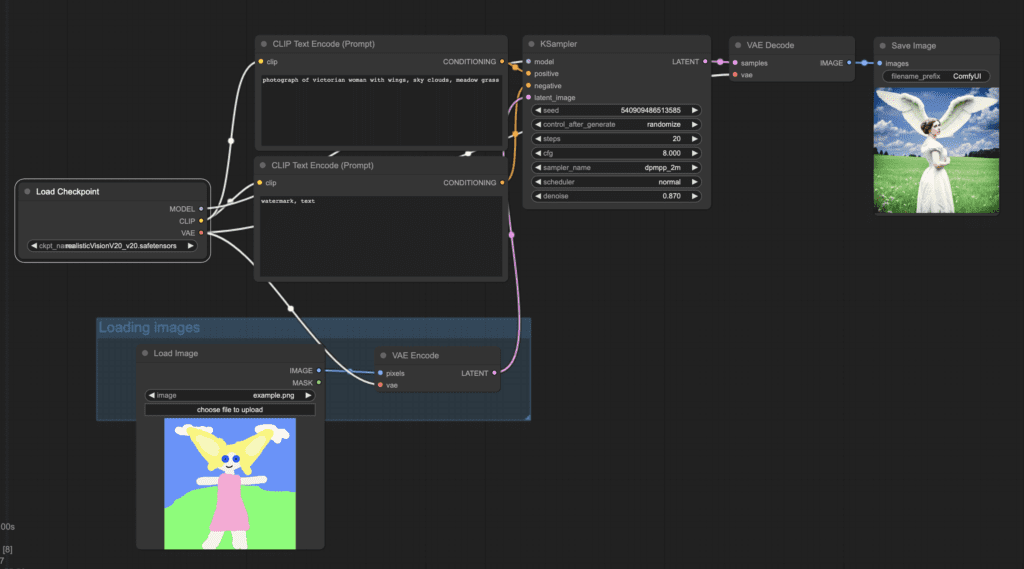
To use this img2img workflow:
- Select the checkpoint model.
- Revise the positive and the negative prompts.
- Optionally adjust the denoise (denoising strength) in the KSampler node.
- Press Queue Prompt to start generation.
ComfyUI Manager
ComfyUI manager is a custom node that lets you install and update other custom nodes through the ComfyUI interface.
Install ComfyUI Manager on Windows
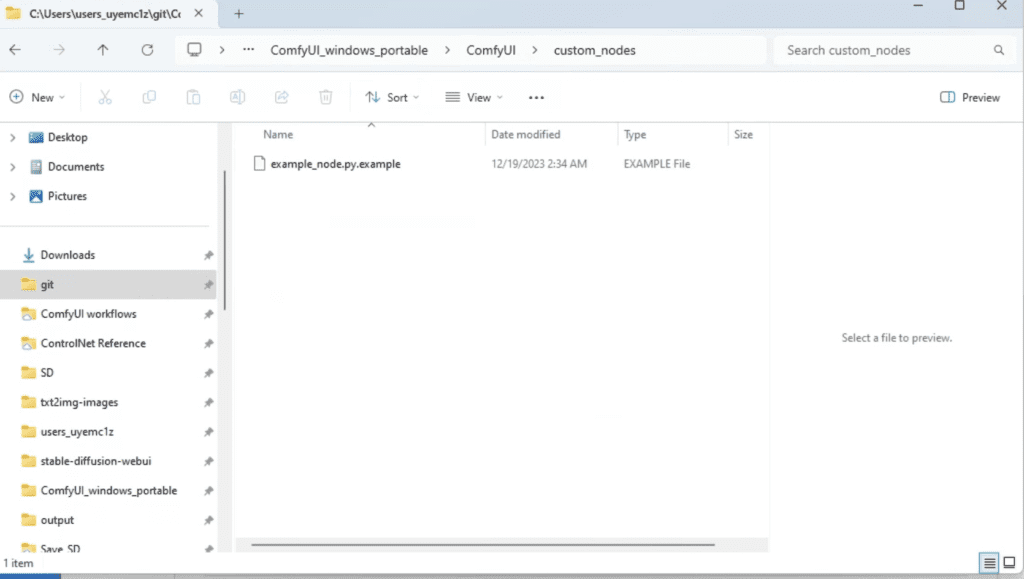
In the File Explorer App, navigate to the folder ComfyUI_windows_portable > ComfyUI > custom_nodes.
In the address bar, type cmd and press Enter.
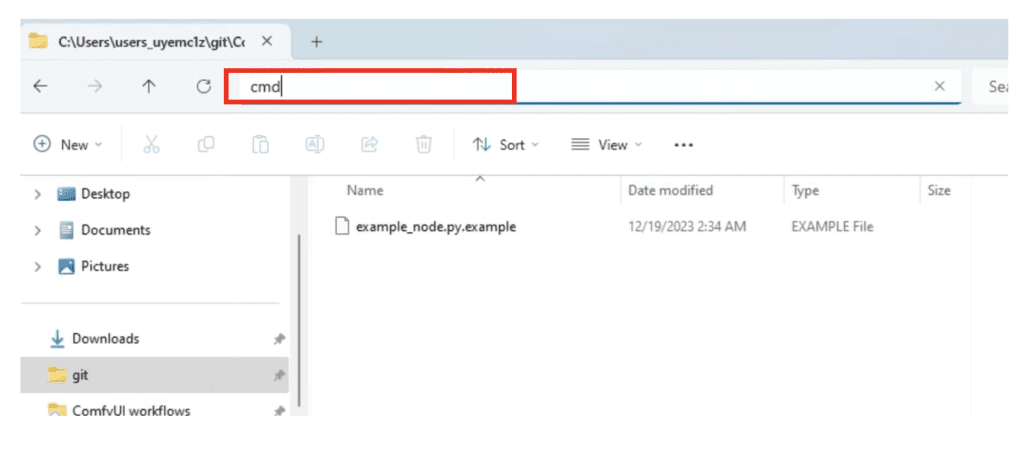
A command prompt terminal should come up.
Type the following command and press Enter.
git clone https://github.com/ltdrdata/ComfyUI-ManagerWait for it to complete.
Restart ComfyUI. You should see the new Manager button on top.

Tip: If the ComfyUI manager doesn’t show up, read the error message in the terminal.
A common error mode is GIT (A source code management system) not installed in your system. Installing it should resolve the issue.
Install ComfyUI Manager on Mac
To install ComfyUI Manager, go to the custom nodes folder Terminal (Mac) App:
cd ComfyUI/custom_nodesAnd clone the node to your local storage.
git clone https://github.com/ltdrdata/ComfyUI-ManagerRestart ComfyUI completely.
Using ComfyUI Manager
After the installation, you should see an extra Manager button on the top bar.
Clicking it shows a GUI that lets you
- Install/uninstall custom nodes.
- Install missing nodes in the current workflow.
- Install Models such as checkpoint models, AI upscalers, VAEs, LoRA, ControlNet models, etc.
- Update ComfyUI UI.
- Read the community manual.
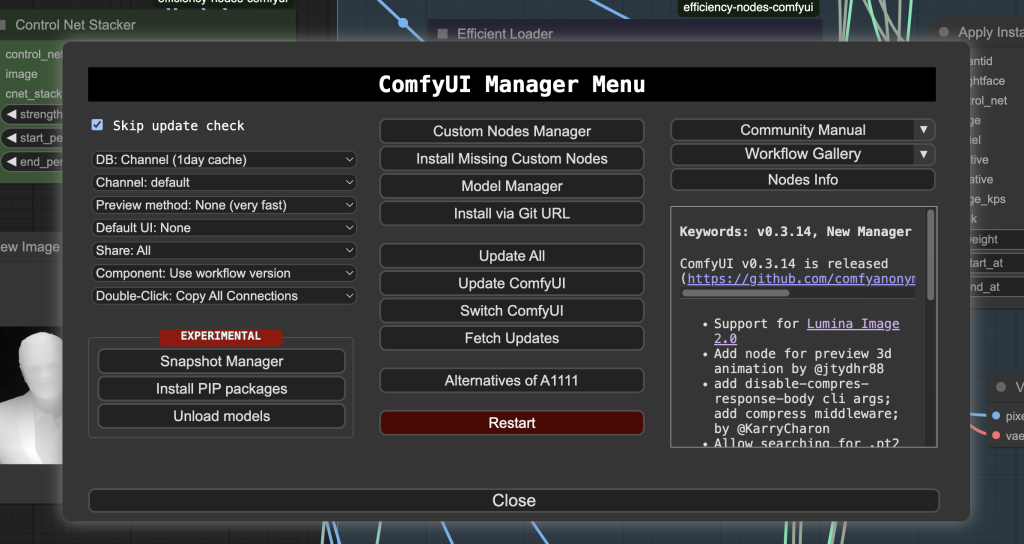
The Install Missing Nodes function is especially useful for finding what custom nodes that are required in the current workflow.
The Install Custom Nodes menu lets you manage custom nodes. You can uninstall or disable an installed node or install a new one.

How to install missing custom nodes
You may not have installed all the custom nodes you need in a workflow. After loading the workflow file, perform the following steps to install missing custom nodes.
- Click Manager in the Menu.
- Click Install Missing custom Nodes.
- Restart ComfyUI completely.
ComfyUI Update All
The simplest way to update ComfyUI is to click the Update All button in ComfyUI manager. It will update ComfyUI itself and all custom nodes installed. Restart ComfyUI to complete the update.
Follow the following update steps if you want to update ComfyUI or the custom nodes independently.
How to update ComfyUI
To update ComfyUI:
- Click Manager in the Menu.
- Click Update ComfyUI.
- Restart ComfyUI completely.
How to update custom nodes
You can use ComfyUI manager to update custom nodes.
- Click Manager in the Menu.
- Click Fetch Updates. It may take a while to be done.
- Click Install Custom nodes.
- If an update is available, a new Update button will appear next to an installed custom node.
- Click Update to update the node.

6. Restart ComfyUI.
If this update process doesn’t work, you will need to use a terminal such as the PowerShell app (Windows) or the Terminal app (Mac) to do a git pull.
- Open the terminal.
- cd to the custom node’s directory. Below is an example of going into the controlnet aux directory.
cd ComfyUI/custom_nodes/comfyui_controlnet_aux/3. Do a git pull.
git pull4. Restart ComfyUI.
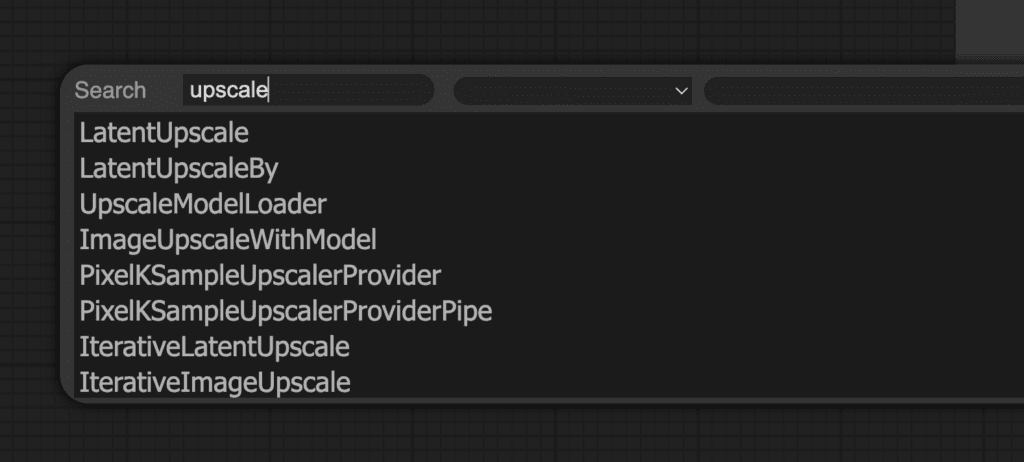
Search custom nodes
The Add Node menu may not be the best way to find a custom node. Things only get harder after you install many custom nodes.
You can double-click any empty area to bring up a menu to search for nodes.
Upscaling
There are several ways to upscale in Stable Diffusion. For teaching purposes, let’s go through upscaling with
AI upscale
An AI upscaler is an AI model for enlarging images while filling in details. They are not Stable Diffusion models but neural networks trained for enlarging images.
Load this upscaling workflow by first downloading the image on the page. Drag and drop the image to ComfyUI.
Tip: Dragging and dropping an image made with ComfyUI loads the workflow that produces it.
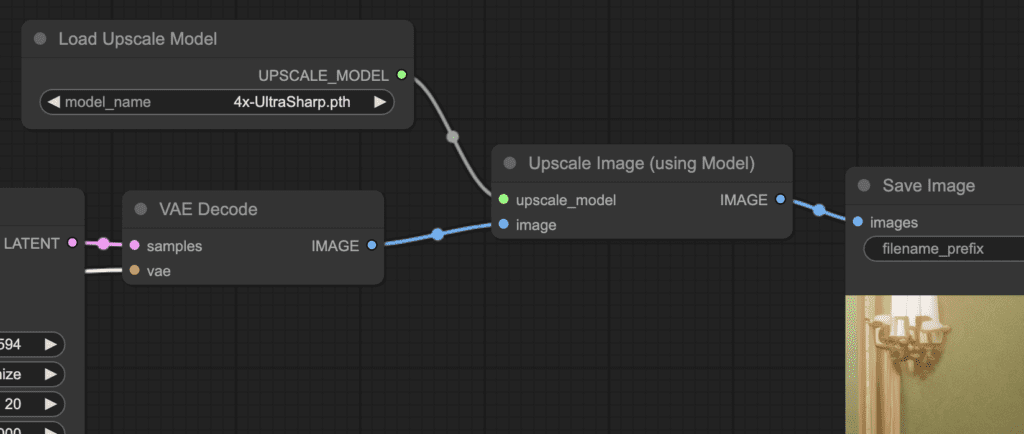
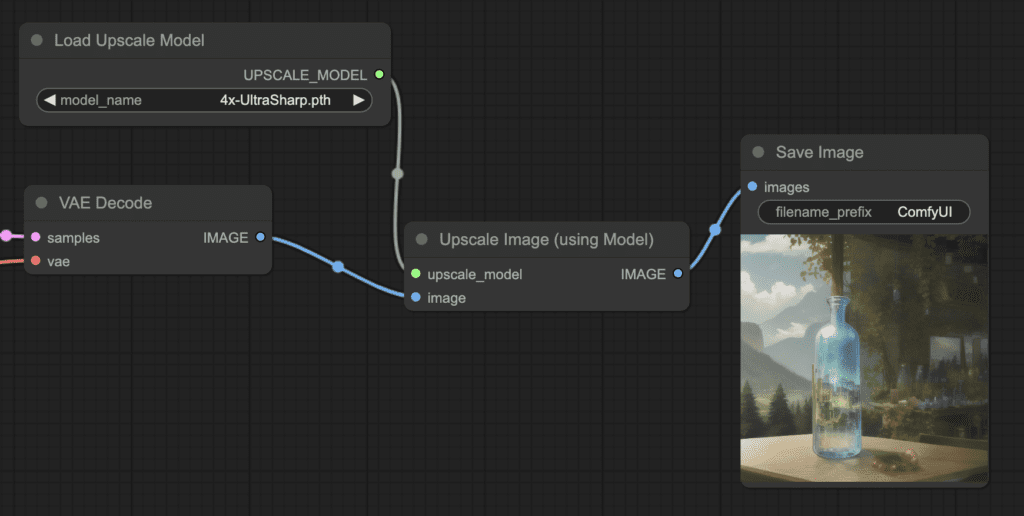
In this basic example, you see the only additions to text-to-image are
- Load Upscale Model: This is for loading an AI upscaler model. (This node is in Add node > loaders)
- Upscale image(using Model): The node now sits between the VAE decoder and the Save image node. It takes the image and the upscaler model. And outputs an upscaled image. (This node is in Add node > Image > upscaling)
To use this upscaler workflow, you must download an upscaler model from the Upscaler Wiki, and put it in the folder models > upscale_models.
Alternatively, set up ComfyUI to use AUTOMATIC1111’s model files.
Select an upscaler and click Queue Prompt to generate an upscaled image. The image should have been upscaled 4x by the AI upscaler.
Exercise: Recreate the AI upscaler workflow from text-to-image
It is a good exercise to make your first custom workflow by adding an upscaler to the default text-to-image workflow.
- Get back to the basic text-to-image workflow by clicking Load Default.
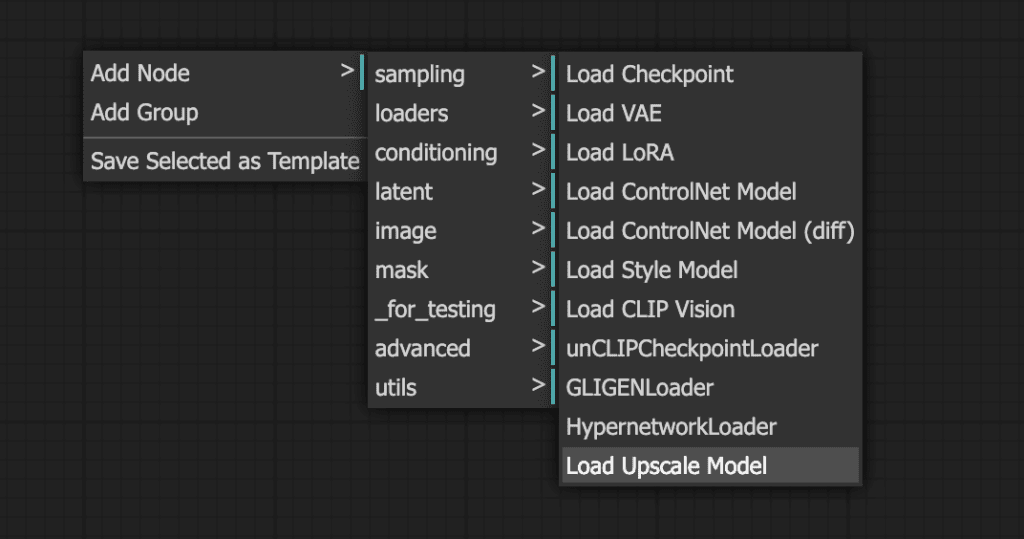
2. Right-click an empty space near Save Image. Select Add Node > loaders > Load Upscale Model.
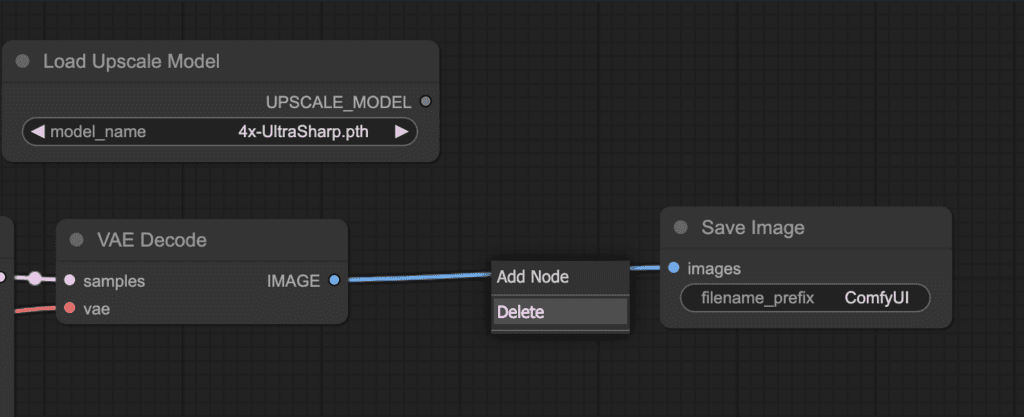
3. Click on the dot on the wire between VAE Decode and Save Image. Click Delete to delete the wire.
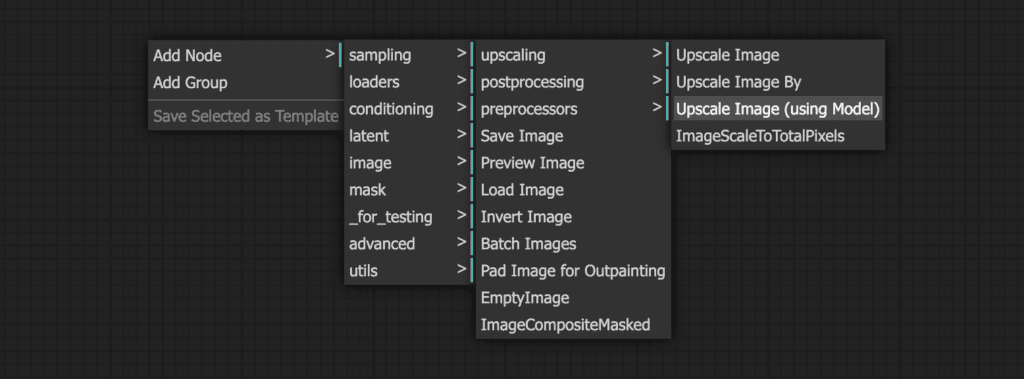
4. Right-click on an empty space and select Add Node > image > upscaling > Upscale Image (using Model) to add the new node.
5. Drag and hold the UPSCALE_MODEL output of Load Upscale Model. Drop it at upscale_model of the Upscale Image (using Model) node.
6. Drag and hold the IMAGE output of the VAE Decode. Drop it at the image input of the Upscale Image (using Model).
7. Drag and hold the IMAGE output of the Upscale Image (uisng Model) node. Drop it at the images input of the Save Image node.
8. Click Queue Prompt to test the workflow.
Now you know how to make a new workflow. This skill comes in handy to make your own workflows.
Hi-res fix
Download the first image on this page and drop it in ComfyUI to load the Hi-Res Fix workflow.
This is a more complex example but also shows you the power of ComfyUI. After studying the nodes and edges, you will know exactly what Hi-Res Fix is.
The first part is identical to text-to-image: You denoise a latent image using a sampler, conditioned with your positive and negative prompts.
The workflow then upscales the image in the latent space and performs a few additional sampling steps. It adds some initial noise to the image and denoises it with a certain denoising strength.
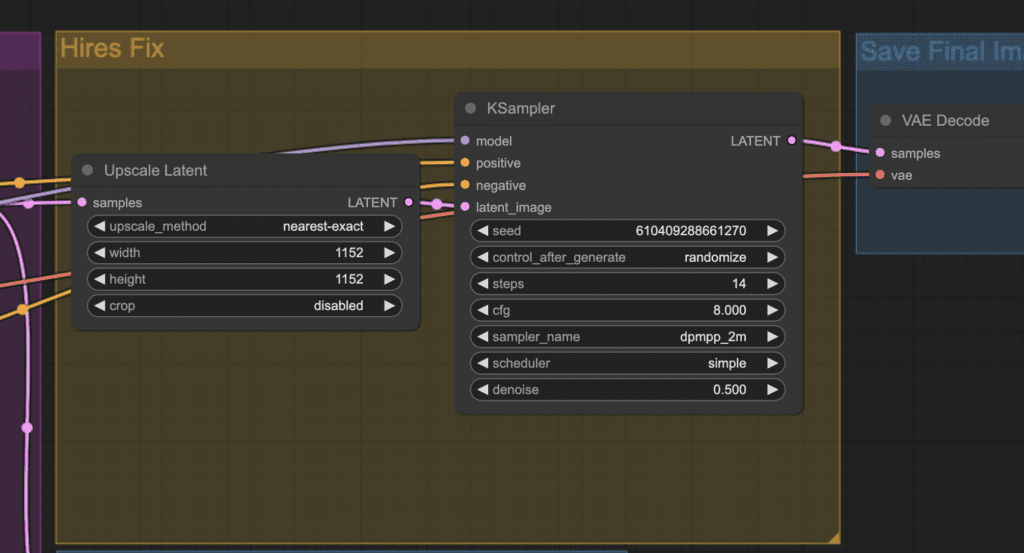
The VAE decoder then decodes the larger latent image to produce an upscaled image.
SD Ultimate upscale – ComfyUI edition
SD Ultimate upscale is a popular upscaling extension for AUTOMATIC1111 WebUI. You can use it on ComfyUI too!
Github Page of SD Ultimate upscale for ComfyUI
This is also a good exercise for installing a custom node.
Installing the SD Ultimate upscale node
To install this custom node, go to the custom nodes folder in the PowerShell (Windows) or Terminal (Mac) App:
cd ComfyUI/custom_nodesAnd clone the node to your local storage.
git clone https://github.com/ssitu/ComfyUI_UltimateSDUpscale --recursiveRestart ComfyUI completely.
Using SD Ultimate upscale
A good exercise is to start with the AI upscaler workflow. Add SD Ultimate Upscale and compare the result.
Load the AI upscaler workflow by dragging and dropping the image to ComfyUI or using the Load button to load.
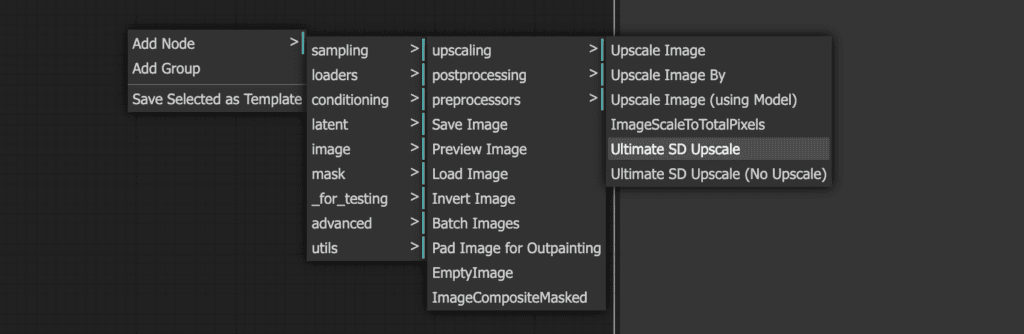
Right-click on an empty space. Select Add Node > image > upscaling > Ultimate SD Upscale.
You should see the new node Ultimate SD Upscale. Wire up its input as follows.
- image to VAE Decode’s IMAGE.
- model to Load Checkpoint’s MODEL.
- positive to CONDITIONING of the positive prompt box.
- negative to CONDITIONING of the negative prompt box.
- vae to Load Checkpoint’s VAE.
- upscale_model to Load Upscale Model’s UPSCALE_MODEL.
For the output:
- IMAGE to Save Image’s images.
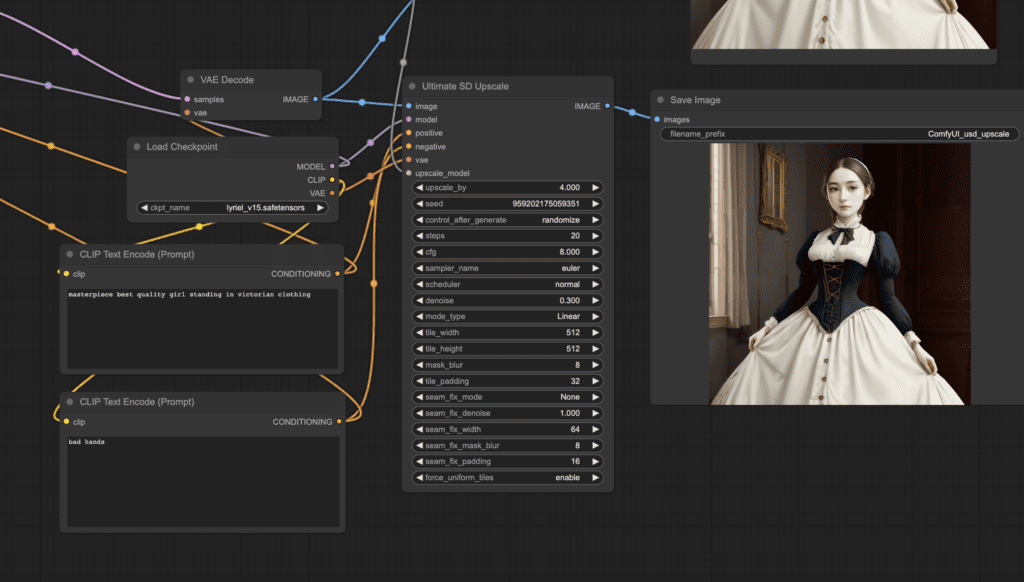
If they are wired correctly, clicking Queue Prompt should show two large images, one with the AI upscaler and the other with Ultimate Upscale.
You can download this workflow example below. Drag and drop the image to ComfyUI to load.
ComfyUI Inpainting
You can use ComfyUI for inpainting. It is a basic technique to regenerate a part of the image.
I have to admit that inpainting is not the easiest thing to do with ComfyUI. But here you go…
Step 1: Open the inpaint workflow
Download the following inpainting workflow. Drag and drop the JSON file to ComfyUI.
Step 2: Upload an image
Pick an image that you want to inpaint.

You can download the image in PNG format here.
Upload it to the workflow.

Step 3: Create an inpaint mask
Right-click the image. Select Open in MaskEditor in the context menu.
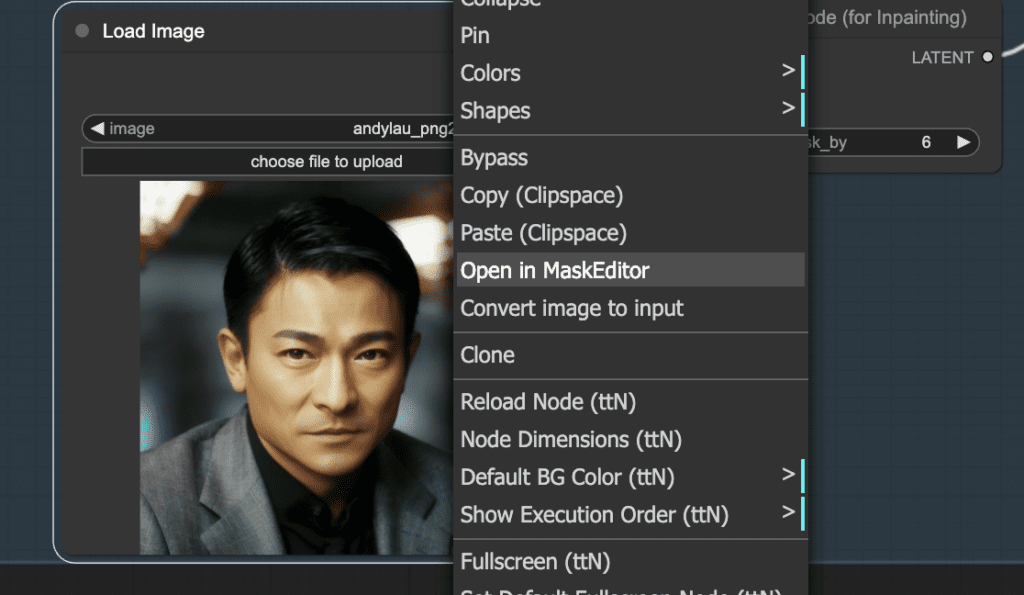
Mask the area you want to regenerate.
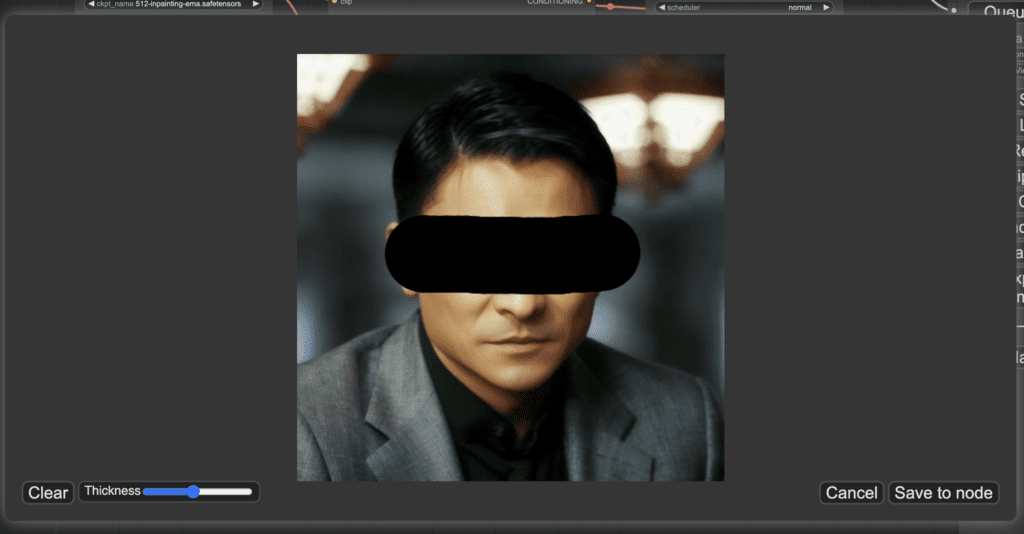
Click Save to node.
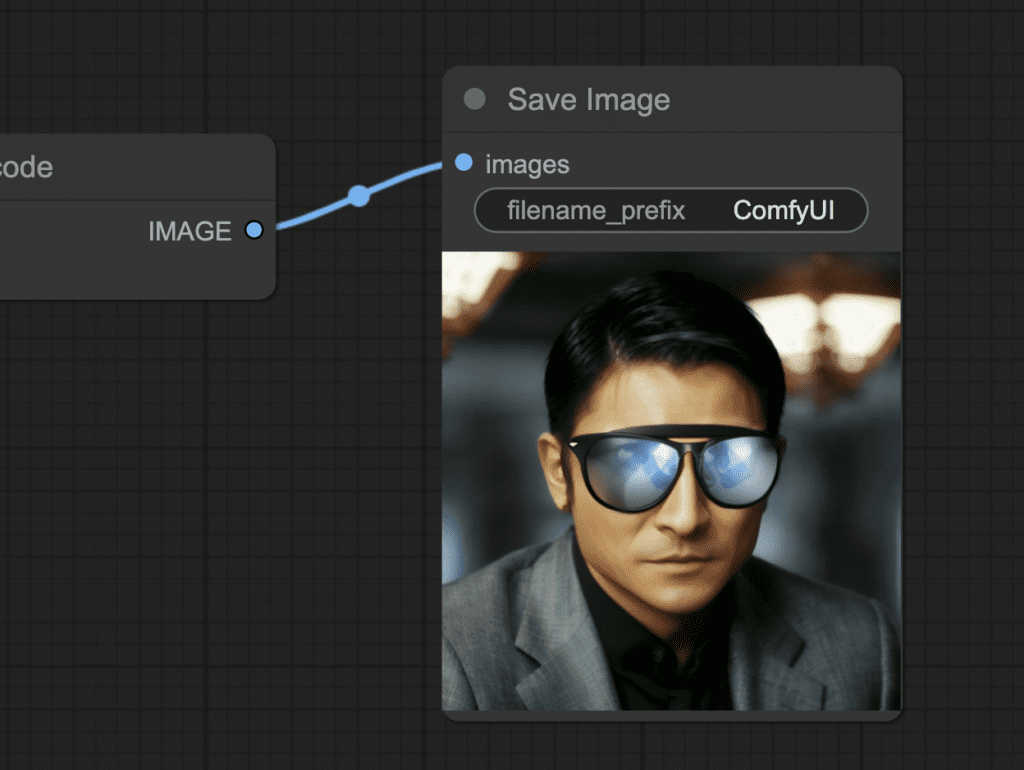
Step 4: Adjust parameters
Select a Checkpoint model. Note that an inpainting model doesn’t work with the workflow.
Change the prompt:
a man wearing sunglasses, epic style, super hero, highly detailed
The original denoising strength (denoise) is too high. Set it to 0.6.
Step 5: Generate inpainting
Finally, press the Queue Prompt to perform inpainting.
You can find more inpainting workflows in the ComfyUI impainting post.
SDXL workflow
Because of its extreme configurability, ComfyUI is one of the first GUIs that made the Stable Diffusion XL model work.
Download the following SDXL workflow for ComfyUI. Drag and drop the image to ComfyUI to load.
You will need to change
- Positive Prompt
- Negative Prompt
That’s it!
There are a few more complex SDXL workflows on this page.
ComfyUI Impact Pack
ComfyUI Impact pack is a pack of free custom nodes that greatly enhance what ComfyUI can do.
There are more custom nodes in the Impact Pact than I can write about in this article. See the official tutorials to learn them one by one. Read through the beginner tutorials if you want to use this set of nodes effectively.
Install
To install the ComfyUI Impact Pack, first open the PowerShell App (Windows) or the Terminal App (Mac or Linux).
cd custom_nodesClone the Impact Pack to your local storage.
git clone https://github.com/ltdrdata/ComfyUI-Impact-Pack.gitClone Workflow Component that is needed for Impact Pack.
git clone https://github.com/ltdrdata/ComfyUI-Workflow-ComponentRestart ComfyUI completely.
Regenerate faces with Face Detailer (SDXL)
ADetailer is an AUTOMATMIC1111 extension that fixes faces using inpainting automatically. The counterpart in ComfyUI is the Face Detailer (also called DDetailer). It is included in the Impact Pack.
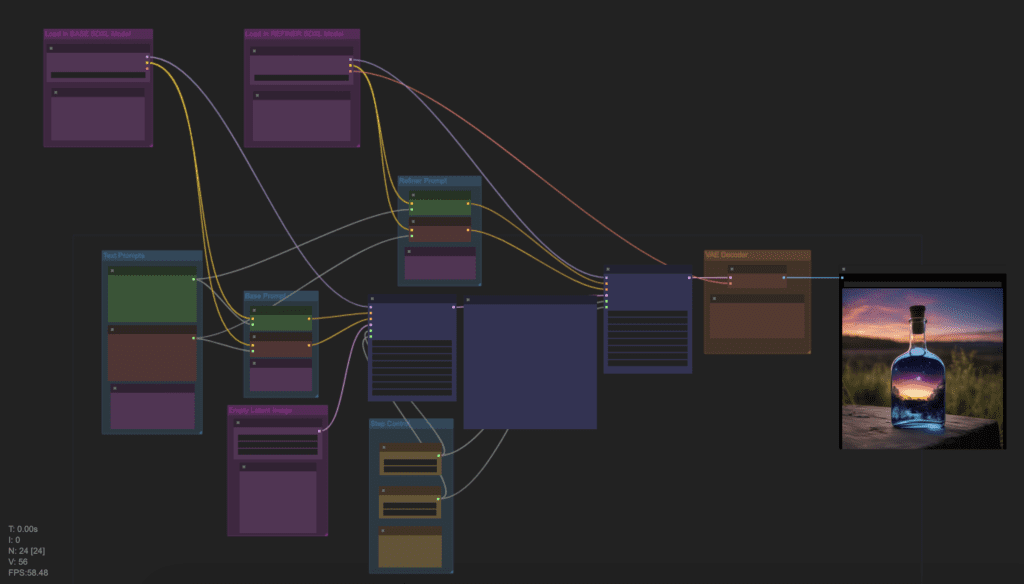
You can use this workflow in the Impact Pack to regenerate faces with the Face Detailer custom node and SDXL base and refiner models. Download and drop the JSON file into ComfyUI.
To use this workflow, you will need to set
- The initial image in the Load Image node.
- An SDXL base model in the upper Load Checkpoint node.
- An SDXL refiner model in the lower Load Checkpoint node.
- The prompt and negative prompt for the new images.
Click Queue Prompt to start the workflow.
Andy Lau’s face doesn’t need any fix (Did he??). So I used a prompt to turn him into a K-pop star.
a closeup photograph of a korean k-pop star man
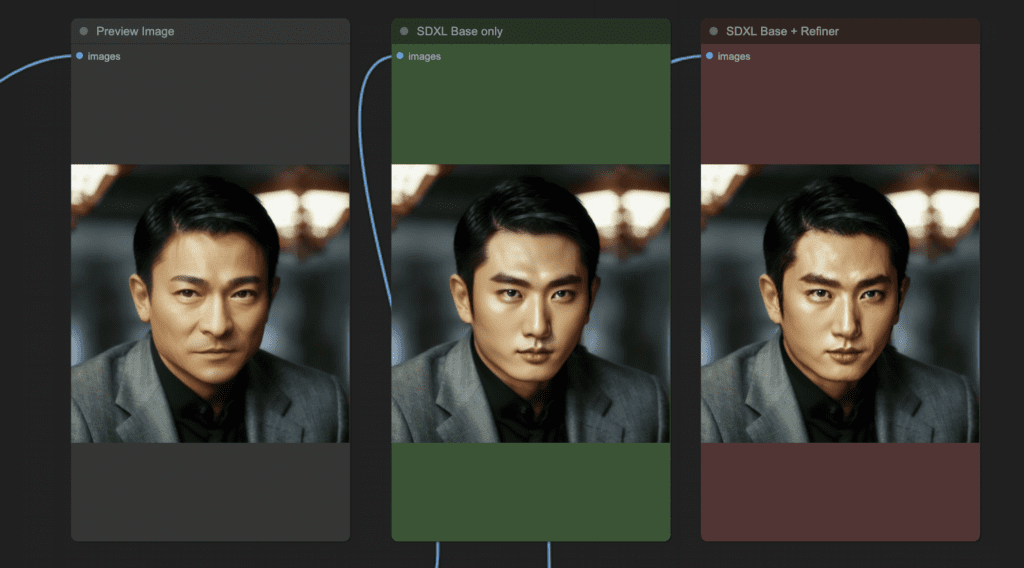
Only the face changes, while the background and everything else stays the same.
Regenerate faces with Face Detailer (SD v1.5)
The following is an example of text-to-image workflow using the Face Detailer to automatically fix faces. It is a v1.5 workflow.
Inpainting with ControlNet provides extra consistency by following the original content. Here’s an example of a text-to-image workflow using Face Detailer with ControlNet Tile.
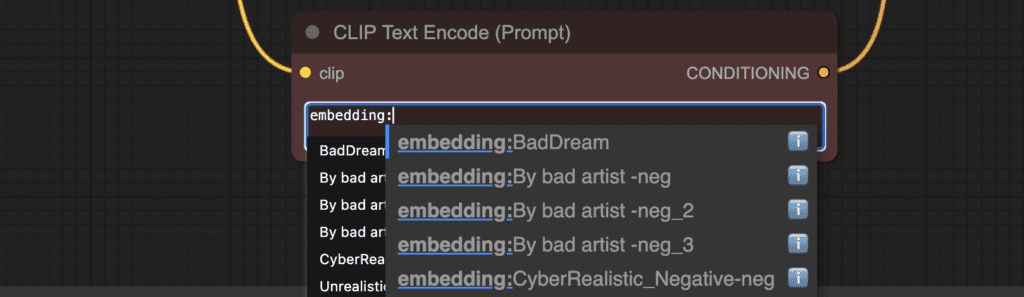
Embeddings
To use embeddings (also called textual inversion) in ComfyUI, type embedding: in the positive or negative prompt box. For example:
embedding: BadDream
ComfyUI will search the embeddings in the folder ComfyUI > models > embeddings with the same filename.
Embedding with autocomplete
But it is a lot of work to look up the filenames. Instead, you can enable the autocomplete of embedding names by installing the ComfyUI-Custom-Scripts custom node.
You can install it by using the ComfyUI manager. Click Manager > Install Custom nodes. Search for “ComfyUI-Custom-Scripts” and install it. Restart ComfyUI.
After typing embedding: in a prompt, a list of available embeddings should appear. Select the one you want to use.
Embedding weight
Since embeddings are just keywords, you can apply keyword weights to embedding similarly.
(embedding: BadDream:1.2)
This increases the embedding weight by 20%.
LoRA
LoRA is a small model file modifying a checkpoint model. It is frequently used for modifying styles or injecting a person into the model.
In fact, the modification of LoRA is clear in ComfyUI:
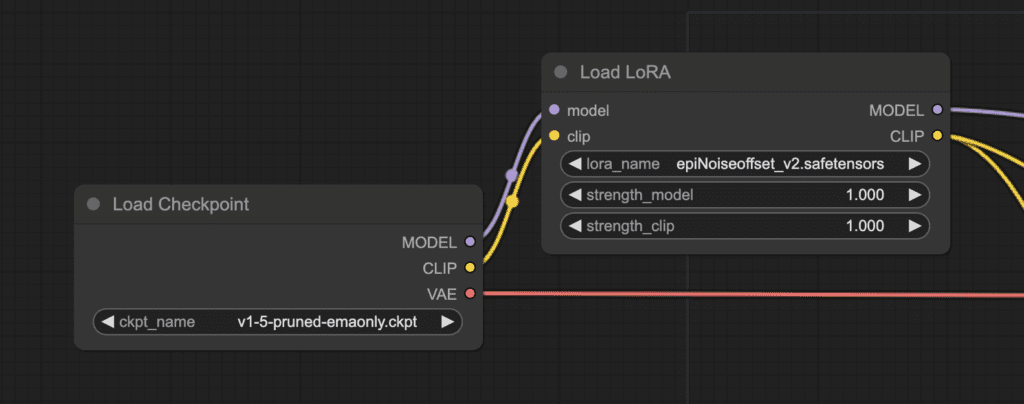
The LoRA model changes the MODEL and CLIP of the checkpoint model but leaves the VAE untouched.
Simple LoRA workflows
This is the simplest LoRA workflow possible: Text-to-image with a LoRA and a checkpoint model.
Download the simple LoRA workflow
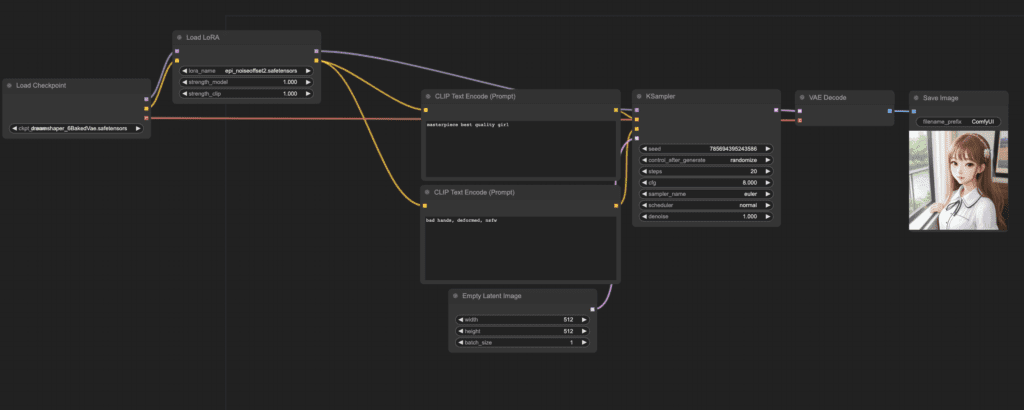
To use the workflow:
- Select a checkpoint model.
- Select a LoRA.
- Revise the prompt and the negative prompt.
- Click Queue Prompt.
Multiple LoRAs
You can use two LoRAs in the same text-to-image workflow.
Download the two-LoRA workflow
The usage is similar to one LoRA, but now you must pick two.
The two LoRAs are applied one after the other.
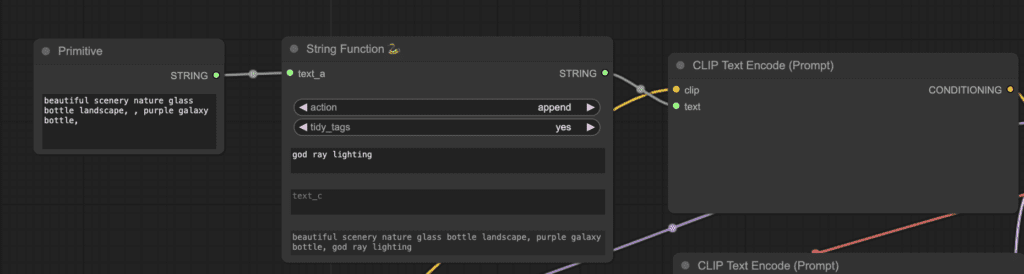
Joining two strings
To join two strings, you will use a node called String Function from the ComfyUI-Custom-Scripts custom node.
You should have installed this custom node to enable autocomplete of the textual inversion. Install it in the ComfyUI Manager if not.
Double-click an empty space. Search for and add the StringFunction node.
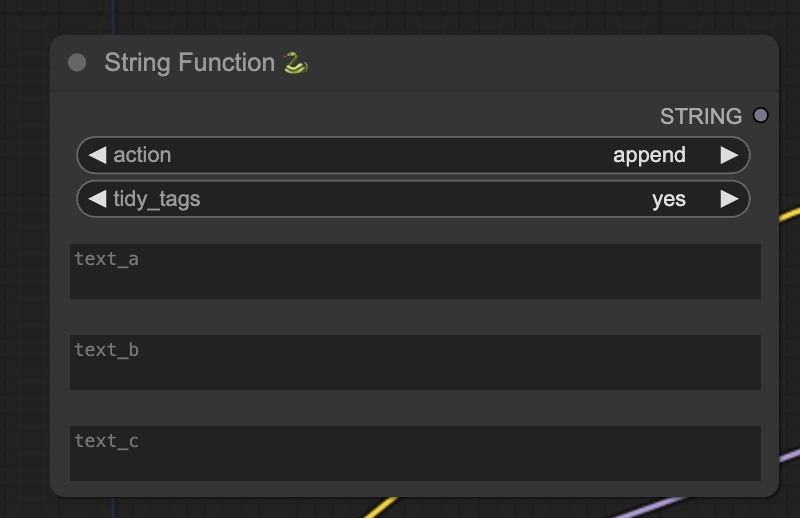
Convert the first text box (text_a) to input by right-clicking the node and selecting Convert text_a to input. The node should now look like this:
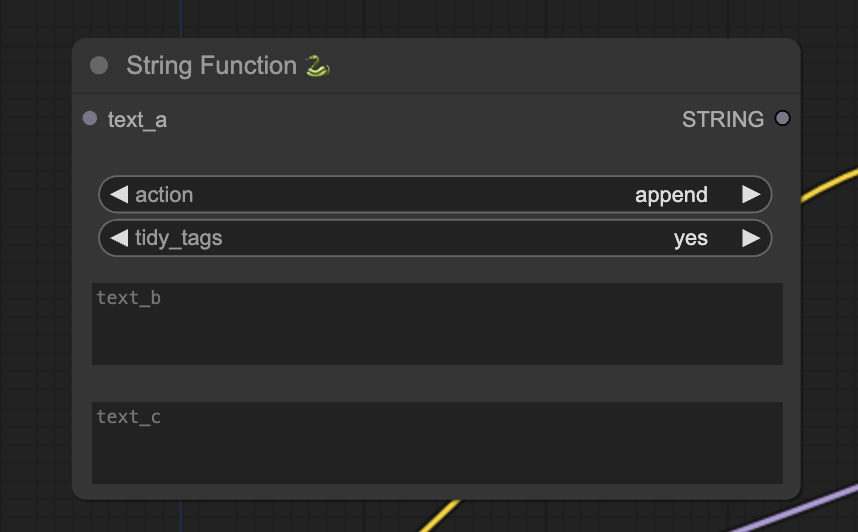
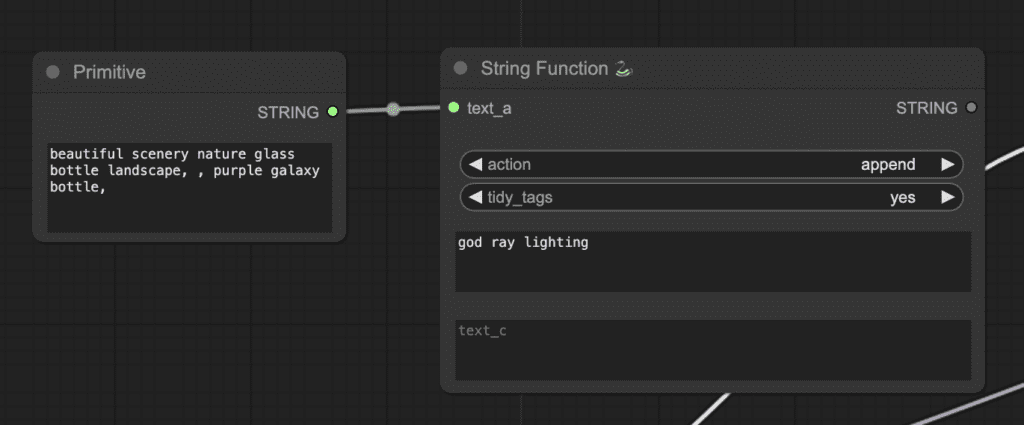
Add a primitive node and connect it to the text_a input. Now, you can write the prompts in two different text boxes. They will be joined together.
To use it, you will need to convert the textbox of CLIP Text Encode (Prompt) to an input.
Finally, connect the String Function and the CLIP Text Encode (Prompt) nodes.
Shortcuts and Tricks for ComfyUI
Copy and paste
Select a node and press Ctrl+C to copy.
Ctrl+V to paste.
Ctrl+Shift+V to paste with input connections intact.
Moving multiple nodes
Create a group to move a set of nodes together.
Alternatively, hold down Ctrl and drag to create a box to select multiple nodes. You can also hold down Ctrl to select multiple nodes.
To move them, hold down Shift and move the mouse.
Mute a node
You can temporarily disable a node by muting it. Select a node and press Ctrl+M to node a node.
There’s no keyboard shortcut to mute a group. You can select Bypass Group Node in the right-click menu to bypass it. Or mute the first node in the group to disable it.
Minimize a node
Clicking the dot on the top left corner of the node minimizes it.
Generate image
Press Ctrl+Enter to put the workflow in the queue and generate images.
Embedded workflow
ComfyUI saves the whole workflow in the metadata of the PNG file it saves. To load the workflow, drag and drop the image to ComfyUI.
Fix seeds to save time
ComfyUI only reruns a node if the input changes. If you are working on a long chain of nodes, you can save time from regenerating the upstream results by fixing the seeds.
Exercise: Make a workflow to compare with and without LoRA
To be good at ComfyUI, you really need to make your own workflows.
A good exercise is to create a workflow to compare text-to-image with and without a LoRA while keeping everything else the same.
To achieve this, you need to know how to share parameters between two nodes.
Sharing parameters between two nodes
Let’s use the same seed in two K-Samplers.
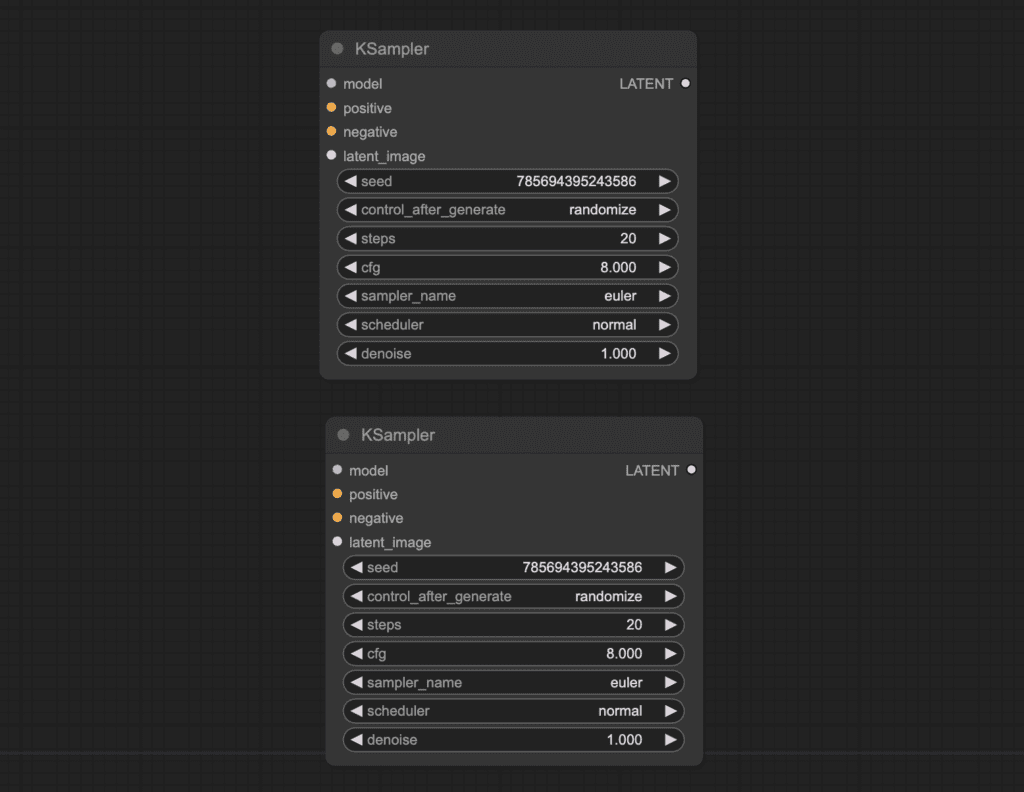
They have their own seed values. To use the same seed value between the two, right-click on the node and select convert seed to input.
You should get a new input node called seed.
Right-click on an empty space. Select Add node > utils > Primitive. Connect the primitive node to the two seed inputs.
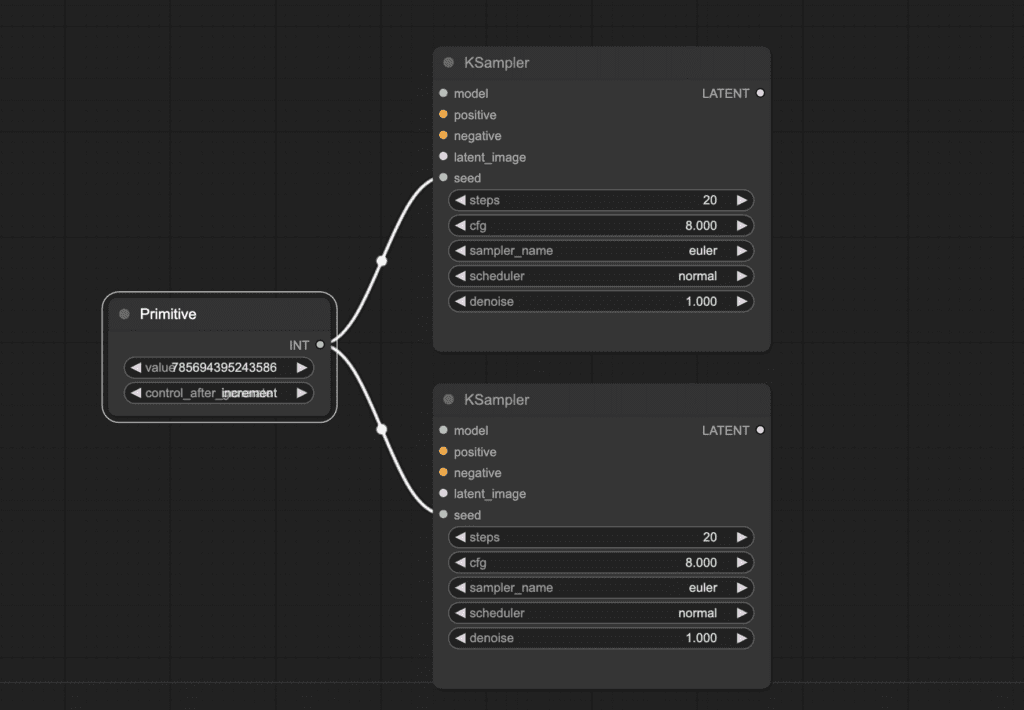
Now, you have a single seed value sharing between the two samplers.
Workflow to compare images with and without LoRA
Using this technique alone, you can modify the single LoRA example to make a workflow comparing the effect of LoRA while keeping everything else the same.
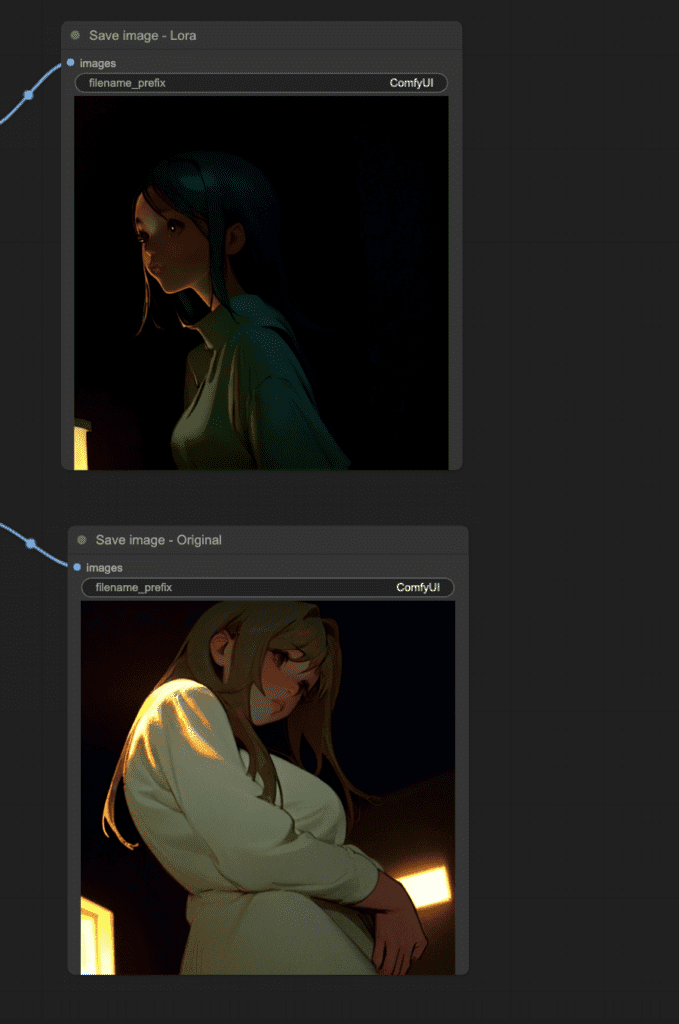
You can download the answer below.
FAQ
I got an Out Of Memory (OOM) error. What should I do?
You can try adding the argument --disable-smart-memory to the launch file run_nvidia_gpu.bat. This option forces ComfyUI to unload the model from VRAM as much as possible.
Useful resources
Official ComfyUI tutorial – A graphical tutorial. Very basic.
ComfyUI Examples – A bunch of example workflows you can download.
ComfyUI Community Manual – A reference manual.
youre such an asshole, i’ve started this 12 hours ago. its 2a.m. now and i was stuck with gemini at the end because it seems it did understand euler, hilbert the difference in relation of energy or of scale also it seems im fcking good in physiks, in quantenphysiks and the things i did ask were invented but as things as Computers that work with qubits and mass comes down to quarks and so on for hours. but i didnt buy google colab pro because i lost myself in excersizing(was fun tho) but, well now i dont want to understand everything i work with anymore. Youre totuorials waked up my interest keep up the good work. if im less broke anytime im gonna support
Hi Andrew, I copied your comfyUI Notebook into my drive and started the cell in colab with only Flux1_dev. I got a link for cloudflare. Clicking it results in a 403-Error. Do you have an idea how to fix this? Cheers, S
“Der Zugriff auf reviewed-interpretation-mounted-accent.trycloudflare.com wurde verweigert
Du bist nicht zum Aufrufen dieser Seite autorisiert.
HTTP ERROR 403”
Another user reports this workaround. See if this works for you: “By simply clicking in the address bar and highlighting the address and hitting enter, it works! Hitting the refresh button does not work and if the URL is not highlighted it does not work. Only if the address is highlighted.”
Great ressource to learn. The time and effort it must have taken to compile is much appreciated!
Hi Andrew, I’ve been using Comfy for a couple of months but have only just realised that I’ve never seen the right hand panel. I’m on windows but Ctrl-0 (or Ctrl-O) doesn’t do anything. I’m using the colab notebook version. Can you help?
thanks
The right panel is gone in the newer versions of comfyui. I’ve updated the post.
Aha so I’m not going mad!
This was an excellent guide that helped me get started. Thank you for spending the time to write such excellent content.
Hi Andrew, been following you since day one 🙂
I’ve mainly been using Auto1111 for casual use and found it intuitie enough to flow between txt2img, img2img all in the same UI, which also contains the metadata so it’s easier to see/retreive. I’ve tried Comfy a few times, but I still don’t grasp how it is intended to work – e.g. if I produced something with one workflow, but then I want to send it to inpaint or img2img, how do I use the result as input, in a completely new workflow or build on from the same one? The main difference bewteen a1111 and cf is that in the former I can choose what to do with the result very intuitively, but in cf if I build a big workflow, but the next time I don’t intend to run it, it seems less useful. I also can’t seem to be able to find metadata associated with the generated outcomes – not sure if I’ve made my question clear here or not… but hopefully you get what I’m confused about?
Thanks for your support! 😭
A1111/Forge is good for interactive art creation. As you said, you can iterate the result easily by sending it to different tabs. But it can be hard to remember what you did.
ComfyUI is more reproducible. People gets the exact image after running the workflow. It is not as interactive but you can change a setting in a long workflow easily to test its effect. Its very well suit for videos where the you want to apply the same processing to all frames.
Another reason to use ComfyUI is model support. It is usually the first GUI to support a new model.
I used EasyDiffusion before, and now I decided to try ComfyUI, but during the test I was unable to repeat the images that I made there, despitewith identical parameters, the ComfyUI result differed from the EasyDiffusion result. When entering a seed value, ComfyUI forcibly lengthens it to 15 characters. Is there a way to get around this?
Each SD software has slightly different implementation in sampling. It’s typical that you cannot reproduce the same image with the exact same settings.
Error occurred when executing KSampler:
How to fix? Thanks!
Query/Key/Value should either all have the same dtype, or (in the quantized case) Key/Value should have dtype torch.int32
query.dtype: torch.float16
key.dtype : torch.float32
value.dtype: torch.float32
seems to be bad programming from a custom node.
To save others some time, since it’s hard to know what parameters you can change and which you can’t:
Hires fix as demonstrated injects noise into the latent, but it injects an amount of noise only appropriate for a “simple” noise schedule– the node itself doesn’t take the schedule into account for determining the amount of noise to inject. So, if you use those nodes, don’t change the noise schedule for the hires fix, or you’ll end up with extra noise in your final output. (Same goes for the advanced ksampler– it doesn’t take schedule into account for noise injection with “enabled” add noise.)
Good news to offset that: you can just turn an image into a latent and hiresfix. You don’t need to regen the whole input, it’s exactly the same thing either way. Just, if you try to hiresfix something dissimilar to your model+clip, it won’t know what do without full denoising and will give you something undesirable (like a bad photoshop clone brush operation that didn’t register your mouse movement until the 8th pixel.)
While there are things comfy can do that A1111 can’t, the reverse is also true (like, dpm2++k with fractional denoise– or, for that matter, noise multiplier for i2i.)
Wait, disregard or delete 🙂 I must have been getting something else wrong.
Hi, uh when i try to run cpu_run.bat it opens the command prompt and shows on the first line
C:\Users\Izaan\Downloads\ComfyUI_windows_portable_nvidia_cu121_or_cpu\ComfyUI_windows_portable\ComfyUI\.ci\windows_base_files>.\python_embeded\python.exe -s ComfyUI\main.py –cpu –windows-standalone-build
The system cannot find the path specified.
and on the second,
C:\Users\Izaan\Downloads\ComfyUI_windows_portable_nvidia_cu121_or_cpu\ComfyUI_windows_portable\ComfyUI\.ci\windows_base_files>pause
Press any key to continue . . .
but when I press any key it just closes and nothing happens. The same happens with the update as well.
Been using Auto 1111 for sometime ,but interested in switching to Comfy for speed. Followed installation procedures and I get the following when trying to run it
E:\>cd\Comfyui
E:\ComfyUI>python main.py
Total VRAM 6144 MB, total RAM 32685 MB
xformers version: 0.0.24+cu118
Set vram state to: NORMAL_VRAM
Device: cuda:0 NVIDIA GeForce GTX 1660 : cudaMallocAsync
VAE dtype: torch.float32
Using xformers cross attention
Traceback (most recent call last):
File “E:\ComfyUI\main.py”, line 203, in
load_extra_path_config(extra_model_paths_config_path)
File “E:\ComfyUI\main.py”, line 170, in load_extra_path_config
config = yaml.safe_load(stream)
File “C:\Users\sande\AppData\Local\Programs\Python\Python310\lib\site-packages\yaml\__init__.py”, line 125, in safe_load
return load(stream, SafeLoader)
File “C:\Users\sande\AppData\Local\Programs\Python\Python310\lib\site-packages\yaml\__init__.py”, line 81, in load
return loader.get_single_data()
File “C:\Users\sande\AppData\Local\Programs\Python\Python310\lib\site-packages\yaml\constructor.py”, line 49, in get_single_data
node = self.get_single_node()
File “C:\Users\sande\AppData\Local\Programs\Python\Python310\lib\site-packages\yaml\composer.py”, line 36, in get_single_node
document = self.compose_document()
File “C:\Users\sande\AppData\Local\Programs\Python\Python310\lib\site-packages\yaml\composer.py”, line 55, in compose_document
node = self.compose_node(None, None)
File “C:\Users\sande\AppData\Local\Programs\Python\Python310\lib\site-packages\yaml\composer.py”, line 84, in compose_node
node = self.compose_mapping_node(anchor)
File “C:\Users\sande\AppData\Local\Programs\Python\Python310\lib\site-packages\yaml\composer.py”, line 127, in compose_mapping_node
while not self.check_event(MappingEndEvent):
File “C:\Users\sande\AppData\Local\Programs\Python\Python310\lib\site-packages\yaml\parser.py”, line 98, in check_event
self.current_event = self.state()
File “C:\Users\sande\AppData\Local\Programs\Python\Python310\lib\site-packages\yaml\parser.py”, line 428, in parse_block_mapping_key
if self.check_token(KeyToken):
File “C:\Users\sande\AppData\Local\Programs\Python\Python310\lib\site-packages\yaml\scanner.py”, line 116, in check_token
self.fetch_more_tokens()
File “C:\Users\sande\AppData\Local\Programs\Python\Python310\lib\site-packages\yaml\scanner.py”, line 223, in fetch_more_tokens
return self.fetch_value()
File “C:\Users\sande\AppData\Local\Programs\Python\Python310\lib\site-packages\yaml\scanner.py”, line 577, in fetch_value
raise ScannerError(None, None,
yaml.scanner.ScannerError: mapping values are not allowed here
in “E:\ComfyUI\extra_model_paths.yaml”, line 8, column 16
E:\ComfyUI>
Any help or guidance would be greatly appreciated
Not if the libraries are installed correctly. You can use the portable standalone version to save yourself some troubles.
ComfyUI Manager does not show. I see discussion on the issue others have faced.. Still can’t make it appear …
Never mind. It was missing Git command , saw the error , installed and then it worked.
Great info Andrew, thanks for sharing your knowledge
Can A111 do everything ComfyUI does?
Most but not all.
I feel like I’m a little late here, but: I found out about ComfyUI a few weeks ago (after a very long period of not paying attention to this.) I tried it out and was able to understand what was going on pretty easily, but I was getting bizarre results when I tried to use a Lora. I went searching, found this and it turns out I’d hooked it up wrong.
I also never thought about duplicating everything to see results with and without a lora, which is something I always wanted to do on A1111. I mean, you can do it manually by copying seeds and turning the lora off and on as needed, but it takes more effort.
If I can find a way in ComfyUI to duplicate Dynamic Prompt’s wildcards functionality, I am going to be very happy, as wildcards are one of my favorite techniques to find interesting combinations of keywords.
I’m surprised you didn’t mention inpaint masking inside of comfyUI itself, if you right click on the loaded image, you can open the mask editor and mask it there, so you don’t really need to use an external program, The downside is that doing so you can’t zoom so on small images or hires monitors it can be a bit tedious to mask things well. Also surprised there’s no any coverage on outpainting, which can also be achieved internally.
Some advice on inpainting is that it tends to work better on moderate sized or larger portions, small areas it will struggle generally speaking. I’ll double check later if the mask editor is part of a custom node pack but I believe that’s base.
Cool. A little bird told me that I could train lora files with ComfyUI. How do I do that? I have my sample images ready to go. I’m not able to use Dreambooth or Kohya. What do I do?
These two tutorials use Google colab:
https://stable-diffusion-art.com/dreambooth/
https://stable-diffusion-art.com/train-lora/
Thanks for all the informations…this manuals is very helpful!
Great…🤩
happy diffusing!
>To use embeddings in ComfyUI, type embedding: in the positive or the negative prompt box. A list a available embeddings should appear.
—
Nope. Nothing appears but my text, “embedding:” even with all the recommended and “missing” custom nodes from this tutorial.
This is part of a Custom node in the customScripts project. It can be found on github
user: pythongosssss
Project name: ComfyUI-Custom-Scripts
Also if you have the ComfyUI manager it can be installed through that. It will not always find the embeddings, the two models I work with most it doesn’t find them, but a lot of them it does. so mileage may vary.
Just wanted to say a big thank you for this guide which helped me the most with starting comfyui!
Happy diffusing ?
Great content for beginners. really make things easy. Thanks a lot
How do I save the ControlNet images and Output images from video2video workflow?