Inpainting in ComfyUI has not been as easy and intuitive as in AUTOMATIC1111. The resources for inpainting workflow are scarce and riddled with errors. This post hopes to bridge the gap by providing the following bare-bone inpainting examples with detailed instructions in ComfyUI.
- Inpainting with a standard Stable Diffusion model
- Inpainting with an inpainting model
- ControlNet inpainting
- Automatic inpainting to fix faces
Table of Contents
Software
Read the ComfyUI installation guide and ComfyUI beginner’s guide if you are new to ComfyUI.
Using the workflow file
You will find many workflow JSON files in this tutorial. Drop them to ComfyUI to use them. Do the following steps if it doesn’t work.
Every time you try to run a new workflow, you may need to do some or all of the following steps.
- Install ComfyUI Manager
- Install missing nodes
- Update everything
Install ComfyUI Manager
Install ComfyUI manager if you haven’t done so already. It provides an easy way to update ComfyUI and install missing nodes.
To install this custom node, go to the custom nodes folder in the PowerShell (Windows) or Terminal (Mac) App:
cd ComfyUI/custom_nodesInstall ComfyUI by cloning the repository under the custom_nodes folder.
git clone https://github.com/ltdrdata/ComfyUI-ManagerRestart ComfyUI completely. You should see a new Manager button appearing on the menu.
If you don’t see the Manager button, check the terminal for error messages. One common issue is GIT not installed. Installing it and repeat the steps should resolve the issue.
Install missing custom nodes
To install the custom nodes that are used by the workflow but you don’t have:
- Click Manager in the Menu.
- Click Install Missing custom Nodes.
- Restart ComfyUI completely.
Update everything
You can use ComfyUI manager to update custom nodes and ComfyUI itself.
- Click Manager in the Menu.
- Click Updates All. It may take a while to be done.
- Restart the ComfyUI and refresh the ComfyUI page.
Inpainting with a standard model
This workflow is for inpainting with a standard Stable Diffusion model (not an inpainting model). This workflow is similar to inpainting the whole picture in AUTOMATIC1111.
Download the ComfyUI workflow for inpainting below.

This inpainting workflow works for both Stable Diffusion v1.5 and Stable Diffusion XL models.
This workflow only works with a standard Stable Diffusion model, not an Inpainting model. (See the next section for a workflow using the inpaint model)
How it works
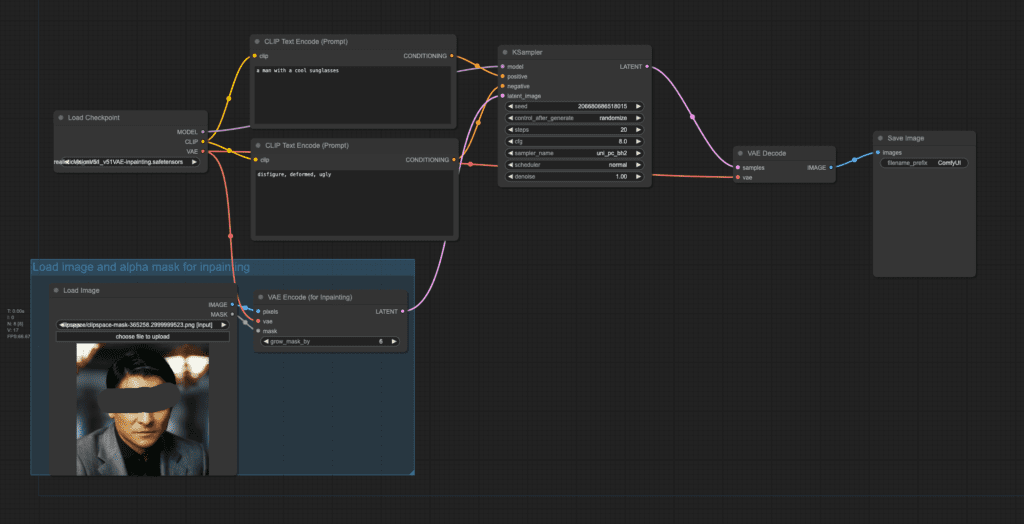
The trick is NOT to use the VAE Encode (Inpaint) node (which is meant to be used with an inpainting model), but:
- Encode the pixel images with the VAE Encode node.
- Use the Set Latent Noise Mask to attach the inpaint mask to the latent sample.
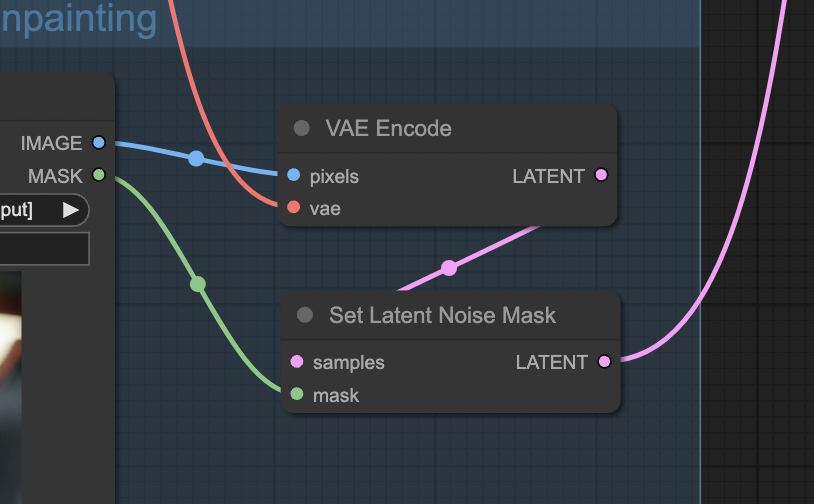
The KSampler node will apply the mask to the latent image during sampling.
How to use
Step 1: Load a checkpoint model
This workflow uses the Realistic Vision v5.1 model. (A SD v1.5 fine-tuned model).
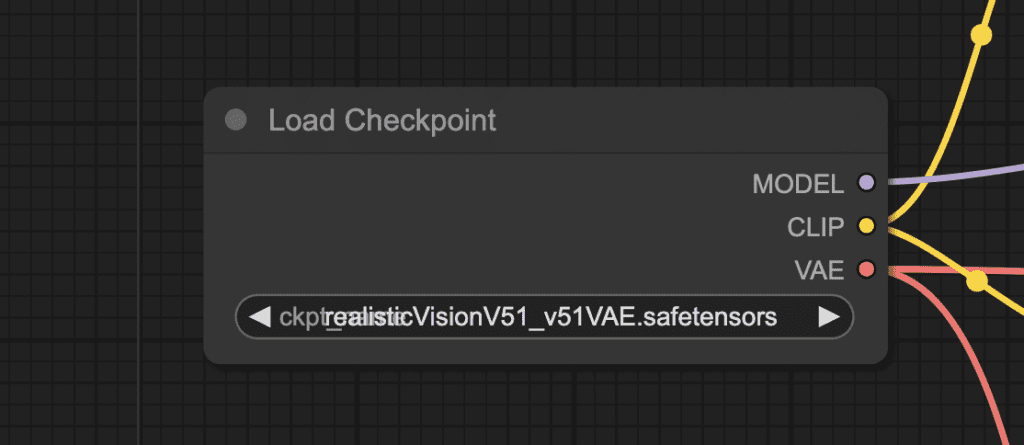
Download the Realistic Vision model, put it in the folder ComfyUI > models > checkpoints.
Refresh the page and select the model in the Load Checkpoint node’s dropdown menu.
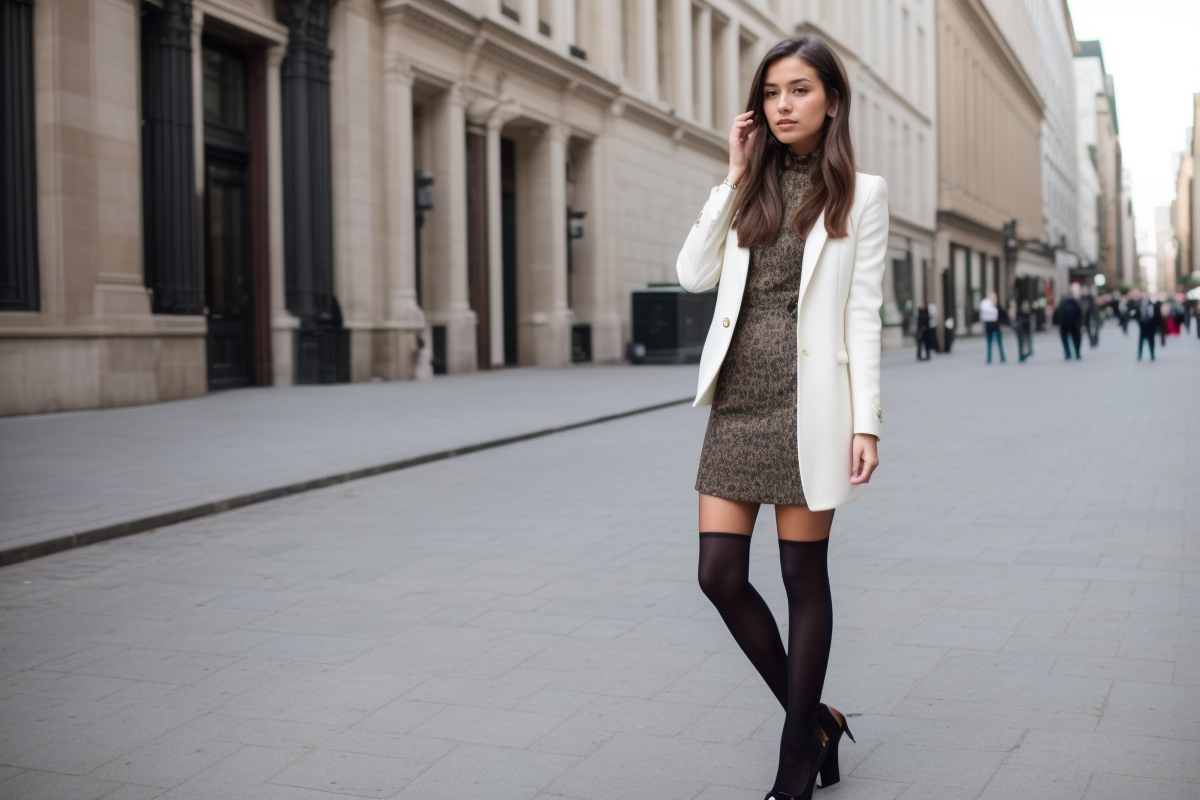
Step 2: Upload an image
Pick an image that you want to inpaint.

You can download the image in PNG format here.
Upload it to the workflow.

Step 3: Create an inpaint mask
Right-click the image. Select Open in MaskEditor in the context menu.
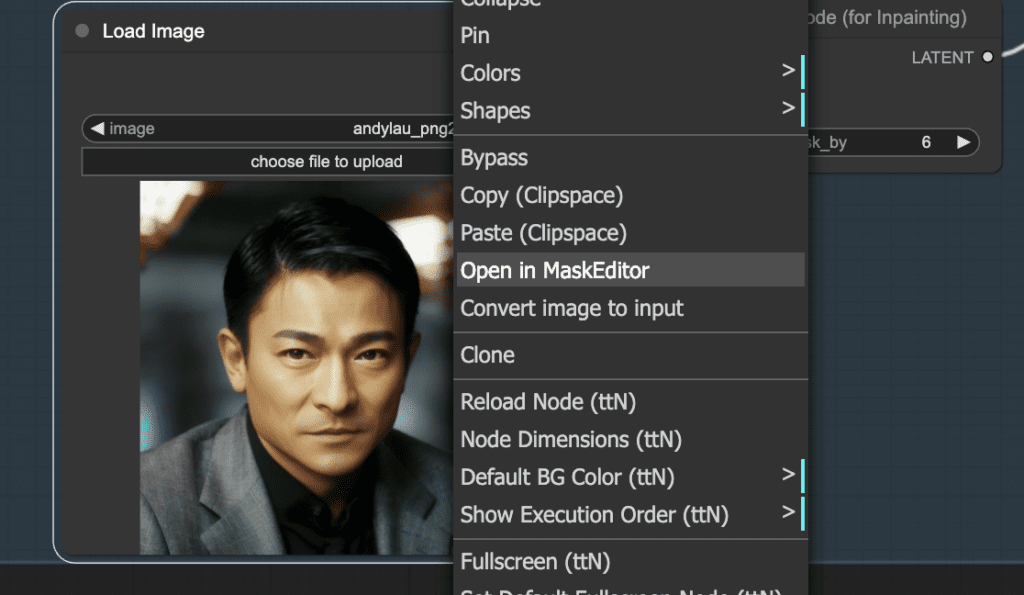
Mask the area you want to regenerate.
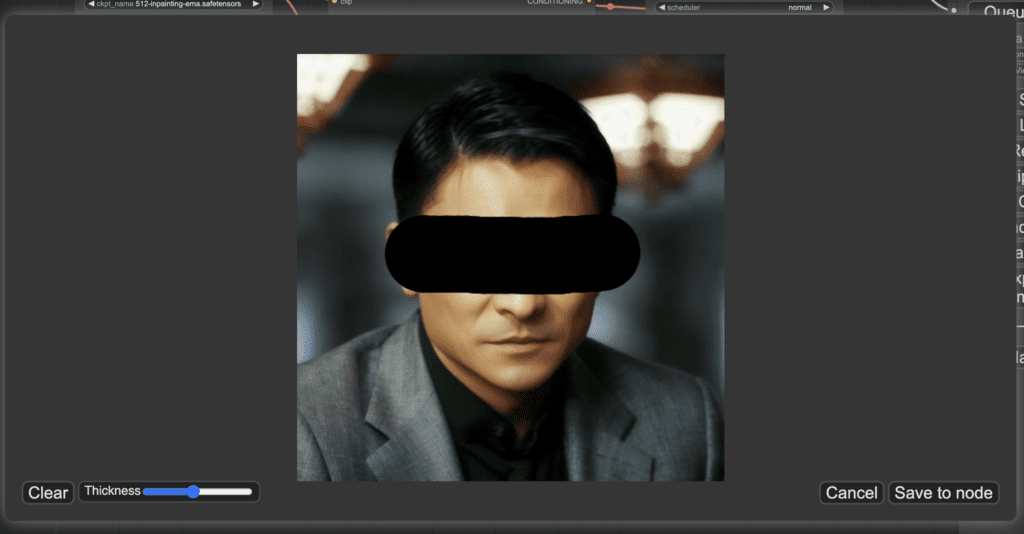
Click Save to node.
Step 4: Adjust parameters
Select a Checkpoint model. Note that an inpainting model doesn’t work with the workflow.
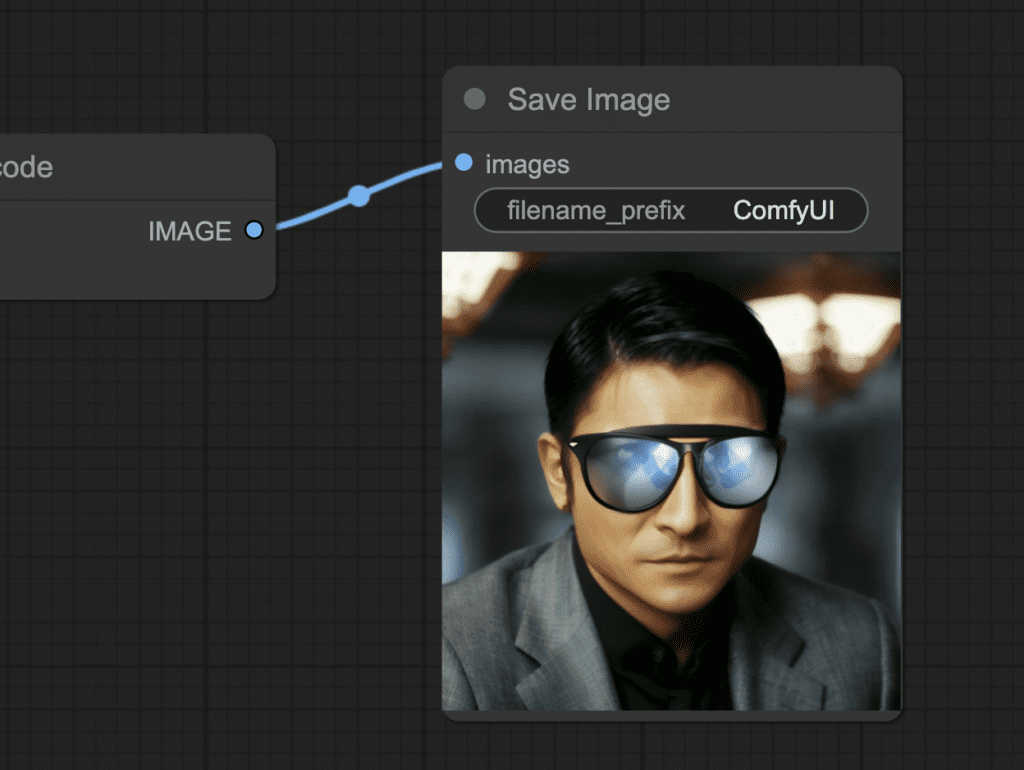
Change the prompt:
a man wearing sunglasses, epic style, super hero, highly detailed
The original denoising strength (denoise) is too high. Set it to 0.6.
Step 5: Generate inpainting
Finally, press the Queue Prompt to perform inpainting.
Note
You can adjust the denoising strength in the KSampler node. Lower it to change less. Increase it to change more. Setting it too high will result in incoherent images.
This workflow is for use with a low to moderate denoising strength. If you must use a high denoising strength, you need to use the next two workflows: Inpaint with an inpainting model and ControlNet inpainting.
Inpaint with an inpainting model
An inpainting model is specially designed for inpainting. Its model architecture is different from a standard model. You cannot use the workflow in the previous section with an inpainting model.
Download the ComfyUI inpaint workflow with an inpainting model below.
How it works
This workflow uses the VAE Enocde (for inpainting) node to attach the inpaint mask to the latent image.

Note that this workflow only works when the denoising strength is set to 1. Don’t change it to any other value!
How to use
The usage is the same as the first method, so I won’t repeat it here.
You will need to use an inpainting model, such as the Realistic Vision Inpainting model.
ControlNet inpainting
The two workflows above have their own drawbacks: You cannot use a high denoising strength with a standard model, and a low denoising strength with an inpainting model.
ControlNet inpainting allows you to use a standard Stable Diffusion model with a high denoising strength.
You can download the ComfyUI workflow for ControlNet inpainting below.

How it works
You make the workflow just like any other ControlNets. But you use the Inpaint Preprocessor node. It takes the pixel image and the inpaint mask as the input, and output to the Apply ControlNet node.
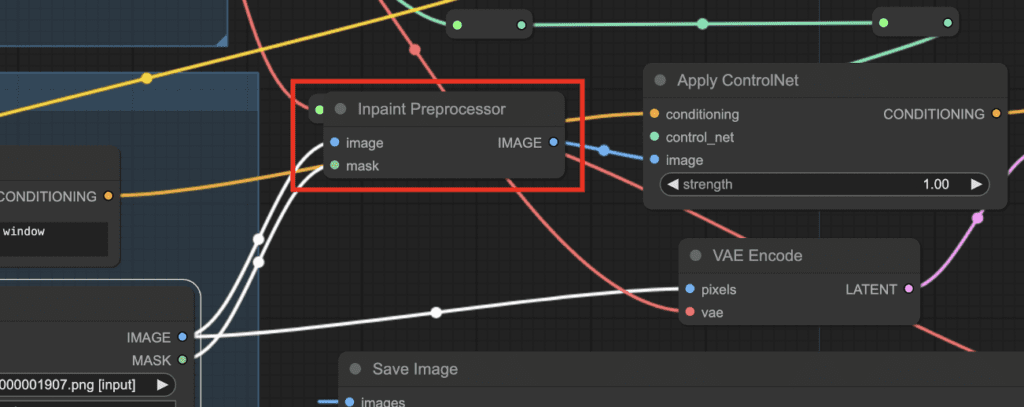
The ControlNet conditioning is applied through positive conditioning as usual.
How to use
Download the Realistic Vision model. Put it in Comfyui > models > checkpoints folder. Refresh the page and select the Realistic model in the Load Checkpoint node.
Download the ControlNet inpaint model. Put it in ComfyUI > models > controlnet folder. Refresh the page and select the inpaint model in the Load ControlNet Model node.
You can use it like the first example.
You can set the denoising strength to a high value without sacrificing global coherence.
Automatic inpainting to fix faces
Adetailer is an AUTOMATIC1111 extension for inpainting faces automatically. In Stable Diffusion, faces are often garbled if they are too small. Adetailer crops out a face, inpaints it at a higher resolution, and puts it back.
You can do the same with the FaceDetailer node with the Impact Pack in ComfyUI.
Text-to-image with Face Detailer
Download the ComfyUI Detailer text-to-image workflow below.
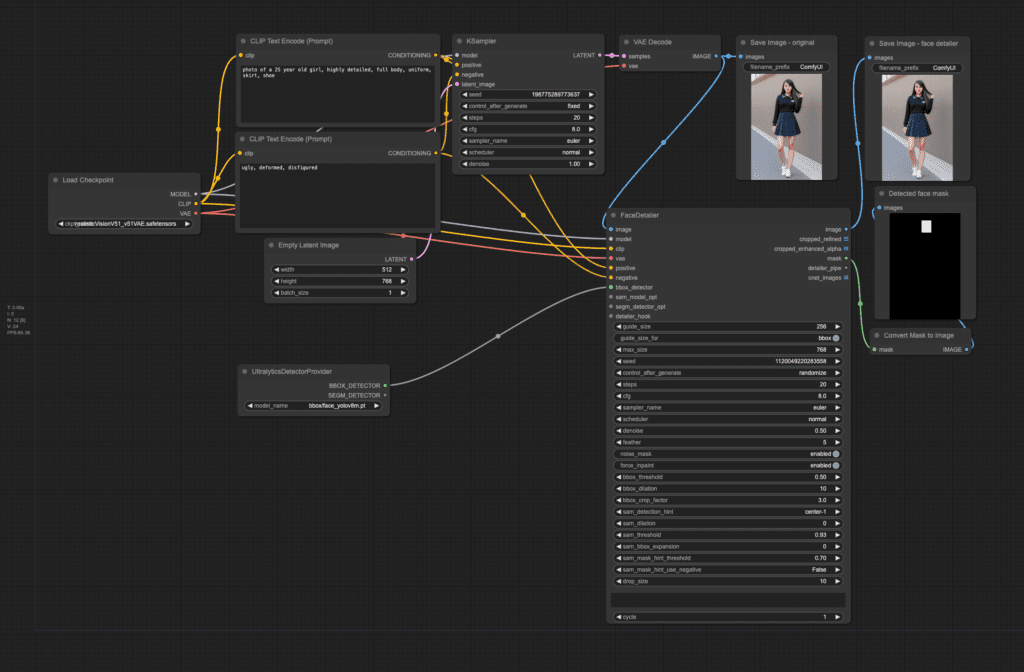
How it works
The main node that does the heavy lifting is the FaceDetailer node. It uses a face-detection model (Yolo) to detect the face. It then crops it out, inpaints it at a higher resolution, and puts it back.
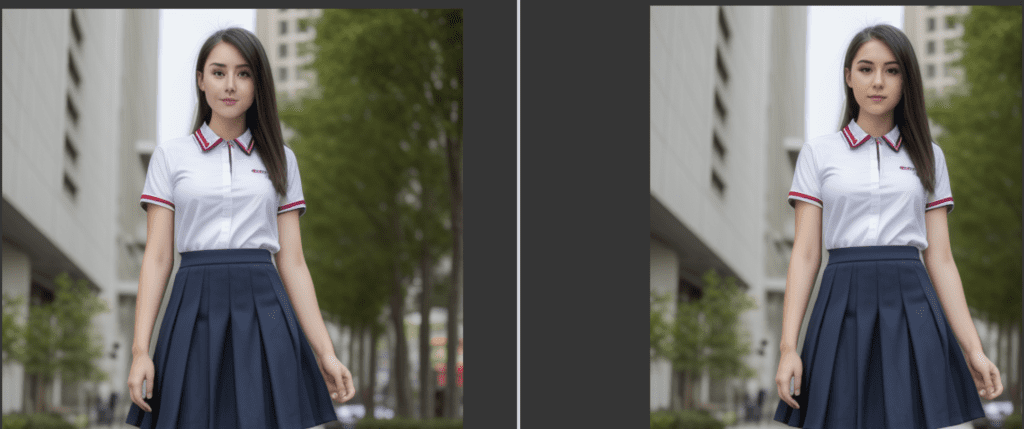
Compare the original image on the left and the face-fixed image on the right below.
How to use
You need to set the checkpoint model in the Load Checkpoint node. Adjust the prompt as needed. Press Queue Prompt.
it works the same as the Adetailer’s default setting.
You can adjust the denoising strength in the FaceDetailer node to adjust how much the face should change.
Face Detailer on an uploaded image
The following workflow automatically fixes faces on an uploaded image.
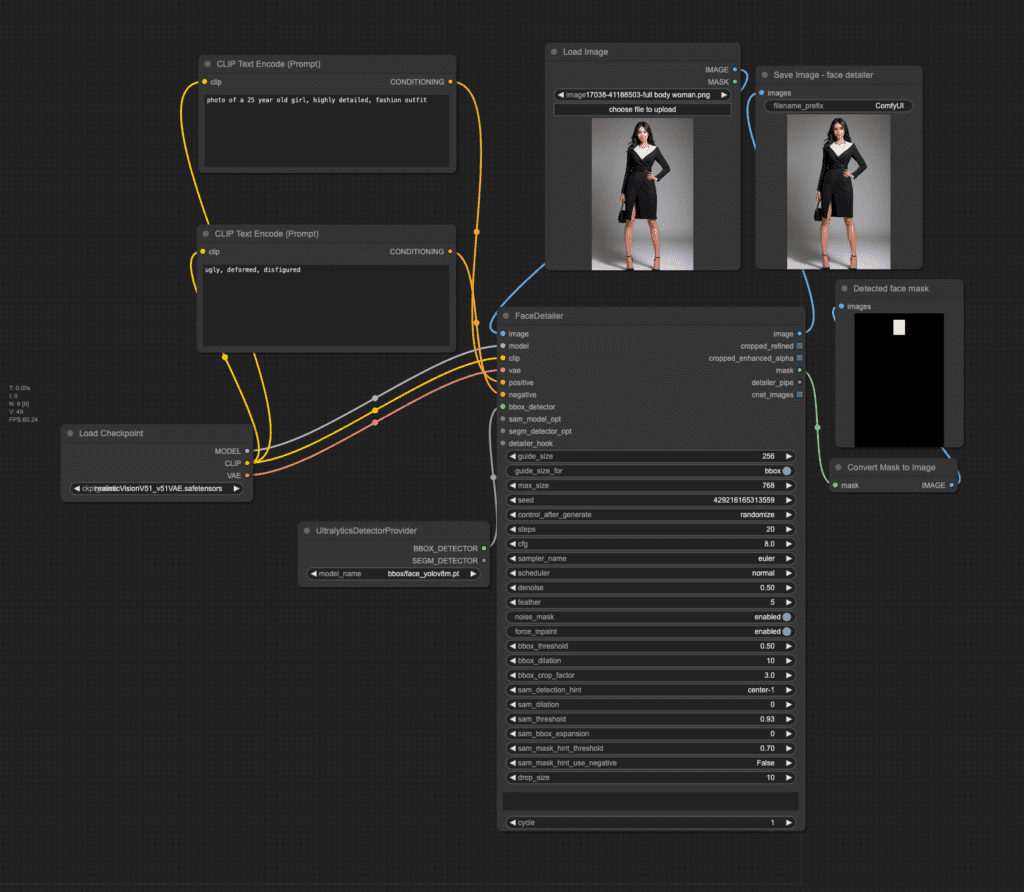
To use the workflow, upload an image to the Load Image node and press Queue Prompt.
You can optionally revise the prompt to customize the face.
Thank you for this detailed tutorial.
I have an artwork (a painting). Now I want to create a mockup of living room showing my painting in the frame on the wall.
I have seen different tutorials for inpainting. You load an image, mask the area and it will change according to the prompt.
I will load the living room image with the empty frame on the wall in comfyui workflow, but how I can input my artwork into the frame on the wall?
You can try inpainting with IP adpater plus.
Hi Andrew, in the Face Detailer workflow using Colab, the UltralyticsDetectorProvider node doesn’t find bbox/yolov8m.pt. Can you give me a link to the file and tell me where to put it?
Also, does the SEGM_detector need to be linked to something?
Thanks
I used the last workflow and installed the missing nodes (comfyui impact pack and comfyui impact subpack) on colab. The workflow ran successfully.
Thanks, Andrew. It looks like the comfy_impact_subpack doesn’t like being in my comfy custom nodes folder. When I tried to use it from there, it failed and I couldn’t resurrect it from the custom nodes manager but if I did a clean install without any custom nodes from the folder, it worked.
You’ve warned about this in the notebook and I’ve only recently started to experience this issue – I think the Facerestore CF node may have the same problem. Another quirk of Comfy as most nodes seem to work fine if pre-loaded. Do you recommend always doing a clean install, if only to ensure the latest version are used?
Yes, the best practice is clean installation.
Hi Andrew!
First of all, thank you for the amazing work that you are doing. I cannot imagine how else it would be possible to learn about SD in such an organized and structured way as you teach it with your articles.
Now comes the question. Do you have any clue why I keep getting this error when I am trying to run inpainting with the standard model as well as with ControlNet?
“Error occurred when executing VAEEncode:
convolution_overrideable not implemented. You are likely triggering this with tensor backend other than CPU/CUDA/MKLDNN, if this is intended, please use TORCH_LIBRARY_IMPL to override this function
File “/Users/yegorartyukh/ComfyUI/execution.py”, line 151, in recursive_execute
output_data, output_ui = get_output_data(obj, input_data_all)
^^^^^^^^^^^^^^^^^^^^^^^^^^^^^^^^^^^^
File “/Users/yegorartyukh/ComfyUI/execution.py”, line 81, in get_output_data
return_values = map_node_over_list(obj, input_data_all, obj.FUNCTION, allow_interrupt=True)
^^^^^^^^^^^^^^^^^^^^^^^^^^^^^^^^^^^^^^^^^^^^^^^^^^^^^^^^^^^^^^^^^^^^^^^^^^^
File “/Users/yegorartyukh/ComfyUI/execution.py”, line 74, in map_node_over_list
results.append(getattr(obj, func)(**slice_dict(input_data_all, i)))
^^^^^^^^^^^^^^^^^^^^^^^^^^^^^^^^^^^^^^^^^^^^^^^^^^^
File “/Users/yegorartyukh/ComfyUI/nodes.py”, line 296, in encode
t = vae.encode(pixels[:,:,:,:3])
^^^^^^^^^^^^^^^^^^^^^^^^^^^^
File “/Users/yegorartyukh/ComfyUI/comfy/sd.py”, line 340, in encode
samples[x:x+batch_number] = self.first_stage_model.encode(pixels_in).to(self.output_device).float()
^^^^^^^^^^^^^^^^^^^^^^^^^^^^^^^^^^^^^^^^
File “/Users/yegorartyukh/ComfyUI/comfy/ldm/models/autoencoder.py”, line 179, in encode
z = self.encoder(x)
^^^^^^^^^^^^^^^
File “/Users/yegorartyukh/ComfyUI/venv/lib/python3.12/site-packages/torch/nn/modules/module.py”, line 1532, in _wrapped_call_impl
return self._call_impl(*args, **kwargs)
^^^^^^^^^^^^^^^^^^^^^^^^^^^^^^^^
File “/Users/yegorartyukh/ComfyUI/venv/lib/python3.12/site-packages/torch/nn/modules/module.py”, line 1541, in _call_impl
return forward_call(*args, **kwargs)
^^^^^^^^^^^^^^^^^^^^^^^^^^^^^
File “/Users/yegorartyukh/ComfyUI/comfy/ldm/modules/diffusionmodules/model.py”, line 520, in forward
h = self.conv_in(x)
^^^^^^^^^^^^^^^
File “/Users/yegorartyukh/ComfyUI/venv/lib/python3.12/site-packages/torch/nn/modules/module.py”, line 1532, in _wrapped_call_impl
return self._call_impl(*args, **kwargs)
^^^^^^^^^^^^^^^^^^^^^^^^^^^^^^^^
File “/Users/yegorartyukh/ComfyUI/venv/lib/python3.12/site-packages/torch/nn/modules/module.py”, line 1541, in _call_impl
return forward_call(*args, **kwargs)
^^^^^^^^^^^^^^^^^^^^^^^^^^^^^
File “/Users/yegorartyukh/ComfyUI/comfy/ops.py”, line 80, in forward
return super().forward(*args, **kwargs)
^^^^^^^^^^^^^^^^^^^^^^^^^^^^^^^^
File “/Users/yegorartyukh/ComfyUI/venv/lib/python3.12/site-packages/torch/nn/modules/conv.py”, line 460, in forward
return self._conv_forward(input, self.weight, self.bias)
^^^^^^^^^^^^^^^^^^^^^^^^^^^^^^^^^^^^^^^^^^^^^^^^^
File “/Users/yegorartyukh/ComfyUI/venv/lib/python3.12/site-packages/torch/nn/modules/conv.py”, line 456, in _conv_forward
return F.conv2d(input, weight, bias, self.stride,
^^^^^^^^^^^^^^^^^^^^^^^^^^^^^^^^^^^^^^^^^^”
My tech specs are:
MacBook Air M3
Sonoma 14.3
16 GB
Python 3.12
You can try using python 3.11. Delete the venv folder.
Hey Andrew,
I encountered the same issue with Macbook Pro M1 Python 3.11.3.
There’s no venv folder in my comfyui folder.
Is there anything else you suggest trying?
Thank you
You can try following this instruction to recreate a venv folder.
https://stable-diffusion-art.com/how-to-install-comfyui/#Installing_ComfyUI_on_Mac_M1M2
Hi, Andrew. Thanks for this wonderful write-up! Always super helpful and easy-to-follow. One thing I could never get working and is related to this tutorial is getting Instruct Pix2Pix to be implemented in ComfyUI. Any chance you could add that to your list to cover?
2: What is the mechanism that prevents the inpainting models to work with workflow 1 on this page? Thought that the base (non-inpaiting) and the inpainting models differ only in the training (fine-tuning) data and either model should be able to produce inpainting output when using identical input. But, when using workflow 1, I observe that the inpainting model essentially restores the original input, even if I set the de/noising strength to 1.0. How should the original input leak to the output even though it was supposed to be wiped for the area specified by the mask? And how exactly these two types of models are implemented differently (aside from the training data)?
The inpainting model needs an extra image conditioning. The only way to setup the conditioning correctly is to use the VAE (inpaint) node. The output is the same as the original because the workflow failed to use the inpainting model correctly.
Andrew, could you advise on the following points?
1: where to download from the exact same models that you are using in these samples? This is the closest that I can find for V5.1 inapaintig. But even if I select the V5.1-inpainting (VAE) model in the upper tab, the model that gets downloaded is realisticVisionV60B1_v51VAE-inpainting.safetensors and not realisticVisionV51B1_v51VAE-inpainting.safetensors. Is there any place where I can find the 5.1 model? Same question for the “non-inpaiting” variant.
Hi, the links are in the article but here you go:
standard model:
https://huggingface.co/SG161222/Realistic_Vision_V5.1_noVAE/blob/main/Realistic_Vision_V5.1.safetensors
inpainting model:
https://huggingface.co/SG161222/Realistic_Vision_V5.1_noVAE/blob/main/Realistic_Vision_V5.1-inpainting.safetensors
You need to download the models and put the files in Comfyui\models\checkpoints
Thanks for the article. How can I use the last workflow with an external image?
Thank you
hi, I added an workflow for that.