Fooocus is a free and open-source AI image generator based on Stable Diffusion. It attempts to combine the best of Stable Diffusion and Midjourney: open source, offline, free, and ease-of-use.
Fooocus has optimized the Stable Diffusion pipeline to deliver excellent images. You can spend less time on tweaking the settings and more time on creating the images you want.
In this post, we will cover
- Pros and Cons of Fooocus
- How to install Fooocus
- Basic usage
- Setting styles
- Upscaling
- Inpainting and outpainting
- Using Image Prompt
Table of Contents
Pros and Cons of Fooocus
The benefits of using Fooocus are
- Easy to install
- Easy to use
- Generates high-quality images out of the box
The drawbacks of using Fooocus are
- Not as customizable as AUTOMATIC1111 or ComfyUI
- The functionality is not as extensive as other GUIs
How to install Fooocus
Minimum system requirement
You need an Nvidia card with 8GB of VRAM. Other setups may also work. See the full list of minimum requirements.
Windows
Follow these steps to install Fooocus on Windows.
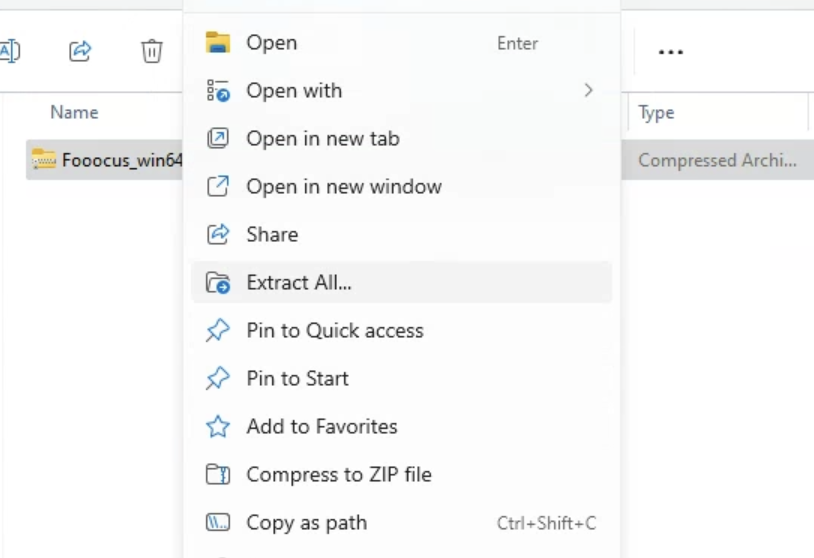
- Download the zip file on this page.
- Put the zip file to the folder you want to install Fooocus
- Right-click on the zip file and select Extract All… to extract the files.
Double-click run.bat to start Fooocus.
It will download models the first time you run.
AMD GPU, Mac, Linux and Colab
You can also install Fooocus on AMD GPU, Mac, Linux, and Colab.
Using Fooocus
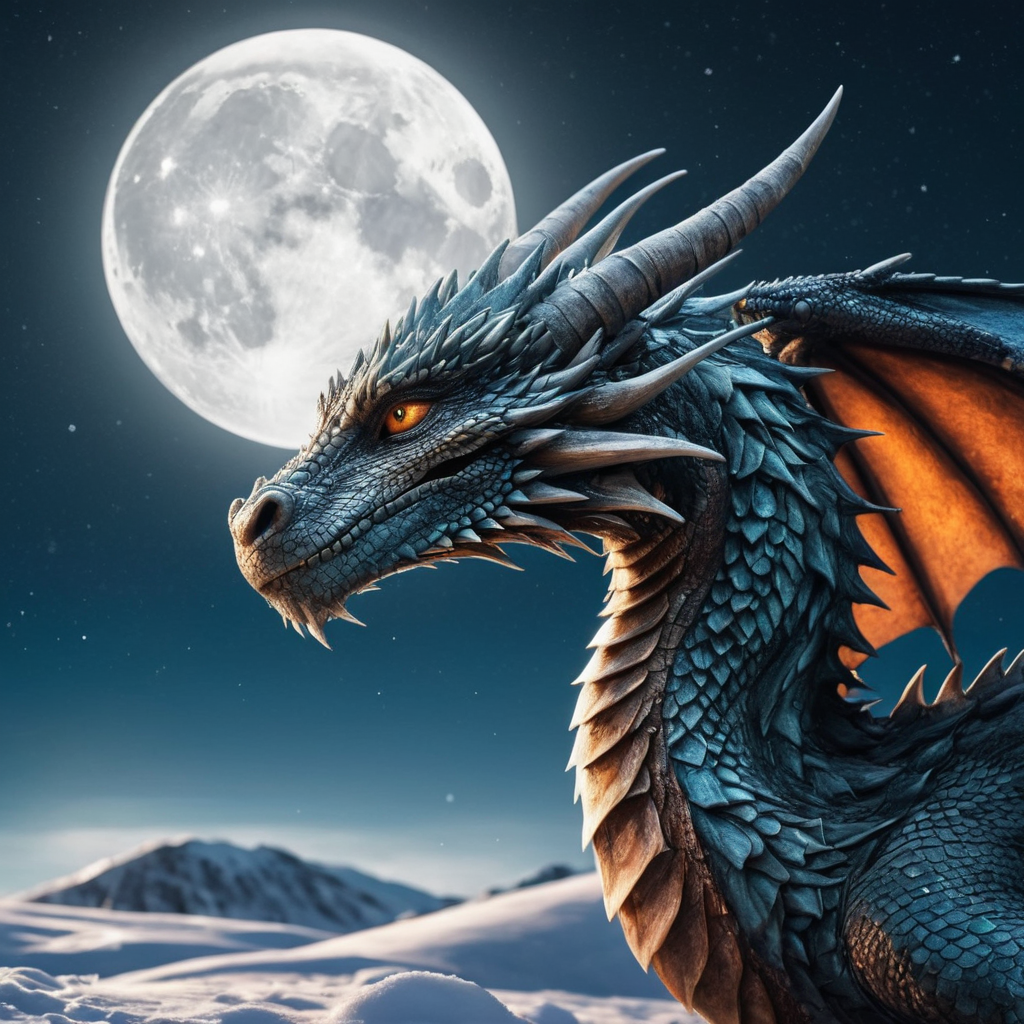
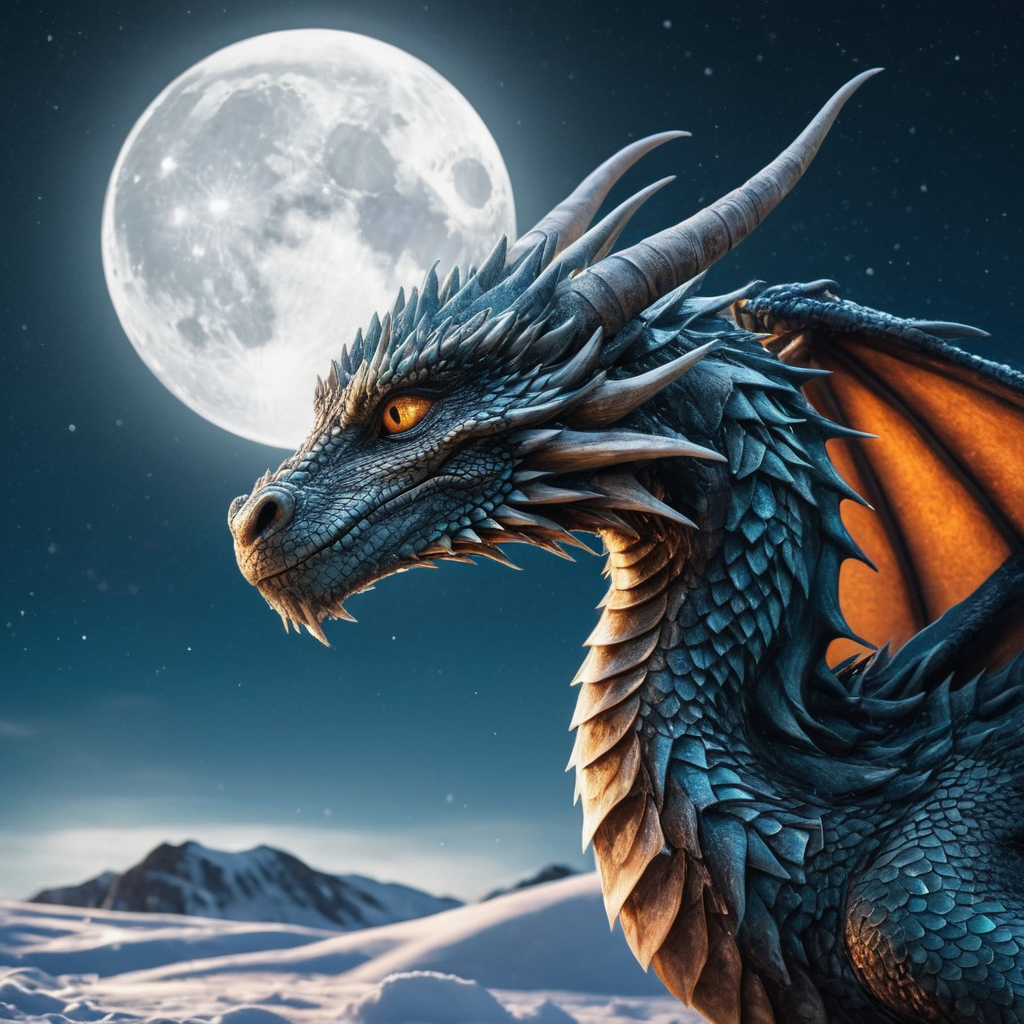
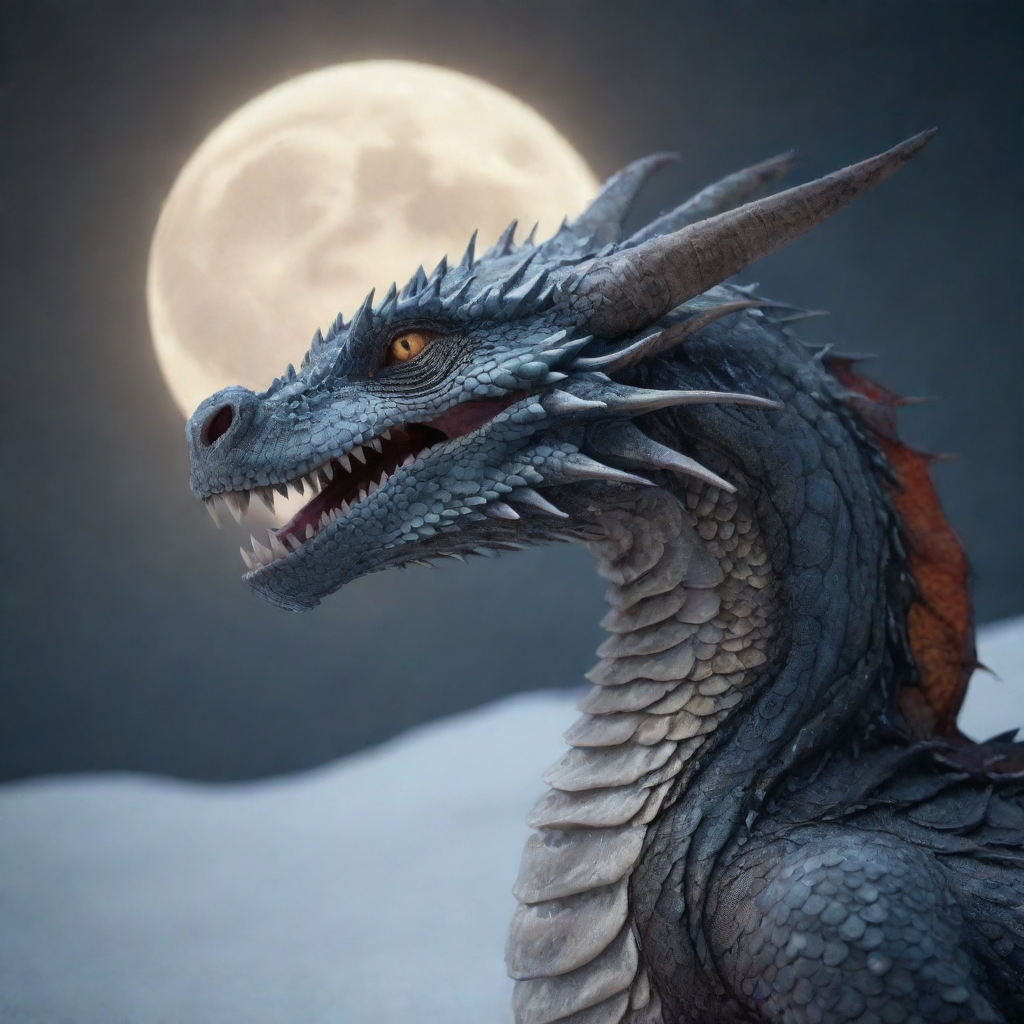
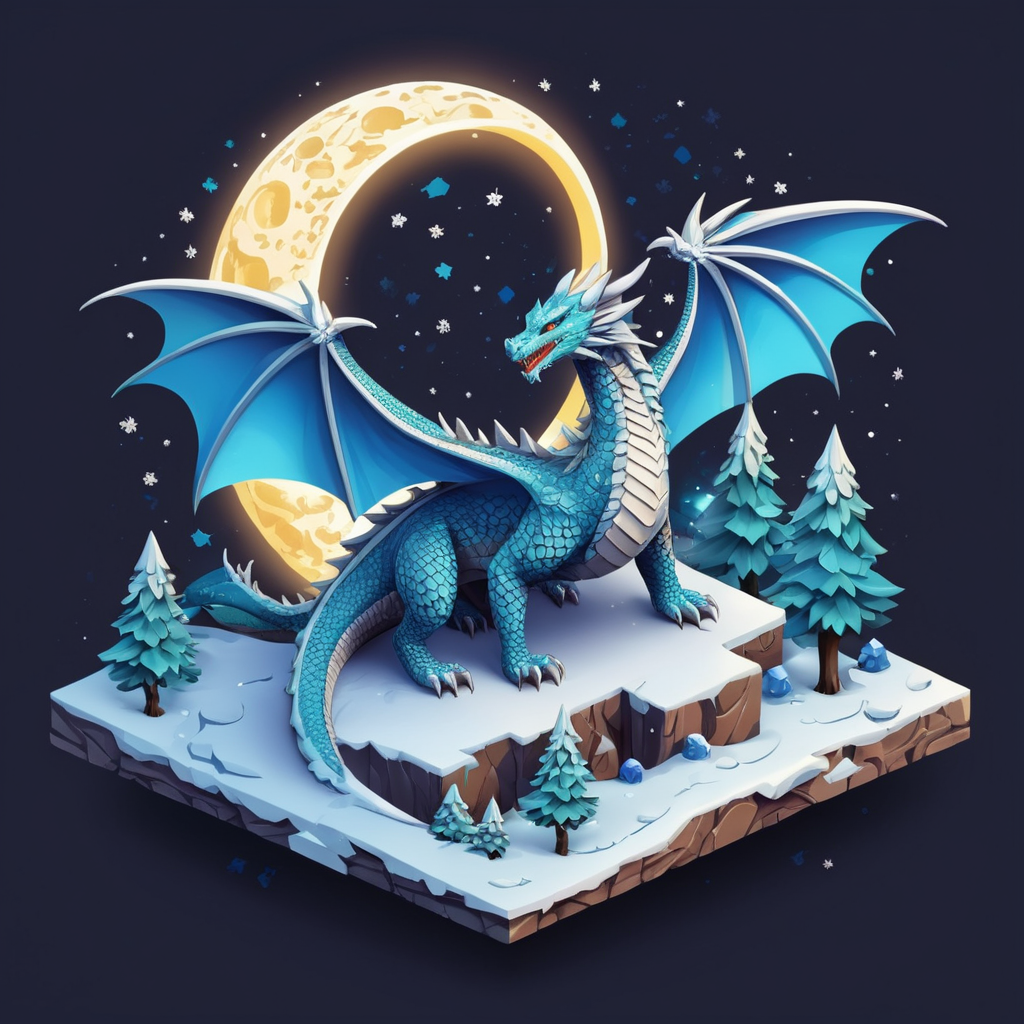
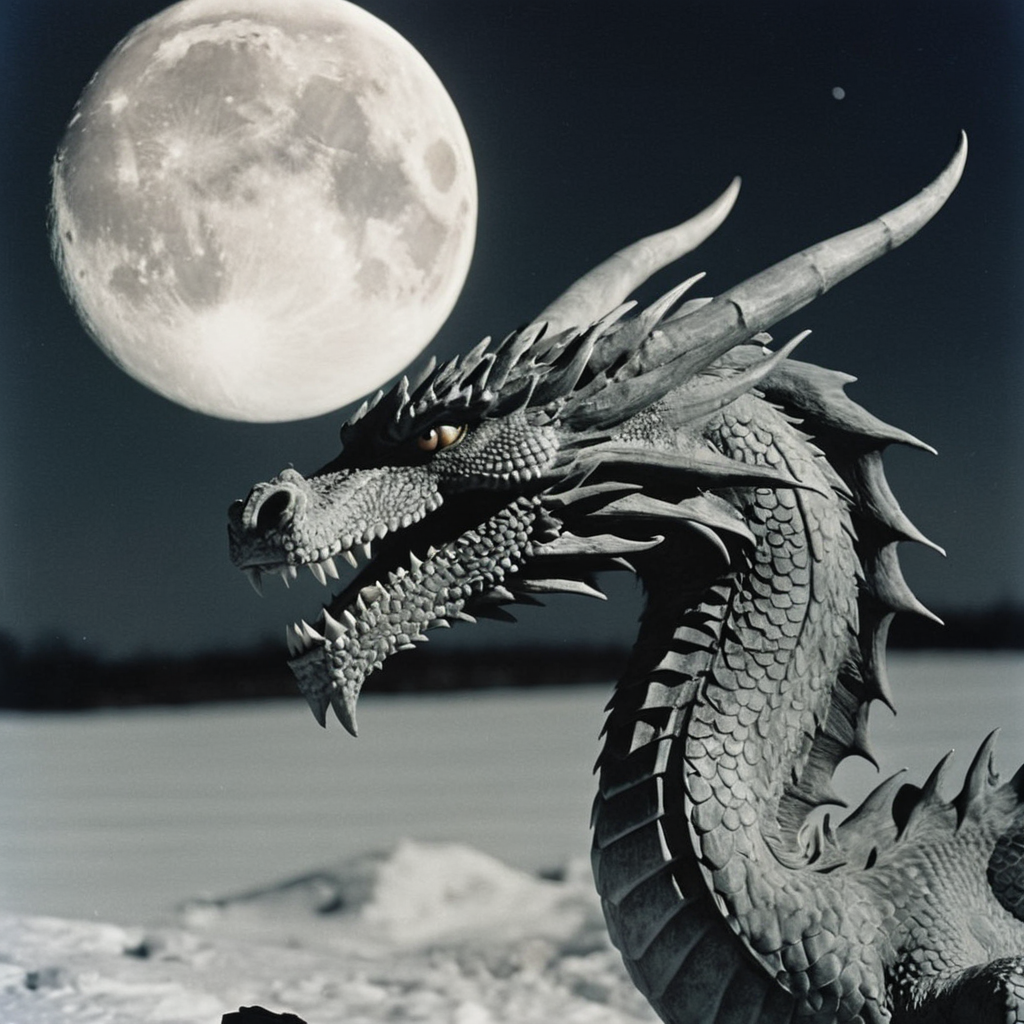
Fooocus is super easy to use. In the default mode, you enter the prompt and press Generate. (Ctrll+Enter on Windows. Cmd+Enter on Mac)
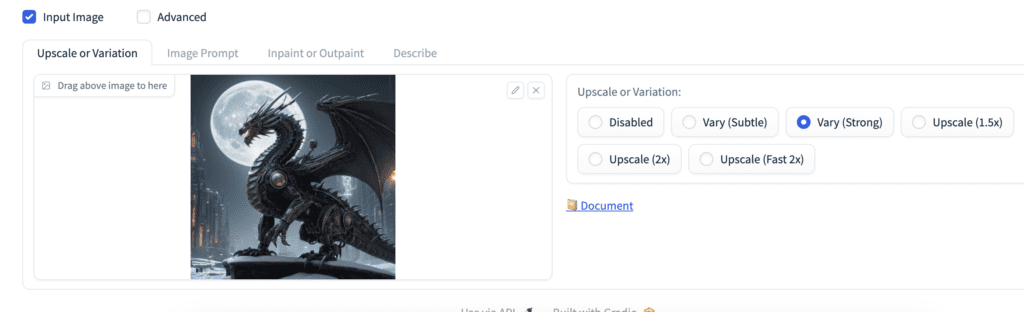
a dragon, snow, moon
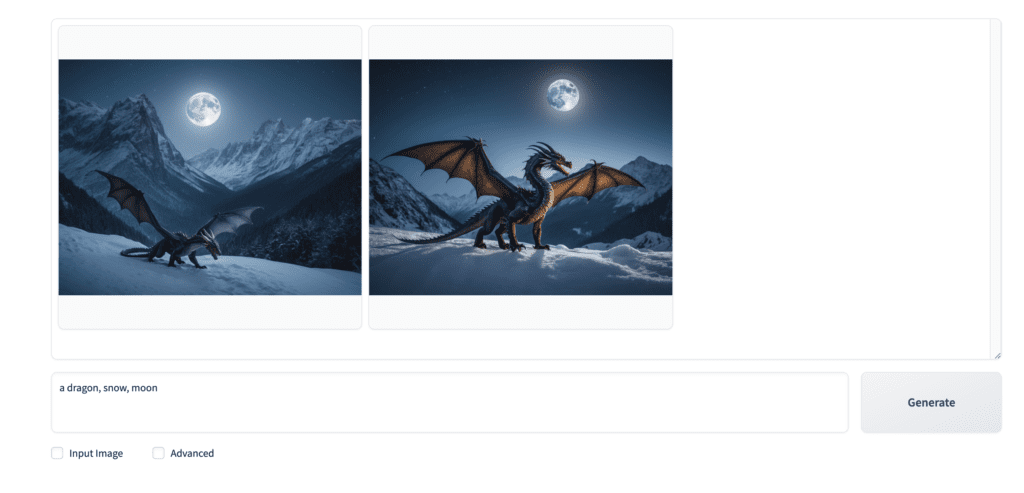
It uses a default model, which is juggernautXL, a fine-tuned Stable Diffusion XL model. It is a general-purpose model capable of producing various styles.
Prompt expansion
You don’t need to write long and complicated prompts like those on popular image-sharing sites. Fooocus will expand your prompt with a GPT-2 based prompt engine.
For example, the prompt:
a dragon, snow, moon
is expanded into the following prompt under the hood.
a dragon, snow, moon, light, intricate, elegant, sharp focus, beautiful dynamic, highly detailed, very sleek, professional fine detail, cinematic, dramatic ambient bright colors, perfect, warm color, epic composition, striking, brave, attractive, elite, best, vivid, clear, coherent, advanced, creative, cute, artistic, trendy, cool, gorgeous, awesome
Advanced Settings
Selecting the Advanced checkbox brings up the advanced setting menu.
Performance settings
True to its design philosophy, even the advanced setting is pretty easy to understand.
The performance section.
- Speed: A good balance, Perform 30 sampling steps.
- Quality: Perform twice as many sampling steps.
- Extreme Speed: Use LCM LoRA to reduce sampling steps.
As expected from the settings, Speed and Quality don’t differ much. Doing more than 30 steps gains a diminishing return for SDXL models.
The Extreme Speed setting generates lower-quality images. It is expected from the LCM-LoRA model.
Below is a comparison of generation time on a Windows system with an RTX4090 GPU card.
| Speed | 17.3 sec (1x) |
| Quality | 25.2 sec (1.5x) |
| Extreme Speed | 10.4 sec (0.6x) |
I like the ease of using LCM-LoRA (Extreme Speed). Using LCM-LoRA in AUTOMATIC1111 requires changing the CFG scale and sampling step. And it is easy to forget. Fooocus takes care of all these with a single selection.
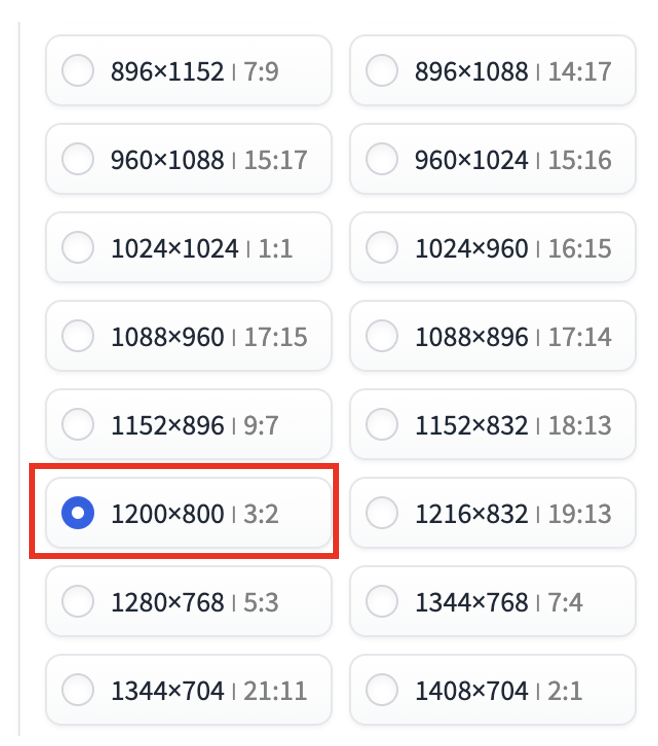
Aspect Ratios
Fooocus provides an extensive list of image sizes for you to choose from. Interestingly, there’s no way to enter an image size in the GUI.
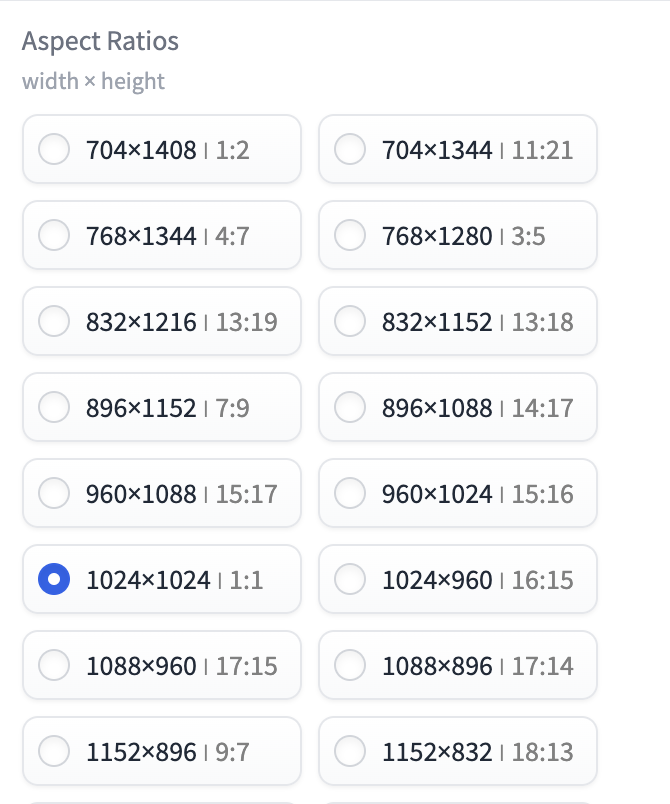
There are many reasons you want to use a specific image size, e.g. compatibility with a Stable Diffusion model and for publishing needs.
To add an image resolution to the list, look for a file called config_modification_tutorial.txt in the Fooocus folder.
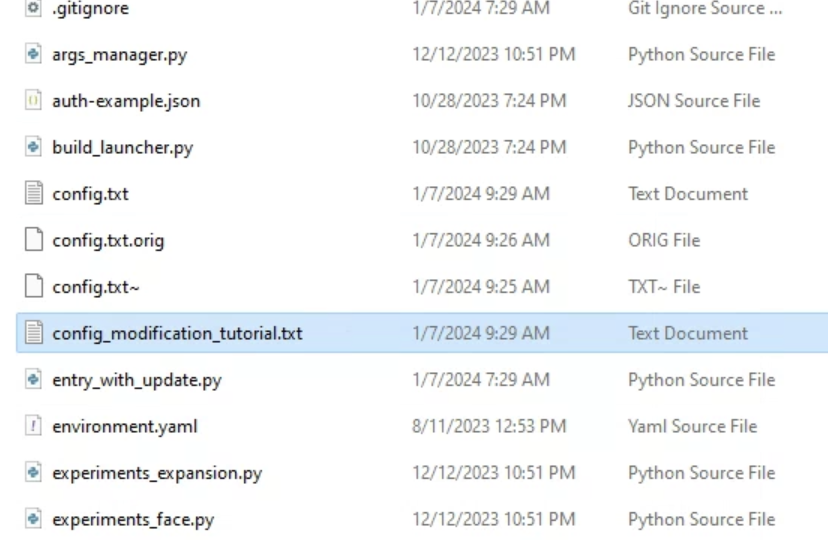
This is a template for the configuration file config.txt.
Rename config.txt to config.txt.original.
Make a copy of the file config_modification_tutorial.txt and rename it to config.txt.
Edit config.txt in a text editor (I use Notepad++).
Remove the explanatory note on top.
Add a new resolution to the list of “available_aspect_ratios”. For example:
    "available_aspect_ratios": [
        "704*1408",
        "704*1344",
        "768*1344",
        "768*1280",
        "832*1216",
        "832*1152",
        "896*1152",
        "896*1088",
        "960*1088",
        "960*1024",
        "1024*1024",
        "1024*960",
        "1088*960",
        "1088*896",
        "1152*896",
        "1152*832",
        "1200*800",
        "1216*832",
        "1280*768",
        "1344*768",
        "1344*704",
        "1408*704",
        "1472*704",
        "1536*640",
        "1600*640",
        "1664*576",
        "1728*576"
    ],
Restart Fooocus and you should see the new resolution added.
Style
In Fooocus, you don’t need to engineer a prompt to achieve a certain style. You use the Style menu to get there.
There are so many preset styles! You can visualize many of them in the SDXL style guide.
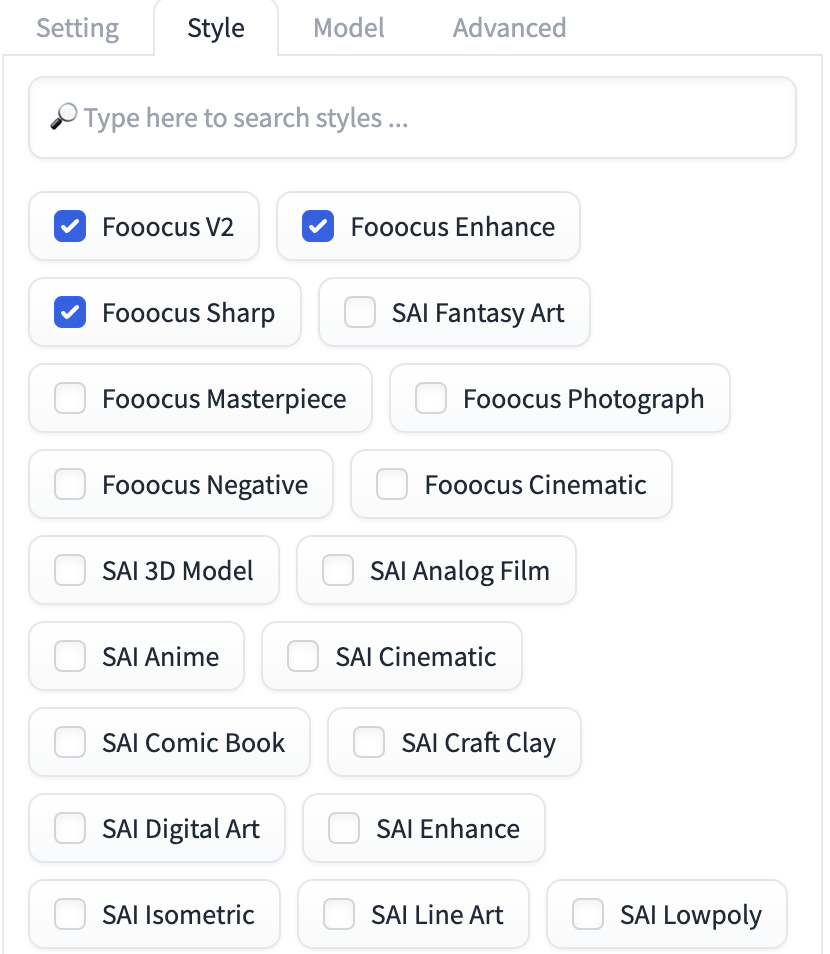
You can combine multiple styles. But many of them only have an effect when the the default styles are unchecked.

You can also add a negative prompt to dial in the image. For example, add “B&W” to the negative prompt (In Settings > Negative Prompt) to generate a color image.
Model
You can specify a checkpoint model and LoRA in the Model tab.
The path of models can be found or changed in config.txt in the Fooocus folder.
Upscale an image
To upscale an image in Fooocus:
- Select the Input Image checkbox.
- Under Upscale or Variation, select the upscale option you want.
- Press Generate.
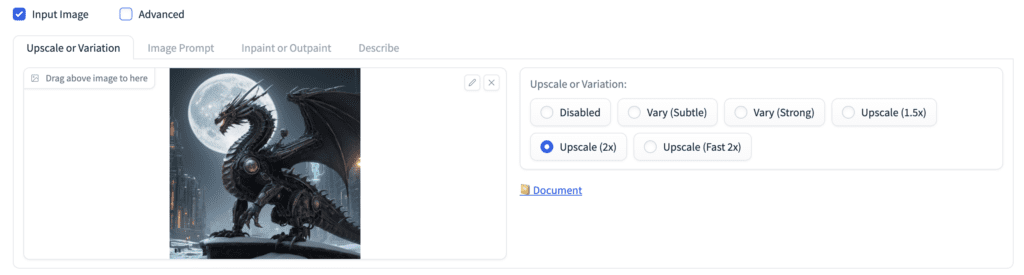
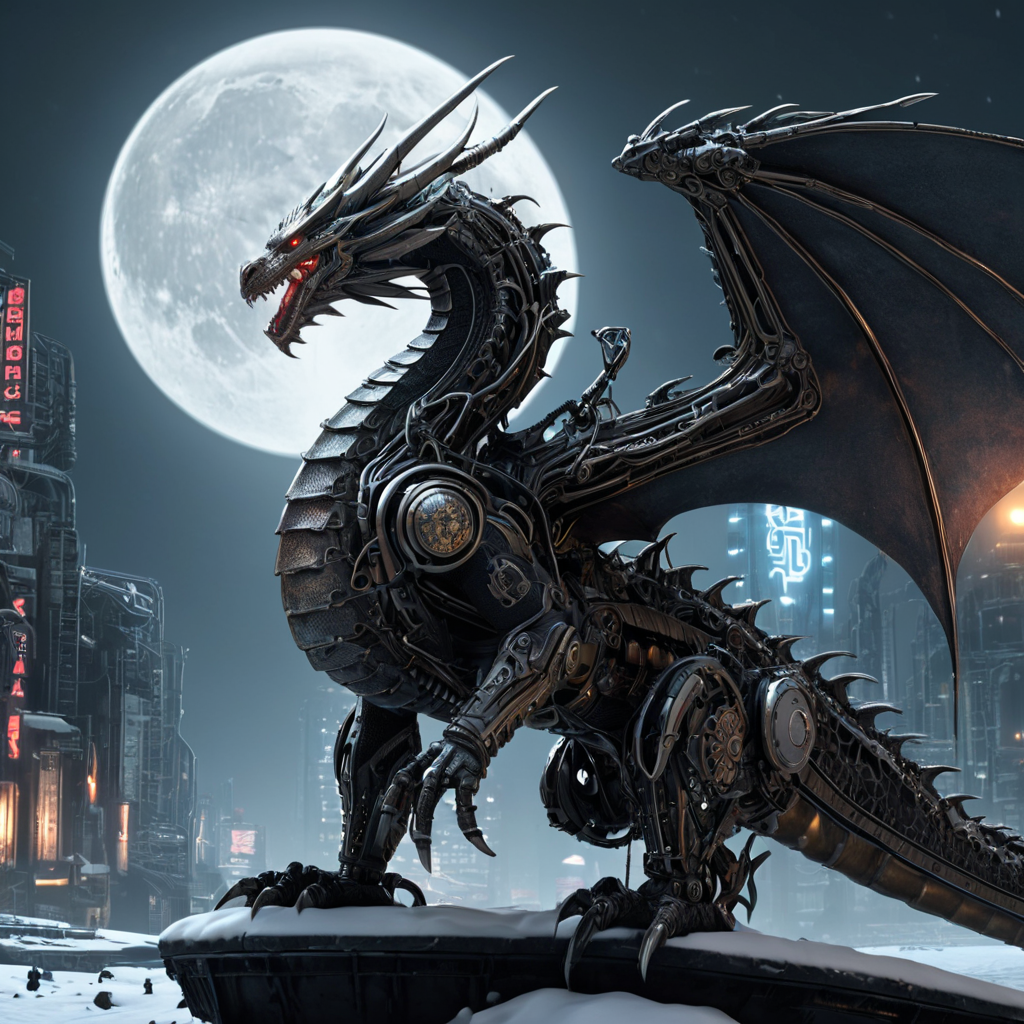
Image variation
Like Midjourney’s V1/V2/V3/V4 function, you can generate variants of an image.
- Select the Input Image checkbox.
- Under Upscale or Variation, select the Vary option you want.
- Press Generate.
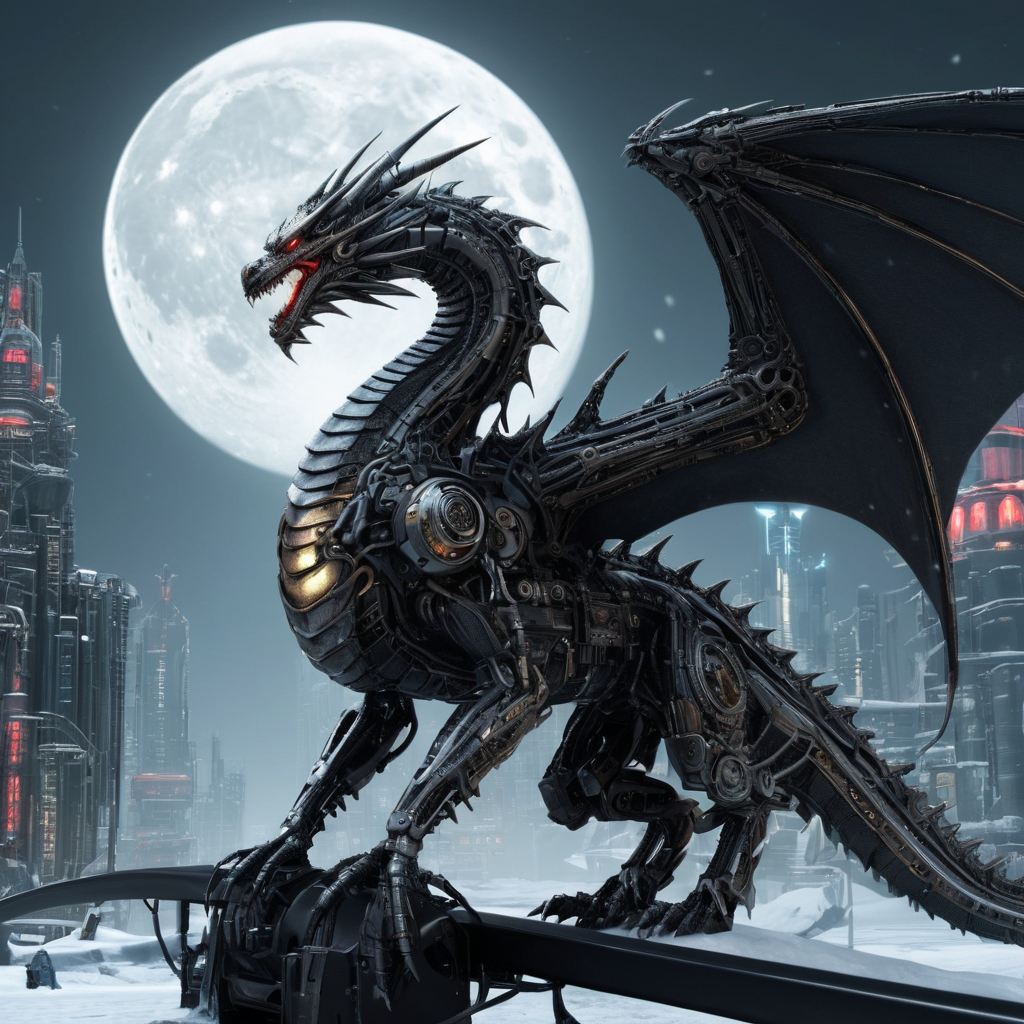
Here is how much change the Vary Subtle and Vary Strong options create. They are not that much.

Note: You can create image variations with the Extra Seed option in AUTOMATIC1111.
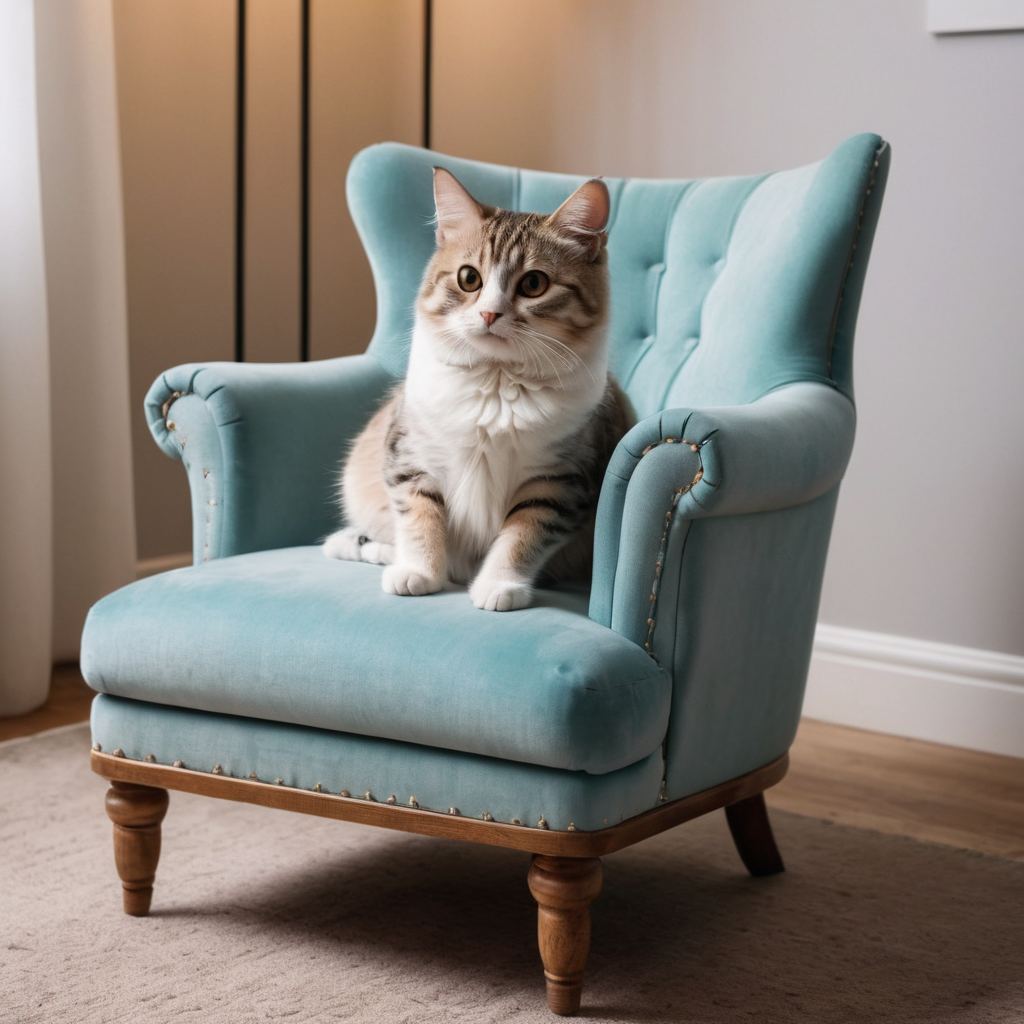
Image Prompt
You can use an image as an additional prompt like AUTOMATIC1111. But unlike AUTOMATIC1111, you don’t need to install extensions. It is part of Fooocus’ basic functionality.
To use Image Prompt, check the Input Image checkbox and select the Image Prompt tab.
Upload an image to one of the image slots.
You probably want to check the Advanced checkbox at the bottom of the page to enable editing more settings.
ImagePrompt
The default Image Prompt option is ImagePrompt.
The settings should look familiar to you if you have used ControlNet in AUTOMATIC1111.
- Stop At: Stop the Image Prompt control at certain sampling steps. 0.5 means stopping after 15 steps for 30 sampling steps.
- Weight: The strength of the Image Prompt control.
Increase either of them to increase the effect of the image prompt.
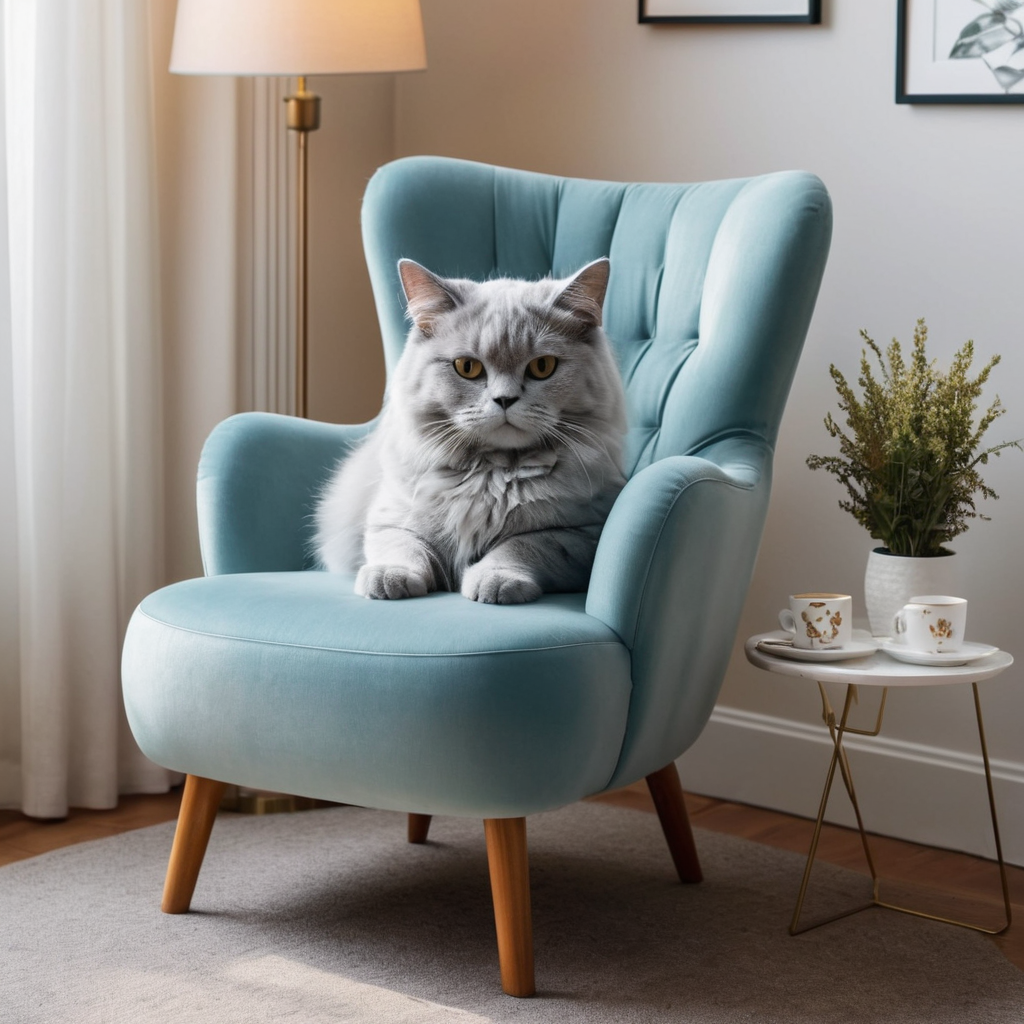
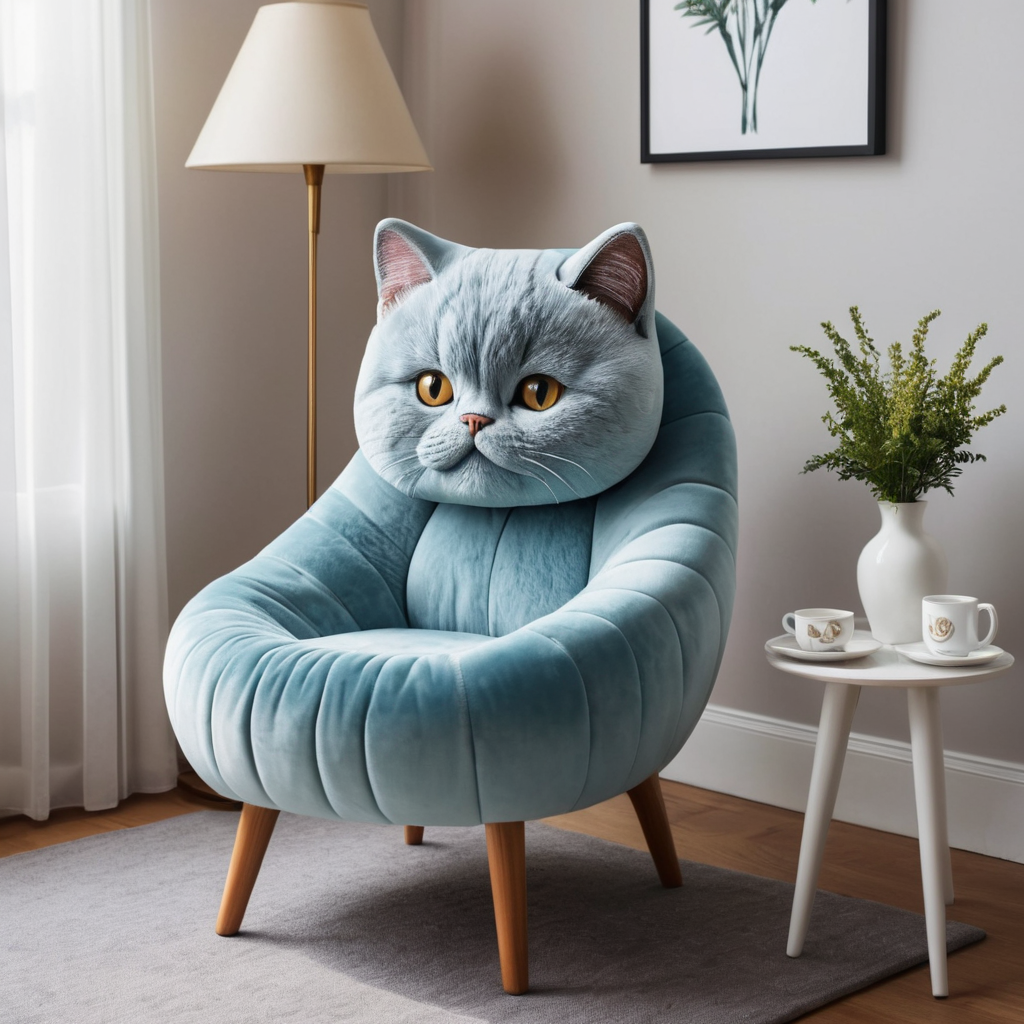
Using the prompt:
a chair that resembles a cat
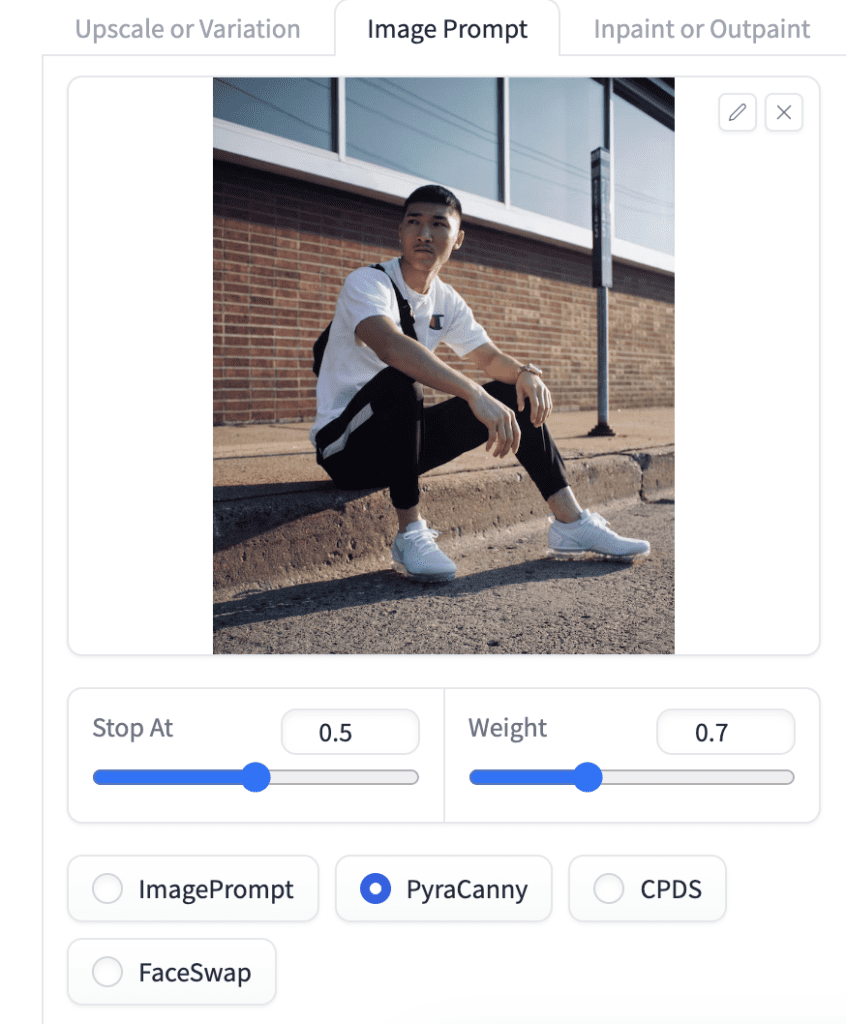
PyraCanny
PyraCanny is a pyramid-based Canny edge control method. The higher resolution of SDXL images may cause a standard Canny algorithm to miss some details. This method detects edges hierarchically in multiple resolutions.
Use PyraCanny like Canny ControlNet to copy composition or human poses.
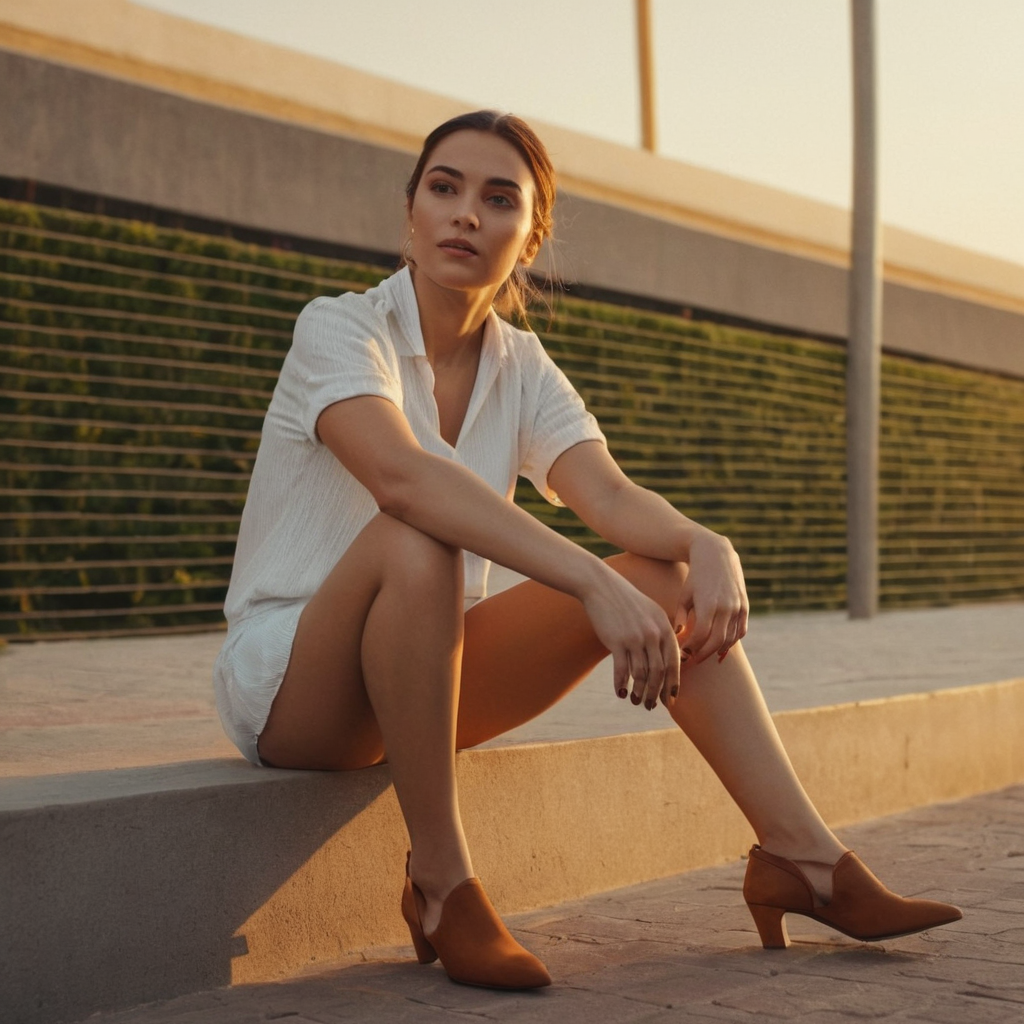
Prompt:
A woman
Upload an image and select PyraCanny.

CPDS
CPDS is a depth-based structure detection method. It copies the 3D composition of the image but not the lines. Similar to the Depth ControlNet, it changes the image more.
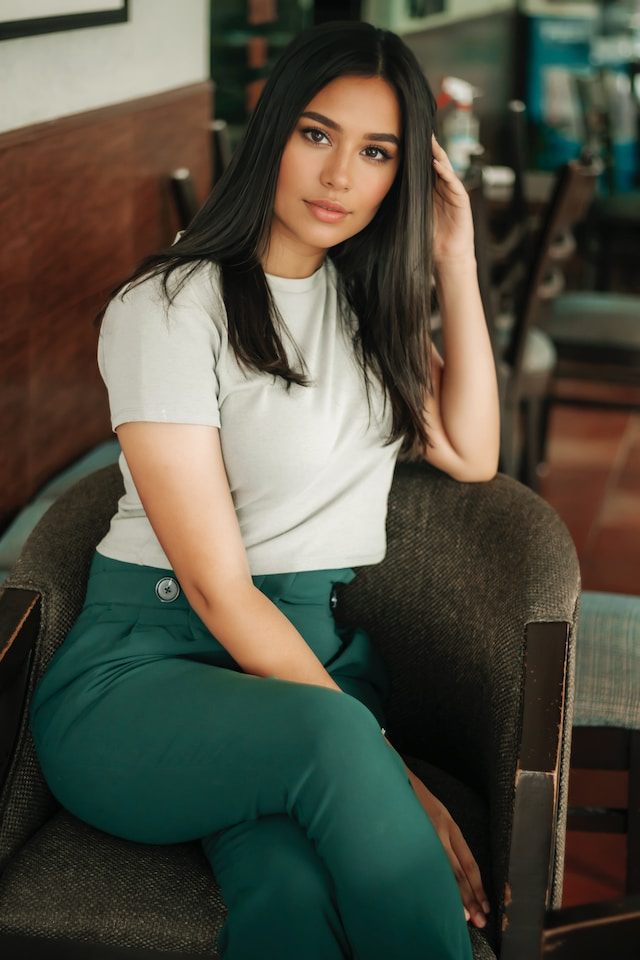
See a sample of CPDS below. It copies the composition but not the facial details, such as hairstyle and the direction in which she is looking.
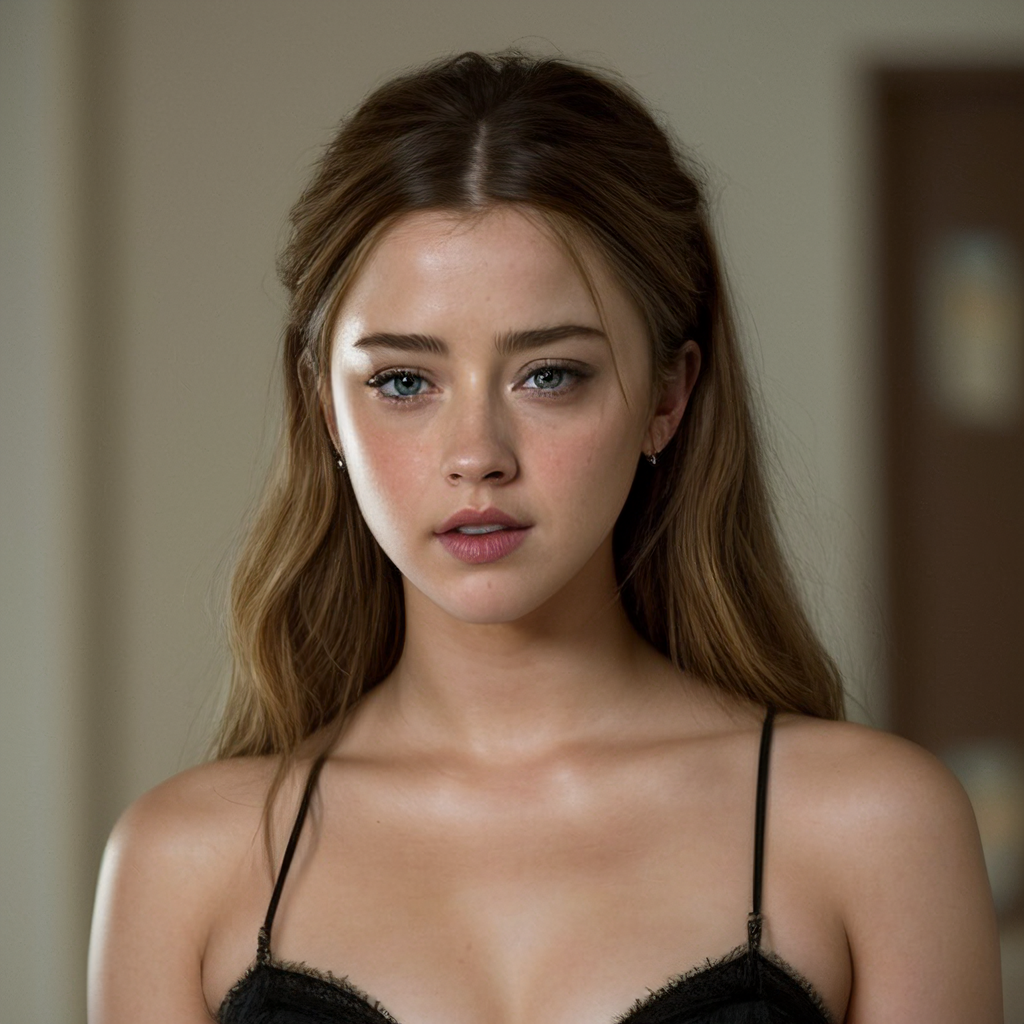
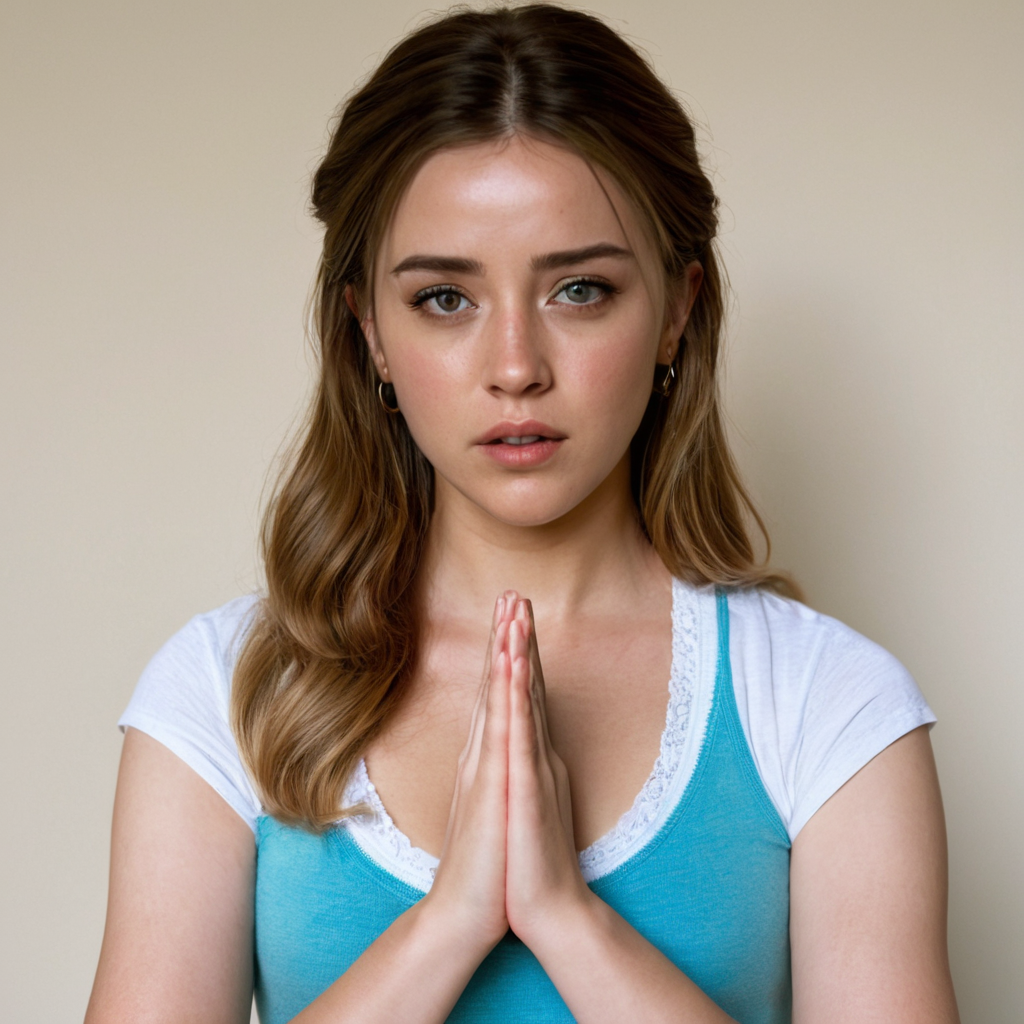
FaceSwap
Face Swap is like IP-adapter Face in ControlNet. It copies the face in the reference image.
Here’s an example. This prompt is:
a woman, praying
Multiple Image Prompts
Like ControlNet in AUTOMATIC1111, you can use multiple image prompts in Fooocus.
Let’s illustrate with an example of using two Image Prompts:
- FaceSwap – weight 0.5, stop at 0.9: Copy the face.
- PyraCanny – weight 0.5, stop at 0.5: Copy the pose.
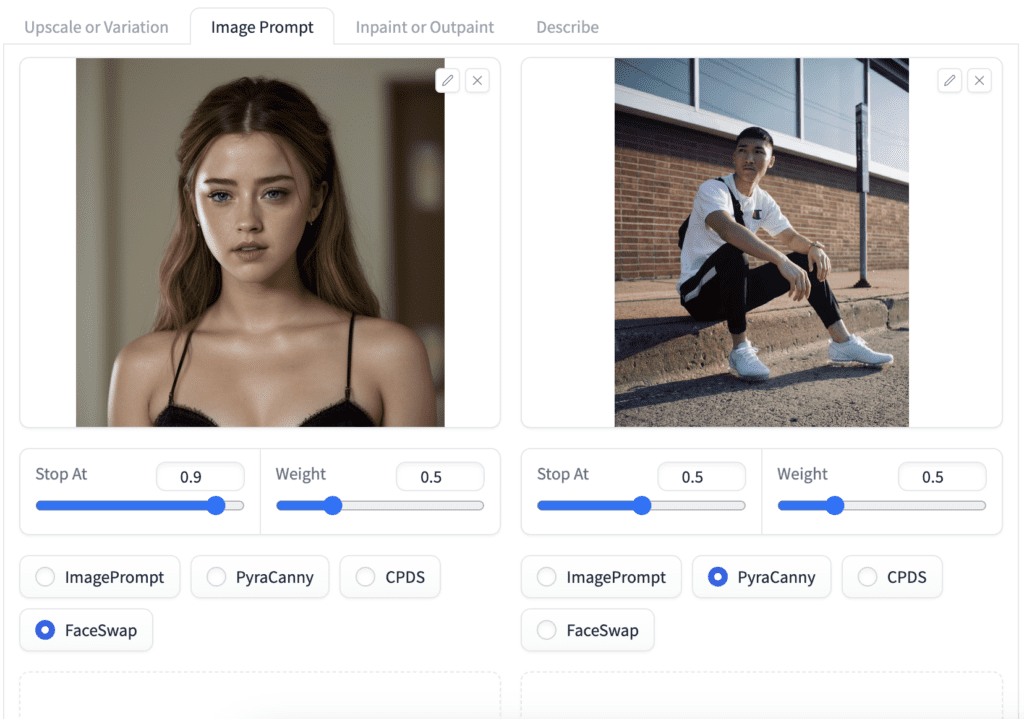
You often need to set the weights lower when using multiple image prompts. Otherwise, you may see artifacts like weird colors.
PyraCanny does a good job of copying the pose. The lower weight and stopping sets the control loose. It helped to generate a different background.
FaceSwap does an okay job of copying the face. You may be able to apply a stronger effect by increasing the weight and stopping.
Inpainting
Inpainting regenerates part of the input image. It is straightforward in Fooocus.
Check the Input Image and select Inpaint or Outpaint.
Upload an image you want to inpaint.
Use the paintbrush tool to mask over an area you want to regenerate.
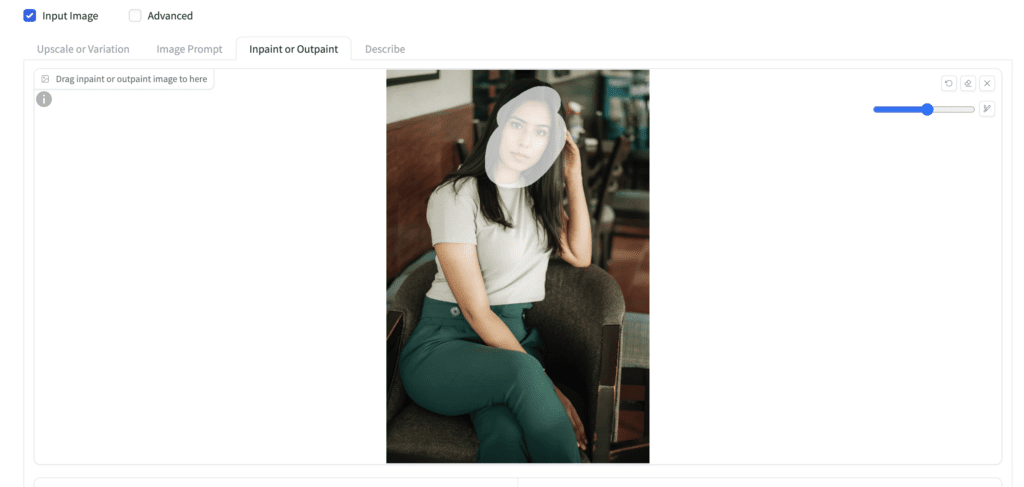
Here’s a result.
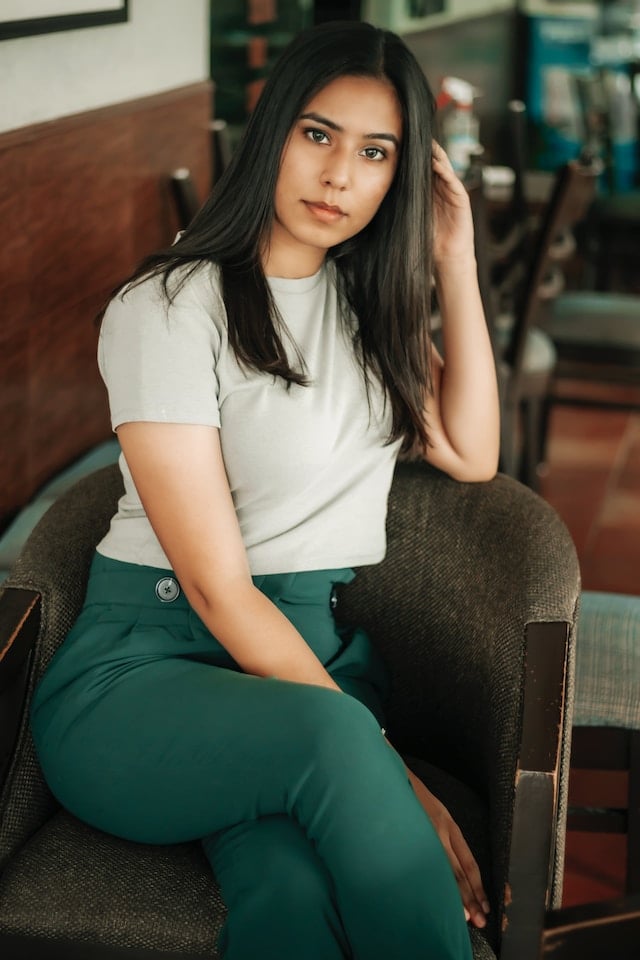
The Improve Detail method keeps the input image more or less the same but improves fine details.
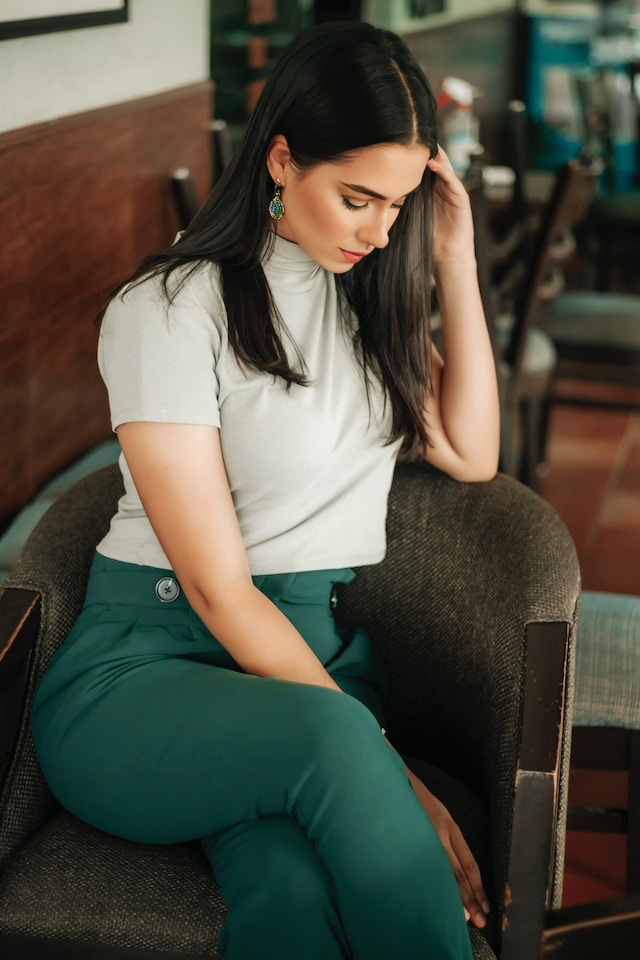
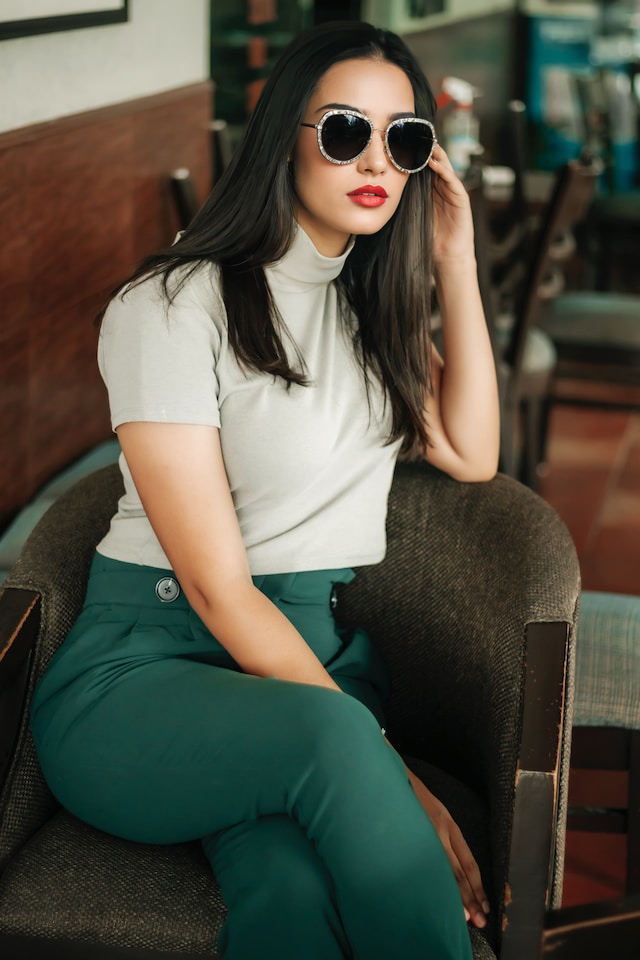
The Modify Content method lets you modify the masked area with a prompt. It’s similar to inpainting with a high denoising strength.
Inpaint additional prompt:
a woman with sunglasses
Outpainting
Outpainting extends an image in one or more directions.
Check the Input Image and select Inpaint or Outpaint.
Upload an image you want to inpaint.
In the Method dropdown menu, select Inpaint or Outpaint (default).
Select the desired Outpaint Direction.

Below is an example of an image outpainted in the lateral directions.
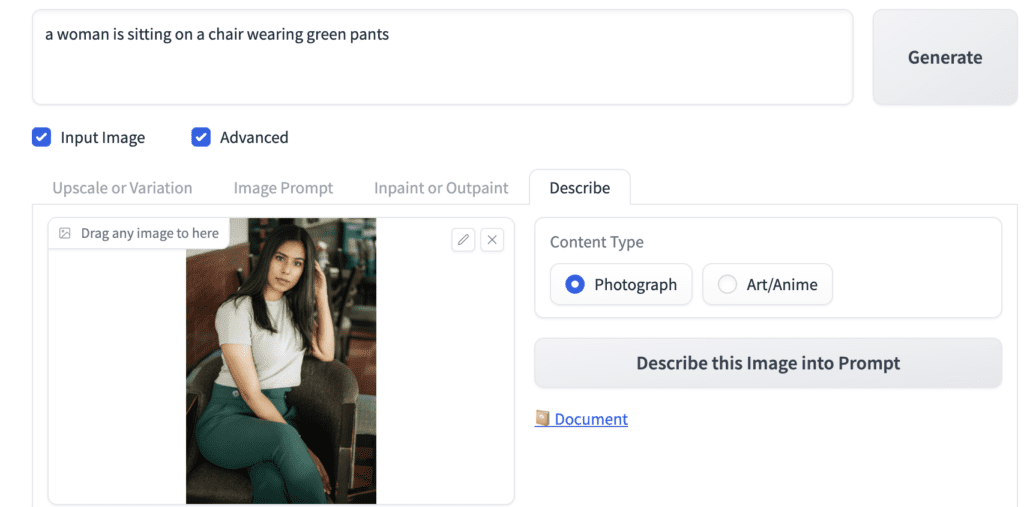
Describe
The Describe function in Input Image guesses a prompt of an image. It is similar to the Interrogate CLIP button in AUTOMATIC1111.
Upload an image to the canvas of the Describe tab and press Describe this image into Prompt.
The guessed prompt will appear in the prompt input box.
Sharing models with AUTOMATIC1111
If you have installed AUTOMATIC1111 or other Stable Diffusion GUI, you may want to share models between them to conserve disk space.
To let Fooocus use A1111’s model:
- Edit the file Fooocus > config.txt
- Edit the paths to point to the locations of your models.
Below is an example of config.txt that points to the model folders of AUTOMATIC1111. You must modify it to reflect the paths on your local storage.
{
    "path_checkpoints": [
        "C:\\Users\\USER\\stable-diffusion-webui\\models\\Stable-Diffusion"
    ],
    "path_loras": [
        "C:\\Users\\USER\\stable-diffusion-webui\\models\\Lora"
    ],
    "path_embeddings": "C:\\Users\\USER\\stable-diffusion-webui\\models\\embeddings",
    "path_vae_approx": "C:\\Users\\USER\\stable-diffusion-webui\\models\\vae_approx",
    "path_vae": "C:\\Users\\USER\\stable-diffusion-webui\\models\\vae",
    "path_upscale_models": "C:\\Users\\USER\\stable-diffusion-webui\\models\\upscale_models",
    "path_inpaint": "C:\\Users\\USER\\stable-diffusion-webui\\models\\inpaint",
    "path_controlnet": "C:\\Users\\USER\\stable-diffusion-webui\\models\\ControlNet",
    "path_clip_vision": "C:\\Users\\USER\\stable-diffusion-webui\\models\\clip_vision",
    "path_fooocus_expansion": "C:\\Users\\USER\\stable-diffusion-webui\\models\\prompt_expansion\\fooocus_expansion",
    "path_wildcards": "C:\\Users\\USER\\stable-diffusion-webui\\wildcards",
    "path_safety_checker": "C:\\Users\\USER\\stable-diffusion-webui\\models\\safety_checker",
    "path_sam": "C:\\Users\\USER\\stable-diffusion-webui\\models\\sam",
    "path_outputs": "C:\\Users\\USER\\stable-diffusion-webui\\outputs\\fooocus"
}
Startup command line arguments
You can edit Fooocus_win64_2-5-0 > run.bat to add command line arguments.
Below is an example of adding the --listen argument in the file. It enables remote access from another computer in the local network.
.\python_embeded\python.exe -s Fooocus\entry_with_update.py --listenAlternative to Fooocus
You can consider the following alternative:
- AUTOMATIC1111: The Stable Diffusion GUI with the most features. The de facto standard.
- SD.Next: A more curated version of AUTOMATIC1111. Many must-have extensions are pre-installed.
- ComfyUI: A node-based Stable Diffusion GUI. The learning curve is a bit steep but knowing it goes a long way.
Fooocus vs Midjourney
Midjourney is a popular and proprietary AI image generator. You can replicate many of Midjourney’s functions with Stable Diffusion.
Fooocus is designed as a Midjourney replacement. If you like the simplicity of MidJourney, you may also like Fooocus. Midjourney is a Discord-based image generator. I would say Fooocus has a better user interface.
See the feature comparison between Fooocus and Midjourney.
Thoughts on Fooocus
I’m a regular user of Stable Diffusion, Midjourney, and DALLE. I always appreciate the infinite tweak-ability of Stable Diffusion, the quality of Midjourney, and how accurately DALLE follows a prompt.
Fooocus fills the gap of being simple and easy to use.
I am sometimes reluctant to use Midjourney because of the hassle of dealing with the Discord interface. It is a bit difficult to tweak the prompt and settings.
Fooocus attempts to deliver a Midjourney experience with the added benefit of running locally, free of censorship, and free. As a bonus, it has a properly-designed GUI!
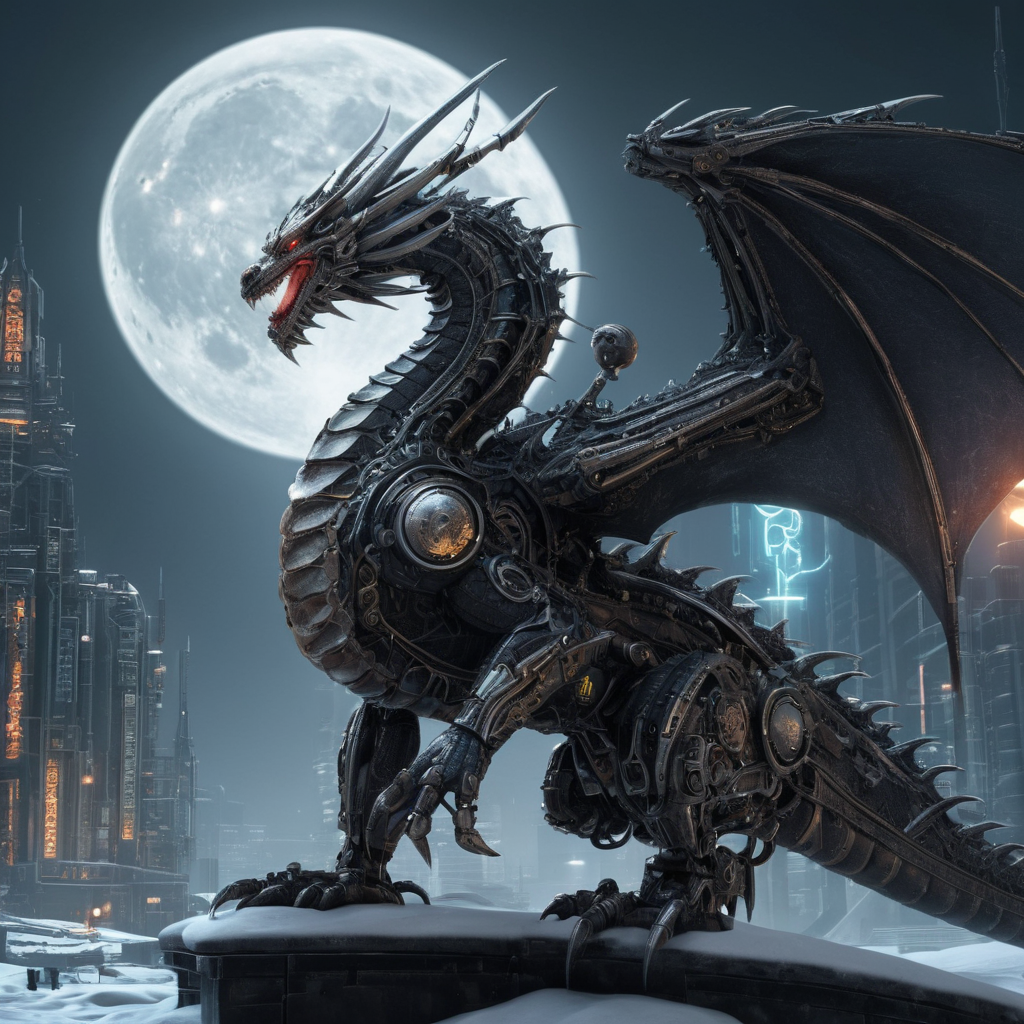
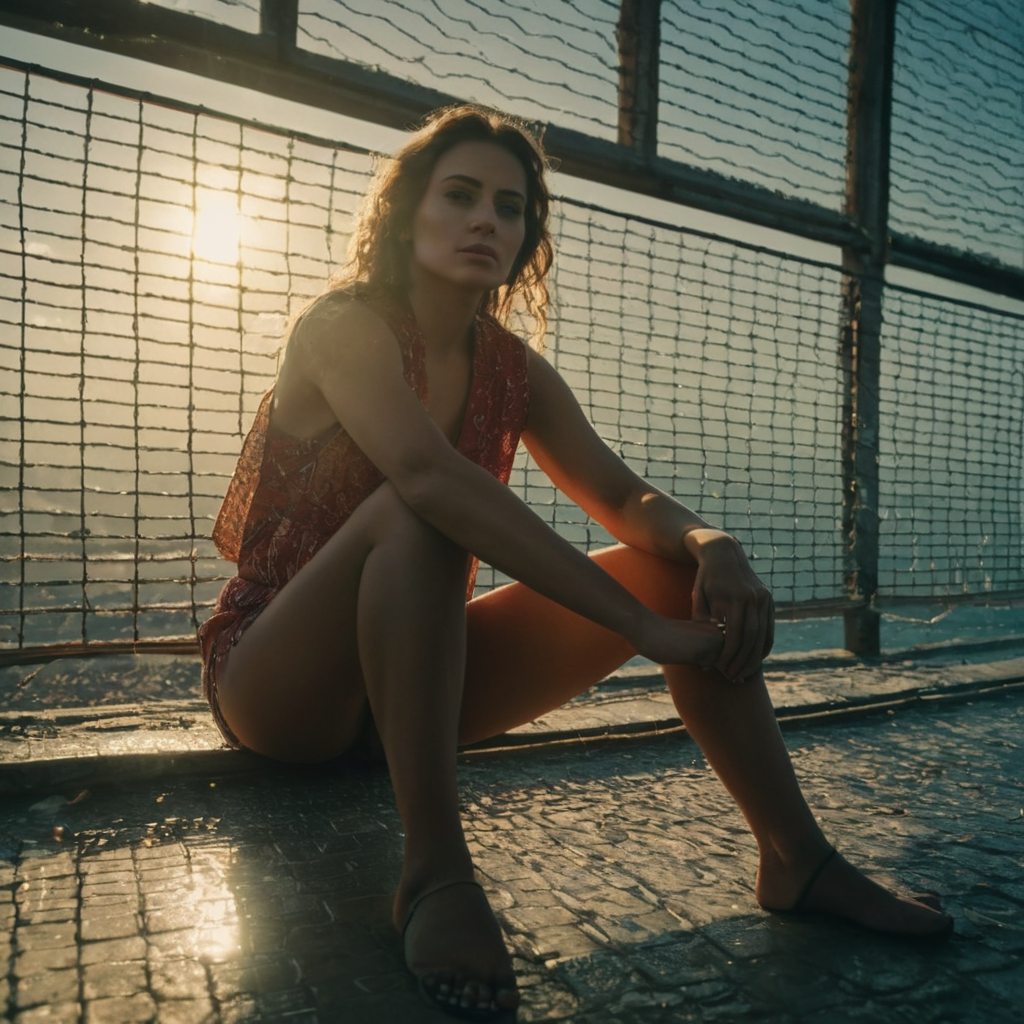
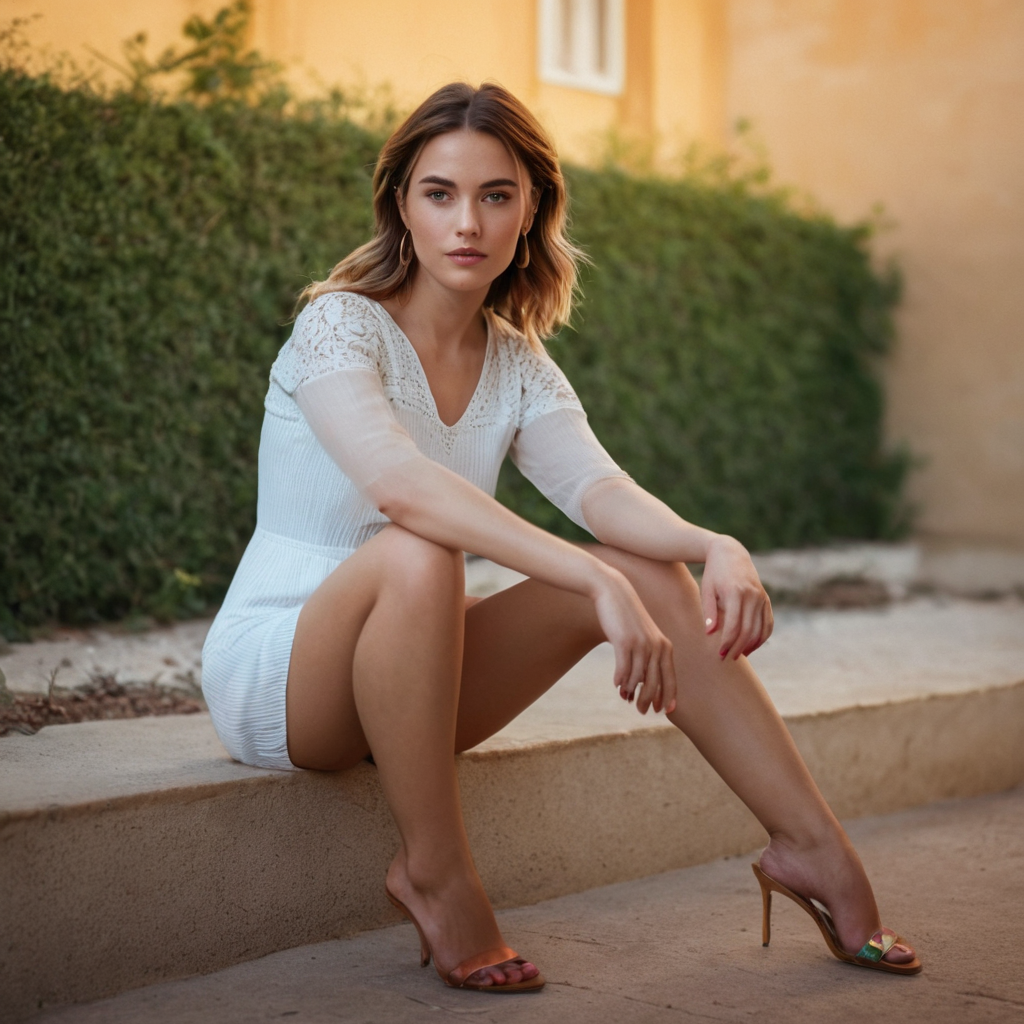
I will use Fooocus to get high-quality images quickly, such as the cover image of this post.
Ive been trying to Download Fooocus for a week now. It doesnt download a zip file it downloads an internet link to absolutely nothing.
This is the link. file:///C:/Users/Shane/Downloads/Fooocus_win64_2-5-0.7z
I don’t know whats happening and would love some help thanks.
Has ido a esta URL: https://github.com/lllyasviel/Fooocus
Just a quick comment to say what you said about not being able to enter your own custom resolution is not quite correct.
If you go to to advanced section and click on ‘Developer Debug Mode’ then in the in the standard Debug Tools section if you scroll down a little you’ll find two sliders called ‘Forced Overwrite Of Generating Width’ & ‘Forced Overwrite Of Generating Height’. If you set those to the resolution you want that will override whatever you have set in the Aspect Ratios section.
thanks for the tip!
Hi, thanks for this text!
I have been seeing ControlNet tab in some video tutorials (CN tab is between I2I and Models tab), but it does not apper in my Fooocus interface. Fooocus is updated to newest vesion. I could not find instrucitons about additional installations of ControlNet, so I am puzzled about how to activate it. If you have any information about that, it would be very helpfull.
Thanks!
You will have better luck using A1111.
That is what I am been thinking too! I wanted to try SDXL+ControlNet, but maybe it is better to wait for XL and A1111 to become compatible.
Tried ConfyUI too, but since I am from the background of architecture, I was only able to get basic workflows to work. Hope I will get better in time and figure out more advanced ones too. Your blog helps a lot!
A1111, SDXL and controlnet canny should work pretty well together.
One BIG con of Fooocus to day is that it doesn’t run on Intel GPUs
Andrés, ¿las imágenes que se crean en este modelo fooocus son públicas? ¿sólo puedo yo verlas? ¿y son de uso comercial?
You can see the model used in advanced option. The default one is juggernauntXL when I tested it. You can read the license agreement.
Is there a checkpoint or workflow that compares to Midjourney V6 photographic images? SD gives me very fine “normal” pictures, but the more creative ones, like high fashion surealism photo’s, seem much harder to generate. (e.g. prompting for a covered face with something still renders a complete face in juggernaut, rE of rStockPhoto)
I am unable to get fooocus to generate accurate faces when giving it photos from image prompt – tried different strengths on faceswap. Do you have any recommendations on how to go about this? Will I have to train a LoRA to get consistently accurate faces? How can I integrate that into fooocus?
you can try increasing the weight but I suspect it is the limitation of the model. There are good ones coming out. I am not sure the software is using them.
Hi Andrew
Thanks for all the great tutorials.
Three questions I have are,
1) Which browser if any, other than Firefox, works best for SD.
2) Is there another base model that is focused more on realistic people, etc than Juggernaut. I have had some success by bringing in RealisticVision at 0.4, but would love something that goes that direction right from the start.
3)Prompt expansion is quite nice, I would guess for those who are new to making good prompts, especially when doing fantasy stuff. It does however get a little out of hand, when trying to make a specific picture, I find. I hate having my “Mona Lisa moment” ruined, because the AI decided my subject needs some green and pink hair dye, blue surgical gloves and a nose ring or some such thing.
Is there a particular default style one must uncheck to kill that function or at least tame it somewhat?
I used chrome with no issue.
Juggernaut and realvis are good for realistic.
It won’t expand or add to the prompt if you uncheck all the preset styles.
Thanks a stack for your help. Due to my computer being ancient, the hit or miss/trial and error approach is not really great. I may die of old age, before getting it right. Your help has been invaluable. Thank you again.
realismEngine is absolutely bonkers as a base model. I try other SDXL models, but after running the identical prompt through a variety, I chose rE nearly every time.
Great tutorial, as always!
Does this have to use SDXL-based models? What if I used SD1.5 ones?
You can use other models with fooocus. change the default model directory in config.txt to point to your existing model directory. Change the model in advanced settings.
Hi, can anyone tell me how I can use foooocus here? I have it downloaded but I dont know how to generate images on it , thank you
Hi, follow the instructions here: https://stable-diffusion-art.com/fooocus/#Windows
Could I use dreambooth models with this? Didn’t work on first pass.
It should. dreambooth models are no different from the standard SD model.
Ok cool. I put it as the refiner model. It says the safe tensor file is corrupted. I think it may need a similar command as you added last time. Does that make sense?
refiner has a different structure so putting it as a refiner may not work correctly.
So where should I put it? I thought main model was XL only?
ValueError: Error while deserializing header: MetadataIncompleteBuffer
File corrupted: /content/Fooocus/models/checkpoints/trin3.safetensors
Fooocus has tried to move the corrupted file to /content/Fooocus/models/checkpoints/trin3.safetensors.corrupted
Beyond my paygrade to resolve this. Folks at the fooocus github page may be able to help.
Where is the prompt “under the hood”? I gave the image produced in Fooocus in Automatic1111 for PNG-Info and CLIP-Interrogate. Nothing to see.
Ah, i find the prompt in the log.html in the output folder.
Fantastic! Thank you so Much!
Most of the time I use ComfyUI, but since last month when I discovered Fooocus, It is my favorite image generator.
Your guide is very Good!
Hi .. many thanks for this article. I want just to know if there is a way to create seamless patterns with fooocus like midjourney (using –tile) …
not that I am aware of.