Image prompt allows you to use an image as part of the prompt to influence the output image’s composition, style, and colors. In this post, you will learn how to use image prompts in the Stable Diffusion AI image generator.
Table of Contents
Software setup
We will use AUTOMATIC1111 Stable Diffusion WebUI in this tutorial. It is popular and free. You can use this software on Windows, Mac, or Google Colab.
Check out the Quick Start Guide if you are new to Stable Diffusion. Check out the AUTOMATIC1111 Guide if you are new to AUTOMATIC1111.
You will need to have ControlNet installed to follow this tutorial.
Install IP-adapter models
Before using the IP adapters in ControlNet, download the IP-adapter models for the v1.5 model.
Put them in ControlNet’s model folder.
stable-diffusion-webui > extensions > sd-webui-controlnet > models
What is an image prompt?
An image prompt is an image input to a Stable Diffusion model. It is in an additional input to the text prompt. Both the text prompt and the image prompt influence the AI image generation through conditioning.
You can use the image prompt with Stable Diffusion through the IP-adapter (Image Prompt adapter), a neural network described in IP-Adapter: Text Compatible Image Prompt Adapter for Text-to-Image Diffusion Models by Hu Ye and coworkers.
Similar to ControlNet, the IP-adapter does not modify a Stable Diffusion model. It influences a model by conditioning. You can use it with any Stable Diffusion model.
In AUTOMATIC1111, the IP-adapter is implemented in the ControlNet extension.
Using Image Prompt
text-to-image
You can use the Image Prompt on the txt2img page of AUTOMATIC1111.
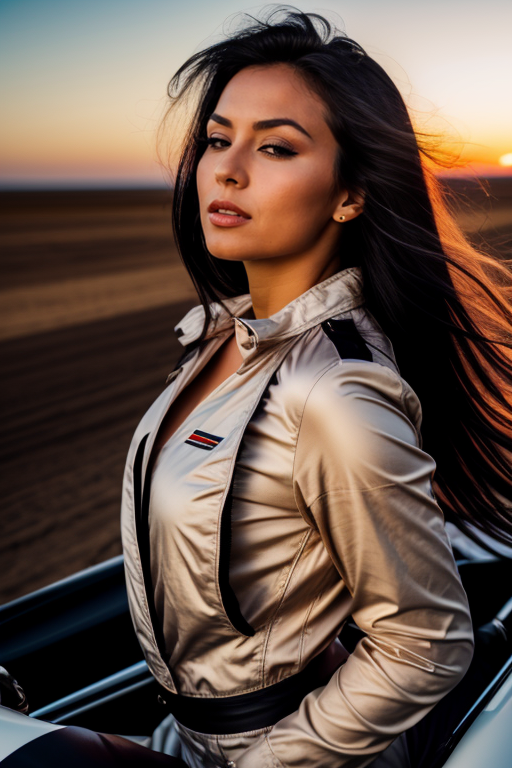
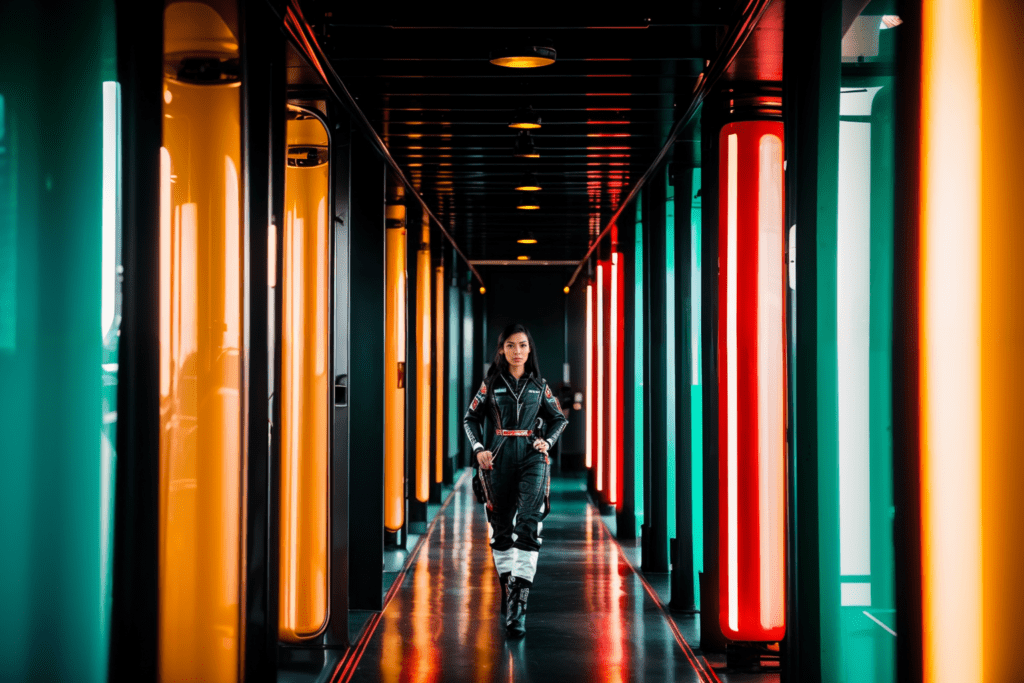
Let’s first generate an image without using an image prompt, and add an image prompt to it to test the effect.
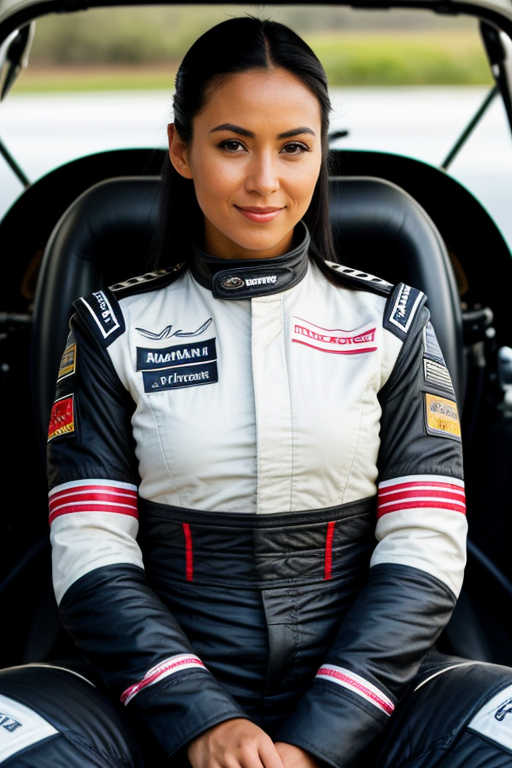
Let’s use the following settings on txt2img page to generate an image.
- Model: Realistic Vision v5.1
- Prompt:
photo of a ino woman in a race car with black hair and a black pilot outfit,morning time, dessert
disfigured, ugly, bad, immature, cartoon, anime, 3d, painting, b&w, 2d, 3d, illustration, sketch, nfsw, nude
- Sampling Method: DPM++ 2M Karras
- Size: 512×768
- CFG Scale: 7
We get the following image.
Adding image prompt
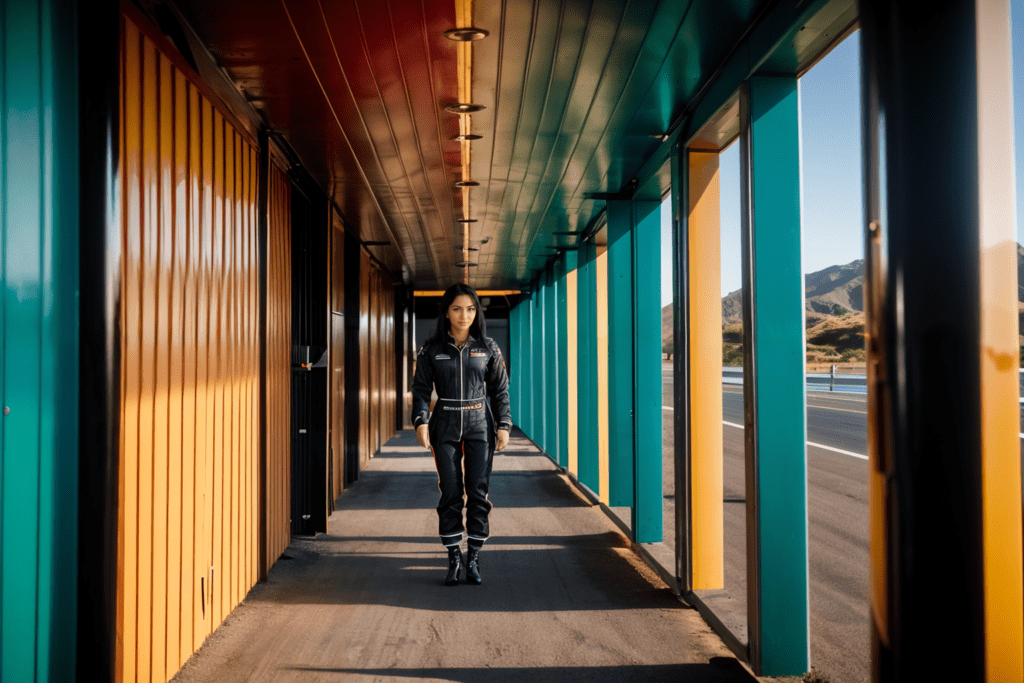
Let’s add an image prompt by using enabling the IP-adatper control model in the ControlNet extension.
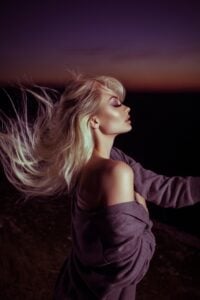
We will use the following image as the image prompt.
On the txt2img page, scroll down to the ControlNet section.
Upload this image to the image Canvas.
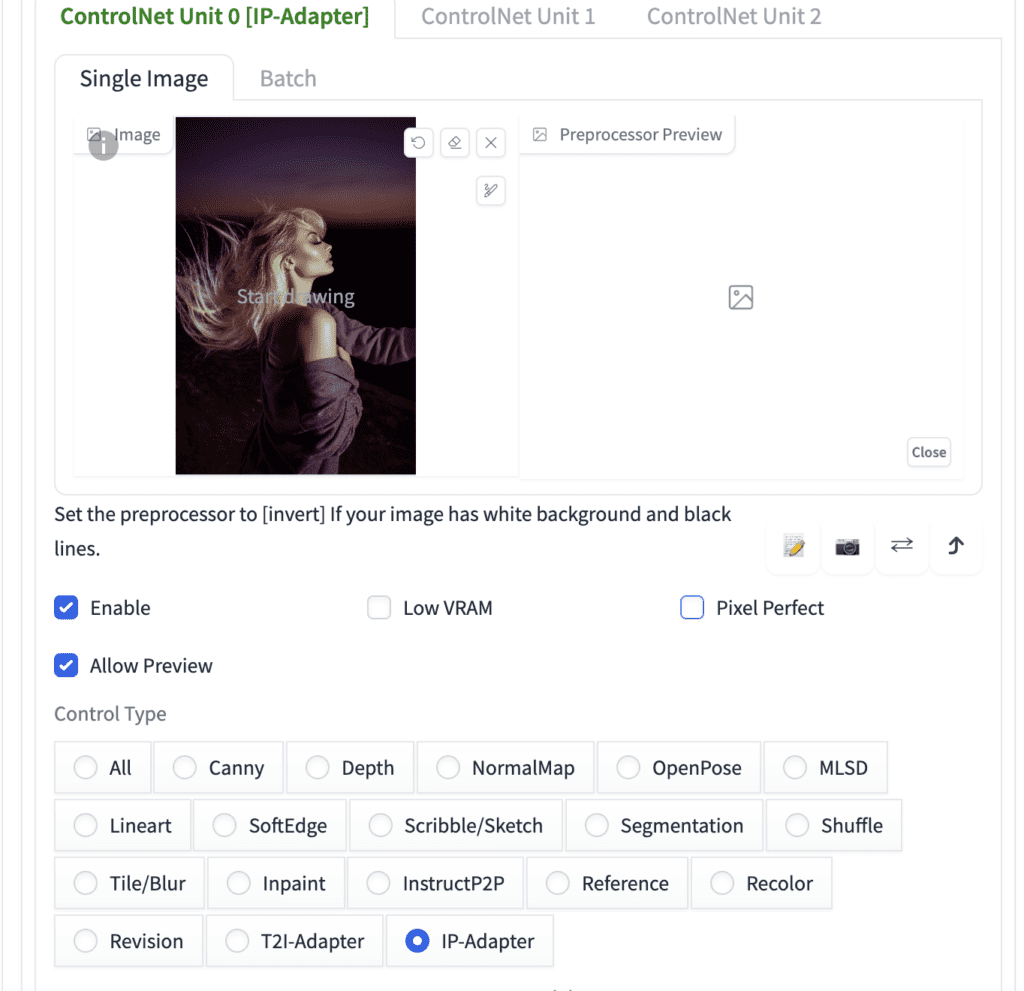
Enter the following ControlNet settings:
- Enable: Yes
- Pixel Perfect: No
- Control Type: IP-Adapter
- Preprocessor: ip-adapter_clip_sd15
- Model: ip-adapter_sd15
- Control Weight: 0.5
- Starting Control Step: 0
- Ending Control Step: 1
- Control Mode: Balanced
- Resize mode: Crop and Resize
Press Generate. You get an image that is influenced by both the text prompt (a woman in a pilot outfit) and the image prompt (a woman looking sideway with a horizon in the background.)
Adjusting the effect of the image prompt
The effect of the image prompt can be controlled by adjusting the Control weight of the IP-adapter.
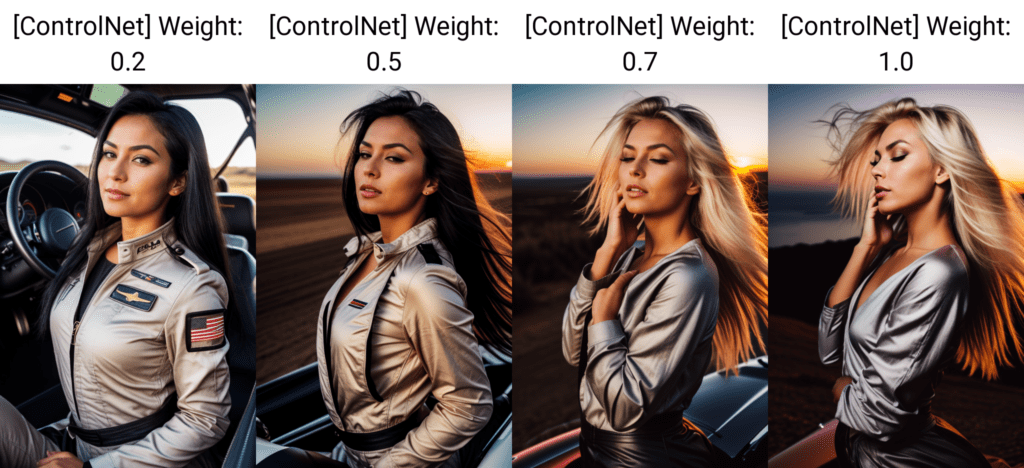
In this example, using a weight higher than 0.5 overwhelms the text prompt. So, it is important to set the weight to an appropriate value so that both the text prompt and the image prompt have effects.
IP-adapter plus
There are two IP-adapters available. The standard model we just studied and the plus model.
To use the plus model, select ip-adapter_sd15_plus in ControlNet > model.
The plus model is very strong. It tends to copy the image prompt faithfully. See the result below.
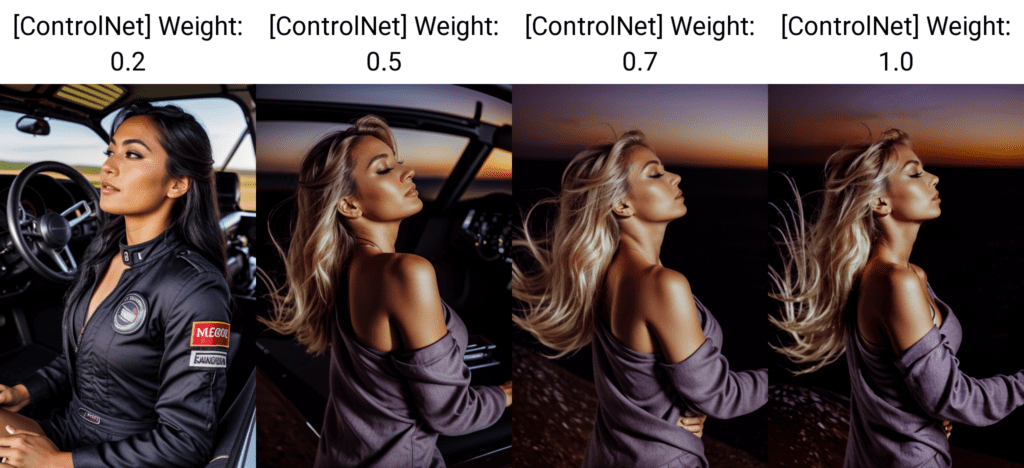
But it has some good use cases that I will go through in a moment.
Using image prompt with SDXL model
You can use the IP-adapter with an SDXL model. The changes you need to make are:
- Checkpoint model: Select a SDXL model.
- Image size: 832×1216
- ControlNet Preprocessor: ip-adapter_clip_sdxl
- ControlNet model: ip-adapter_xl
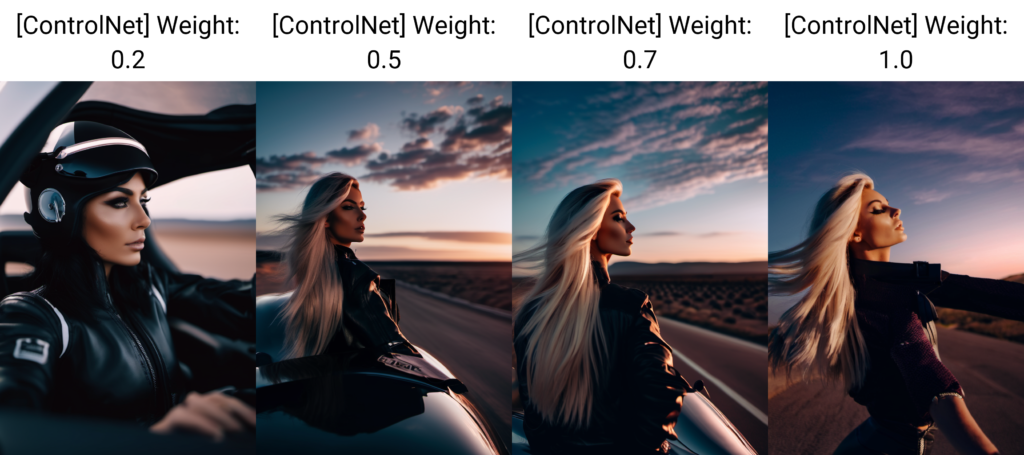
Here’s the image without using the image prompt.
Here are the images with IP-adapter XL at various control weights. The effect is similar to the standard 1.5 model.
Use cases for IP-adapter
Generate images with the same style
With IP-adapter, you can set the color and composition to achieve a somewhat fixed style.
Image Prompt:
Control weight: 0.6
Ending control step: 0.3
We get images with a similar composition.
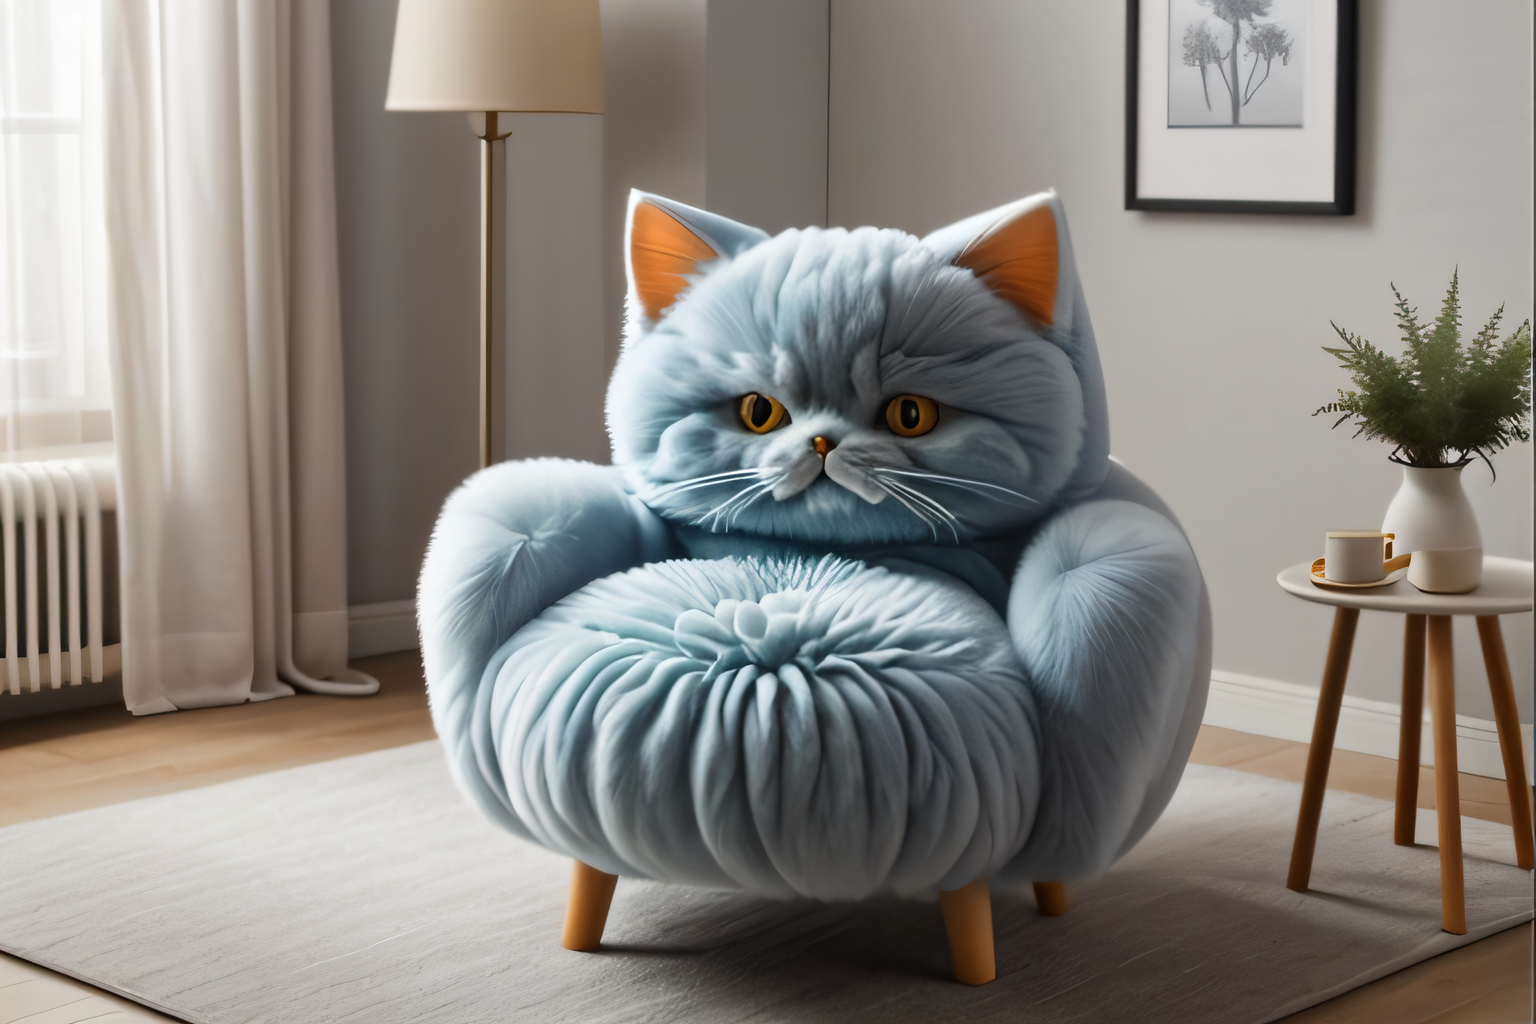
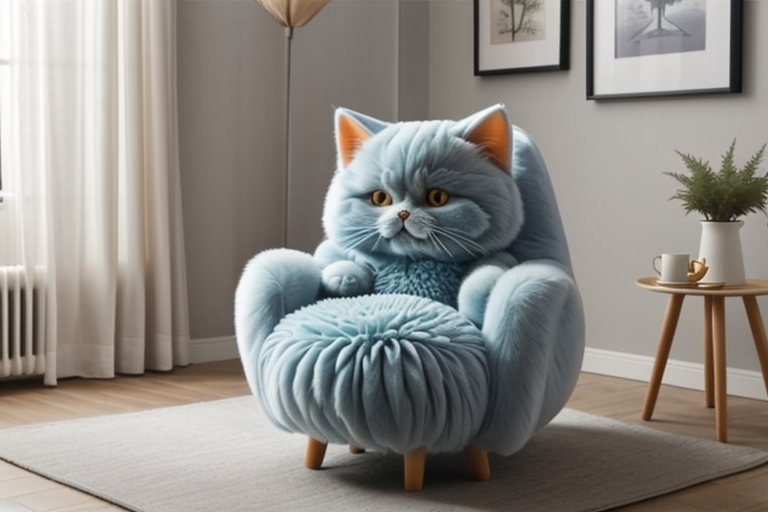
Reproducing an image
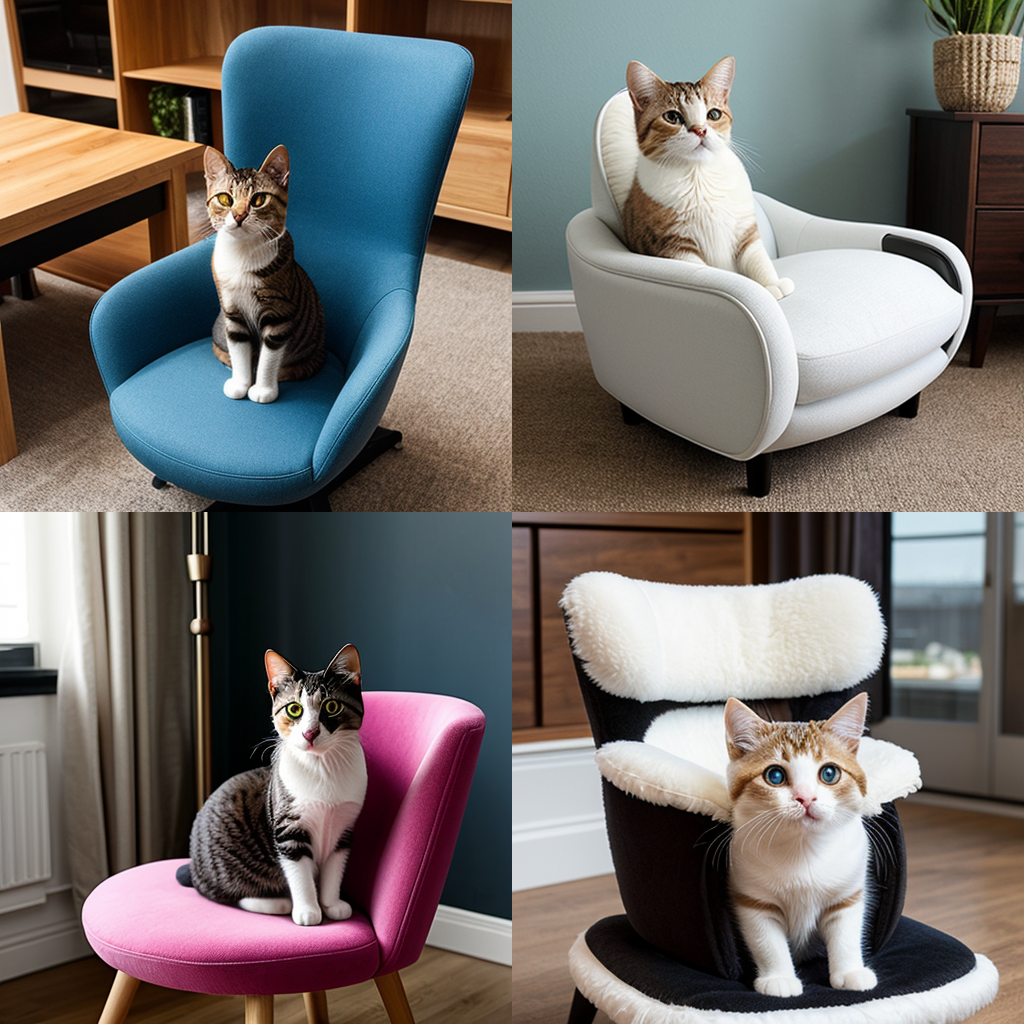
You may not know how to reproduce an image with a text prompt alone. For example, the image below cannot be recreated with the prompt “cat chair”
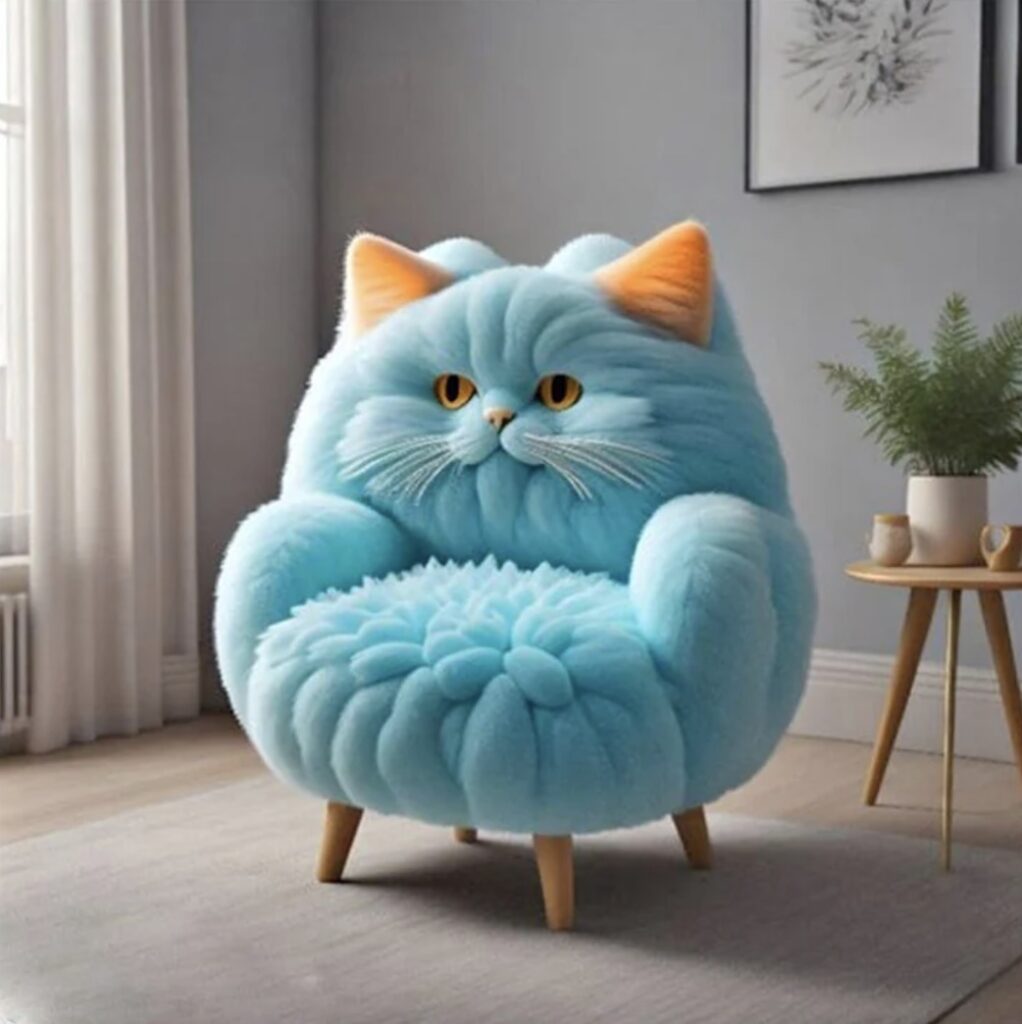
Using the prompt “cat chair”, you get:
But using IP-adapter with the reference image, you get:
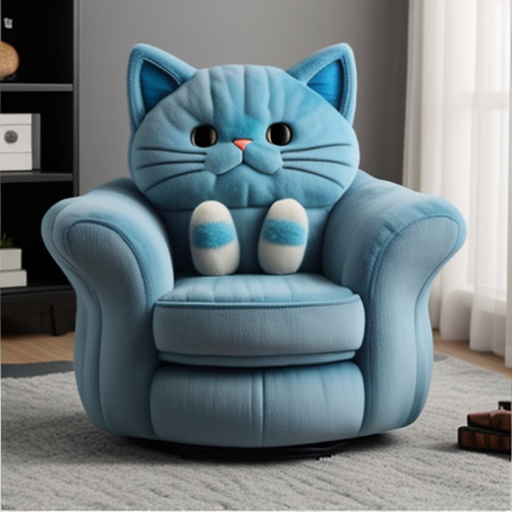
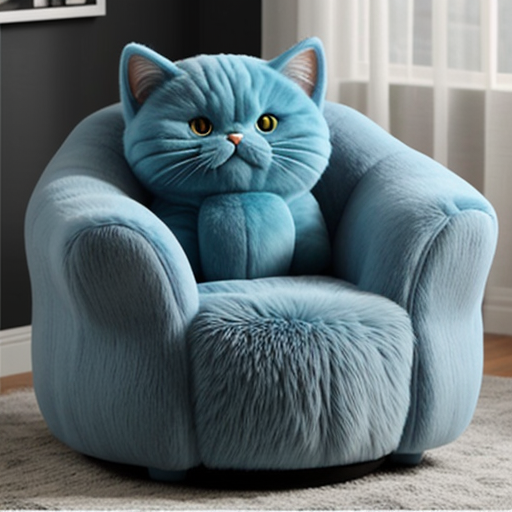
The effect is stronger with the Plus model:
Hi, very good post!
How would you pose the difference between the concept of Image Prompt, and Image2Image? I saw they are quite similar, but I can’t point out the real difference between them.
Thank you!
img2img’s result is pixel-to-pixel similar to the original.
Image prompt is visually the same content but not necessarily similar pixel-to-pixel
what if we don’t use the IP adapters, I see there’s img2img tab in A1111, does it have similar feature ? thanks !
img2img is based on pixel-to-pixel similarity. IP-adapter is based on concept and semantic. So it can generate similar images without is dissimilar pixel wise.
I created this using comfyui, Here is the output uploaded along with workflow: https://comfyworkflows.com/workflows/dde9dfbb-2d50-4326-943d-dada6d386e42
Nice!
Hey! Do you maybe still have the workflow? I´ll be interested but your link isn´t working anymore unfortunately.
Hello! I’m new in SD and when I’m trying to generate this picture with controlNet, SD starts uploading “ip-adapter_clip_sd15” file and stuck at the finish. In a folder where it should be only tmp-files and on the next trying it starts to load it again. Problem is – I can’t find this file to upload by myself. Is it possible to load it from somewhere?
without knowing your system, I can only say you can try: (1) delete the venv folder. (2) remove the controlnet folder and reinstall.
Thank you for your answer. I tried esterday to fix it. Looks like problem was in old version of ContorlNet. After update it starts uploading another file one time and its working fine! But thank you))
Hi, I hope you are doing well. Which checkpoint should I select for the cat chair image? Waiting for the help. Thanks
realistic vision.
Ok, Thanks for the help 🙂
Hello Andrew,
I trust you’re doing well.
I’ve been attempting to create a cozy chair that resembles a cat, similar to the example you shared. However, I’m still facing some challenges in achieving that.
You can find an image of my current chair design along with the settings I’ve used in this link: [https://www.dropbox.com/scl/fo/18kf953urhj7gny7v3epk/h?rlkey=hn14ra0z5kp6ub700am0ddwxe&dl=0].
I would greatly appreciate it if you could take a look and provide some insights on what might be going wrong and suggest any adjustments needed to bring my chair closer to the adorable cat chair example you’ve created.
Looking forward to your assistance.
Thank you!
Can you try using the ip-adapter plus with the exact cat chair image? That should work and serve as a good starting point.
Which cat chair image?
Like the one in the cover image.
Can we create this kind of chair using only a cat prompt and a simple chair image?
great ! thanks a lot !