
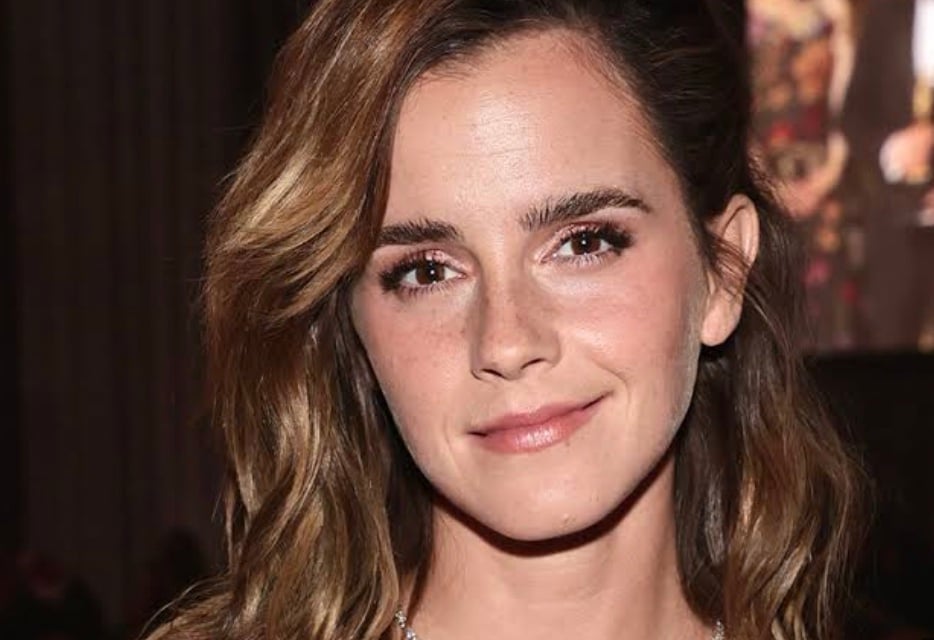
Looking for a way to put someone in Stable Diffusion? InstantID is a Stable Diffusion addon for copying a face and add style. No model-training is required! Below is an example.

In this post, I will cover:
- What is InstantID
- How to use InstantID in AUTOMATIC1111
- How to use InstantID in ComfyUI
- Tips on using InstantID
Table of Contents
What is InstantID?
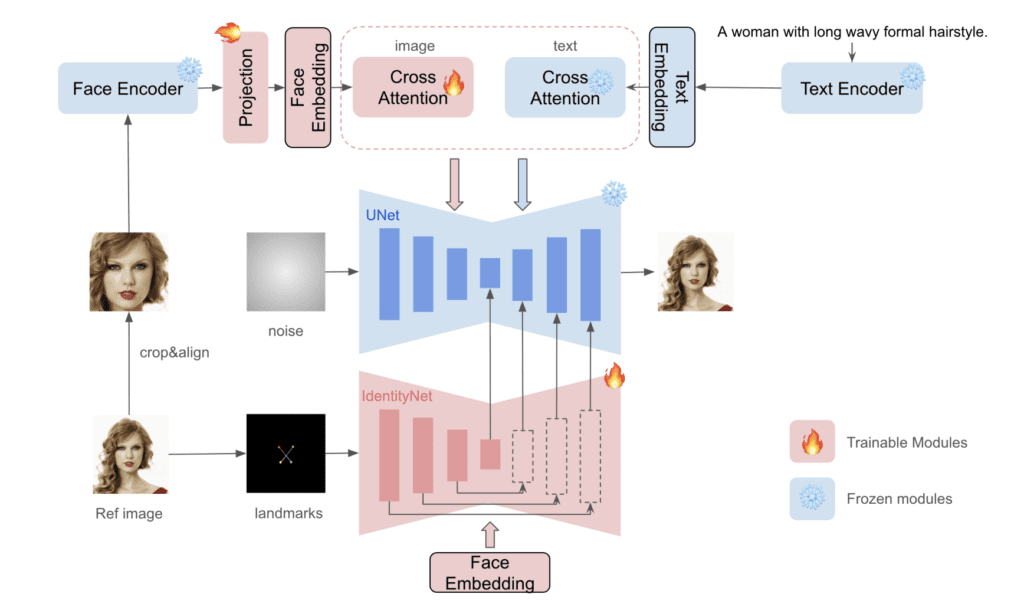
InstantID uses InsightFace to detect, crop and extract a face embedding from the reference face. The embedding is then used with the IP-adpater to control image generation. This part is very similar to the IP-Adapter Face ID.
In addition, it detects and fixes several facial landmarks (eyes, nose, and mouth) with ControlNet.
The combination of using IP-Adapter Face ID and ControlNet enables copying and styling the reference image with high fidelity.
InstantID uses Stable Diffusion XL models. There’s no Stable Diffusion 1.5 version at the time of writing.
Since IP-Adapter Face ID doesn’t work as well with the SDXL models, InstantID is a good choice for face swap with SDXL.
Alternative to InstantID
InstantID is not the only face swap technology.
To put a face, or anything, in Stable Diffusion, you can train a checkpoint or a LoRA models. This approach usually gives the best result but it is time-consuming and requires some skill in training models.
You can also use training-free methods like the IP-adapter Face ID or the ReActor extension.
Using InstantID in AUTOMATIC1111
Software setup
We will use AUTOMATIC1111 , a popular and free Stable Diffusion software. Check out the installation guides on Windows, Mac, or Google Colab.
If you are new to Stable Diffusion, check out the Quick Start Guide.
Take the Stable Diffusion course if you want to build solid skills and understanding.
Check out the AUTOMATIC1111 Guide if you are new to AUTOMATIC1111.
Running InstantID requires close to 20 GB of VRAM in my test. If you run into memory issue, you can try the Low VRAM setting in ControlNet, and the SDXL memory optimization options.
Install ControlNet Extension
You will need to install the ControlNet extension to use InstantID.
- Start AUTOMATIC1111 Web-UI normally.
2. Navigate to the Extension Page.
3. Click the Install from URL tab.
4. Enter the following URL in the URL for extension’s git repository field.
https://github.com/Mikubill/sd-webui-controlnet5. Click the Install button.
6. Wait for the confirmation message that the installation is complete.
7. Restart AUTOMATIC1111.
You will need to select an SDXL checkpoint model to select an SDXL InstantID. The list won’t refresh automatically. You can change the Control Type and change back to see the new options.
Updating the ControlNet extension
Your ControlNet extension may be outdated if you already have it.
Extensions need to be updated regularly to get bug fixes or new functionality. To update an extension:
- Go to the Extensions page.
- Click Installed tab.
- Click Check for updates.
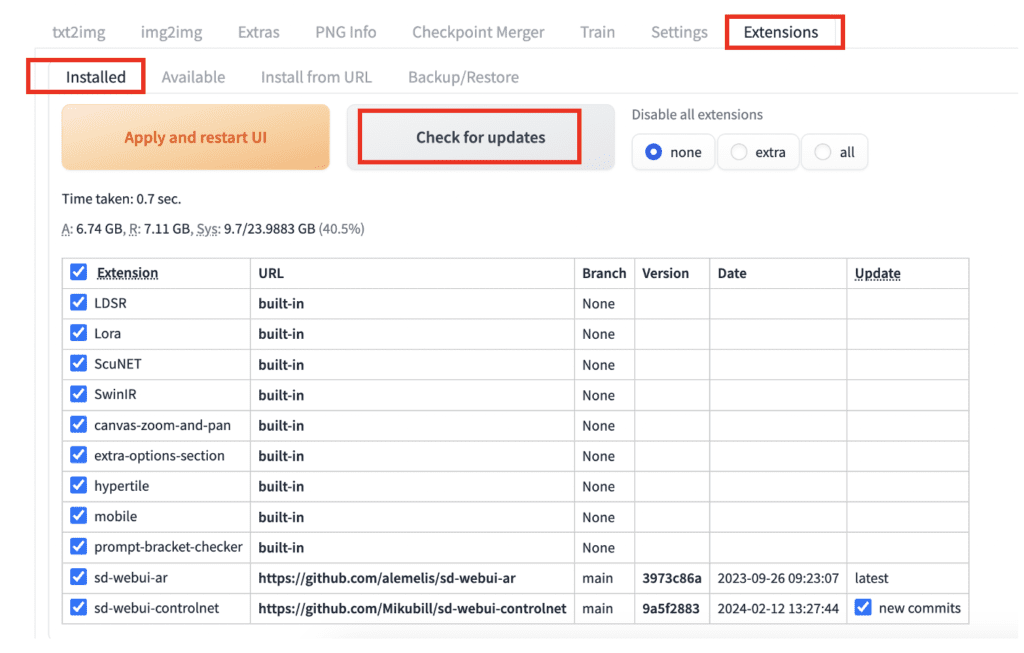
If an update to an extension is available, you will see a new commits checkbox in the Update column.
Leave the checkbox checked for the extensions you wish to update.
Click Apply and Restart UI to update the extensions.
You may need to restart the AUTOMATIC1111 server manually for it to work.
Install InstantID models
Windows or Mac
You need to download the following two model files.
Download the IP Adapter model for InstantID. Rename it to
ip-adapter_instant_id_sdxl.binPut it in the folder stable-diffusion-webui > models > ControlNet.
Download the InstantID controlnet model. Rename it to
control_instant_id_sdxl.safetensorsPut it in the folder stable-diffusion-webui > models > ControlNet.
Google Colab
If you use our AUTOMATIC1111 Colab notebook, download and rename the two models above and put them in your Google Drive under AI_PICS > ControlNet folder.
You must select the ControlNet extension to use the model when starting the notebook.
How to use InstantID on AUTOMATIC1111
Here are a few things to pay attention to when using the InstantID model.
- Use an SDXL model.
- Use a lower CFG scale than you normally would.
- Use two ControlNets for InstantID.
- Reduce the Control Weights and Ending Control Steps of the two controlNets.
Step 1: Select a SDXL model
Select an SDXL Turbo model in the Stable Diffusion checkpoint dropdown menu.
We will use the Dreamshaper SDXL Turbo model. Download the model and put it in the folder stable-diffusion-webui > models > Stable-Diffusion.
Step 2: Enter the txt2img setting
Go to the txt2img page.
You can control the style by the prompt
watercolors portrait of a woman (happy laughing:1.15), masterpiece, artistry
And the negative prompt.
low quality, blurry, malformed, distorted
Use the following sampler for the DreamShaper XL Turbo model.
Sampling Method: DPM++ SDE Karras
Sampling steps: 7
The default image size of 1024×1024 doesn’t work well with Instant ID. Use something close but not exactly 1024×1024.
Width: 1016
Height: 1016
The CFG Scale must be set quite low for Instant ID to work.
CFG scale: 2
Step 3: Enter ControlNet settings
You need to use both InstantID models. In other words, you will use two ControlNets.
I will use the following reference image for ControlNet 0 and ControlNet 1.
ControlNet 0 settings
The first ControlNet uses InsightFace to extract the facial features.
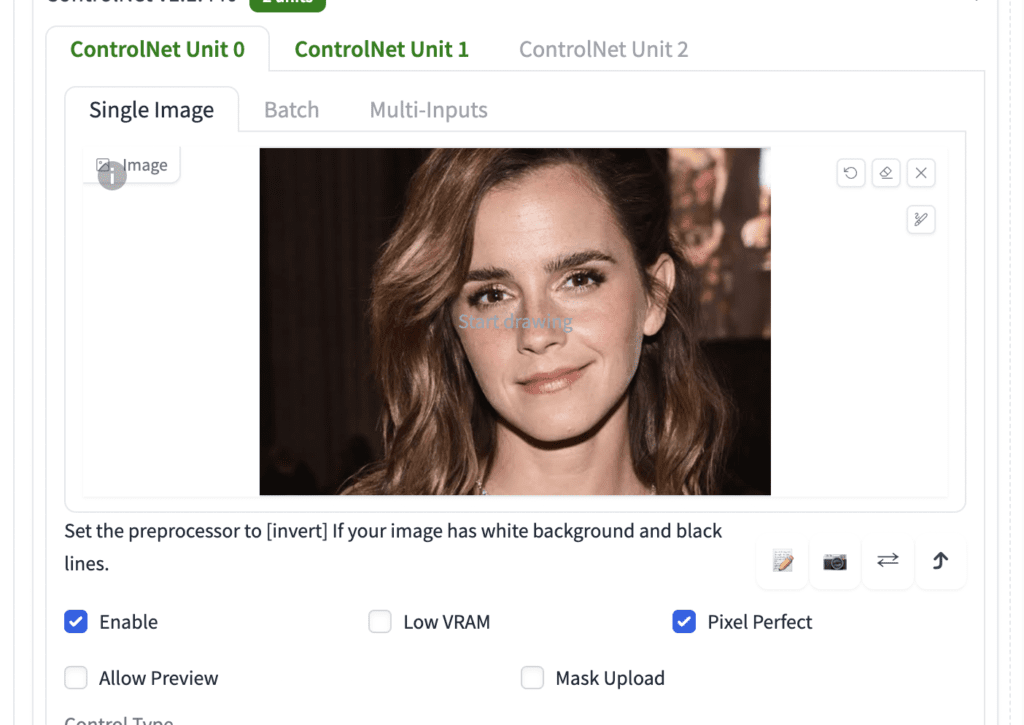
- Enable: Yes
- Pixel Perfect: Yes
- Control Type: Instant_ID
- Preprocessor: instant_id_face_embedding
- Model: ip-adapter_instant_id_sdxl
- Control weight: 1
- Starting control step: 0
- Ending control step: 1
Note: If you don’t see Instant_ID in the Control Type and preprocessor list, your ControlNet extension is outdated. See how to update an extension.
ControlNet 1 settings
The second ControlNet is used to extract facial keypoints such as positions of the eyes, the nose and the mouth.
Upload the SAME reference image as ControtNet 0.
- Enable: Yes
- Pixel Perfect: Yes
- Control Type: Instant_ID
- Preprocessor: instant_id_face_keypoints
- Model: control_instant_id_sdxl
- Control weight: 0.4
- Starting control step: 0
- Ending control step: 0.5
Step 4: Generate images
Click Generate. You should have images like this.


Tips for getting good images
The style is controlled by the prompt. You can use the prompts for SDXL.
The settings are highly dependent on the prompt and style. You may need to adjust the following settings.
- Control Weight (ControlNet 0 and 1) – 0.5 to 1
- Ending Control Step (ControlNet 0 and 1) – 0.2 to 0.6
- CFG Scale – 2 to 3.
The first Control image sets the facial feature. The second image sets the keypoints of the face. You can use different images but I found using the same image improves the result.
The InstantID function is flinchy. Watch the terminal for error messages. It is not uncommon to see errors even if you do everything right. Try turning off the ControlNets, generate an image, and turn it back on. Or refresh the page.
How to use InstantID on ComfyUI
Software setup
We will use ComfyUI, a free AI image and video generator. You can use it on Windows, Mac, or Google Colab.
Think Diffusion provides an online ComfyUI service. They offer an extra 20% credit to our readers.
Read the ComfyUI beginner’s guide if you are new to ComfyUI. See the Quick Start Guide if you are new to AI images and videos.
Take the ComfyUI course to learn how to use ComfyUI step by step.
You need to have the ComfyUI Manger installed to follow this workflow.
Install InsightFace
Like the IP-Adapter FaceID, InstantID requires the InsightFace librrary to run. You should be all set if you have the IP-Adapter FaceID up and running.
If you haven’t installed InsightFace on ComfyUI, follow this instruction to install InsightFace on ComfyUI.
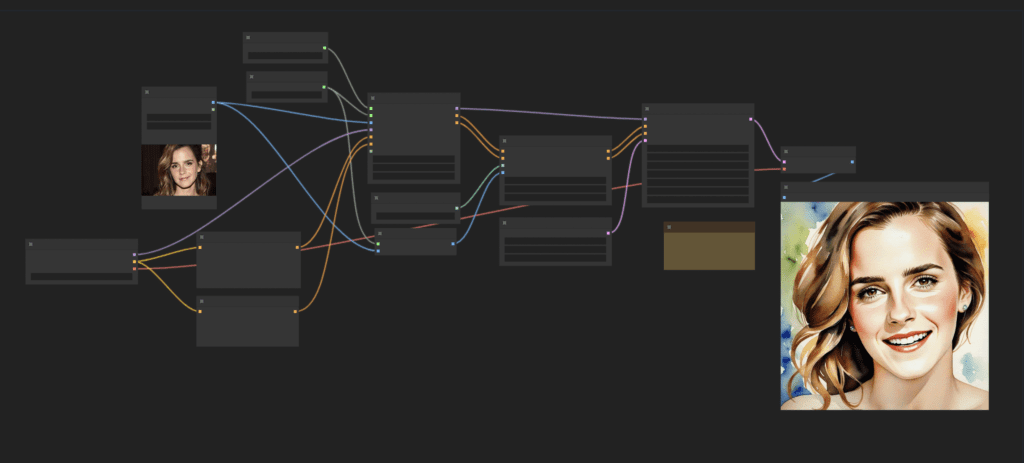
Step 1: Load the workflow
Download the InstantID basic workflow below.
Drag and drop it to ComfyUI to load.
Step 2: Install missing nodes
You should see some nodes in red.
Click Manager > Install Missing Custom Nodes. Install all nodes that are missing.
On the ComfyUI Manager menu, click Update All to update all custom nodes and ComfyUI iteself.
Step 3: Download models
Create the folder ComfyUI > models > instantid.
Download the InstandID IP-Adpater model. Put it in the newly created instantid folder.
Download the InstantID ControlNet model. Put it in the folder ComfyUI > models > controlnet.
Download the antelopev2 face model. Extract the zip files and put the .onnx files in the folder ComfyUI > models > insightface > models > antelopev2. (You need to create the last folder.)
Restart ComfyUI and refresh the ComfyUI page.
Step 4: Run the workflow
Now you should have everything you need to run the workflow.
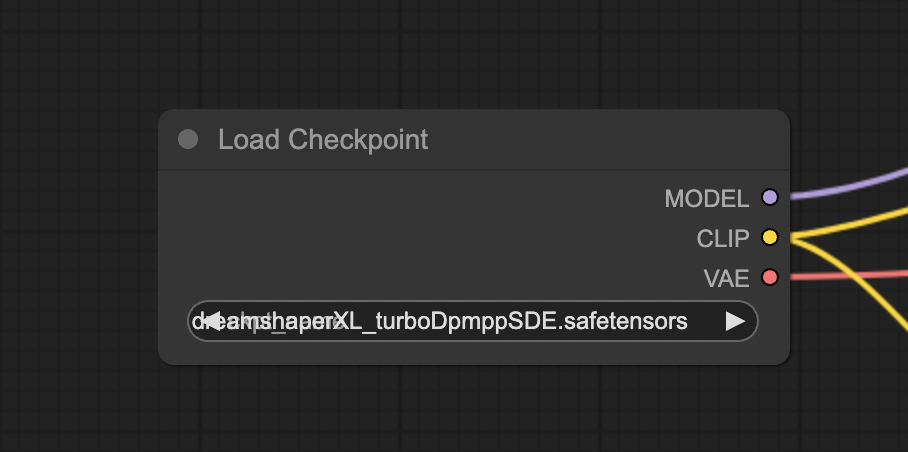
Select a SDXL Turbo checkpoint model in the Load Checkpoint node. I use the DreamShaper SDXL Turbo model in this example.
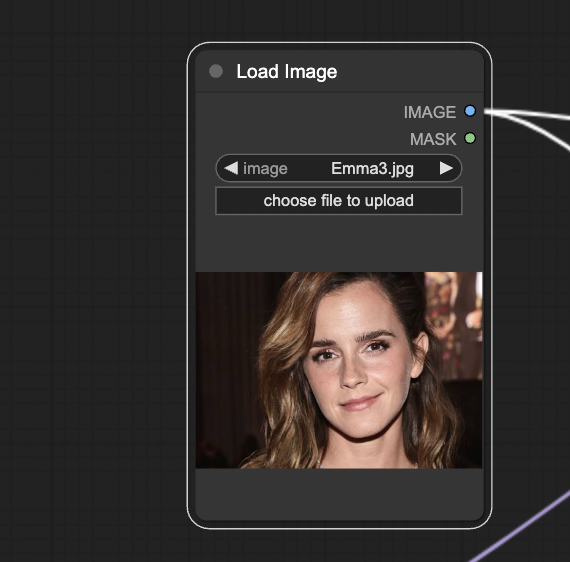
Drop an face image to the Load Image node.
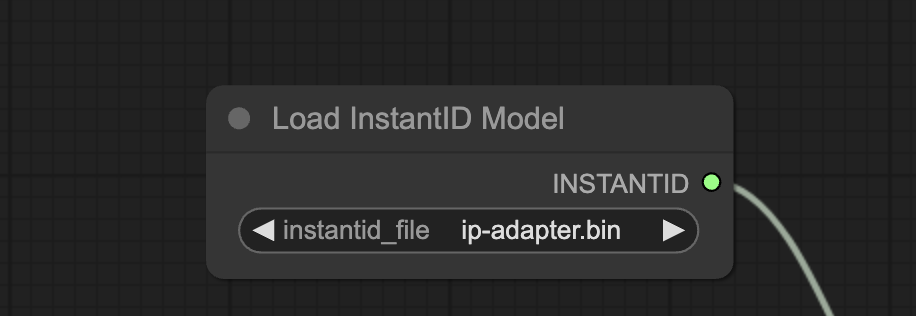
Select the InstantID IP-Adapter model in the Load InstatID Model node.
Select the InstantID ControlNet model in the Load ControlNet Model node.

Click Queue Prompt to generate an image.
Tips for using InstantID on ComfyUI
You can find more InstantID workflows here.
Avoid using image size of 1024×1024. For example, use a slight offset 1016×1016 to get the best result.
The default setting should work for most images. Tweak the following settings for for best results:
- Strength and the ending percent of the ControlNet.
- Weight and end_at of the InstantID nodes.
- CFG scale of the KSampler node.
hello may friends, in my stable diffusion, instant-id didn’t work, i did every steps correctly, what is problem?
see any error message in the terminal?
This worked fantastically. The image I had was of someone younger from many years ago, but the result was a perfect match.
Hey, really nice tutorial. I get only a face always tho. Never the pose described in the prompt. Are these settings only for portrait face swap or how do i get the described pose with the face of faceid?
This method also copy keypoints. try ip adapter plus face
thank you for youre answer 👍 where do i find this ? No matter the prompt i still just get only the close up of the face. I need the whole body and the faceid face
okay nvm i found it.
Thanks for your amazing tutorial!
Could you maybe explain how to do a different pose? Using the method in your tutorial, only gives me the exact same pose as the refference image.
I believe this is by design with instant ID. You can try ip adapter plus face which is more flexible in poses.
Hello and thanks, finally I clear tutorial for downloading and storing the files in the exact place for ComfyUi.
Now works, thanks!
Hi. Using your tutorial, I achieved truly brilliant results. Thank you. Everything is written very clearly, I didn’t encounter any problems.
I have an additional question. I am now able to generate faces in the selected style. However, the generated image maintains the pose of the original photo. How could I generate an image showing the entire body but using the same facial styling method?
Great to hear that you get good results.
You can try ip-adapter face id v2.
https://stable-diffusion-art.com/ip-adapter/
It will be great if you could provide a check list. Like version of Python , commands to run to install etc. Instant_ID Workflows don’t run. IPAdapter when using “Unified Loader FaceID” gives this error
———insightface model is required for FaceID models—-
Ok, I fixed my problem .. by reinstalling Insightface ..even though it was installed before …
I had to force a re-install by using this command
python_embeded\python.exe -m pip install –upgrade –force-reinstall insightface-0.7.3-cp311-cp311-win_amd64.whl
Thanks for sharing your solution! Yes, ip adapter has a lot of breaking changes. This one still works though.
Andrew, Instant_ID workflows that worked once do not work now. Has something changed like in the IPAdapter world. It is a common theme , things work and then they stop working 🙂 .. Please confirm if the Workflows above still work. I see Red all over when I load them . Installing missing nodes does not fix it ..
Magnificent! Thanks so much for writing this, I was glad to see it in my Google news feed a while ago. (Took me forever to get around to trying it.)
I made the mistake of updating my A1111 (which broke it) so I appreciated your install guide as well.
Teeny nitpick: on my end the Control Type shows as “Instant-ID” not “Instant_ID” and I was a little confused for a moment.
I was hoping this would be the EVERY DREAM KILLER but my results so far haven’t been great. Aside from the Emma Watson test image, nothing I’ve made so far has a “hey, I know that person!” effect. I think maybe the model is too trained on handsome/beautiful faces and I should try another one that’s less biased?! 😆
Still, lots of fun. Thanks again!
You can also try IP adapter face id if you are into this 🙂
search the site for the tutorial.
Nice, thanks! Reading now 😎
Hello Andrew
How can i map my Face on a Actor defined with a szenario in my Phrases? I. E. a old man lies in the bed and have my Face Portrait in InstantID of Control Net as descript in this Tutorial? So can i map everybodys Face from a Photographic Portrait to every Person that is describt in my Prompt.
Yes, you should be able to do that by using instant id and a prompt. The model only works for a single person. You can also try inpainting.
Thank you Andrew. I have now found a good solution. First, as described, load Unit1 with the photo of the face in ControlNet, but then load the desired scenario in a picture/photo in Unit2 as an image with a person and their face on it and keep the keypoints recognized from this face, if necessary adjust it, then the same scenario Picture in Unit3 use as reference. This works fine.
As a suggestion for the ControlNet programmers, it would be great if several units were integrated which could then be assigned to the desired face as Actors 1 and 2 in the phrase.
In my gallery https://www.deviantart.com/heinz7777 I assigned my face to a sleeping person in the picture “Afterlife” and had it calculated. InstantID is really good and works perfectly. 👍
Nice work!
Hi is there more info on using Instant ID.
I would like to use a photo and have it just enhance that same image not change it into a different one. So it is the same person but with a new custom look?
I am on Mac and the Mac install info got me up and running with it and your workflow.
I am using comfy
Thanks
you can use it with inpainting.
Hey, can you please give some instructuions, how can I use intsant id in Forge web-ui, and what preprocessor and model to use.
Thanks for the article !
Do you know how the InstantID works ? How does it compare to IP adapter Face ID etc. ? Have you found any other techniques they use to make the face swap better ?
Thanks !
For me, InstantID works better than Face ID with SDXL models.
You can also try ReActor. https://stable-diffusion-art.com/consistent-face/
Thanks ! Are you aware of any other tools/web to use InstantID which allows more flexibility ?
I’m not 100% sure if A1111 extension is using InstantID correctly (can’t see the code) I’m not able to reproduce the face fidelity compared to their own demo.
The Comfyui one works better.
Does size of the image being used in COntrol Net matter? Should it be also around 1024 x 1024?
Yes, you should use a high resolution image. 1024×1024 is a good size.
I get the following error message:
Prompt outputs failed validation
ApplyInstantID:
– Required input is missing: control_net
– Required input is missing: image
Any advice?
I am facing the exact same issue.
Andrew, please help.
Two required input of the ApplyInstantID node is missing for some reason. I have updated the tutorial to include an workflow image.
It’s likely because your comfyui is outdated. Go to manager > update all. Restart comfyui and reload the workflow.
Thanks for the great tutorial(s) Andrew.
It actually seems to be the opposite. Something changed with to the newest version of https://github.com/cubiq/ComfyUI_InstantID
For a quick temporary fix, head over to ComfyUI/custom_nodes/ComfyUI_InstantID/ folder
and checkout an older version:
git checkout 40b86b449774424893deac1d19139abc25c02882
In A1111 I’m getting an invalid load key error. ‘/xd8’ the IP adapter model is downloading as a zip file and hugging face says it’s stored as a Git LFS is this the problem and what’s the work around?
yes,this is it~extremely grateful
You are correct. There’s a breaking change in the repro. 🙁
The workflow is updated.
I still have the same problem.
Prompt outputs failed validation
ApplyInstantID:
– Required input is missing: control_net
– Required input is missing: image
Any new advice?
Just tested and the nodes are connected correctly. Try updating your ComfyUI and custom nodes.
Could not make this work yet …
1) Download the antelopev2 face model. Extract the zip files and put the .onnx files in the folder ComfyUI > models > insightface > models > antelopev2. (You need to create the last folder.)
There was no Folder insightface under Models .. so I created the structure ..this may be a problem
2) Workflow loads without errors … but K-Sampler, at execution throws bunch of errors ..listing first few
Error occurred when executing KSampler:
‘NoneType’ object has no attribute ‘shape’
File “C:\Users\satis\OneDrive\Documents\ComfyUI_windows_portable\ComfyUI\execution.py”, line 152, in recursive_execute
output_data, output_ui = get_output_data(obj, input_data_all)
^^^^^^^^^^^^^^^^^^^^^^^^^^^^^^^^^^^^
File “C:\Users\satis\OneDrive\Documents\ComfyUI_windows_portable\ComfyUI\execution.py”, line 82, in get_output_data
return_values = map_node_over_list(obj, input_data_all, obj.FUNCTION, allow_interrupt=True)
^^^^^^^^^^^^^^^^^^^^^^^^^^^^^^^^^^^^^^^^^^^^^^^^^^^^^^^^^^^^^^^^^^^^^^^^^^^
I guess you will need to have insightface installed successfully to see it.
It works now and it is great! Thanks.
Is there a way to save your Automatic 111 work in a jason file (or similar that can be laoded back). That is one advantage ComfyUI has.
Great! Unfortunately no.
For me, it worked on Automatic 111 , ComfyUI has different models,objects and steps used …bit confusing why there is a difference .. anyway, it has not worked in COmfyUI, yet
Insighface Installation has issues (Googled it). No solution seems to be working. I have follwed the instructions.
After this cmd
“python.exe -m pip install insightface-0.7.3-cp311-cp311-win_amd64”
I get
“ERROR: Could not find a version that satisfies the requirement insightface-0.7.3-cp311-cp311-win_amd64 (from versions: none)
ERROR: No matching distribution found for insightface-0.7.3-cp311-cp311-win_amd64”
Can you help me? Point me in right direction > Re-install … delete some folders, Uninstall etc…
Never mind, got it working .. all good 🙂
Great!
I get “AssertionError: InstantID control model should follow ipadapter model” error doing by this guide.
You need to turn two controlnets on: unit 0 – ip adapter, and unit 1 – controlnet. If this is what you did, you can try refreshing the page and restart. The extension is flinicky when I tested it.
Uhm… Maybe there’s a typo.
“You need to download the following two model files.
Download the IP Adapter model for InstantID. Rename it to
ip-adapter_instant_id_sdxl.bin
Put it in the folder stable-diffusion-webui > models > ControlNet.
Download the InstantID controlnet model. Rename it to
control_instant_id_sdxl.safetensors
Put it in the folder stable-diffusion-webui > models > ControlNet.”
AND
Enable: Yes
Pixel Perfect: Yes
Control Type: Instant_ID
Preprocessor: instant_id_face_embedding
Model: control_instant_id_sdxl
Control weight: 0.5
Starting control step: 0
Ending control step: 0.5″
—-
After running the download, rename and copy instructions
Restarting Automatic1111
There’s no “Control Type: Instant-ID” in ControlNet
And only “ip-adapter_instant_id_sdx”l in the MODEL drop down menu
There’s no “instant_id_face_embedding” and “instant_id_face_keypoints” in preprocessors list.
Thx.
Hi, good catch! corrected.
What is corrected? As the poster said,
> There’s no “Control Type: Instant-ID” in ControlNet
> There’s no “instant_id_face_embedding” and “instant_id_face_keypoints” in preprocessors list.
If there’s no Instant-ID in Control Type and no instant_id in the preprocessor list, your controlnet extension is outdated. Update the extension in the Extensions tab should fix it.
I had the same problem. I struggled for 2 days. I reinstalled everything, read everything on the web. Then I saw a news on git of the module author in 2 lines from 20.02 that he rewrote the module and old examples (nodes) may not work. Solution: opened the example, extracted the new main custom node from the menu, and dragged all the links to the old node to the new one. Everything worked!
Excellent post!
In both of the controlnet settings sections, you said to use:
Model: control_instant_id_sdxl
I think that one of them should be the second mode?
Tal.
You are correct. It is corrected. Thanks!