IP-adapter (Image Prompt adapter) is a Stable Diffusion add-on for using images as prompts, similar to Midjourney and DaLLE 3. You can use it to copy the style, composition, or a face in the reference image.
The post will cover:
- IP-Adapter models – Plus, Face ID, Face ID v2, Face ID portrait, etc.
- How to use IP-adapters in AUTOMATIC1111 and ComfyUI.
IP-adapter models
The number of IP-adapter models is growing rapidly. It can be difficult to keep track of if you are not following closely.
This section gives you an overview of all IP-adapters released so far. You can find the original repository below.
- IP-Adapter GitHub page (codes)
- IP-Adapter models (Hugging Face)
- IP-Adapter Face ID models (Hugging Face)
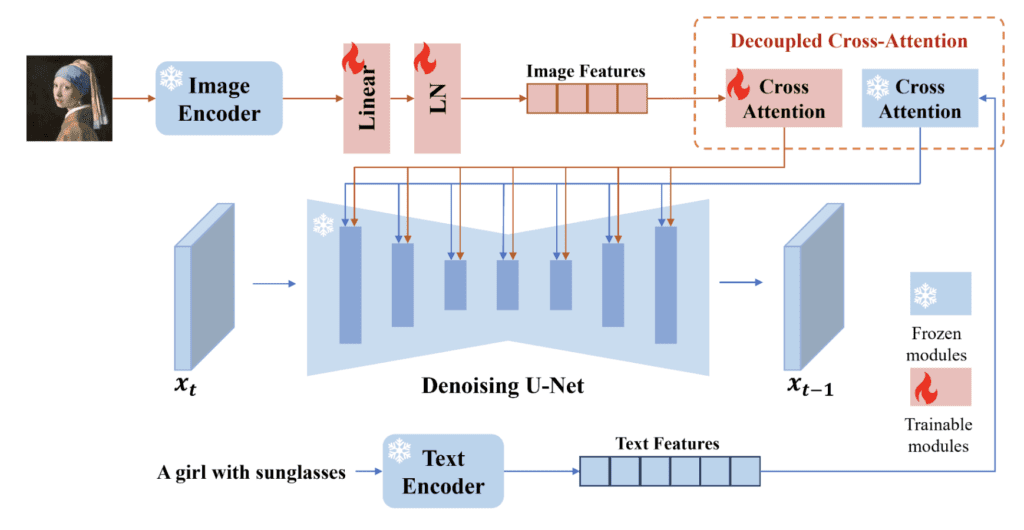
An image encoder processes the reference image before feeding into the IP-adapter. Two image encoders are used in IP-adapters:
- OpenClip ViT H 14 (aka SD 1.5 version, 632M paramaters)
- OpenClip ViT BigG 14 (aka SDXL version, 1845M parameters)
However, things got muddled when some SDXL IP-Adapter models also got trained with the H version. For clarity, I will refer them as the ViT H and ViT BigG version. (ViT stands for Vision Transformer)
The Original IP-adapter
- Image Encoder: ViT H
- Model: IP-adapter SD 1.5
The original IP-adapter uses the CLIP image encoder to extract features from the reference image. The novelty of the IP-adapter is training separate cross-attention layers for the image. This makes the IP-adapter more effective in steering the image generation processing.
Here’s what IP-adapter’s output looks like. It loosely follows the content of the reference image. The DreamShaper 8 model and an empty prompt were used.


IP adapter Plus
- Image Encoder: ViT H
- Model: IP-Adapter Plus
IP-Adapter Plus uses a patch embedding scheme similar to Flamingo‘s Percepter-Resampler to encode the image. The IP adapter Plus model produces images that follow the original reference more closely. The fine-grained details, like the face, are usually not copied correctly.
IP-Adapter Plus Face
- Image Encoder: ViT H
- Model: IP-Adapter Plus Face
IP-Adapter Plus Face model has the same architecture as the IP-Adapter Plus. The model weight is fine-tuned for using a cropped face as the reference.
You should use a close-up face as the reference. (like the one below)
The face is followed much more closely.


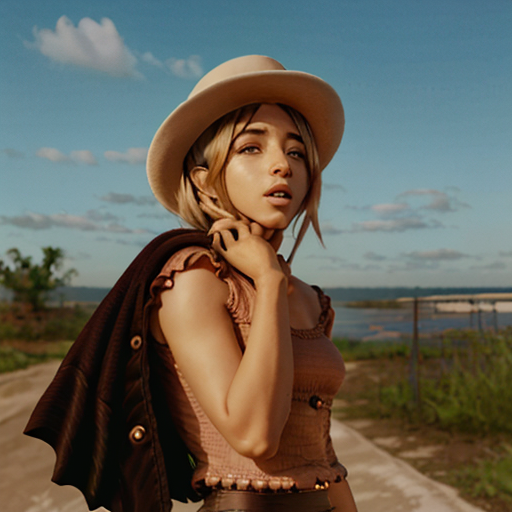
With IP-Adapter Plus Face, you can direct the image much easier with the prompt.
A girl in office, white professional shirt


IP-Adapter SDXL
There are two versions of IP-Adapter SDXL. One was trained with ViT BigG, and the other was trained with ViT H.
I will use the DreamShaper SDXL model for SDXL versions of the IP-Adapter.
ViT BigG version
- Image Encoder: ViT BigG
- Model: IP-Adapter SDXL
This is the original SDXL version of the IP-Adapter. It uses the bigger image encoder BigG.

ViT H version
- Image Encoder: ViT H
- Model: IP-Adapter SDXL ViT H

IP-Adapter Plus SDXL
- Image Encoder: ViT H
- Model: IP-Adapter Plus SDXL ViT H
The Plus version likewise uses the patch image embeddings and the ViT H image adapter. It follows the reference images more closely.

IP-Adapter Plus Face SDXL
- Image Encoder: ViT H
- Model: IP-Adapter Plus Face SDXL ViT H
IP-Adapter Plus Face SDXL model has the same architecture as the IP Adapter Plus SDXL model but uses images of cropped faces for conditioning.
It copies the face more closely.

IP-Adapter Face ID
- Image Encoder: InsightFace
- Model: IP-Adapter Face ID
- LoRA: Face ID SD 1.5
IP-Adapter Face ID uses InsightFace to extract the Face ID embedding from the reference image.
You need to use the accompanying LoRA with the Face ID model. It is recommended
A girl in office, white professional shirt <lora:ip-adapter-faceid_sd15_lora:0.6>
Not quite sure if this is working.

IP-Adapter Face ID SDXL
- Image Encoder: InsightFace
- Model: IP-Adapter Face ID SDXL
- LoRA: Face ID SDXL
IP-Adapter Face ID uses InsightFace to extract the Face ID embedding from the reference image.
The InsightFace model is the same as the SD1.5’s. There’s no SDXL version
You need to use the accompanying LoRA with the Face ID model.
I am not able to get this one to work.

IP-Adapter Face ID Plus
- Image Encoder: InsightFace and CLIP image embedding
- Model: IP-Adapter Face ID Plus
- LoRA: Face ID Plus SD 1.5
IP-Adapter Face ID Plus uses everything in the image encoder toolbox:
- InsightFace for the facial features
- CLIP image encoder for global facial features
- Use Perceiver-Resampler to combine them
Use the LoRA with a weight between 0.5 and 0.7.
A girl in office, white professional shirt <lora:ip-adapter-faceid-plus_sd15_lora:0.6>

The LoRA seems to have the effect of following the color scheme of the reference image. Removing the LoRA (or setting the weight to 0) also works.
A girl in office, white professional shirt

IP-Adapter Face ID Plus v2
- Image Encoder: InsightFace and CLIP image embedding
- Model: IP-Adapter Face ID Plus v2
- LoRA: Face ID Plus SD Plus v2 1.5
IP-Adapter Face ID Plus is the same as Face ID Plus except
- An improved model checkpoint and LoRA
- Allowing setting a weight on the CLIP image embedding
The LoRA is necessary for the Face ID Plus v2 to work. Use a value between 0.5 and 1.0. The higher it is, the stronger the effect.
A girl in office, white professional shirt <lora:ip-adapter-faceid-plusv2_sd15_lora:0.6>

IP-Adapter Face ID Plus v2 SDXL
- Image Encoder: InsightFace and CLIP image embedding
- Model: IP-Adapter Face ID Plus v2 SDXL
- LoRA: Face ID Plus SD Plus v2 SDXL
IP-Adapter Face ID Plus v2 SDXL is the SDXL version of Face ID Plus v2.
It doesn’t look so hot in my test.

IP-Adapter Face ID Portrait
- Image Encoder: InsightFace
- Model: IP-Adapter Face ID Portrait
IP-Adpater Face ID Portrait has the same model architecture as Face ID but accepts multiple images of cropped faces.
Using IP-Adapter in AUTOMATIC11111
Software setup
We will use AUTOMATIC1111 , a popular and free Stable Diffusion software, in this section. You can use this GUI on Windows, Mac, or Google Colab.
Check out the Quick Start Guide if you are new to Stable Diffusion. Check out the AUTOMATIC1111 Guide if you are new to AUTOMATIC1111.
Install ControlNet Extension
You will need to install the ControlNet extension to use IP-Adapter.
- Start AUTOMATIC1111 Web-UI normally.
2. Navigate to the Extension Page.
3. Click the Install from URL tab.
4. Enter the following URL in the URL for extension’s git repository field.
https://github.com/Mikubill/sd-webui-controlnet5. Click the Install button.
6. Wait for the confirmation message that the installation is complete.
7. Restart AUTOMATIC1111.
You will need to select an SDXL checkpoint model to select an SDXL IP Adapter. The list won’t refresh automatically. You can change the Control Type and change back to see the new options.
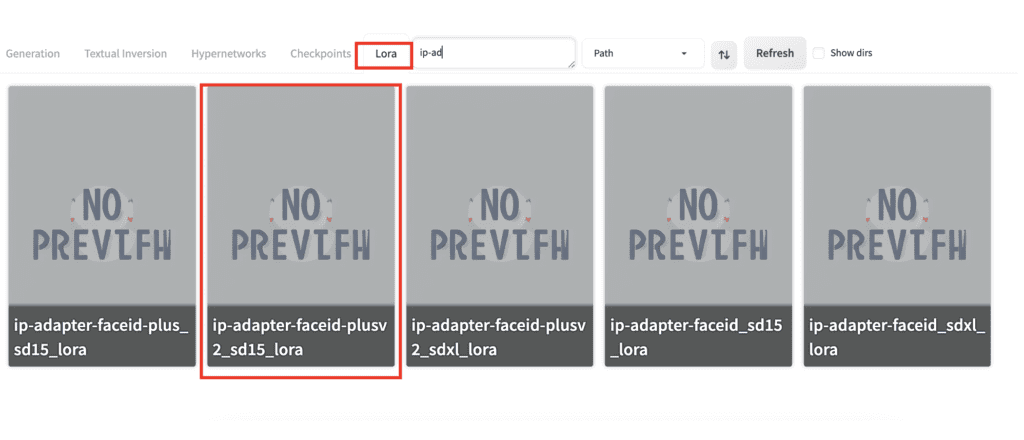
Download IP-Adapter and LoRA models
For AUTOMATIC1111, you need to download the IP-Adapter and LoRA models to use them.
Pick the one you want to use in the table below.
| Version | Preprocessor | IP-Adapter Model | LoRA |
|---|---|---|---|
| SD 1.5 | ip-adapter_clip_sd15 | ip-adapter_sd15 | |
| SD 1.5 Plus | ip-adapter_clip_sd15 | ip-adapter_sd15_plus | |
| SD 1.5 Plus Face | ip-adapter_clip_sd15 | ip-adapter-plus-face_sd15 | |
| SD 1.5 Face ID | ip-adapter_face_id | ip-adapter-faceid_sd15 | |
| SD 1.5 Face ID Plus | ip-adapter_face_id_plus | ip-adapter-faceid-plus_sd15 | ip-adapter-faceid-plus_sd15_lora |
| SD 1.5 Face ID Plus V2 | ip-adapter_face_id_plus | ip-adapter-faceid-plusv2_sd15 | ip-adapter-faceid-plusv2_sd15_lora |
| SDXL | ip-adapter_clip_sdxl | ip-adapter_sdxl | |
| SDXL ViT H | ip-adapter_clip_sdxl_plus_vith | ip-adapter-sdxl_vit-h | |
| SDXL Plus ViT H | ip-adapter_clip_sdxl_plus_vith | ip-adapter-plus_sdxl_vit-h | |
| SDXL Face ID | ip-adapter_face_id | ip-adapter-faceid_sdxl | ip-adapter-faceid_sdxl_lora |
| SDXL Face ID Plus v2 | ip-adapter_face_id_plus | ip-adapter-faceid-plusv2_sdxl | ip-adapter-faceid-plusv2_sdxl_lora |
Windows or Mac
Download the IP-Adapter models and put them in the folder stable-diffusion-webui > models > ControlNet.
Download the LoRA models and put them in the folder stable-diffusion-webui > models > Lora.
Google Colab
If you use our AUTOMATIC1111 Colab notebook,
- Put the IP-adapter models in your Google Drive under AI_PICS > ControlNet folder.
- Put the LoRA models in your Google Drive under AI_PICS > Lora folder.
You need to select the ControlNet extension to use the model.
Using an IP-adapter model in AUTOMATIC1111
I will use the SD 1.5 Face ID Plus V2 as an example. The usage of other IP-adapters is similar. You only need to follow the table above and select the appropriate preprocessor and model.
Step 1: Select a checkpoint model
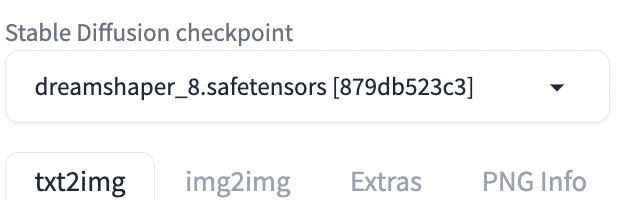
Since we will use an SD 1.5 IP-adapter, you must select an SD 1.5 model. I will use the Dreamshaper 8 model.
On the txt2img page, select dreamshaper_8.safetensors in the Stable Diffusion Checkpoint dropdown menu.
Step 2: Enter a prompt and the LoRA
Enter a prompt and, optionally, a negative prompt. E.g.,
A woman in office, white professional shirt
disfigure, deformed, ugly
Look at the table above to see if the IP-adapter needs to be used with a LoRA. You need one for the SD 1.5 Face ID Plus V2 model.
Select the Lora tab. Select the appropriate LoRA. In our case, it is ip-adapter-faceid-plusv2_sd15_lora.
The LoRA directive should be inserted in the prompt. Set the LorA weight to 0.6 to 1 to adjust the effect.
A woman in office, white professional shirt <lora:ip-adapter-faceid-plusv2_sd15_lora:1>
Step 3: Enter ControlNet setting
Scroll down to the ControlNet section.
Upload an reference image to the Image Canvas.
Enable: Yes
Control Type: IP-Adapter
Select the preprocessor and model according to the table above. In this example, they are:
- Preprocessor: ip-adapter_face_id_plus
- Model: ip-adapter-faceid-plusv2_sd15
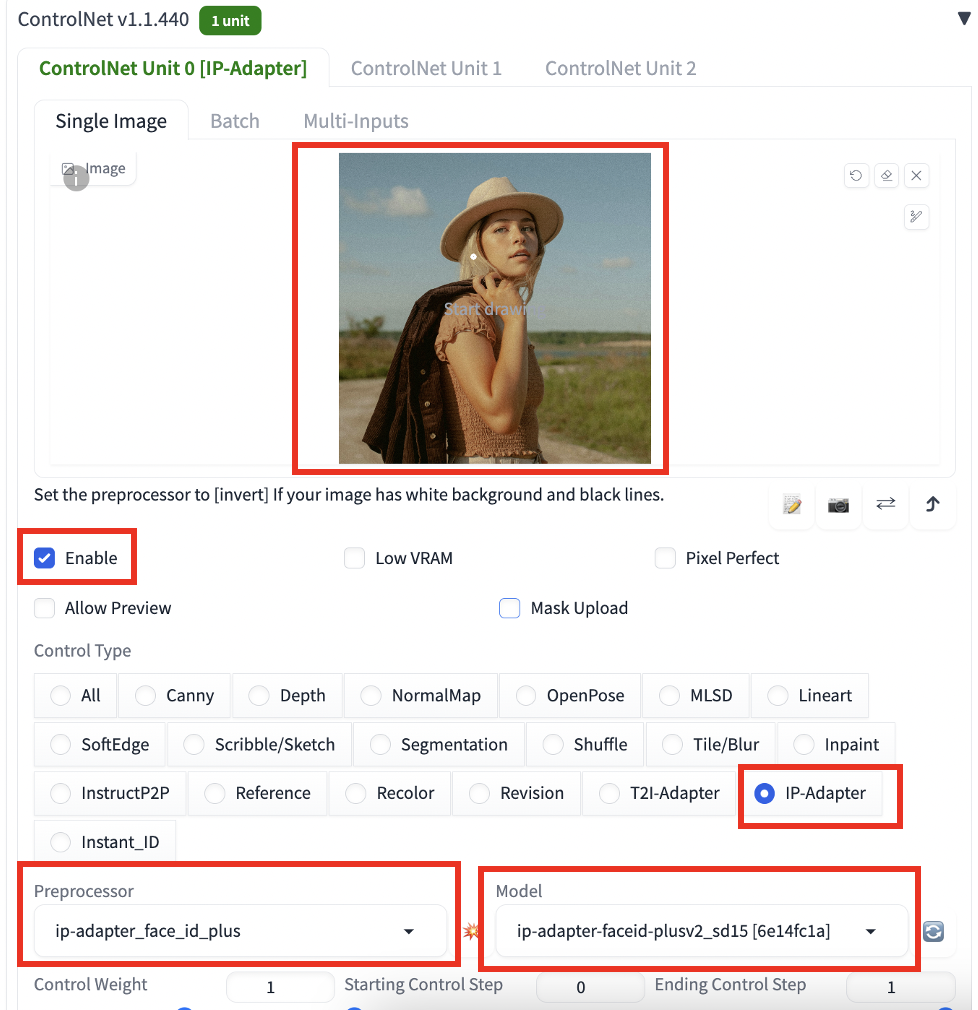
Click Generate to create an image.

Multiple IP-adapter Face ID
You can use multiple IP-adpater to acheive something similar to the IP-adapter portriat model.
Below are 3 pictures from the LoRA training dataset.
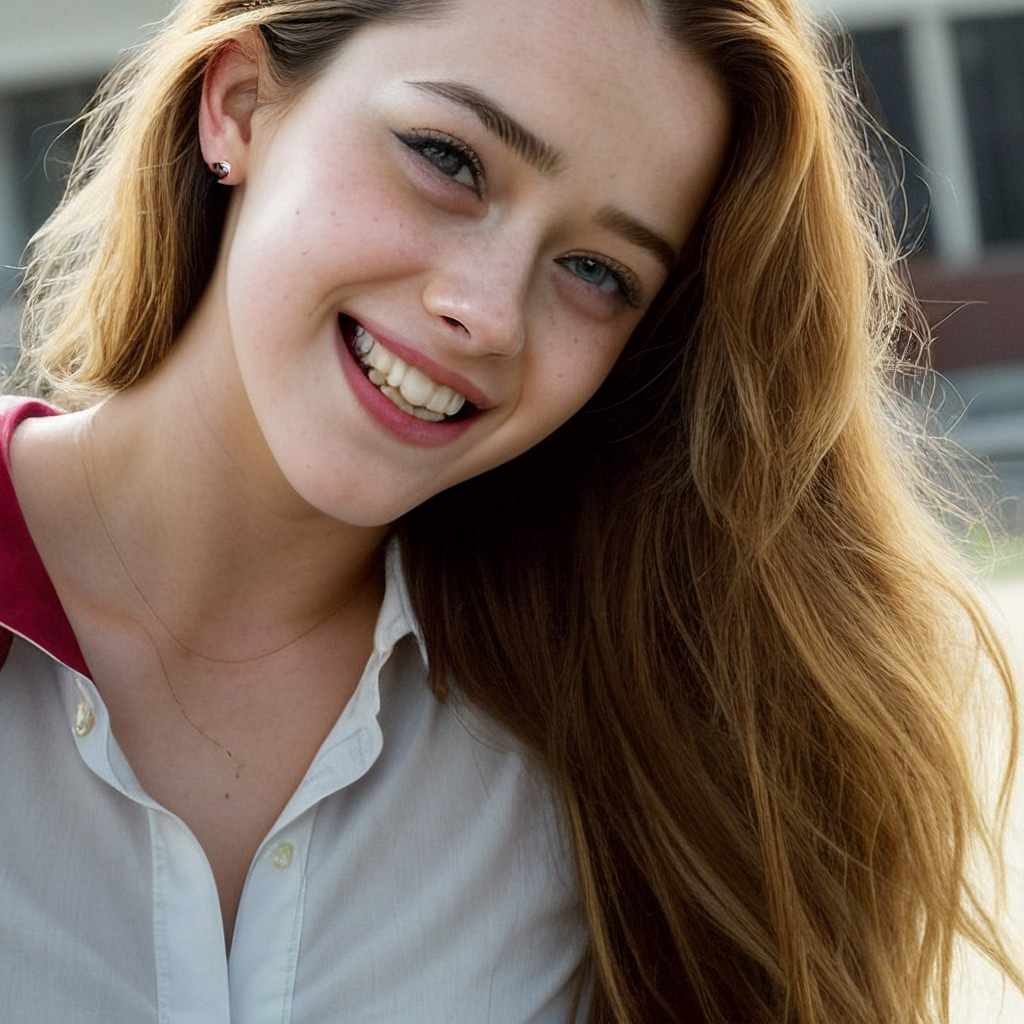


You can use them in ControlNet Unit 0, 1 and 2. The setting for each one is the same as above, except you need to set the Control Weight to 0.3 so that they sum up to about 1.
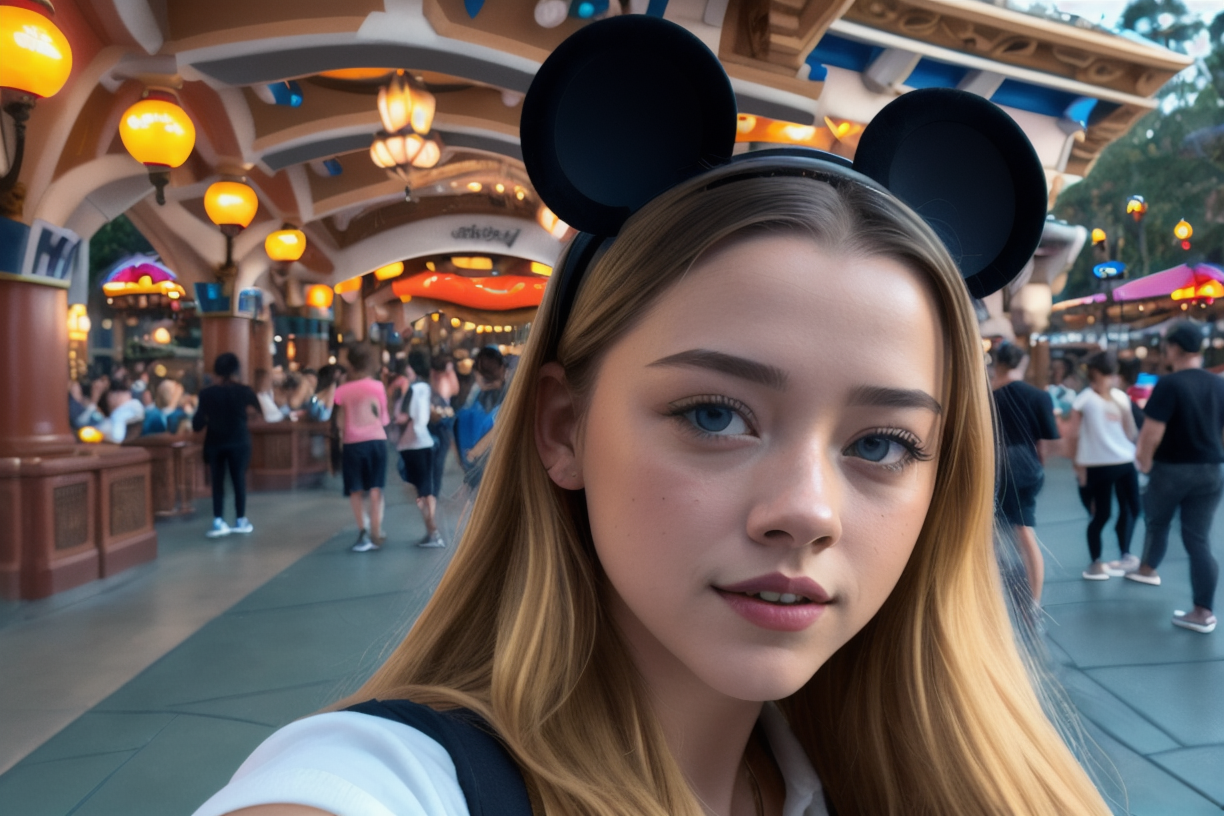
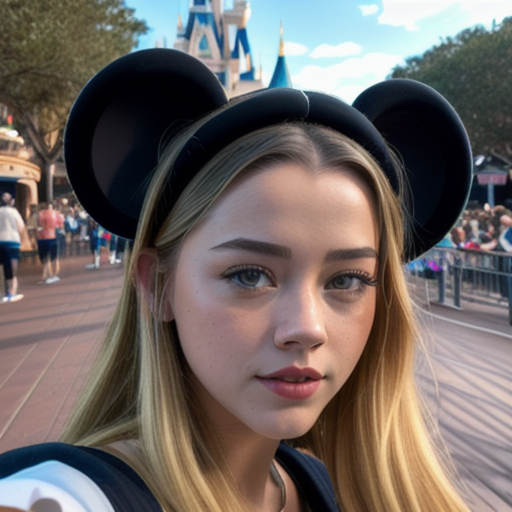
Write a prompt for what you want to generate.
Selfie photo of a woman, smiling, disney, mickey headwear <lora:ip-adapter-faceid-plusv2_sd15_lora:0.8>
Now you get her face without training a LoRA!
Using IP-Adapter in ComfyUI
Software setup
We will use ComfyUI to generate images in this section. It is an alternative to AUTOMATIC1111.
Read the ComfyUI installation guide and ComfyUI beginner’s guide if you are new to ComfyUI.
You will need the IP Adapter Plus custom node to use the various IP-adapters.
Install InsightFace for ComfyUI
You must install InsightFace before using the Face ID workflows.
ComfyUI has recently updated the Python version. You first need to determine what Python version you are using.
Open the File Explorer App. Navigate to the ComfyUI_windows_portable folder. In the address bar, type cmd and press Enter.
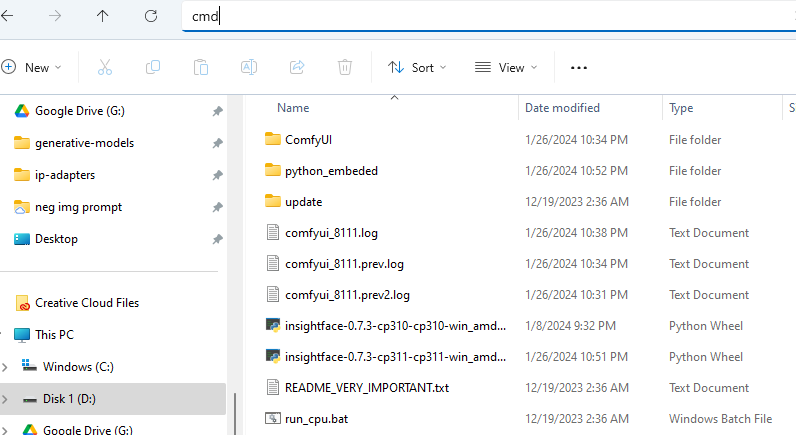
A terminal should show up.
In the terminal, type the following command and press Enter.
.\python_embeded\python.exe --versionIt should show either Python 3.10.x or 3.11.x.
Download the InsightFace installation file.
Put the file in the ComfyUI_windows_portable folder.
Go back to the terminal.
If you use Python 3.10.x, run:
.\python_embeded\python.exe -m pip install .\insightface-0.7.3-cp310-cp310-win_amd64.whlIf you use Python 3.11.x, run:
.\python_embeded\python.exe -m pip install .\insightface-0.7.3-cp311-cp311-win_amd64.whlInsight Face should have been installed after running the command.
Download models and LoRAs
To use the workflow
- Install the model files according to the instructions below the table.
- Download the workflow JSON in the workflow column.
- Select the IPAdapter Unified Loader Setting in the ComfyUI workflow.
Download the IP-adapter models and LoRAs according to the table above.
Put the IP-adapter models in the folder: ComfyUI > models > ipadapter.
Put the LoRA models in the folder: ComfyUI > models > loras.
You also need these two image encoders.
- OpenClip ViT BigG (aka SDXL – rename to CLIP-ViT-bigG-14-laion2B-39B-b160k.safetensors)
- OpenClip ViT H (aka SD 1.5 – rename to CLIP-ViT-H-14-laion2B-s32B-b79K.safetensors)
Put them in ComfyUI > models > clip_vision.
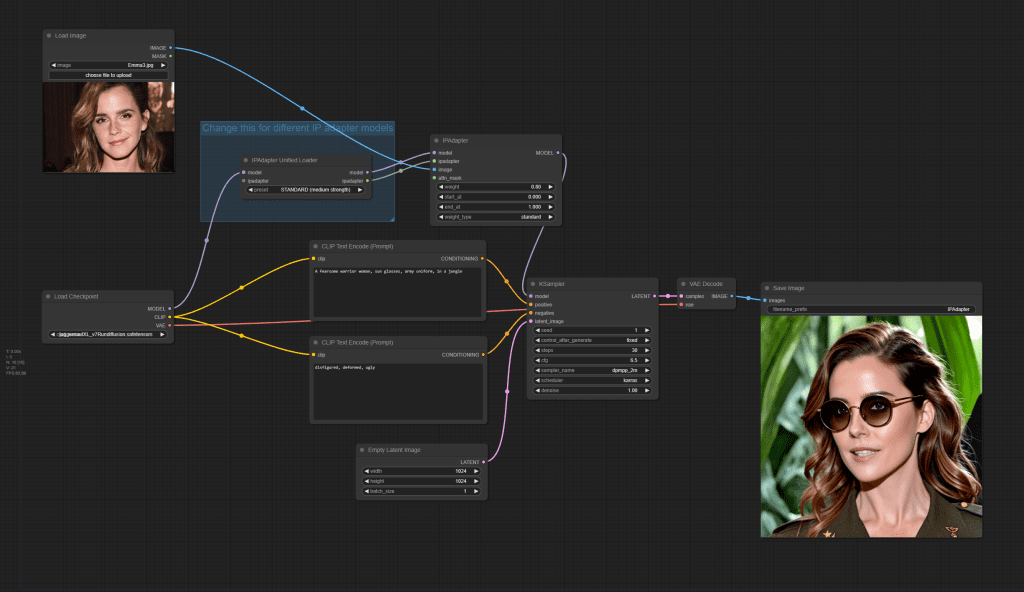
IP-Adapter SD 1.5
Use the following workflow for IP-Adapter SD 1.5, SD 1.5 Plus, and SD 1.5 Plus Face. Change the unified loader setting according to the table above.

IP-Adapter SDXL
Use the following workflow for IP-Adapter SDXL, SDXL ViT, and SDXL Plus ViT. Set the models according to the table above.
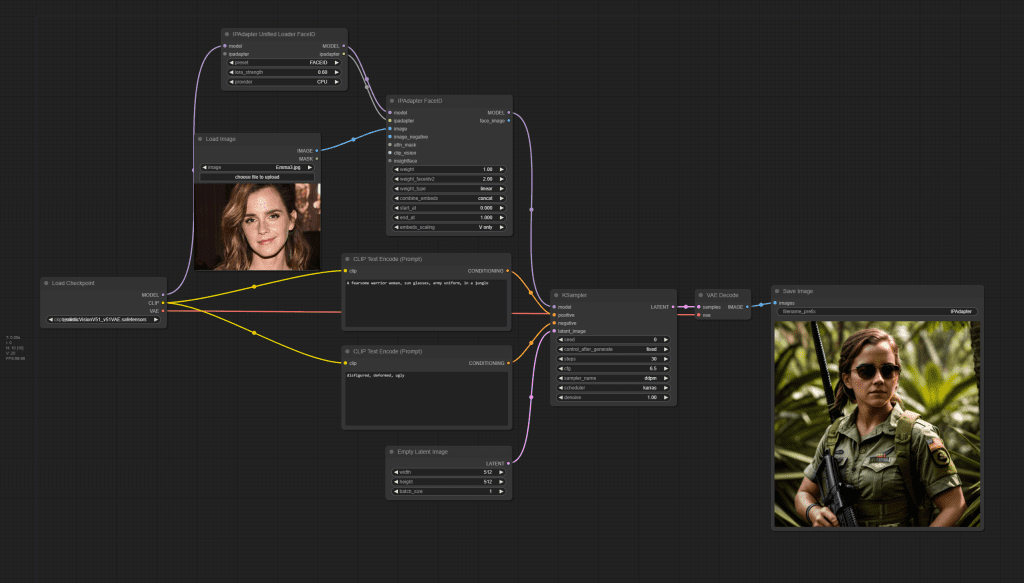
IP-Adapter Face ID SD 1.5
Use the following workflow for IP-Adapter Face ID SD 1.5. Set the models according to the table above.
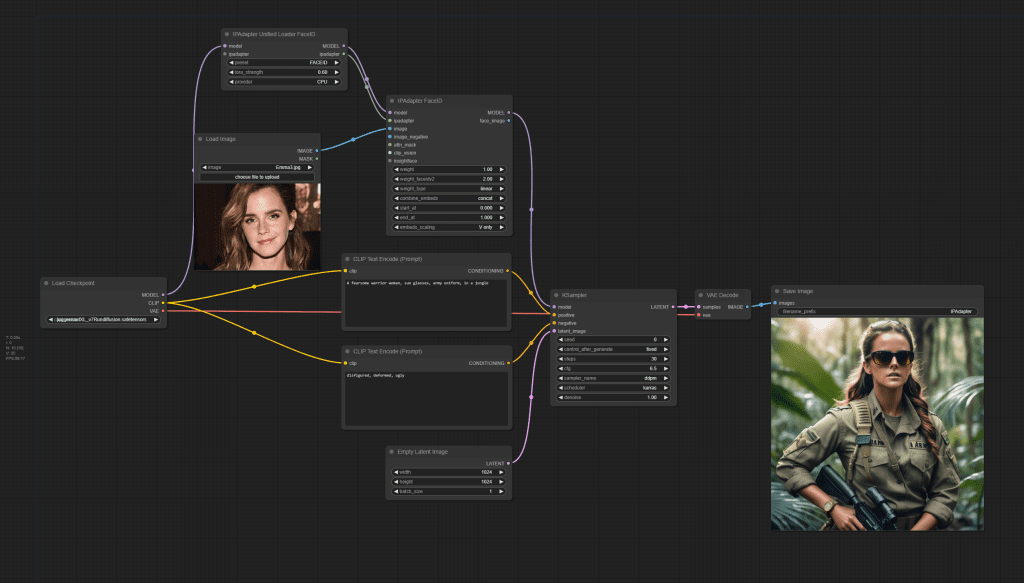
IP-Adapter Face ID SDXL
Use the following workflow for IP-Adpater Face ID SDXL. Set the models according to the table above.
This is great! I see that I need to download the IP-Adapter and LoRA models. Are there cases where I also need to download the preprocessors and image encoders?
Yes, for comfyui you need to download and rename the clip models accordingly.
Trying the ip-adapter, I end up with multiple clip-type preprocessors. Specifically “clip_h” and “clip_g”. Why? More importantly, is there any way to find the preprocessors?
There are only two clip visions H and G. IP adapter uses them to convert an image to embeddings similar to the prompt’s, so that they can be used like prompt to influence the image generation.
If you use A1111, they are automatically downloaded. If you ComfyUI, you need to do a one-time download and rename.
How do I download InsightFace on your colab notebook?
You shouldn’t need to on A1111.
Andrew, can you please update a workflow for IPAdaptor. There have been changes made in ComfyUO and the examples provided above do not work
OK, let me look into it when I get a chance.
hi Andrew, were you able to get to it? Need help with IP Adaptors, it does not work anymore with changes made to it by the developers
Hi! The owner was still making changes last week I checked. I will work on them when he’s done.
I am quite busy this week but will have time to check again in weekend.
thanks for your patience!
Yes, I did follow these instructions. The workflow does not reference these Image encoders ..should it?
===================================
OpenClip ViT BigG (aka SDXL – rename to CLIP-ViT-bigG-14-laion2B-39B-b160k.safetensors)
OpenClip ViT H (aka SD 1.5 – rename to CLIP-ViT-H-14-laion2B-s32B-b79K.safetensors)
Put them in ComfyUI > models > clip_vision.
I just reran the workflow. Removing these two files reproduces your error message.
A few things to check:
– Are you comfyui and ip-adapter-plus up to date? Click update all and restart.
– Check if there’s any typo in the clip vision file names.
– Restart comfyUI if you newly created the clip_vision folder.
– Check to see if the clip vision models are downloaded correctly. BigG is ~3.6 GB. H is ~ 2.5 GB.
– Check if you have set a different path for clip vision models in extra_model_paths.yaml
I also included the workflow images near the end of the post. But your issue is related to loading the clip vision model, not linking the nodes.
An update: Trying to work on this today but the repository is still hopelessly broken — can’t even run the most basic ip-adapter workflow. See the instruction above ComfyUI’s table to check out an older version.
Will revisit in 2 weeks.
Any updates Andrew? I see videos of IP Adaptor working … please help make it work for us
It’s working now and I have updated the workflows. Thanks for your patience. Let me know if they work for you.
Still not working. I do not see ClipVision model in Workflows but it errors on it saying , it didn’t find it. I did put the Models in Paths as instructed above
=======================
Error occurred when executing IPAdapterUnifiedLoader:
ClipVision model not found.
File “C:\Users\satis\OneDrive\Documents\ComfyUI_windows_portable\ComfyUI\execution.py”, line 151, in recursive_execute
output_data, output_ui = get_output_data(obj, input_data_all)
^^^^^^^^^^^^^^^^^^^^^^^^^^^^^^^^^^^^
File “C:\Users\satis\OneDrive\Documents\ComfyUI_windows_portable\ComfyUI\execution.py”, line 81, in get_output_data
return_values = map_node_over_list(obj, input_data_all, obj.FUNCTION, allow_interrupt=True)
^^^^^^^^^^^^^^^^^^^^^^^^^^^^^^^^^^^^^^^^^^^^^^^^^^^^^^^^^^^^^^^^^^^^^^^^^^^
File “C:\Users\satis\OneDrive\Documents\ComfyUI_windows_portable\ComfyUI\execution.py”, line 74, in map_node_over_list
results.append(getattr(obj, func)(**slice_dict(input_data_all, i)))
^^^^^^^^^^^^^^^^^^^^^^^^^^^^^^^^^^^^^^^^^^^^^^^^^^^
File “C:\Users\satis\OneDrive\Documents\ComfyUI_windows_portable\ComfyUI\custom_nodes\ComfyUI_IPAdapter_plus\IPAdapterPlus.py”, line 440, in load_models
raise Exception(“ClipVision model not found.”)
Have you renamed the clip vision models as described in the article?
Andrew, is it possible for you to put a Video link to your working Work Flows. Or , at minimum a screen shot of the Workflow. This IP Adapter thing is not working. It may be a minor thing I am missing but for us semi-technicals, it is not obvious. Like Clip Vision Model not found error. Workflow does not ask for it, so not sure how does it know which one to use
Ok, it is working now. The offending omission turned out to be naming of H clip vision model. I guess workflow knows which clip vision to look for based on checkpoint
Using Multiple Images –
One of my top consistency tricks for making synthetic characters is combining actresses or actors in specific granular weights, like “inspired by (jack black:1.001) and (morgan freeman:1.251)” which makes perfect consistent characters better than LoRAs (ranked by website to check how close face is). Would this be transferable in a way by using multiple pictures of different people to combine into one look? Think it would be the same every time? Gonna check today, but I was curious as to your thoughts.
Should work the same with adjusting the adapter’s control weight.
hy guys, i have problem with IP-adapter , anybody can help? and the result of image is blurry too. I use dreamshaper XL as the checkpoint. thankss
– ControlNet – ERROR – Invalid pair of IP-Adapter preprocessor(ip-adapter_clip_sdxl) and model(ip-adapter-faceid-plusv2_sdxl [187cb962]).
Please follow following pairing logic:
{
“ip-adapter_clip_sdxl”: lambda model: “faceid” not in model and “vit” not in model,
“ip-adapter_clip_sdxl_plus_vith”: lambda model: “faceid” not in model and “vit” in model,
“ip-adapter_clip_sd15”: lambda model: “faceid” not in model,
“ip-adapter_face_id”: lambda model: “faceid” in model and “plus” not in model,
“ip-adapter_face_id_plus”: lambda model: “faceid” in model and “plus” in model,
i’m using dreamshaperXL checkpoint and the result of image is blurry too.
thanks
This article, like all of your articles, is fantastic. Thank you for all your hard work, really appreciate everything you do.
Do you have to change the “.bin” extension to “.pth” anymore? I saw some video tutorials that mentioned this change is required but I have no idea why.
An aside, do you have a course on training LORA’S? Full Checkpoints?
Sorry forgot to mention I use A1111. The questions above are related to A1111.
Welcome to my site!
No don’t need to change the extension anymore.
How is this different than img2img or the reference controlnets?
img2img is generating a pixel-to-pixel similar image. This is conceptually similar, like image variation.
It is similar to ref controlnet, but better.
I have seen people on Youtube using IP-Adapter Face xxx, with Inpainting:
1) manually draw a mask to cover the face area in inpainting
2) use Face ID plus to swap face …
The IPA Face supposedly to “copy face features”, but Is IPA Face + Inpainting better than just using IPA Face for the whole image ?
Any thoughts? Thanks !
It could work if you have an image you just want to swap the face.
It works well if IPA face interferes with the whole image generation. Making it a 2-step process gives you more flexibility.
A drawback is the inpainted face could be inconsistent with the image in color, etc.
I’m looking for a way to achieve the best realistic face swap, no great way yet
These are what we have. Perhaps you need to wait 6 months… 😂
Could you then do a pass over the whole pic with denoise at 0.05 or 0.1 so smooth out colors and such?
How do you compare the IPA (good name haha) Face vs. Face ID versions ? Thanks !
Face ID is better than IPA face.
I try to run IP-Adapter on A1111, I got this error:
2024-02-23 22:19:32,291 – ControlNet – INFO – Loading model: ip-adapter-faceid-plus_sd15 [e3b0c442]
*** Error running process: C:\Users\federico\stable-diffusion-webui\extensions\sd-webui-controlnet\scripts\controlnet.py
Traceback (most recent call last):
File “C:\Users\federico\stable-diffusion-webui\modules\scripts.py”, line 718, in process
script.process(p, *script_args)
File “C:\Users\federico\stable-diffusion-webui\extensions\sd-webui-controlnet\scripts\controlnet.py”, line 1143, in process
self.controlnet_hack(p)
File “C:\Users\federico\stable-diffusion-webui\extensions\sd-webui-controlnet\scripts\controlnet.py”, line 1128, in controlnet_hack
self.controlnet_main_entry(p)
File “C:\Users\federico\stable-diffusion-webui\extensions\sd-webui-controlnet\scripts\controlnet.py”, line 894, in controlnet_main_entry
model_net, control_model_type = Script.load_control_model(p, unet, unit.model)
File “C:\Users\federico\stable-diffusion-webui\extensions\sd-webui-controlnet\scripts\controlnet.py”, line 367, in load_control_model
control_model = Script.build_control_model(p, unet, model)
File “C:\Users\federico\stable-diffusion-webui\extensions\sd-webui-controlnet\scripts\controlnet.py”, line 395, in build_control_model
state_dict = load_state_dict(model_path)
File “C:\Users\federico\stable-diffusion-webui\extensions\sd-webui-controlnet\scripts\utils.py”, line 21, in load_state_dict
state_dict = unsafe_torch_load(ckpt_path, map_location=torch.device(location))
File “C:\Users\federico\stable-diffusion-webui\venv\lib\site-packages\torch\serialization.py”, line 815, in load
return _legacy_load(opened_file, map_location, pickle_module, **pickle_load_args)
File “C:\Users\federico\stable-diffusion-webui\venv\lib\site-packages\torch\serialization.py”, line 1033, in _legacy_load
magic_number = pickle_module.load(f, **pickle_load_args)
_pickle.UnpicklingError: invalid load key, ‘<'.
How to fix it?
You likely have an incomplete download of the ip adapter model.
Another great read ! Thanks a lot !
I’m looking for the best way to do face swapping, is it possible to use multiple face IP adapters to really achieve good results comparable to LoRA ? What’s your thoughts ?
Thanks !
Yes, you use multiple IP adapters face ID for face swap. It should be close to training a LoRA
After following this instructions
“.\python_embeded\python.exe -m pip install .\insightface-0.7.3-cp311-cp311-win_amd64.whl”,
my ComfyUI has stopped working.
Log of Running run_nvidia_gpu batch file.
=========================
C:\Users\satis\OneDrive\Documents\ComfyUI_windows_portable>.\python_embeded\python.exe -s ComfyUI\main.py –windows-standalone-build
Error processing line 7 of C:\Users\satis\OneDrive\Documents\ComfyUI_windows_portable\python_embeded\Lib\site-packages\pywin32.pth:
Traceback (most recent call last):
File “”, line 186, in addpackage
File “”, line 1, in
ModuleNotFoundError: No module named ‘pywin32_bootstrap’
Remainder of file ignored
** ComfyUI startup time: 2024-02-18 21:01:00.490029
** Platform: Windows
** Python version: 3.11.6 (tags/v3.11.6:8b6ee5b, Oct 2 2023, 14:57:12) [MSC v.1935 64 bit (AMD64)]
** Python executable: C:\Users\satis\OneDrive\Documents\ComfyUI_windows_portable\python_embeded\python.exe
** Log path: C:\Users\satis\OneDrive\Documents\ComfyUI_windows_portable\comfyui.log
Prestartup times for custom nodes:
0.0 seconds: C:\Users\satis\OneDrive\Documents\ComfyUI_windows_portable\ComfyUI\custom_nodes\ComfyUI-Manager
Traceback (most recent call last):
File “C:\Users\satis\OneDrive\Documents\ComfyUI_windows_portable\ComfyUI\main.py”, line 73, in
import comfy.utils
File “C:\Users\satis\OneDrive\Documents\ComfyUI_windows_portable\ComfyUI\comfy\utils.py”, line 1, in
import torch
File “C:\Users\satis\OneDrive\Documents\ComfyUI_windows_portable\python_embeded\Lib\site-packages\torch\__init__.py”, line 130, in
raise err
OSError: [WinError 127] The specified procedure could not be found. Error loading “C:\Users\satis\OneDrive\Documents\ComfyUI_windows_portable\python_embeded\Lib\site-packages\torch\lib\nvfuser_codegen.dll” or one of its dependencies.
C:\Users\satis\OneDrive\Documents\ComfyUI_windows_portable>pause
Press any key to continue . . .
You can try updating the dependences by running: ComfyUI_windows_portable > update > update_comfyui_and_python_dependencies.bat
Did that .. no luck ..this is the error
File “C:\Users\satis\OneDrive\Documents\ComfyUI_windows_portable\python_embeded\Lib\site-packages\transformers\utils\import_utils.py”, line 1354, in __getattr__
module = self._get_module(self._class_to_module[name])
^^^^^^^^^^^^^^^^^^^^^^^^^^^^^^^^^^^^^^^^^^^^^
File “C:\Users\satis\OneDrive\Documents\ComfyUI_windows_portable\python_embeded\Lib\site-packages\transformers\utils\import_utils.py”, line 1366, in _get_module
raise RuntimeError(
RuntimeError: Failed to import transformers.models.clip because of the following error (look up to see its traceback):
cannot import name ‘_sentencepiece’ from partially initialized module ‘sentencepiece’ (most likely due to a circular import) (C:\Users\satis\OneDrive\Documents\ComfyUI_windows_portable\python_embeded\Lib\site-packages\sentencepiece\__init__.py)
C:\Users\satis\OneDrive\Documents\ComfyUI_windows_portable>pause
I guess I will reinstall the whole thing. Is there a way to do a version control on this? Like restore last working version. I am a techy and still finding it hard to keep up with new stuff to install that breaks previously working install 🙂 , wonder how artists deal with this
I guess we are doing stuff at bleeding edge of technology
Yes, its probably easier to reinstall the whole thing. It uses git internally for updates.
Despite following your steps exactly, I get this Error Message:
Error occurred when executing IPAdapterApply:
Error(s) in loading state_dict for Resampler:
size mismatch for proj_in.weight: copying a param with shape torch.Size([1280, 1280]) from checkpoint, the shape in current model is torch.Size([1280, 1664]).
I haven’t seen this before, but this post suggests you were not selecting the correct model pairing.
In the example of running on Windows A1111, you did not crop the face while using IP-Adapter 1.5 face id controlnet. Do we need to use cropped face while running the SDXL face id version(s) for better results like in the body of the article?
Face ID uses Insightface, which detects and crops the face so you don’t have to.
Put the IP-adapter models in the folder: ComfyUI > models > ipadapter
I do not see folder ipadapter in ComfyUI > models
Did I miss a step in installation ?
You need to create the directory if its not there. Restart comfyui and refresh the page to take effect.
Thank you so much, this worked like a charm!
Hello
I’m using your Automatic 1111 Colab notebook, and I was wondering how to integrate base models and loras to test this controlnet extension; in the actual notebook there are only two base models and no loras…
I forgot about you guys LOL. Instructions added
https://stable-diffusion-art.com/ip-adapter/#Google_Colab
good!… thank you… I will try and report my experience
An insight about the licensing of these solutions would be great!
I think they’re all non-commercial because they are based on the Insightface model.
I’d forget about IP-Adapter / Face ID. Give InstantID a shot, it’s way better.