An image with a transparent background is useful for downstream design work. You can use the image with different backgrounds without generating a new one. The Layer Diffusion model can generate transparent images with any Stable Diffusion v1.5 and SDXL models.
I will cover:
- Generating transparent images with SD Forge
- Generating transparent images with ComfyUI
- How does it work
Table of Contents
Software
Currently, you have two options for using Layer Diffusion to generate images with transparent backgrounds.
- SD forge, a faster alternative to AUTOMATIC1111.
- ComfyUI, a node-based Stable Diffusion software.
If you are new to Stable Diffusion, check out the Quick Start Guide to decide what to use.
Check out the Stable Diffusion course for a self-guided course.
Alternatives to Layer Diffusion
You can also remove or change the background of an existing image with Stable Diffusion to achieve a similar effect.
In general, layer Diffusion generates higher-quality transparent backgrounds than removing them after the fact.
SD Forge
SD Forge is a faster alternative to AUTOMATIC1111. It looks very much like AUTOMATIC1111, but the backend has been reworked.
Follow the installation guide to set up the software on your local PC.
Updating SD Forge
You first need to update SD Forge to the latest version.
In the File Explorer App, open the webui_forge_cuxxx_torchxxx folder and double-click the update file to update the software.

Install the Layer Diffuse extension
- Start SD Forge normally.
2. Navigate to the Extension Page.
3. Click the Install from URL tab.
4. Enter the following URL in the URL for extension’s git repository field.
https://github.com/layerdiffusion/sd-forge-layerdiffuse5. Click the Install button.
6. Wait for the confirmation message that the installation is complete.
7. Restart SD Forge.
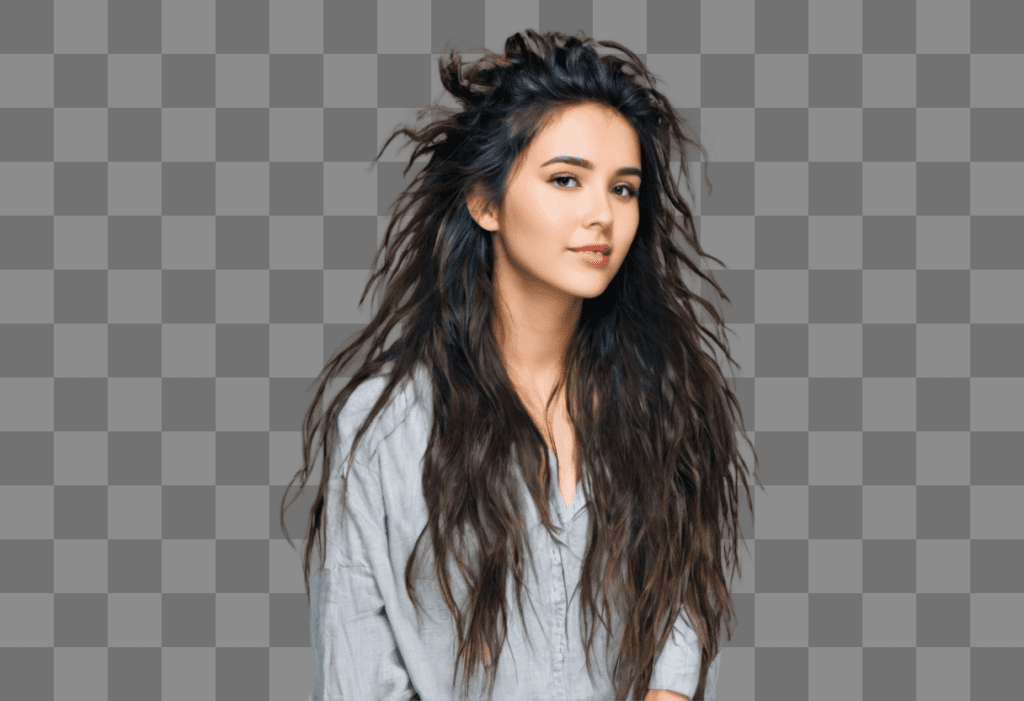
Generate SD v1.5 images with transparent backgrounds
On the txt2img page, select an SD v1.5 checkpoint model in the Stable Diffusion checkpoint dropdown menu.
Let’s use the Realistic Vision v5 model.
- Checkpoint model: Realistic Vision v5.1
- Prompt:
a beautiful woman with messy hair, dress
disfigured, deformed, ugly
- Sampling method: DPM++ 2M Karras
- Sampling Steps: 20
- CFG scale: 7
- Seed: -1
- Size: 512×768
In the LayerDiffuse section:
- Enable: Yes
- Method: (SD1.5) Only Generate Transparent Image (Attention Injection)
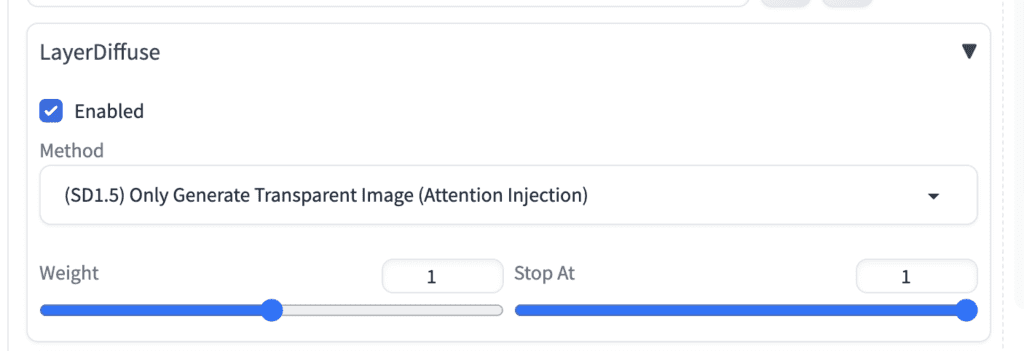
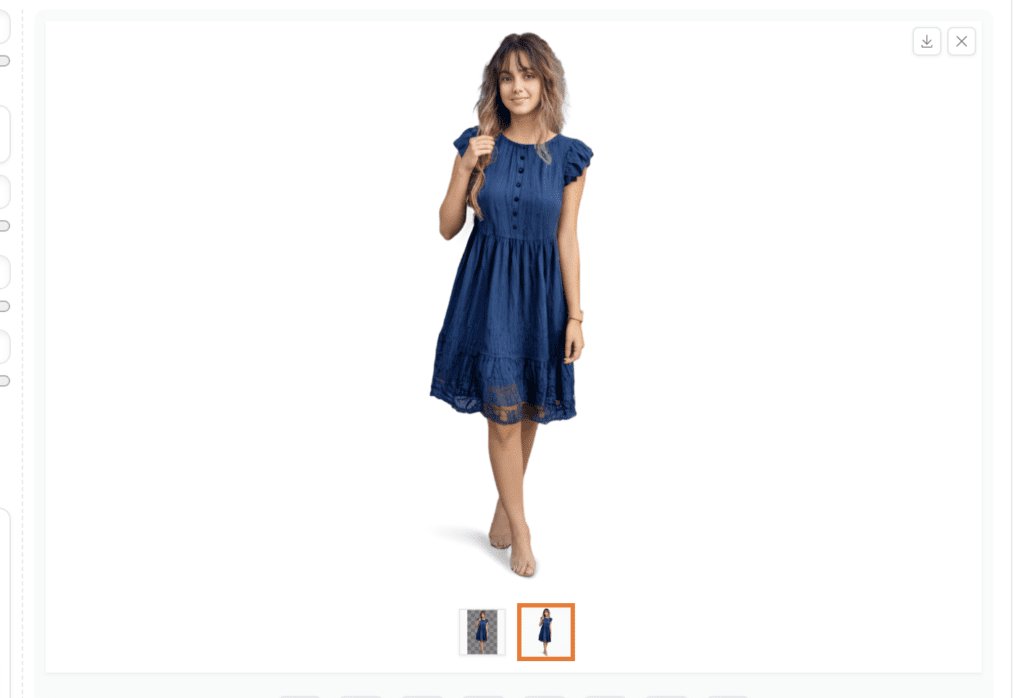
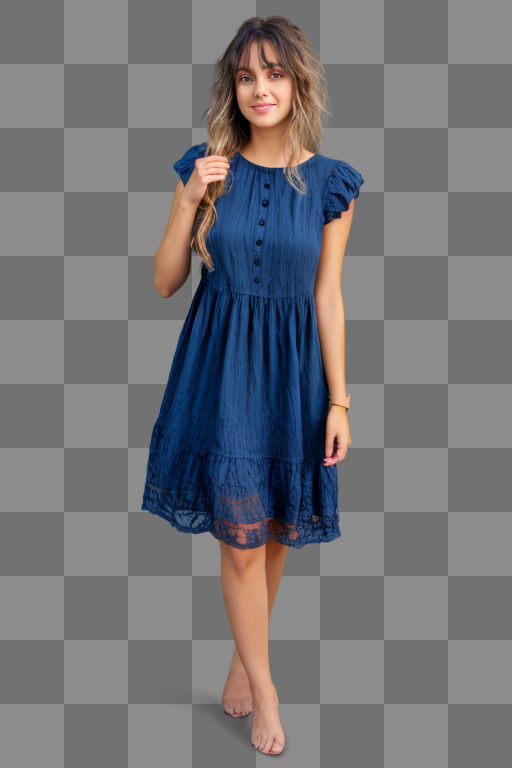
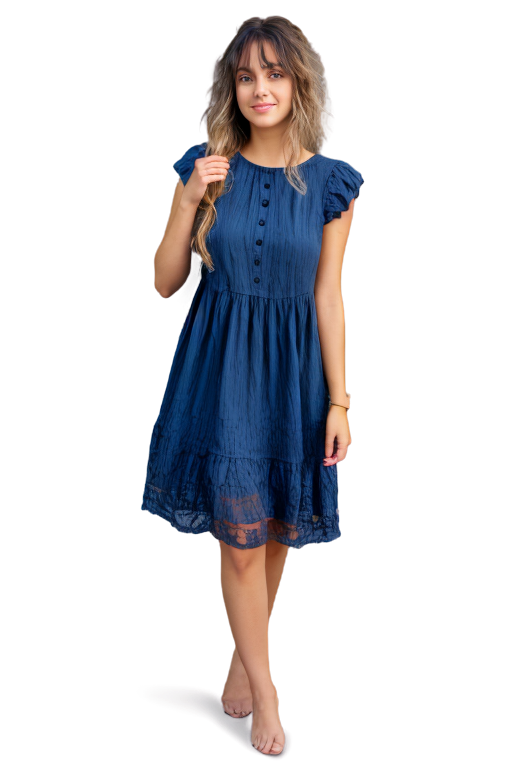
Click Generate to generate an image.
You should see two images generated. The one with a white background is the transparent image. The image with a checkered background is for inspection purposes only.
A common issue of the SD v1.5 model is garbled faces. When the face is not covered by enough pixels, it is not generated correctly.
Luckily, the Layer Diffuse extension is compatible with the high-res fix.
You can turn on Hires Fix to generate a larger image and fix the face.

As of this writing, the transparent layer generation is incompatible with img2img. You cannot use inpainting to fix a transparent image.
Generate SDXL images with transparent backgrounds
The steps for generating
- Checkpoint model: Juggernaut XL v7
- Prompt:
a beautiful woman with messy hair
- Negative prompt:
disfigured, deformed, ugly
- Sampling method: DPM++ 2M Karras
- Sampling Steps: 20
- CFG scale: 7
- Seed: -1
- Size: 1216×832
In the LayerDiffuse section:
- Enable: Yes
- Method: (SDXL) Only Generate Transparent Image (Attention Injection)
Tips
Layer Diffusion Models
There are multiple Layer Diffuse models available in the dropdown menu. The Attention Injection method usually works the best. If it doesn’t work for your image, try the Conv Injection method.
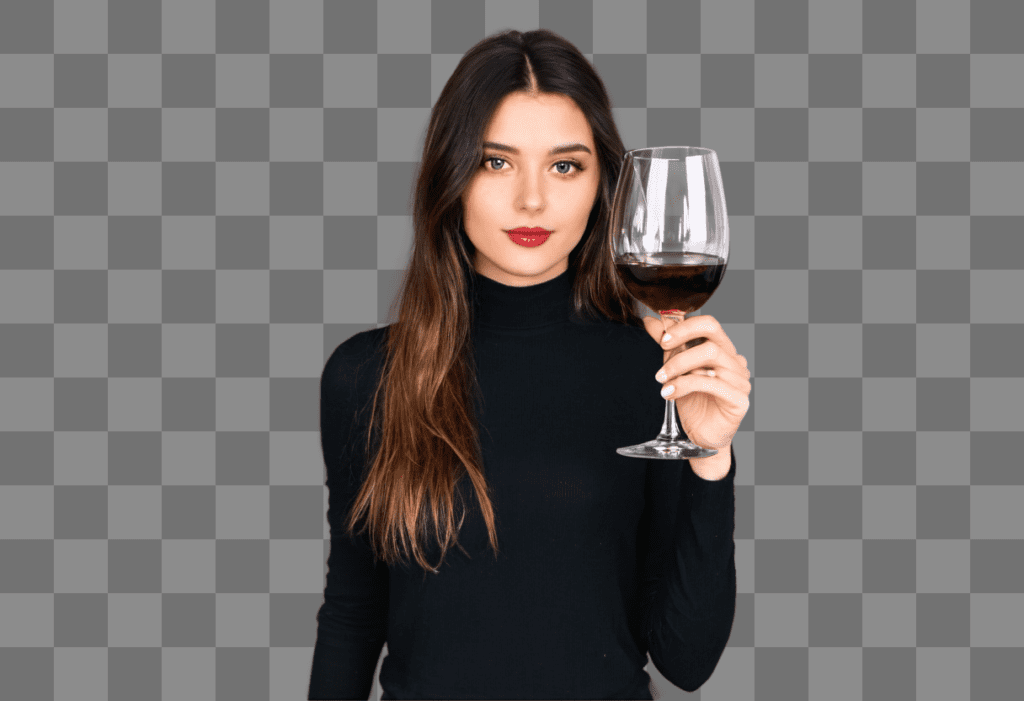
Semi-transparent objects
You can experiment with semi-transparent objects such as glasses. The model is smart enough to let the background come through them!

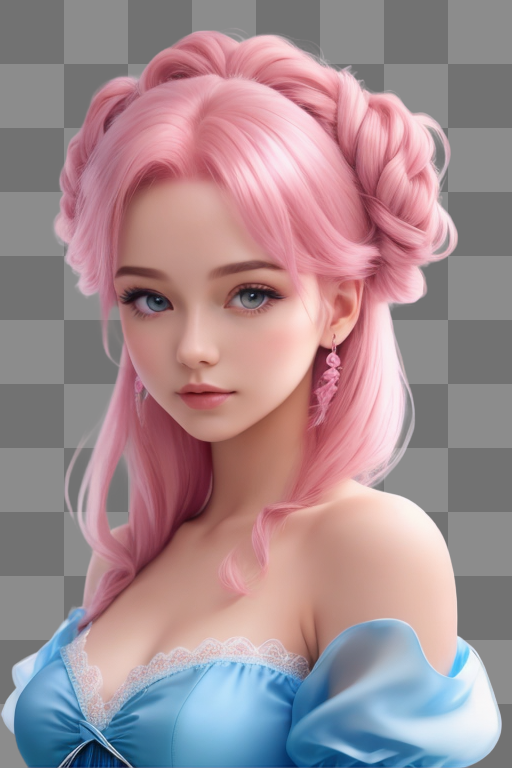
Other styles
The transparent images are not restricted to a photorealistic style. You can generate images in painting or anime style.
- Checkpoint Model: Dreamshaper v8
- Prompt:
close up of A beautiful girl, pink hair
BREAK
blue translucent dress
(I used BREAK to separate the color of the hair from the color of the dress. See the prompt guide.)
ComfyUI
You can generate images with transparent images in ComfyUI with the Layer Diffuse custom nodes.
Download the workflow
The following workflow generates images with transparent backgrounds. Download the workflow below and drop it to ComfyUI.
Installing missing nodes and updating ComfyUI
Every time you try to run a new workflow, you may need to do some or all of the following steps.
- Install ComfyUI Manager
- Install missing nodes
- Update everything
Install ComfyUI Manager
Install ComfyUI manager if you haven’t done so already. It provides an easy way to update ComfyUI and install missing nodes.
To install this custom node, go to the custom nodes folder in the PowerShell (Windows) or Terminal (Mac) App:
cd ComfyUI/custom_nodesInstall ComfyUI by cloning the repository under the custom_nodes folder.
git clone https://github.com/ltdrdata/ComfyUI-ManagerRestart ComfyUI completely. You should see a new Manager button appearing on the menu.
If you don’t see the Manager button, check the terminal for error messages. One common issue is GIT not installed. Installing it and repeat the steps should resolve the issue.
Install missing custom nodes
To install the custom nodes that are used by the workflow but you don’t have:
- Click Manager in the Menu.
- Click Install Missing custom Nodes.
- Restart ComfyUI completely.
Update everything
You can use ComfyUI manager to update custom nodes and ComfyUI itself.
- Click Manager in the Menu.
- Click Updates All. It may take a while to be done.
- Restart the ComfyUI and refresh the ComfyUI page.
Fixing library issues
Do the following if you run into an import error with the Layer Diffuse custom node.
Click Manager > Install PIP packages. Enter the following and press Enter.
diffusers>=0.25.0Restart ComfyUI.
The import error should be fixed.
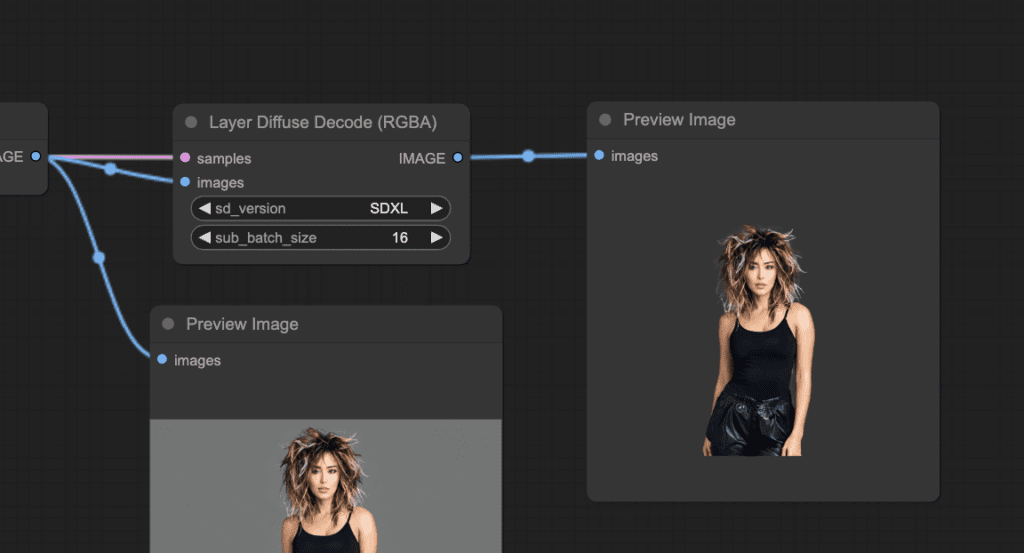
Generating an image with a transparent background
Now, the workflow should be ready to use.
Select an SDXL model in the Load Checkpoint node. The workflow uses the Juggernaut XL v7 model.
Click Queue Prompt to generate an image. You should see an image with a transparent background generated after the Layer Diffuse Decode node.
You can find more workflows, such as adding a background in the ComfyUI-layerdiffuse repository.
SD 1.5 workflow
If you are a site member, you can download the SD 1.5 Layer Diffuse workflow on the Resources page.
How does Layer Diffusion work?
The Layer Diffusion method is described in the research article Transparent Image Layer Diffusion using Latent Transparency by Lvmin Zhang and Maneesh Agrawala.
Background on transparent images
First, I will give a little background info on how a transparent image in PNG works.
An image in the JPEG format has three color channels: red, green, and blue. Or it is more commonly called RGB. Each pixel has these three primary color values. This is how different colors are created on a computer screen.
However, the RGB channels don’t define transparency. An extra alpha channel in a PNG image defines how transparent a pixel is. 0 is completely transparent, and a maximum value is fully opaque.
In other words, a PNG image has 4 channels: RBG and alpha. The transparency information is encoded in the alpha channel.
The Layer Diffuse model
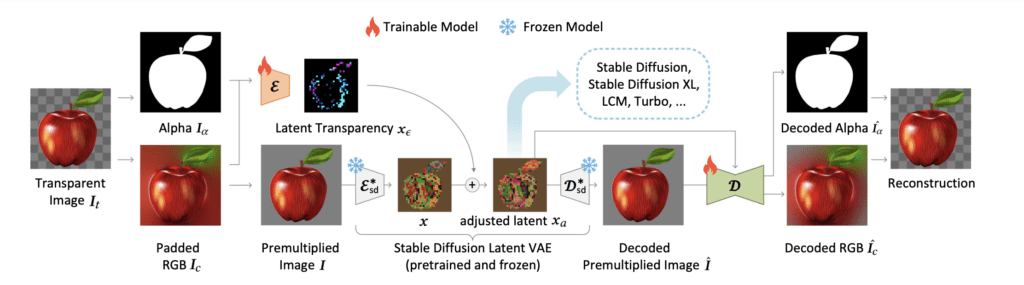
The Layer Diffuse model includes a newly trained VAE encoder (E) and decoder (D) to encode the transparent image to a new latent transparency image. The VAE works with images with 4 channels: RBG and alpha.
This latent transparency image is added to the latent image of Stable Diffusion, effectively “hiding” in the original latent image without affecting its perceptual quality.
The U-Net noise predictor is also trained to predict the noise of transparent images. To enable transparent images with any custom models, the change to U-Net is stored as a LoRA model.
The authors also released models that can add background to foreground, foreground to background, etc.
Text-to-image
Here’s how text-to-image with Layer Diffusion works.
- A random tensor (image) is generated in the latent space.
- The U-Net noise estimator, modified with a Layer Diffusion LoRA, predicts the noise of the latent image at each sampling step.
- The expected noise is subtracted from the latent image.
- Steps 2 and 3 are repeated for each sampling step.
- At the end of the sampling steps, you get a latent image encoding an image with a transparent background.
- A special VAE decoder converts the latent image to a pixel image with the RGB and alpha channels.
If you want to learn more about how Stable Diffusion and sampling work, I have these two articles written previously.
Is Pony considered XL, right? Tried it and it generated the infamous “fake background” checkered instead of transparency, did I forget something maybe?
Pony is a bit different because it is trained from scratch. Use SDXL base.
It’s okay, I got it. It works with Pony too, the problem is that Forge has some bug and doesn’t generate the transparent image unless we disable the metadata being saved with image (Configurations > disable “metadata is saved with image” or something like that). Very strange. Thank you.
Good find!
A transparent background can also be generated more easily. Simply add “white background” to the positive phrase, done. Load the image in Photoshop and define white as the selection and you have the alpha channel.
Hello! Thank you for the explanation! Is is possible to train SD (dreambooth) with custom images with transparent layers (png 4 channels)?
You will need a special dreambooth code. you can ask in the layer diffusion project page.
bakend import error in utils
Hi there, if anyone is having trouble setting this up. You can also use https://genpng.com?ref=sda to generate transparent pngs directly on the website. You can actually choose from LayerDiffuse or Generating&Matting. These two methods can achieve drastically different results.
Dear Andrew,
thank you for this comprehensible guide! I installed SD Forge and tried to create images without background but I can not get it to create images of any kind because it always stops at the start of the generation reporting:
TypeError: ‘NoneType’ object is not iterable
Time taken: 2.2 sec.
I did not use any extensions just a promt and a negative promt
doing so without LORAs doesn’t seem to resolve the problem either. And yes I restarted SD, did extension updates and all but the result is the same.
Do you have an idea of ho to fix this?
Many thanks and a great day!
Here’s a solution you can try: https://github.com/lllyasviel/stable-diffusion-webui-forge/issues/798
Hi Andrew
Thank you for sharing this.
The image is transparent, but the background is while/grey grid, which is still not transparent. Is there any way I can get the image with transparent background, I mean 0 alpha on background?
Hi Andrew again
I just found that the transparent image is on Forge but not saved in disk drive. I need to manually download it by clicking the download icon on Forge.
Is there a way to make it saved in my disk? For example, if I generate multiples images with batch count (not batch size), I can only manually download the last image visible on Forge.
You will need to report to the github repo.
there are two images generated. one is with grid background. The other is transparent.
Hey there! First off- thank you so much for sharing this! I just had a couple of questions:
– Although I see the files installed in the ComfyUI Custom Nodes folder, the ComfyUI manager displays an error in the “Install Custom Nodes” window ((IMPORT FAILED) ComfyUI Nodes for Inference.Core) and (IMPORT FAILED) ComfyUI Nodes for Inference.Core). I am also seeing in the description a multitude of conflicting nodes “Conflicted Nodes:
LayeredDiffusionApply [ComfyUI-Inference-Core-Nodes], LayeredDiffusionCondApply [ComfyUI-Inference-Core-Nodes], LayeredDiffusionCondJointApply [ComfyUI-Inference-Core-Nodes], LayeredDiffusionDecode [ComfyUI-Inference-Core-Nodes],”
I am not an expert on this so I apologize if ther error is mine, but would love to know if you have an idea of what the issue could be?
Secondly, I creating Animatediff videos- do you think this may work in such a workflow?
Thanks again for all this!
Best Regards,
J
I also encountered an import error. You can check with the error is the same and apply the fix if it is.
https://stable-diffusion-art.com/transparent-background/#Fixing_library_issues
Hi Andrew,
I tried using the Layer Diffuse extension with the standard GUI Automatic 1111 (not Forge), but it won’t appear in the txt2img tab. Installation seemed to work fine, and the extension folder was created. Any idea why it’s not appearing?
Thanks
Why not just install Forge? It’s newer version of AUTO1111 which wasn’t updated for quite some time and has a lot more features while retaining the same look of the original.
The extension only works on Forge not A1111.
What are the minimum GPU requirements for desktop use?
Thank you!
This is great, I am trying something similar. For example I have a painting of mine which I did long time ago. I want to put my face before the painting. The painting should be in background. I tried doing this using IPAdapter but whatever I do, it seems to be changing the painting and not giving the background which i am expecting. I also used instantid for my face which is working fine, but somehow my workflow is unable to control the background. What is the best possible way to do this. Thanks
You can make it a two-step process – 1. generate a person in front of a painting. 2. Use inpainting to add your face.
Hi Andrew,
Thank you for the explanation.
I want to ask, is there any API coming from Stability.ai for this particular feature?
The reason I asked is that I don’t see any API documentation for the above implementation. Or is there something I’m not seeing? All I can see there is text-to-image, image-to-video, in painting and masking and I was able to implement the first two in my app. It can be found on Amazon appstore here https://www.amazon.com/dp/B0CVW52TTY/
I had to combine my own trained dataset (with just a few parameters) and SD to achieve the results users get on my app.
In the future, I would also like to add Image-to-3D and expand the video duration from 4 seconds to at least 1 hour so that authors/creators can use the app as a tool to generate full-length video for storytelling – something we might might also classify as filmmaking.
Already, a user can convert their story to an eBook, but converting the ebook to video is one of the remarkable features we hope to achieve with the app.
I also would appreciate collaboration on the project. Thanks.
I don’t think this is in SA’s API.