You can add or replace the background of any image with Stable Diffusion. This technique works with both real and AI images.
Here are some images with the background changed.
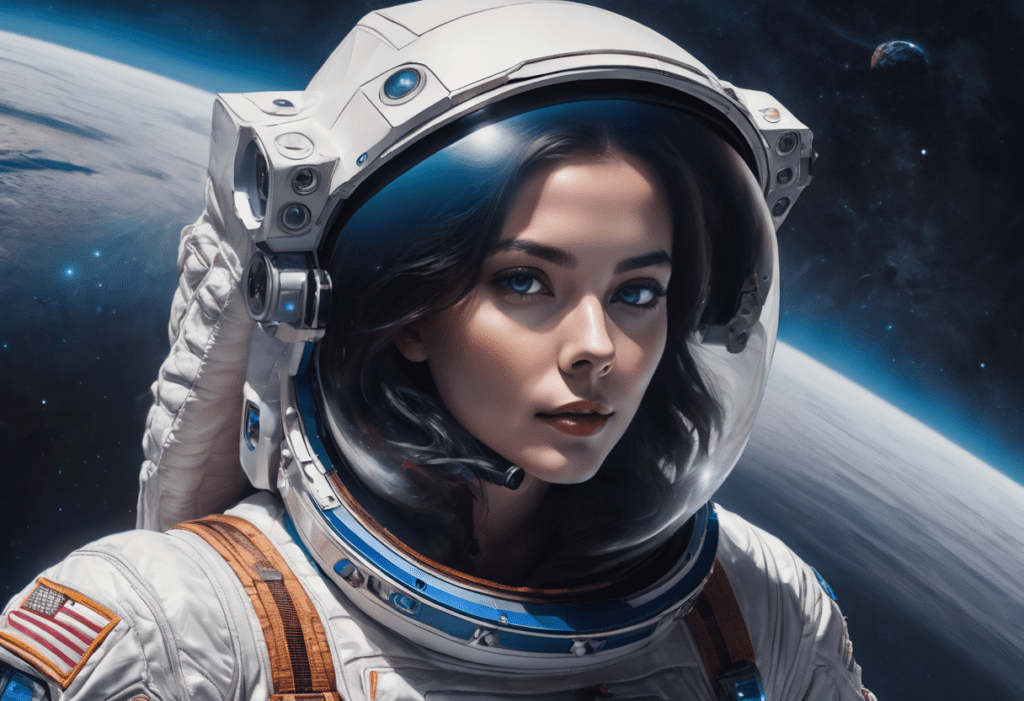
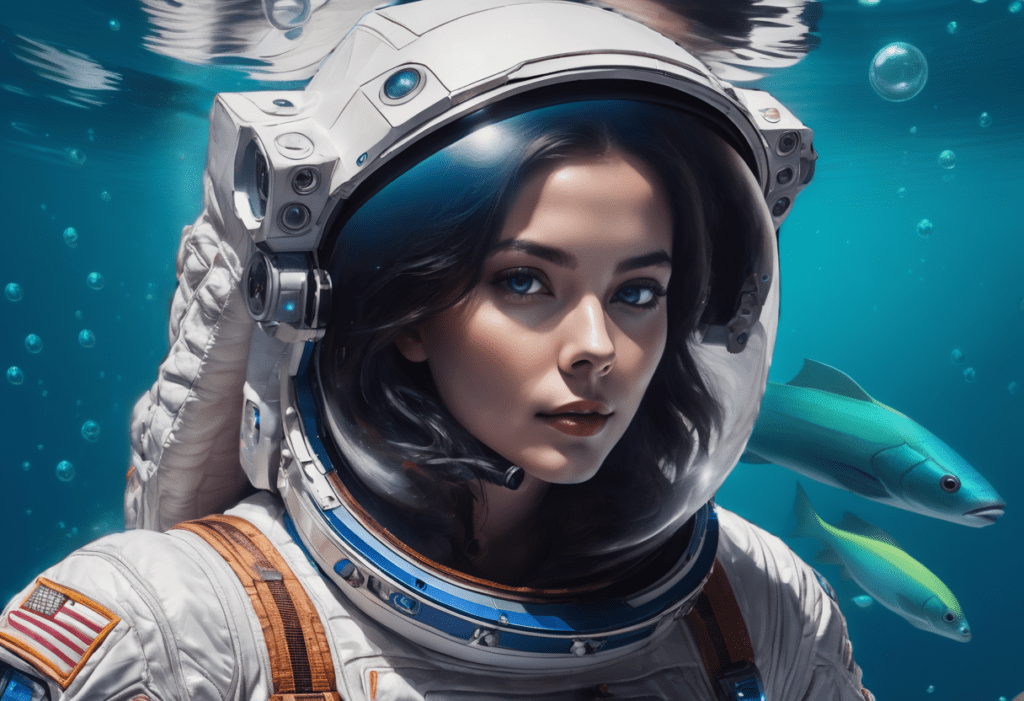
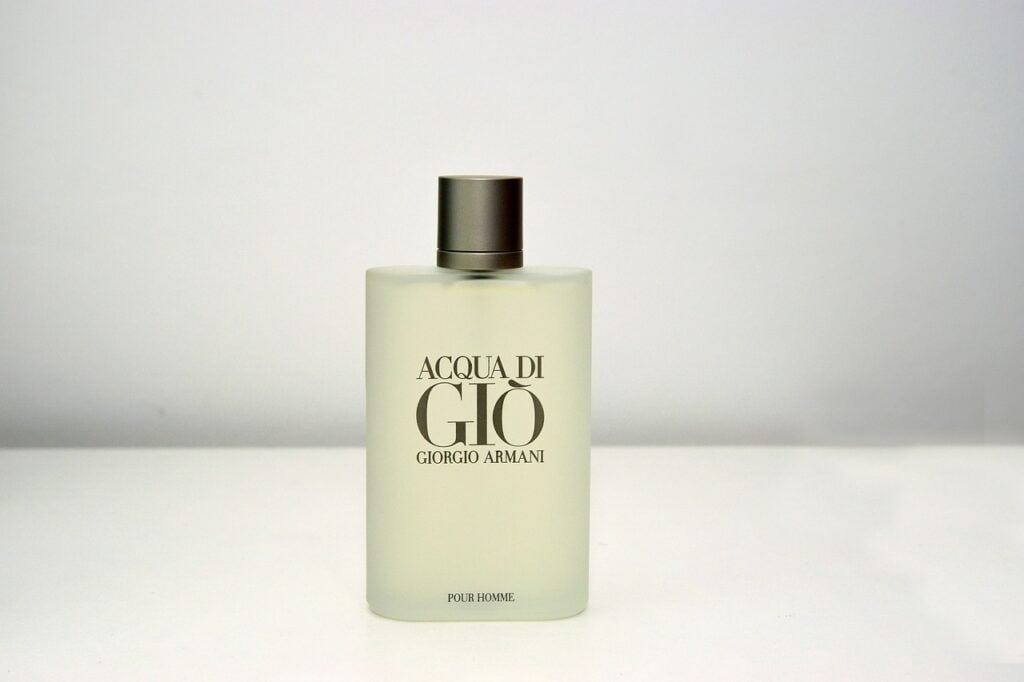
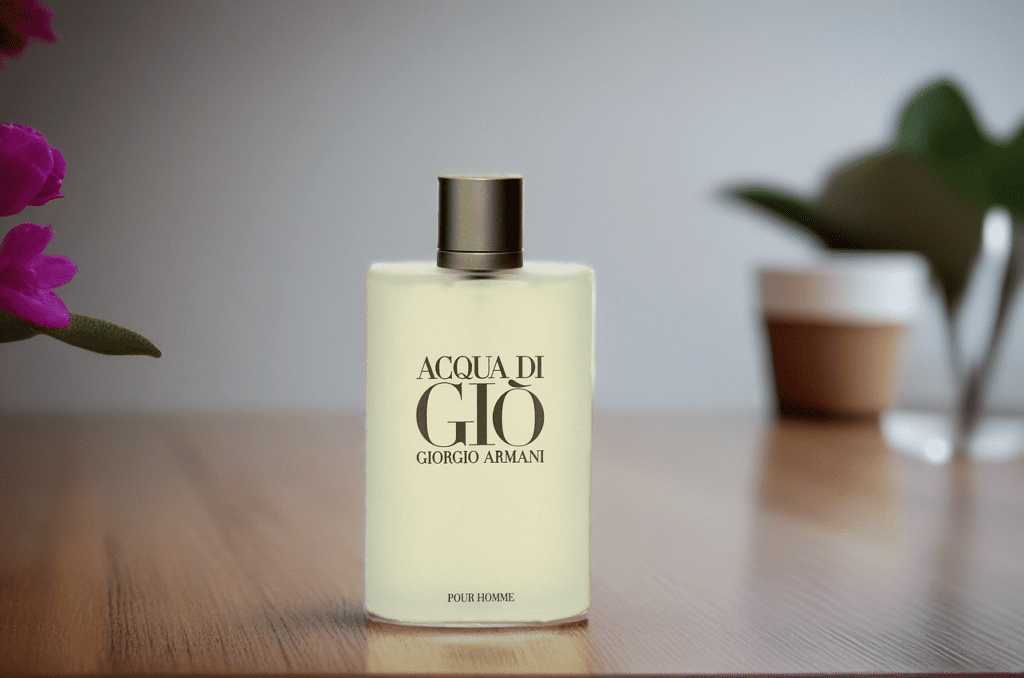
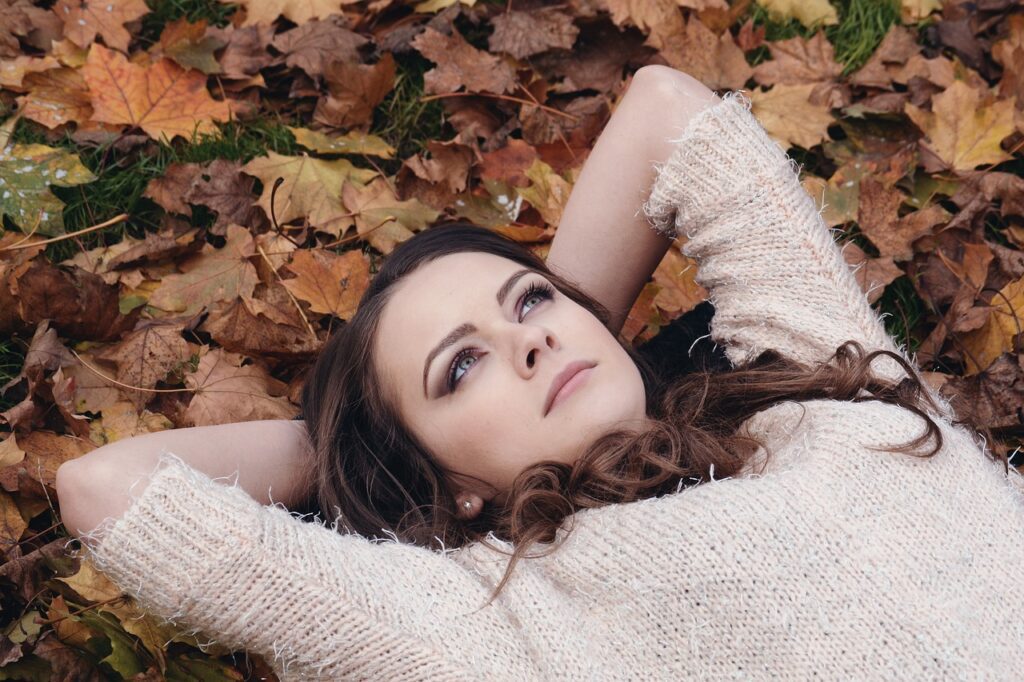
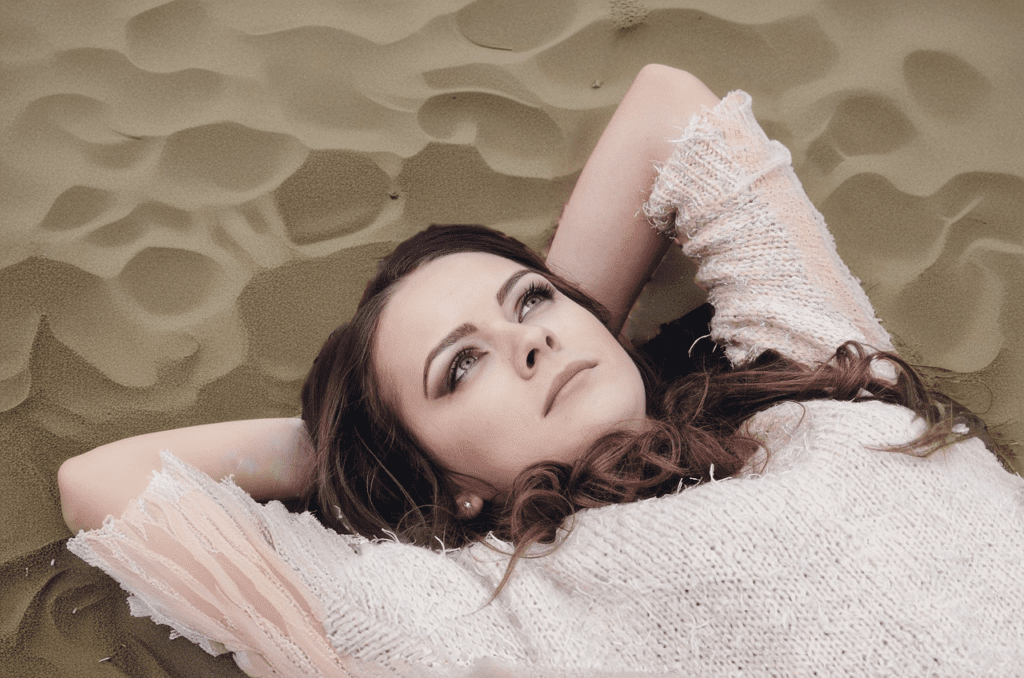
Table of Contents
Software
We will use AUTOMATIC1111 Stable Diffusion WebUI, a popular and free open-source software. You can use this GUI on Windows, Mac, or Google Colab.
Check out the Quick Start Guide if you are new to Stable Diffusion. Check out the AUTOMATIC1111 Guide if you are new to AUTOMATIC1111.
Change Background with Stable Diffusion
This method uses the Rembg extension. You can use this extension to remove the background of any image. But we will use it to create an inpaint mask.
Step 1: Install the Rembg extension
Follow these steps to install the extension.
- Start AUTOMATIC1111 Web-UI normally.
2. Navigate to the Extension Page.
3. Click the Install from URL tab.
4. Enter the following URL in the URL for extension’s git repository field.
https://github.com/AUTOMATIC1111/stable-diffusion-webui-rembg
5. Click the Install button.
6. Wait for the confirmation message that the installation is complete.
7. Restart AUTOMATIC1111.
Step 2: Generate an image
We will first generate an AI image. You can skip this step if you already have an image.
Open AUTOMATIC1111. Go to the txt2img page.
- Stable Diffusion Checkpoint: DreamShaperXL Alpha 2
- Prompt:
woman in space suit , underwater, full body, floating in water, air bubbles, detailed eyes, deep sea in background
disfigured, deformed, ugly
- Sampling method: DPM++ 2M Karras
- Sampling steps: 25
- Size: 1216 x 832
- CFG Scale: 7
Select the image you want to remove the background. Click the Send to Extras button under the image to send it to the Extras page.
The image should now appear on the Extra page.
Step 2: Create an inpaint Mask
If you start with an image, drag and drop it to the source canvas.
Select u2net in the Remove background dropdown menu.
Select Return mask.
Press Generate to create a mask.
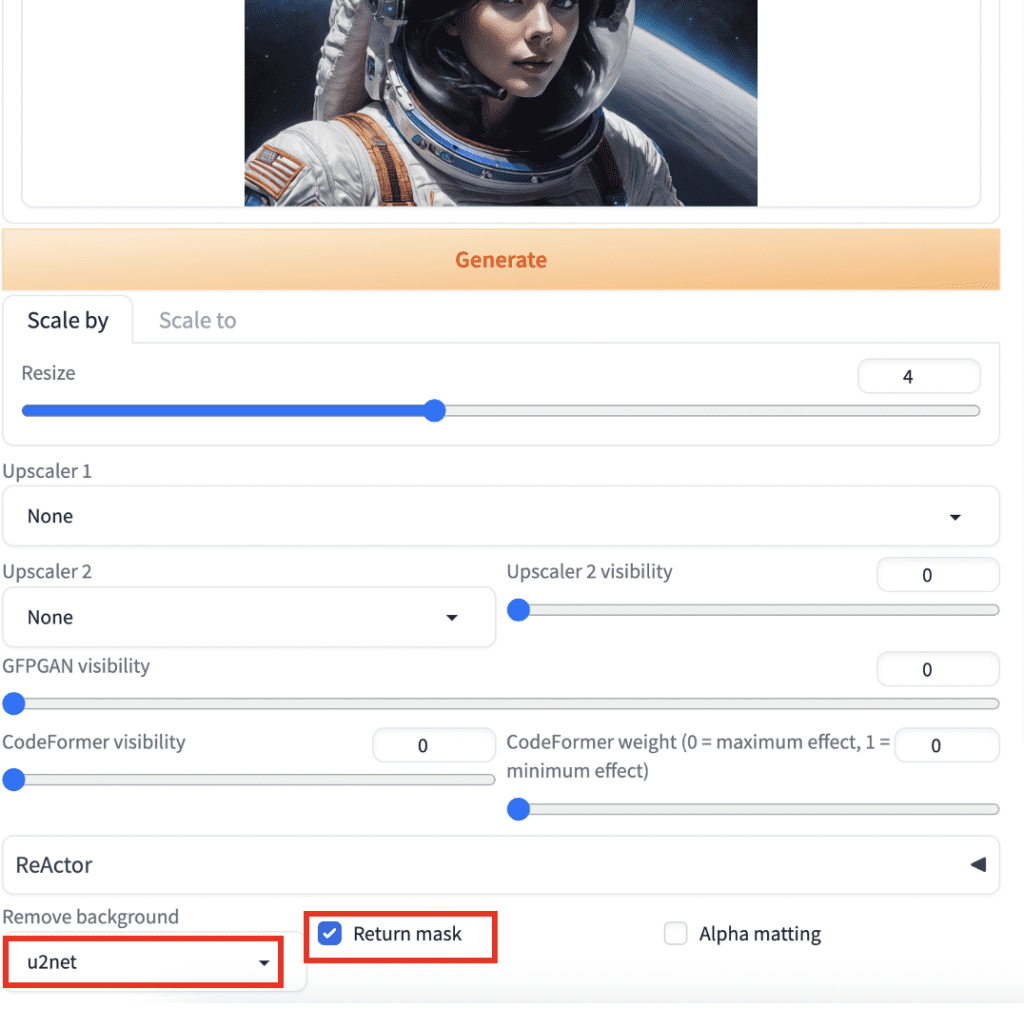
You should get a mask of the foreground image. Save it to your local storage.

If you don’t get a good mask, follow the instructions in this post to customize the alpha matte settings.
Step 3: Inpaint with the mask
You will now use inpainting to regenerate the background while keeping the foreground untouched.
Go to the img2img page > Generation > Inpaint Upload.
Drop the original image on the upper canvas.
Drop the mask image you just created on the mask canvas.
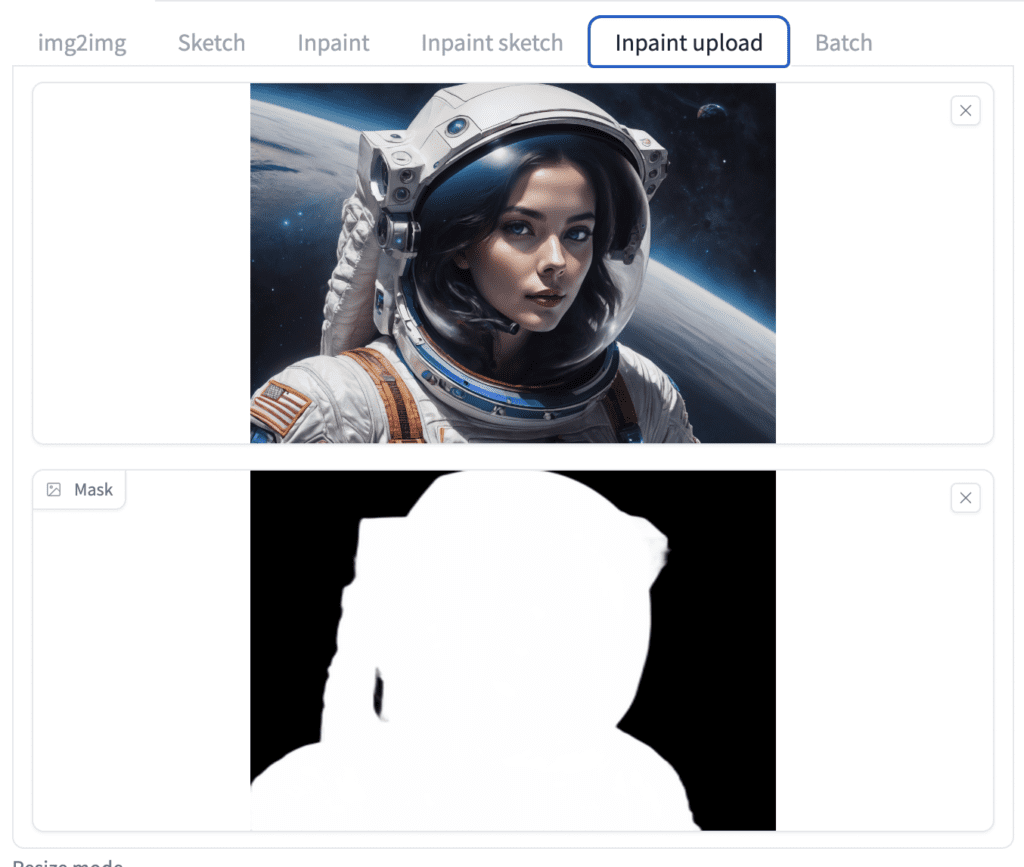
Enter a prompt to describe the new background. I will use the following prompt.
woman in space suit , underwater, full body, floating in water, air bubbles, detailed eyes, deep sea in background, water surface, god ray, fish
Negative prompt:
disfigured, deformed, ugly
- Mask mode: Inpaint not masked (This is important because you want to inpaint the black area.)
- Mask Content: Original
- Inpaint area: Whole picture
- Sampling method: Euler a
- Sampling steps: 25
- Size: 1216 x 832
- CFG Scale: 7
- Denoising strength: 1 (So that the background do not follow original content at all)
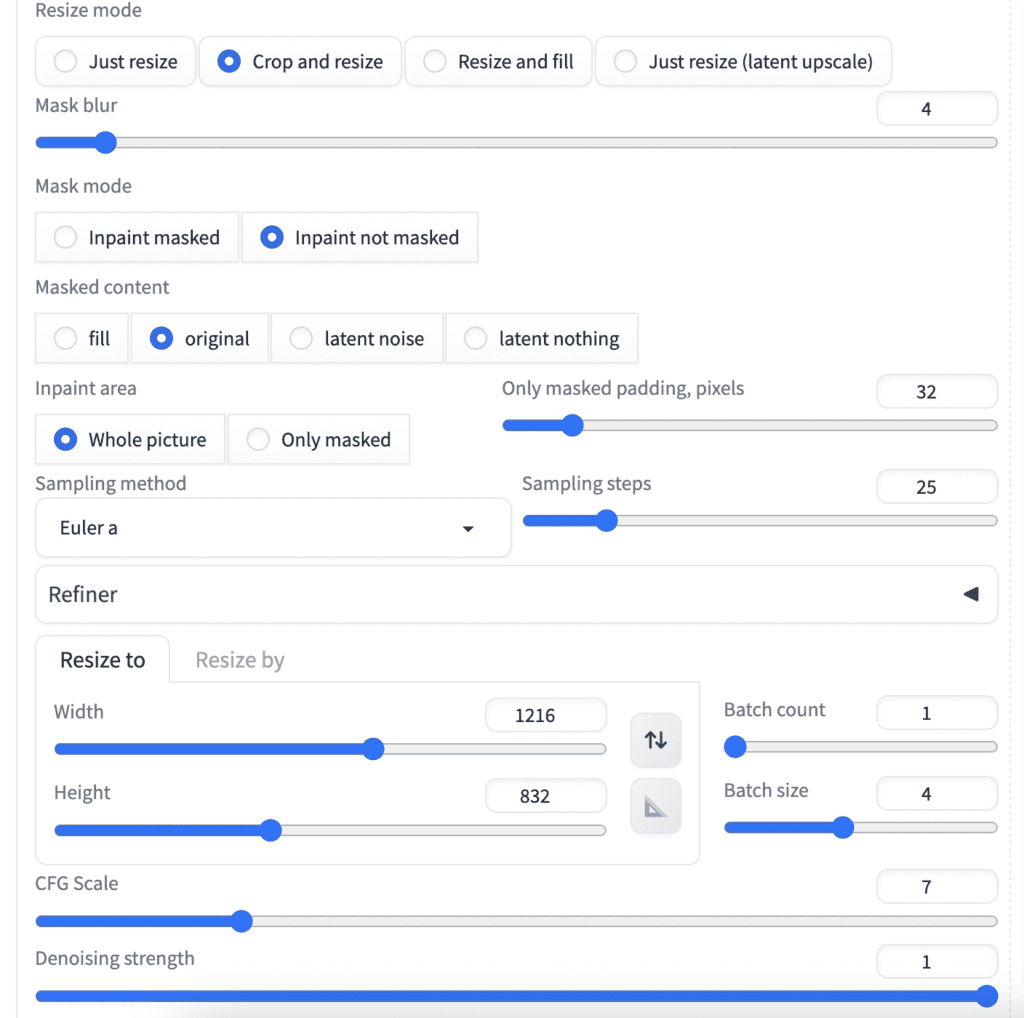
Press Generate.
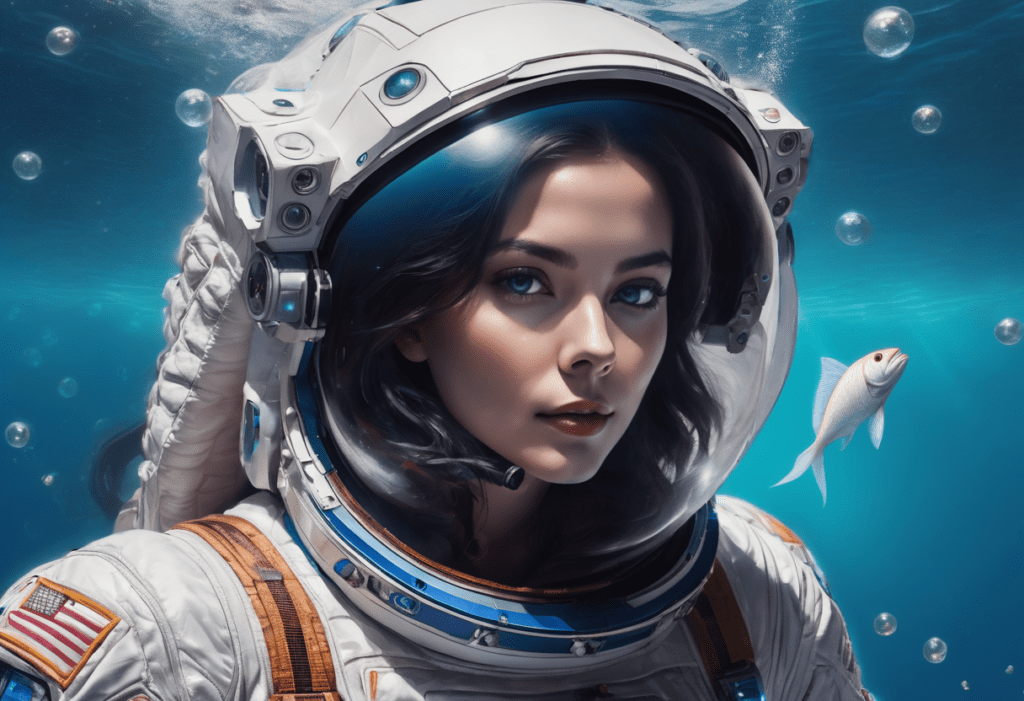
Now she’s underwater instead of in space!
Optional: Inpaint with ControlNet
If the background is not quite right, such as generating some foreground or extra limbs, you can turn on ControlNet in the inpainting step.
If you don’t have ControlNet installed, follow this article to install it (You will need it!).
The following example uses the ControlNet XL Depth model. Follow this article to install the model.
The Depth ControlNet tells Stable Diffusion where the foreground and background are. The image generated will have a clear separation between foreground nad background.
Do everything in Step 3. Scroll down to the ControlNet section.
- Enable: Yes
- Pixel Perfect: Yes
- Allow Preview: Yes
- Upload independent control image: Yes
- Control Type: Depth
- Preprocessor: Depth Midas
- Model: sai_xl_depth_256lora
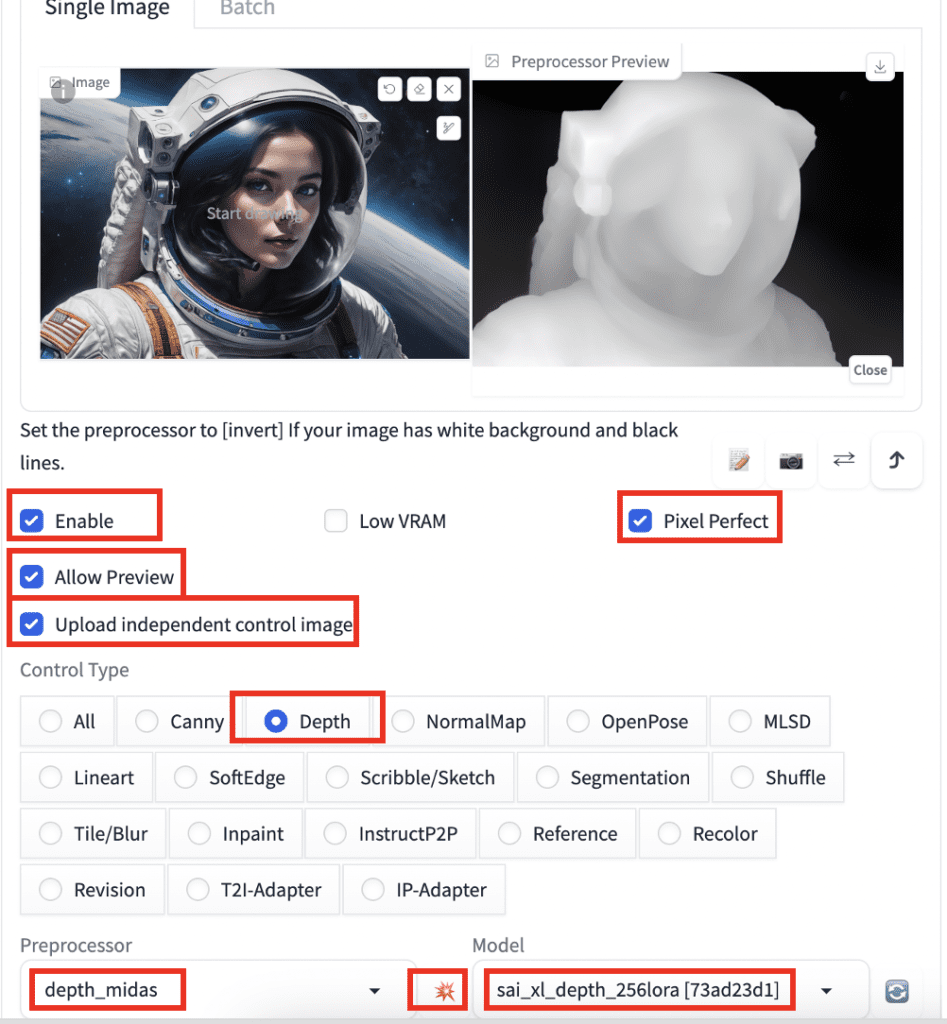
Click the preview button next to the Preprocessor menu to preview the depth map. Make sure it accurately represents the depth of the image. If not, try other depth preprocessors.
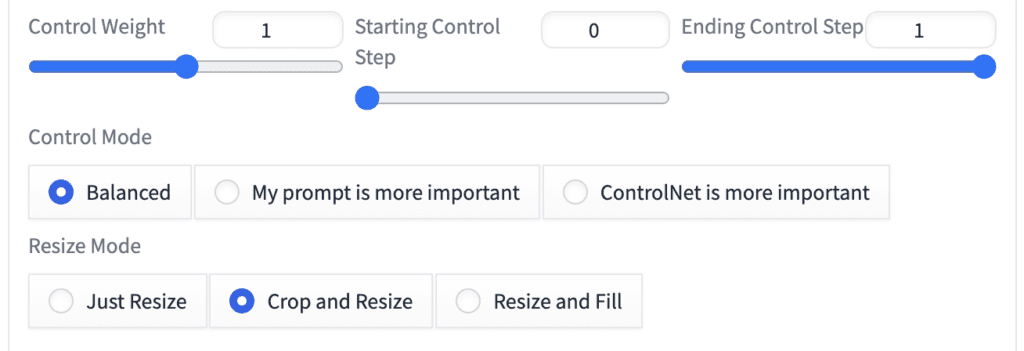
You can leave the rest of the ControlNet settings as the default.
Press Generate. You will get images with the foreground following the depth map.
The Depth ControlNet is not the only ControlNet that works. You can also use:
- Canny
- Line art
- Inpainting
Additional examples
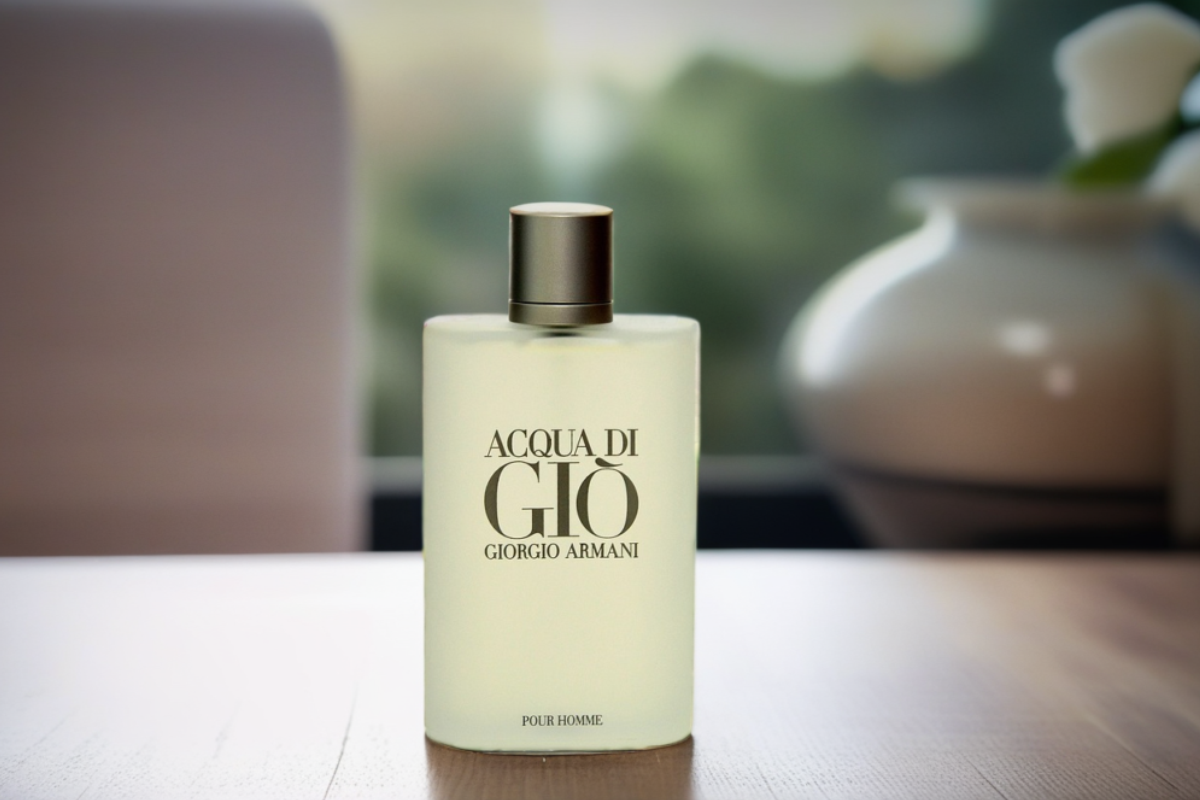
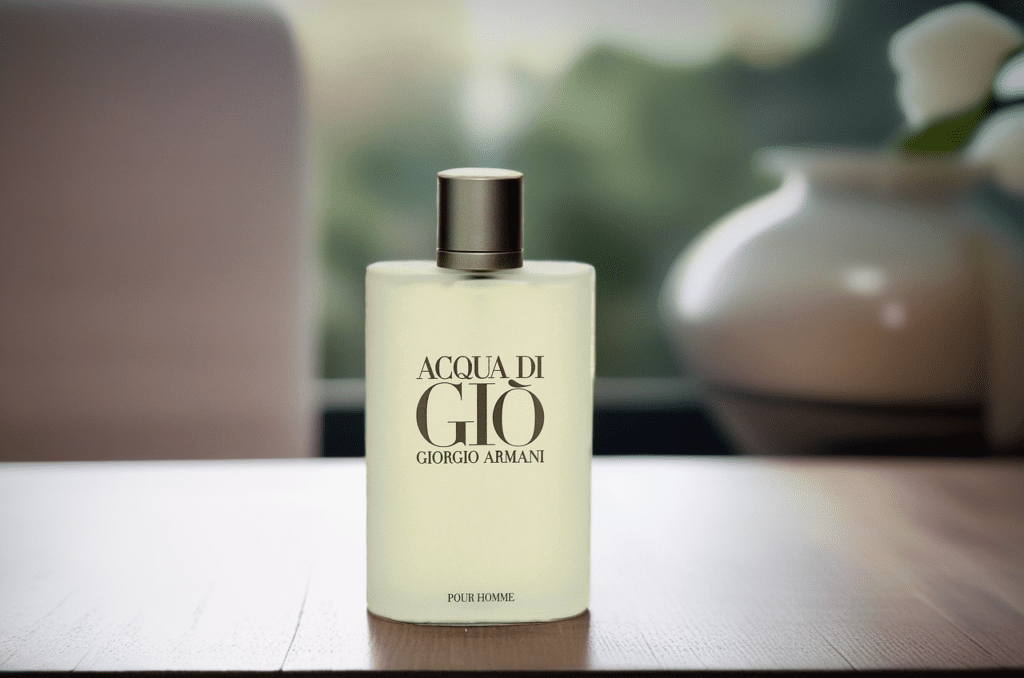
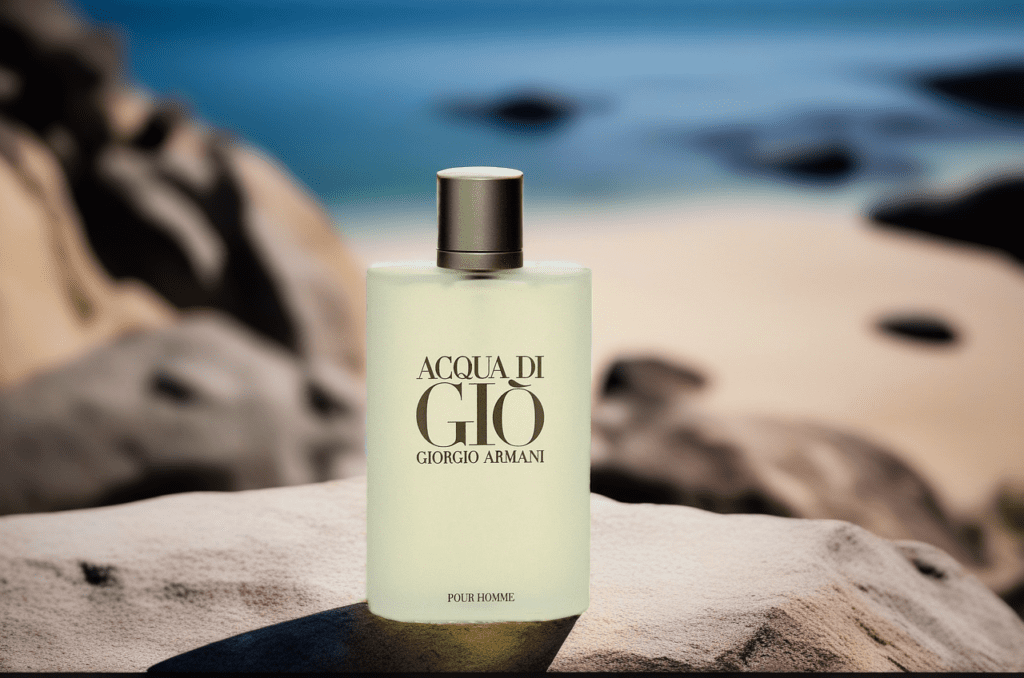
Product image
Here’s the initial product image.
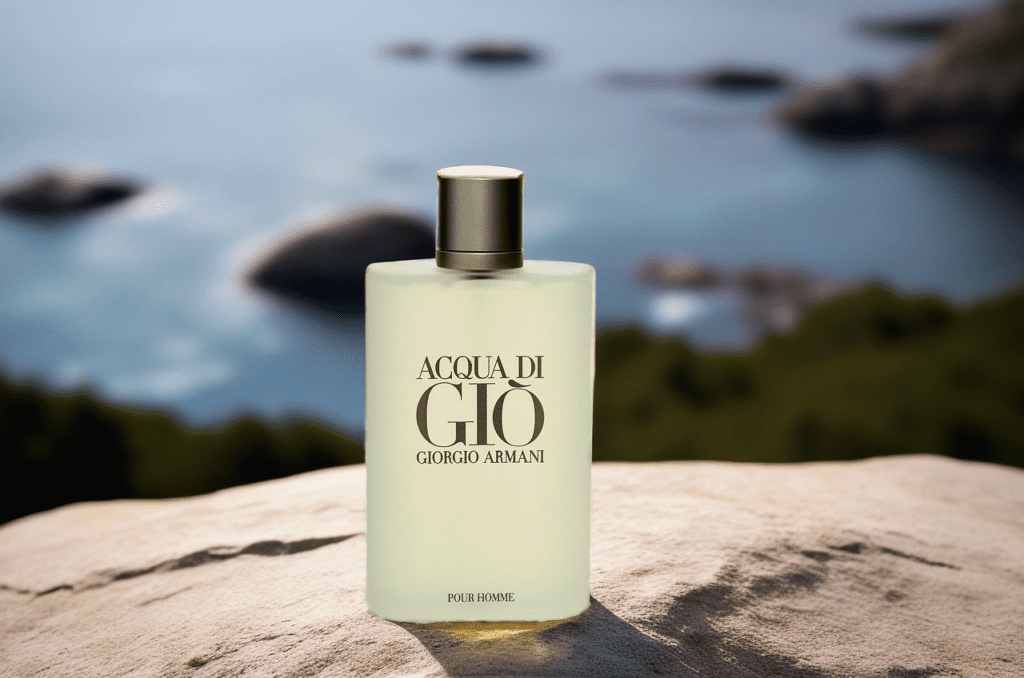
Use the same technique with the ControlNet Depth model and a realistic model.
- Stable Diffusion Checkpoint: RealVisXL V2.0
Prompt:
Product photo of a bottle of perfume on a wooden table, modern living room
Product photo of a bottle of perfume on a rock, nature setting, shadow
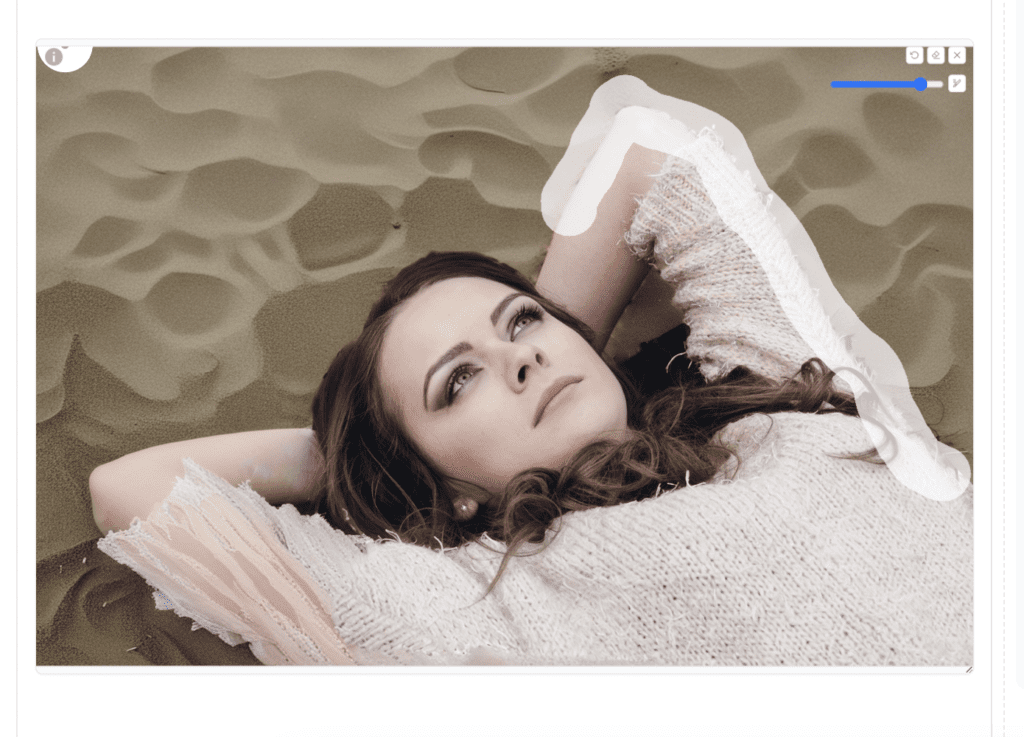
Real photo
Used Stable Diffusion Checkpoint RealVisXL V2.0 and prompt:
A woman lying on a sandy beach
This mask is taken from the depth preprocessor of ControlNet. Since it is not completely black or white, the gray area can be somewhat changed.

The mask was slightly off, resulting in a black outline on her left arm. I used inpainting (without ControlNet) and a low denoising strength of 0.3 to repair the outline.
Tips for changing background
ControlNet Depth helps Stable Diffusion to differentiate the foreground and background. It will increase your chance of generating the correct image.
I used the XL Depth ControlNet model in the tutorial. If you are using a v1.5 model, use the corresponding depth model (control_v11f1p_sd15_depth).
Instead of using the mask from the Rembg extension, you can try the Control Maps of the depth models. They sometimes work well.
It is okay if the mask is slightly off. You can use inpainting to repair problematic edges.
Hello, I have a question, that is, why when changing the background, there will always be a character behind the background, I entered the prompt word and no humans or nobody, but it still has no effect, there will always be other characters in the background
Would be great to get a better explanation on how to install. All you showed is how to install the extension but not its requirements. While onnx is automatically installed, non of its requirements is, TensorRT, CUDA, and cuDNN.
You should not need to install them manually.
Hi 🙂 It’s a really simple and clear guide. You’re so smart!!
May I know how to apply the color and tone of my reference image to the results? Thanks.
Thanks! You can try adding ip-adapter in controlnet. https://stable-diffusion-art.com/ip-adapter/
Can we have this tutorial for ComfyUI?
Would inverting the mask help at all / much with background changing?
inverting the mask would change the foreground.
You can Inpaint Mask with XL models? I didn’t know that
Great tutorial, I see you are using RealVis2.0, but the latest is 4.0. Is there a reasons not to use the new one ? thanks ~!
No particular reason.
Hi Andrew, reallny nice workflow, thanks! I’m trying the product placement in another background, for ex. also a perfume bottle, but seems like SD is creating a perfume bottle that is somehow behind the masked one, is there a way not to have those artefact in the background? I tested a lot, i have no clue what i could do more (without using psd 😉 thanks
Yes, you can add controlnet depth to the workflow.
https://stable-diffusion-art.com/change-background/#Optional_Inpaint_with_ControlNet
How does it work in comfy ui?
Thanks for the great article.
By the way, on the perfume example, how are you able to get perfect edges on the bottle?
What settings do you use to get perfect blending on the object with the background.
Tried a few settings myself, but always have issue on the edges of the object.
You can add a controlnet depth to better fix the edges.
Thank you for the show & tell, really helps to understand. Are you restricted to only using the model that created the original image when you want to add a new background? I have about 45 SDXL models in my test environment as I find some do some aspects of my creative work better than others, so I constantly switch around. My focus right now is on creating realistic people I can use as models for concepts for my clients.
Hi, you can use any images.
Thank you – it is models I’m asking about, not images. Out of 45 models, maybe 23 actually worked creating new backgrounds the others just crashed. Or is it an environment config prob? Such as needing a VAE or something else?
O ok. All models should work the same. The only limiting factor is memory. You can look at the console output to see if you have an out-of-memory error. You can reduce the image size if it does.
My AUTOMATIC1111 always crashes when I try to generate the mask with u2net or any other model from the remove background drop-down menu.
Startup time: 7.7s (prepare environment: 1.6s, import torch: 2.0s, import gradio: 0.7s, setup paths: 0.6s, initialize shared: 0.3s, other imports: 0.6s, load scripts: 1.1s, create ui: 0.5s, gradio launch: 0.1s).
Creating model from config: stable-diffusion-webui/repositories/generative-models/configs/inference/sd_xl_base.yaml
Applying attention optimization: Doggettx… done.
Model loaded in 3.7s (load weights from disk: 1.2s, create model: 0.5s, apply weights to model: 1.6s, calculate empty prompt: 0.3s).
Downloading data from ‘https://github.com/danielgatis/rembg/releases/download/v0.0.0/u2net.onnx’ to file ‘/home/…/.u2net/u2net.onnx’.
100%|███████████████████████████████████████| 176M/176M [00:00<00:00, 1.04TB/s]
src/tcmalloc.cc:284] Attempt to free invalid pointer 0x55c3ee484080
./webui.sh: line 256: 29869 Aborted "${python_cmd}" -u "${LAUNCH_SCRIPT}" "$@"
I see you are using mac. It could be that it is not supported.
You can use the mask from depth midas preprocessor instead.
I use Mac but Automatic runs on an AWS EC2 GPU instance with Linux. It’s got 24GB VRAM and 32 GB RAM so should be plenty, and everything else works. Who knows…
Using ControlNet for the mask works.
Great tutorial though, thanks!
If you are using Safari, try Chrome, I had all sorts of issues using Safari. I just toggle the default browser to Chrome temporarily, then I drag the webui.sh icon onto the Terminal icon in my dock. This on an M2 Ultra with Sonoma 14.2.1 (23C71).
Great article.
I do this by jumping between Diffusionbee and Photoshop CC, but if you don’t have Photoshop this would be very useful.