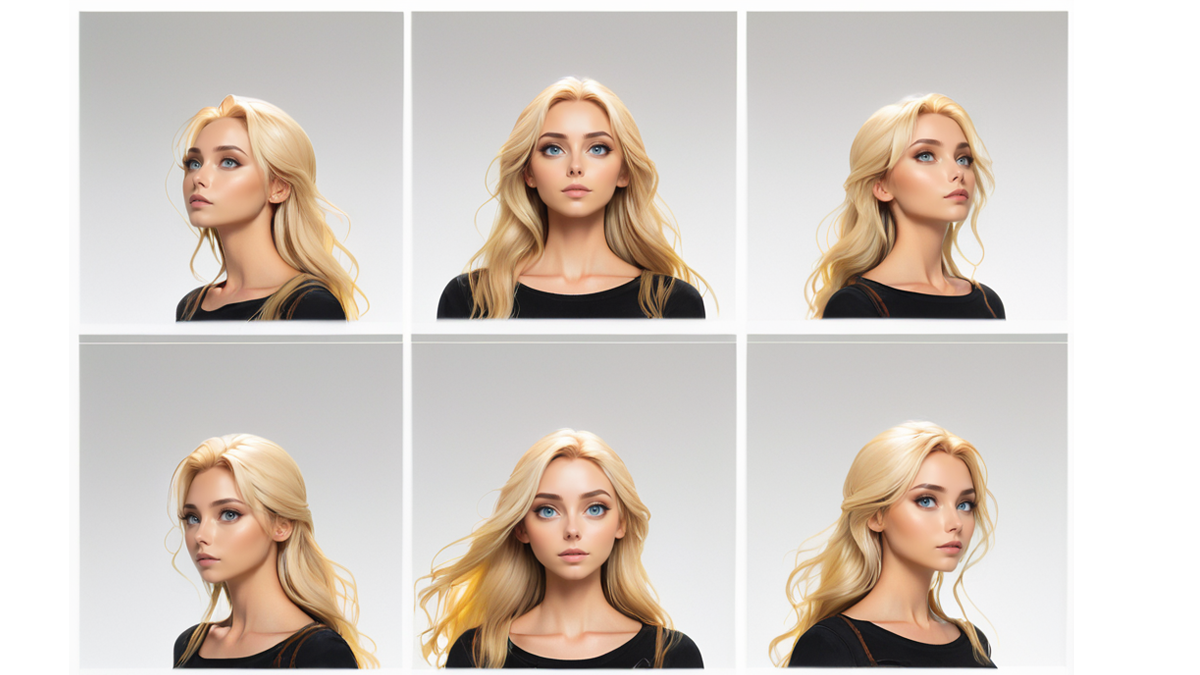
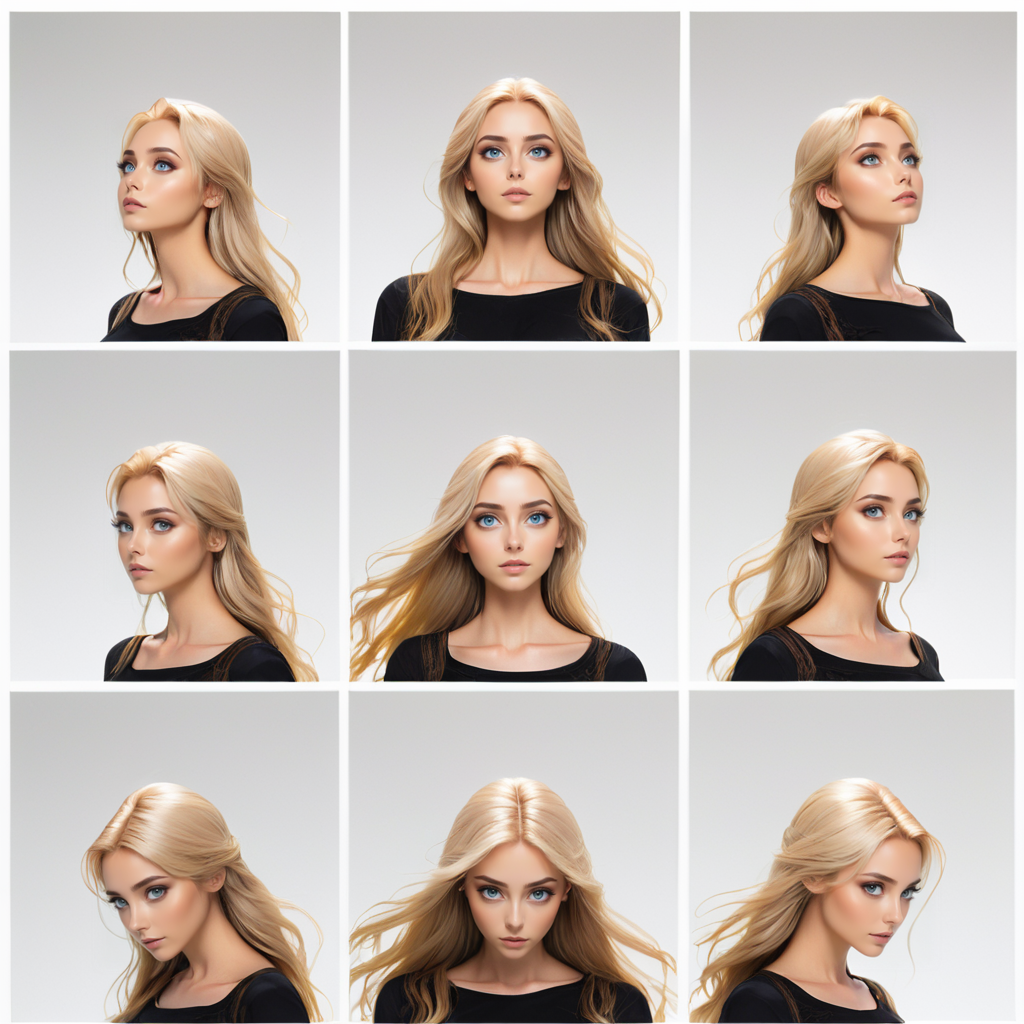
Do you ever need to create consistent AI characters from different viewing angles? The method in this article makes a grid of the same character like the one below. You can use them for downstream artwork that requires the same character in multiple images.
Here’s the video version of this tutorial for AUTOMATIC1111.
Video tutorial for ComfyUI.
Software
I will provide instructions on how to create this in AUTOMATIC1111.
I am working on a ComfyUI workflow. Stay tuned!
AUTOMATIC1111
We will use AUTOMATIC1111 , a popular and free Stable Diffusion software. Check out the installation guides on Windows, Mac, or Google Colab.
If you are new to Stable Diffusion, check out the Quick Start Guide.
Take the Stable Diffusion course if you want to build solid skills and understanding.
Check out the AUTOMATIC1111 Guide if you are new to AUTOMATIC1111.
ComfyUI
We will use ComfyUI, a free AI image and video generator. You can use it on Windows, Mac, or Google Colab.
Think Diffusion provides an online ComfyUI service. They offer an extra 20% credit to our readers.
Read the ComfyUI beginner’s guide if you are new to ComfyUI. See the Quick Start Guide if you are new to AI images and videos.
Take the ComfyUI course to learn how to use ComfyUI step by step.
How this workflow works
Checkpoint model
This workflow only works with some SDXL models. It works with the model I will suggest for sure. Switching to using other checkpoint models requires experimentation.
The reason appears to be the training data: It only works well with models that respond well to the keyword “character sheet” in the prompt.
Controlling the grid of viewing angles
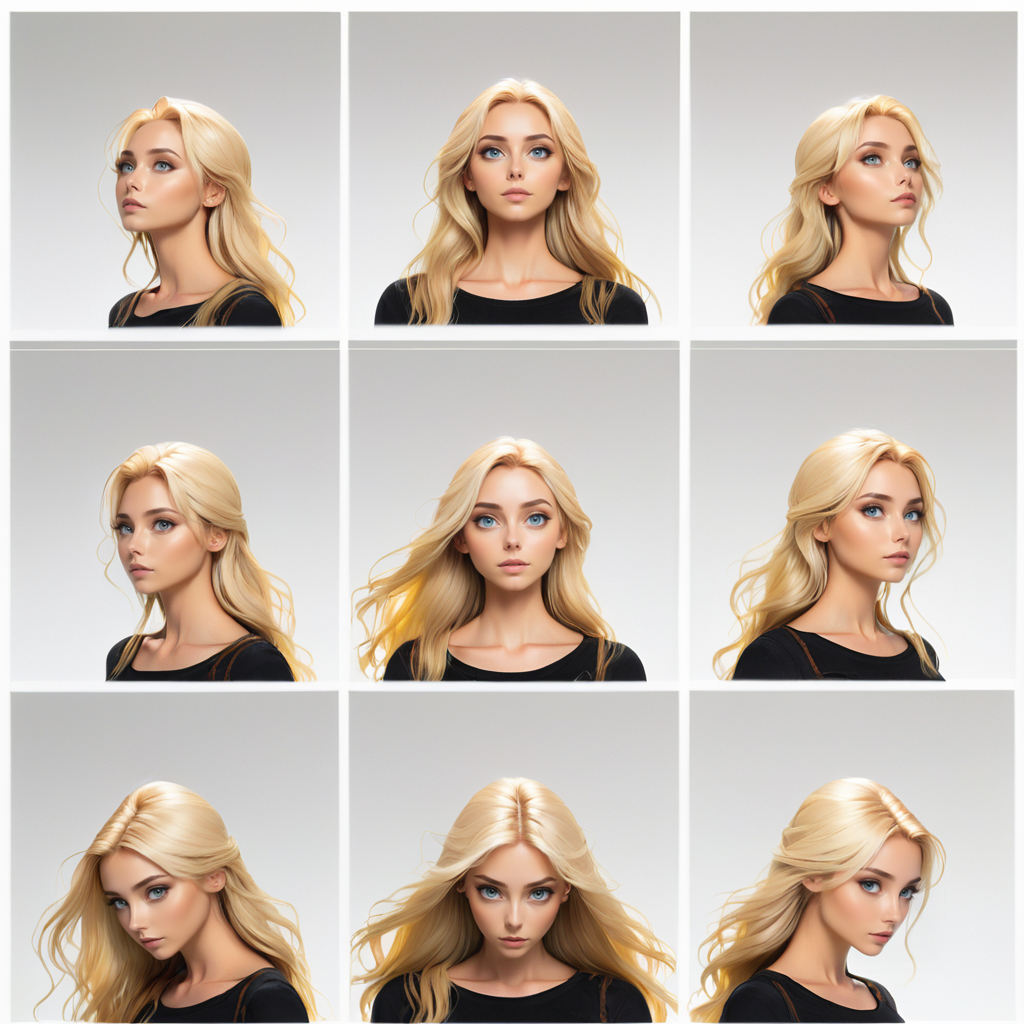
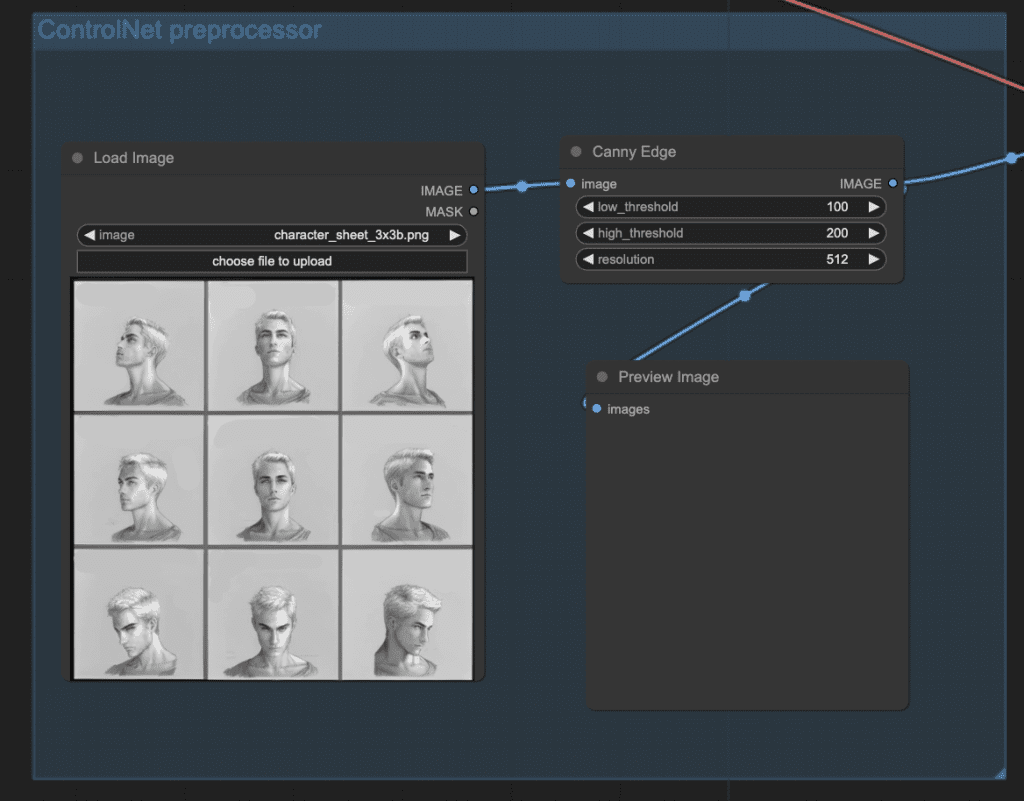
With the right model, this technique uses the Canny SDXL ControlNet to copy the outline of a character sheet, like the one below.

The control image is what ControlNet actually uses. When using a new reference image, always inspect the preprocessed control image to ensure the details you want are there.
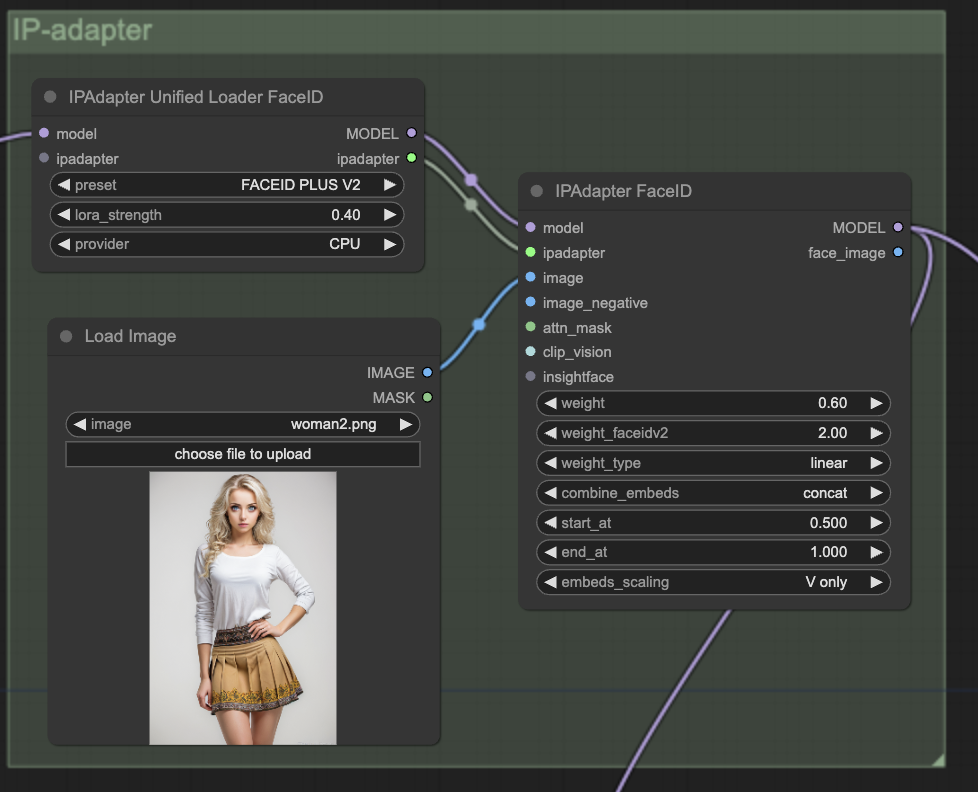
Copying the face
We will use IP-adapter Face ID Plus v2 to copy the face from another reference image. This IP-adapter model only copies the face. Because it uses Insight Face to exact facial features from the reference image, it can accurately transfer the face to different viewing angles.
Face correction
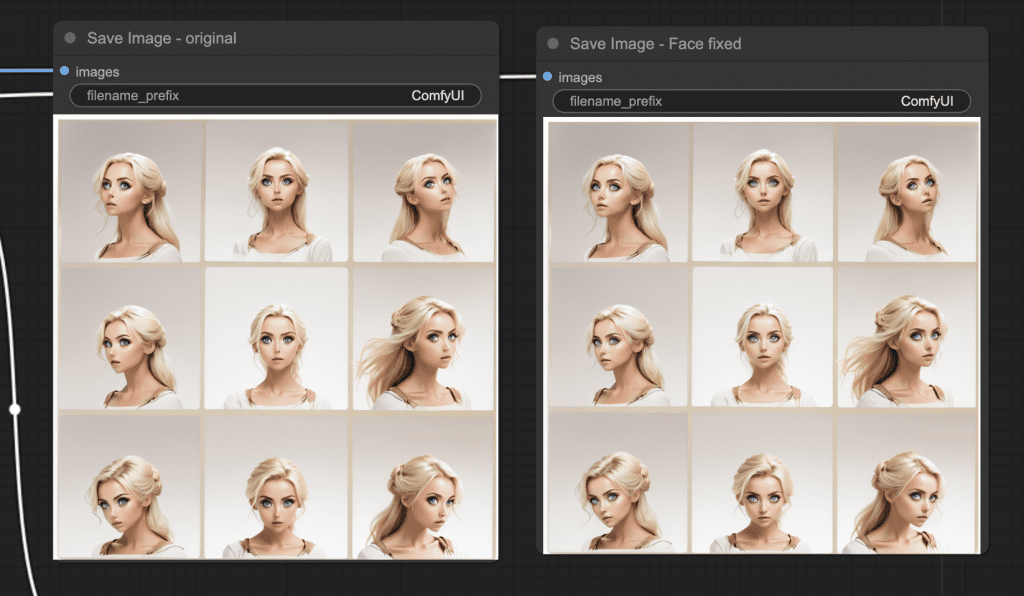
We must stay with an image size compatible with SDXL to ensure global consistency, for example, 1024×1024 pixels. The challenge is that the faces are too small to be rendered correctly by the model.
We will use automatic inpainting at higher resolution to fix them.
AUTOMATIC1111
This section covers using this workflow in AUTOMATIC1111. A video version is also available.
Software setup
Checkpoint model
We will use the ProtoVision XL model. Download it and put it in the folder stable-diffusion-webui > models > Stable-Diffusion.
Extensions
You will need the ControlNet and ADetailer extensions.
The installation URLs are:
https://github.com/Mikubill/sd-webui-controlnethttps://github.com/Bing-su/adetailerIn AUTOMATIC1111, go to Extensions > Install from URL. Enter an URL above in URL for extension’s git repository. Click the Install button.
Restart AUTOMATIC1111 completely.
Scroll down to the ControlNet section on the txt2img page.
You should see 3 ControlNet Units available (Unit 0, 1, and 2). If not, go to Settings > ControlNet. Set Multi-ControlNet: ControlNet unit number to 3. Restart.
IP-adapter and controlnet models
You will need the following two models.
Download them and put them in the folder stable-diffusion-webui > models > ControlNet.
Step 1: Enter txt2img setting
Go to the txt2img page, enter the following settings.
- Checkpoint model: ProtoVision XL
- Prompt:
character sheet, color photo of woman, white background, blonde long hair, beautiful eyes, black shirt
disfigured, deformed, ugly, text, logo
- Sampling method: DPM++ 2M Karras
- Sampling Steps: 20
- CFG scale: 7
- Seed: -1
- Size: 1024×1024
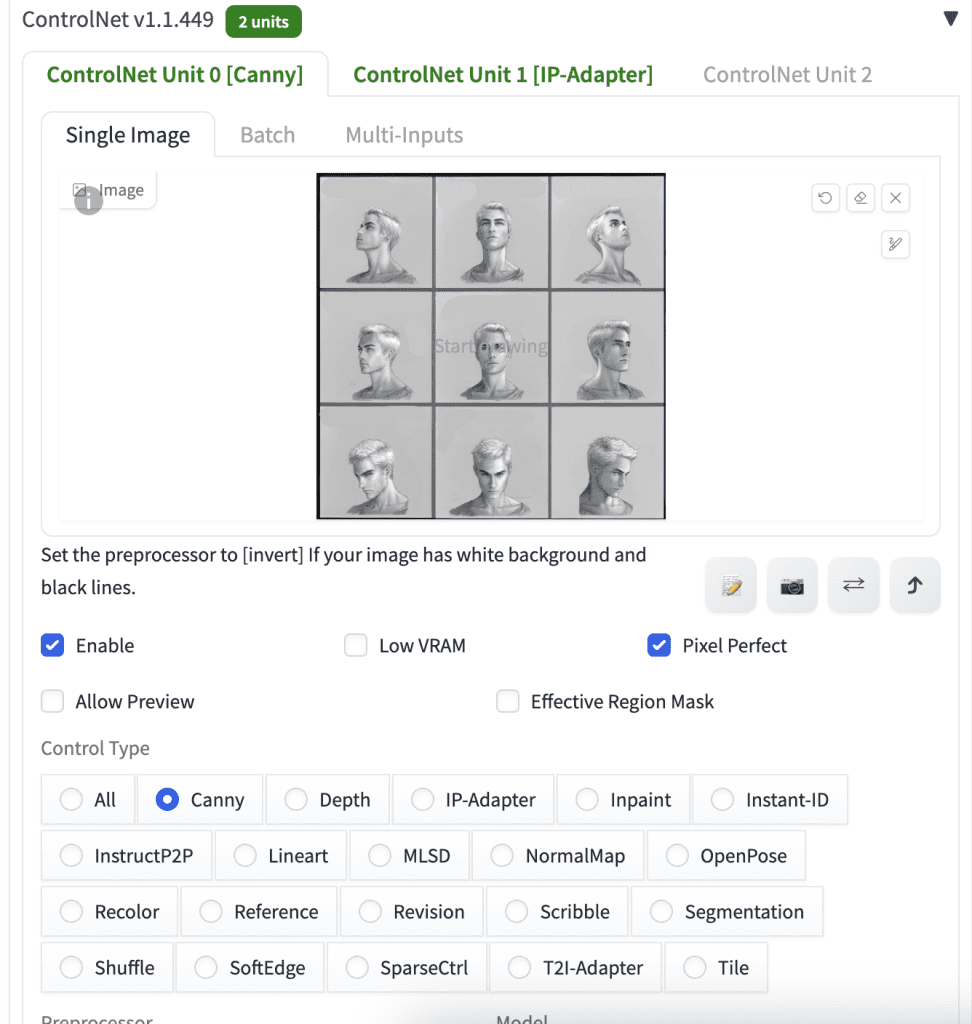
Step 2: Enter ControlNet setting
Scroll down to the ControlNet section on the txt2img page.
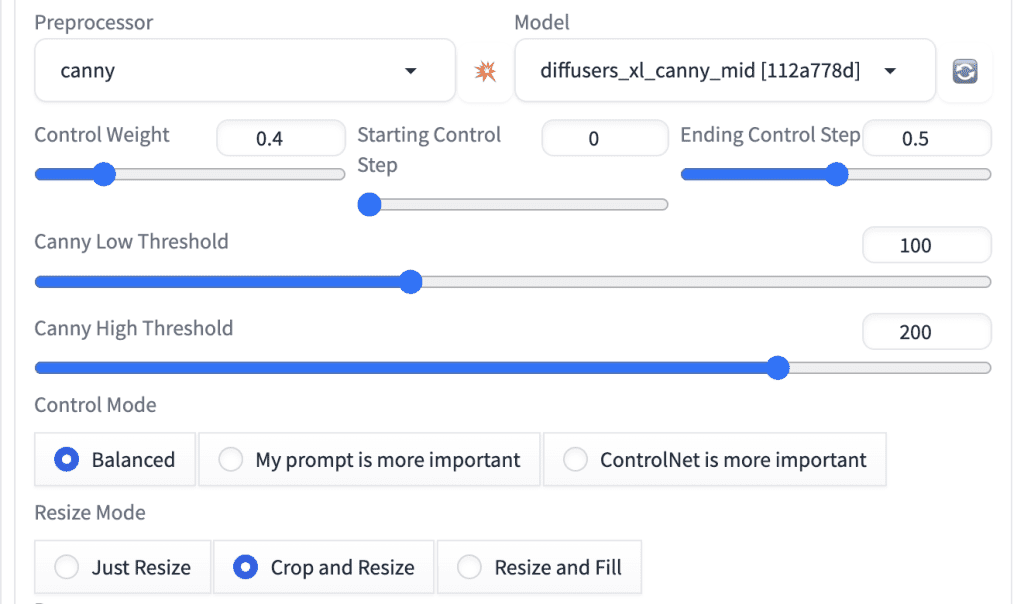
ControlNet Unit 0
We will use Canny in ControlNet Unit 0.
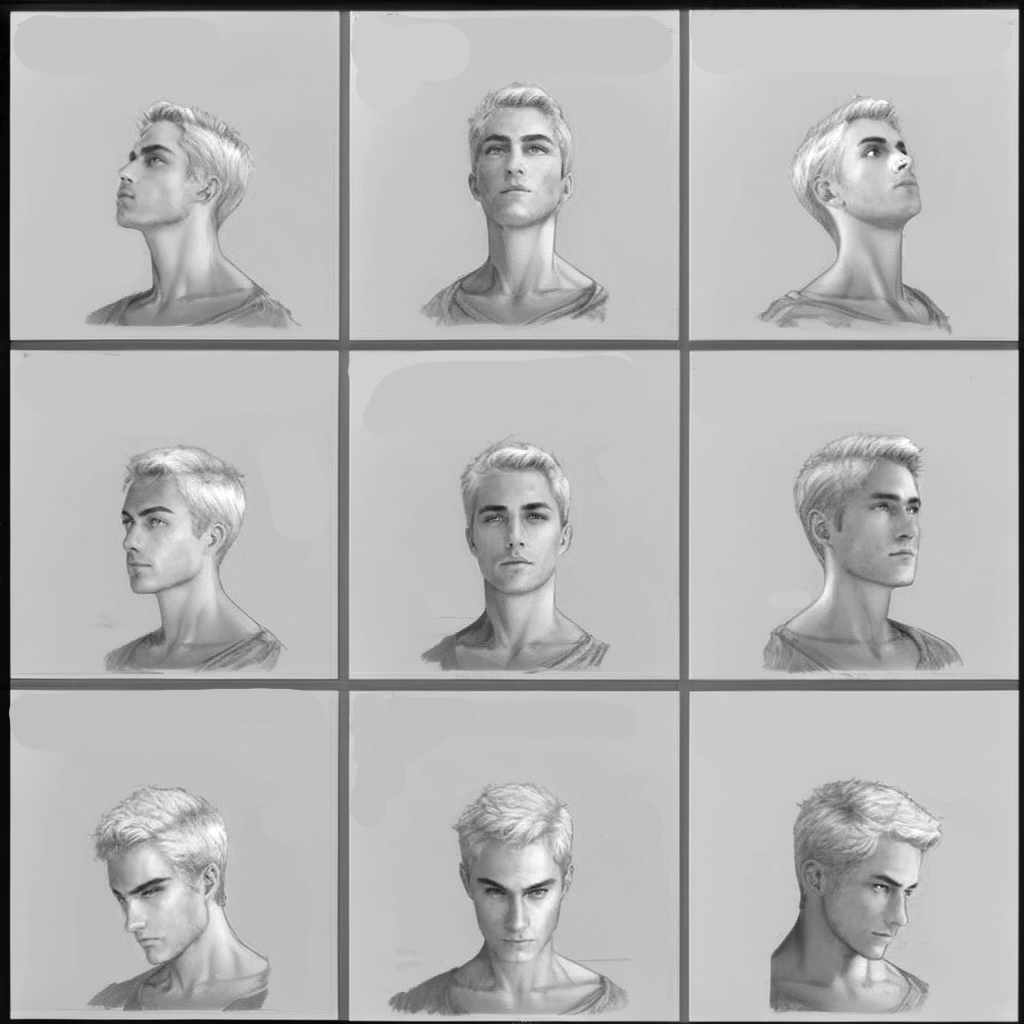
Save the following image to your local storage. Upload it to the image canvas under Single Image.
Here are the rest of the settings.
- Enable: Yes
- Pixel Perfect: Yes
- Control Type: Canny
- Preprocessor: canny
- Model: diffusers_xl_canny_mid
- Control Weight: 0.4
- Starting Control Step: 0
- Ending Control Step: 0.5
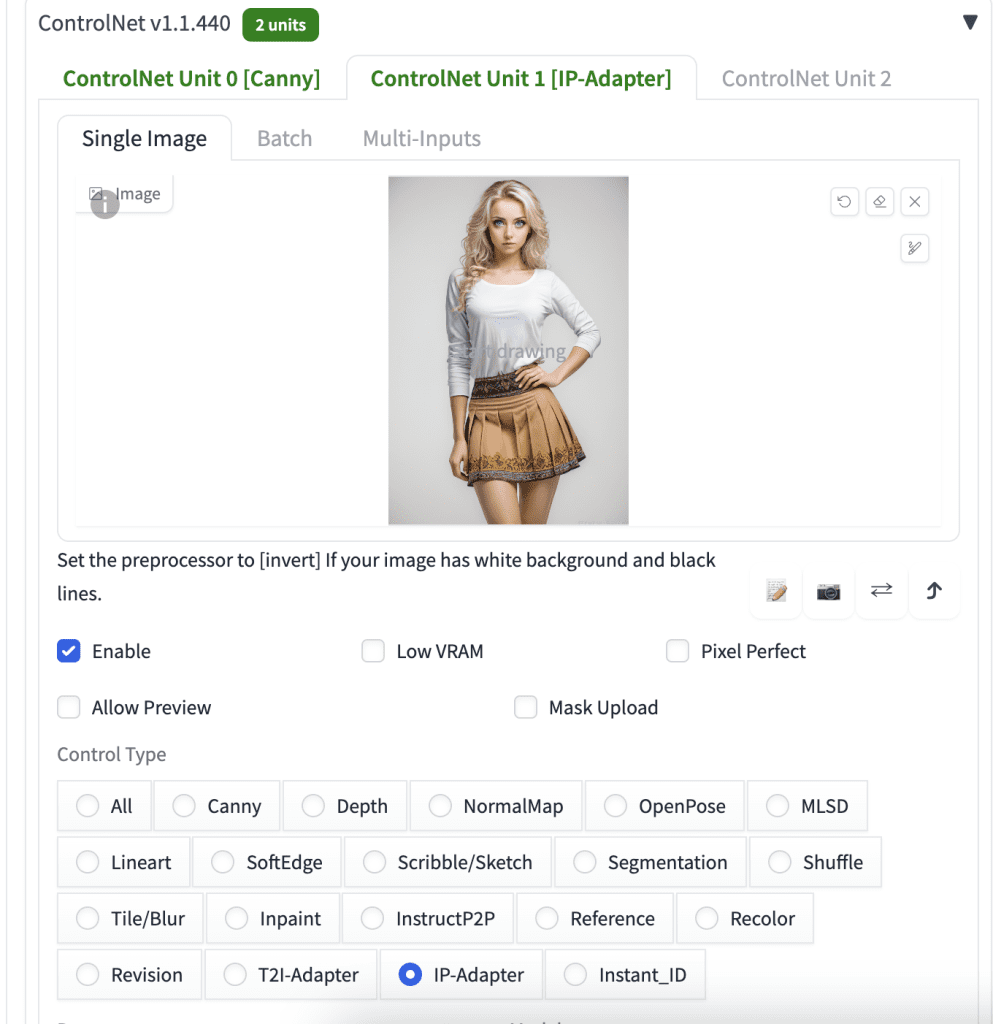
ControlNet Unit 1
We will use ControlNet Unit 1 for copying a face using IP-adapter.
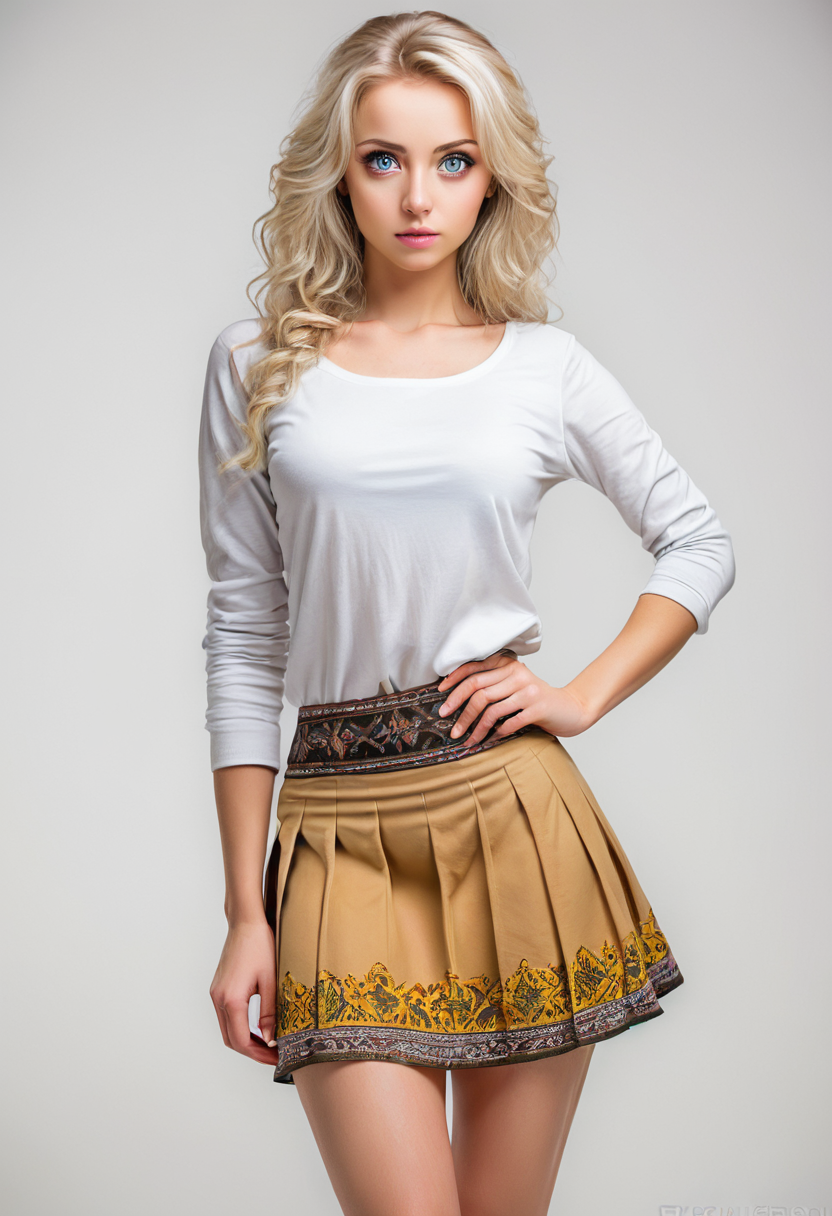
Save the following image to your local storage and upload it to the image canvas of ControlNet Unit 1. You can use any image with a face you want to copy.
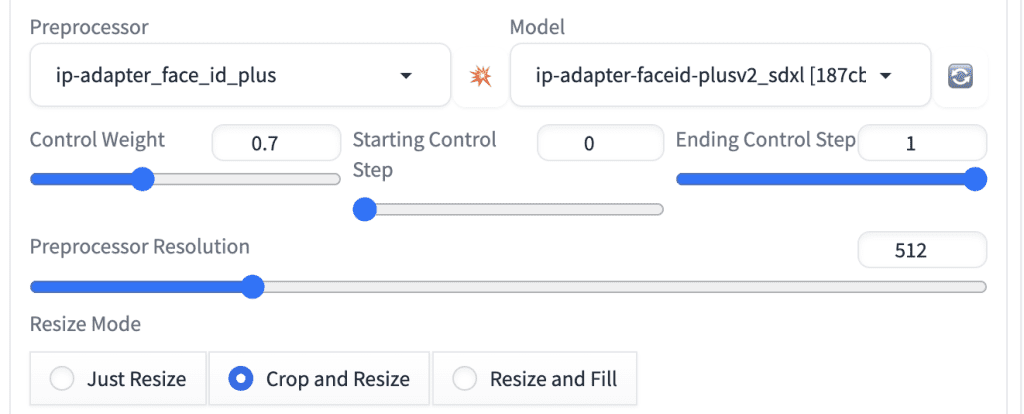
Below are the rest of the settings.
- Enable: Yes
- Pixel Perfect: No
- Control Type: IP-Adapter
- Preprocessor: ip-adapter_face_id_plus (or ip-adapter-auto)
- Model: ip-adapter-faceid-plusv2_sdxl (or ip-adapter-faceid_sdxl for Colab)
- Control Weight: 0.7
- Starting Control Step: 0
- Ending Control Step: 1
It should look like this:
Step 3: Enable ADetailer
We will use ADetailer to fix the face automatically.
Go to the ADetailer section.
Enable ADetailer: Yes.
We will use the default settings.
Step 4: Generate image
Press Generate.
You should get an image like this.
ComfyUI
Software setup
Workflow
Load the following workflow in ComfyUI.
Every time you try to run a new workflow, you may need to do some or all of the following steps.
- Install ComfyUI Manager
- Install missing nodes
- Update everything
Install ComfyUI Manager
Install ComfyUI manager if you haven’t done so already. It provides an easy way to update ComfyUI and install missing nodes.
To install this custom node, go to the custom nodes folder in the PowerShell (Windows) or Terminal (Mac) App:
cd ComfyUI/custom_nodesInstall ComfyUI by cloning the repository under the custom_nodes folder.
git clone https://github.com/ltdrdata/ComfyUI-ManagerRestart ComfyUI completely. You should see a new Manager button appearing on the menu.
If you don’t see the Manager button, check the terminal for error messages. One common issue is GIT not installed. Installing it and repeat the steps should resolve the issue.
Install missing custom nodes
To install the custom nodes that are used by the workflow but you don’t have:
- Click Manager in the Menu.
- Click Install Missing custom Nodes.
- Restart ComfyUI completely.
Update everything
You can use ComfyUI manager to update custom nodes and ComfyUI itself.
- Click Manager in the Menu.
- Click Updates All. It may take a while to be done.
- Restart the ComfyUI and refresh the ComfyUI page.
Checkpoint Model
We will use the ProtoVision XL model. Download it and put it in the folder comfyui > models > checkpoints.
ControlNet model
Download this ControlNet model: diffusers_xl_canny_mid.safetensors
Put it in the folder comfyui > models > controlnet.
IP-adapter models
Download the Face ID Plus v2 model: ip-adapter-faceid-plusv2_sdxl.bin. Put it in the folder comfyui > models > ipadapter. (Create the folder if you don’t see it)
Download the Face ID Plus v2 LoRA model: ip-adapter-faceid-plusv2_sdxl_lora.safetensors. Put it in the folder comfyui > models > loras.
Step 1: Select checkpoint model
In the Load Checkpoint node, select the ProtoVision XL model.
Step 2: Upload reference image for Controlnet
Download the following image.
Upload it to the ControlNet Canny preprocessor.
Step 3: Upload the IP-adapter image
Download the following image.
Upload it to the IP-adapter’s Load Image node.
Step 4: Generate image
Press Queue Prompt.
You should get two output images with consistent faces. The face-fixed images is on the right.
Tips
When you work on the prompt, mute (Ctrl-M) the FaceDetailer node to speed up the process. Once you are happy with the prompt, unmute it with Ctrl-M.
Customization
The image can be customized by the prompt.
character sheet, color photo of woman, white background, long hair, beautiful eyes, black blouse
Troubleshooting
If the face doesn’t look like the image:
- Increase the control weight of the IP adapter.
- Lower the control weight and ending control step of the Canny ControlNet.
Make sure the sum of the control weights of the two ControlNets is not too much higher than 1. Otherwise, you may see artifacts.
Hi Andrew, I’ve been facing this issue on comfyUI
Weights only load failed. This file can still be loaded, to do so you have two options, [1mdo those steps only if you trust the source of the checkpoint[0m.
(1) In PyTorch 2.6, we changed the default value of the `weights_only` argument in `torch.load` from `False` to `True`. Re-running `torch.load` with `weights_only` set to `False` will likely succeed, but it can result in arbitrary code execution. Do it only if you got the file from a trusted source.
(2) Alternatively, to load with `weights_only=True` please check the recommended steps in the following error message.
WeightsUnpickler error: Unsupported global: GLOBAL ultralytics.nn.tasks.DetectionModel was not an allowed global by default. Please use `torch.serialization.add_safe_globals([ultralytics.nn.tasks.DetectionModel])` or the `torch.serialization.safe_globals([ultralytics.nn.tasks.DetectionModel])` context manager to allowlist this global if you trust this class/function.
Check the documentation of torch.load to learn more about types accepted by default with weights_only https://pytorch.org/docs/stable/generated/torch.load.html.
hi andrew. i downloaded the comfyui workflow and when i want to install missing custom node within comfyui manager, there are several conflicts. such as ComfyUI_IPAdapter_plus, has 37 conflicts, ComfyUI-JakeUpgrade has 72 conflicts. so now i postpone installing it. how to solve the problem?
As you install more custom nodes, conflicts will become more likely. there’s no good solution to it. The easiest workaround is to start a fresh comfyui.
thank you, Andrew. maybe i will try to tinker it to disable the conflict node and hopefully it works.
Hey, thanks for the workflow.
I get an error that the clip_vision model was ot found. There’s nothing in the guide about a clip_vision model. I’ve installed one with manager but it doesen’t work and I also have no idea which one.
!!! Exception during processing !!! ClipVision model not found.
Traceback (most recent call last):
File “C:\ComfyUI_windows_portable\ComfyUI\execution.py”, line 328, in execute
output_data, output_ui, has_subgraph = get_output_data(obj, input_data_all, execution_block_cb=execution_block_cb, pre_execute_cb=pre_execute_cb)
^^^^^^^^^^^^^^^^^^^^^^^^^^^^^^^^^^^^^^^^^^^^^^^^^^^^^^^^^^^^^^^^^^^^^^^^^^^^^^^^^^^^^^^^^^^^^^^^^^^^^^^^^^
File “C:\ComfyUI_windows_portable\ComfyUI\execution.py”, line 203, in get_output_data
return_values = _map_node_over_list(obj, input_data_all, obj.FUNCTION, allow_interrupt=True, execution_block_cb=execution_block_cb, pre_execute_cb=pre_execute_cb)
^^^^^^^^^^^^^^^^^^^^^^^^^^^^^^^^^^^^^^^^^^^^^^^^^^^^^^^^^^^^^^^^^^^^^^^^^^^^^^^^^^^^^^^^^^^^^^^^^^^^^^^^^^^^^^^^^^^^^^^^^^^^^^^^^^^^^^^^^^^^^^^^^^
File “C:\ComfyUI_windows_portable\ComfyUI\execution.py”, line 174, in _map_node_over_list
process_inputs(input_dict, i)
File “C:\ComfyUI_windows_portable\ComfyUI\execution.py”, line 163, in process_inputs
results.append(getattr(obj, func)(**inputs))
^^^^^^^^^^^^^^^^^^^^^^^^^^^^
File “C:\ComfyUI_windows_portable\ComfyUI\custom_nodes\ComfyUI_IPAdapter_plus\IPAdapterPlus.py”, line 559, in load_models
raise Exception(“ClipVision model not found.”)
Exception: ClipVision model not found.
Same issue
+1
Same – I tried to install it manually, but always got errors.
I got to IPAdapter FaceID
“insightface model is required for FaceID models”
Did you use https://github.com/deepinsight/insightface ?
Very well written, very easy to follow, thank for the video and detailed write-up.
Oo, there could be a second video/part on how to make photos from this generated character, please guide us for that, subscribed, looking forward to the next video.
Hi Andrew, it doesn’t work in Colab for me (I bought on your site the link and tuto to automatic 1111 last year). After 20 try, impossible to get what you show in your tuto. I don’t have as a choice in controlnet :
-ip-adapter-faceid-plusv2_sdxl.bin
-diffusers_xl_canny_mid.safetensors
same for
-ProtoVision XL (not available in checkpoints)
(all loaded following your links : a) I tried to download within your code in colab in the proposed section b) I also tried by my own and putting those in the right folders. They are not taken into account).
I’ve also download the last version of automatic 1111 following the link available on your version of automatic.
The tuto is no more up to date ?
Many tx in advance for your answer.
ProtoVision XL: You can put the model download link (Not the model page’s link) in “Model_from_URL” in the noteobok to download the model. Make sure to put also your Civitai API key. See the Colab tutorial for generating a key. (https://stable-diffusion-art.com/automatic1111-colab/)
For IP adpater, you can pick “ip-adapter-auto” for preprocessor and “ip-adapter-faceid_sdxl” for model. I updated the instructions for A1111 above.
Many tx Andrew for your quick answer. I’m going to retry. Have a good day.
Thanks Andrew. I had to change the browser to make it works, with Mozilla, no download. With Chrome it works (seen that on Reddit for Proto) I have the images as explained in your tuto. The only thing is that in ControlNet Unit 0 I see only diffusers_xl_canny_full (and not diffusers_xl_canny_mid). I did 2 tests with Proton version v6.6 and 0.6.3.
It works so don’t to annoy you. I just have to play with the control weight to try to have something exactely like my image. Thanks again.
Great! Yes, you can use full in place of mid. I only installed full in the notebook. Full is a bit better but takes longer.
Detected face mask is one single white rectangle on top of black canvas. Maybe a node isn’t connected correctly. Great tutorial but can you show from scratch going forward if possible.
Cant get it to work,
executing KSampler:
expected scalar type Float but found Half
File “C:\Users\Andrew\Desktop\AI\ComfyUI\ComfyUI\execution.py”, line 152, in recursive_execute
output_data, output_ui = get_output_data(obj, input_data_all)
File “C:\Users\Andrew\Desktop\AI\ComfyUI\ComfyUI\execution.py”, line 82, in get_output_data
return_values = map_node_over_list(obj, input_data_all, obj.FUNCTION, allow_interrupt=True)
File “C:\Users\Andrew\Desktop\AI\ComfyUI\ComfyUI\execution.py”, line 75, in map_node_over_list
results.append(getattr(obj, func)(**slice_dict(input_data_all, i)))
File “C:\Users\Andrew\Desktop\AI\ComfyUI\ComfyUI\nodes.py”, line 1382, in sample
return common_ksampler(model, seed, steps, cfg, sampler_name, scheduler, positive, negative, latent_image, denoise=denoise)
File “C:\Users\Andrew\Desktop\AI\ComfyUI\ComfyUI\nodes.py”, line 1352, in common_ksampler
samples = comfy.sample.sample(model, noise, steps, cfg, sampler_name, scheduler, positive, negative, latent_image,
File “C:\Users\Andrew\Desktop\AI\ComfyUI\ComfyUI\custom_nodes\ComfyUI-Impact-Pack\modules\impact\sample_error_enhancer.py”, line 22, in informative_sample
raise e
File “C:\Users\Andrew\Desktop\AI\ComfyUI\ComfyUI\custom_nodes\ComfyUI-Impact-Pack\modules\impact\sample_error_enhancer.py”, line 9, in informative_sample
return original_sample(*args, **kwargs) # This code helps interpret error messages that occur within exceptions but does not have any impact on other operations.
^^^^^^^^^^^^^^^^^^^^^^^^^^^^^^^^
File “C:\Users\Andrew\Desktop\AI\ComfyUI\ComfyUI\comfy\sample.py”, line 43, in sample
samples = sampler.sample(noise, positive, negative, cfg=cfg, latent_image=latent_image, start_step=start_step, last_step=last_step, force_full_denoise=force_full_denoise, denoise_mask=noise_mask, sigmas=sigmas, callback=callback, disable_pbar=disable_pbar, seed=seed)
File “C:\Users\Andrew\Desktop\AI\ComfyUI\ComfyUI\comfy\samplers.py”, line 829, in sample
return sample(self.model, noise, positive, negative, cfg, self.device, sampler, sigmas, self.model_options, latent_image=latent_image, denoise_mask=denoise_mask, callback=callback, disable_pbar=disable_pbar, seed=seed)
File “C:\Users\Andrew\Desktop\AI\ComfyUI\ComfyUI\comfy\samplers.py”, line 729, in sample
return cfg_guider.sample(noise, latent_image, sampler, sigmas, denoise_mask, callback, disable_pbar, seed)
File “C:\Users\Andrew\Desktop\AI\ComfyUI\ComfyUI\comfy\samplers.py”, line 716, in sample
output = self.inner_sample(noise, latent_image, device, sampler, sigmas, denoise_mask, callback, disable_pbar, seed)
File “C:\Users\Andrew\Desktop\AI\ComfyUI\ComfyUI\comfy\samplers.py”, line 695, in inner_sample
samples = sampler.sample(self, sigmas, extra_args, callback, noise, latent_image, denoise_mask, disable_pbar)
File “C:\Users\Andrew\Desktop\AI\ComfyUI\ComfyUI\comfy\samplers.py”, line 600, in sample
samples = self.sampler_function(model_k, noise, sigmas, extra_args=extra_args, callback=k_callback, disable=disable_pbar, **self.extra_options)
File “C:\Users\Andrew\Desktop\AI\ComfyUI\python_embeded\Lib\site-packages\torch\utils\_contextlib.py”, line 115, in decorate_context
return func(*args, **kwargs)
File “C:\Users\Andrew\Desktop\AI\ComfyUI\ComfyUI\comfy\k_diffusion\sampling.py”, line 160, in sample_euler_ancestral
denoised = model(x, sigmas[i] * s_in, **extra_args)
File “C:\Users\Andrew\Desktop\AI\ComfyUI\ComfyUI\comfy\samplers.py”, line 299, in __call__
out = self.inner_model(x, sigma, model_options=model_options, seed=seed)
^^^^^^^^^^^^^^^^^^^^^^^^^^^^^^^^^^^^^^^^^^^^^^^^^^^^^^^^^^^^^^^^^^
File “C:\Users\Andrew\Desktop\AI\ComfyUI\ComfyUI\comfy\samplers.py”, line 682, in __call__
return self.predict_noise(*args, **kwargs)
File “C:\Users\Andrew\Desktop\AI\ComfyUI\ComfyUI\comfy\samplers.py”, line 685, in predict_noise
return sampling_function(self.inner_model, x, timestep, self.conds.get(“negative”, None), self.conds.get(“positive”, None), self.cfg, model_options=model_options, seed=seed)
File “C:\Users\Andrew\Desktop\AI\ComfyUI\ComfyUI\comfy\samplers.py”, line 279, in sampling_function
out = calc_cond_batch(model, conds, x, timestep, model_options)
File “C:\Users\Andrew\Desktop\AI\ComfyUI\ComfyUI\comfy\samplers.py”, line 228, in calc_cond_batch
output = model.apply_model(input_x, timestep_, **c).chunk(batch_chunks)
File “C:\Users\Andrew\Desktop\AI\ComfyUI\ComfyUI\comfy\model_base.py”, line 124, in apply_model
model_output = self.diffusion_model(xc, t, context=context, control=control, transformer_options=transformer_options, **extra_conds).float()
File “C:\Users\Andrew\Desktop\AI\ComfyUI\python_embeded\Lib\site-packages\torch\nn\modules\module.py”, line 1518, in _wrapped_call_impl
return self._call_impl(*args, **kwargs)
^^^^^^^^^^^^^^^^^^^^^^^^^^^^^^^^
File “C:\Users\Andrew\Desktop\AI\ComfyUI\python_embeded\Lib\site-packages\torch\nn\modules\module.py”, line 1527, in _call_impl
return forward_call(*args, **kwargs)
^^^^^^^^^^^^^^^^^^^^^^^^^^^^^
File “C:\Users\Andrew\Desktop\AI\ComfyUI\ComfyUI\comfy\ldm\modules\diffusionmodules\openaimodel.py”, line 852, in forward
h = forward_timestep_embed(module, h, emb, context, transformer_options, time_context=time_context, num_video_frames=num_video_frames, image_only_indicator=image_only_indicator)
File “C:\Users\Andrew\Desktop\AI\ComfyUI\ComfyUI\comfy\ldm\modules\diffusionmodules\openaimodel.py”, line 44, in forward_timestep_embed
x = layer(x, context, transformer_options)
^^^^^^^^^^^^^^^^^^^^^^^^^^^^^^^^^^^^^^
File “C:\Users\Andrew\Desktop\AI\ComfyUI\python_embeded\Lib\site-packages\torch\nn\modules\module.py”, line 1518, in _wrapped_call_impl
return self._call_impl(*args, **kwargs)
^^^^^^^^^^^^^^^^^^^^^^^^^^^^^^^^
File “C:\Users\Andrew\Desktop\AI\ComfyUI\python_embeded\Lib\site-packages\torch\nn\modules\module.py”, line 1527, in _call_impl
return forward_call(*args, **kwargs)
^^^^^^^^^^^^^^^^^^^^^^^^^^^^^
File “C:\Users\Andrew\Desktop\AI\ComfyUI\ComfyUI\comfy\ldm\modules\attention.py”, line 694, in forward
x = block(x, context=context[i], transformer_options=transformer_options)
File “C:\Users\Andrew\Desktop\AI\ComfyUI\python_embeded\Lib\site-packages\torch\nn\modules\module.py”, line 1518, in _wrapped_call_impl
return self._call_impl(*args, **kwargs)
File “C:\Users\Andrew\Desktop\AI\ComfyUI\python_embeded\Lib\site-packages\torch\nn\modules\module.py”, line 1527, in _call_impl
return forward_call(*args, **kwargs)
^^^^^^^^^^^^^^^^^^^^^^^^^^^^^
File “C:\Users\Andrew\Desktop\AI\ComfyUI\ComfyUI\comfy\ldm\modules\attention.py”, line 618, in forward
n = attn2_replace_patch[block_attn2](n, context_attn2, value_attn2, extra_options)
File “C:\Users\Andrew\Desktop\AI\ComfyUI\ComfyUI\custom_nodes\ComfyUI_IPAdapter_plus\CrossAttentionPatch.py”, line 26, in __call__
out = out + callback(out, q, k, v, extra_options, **self.kwargs[i])
^^^^^^^^^^^^^^^^^^^^^^^^^^^^^^^^^^^^^^^^^^^^^^^^^^^^^^^
File “C:\Users\Andrew\Desktop\AI\ComfyUI\ComfyUI\custom_nodes\ComfyUI_IPAdapter_plus\CrossAttentionPatch.py”, line 169, in ipadapter_attention
out_ip = optimized_attention(q, ip_k, ip_v, extra_options[“n_heads”])
File “C:\Users\Andrew\Desktop\AI\ComfyUI\ComfyUI\comfy\ldm\modules\attention.py”, line 296, in attention_split
s1 = einsum(‘b i d, b j d -> b i j’, q[:, i:end], k) * scale
^^^^^^^^^^^^^^^^^^^^^^^^^^^^^^^^^^^^^^^^^^^^^^^
File “C:\Users\Andrew\Desktop\AI\ComfyUI\python_embeded\Lib\site-packages\torch\functional.py”, line 377, in einsum
return _VF.einsum(equation, operands) # type: ignore[attr-defined]
^^^^^^^^^^^^^^^^^^^^^^^^^^^^^^
Hi and thanks for a great tutorial, however, I get this error.
Error occurred when executing IPAdapterUnifiedLoaderFaceID:
LoRA model not found.
any ideas?
You need to download an accompanying lora for some face id models. See my tutorial on face id.
Hello Andrew, great work! I tried to put it work but getting the following errors, do you have any insight on this? Thanks.
Error occurred when executing IPAdapterUnifiedLoaderFaceID:
Unable to import dependency onnxruntime.
File “C:\Users\user\Desktop\ComfyUI_windows_portable\ComfyUI\execution.py”, line 151, in recursive_execute
output_data, output_ui = get_output_data(obj, input_data_all)
^^^^^^^^^^^^^^^^^^^^^^^^^^^^^^^^^^^^
File “C:\Users\user\Desktop\ComfyUI_windows_portable\ComfyUI\execution.py”, line 81, in get_output_data
return_values = map_node_over_list(obj, input_data_all, obj.FUNCTION, allow_interrupt=True)
^^^^^^^^^^^^^^^^^^^^^^^^^^^^^^^^^^^^^^^^^^^^^^^^^^^^^^^^^^^^^^^^^^^^^^^^^^^
File “C:\Users\user\Desktop\ComfyUI_windows_portable\ComfyUI\execution.py”, line 74, in map_node_over_list
results.append(getattr(obj, func)(**slice_dict(input_data_all, i)))
^^^^^^^^^^^^^^^^^^^^^^^^^^^^^^^^^^^^^^^^^^^^^^^^^^^
File “C:\Users\user\Desktop\ComfyUI_windows_portable\ComfyUI\custom_nodes\ComfyUI_IPAdapter_plus\IPAdapterPlus.py”, line 562, in load_models
self.insightface[‘model’] = insightface_loader(provider)
^^^^^^^^^^^^^^^^^^^^^^^^^^^^
File “C:\Users\user\Desktop\ComfyUI_windows_portable\ComfyUI\custom_nodes\ComfyUI_IPAdapter_plus\utils.py”, line 150, in insightface_loader
raise Exception(e)
Oh never mind. Problem solved. Thanks
Hey,
Could you tell me how you resolved this?
I have the same problem.
how did you solve it?
hi Andrew,
great post, but I was wondering if I could automate the work of generating illustrations and creating turntables and walk-cycles for animation through such techniques? Are there any Comfy UI workflows to help with this?
It is possible to some extent. You can also use this turn char model https://civitai.com/models/3036/charturner-character-turnaround-helper-for-15-and-21
Maybe something to mention (and as soon as I did, I stopped having errors) is that you need to install “insightface” for all this to work, as it is what the IPAdapter uses in the background.
Maybe basic, but for newbies (like me!) nice to know before getting into this.
Excelent guide as always!
Yes if you use comfyui. See tips for installation. https://stable-diffusion-art.com/ip-adapter/
Forge is the same than Automatic1111, right? Thanks!
I should also work on Forge but the parameters could be slightly different.
Nice write up. You have a talent for explaining.
Thank you!
Hi – Never mind my previous request for help – turned out looking at the logs there was an error occurring from a missing library.
Hey Andrew, thanks for this writeup.
I’m following the directions, but I’ve run into an issue.
I’m Using A1111… i’ve looked over every setting….
Everything works pretty much as shown, BUT, if I enable the IP-Adapter to influence the face, A1111 won’t generate a character sheet – just a single face. If I disable IP-Adapter, it goes back to generating the 9 faces, but they don’t look like the uploaded face, obviously… any thing I can try to troubleshoot?
Also – one other question – in the ADetailer section you say to just accept the defaults…. which model are you using to fix the faces? I don’t see that mentioned. Are you using “None”?
Hello. Thank you for your great content.
How can I upscale an image that I generated with the SDXL model? Which ControlNet model should I use? I have also purchased your courses, but there was no mention of upscaling with ControlNet for SDXL in the course.
Hi! You can use upscaling techniques like AI upscaler, img2img or hi res fix for SDXL. I don’t believe a tile controlnet model is available for SDXL. But you can still use tile upscaling (ultimate sd upscale) with an AI upscaler. Just keep the denoising strength low.
I will add a section for upscaling later.