
Z-Image is a fast and open-sourced image model released by Alibaba Tongyi Lab. It quickly gains popularity because of its speed and image quality. It excels in photo-realistic image generation and bilingual text rendering, comparing directly with the Flux and SDXL models.
In this article, I will cover:
- Z-Image model overview
- How to install Z-Image Turbo on ComfyUI
- Comparing Flux and Z-Image models
- Usage tips

Table of Contents
Software
We will use ComfyUI, a free AI image and video generator. You can use it on Windows, Mac, or Google Colab.
Think Diffusion provides an online ComfyUI service. They offer an extra 20% credit to our readers.
Read the ComfyUI beginner’s guide if you are new to ComfyUI. See the Quick Start Guide if you are new to AI images and videos.
Take the ComfyUI course to learn how to use ComfyUI step by step.
Free Z-Image Turbo generation
This Hugging Face Space offers free Z-Image Turbo generation. Grab some while it last!
Model
Model architecture
Z-Image uses a new S3-DiT (Scalable Single-Stream Diffusion Transformer) backbone. Let’s break down what this mean.
- The SDXL model uses an older UNet architecture, featuring separate text and image processing. The text embedding influences image generation through conditioning.
- The Flux.1 model uses a hybrid-stream DiT architecture that repeatedly processes the text and image on their own (the double stream) and combined (the single stream).
- The Z-Image model opts for a simpler single-stream DiT for efficiency and puts text and input in a single stream from the start.
The result is a fast model with only 6 billion parameters, but highly competent in generating photo-realistic images and text rendering.
Model variants
- Z-Image Turbo: The fast version. Optimized for 8-step inference. Ideal for consumer GPU cards like RTX 4090.
- Z-Image Base: The non-distilled version. Better suited for fine-tuning and training LoRAs.
- Z-Image Edit: A specialized version for instruction-based image editing.
We will only cover Z-Image Turbo in this article.
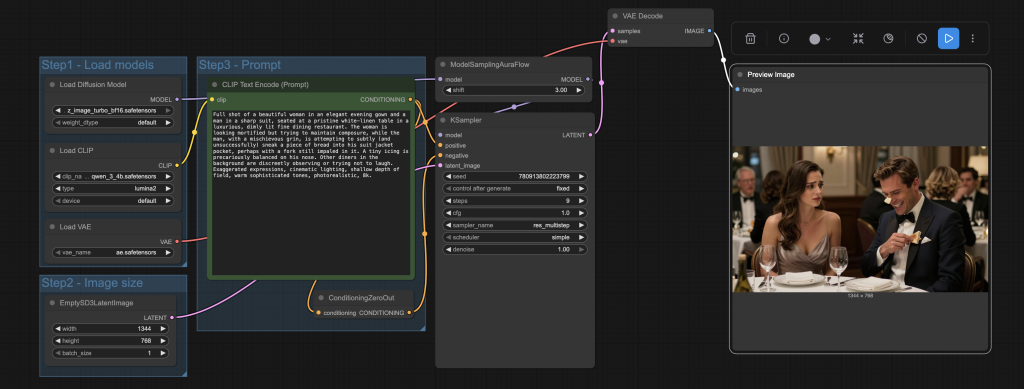
Z-Image on ComfyUI
Follow the steps below to install and use the Z-Image Turbo model on ComfyUI which generates images in 9 steps and consumes less than 16 GB VRAM.
Google Colab
If you use my ComfyUI Colab notebook, you don’t need to download the models. Select the Z_Image before running the notebook.

Step 0: Update ComfyUI
Before loading the workflow, make sure your ComfyUI is up-to-date. The easiest way to do this is to use ComfyUI Manager.
Click the Manager button on the top toolbar.

Select Update ComfyUI.
Restart ComfyUI.
Step 1: Install models
- Download ae.safetensors and put it in ComfyUI > models > vae folder.
- Download qwen_3_4b.safetensors and put it in ComfyUI > models > text_encoders folder.
- Download z_image_turbo_bf16.safetensors and put it in ComfyUI > models > diffusion_models folder.
Step 2: Load the z-image workflow
Download the workflow file below.
Drop it into the ComfyUI window to load.
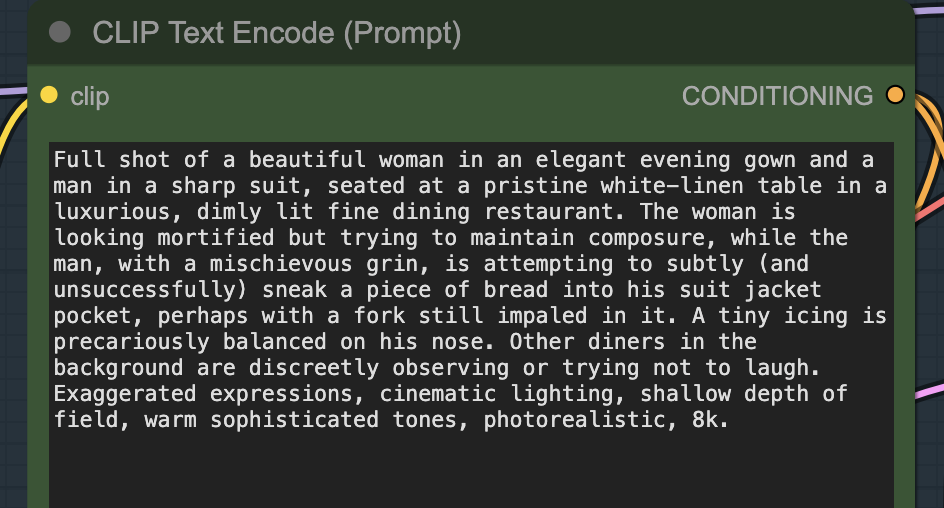
Step 3: Revise the prompt
Revise the prompt to describe the scene you want to generate.
Step 4: Generate an image
Click the Run button to run the workflow.


Compare Z-Image and Flux
In this section, I will compare the Z-Image Turbo model (6 billion parameters) and the Flux.1 Dev model (12 billion parameters). Since both distilled models are roughly the same size and excel in photorealism and text rendering, we can make a fair, apples-to-apples comparison.
Short text rendering
Rendering text in image is a popular application. You can seamlessly incorporate text that convey a message or promote a brand.
Both models are competent in rendering short text.
Verdict: Tie.
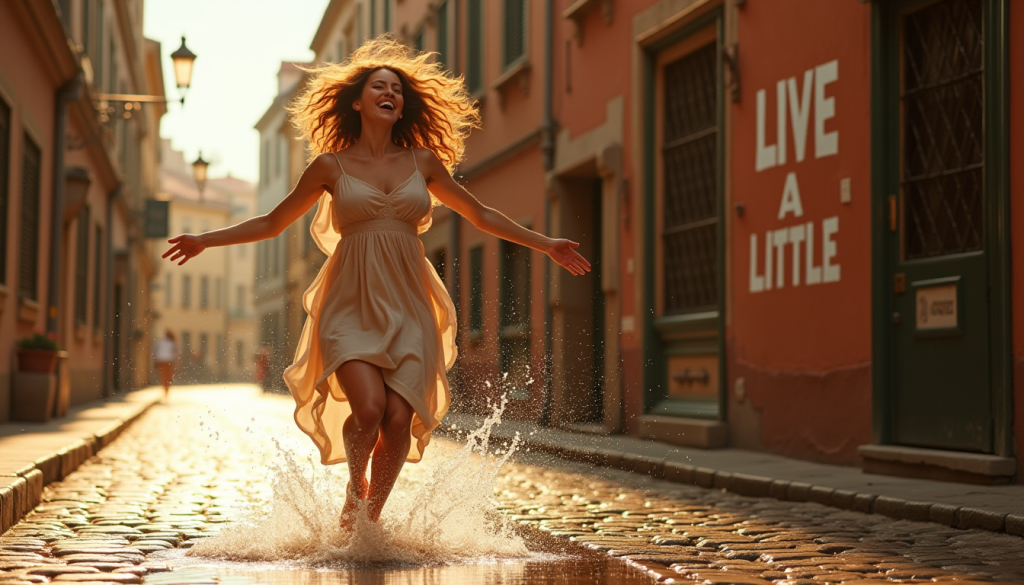
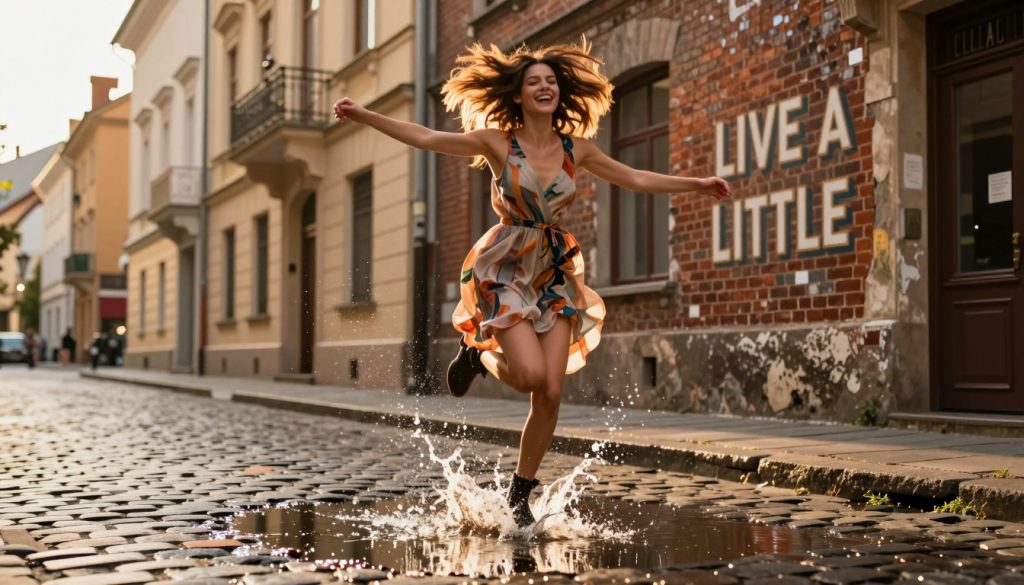
A young woman with vibrant, windswept hair, laughing joyously as she leaps across a shallow puddle on a cobblestone street, splashing water playfully. Her arms are outstretched, and her face is illuminated by warm, golden hour sunlight filtering through tall, charming European buildings in the background. She’s wearing a stylish, flowing dress that catches the light. The composition is dynamic, with leading lines from the street drawing the eye towards her. On the distressed brick wall of a building behind her, or perhaps on a charming vintage shop sign within the scene, is the text “LIVE A LITTLE.” The text should appear as if it belongs to the environment, like painted graffiti or a vintage neon sign that’s part of the scene’s aesthetic. Focus on capturing motion blur in the water splash and a sense of freedom and spontaneity. Cinematic quality, vibrant colors, shallow depth of field, photorealistic, 8k.
Long text rendering
Short text is easy. How about long texts? Z-Image generates the text perfectly, while Flux has made some mistakes.
Verdict: Z-Image wins.
While more accurate, Z-image’s text tends to look too neat to be naturally in the scene.
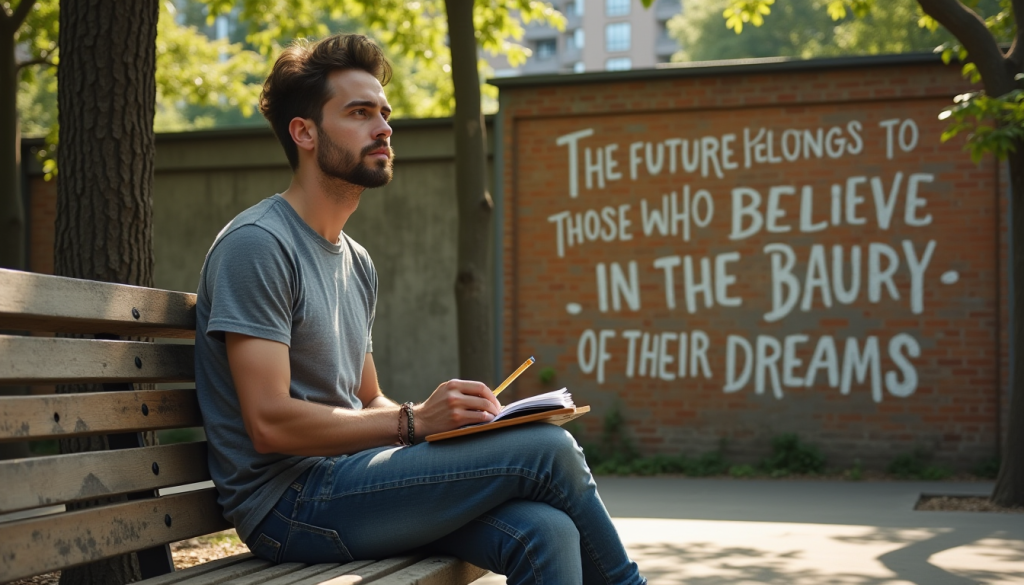
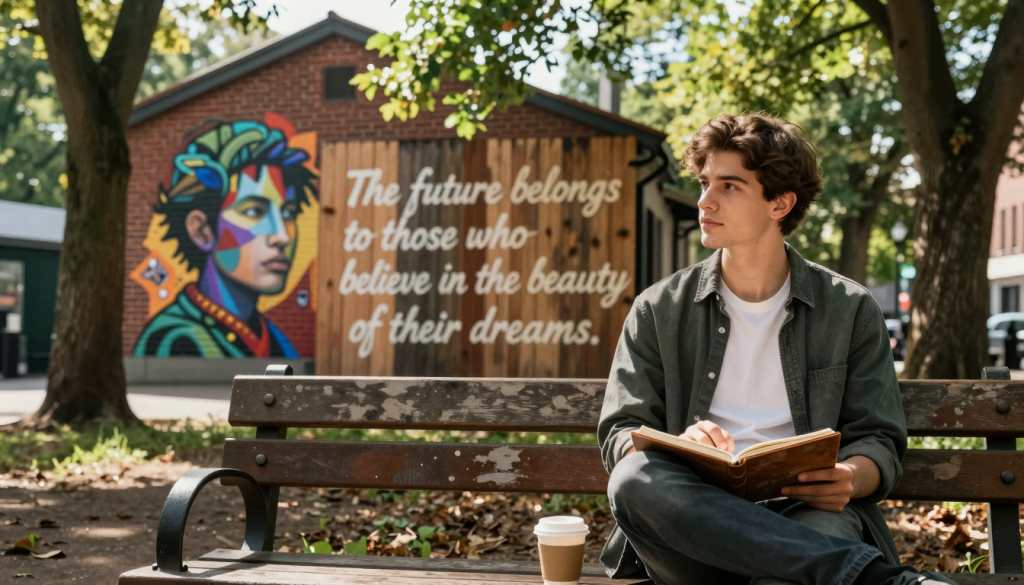
A thoughtful young man, mid-20s, with a relaxed but determined expression, sitting on a weathered wooden bench in a serene urban park. He’s looking slightly off into the distance, perhaps holding a well-worn sketchbook or a cup of coffee. Sunlight filters through the canopy of old trees, dappling the scene. On the aged brick wall of a building across from him, visible in the background, is a detailed, artistic mural or a large piece of elegant street art. Integrated seamlessly into this mural, or painted directly onto a large, natural-looking wooden fence panel, is the flowing text: “The future belongs to those who believe in the beauty of their dreams.” The text is designed with an artistic, slightly faded aesthetic, as if it has been part of the landscape for some time. The overall mood is contemplative and inspiring. Soft, natural lighting, medium depth of field, photorealistic, 8k, detailed textures.
Challenging human pose
Let’s ask the AIs to generate a challenging pose. This is an interesting one.
- Flux is significantly worse in anatomy, although it did get one right in the 4 generations.
- Z-Image correctly generated the cartwheel kick. Flux returned some yoga headstands.
Verdict: Z-Image wins.
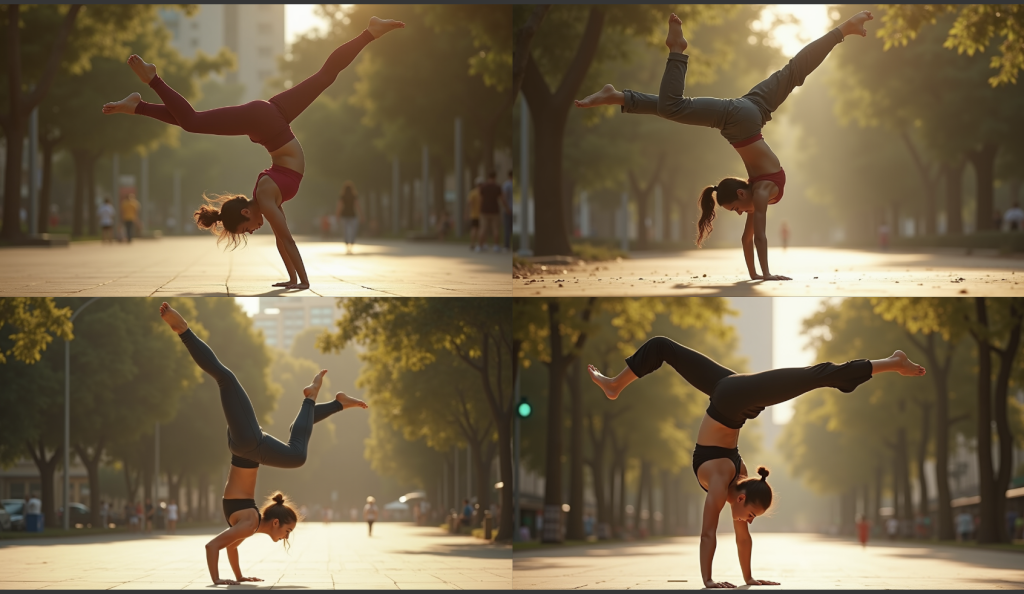
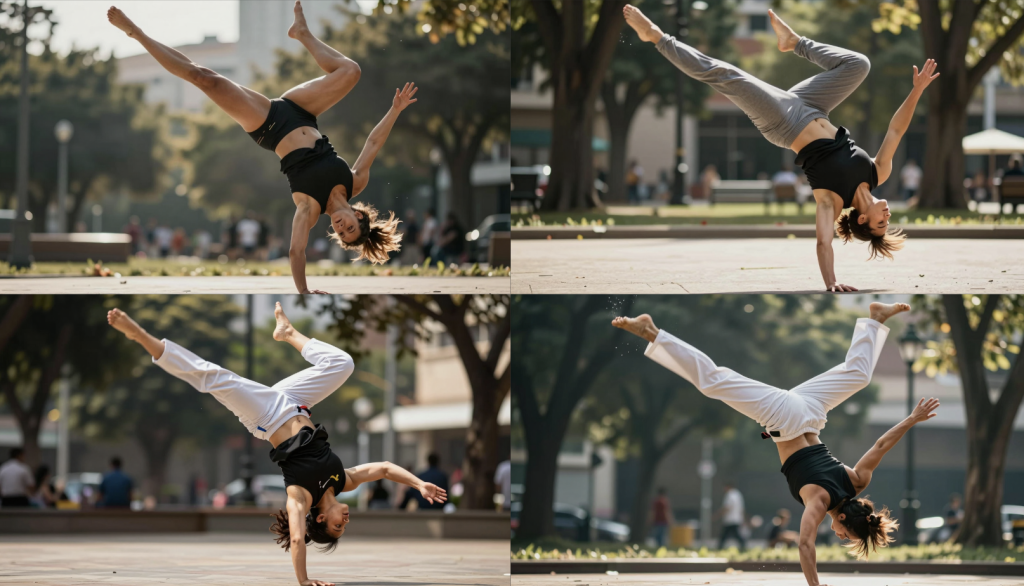
A highly dynamic, full-body shot of an athletic woman in mid-air, executing a capoeira ‘Aú’ (cartwheel kick) with incredible grace and power. Her body is inverted and arced, with one leg fully extended upwards in a powerful kick and the other leg bent at the knee, preparing to land. Her arms are providing balance, one hand just touching the ground while the other is extended. The pose emphasizes extreme torsion in the torso and a complex interplay of muscle tension and relaxation. Shot from a slightly low angle, capturing the full extension and the fluidity of the movement. Background is a blurred, sunlit urban park, emphasizing her as the central, sharp subject. Focus on accurate anatomy, muscle definition under tension, natural fabric wrinkles, and the physics of the pose. Action blur around the kicking leg. Cinematic, photorealistic, 8k.
Other styles
We all know Flux is pretty weak on generating styles other than photorealism, unless you use a LoRA. Let’s test if Z-Image is doing better in the base model.
I would say Flux’s image is way too realistic for the “Van Gogh” style.
Verdict: Z-Image wins.
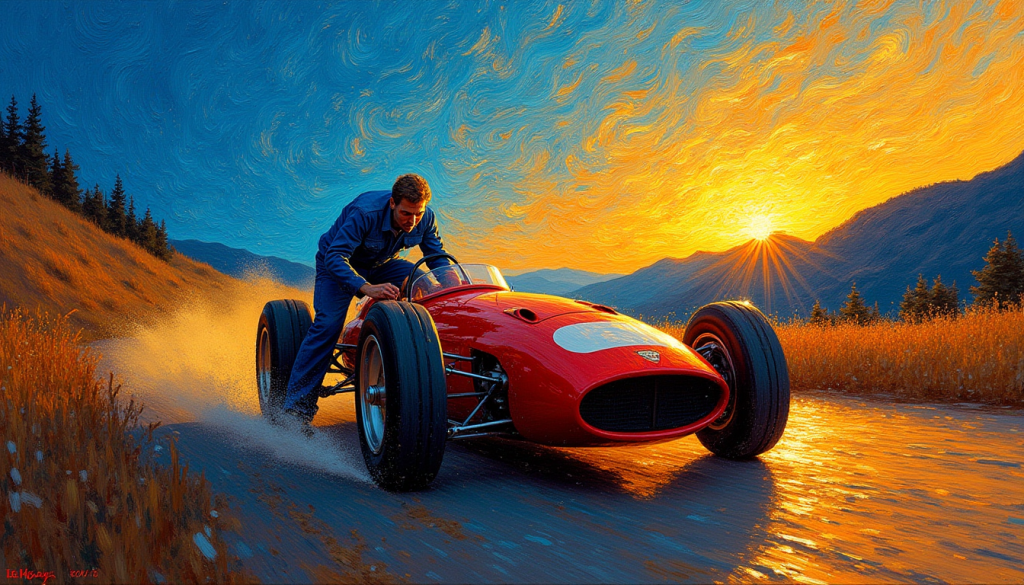
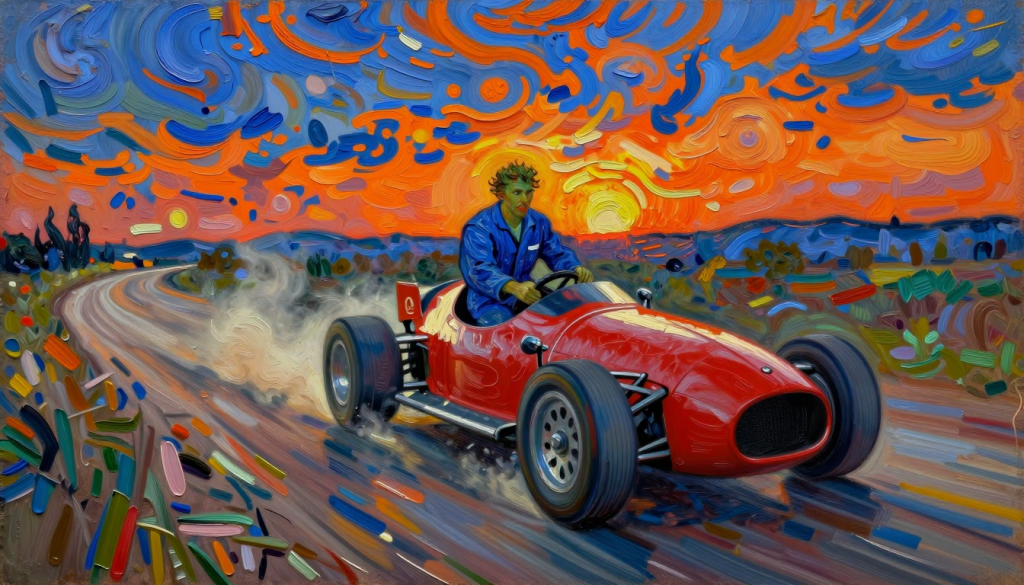
A dramatic, intense oil painting in the style of Vincent van Gogh. The scene features a brightly red race car running very fast in the dimly lit hilly dirt road just after sunset. Van Gogh the great painter is wearing a blue worker’s clothes. Trying to stand on the driver’s seat while driving really fast. Sunset, dust. He is reckless.
Thick, swirling impasto brushstrokes define the heavy textures of the asphalt and the metallic bodywork. Intense, contrasting colors of vibrant electric blue and deep fiery orange dominate the sky and reflections on the car. Post-Impressionism, high texture, expressive detail.
Conclusion
Z-Image Turbo generate better images than Flux.1 Dev in most areas. Given the faster generation time, I would use Z-Image Turbo over Flux.1 Dev as my go-to for photo-realistic images.
Usage tips for Z-Image
- Stick with the photorealistic style unless you use a LoRA.
- You can’t use negative prompts with the Z-Image Turbo because it is a distilled model.
- The model is bilingual. It renders English and Chinese well.
- The text can look artificial. Use inpainting to blend them better with the scene.
- The Z-Image Turbo is a distilled model. For the best result, use the Z-Image Base model for LoRA training.
- Be very specific in your prompt. The model is quite unopinionated. Specify the outfit, human pose, background, etc.
- Enhance the image with lighting keywords like “volumetric lighting,”, “dramatic lighting”, “cinematic lighting,” or “studio softbox.”
Hi Andrew, long time follower here but I haven’t been actively testing SD for quite some time now. Curious to know your thoughts on stable diffusion and running it on the google colab (which I used to use from your link), and vs the latest google AI studio. As they develop it’s getting a lot easier to generate what I want directly with Nano Banana e.g. so less manual work and digging into details for me, therefore slightly out of the loop…
nano banano is eaisier to use. A1111/ComfyUI is more customizable.
Mac Book Air , M4, 16 GB, 2025. 3 mins to generate an image @ 1024 x 768. Good times if you don’t mind the wait.
Hi, is possible to training z Image Turbo lora on free colab?
The full version has some advantages if you have the hardware to use it (which the A100 cards certainly do):
– Highest image fidelity — subtle textures, micro-details, clean edges.
– Better color gradients (quantized models introduce slight banding).
– Better performance with complex scenes (reflections, transparent materials).
– Best compatibility with fine-tuning / LoRA training, ControlNet, adapters, classifier-free guidance.
-No quantization artifacts (smearing, ghosting, noise floor issues).
The biggest difference (without doing a side-by-side comparison of results) is in LORA training. The quantized models just aren’t designed for it due to lack of gradient precision, inaccurate backpropagation, lower resolution, etc. Plus, if you train a LORA on the full model, it will work better on both the full version and the quantized versions, whereas a LORA trained on a quantized version (NF4 is what you have on there now, but there’s also INT8, etc.) will only work best with those quantized versions.
I know it’s an ask, but if it isn’t difficult to do it would be pretty cool to try out!
Andrew, thanks for this. Two things… one, I poked around a bit and no LORA support for Z-image yet. Apparently it doesn’t support stable-diffusion LORA-like adapters anyway, so a new architecture is going to have to be developed to do so. Second, Google Collab Pro added A100 cards with 80+ GB of VRAM to the stable – any chance of adding the full, non-quantized flux1.dev (FP16/BF16) to the collab workbook?
Hi, they will release the non-distilled base model, which is good for LoRA training.
for flux model on colab, it is doable but what is it for?
Thanks, Andrew, this is very timely as I’ve just started trying out Z-Image. I agree with your findings and I’d be interested in your thoughts about how it compares to Qwen. From what I’ve seen so far, Z-Image is at least as good and perhaps better at following the prompt, particularly in directing poses. It doesn’t have much depth of non-photorealistic styles, as you noted above. But the turbo model is very fast and I think, like you, I’ll be using it a lot. The base model doesn’t appear to be available yet.
Please could you add Z-Image turbo to the Colab notebook?
I know you would ask! added.