Many AI image generators, including Stable Diffusion, can use an image as a prompt to generate a similar image. On the other hand, we use text prompts to describe what we want and negative prompts to describe what we don’t want. How about a negative image prompt?
In this post, I will describe an implementation of the negative image prompt in Stable Diffusion and share some interesting use cases.
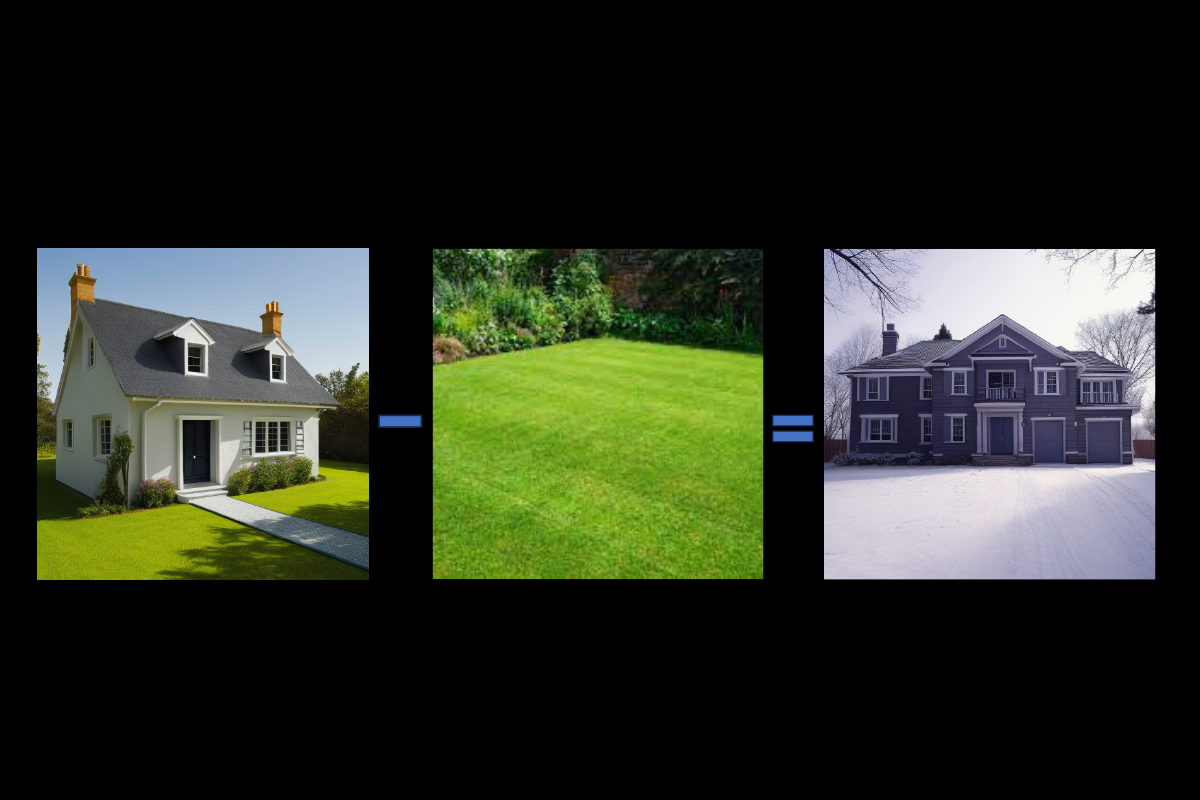
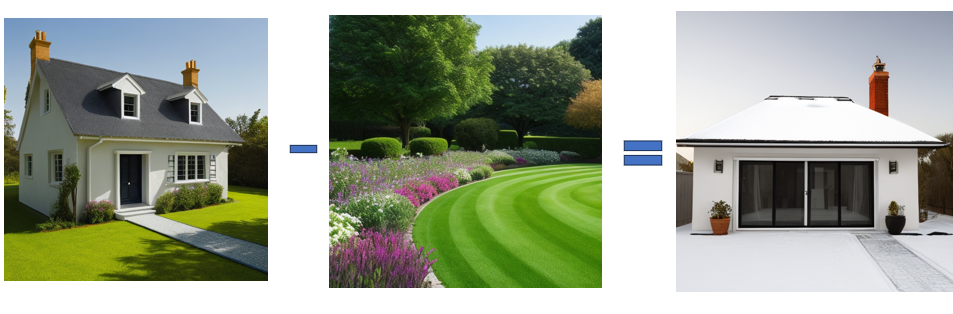
For example, you can subtract a lawn from a house and get a wintery house!
Here’s the GitHub repository with a demo you can play with.
Update: I have implemented it in this ComfyUI custom node.
Table of Contents
Image Prompt in Stable Diffusion
There are a few ways to use image prompts in Stable diffusion.
Image-to-image is the most primitive way to use an image prompt. An image is converted to a latent, added noise and used as an initial latent image for denoising. It can generate a similar image that follows the color and composition.
You can also use ControlNet reference-only to generate similar images. It injects the reference image by passing it through the model and adding its intermediates to the latent image in the attention layers.
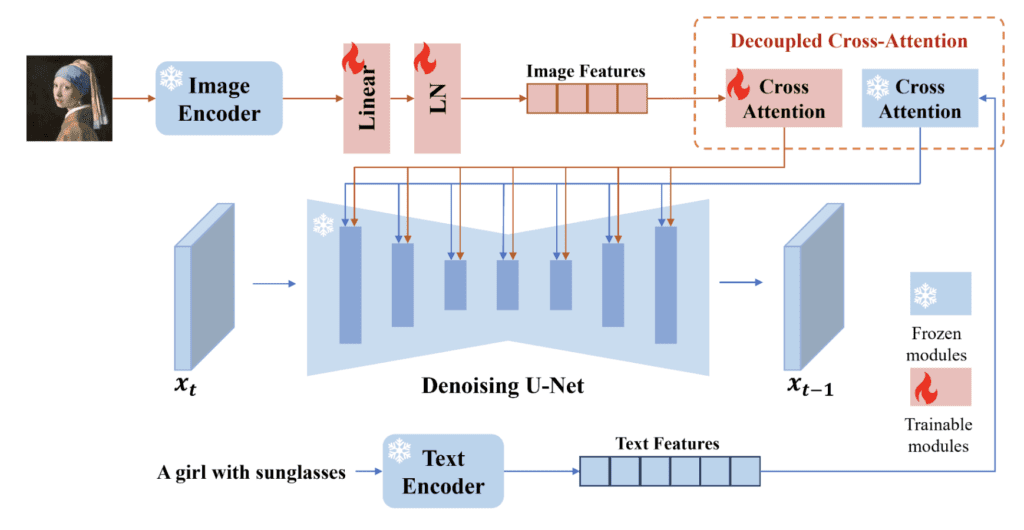
IP-adapter (Image Prompt adapter) is a neural network model that enables image prompts in Stable Diffusion. It’s simple and effective. It uses a model to extract features from the reference image. It then uses separate attention networks to inject the features instead of reusing the ones for text prompts.
IP-adapter produces the best result among these 3 methods.
A brief history of negative prompts
How we arrive at negative prompts is interesting.
Initially, diffusion-based AI image generators could generate random, high-quality images. But there was no way to control what you generate. It just generates images that resembles the training data.
Then, classifier-free guidance came into play. It hijacks the attention layers to inject the text embeddings to the sampling steps. The model is then trained with image and caption pairs. When generating an image, the model steers the images toward the prompt and away from the random images.
It has all been academic. But that changed with the release of Stable Diffusion. It’s open source, free, and accessible with low-power computers. Many people started to play it. They were not looking to publish papers but to hack the software to do what they wanted.
Codes are released right away. The iteration was fast. Then, AUTOMATIC1111 hacked the classifier-free guidance to enable negative prompts.
The idea was simple: Instead of steering away from a random image, you steer away from the images described by the negative prompt. Technically, you only need to replace the unconditioned latent image with the one that’s conditioned with the negative prompt.
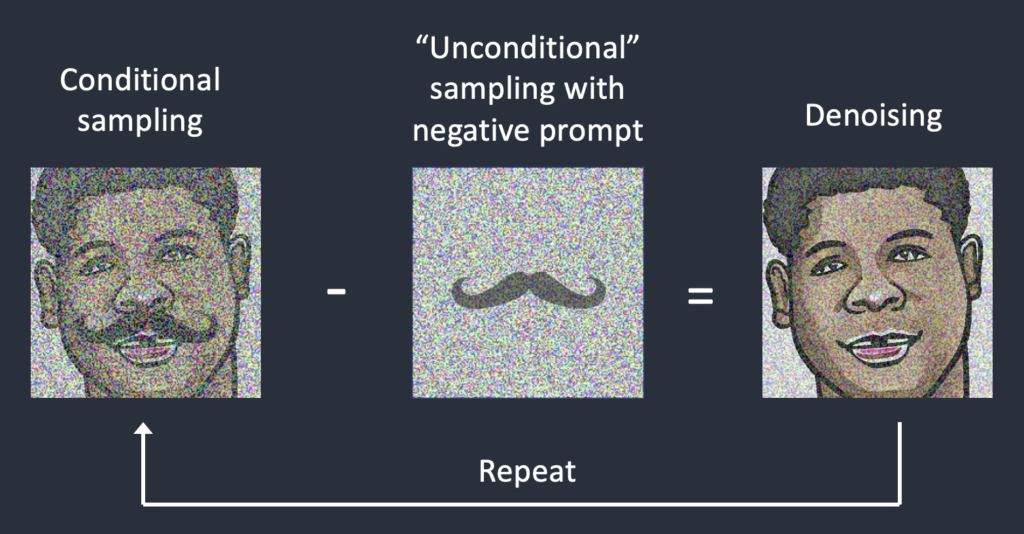
So, the negative prompt was born. We get it for free. It’s just a change in the sampling step. We don’t need to train a new model.
Negative image prompt
The technique for enabling the negative prompt can be applied to images. We encode the negative image to an embedding and inject it into the sampling process of the “unconditioned” latent.
This is exactly the same as the negative prompt. IP-adapter provides all the machinery to do that.
Based on this idea, I have implemented the negative image prompt using IP-adapters.
It’s best used without text prompts, so the conditionings are only based on positive and negative image prompts.
We can subtract the green lawn from a house. It turns into a house in a snowy winter. The first image is the positive image prompt. The second image is the negative image prompt. The third image is generated by Stable Diffusion.
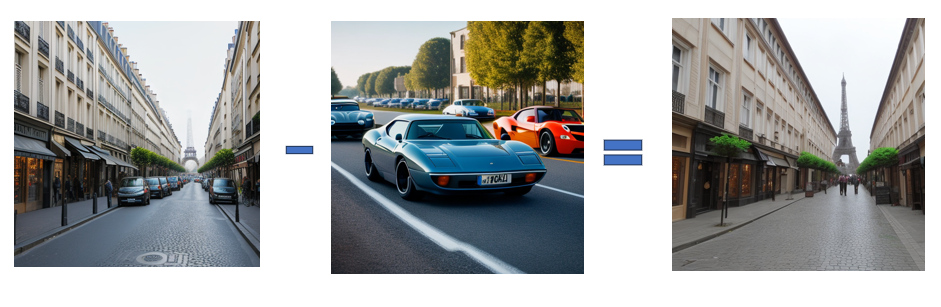
Likewise, we can subtract cars from a street scene.
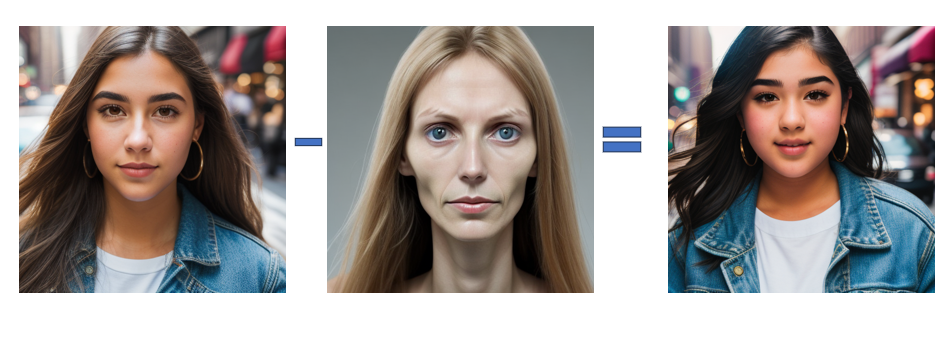
We can also subtract one face from the other!
Running the demo
You can run the Colab demo to try it yourself.
- Go to the GitHub repository.
- Click the Open in Colab icon under the Usage section.
- Run both cells.
- Follow the
gradio.livelink at the end of the notebook output to start the demo.
Basic usage
Upload a positive image to the Image Prompt canvas and a negative image to the Negative Image Prompt canvas. You can leave the prompt and negative prompt empty. Press Generate to generate an image.

The demo uses the Realistic Vision model.
Advanced usage
You can optionally use a prompt and a negative prompt together with the image prompts. You may need to adjust the weights of the image prompts to control the relative effect between the text and the image prompts.
You can select IP-adapter or IP-adapter Plus in the Advanced Options.
IP-adapter Plus uses a more advanced model to extract image features. It follows the reference image more closely.
Here are the rest of the settings.
- Image prompt weight: The effect of the image prompt relative to the text prompt.
- Starting step: The first step to apply the image prompt. 0 means the first step. 1 means the last step.
- Ending step: The last step to apply the image prompt. 0 means the first step. 1 means the last step.
- CFG Scale: The classifier-free guidance scale controls how closely the text and image prompts are followed. Set a higher value to follow more closely.
Technical details
An IP-adapter uses a machine-learning model to extract features from an image. The original IP-adapter uses the CLIP vision model and a simple projection layer to extract the image features.
The image features are similar to the embeddings of the text prompt. So, they can be used to condition the denoising process in image generation.
The IP-adapter method trains its own attention matrices for conditioning the diffusion. The same matrices work for both the positive and negative image prompts.
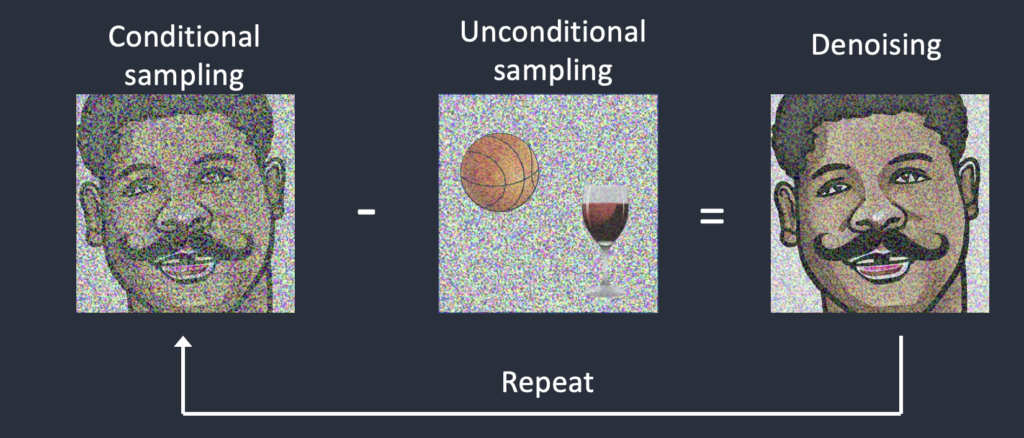
When using classifier-free guidance, we need to denoise two latents for each image generation. One is conditioned by the text prompt. The other one is unconditioned. The latent image moves in the direction of the difference between the two.
The negative prompt hacks the unconditioned latent. The negative prompt now conditions the “unconditioned” latent. The image changes to be more like the prompt and unlike the negative prompt.
We can do the same with the IP-adapter. The pipeline first extracts the features from the positive and negative image prompts. The positive features condition the conditioned latent, and the negative features condition the “uncondtioned” latent.
So, the latent image moves towards the image prompt, and away from the negative image prompt.
Why negative image prompt?
Negative text prompts are easy and convenient. Is there anything that can only be achieved by using negative images? Seriously, I don’t know. I simply haven’t played with it enough to say.
Perhaps you can help find out.
Great write up and great project!
Just a gentle reminder of a hardcoded input file name “thin face.png” in this example:
https://github.com/sagiodev/ComfyUI_IPAdapter_plus/blob/main/examples/ip-adapter%20negative%20prompt.json
First time ComfyUI-user has no idea how to fix it except modifying the input file name in json file.
You should be able to drop the image on the node to change it.
Some trick to use it in Auto1111?
A1111 is lagging behind in ip-adapter. I will take a look on how much work it takes…
Awesome 👌. More please.
Great tutorial, I love your tutorials, they are very simple to understand and helps to understand why they work as they are , this also enables to understand why nodes are placed in a specific location for a workflow. Please keep writing these kind of things. Appreciate this a lot. Thanks
Thanks! I am glad it helps.
Are the courses in form of video?
No, they are text and image based.