
You can train your own SDXL LoRA model with the Google Colab Notebook created by this site. The following instruction trains a LoRA model for a person’s face.
Table of Contents
Software
You must have a Google Colab Plus subscription to use this training notebook.
Download the Easy LoRA Trainer SDXL and sample training images below. You can use the sample images to go through the whole process before using your own.
Option 1: Become a member
If you are a member of this site, access the notebook and training images below.
Option 2: Purchase the notebook
Alternatively, you can purchase the training notebook and sample training images in the store here.
Step 1: Prepare training images
For the best result, crop the images to 1024×1024 pixels. However, this is not strictly necessary because the training script supports bucketing.
See my training examples below.

Step 2: Come up with a good triggering keyword
For training SDXL LoRA models, it is better NOT to use a rare token for the triggering keyword but something that resembles your subject.
Since we are training a woman’s face, we need to find someone in the SDXL model who looks like her. That would increase your chance of success.
Let’s try prompting the SDXL Base 1.0 model.
photo of jane
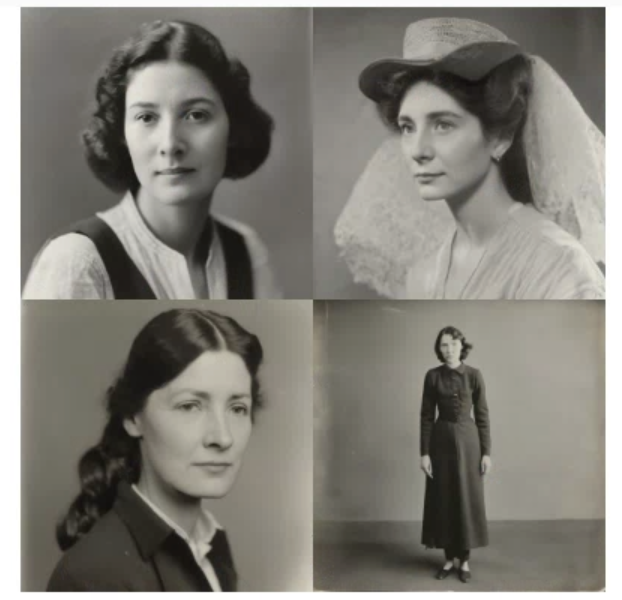
Nah, Jane won’t be a good triggering keyword because it generates black-and-white images with a woman who doesn’t look like ours.
Let’s try another name.
photo of emma
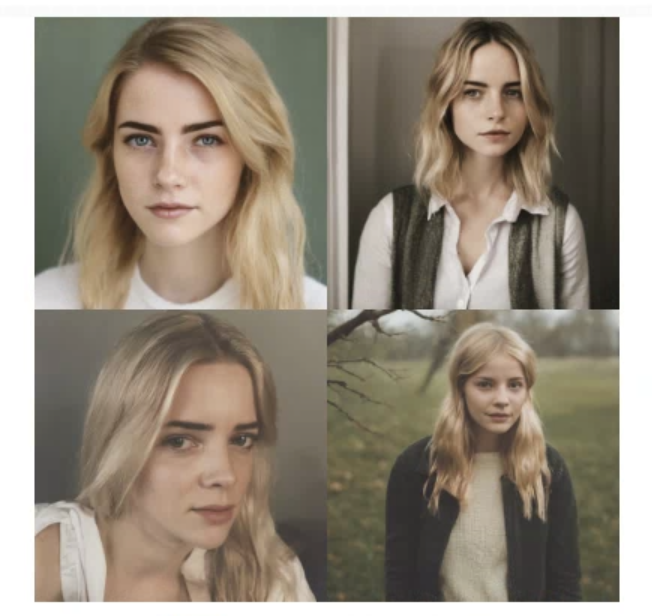
The keyword “emma” generates color pictures of a young woman who resembles our subject. (Likely thanks to Emma Watson) Let’s use “emma” as our triggering keyword. Note you have to stick with a single word.
Step 3: Review the training settings
Open the Easy LoRA trainer SDXL notebook.
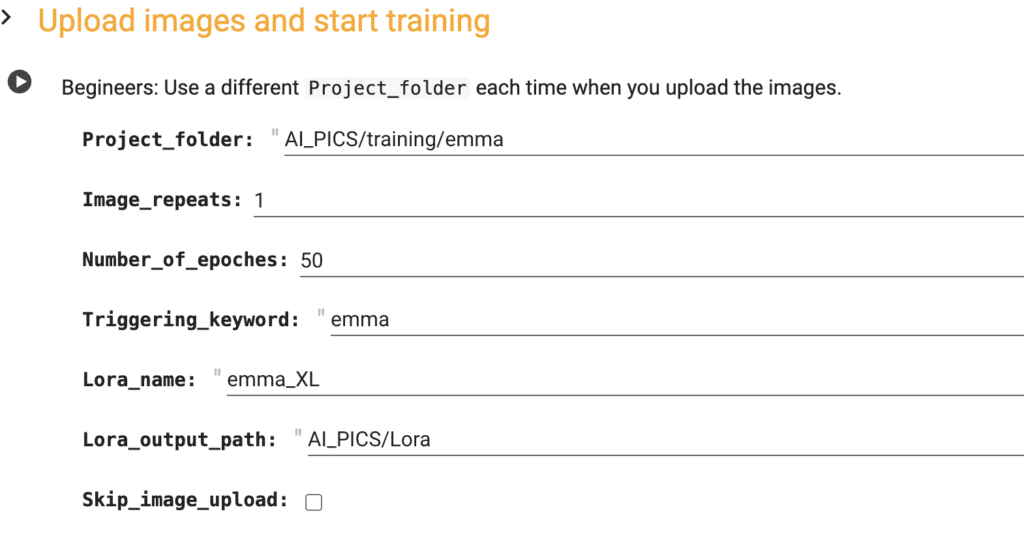
Project name
This is the folder that will be created in your Google Drive. Use a different project folder for each training.
Image Repeats
The Image repeats is how many times the training images are repeated in each training epoch. Keep this at 1 for the default training workflow.
Number of Epochs
The number of epochs is the number of training rounds. Increase this number to increase training cycles.
This is the main parameter to adjust how much want to train the model. Increase to train more. Decrease to train less.
Learning rate
How big a step for each model update.
A larger value trains faster and requires fewer training epochs.
But a learning rate too large may cause error or bad results.
Triggering keyword
The triggering keyword is the token associated with your subject. You need to use this keyword in the prompt.
Lora name
The Lora name is the name of your LoRA file. In AUTOMATIC1111, It looks like <lora:emma_XL:1> when you use the LoRA.
Lora output path
The LoRA file will be saved in this location in your Google Drive.
Skip Image upload
Select this option if you want to reuse the previously uploaded images. This is useful for retraining a LoRA model with a different setting or revising the captions.
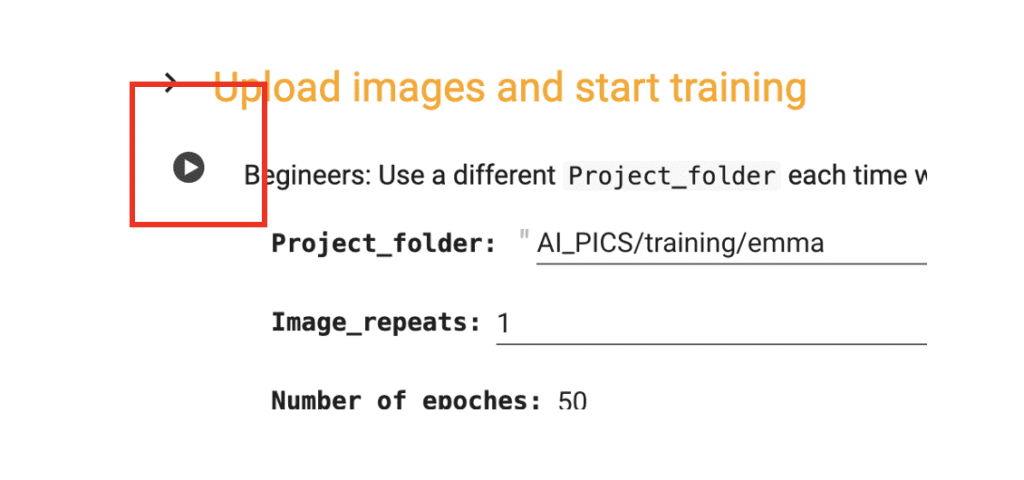
Step 4: Start training
Start the training by clicking the play button on the left of the settings.
It will ask for your permission to access your Google Drive. You must accept the connection to save the final LoRA model in your Google Drive. (There’s no good way to download the model except by saving it in your Google Drive.)

A button will appear that allows you to upload the training images. Click Choose Files and select your training images. (The images, not the zip file.)
It will take a while to complete running. It will
- Set up the training software
- Generate captions for your images. You can find them in the project folder in your Google Drive. They are the
.txtfiles with the same name as your images. - Train the LoRA model.
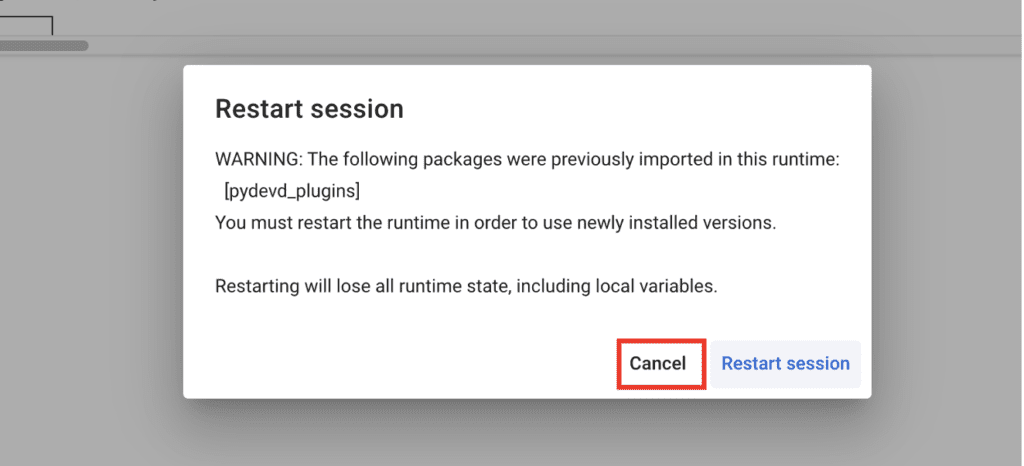
It may prompt for restarting the runtime. Click Cancel.
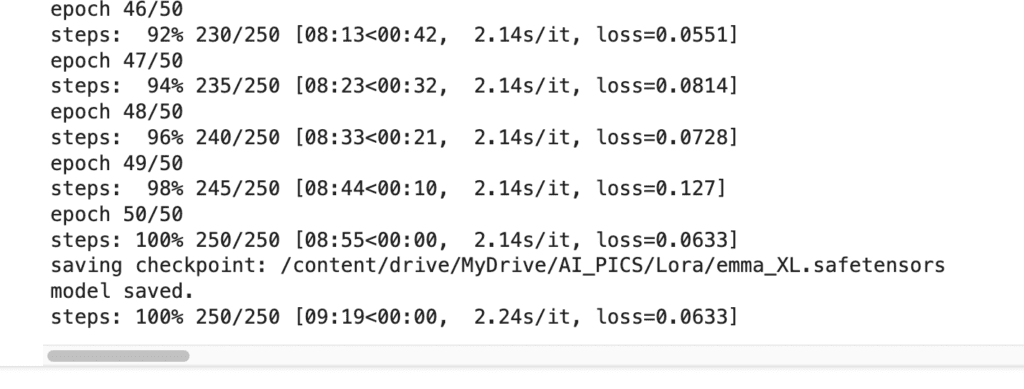
Monitor the training progress with the printouts. It is done when it shows 100% steps.
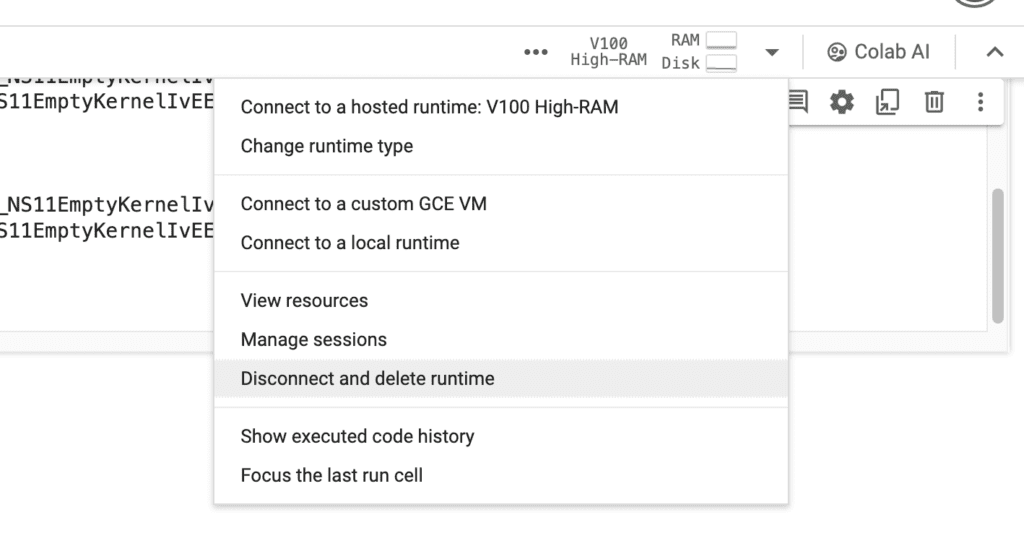
You can rerun the training cell without disconnecting and reconnecting the notebook.
Disconnect the notebook when you are done. Otherwise, it will continue to consume your compute credit.
Using the SDXL LoRA model
Your model is saved in your Google Drive in the AI_PICS > Lora folder. It is ready to use with the Stable Diffusion Colab Notebook.
Alternatively, download and install the LoRA model locally on your machine.
For AUTOMATIC1111, put the LoRA model in stable-diffusoin-webui > models > Lora.
To use the LoRA model in AUTOMATIC1111, you first need to select an SDXL checkpoint model.
Use the prompt with the LoRA:
photo of emma <Lora:emma_XL:1>
Don’t forget to set the image size to 1024×1024.
Now, we get our subject!

Note: You must apply the LoRA AND use the triggering keyword emma to get the effect.
Testing the LoRA weight (e.g. <lora:emma_XL:weight>) when using the LoRA. Sometimes, 1 is not the optimal value.
Tips for successful training
The default setting is good for training a realistic face. You may need to tweak the settings for your training.
Below are some tips for tweaking.
- The quality of the training images is more important than the quantity. The training images should show clear faces if you are training a face. You can get good training with as few as five images.
- The images should have a diverse background.
- Try adjusting the number of epochs to increase or decrease the training. It is possible to overtrain a model.
Experimentation
Training a LoRA model requires patience and experimentation. You should treat the default parameters as a starting point.
Observe the result and change the settings one at a time. Observe the result with the same seeds. Generate multiple images to draw conclusion.
Just like a good old scientist would do.
A systematic approach may take longer. But in the end, the knowledge and intuition you gain will make you a better trainer.
Undercook and overcook
You should not undercook (training too little) or overcook (training too much) your model. You should aim at training the just right amount and stop.
A basic way to do that is to change the number of epochs.
Just right
Below are from a model trained with the default value of 50 epochs. Her face shows up nicely.

Undercooked
Training with 25 epochs is not enough. The face doesn’t show.

Overcooked
100 epochs overcook the model. The pose and the face lost diversity. Her face doesn’t look natural.

FAQ
I got ModuleNotFoundError: No module named ‘torch._custom_ops’
You likely have restarted the runtime when prompted. Click cancel when prompted to restart the runtime.
it does not work at 2025/1/17, I tried few times with CPU, A100 GPU, L4 GUP and T4 GPU, but the results are the same, below is the log:
You are in ‘detached HEAD’ state. You can look around, make experimental
changes and commit them, and you can discard any commits you make in this
state without impacting any branches by switching back to a branch.
If you want to create a new branch to retain commits you create, you may
do so (now or later) by using -c with the switch command. Example:
git switch -c
Or undo this operation with:
git switch –
Turn off this advice by setting config variable advice.detachedHead to false
/content/kohya_ss
env: PYTHONPATH=/env/python:/content/kohya_ss
env: PYTHONPATH=/env/python:/content/kohya_ss
/bin/bash: line 1: /content/venv/bin/pip: No such file or directory
/bin/bash: line 1: /content/venv/bin/accelerate: No such file or directory
Fixed. Please follow the link on this page to access the new notebook (updated 1/17/2025).
OK, I am also seeing the error now. The notebook is fixed. Follow the link on this page to access the new notebook (updated 1/17).
what ‘3e-05’ mean in the learning rate option? how can change it to adjust my training?
It means 0.00003. Don’t change it too much but increasing it would make the training faster in expense of accuracy. Decrease it if you see numerical error during training.
Hi! Can I include txt captions in the dataset? thanks!
The captions are automatically generated after you upload the images. You can find them in the project folder along with the images. You can then edit them to match the images.
The next time you run the notebook, click “skip image upload” to use the existing images and the captions.
I am using AUTOMATIC1111 Web-UI. Do you explain how to train LoRA in a local environment?
Is it difficult to create LoRA in a local environment with RTX2060 12G?
I want to create a consistent face that I like.
You can use Kohya_ss to train LoRA locally. https://github.com/bmaltais/kohya_ss
The amount of RAM you have looks good. It should work with the correct settings.
I asked if it was possible to build LoRA in a local environment with an RTX2060 12G, and you replied that it was.
I was able to create Lora in V1.5, but it took a very long time for SDXL, so I canceled it midway.
So my question is, is it not realistic to create Lora for SDXL in a local environment unless you have a super high-performance PC?
Or was my configuration wrong and it took a very, very long time?
It could take a long time if you don’t have a fast GPU. check your network dimension and make sure it is not too high.
Hi, great tutorial and colab, I will try it. One question: I need to train a style. Can I also use it?
Thanks!
Yes, it should work.
I’ve been trying to run this today to some more training but I now seem to be getting some errors whilst the notebook is installing its dependencies:
torchaudio 2.3.0+cu121 requires torch==2.3.0, but you have torch 2.0.1+cu117 which is incompatible.
torchtext 0.18.0 requires torch>=2.3.0, but you have torch 2.0.1+cu117 which is incompatible.
Successfully installed torch-2.0.1+cu117 torchvision-0.15.2+rocm5.4.2
env: PYTHONPATH=/env/python:/content/kohya_ss
env: PYTHONPATH=/env/python:/content/kohya_ss
Traceback (most recent call last):
File “/usr/local/bin/accelerate”, line 5, in
from accelerate.commands.accelerate_cli import main
File “/usr/local/lib/python3.10/dist-packages/accelerate/__init__.py”, line 16, in
from .accelerator import Accelerator
File “/usr/local/lib/python3.10/dist-packages/accelerate/accelerator.py”, line 34, in
from huggingface_hub import split_torch_state_dict_into_shards
ImportError: cannot import name ‘split_torch_state_dict_into_shards’ from ‘huggingface_hub’ (/usr/local/lib/python3.10/dist-packages/huggingface_hub/__init__.py)
I’m not familiar enough with the various requirements to be confident enough to go in and start trying to fix it myself. Is there any chance of some guidance from someone that knows what they are doing?
Hi, issue is fixed.
I would like to load images from my Google Drive, if at all possible, without breaking your Notebook. Let me know if there’s any snippet of code that I can add or anything, thanks.
I don’t plan to support it but, if you code, you can modify the following code:
if not Skip_image_upload:

.....
The images will be in imagePath
Thanks. I’ll try that.
I was using V100 high ram (also tried T4 high ram as well). I got the same error reported by other users. First I was asked to restart the runtime:
WARNING: The following packages were previously imported in this runtime:
[pydevd_plugins]
You must restart the runtime in order to use newly installed versions.
After restarting it will hit the the module not found error:
ModuleNotFoundError: No module named ‘torch._custom_ops’”
Hi, I can reproduce this error. It is because the runtime was restarted.
You must not restart the runtime. Click “Cancel” and it will work.
Any tips for training a face LoRA for use in Pony diffusion? I’m stuck at step 2 because that checkpoint is trained to the point that you can’t really find a celebrity lookalike (at least not in my experience).
It could be difficult if the checkpoint is over-trained to produce a certain style.
This likely not giving good results, but you can try training a lora on SDXL base and apply it to pony diffusion. Adjust the lora weight to see if you get what you want.
Otherwise, you really need to pick a keyword and start training, even if it is not close.
Hi in running “Easy_Lora_Trainer_SDA_SDXL_v1.1.ipynb”.
I’m getting the following errors, after uploading the images:
“Already installed.
/content/kohya_ss
env: PYTHONPATH=/env/python:/content/kohya_ss
python3: can’t open file ‘/content/kohya_ss/finetune/make_captions.py’: [Errno 2] No such file or directory
Traceback (most recent call last):
File “/usr/local/bin/accelerate”, line 5, in
from accelerate.commands.accelerate_cli import main
File “/usr/local/lib/python3.10/dist-packages/accelerate/commands/accelerate_cli.py”, line 19, in
from accelerate.commands.estimate import estimate_command_parser
File “/usr/local/lib/python3.10/dist-packages/accelerate/commands/estimate.py”, line 34, in
import timm
File “/usr/local/lib/python3.10/dist-packages/timm/__init__.py”, line 2, in
from .models import create_model, list_models, is_model, list_modules, model_entrypoint, \
File “/usr/local/lib/python3.10/dist-packages/timm/models/__init__.py”, line 1, in
from .beit import *
File “/usr/local/lib/python3.10/dist-packages/timm/models/beit.py”, line 49, in
from timm.data import IMAGENET_DEFAULT_MEAN, IMAGENET_DEFAULT_STD
File “/usr/local/lib/python3.10/dist-packages/timm/data/__init__.py”, line 5, in
from .dataset import ImageDataset, IterableImageDataset, AugMixDataset
File “/usr/local/lib/python3.10/dist-packages/timm/data/dataset.py”, line 12, in
from .parsers import create_parser
File “/usr/local/lib/python3.10/dist-packages/timm/data/parsers/__init__.py”, line 1, in
from .parser_factory import create_parser
File “/usr/local/lib/python3.10/dist-packages/timm/data/parsers/parser_factory.py”, line 3, in
from .parser_image_folder import ParserImageFolder
File “/usr/local/lib/python3.10/dist-packages/timm/data/parsers/parser_image_folder.py”, line 11, in
from timm.utils.misc import natural_key
File “/usr/local/lib/python3.10/dist-packages/timm/utils/__init__.py”, line 2, in
from .checkpoint_saver import CheckpointSaver
File “/usr/local/lib/python3.10/dist-packages/timm/utils/checkpoint_saver.py”, line 15, in
from .model import unwrap_model, get_state_dict
File “/usr/local/lib/python3.10/dist-packages/timm/utils/model.py”, line 8, in
from torchvision.ops.misc import FrozenBatchNorm2d
File “/usr/local/lib/python3.10/dist-packages/torchvision/__init__.py”, line 6, in
from torchvision import _meta_registrations, datasets, io, models, ops, transforms, utils
File “/usr/local/lib/python3.10/dist-packages/torchvision/_meta_registrations.py”, line 4, in
import torch._custom_ops
ModuleNotFoundError: No module named ‘torch._custom_ops'”
I tried to ignore and continue
“ERROR: pip’s dependency resolver does not currently take into account all the packages that are installed. This behaviour is the source of the following dependency conflicts.
torchaudio 2.2.1+cu121 requires torch==2.2.1, but you have torch 2.0.1 which is incompatible.
torchtext 0.17.1 requires torch==2.2.1, but you have torch 2.0.1 which is incompatible.
torchvision 0.17.1+cu121 requires torch==2.2.1, but you have torch 2.0.1 which is incompatible.
Successfully installed GitPython-3.1.42 antlr4-python3-runtime-4.9.3 docker-pycreds-0.4.0 gitdb-4.0.11 lit-18.1.2 mypy-extensions-1.0.0 nvidia-cublas-cu11-11.10.3.66 nvidia-cuda-cupti-cu11-11.7.101 nvidia-cuda-nvrtc-cu11-11.7.99 nvidia-cuda-runtime-cu11-11.7.99 nvidia-cudnn-cu11-8.5.0.96 nvidia-cufft-cu11-10.9.0.58 nvidia-curand-cu11-10.2.10.91 nvidia-cusolver-cu11-11.4.0.1 nvidia-cusparse-cu11-11.7.4.91 nvidia-nccl-cu11-2.14.3 nvidia-nvtx-cu11-11.7.91 omegaconf-2.3.0 pathtools-0.1.2 pyre-extensions-0.0.29 sentry-sdk-1.44.0 setproctitle-1.3.3 smmap-5.0.1 tk-0.1.0 tokenizers-0.13.3 torch-2.0.1 transformers-4.30.2 triton-2.0.0 typing-inspect-0.9.0 voluptuous-0.13.1 wandb-0.15.0 xformers-0.0.20
WARNING: The following packages were previously imported in this runtime:
[pydevd_plugins]
You must restart the runtime in order to use newly installed versions.
Are you using the latest version of the notebook? Please follow the link in this article or Gumroad. I just tested the notebook and it is working correctly.
You can also try disconnect and reconnect to start over.
Thanks for the response. Yes I’m using the notebook for members.
It seems to only be happening when using the V100.
But I’m still facing issues that the LoRA isn’t actually making a difference. I’ve done it twice now and followed the instructions.
Ok I figured out that in A1111 the lora’s don’t seem to work.
But in Fooocus it works well. I’d update the instructions to show that. 🙂
interesting. would like to know more!
Your tutorials are great (learned how to install automatic1111 from here). So mucho thanks.
This tutorial seems great for training a consistent face (although I guess Dreambooth is better for some reason), but what about if I want the character’s “figure” to be consistent?
As an example, yes I want a strong Scandinavian face for my model that’s always the same (Valkyrie), but I also want the same powerful figure (wide shoulders, strong musculature, height, etc.) for all the generated figures (its the same person in a novel I’m writing).
Can that also be achieved? Is that why Dreambooth might be better?
Thanks,
GeoffW
You will need to train your model with lora and dreambooth for the kind of consistency you are looking for.
>> You should not undercook (training too much) or overcook (training too little) your model. You should aim at training the just right amount and stop.
Shouldn’t it be “undercook (training too little)” and “overcook (training too much)”?
Another thing is, instead of finding someone look like the trained subject, I do the following:
1) Annotate each image in the dataset with captions, using a rare token as before. However, better results might be achievable if the keyword could generate someone resembling the trained subject. I have not personally tested this theory. NOTE: The caption should start with the token + class. If “emma” is chosen as the keyword, the caption should begin with “emma woman.”
2) Utilize the same captions to create regularization images using the DDIM sampler with the model that you’re training, and a “FIXED” seed (ex, 1234).
3) Assign the same names to both the dataset images and the regularization images— for instance, if the first dataset image is named “00,” then the regularization image generated using that image’s caption should also be named “00.” This approach implies that the number of regularization images needed will be the same as the number of dataset images.
4) Ensure that the caption files are not placed in the regularization directory.
5) Proceed with training using the same seed employed in Step 2.
Thanks for pointing out the typo!
What you said sounds reasonable.
It did not work (training any model has not worked for me yet).
Here are the last few lines from the 30 odd minute run of the notebook
===================
diffusion_pytorch_model.fp16.safetensors: 100% 5.14G/5.14G [01:07<00:00, 76.3MB/s]
Fetching 15 files: 100% 15/15 [01:07<00:00, 4.53s/it]
Loading pipeline components…: 83% 5/6 [00:10<00:01, 1.94s/it]Traceback (most recent call last):
File "/usr/local/bin/accelerate", line 8, in
sys.exit(main())
File “/usr/local/lib/python3.10/dist-packages/accelerate/commands/accelerate_cli.py”, line 46, in main
args.func(args)
File “/usr/local/lib/python3.10/dist-packages/accelerate/commands/launch.py”, line 1057, in launch_command
simple_launcher(args)
File “/usr/local/lib/python3.10/dist-packages/accelerate/commands/launch.py”, line 673, in simple_launcher
raise subprocess.CalledProcessError(returncode=process.returncode, cmd=cmd)
subprocess.CalledProcessError: Command ‘[‘/usr/bin/python3’, ‘./sdxl_train_network.py’, ‘–enable_bucket’, ‘–min_bucket_reso=256’, ‘–max_bucket_reso=2048’, ‘–pretrained_model_name_or_path=stabilityai/stable-diffusion-xl-base-1.0’, ‘–train_data_dir=/content/drive/MyDrive/AI_PICS/training/emma’, ‘–resolution=1024,1024’, ‘–output_dir=/content/drive/MyDrive/AI_PICS/Lora’, ‘–network_alpha=32’, ‘–save_model_as=safetensors’, ‘–network_module=networks.lora’, ‘–text_encoder_lr=3e-05’, ‘–unet_lr=3e-05’, ‘–network_dim=32’, ‘–output_name=emma_XL’, ‘–lr_scheduler_num_cycles=50’, ‘–no_half_vae’, ‘–learning_rate=3e-05’, ‘–lr_scheduler=constant’, ‘–train_batch_size=3’, ‘–max_train_steps=99999’, ‘–save_every_n_epochs=5000’, ‘–mixed_precision=fp16’, ‘–save_precision=fp16’, ‘–caption_extension=.txt’, ‘–cache_latents’, ‘–cache_latents_to_disk’, ‘–optimizer_type=AdamW’, ‘–max_train_epochs=50’, ‘–max_data_loader_n_workers=0’, ‘–caption_dropout_rate=0.05’, ‘–bucket_reso_steps=64’, ‘–min_snr_gamma=5’, ‘–gradient_checkpointing’, ‘–xformers’, ‘–noise_offset=0.0′]’ died with .
Do you have colab pro subscription?
No, do I need one for this exercise? Is it a monthly amount or one time deal, just to train the model
Yes, training SDXL model is memory intensive. You need to enable the high ram setting to avoid out-of-memory issue.
It is monthly $10 per month I think.