No matter how good your prompt and model are, it is rare to get a perfect image in one shot.
Inpainting is an indispensable way to fix small defects. In this post, I will go through a few basic examples to use inpainting for fixing defects.
If you are new to AI images, you may want to read the beginner’s guide first.
This is part 3 of the beginner’s guide series.
Read part 1: Absolute beginner’s guide.
Read part 2: Prompt building.
Read part 4: Models.
Table of Contents
Image model and GUI
We will use Stable Diffusion AI and AUTOMATIC1111 GUI. See my quick start guide for setting up in Google’s cloud server.
Basic inpainting settings
In this section, I will show you step-by-step how to use inpainting to fix small defects.
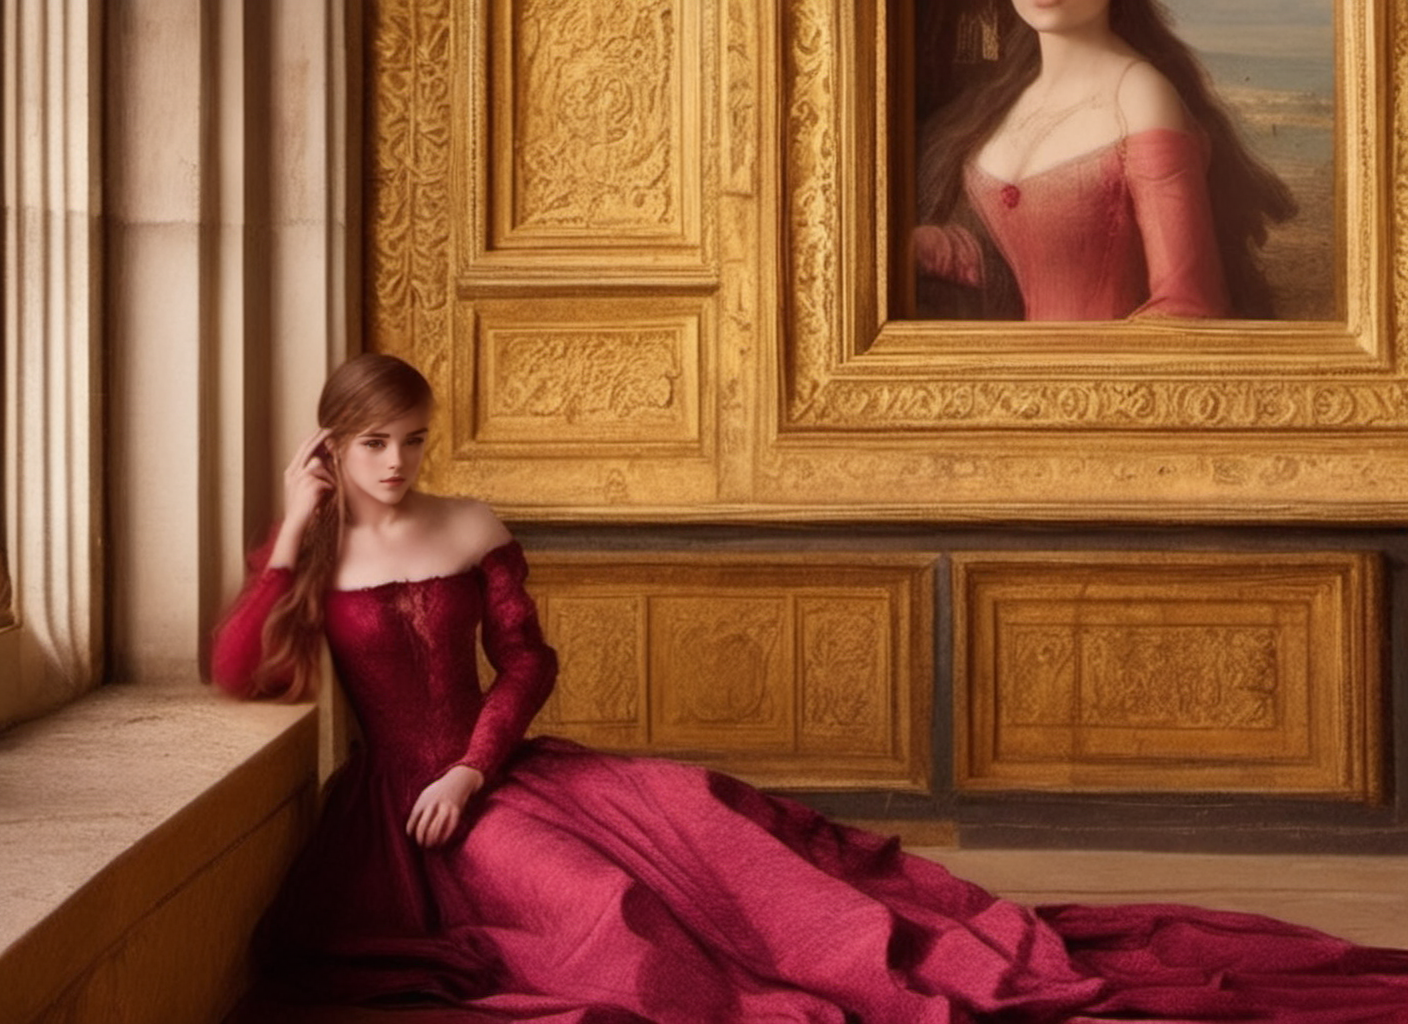
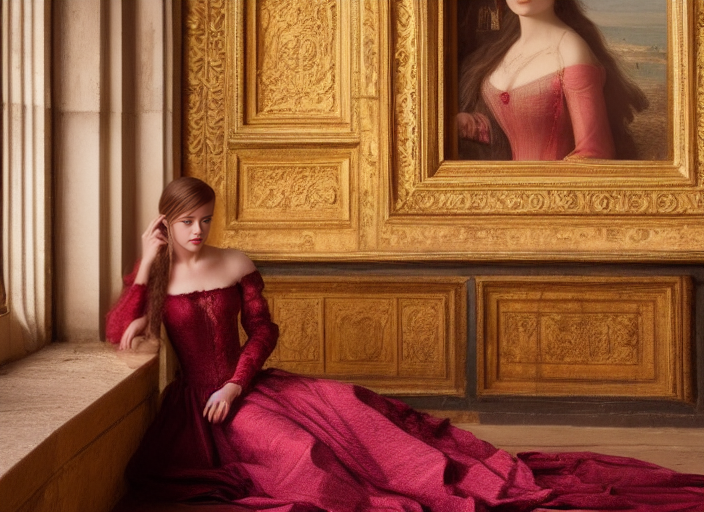
I will use an original image from the Lonely Palace prompt:
[emma watson: amber heard: 0.5], (long hair:0.5), headLeaf, wearing stola, vast roman palace, large window, medieval renaissance palace, ((large room)), 4k, arstation, intricate, elegant, highly detailed
(Detailed settings can be found here.)
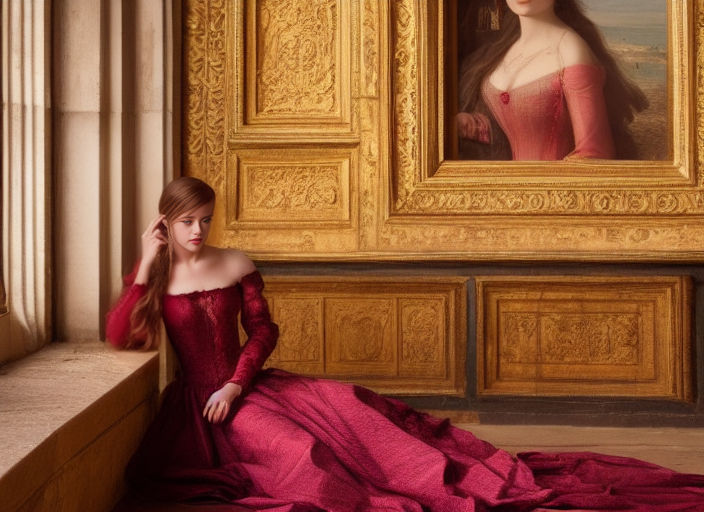
It’s a fine image but I would like to fix the following issues
- The face looks unnatural.
- The right arm is missing.
Use an inpainting model (optional)
Do you know there is a Stable Diffusion model trained for inpainting? You can use it if you want to get the best result. But usually, it’s OK to use the same model you generated the image with for inpainting.
To install the v1.5 inpainting model, download the model checkpoint file and put it in the folder
stable-diffusion-webui/models/Stable-diffusionIn AUTOMATIC1111, press the refresh icon next to the checkpoint selection dropbox at the top left. Select sd-v1-5-inpainting.ckpt to enable the model.

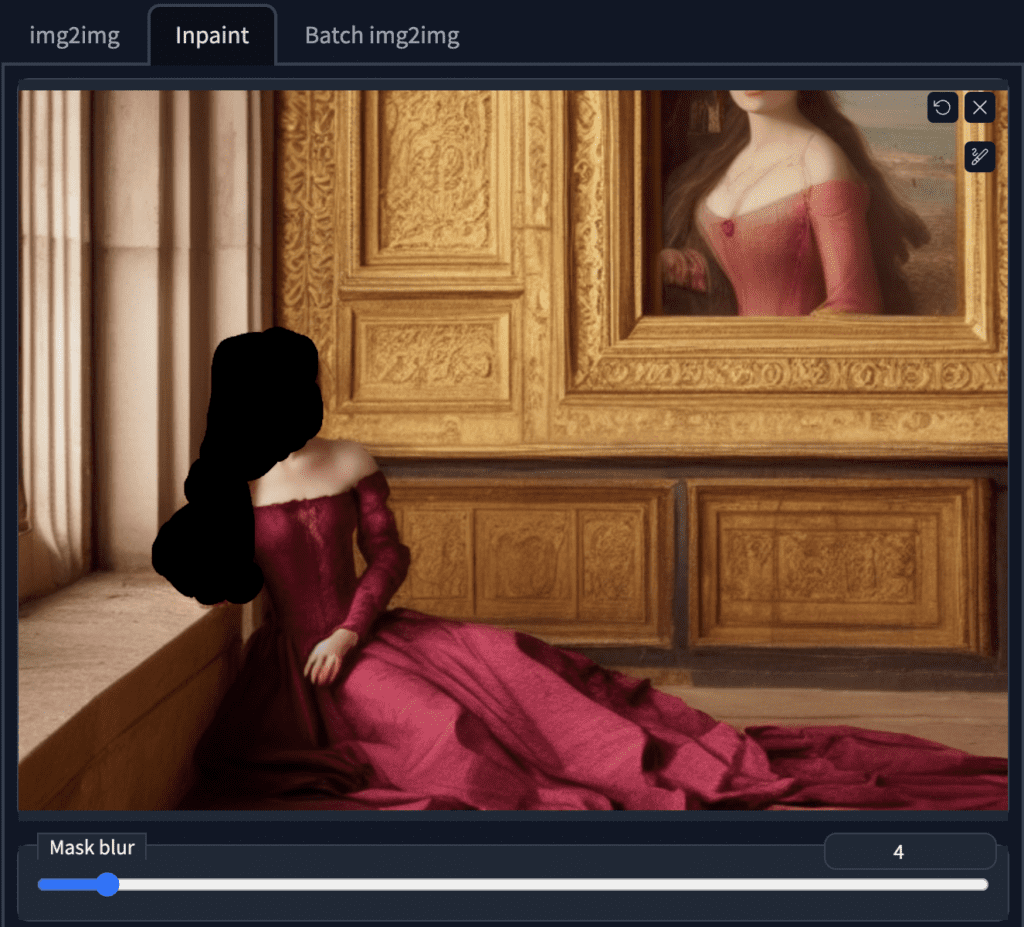
Creating an inpaint mask
In AUTOMATIC1111 GUI, Select the img2img tab and select the Inpaint sub-tab. Upload the image to the inpainting canvas.

We will inpaint both the right arm and the face at the same time. Use the paintbrush tool to create a mask. This is the area you want Stable Diffusion to regenerate the image.
Settings for inpainting
Prompt
You can reuse the original prompt for fixing defects. This is like generating multiple images but only in a particular area.
Image size
The image size needs to be adjusted to be the same as the original image. (704 x 512 in this case).
Face restoration
If you are inpainting faces, you can turn on restore faces. You will also need to select and apply the face restoration model to be used in the Settings tab. CodeFormer is a good one.
Caution that this option may generate unnatural looks. It may also generate something inconsistent with the style of the model.
Mask content
The next important setting is Mask Content.
Select original if you want the result guided by the color and shape of the original content. Original is often used when inpainting faces because the general shape and anatomy were ok. We just want it to look a bit different.
In most cases, you will use Original and change denoising strength to achieve different effects.
You can use latent noise or latent nothing if you want to regenerate something completely different from the original, for example removing a limb or hiding a hand. These options initialize the masked area with something other than the original image. It will produce something completely different.
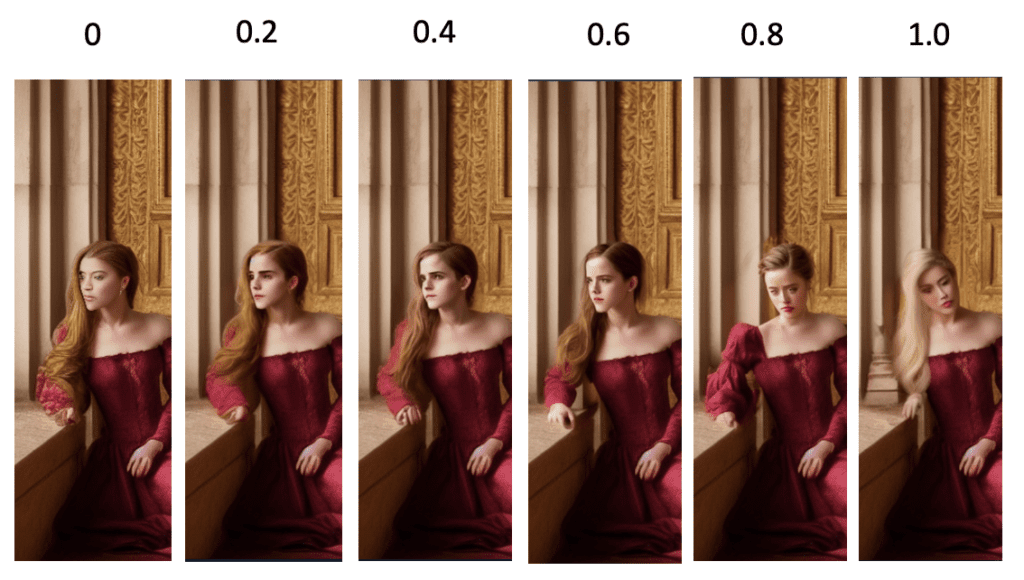
Denoising strength
Denoising strength controls how much change it will make compared with the original image. Nothing will change when you set it to 0. You will get an unrelated inpainting when you set it to 1.
0.75 is usually a good starting point. Decrease if you want to change less.
Batch size
Make sure to generate a few images at a time so that you can choose the best ones. Set the seed to -1 so that every image is different.
| Prompt | (Same as original) |
| Sampling steps | 20 |
| Seed | -1 |
| Image size | 704 x 512 |
| Face restoration | Codeformer |
| Sampling method | Euler a |
| Model | Stable Diffusion v1.5 inpainting |
| Mask content | latent noise or latent nothing |
| Inpaint at full resolution | On |
| Denoising strength | 0.75 |
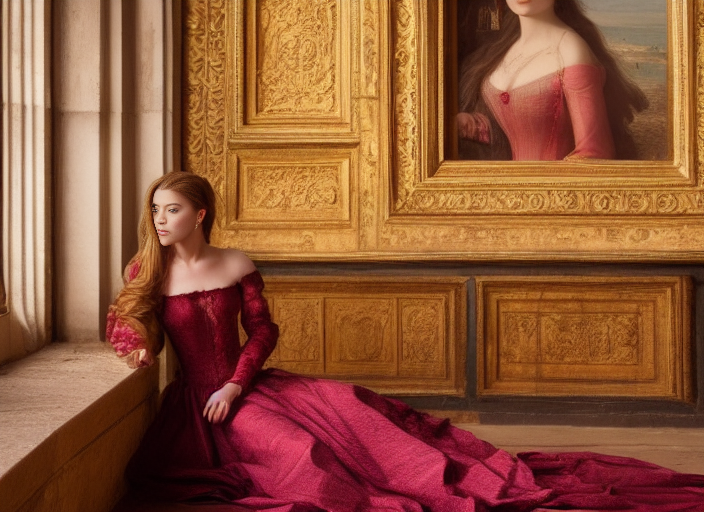
Inpainting results
Below are some of the inpainted images.

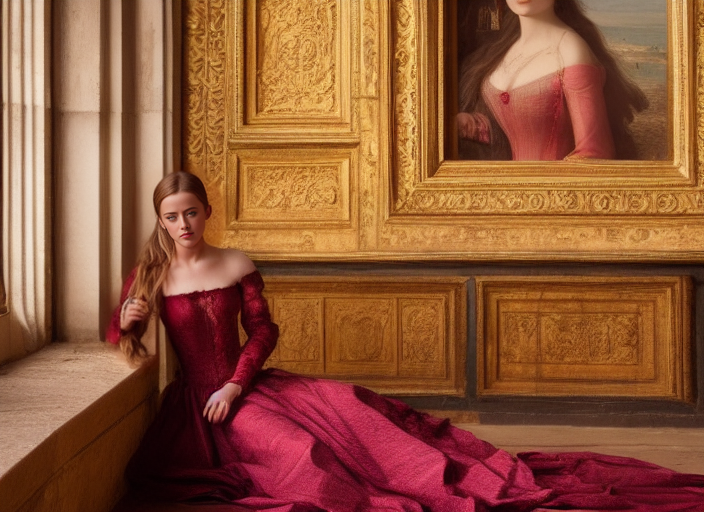
One more round of inpainting
I like the last one but there’s an extra hand under the newly inpainted arm. Follow similar steps of uploading this image and creating a mask. Masked content must be set to latent noise to generate something completely different.
The hand under the arm is removed with the second round of inpainting:
And this is my final image.
A side-by-side comparison
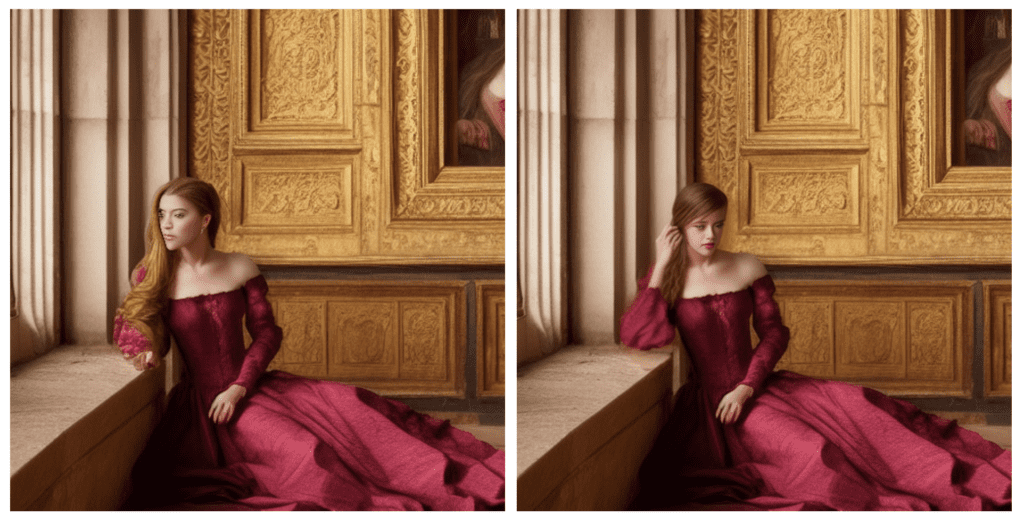
Inpainting is an iterative process. You can apply it as many times as you want to refine an image.
See this post for another more extreme example of inpainting.
See the tutorial for removing extra limbs with inpainting.
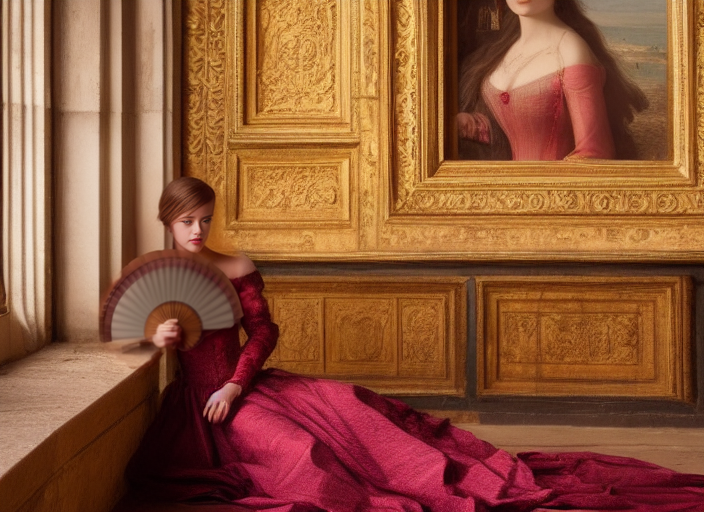
Adding new objects
Sometimes you want to add something new to the image.
Let’s try adding a hand fan to the picture.
First, upload the image to the inpainting canvas and create a mask around the chest and right arm.
Add the prompt “holding a hand fan” to the beginning of the original prompt. The prompt for inpainting is
(holding a hand fan: 1.2), [emma watson: amber heard: 0.5], (long hair:0.5), headLeaf, wearing stola, vast roman palace, large window, medieval renaissance palace, ((large room)), 4k, arstation, intricate, elegant, highly detailed
Adding new objects to the original prompt ensures consistency in style. You can adjust the keyword weight (1.2 above) to make the fan show.
Set masked content as latent noise.
Adjust denoising strength and CFG scale to fine-tune the inpainted images.
After some experimentation, our mission is accomplished:
Explanation of inpainting parameters
Denoising strength
Denoising strength controls how much respect the final image should pay to the original content. Setting it to 0 changes nothing. Setting to 1 you got an unrelated image.
Set to a low value if you want small change and a high value if you want big change.
CFG scale
Similar to usage in text-to-image, the Classifier Free Guidance scale is a parameter to control how much the model should respect your prompt.
1 – Mostly ignore your prompt.
3 – Be more creative.
7 – A good balance between following the prompt and freedom.
15 – Adhere more to the prompt.
30 – Strictly follow the prompt.
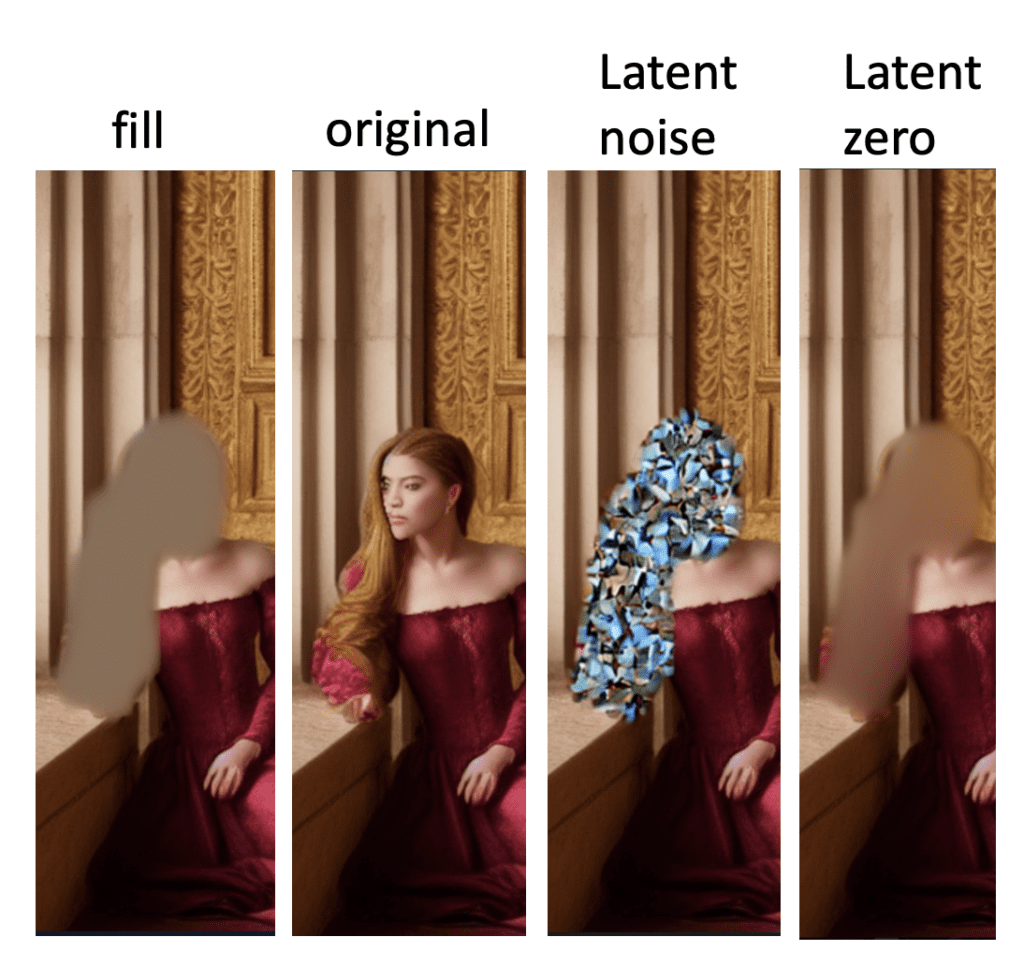
Masked content
Masked content controls how the masked area is initialized.
- Fill: Initialize with a highly blurred of the original image.
- Original: Unmodified.
- Latent noise: Masked area initialized with fill and random noise is added to the latent space.
- Latent nothing: Like latent noise except no noise is added to the latent space.
Below are the initial mask content before any sampling steps. This gives you some idea of what they are.
Tips for inpainting
Successful inpainting requires patience and skill. Here are some take homes for using inpainting
- One small area at a time.
- Keep masked content at Original and adjust denoising strength works 90% of the time.
- Play with masked content to see which one works the best.
- If nothing works well within AUTOMATIC1111’s settings, use photo editing software like Photoshop or GIMP to paint the area of interest with the rough shape and color you wanted. Upload that image and inpaint with original content.
Check out the Stable Diffusion Course for a step-by-step guided course.
Or continue to part 4 below.
This is part 3 of the beginner’s guide series.
Read part 1: Absolute beginner’s guide.
Read part 2: Prompt building.
Read part 4: Models.
Denoising Strength, So I suspect that you know if you have a blurry picture and load it into img2img and set a Denoising of 0.01 and Generate nothing happens but if you use Face restoration the face will improve, my question is how can you improve the whole picture not just the face with a low denoising value, basically making a blurry photo sharper, Cheers
You can try a low denoising strength ~0.3. Repeat a few rounds.
And nothing happens unless face restoration is ticked.
Hi, thanks for the tutorial. I am using SDXL Inpaint 1.0 and model is working well when i give it a mask drawn over a human, animal or an object. But when I give it mask of background to change the scene or an empty space to add an object, it returns me the original image. I tried adjusting the denoising strength and guidance scale but nothing worked
It is better to use inpaint “whole picture” setting for background. See https://stable-diffusion-art.com/inpainting/
Hi, im getting this error when trying to use SD Inpaint model.
RuntimeError: Sizes of tensors must match except in dimension 1. Expected size 1 but got size 2 for tensor number 1 in the list.
any ideas?
Check the dimension of the image you set. The width and the height have the be divisible by 8.
hello, thanks for the tutorial, i have just load your image sample. Then mask it using brush. Then add some prompt, then error happend below :
NansException: A tensor with all NaNs was produced in Unet. This could be either because there’s not enough precision to represent the picture, or because your video card does not support half type. Try setting the “Upcast cross attention layer to float32” option in Settings > Stable Diffusion or using the –no-half commandline argument to fix this. Use –disable-nan-check commandline argument to disable this check.
try a different model and see if the error goes away.
Thank you for this great tutorial! It has useful pointers to get me started with InPainting and so far the results are getting better from now on.
Thanks – reinstall seemed to fix this!
Any idea why when I select inpainting from the dropdown list, it never loads? It counts in seconds but entirely locks my PC to the point that after 5 minutes or more I reboot. I get the same when selecting the refiner, too, I let that count to over 3000 seconds before hard rebooting. Thanks in advance 🙂
You can take a look at the terminal output to see if there’s any error message.
I really like this website. It provides deep insight with simple explanations. My favorite chapters are basic prompting, ControlNet, and regional prompter. Without Andrew and team I would not have understood it.
Now it’s my turn to share something, especially about inpainting. I think we need to consider to combine inpainting with ControlNet. So, we tell SD how the inpainted part should look like. Based on my experience lineart is a good choice. We just need to draw some white line segments or curves and upload it to ControlNet.
I took an example of inpainting bad hand here:
https://powerpointopenposeeditor.wordpress.com/2023/07/03/chapter-8-correcting-band-hand-with-inpainting-and-lineart/
No matter what I do, I just get a blurred area if I select “latest noise”. Original + restore faces does nothing to the final image. I don’t understand what’s going on.
I typically select original. It sounds like you didn’t set denoising strength high enough. Set to 0.75 as a starting point and adjust accordingly.
It can do hands perfectly, you just need to stop using shit models 😛
And which model can be more realistic please?
this is truly an awesome set of tutorials. Thank you for the great work Andrew!
bang all of this shite, then when it doesn’t work do it yourself in gimp, lofl. AI CAN’T DO HANDS
You said select Latent noise for removing hand. How does that suppose to work? Latent noise just added lots of weird pixated blue dots in mask area on the top of extra hand and that was it. It just makes whole image look worser than before? This tutorial needs to explain more about what to do if you get oddly colorful pixated in place of extra hand when you select Latent noise.
Hi, the “oddly colorful pixels” for latent noise was for illustration purpose only. It was obtained by setting sampling step as 1. In practice, you set it to higher values like 25, so that the random colorful pixels would converge to a nice image.
Alternatively, you can use “original” but increase denoising strength.
Hi Andrew,
Thanks for your clarification. I followed your instruction and this example, and it didn’t remove extra hand at all. Just add more pixels on the top of it. I tried both Latent noise and original and it doesn’t make any difference. I can’t see how you achieved this in two steps when I tried to do this step 135 times and it got worse and worse (basically AI got dumber and dumber every time I repeat this step in my feeling).
I am lost. Maybe it’s worthwhile to proofread this tutorial because I feel that there is a missing step or two? Thanks for your help/clarification.
Hi Peter, the method should work in majority of cases and I am happy to revise to make it clearer. If you don’t mind, could you send me an image and prompt that doesn’t work, so I understand where the pain point is? [email protected]
you are right