
Running Stable Diffusion in the cloud (AWS) has many advantages. You rent the hardware on-demand and only pay for the time you use. You don’t need to worry about maintaining the hardware.
Recently, my Stable Diffusion PC has been down, so I set up a personal cloud server to run AUTOMATIC1111, ComfyUI, and SD Forge. To save storage space, the three Stable Diffusion software share models.
This article is the notes I wrote down when setting up the server on AWS.
Table of Contents
When do you want to use the Cloud?
The benefits of using a personal cloud server to run Stable Diffusion are:
- You don’t need to buy and maintain hardware. The cloud provider is responsible for the capital cost and maintenance.
- You can easily rent a more powerful GPU if you need it.
- You can access the machine anywhere, even when you are traveling.
Alternative
Setting up a cloud server requires some technical expertise and can be time-consuming.
Check out Think Diffusion for a fully managed A1111 and ComfyUI online service. They offer 20% extra credits to our readers. (and a small commission to support this site.)
Cloud server setup
This article will guide you in setting up a Stable Diffusion cloud server for personal use. You will use Amazon Web Service (AWS) to set up the cloud system.
AWS is Amazon’s cloud computing service. You can rent computer resources such as CPU, GPU, RAM, storage, and public IP addresses on demand. You only pay for the hours you use.
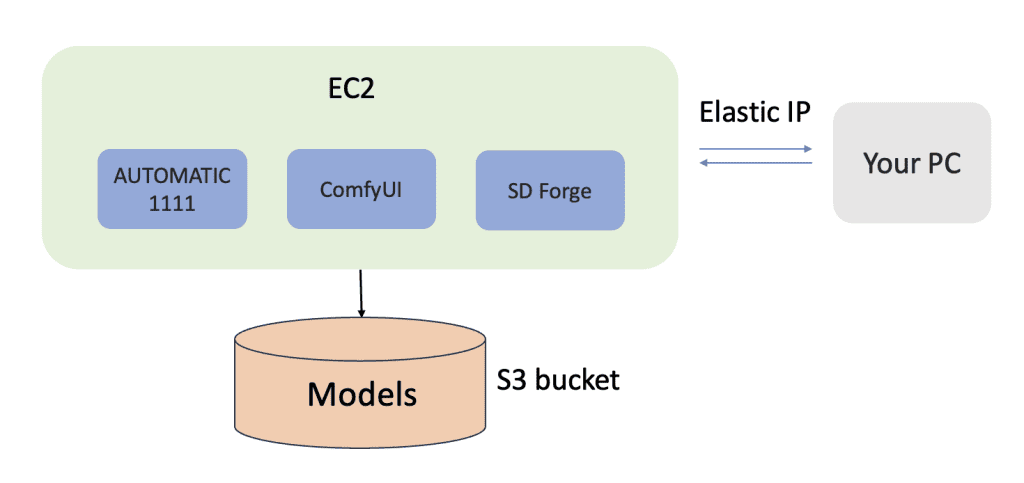
We will use:
- EC2: Compute instance to host the Stable Diffusion server. You can select the CPU, GPU, and RAM specs. The instance will have options to run A1111, ComfyUI, or SD Forge.
- Elastic IP: Fix the IP address of the EC2 instance. Without it, the IP address will change everytime you stop and start the instance.
- S3 bucket: Optional. For storing the AI models more economically.
Notes:
- You should stop the instance after each session. Otherwise, it will keep charging at the rate of a running instance.
- The storage is persistent, meaning that all the files and settings stay the same between sessions. It is no different from your local PC.
- See the summary of commands.
Prerequisite
To follow this tutorial, you should have a basic knowledge of using Linux with a terminal.
Create a new EC2 instance
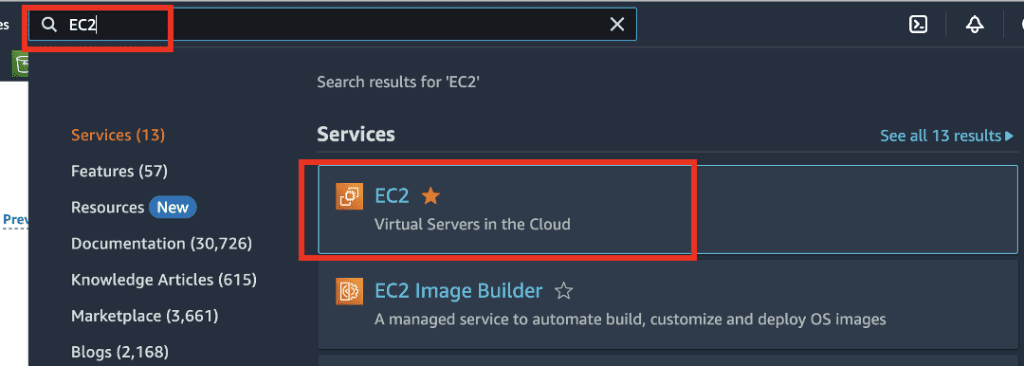
Log in to AWS. In the top search bar, type “EC2”. Click the EC2 service.
Click lanch instance.
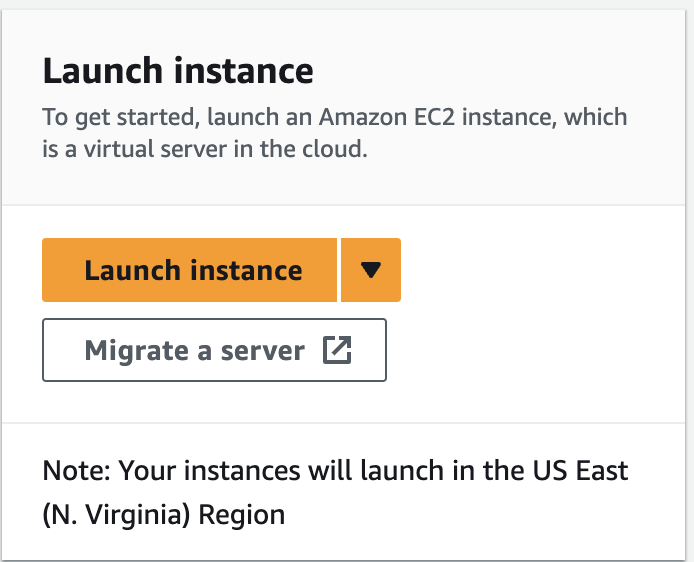
Now, you should be on the Launch Instance page. Use the following settings.
EC2 instance settings
Enter the following settings for the EC2 instance.
Name: stable diffusion
Amazon Machine Image: Ubuntu Server 24.04 LTS
Instance type: g4dn.xlarge
The g4dn.xlarge instance has 4 vCPU, 16 GB RAM, and one T4 GPU with 16GB of VRAM.
If you want more RAM, the next level up is g4dn.2xlarge with 8 vCPU and 32 GB RAM.
G4dn is not the only option. You can pick a different instance with a different price and speed tradeoff. You can see the pricing in the page below.
Security key
Next, you will need to create a security key pair. In Key pair (login), click Create new key pair. Give it a name (e.g. aws_sd) and click create pair.
The pem key file should be downloaded automatically.
Configure Storage
In Configure Storage, change the storage to 100 GiB.
Click Launch instance.
Set up EC2 instance
Open the Amazon EC2 console.
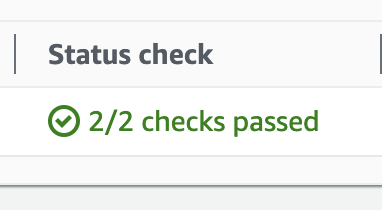
Select Instances in the sidebar. You should see your instance initializing. The machine is ready to use when the Status check changes to checks passed.
Select the EC2 instance and click Connect.
In the EC2 Instance Connect, ensure the Username is ubuntu and click Connect.
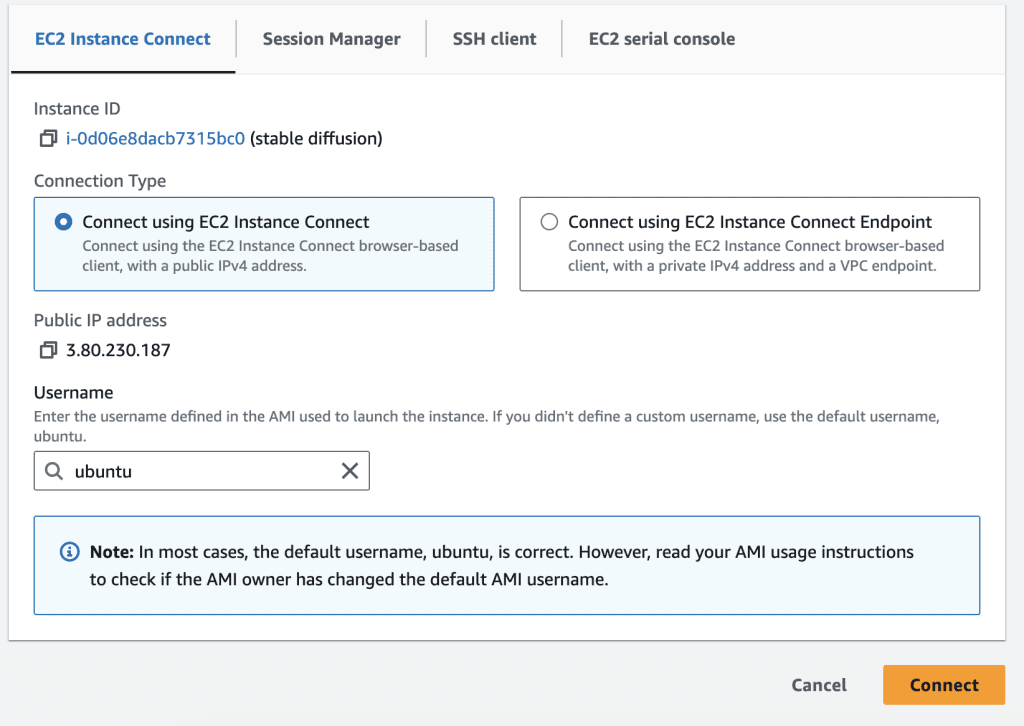
You should now have access to the machine’s terminal. Alternatively, you can ssh the machine from your local PC using the information in the SSH client tab.
Update software
The machine image is outdated. Update the machine by running the following commands.
sudo apt updatesudo apt upgradeInstall NVidia driver
You need to install the NVidia driver before using the GPU. Run the following command.
sudo apt install nvidia-driver-535You can use any newer version (the last 3 digits) available.
Install Python 3.10
You will need Python 3.10 to run the Stable Diffusion software.
First, add the deadsnakes repository,
sudo add-apt-repository ppa:deadsnakes/ppaInstall Python 3.10.
sudo apt install python3.10Set Python 3.10 as the default when you type python3.
sudo update-alternatives --install /usr/bin/python3 python3 /usr/bin/python3.10 2Verify that python3 is calling python 3.10.
python3 --versionInstall Python 3.10 venv. You will need it later when setting up AUTOMATIC1111.
sudo apt install python3.10-venvRestart the instance
You need to restart the EC2 instance to initialize the GPU driver.
Restart the instance by using the AWS interface. Instance state > Reboot instance.
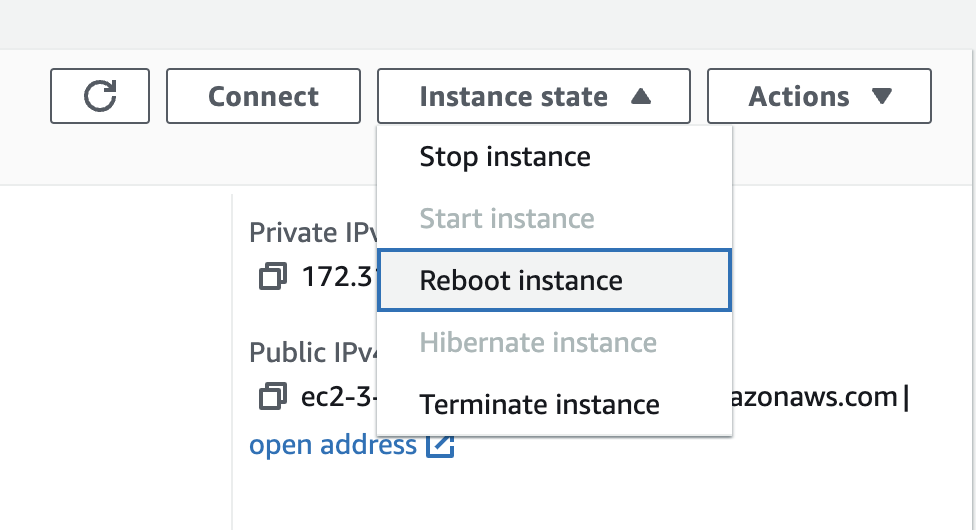
When the reboot is complete, and the instance is ready, start a new terminal.
Confirm that the NVidia driver is working.
nvidia-smiYou should see something like this.
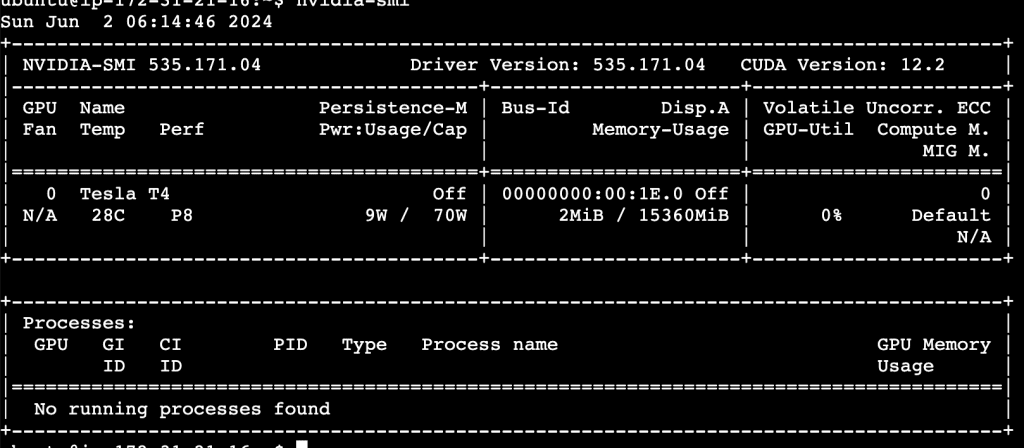
Now, the GPU is ready to be used.
Elastic IP
The public IP address of the EC2 instance will change whenever the instance is restarted.
An elastic IP is a fixed public IP address you rent from AWS. It is not straightly necessary but, for a small fee, you get a fixed IP address to your machine.
Open the Amazon EC2 console.
Select Elastic IP under Network Security.
Click Allocate Elastic IP > Allocate.
Select the Elastic IP > Action > Associate Elastic IP.
Choose the EC2 instance you just created under Instance.
Click Associate.
Now, your EC2 instance has a persistent IP address.
You can confirm the IP address by clicking EC2 > Instances. Select your EC2.
The public IP is listed in the Public IPv4 address.
AUTOMATIC1111
Clone repository
Go to the home directory.
cd ~Run the following command to clone AUTOMATIC1111 to your EC2.
git clone https://github.com/AUTOMATIC1111/stable-diffusion-webuiSet command line arguments
In the stable-diffusion-webui directory, edit the file webui-user.sh. The following example uses nano to edit the file. Feel free to use other editors.
cd stable-diffusion-webuinano webui-user.shUncomment the line with COMMANDLINE_ARGS and change to the following.
export COMMANDLINE_ARGS="--listen --opt-sdp-attention --enable-insecure-extension-access"This enables:
- Connecting to A1111 from another computer such as yours.
- Using the faster flash attention when using models.
- Allowing you to install extensions when connecting remotely.
Install and run webui
Start webui:
./webui.shIt will take some time to install. When it is done, you should see a local URL address http://0.0.0.0:7860.
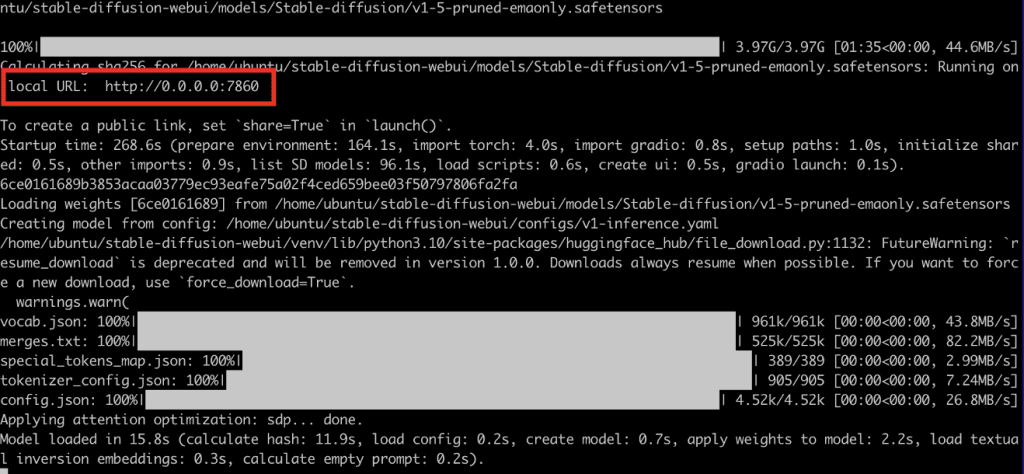
You will need to open port 7860 on the EC2 instance to connect to it.
Open port
Go to the instance > security. Click the link on the security group.
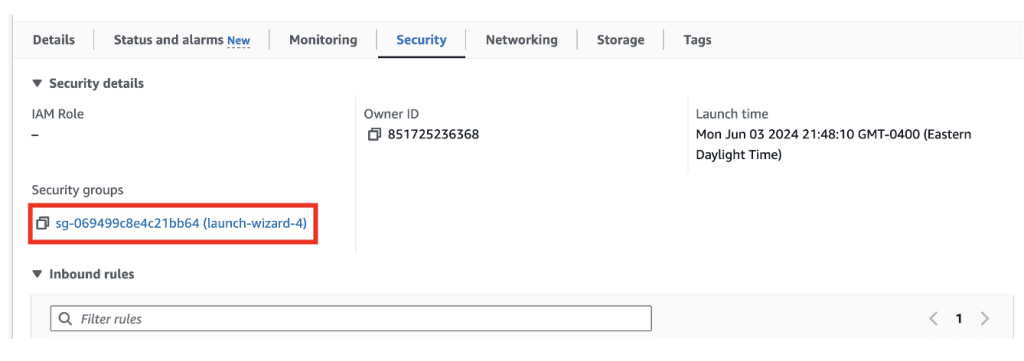
Inbound rule > Edit inbound rules.
Click Add rule. Add a Custom TCP port 7860. Allow connection source from My IP.
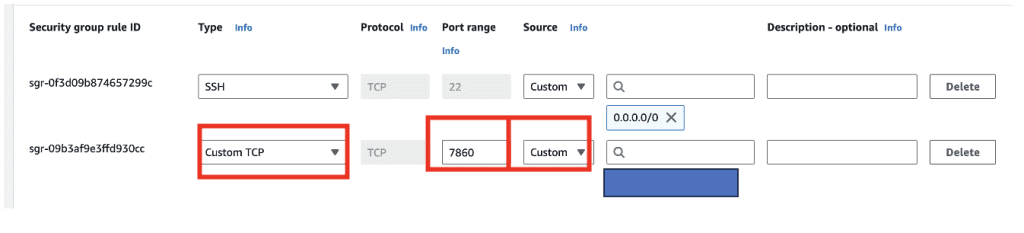
This restrict access of your Stable Diffusion port 7860 only from your IP address.
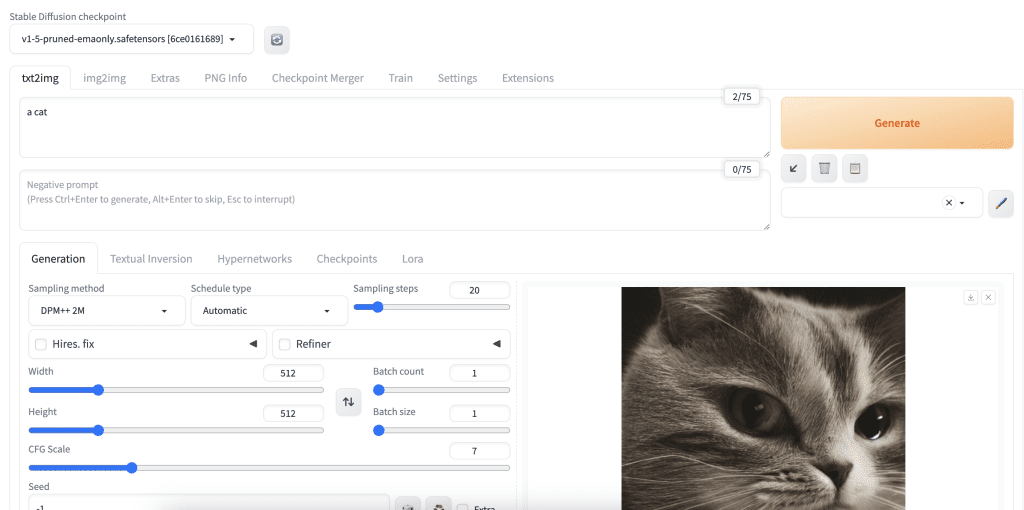
Test connection
Now, you should be able to access your AUTOMATIC1111 webui by the elastic IP address and the port 7860.
Go to EC2> Instance. Click on your instance and note the Public IPv4 address. For example, if the public IPv4 address is http://12.3.456.789, you can add “:7860” to the address to access AUTOTMATIC1111 from your browser.
http://12.3.456.789:7860Test using it to make sure it works.
ComfyUI
Install ComfyUI
To install ComfyUI, first go to the home folder.
cd ~Clone ComfyUI.
git clone https://github.com/comfyanonymous/ComfyUIUse AUTOMATIC1111’s models.
cd ComfyUIcp extra_model_paths.yaml.example extra_model_paths.yamlEdit extra_model_paths.yaml with nano.
nano extra_model_paths.yamlChange the line.
base_path: path/to/stable-diffusion-webui/To:
base_path: /home/ubuntu/stable-diffusion-webuiRun ComfyUI
You can use the python of AUTOMATIC1111 so that you don’t need to install all the libraries again. This saves some space.
~/stable-diffusion-webui/venv/bin/python main.py --listenYou should see it uses the port 8188.
Open port
Open the Amazon EC2 console > Instances. Select your Stable Diffusion instance > Security > Click the link of the security group.
Edit inbound Rule. Add custom TCP port 8188 and make it only accessible from your IP address.
See the previous instructions.
SD Forge
Install Forge
First, go to the home folder.
cd ~Clone the repository.
git clone https://github.com/lllyasviel/stable-diffusion-webui-forgeEdit webui-user.sh. Uncomment the following line and add the path pointing to A1111. This let you use A1111’s model files.
export COMMANDLINE_ARGS="--listen --forge-ref-a1111-home /home/ubuntu/stable-diffusion-webui"Complete the installation of and start SD Forge.
./webui.shNow you will find the Insight Face library is missing.
Quit Forge and install Insight Face.
./venv/bin/python -m pip install insightfaceStart Forge
./webui.shStoring models in S3 bucket (optional)
You can store all your models in the Elastic Block Storage (The local hard drive of your EC2). It is fast and convenient, but it is not the most cost-effective.
Alternatively, you can use AWS’s S3 bucket data storage service, which is about a few times cheaper. The tradeoff is extra setup steps and longer loading times when switching models.
Note: I would only recommend using an S3 bucket if you need many checkpoint models. Otherwise, a more straightforward method is to increase the storage size to 200 GB, for example.
Create an S3 bucket
Search S3 in the top search bar and select the S3 service.
Click Create Bucket. Enter a unique bucket name. You may need to add some numbers to the end to make it unique.
Click Create Bucket.
Create an IAM policy
Open the IAM console.
On the sidebar, click Roles > Create Role.
On the Select trusted entity page, select AWS Service and EC2 under Use Case. Click Next.
On the Add permission page, search and select AmazonS3FullAccess. Click Next.
On the next page, enter the role name, e.g. s3fullaccess. Click Create role.
Now, you have created a policy for an EC2 instance to access an S3 bucket.
Attach IAM policy to the EC2 instance
Open the Amazon EC2 console.
On the sidebar, select Instance.
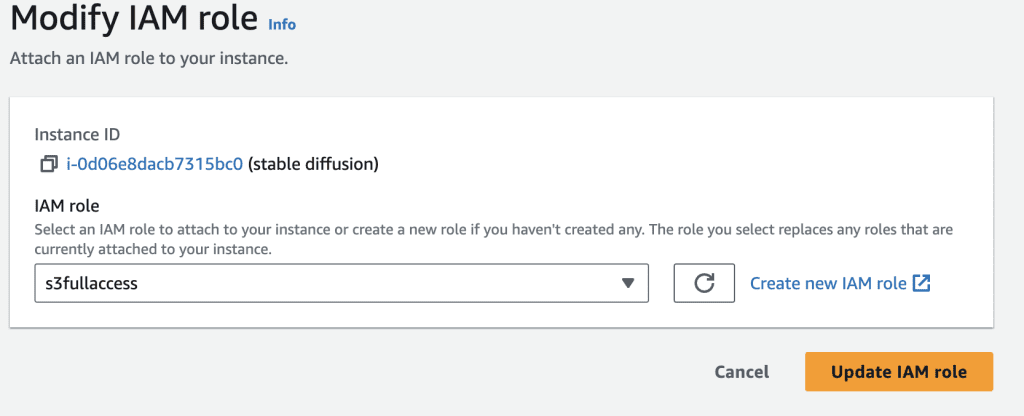
Select your Stable Diffusion EC2 instance. Then select Actions > Security > Modify IAM role.
Select the IAM role you just created and click Update IAM role.
Verifying access to S3
In the terminal of your EC2 instance, run the following commands to install the AWS command line interface tool.
sudo apt install unzipcurl "https://awscli.amazonaws.com/awscli-exe-linux-x86_64.zip" -o "awscliv2.zip"unzip awscliv2.zipsudo ./aws/installRun the following command to verify access to your S3 bucket. Substitute BUCKET_NAME with the unique name of your S3 bucket.
aws s3 ls s3://BUCKET_NAMEYou have access to your S3 bucket if it runs without error and output. You can change it to a non-existent bucket name, and you should see an error.
Mounting the s3 bucket
We will use the s3fs tool to mount the S3 bucket.
First, install the s3fs tool.
sudo apt install s3fsCreate the mount point.
sudo mkdir /s3Finally, mount the S3 bucket to the mount point.
sudo s3fs BUCKET_NAME /s3 -o iam_role=s3fullaccess -o use_cache=/tmp -o allow_other -o uid=1001 -o mp_umask=002 -o multireq_max=5 -o use_path_request_style -o url=https://s3.us-east-1.amazonaws.com -o endpoint=us-east-1You will need to substitute BUCKET_NAME with your S3 bucket’s name. You will also need to use an iam_role that matches the one you attached. You may need to change the url and endpoint parameters to match your EC2’s region.
The last step needs to be done every time you restart the instance. I simply create a script that runs this command. You can also use /etc/fstab to automate the mount, but this is out of the scope of this tutorial.
Moving the A1111 models to the S3 bucket
Now, we are in a position to move all the models to the S3 bucket. The best way is to move the models folder.
Make sure the S3 bucket is mounted to /s3. Then run:
cd ~/stable-diffusion-webuimv models /s3These commands move the whole models folder to the S3 bucket’s root location.
Then, create a symbolic link to the new models location.
ln -s /s3/modelsSummary of usage commands
You would normally stop (but not terminate) the instance after each usage session.
Start the instance
Open the Amazon EC2 console.
Select your Stable Diffusion instance > Instance state > Start instance.
Then connect to the terminal: Actions > Connect.
Mount S3
If you use a S3 bucket to store models, run the following command (with modification) to mount the S3 bucket.
sudo s3fs BUCKET_NAME /s3 -o iam_role=s3fullaccess -o use_cache=/tmp -o allow_other -o uid=1001 -o mp_umask=002 -o multireq_max=5 -o use_path_request_style -o url=https://s3.us-east-1.amazonaws.com -o endpoint=us-east-1Start AUTOMATIC1111
cd ~/stable-diffusion-webui; ./webui.shStart ComfyUI
~/stable-diffusion-webui/venv/bin/python main.py --listenStart SD Forge
cd ~/stable-diffusion-webui-forge; ./webui.shStop the instance
When you are done, stop the instance to avoid extra charges.
Open the Amazon EC2 console. Select your Stable Diffusion instance > Instance state > Stop instance.
This was a great resource to get started. Some renderings that would take around an hour on my local computer complete in minutes on that EC2 instance. There are, however, some advanced techniques that experienced AWS users can implement to save some money:
1) Spot-instance pricing can have sigificant savings over the default “on-demand” price, but mileage may vary depending on demand and region.
2) Creating an Amazon Machine Image of the completed system can let you quickly reload the whole setup at any time…but I must admit I’m having trouble getting that to work right now. There appear to be some particulars about prepping Ubuntu to make a functional AMI that I need to explore.
If I’m successful in working out my AMI kinks, and if I have time, I’ll try to do a writeup on my process.
Thanks again!
Hello!! I am currently using an organization with Google Workspace to host the models, loras, etc. I use Google Colab Pro mainly and everything works well, at the moment in the organization I have 4 TB, but I would like to increase it but I know that the cost will skyrocket, the storage with Amazon S3 EBS In the latter, I don’t know if it would be the solution or directly, free up space in Google Workspace and use local hard drives for it, do you think that Amazon S3 EBS would be cheaper than, for example, increasing Google Workspace space by adding more users, for example? ?
Thank you!
Amazon has an online cost calculator. You should be able to plugin the number. But EBS is not cheap. S3 makes more sense but they also charge for bandwidth out to the internet. Another option is cloudflare.
It’s amazing that I’ve been desperate for 2 years now :))
I’ve been using AWS for 2 years now and realized that Ubuntu Server has quite a lot of errors with python (or it’s my fault because I don’t know how to operate it). For example, A1111 during the upgrade to 1.6.
You can use the solution: Internal NVIDIA Deep Learning AMI 23.03.0-676eed8d-dcf5-4784-87d7-0de463205c17, it’s quite good, I’ve been using it for a long time (it’s also free).
In addition, requesting to upgrade to larger vCPU levels is also quite troublesome. If you request multiple times in a short period of time, they will try to deduct money and ask you to submit a declaration of your most recent expenses. card for further authentication…
You will have to pay many other fees such as:
– Instance : $0.526 per On Demand Linux g4dn.xlarge Instance Hour 21.64 Hrs, USD 11.38
– Storage: $0.08 per GB-month of General Purpose (gp3) provisioned storage – US East (N. Virginia), 348.55 GB-Mo, USD 27.88
– Static IP address: $0.005 per Idle public IPv4 address per hour, 1,236,172 Hrs, USD 6.18
– Data Transfer if it exceeds the free threshold
The average total cost I have to pay each month ranges from 40~50$ TvT
In addition, I also encountered many problems such as:
– Learn more about Linux commands
– You will have to download PuTTY and WinSCP if you are not familiar with the code interface or want to simply upload something to S3.
– If you run in the browser, sometimes you will encounter errors so you will have to download PuTTY to run further.
– If you get an error that you can’t run, it might be because you haven’t created a set of security group rules (I installed it like this and it doesn’t seem very safe :(( – but maybe it will help someone): HTTP
tcp
80
0.0.0.0/0
–
Custom TCP
tcp
21
0.0.0.0/0
–
ssh
tcp
22
0.0.0.0/0
–
Custom TCP
tcp
20
0.0.0.0/0
–
Custom TCP
tcp
7860
0.0.0.0/0
–
HTTPS
tcp
443
0.0.0.0/0
–
Some additional tips to speed up your image creation:
1. Install TCMalloc: sudo apt-get install libgoogle-perftools4 libtcmalloc-minimal4 -y
2. Install xformers, I recently saw it install itself, but if not, you can:
cd /home/ubuntu/stable-diffusion-webui/
source ./venv/bin/activate
cd repositories
git clone https://github.com/facebookresearch/xformers.git
cd xformers
git submodule update –init –recursive
pip install -r requirements.txt
pip install -e .
** These 2 things will help you increase 1 – 3 seconds when creating photos. It doesn’t look like much but it’s faster 🙂
But if you are not an expert like me, you will have a lot of trouble installing xformers and it will take a lot of time to process them and cost money to run, AWS calculates in hours.
I really hope someone can help me with the problems I’m always trying to solve. I hope Andrew can help me:
– Installing kohya_ss or Dreambooth both fails for many reasons or cannot run.
– The video creation extensions like deforum, mov2mov that I use all give me errors such as: unable to merge images, FFmpeg has an error or does not exist (for example, I don’t know how to handle this – error on deforum when merging images) ,…
Thank you Andrew.
Thanks for sharing some great infos!
For S3, you can use AWS’s web interface to upload files.
i got Kohya to work with the GUI. Now going for headless. I wouldn’t recommend g4dn.xlarge btw, had to shrink everything and reduce power to get it to work. Going to try g4dn.2xlarge but i think it will be the same with the 16GB memory. Will keep experimenting and report back. Headless is key!
Great! thanks for the update!
Hey, thanks for making this tutorial!
I’m trying to run Kohya headless. I wanted to run it with GUI first and then try to run it headless, but I can’t get the training command for a LoRA to run successfully.
1. Has anyone successfully run Kohya on AWS? either with GUI or headless? I used the same specs in this tutorial to create instance
2. If not Kohya, any other way to create a LoRA on AWS?
Thank you!
Sorry meant to respond to the entire post:
Hey, thanks for making this tutorial!
I’m trying to run Kohya headless. I wanted to run it with GUI first and then try to run it headless, but I can’t get the training command for a LoRA to run successfully.
1. Has anyone successfully run Kohya on AWS? either with GUI or headless? I used the same specs in this tutorial to create instance
2. If not Kohya, any other way to create a LoRA on AWS?
Thank you!
Thank you for the tutorial. Automatic 1111 seems to be working well, but comfy starts yet refuses to show up in the browser. I have opened the ports on my aws and tried reinstalling comfy a few times. is there any specific setting for comfy which needs to be modified so we can access it through the browser ?
You should only to the argument ‘–listen’ when you run comfyui and opening the port for you to access from your browser.
I’m wondering if there is a good “serverless” solution, with a tolerable cold boot time, that would allow the user to pay ONLY for the render time, and not the composite time. That should dramatically shrink costs in most cases, even from AWS – you only pay for the GPU when you are actually using it.
I’m busy looking into solutions like modal.com to see if there’s a sane workflow. Have you dabbled in any serverless solutions that don’t require a persist server instance?
Last time I checked, Diffus used a shared A1111 instance across multiple users.
The next closest things I see are those API for Stable Diffusion. Don’t know if they offer A1111 API.
Thank you so much Andrew! And just as I was asking about EC2 on your forum. (I do hope your PC recovers!)
If you get a chance to explore AWS SageMaker, let us know. 👍 It may be worth mentioning that Kohya SS GUI has a prompt during installation:
“Which compute environment are you running?”
You are supposed to select “This Machine” for local training, but I did notice ‘AWS SageMaker’ as one of the options to select. So, if you try training on it or find something useful, let us know! 🙂
Cheers,
Marko
Yeah, I see the benefit of cloud when my PC stops booting up. Since it is still under warranty, I will ship it back and it will be a long journey to recovery…
I didn’t know Kohya SS has the option to use sage maker. Would be interesting to see what integration it has with AWS.
It’s cool you can do this, but I’ll stick with my desktop for now. I might set it up as a server though, so I can fiddle around and have it run projects when I’m not home. (The 6GB laptop-grade 3050 is a zippy little workhorse as long as you stick to 512×512 or so, but more and more people are switching over to XL, and sooner or later the switch will give me more than it takes away.)
On a related topic, though, between A1111 and SD Forge, which do you recommend? Forge’s speed over A1111 isn’t really a concern; I have enough VRAM at home that it would only be a 6% speedup or so, which is negligible compared to the cost of re-learning where everything is and which plugins/techniques will work, etc. (ComfyUI is doing its own thing; I have it installed with some symlinks to my models folders, but rarely use it directly.)
P. S. Your “notify me of new posts by email” button might be broken. You’ve responded to questions I’ve asked you on other pages, but I never got an email for them.
Forge and A1111’s interface are almost identical, so you don’t need to relearn much when using Forge.
Some extensions and functions are only available on one of them. E.g. Generating transparent images and SVD videos are only available on Forge.
So I would keep both A1111 and Forge, and have them share models.
Thanks for letting me know about the issue of notification function! My wordpress is finicky. I will see what I can do with it.
Interesting!! One question. You pay what you use but, meanwhile, all our configurations, installations, models… keep them saved for next time use? Thanks!
Yes, the machine is persistent. This is similar to what companies that offer A1111 service use in the backend.
Kubernetes can also be interesting Maybe… but will be More expensive i think ….
Shared Cluster like used in something like cloud run could also be very interesting… but my Last Info was that using gpu with cloud run is Not rly possible at the Moment…
BR Daniel
I think kubernetes is for scaling up a system to a large number of users. You shouldn’t need it for personal use.
Hey! Thanks for that! do you have a rough estimation regarding costs?
BR Daniel
The exact cost depends on the kind and how much storage you use. It should be about ~ $0.6/hr.
With Spot pricing, I’ve averaged around $0.20/hour, and even as low as $0.04/hour! Mind that’s just for running the EC2 instance, and doesn’t include the fees for the EBS storage (“hard drives”) that it uses.
Great suggestions, thanks!