
The Flux Dev AI model is a great leap forward in local Diffusion models. It delivers quality surpassing Stable Diffusion 1.5 and XL models. Like Stable Diffusion models, you can train LoRA models on top of Flux to inject custom characters and styles.
In this post, I will provide a Google Colab notebook for training Flux LoRA models. With some setup, you can also run the training workflow locally if you have a good GPU card.
Table of Contents
Requirement
You must be a site member to access the Colab Training notebook and training images below.
You can download the ComfyUI training workflow for free to train locally.
Software
This is an advanced tutorial for training your own AI model. If you are new to Stable Diffusion or Flux AI models, get the Quick Start Guide for a newbie setup guide.
This training workflow uses ComfyUI as GUI. It uses the ComfyUI Flux Trainer custom node with modifications for ease of use, which calls the tried-and-true Kohya LoRA Trainer under the hood.
The training workflow consists of two parts:
- Generate captions of the training images automatically.
- Apply those images to Flux.1 dev model to train a custom LoRA model.
Alternatives
The Flux1.dev model requires more memory to run. Alternatively, you can train:
- Stable Diffusion 1.5 LoRA model
- Stable Diffusion 1.5 checkpoint model
- Stable Diffusion XL LoRA model
Training on Google Colab
What you need before you start
Google Colab Pro Plan
Due to the demanding computational resources required to train a Flux LoRA model, this notebook requires a paid Google Colab Pro plan. I use the Colab Pro Plan, but the Pro and Pro+ plans would work.
It typically takes ~4.5 hours to train a LoRA on an L4 instance. As of September 2024, the Colab Plus plan costs $10 a month, and you can use an L4 for about 33 hours. So, training a LoRA on Colab will set you back ~$1.40.
Training images
To train a Flux LoRA model, you need a set of training images. 10-20 images should do the trick for training a face.
ONLY PNG images are supported.

If you are a member of this site, you can download the example training images below.
They are all cropped to 1024×1024, but the training notebook supports different sizes.
Tips for good training images:
- The ideal size is 1024×1024. It is OK to use images with different sizes but be sure to include some close to 1024×1024.
- Diversity is the key. You want your subject to be in different scenes, settings, and clothing. Otherwise, the model will be confused about what you are trying to train.
- If you are training a face, include a few high-resolution headshots.
- The default parameters work for 10 – 20 images.
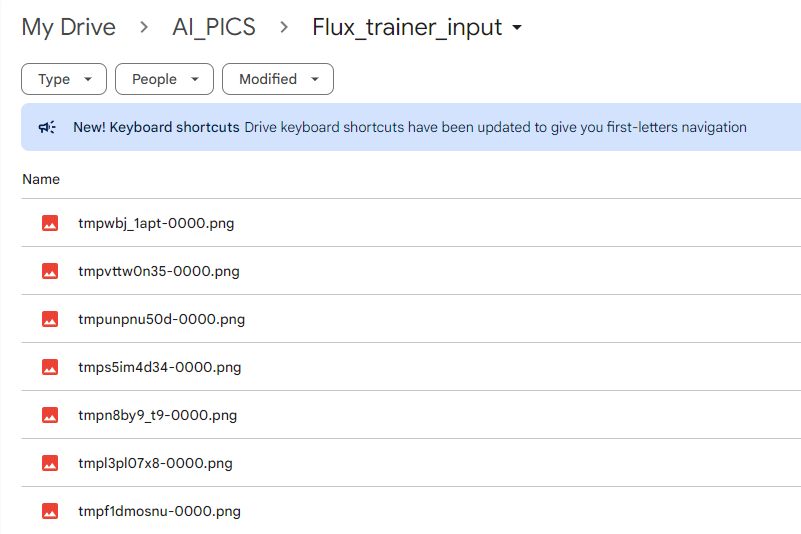
Step 1: Upload images to Google Drive
Put your training images in the folder AI_PICS > Flux_trainer_input in your Google Drive. (The folder names are case-sensitive.)
Note: Only PNG images are supported.
Step 2: Run the training notebook
Open the Google Colab Notebook below. You need to be a site member to access it
Click the Run button to start running the notebook.
You will be asked to grant permission to access your Google Drive. Grant permission, as it is necessary to load the training images and save the LoRA model.
It will take a few minutes to load. When it is done, you should see a URL and a Tunnel Password like the ones below.

Visit the URL and enter the Tunnel Password to access ComfyUI.
Step 3: Load the workflow
Download the Easy Flux Trainer workflow below and drop it on the ComfyUI browser page to load it.
You should see the workflow loaded like the screenshot below.
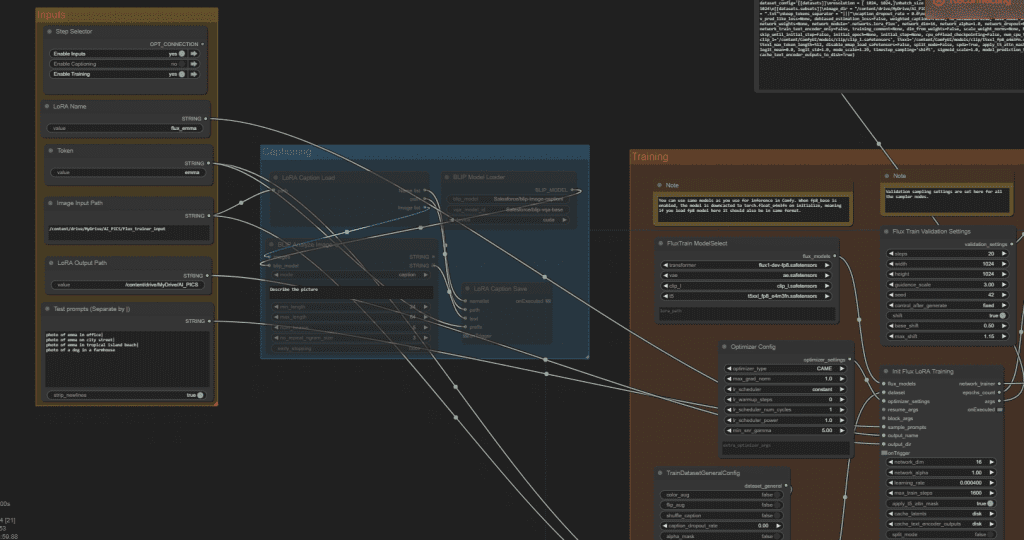
Step 4: Review input parameters
Review the input parameters in the Inputs group.
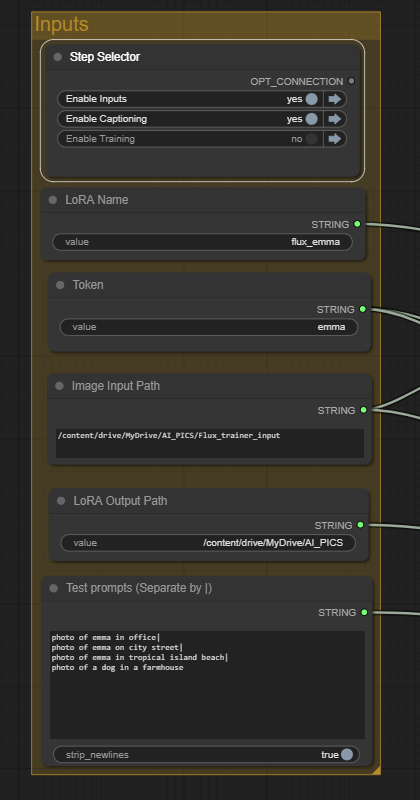
- LoRA name: The name of your LoRA. Pick a name that matches what you are training for.
- Token: The trigger keyword of your LoRA. Put this in the prompt when using your LoRA.
- Image Input Path: The folder path of your training images in Google Drive. You don’t need to change this unless you have put the images in another folder.
- LoRA Output Path: The folder where the LoRA model will be stored.
- Test prompts: The prompts that will be used to test the LoRA model during training. The prompts are separated by a vertical line (|). Include the token in the prompt if you want to test the training. Include a prompt to test not using the token to monitor over-training.
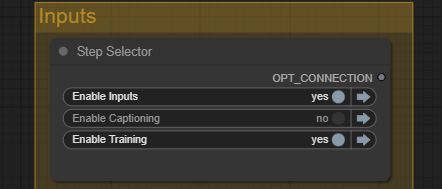
Step 5: Generate captions
The workflow can generate captions automatically for your training images using the BLIP Vision-language model.
In the Step Selector Input node, set
- Enable Captioning: Yes
- Enable Training: No

Click Queue Prompt to start captioning.
After it is done, you will see text files with the same name of the training images created in the image input folder.
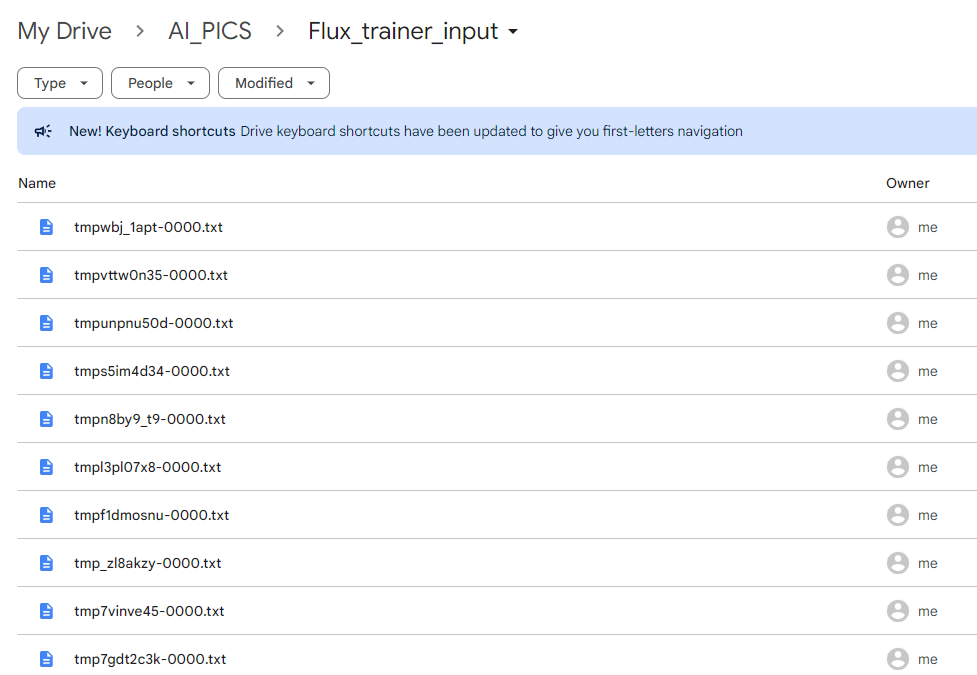
You can optionally revise them to better match the images.
Step 6: Start training
Now, we get to the fun part of training.
In the Step Selector input node, set:
- Enable Captioning: No
- Enable Training: Yes
The workflow is configured to test and save the LoRA with the prompts you specified every 400 steps. You should see 4 blocks of Flux Train Loop nodes like the one shown below.
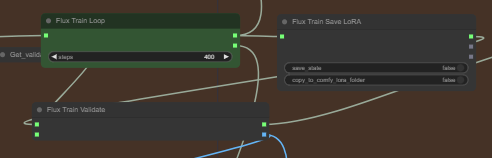
You can change the steps values to change intervals between saving/testing the LoRA.
Click Queue Prompt to run the workflow.
Running on an L4 GPU instance (default) takes ~1.5 hours per 400 steps. If you can visualize the training results in ComfyUI like below.
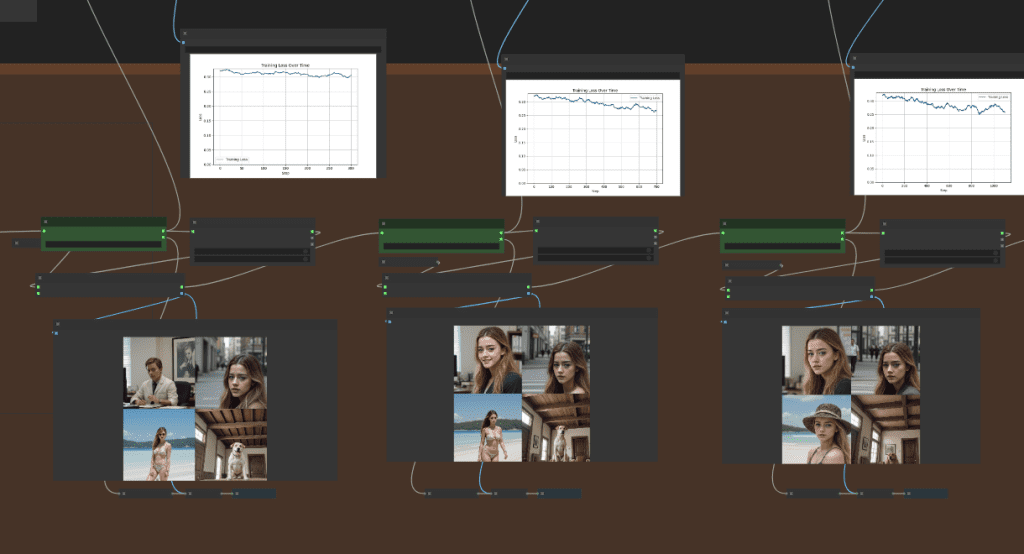
If you don’t see the images, you can find them in the samples folder inside the LoRA output folder. The default output folder is AI_PICS > Flux_trainer_output in your Google Drive.
It typically takes 1,000-1,500 steps to train a LoRA for Flux.1 Dev.
Feel free to stop the workflow early if you have achieved the results already.
Step 7: Test the LoRA
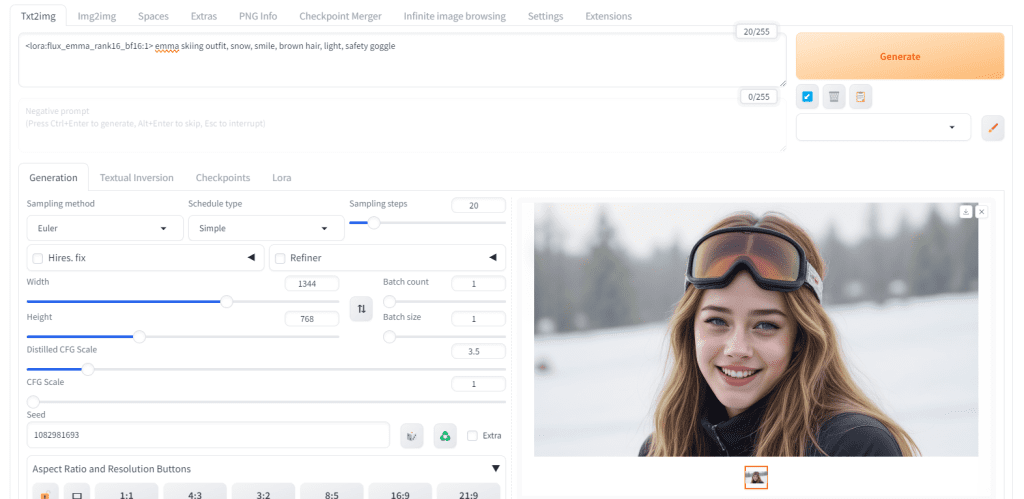
Follow the tutorial How to use LoRA with Flux AI model to test your LoRA.
In addition to adding the LoRA, remember to add the token (trigger keyword) to the prompt. (“emma” in this tutorial)
<lora:flux_emma_rank16_bf16:1> emma skiing outfit, snow, smile, brown hair, light, safety goggle
Use Ngrok for faster connection
If you experience a slow connection with Local Tunnel, you can try using ngrok instead of Local Tunnel to establish a public connection. It is a more stable alternative.
You will need to set up a free account and get an authoken.
- Go to https://ngrok.com/
- Create an account.
- Verify email.
- Copy the authoken from https://dashboard.ngrok.com/get-started/your-authtoken and paste it into the NGROK field in the notebook.
Training locally on Windows/Linux
You can use this workflow locally, although I won’t support it. You can download the workflow JSON file above.
Software setup
It is better to install a fresh copy of ComfyUI just for running this training because the workflow has a low tolerance for conflicts.
Use Pytorch 2.4.
Install ComfyUI Manager.
Drop the workflow to the ComfyUI browser page and install the missing custom nodes using the ComfyUI Manager.
I am not able to keep up with the breaking changes in the custom nodes. So, the workflow only works for particular versions of ComfyUI and custom nodes.
Use git checkout to check out the following commits accordingly.
- ComfyUI:
9c5fca75f46f7b9f18c07385925f151a7629a94f - ComfyUI-Manager:
ce874d5c624d5713e7db334d1e0c50aeddb90d82 - was-node-suite-comfyui:
bb34bd429ab74a22a7f58551429a0f3046e1464e - rgthree-comfy:
cae8e2ad28ddb933a916b852d26b95726f60529f - ComfyUI-KJNodes:
7aa591b3a64a3f83ec2c3e92758d0bb0926a6fe0 - ComfyUI-FluxTrainer:
c3aa4ea889153519f7be40636b44d5a03a060816 - Image-Captioning-in-ComfyUI:
9b24deea8eef830da059aa91cac9690ecde19fda
For example, run the following under the ComfyUI folder.
git checkout 9c5fca75f46f7b9f18c07385925f151a7629a94fAnd the following under the custom_nodes\ComfyUI-FluxTrainer folder.
git checkout c3aa4ea889153519f7be40636b44d5a03a060816Follow the Flux tutorial for ComfyUI to download the Flux.1 Dev UNet model, text encoders, and VAE.
Hi Andrew, I have been using your notebooks and tutorials for some months now, and I find them very helpful. I was wondering if there is a version of your notebook and workflow for Lora training with Flux-Krea?
It should be compatible but needs modification for a direct training.
The lora created with this notebook should work with krea. Does it produce the intended results?
Yes, it does, of course, but there is a difference in output quality when the Flux-1 trained Lora’s I am using Krea, that’s why I was asking, is there a way of modifying the notebook or the workflow to train on Krea? I will be great
Untested: try replace this line
downloadModel(‘https://huggingface.co/Comfy-Org/flux1-dev/resolve/main/flux1-dev-fp8.safetensors’)
with
downloadModel(‘https://huggingface.co/Comfy-Org/FLUX.1-Krea-dev_ComfyUI/resolve/main/split_files/diffusion_models/flux1-krea-dev_fp8_scaled.safetensors’)
Thank you, let me try
Hello Sir. I used this trainer few days ago but now it comes up with an error.
It comes up right after starting the script so its likely not upload to hugging face which is one of the last steps?
Some LLM models are suggesting that this might be due to use of fp8 models?
Thank you for all your hard work here
—
nitFluxLoRATraining
Cannot copy out of meta tensor; no data! Please use torch.nn.Module.to_empty() instead of torch.nn.Module.to() when moving module from meta to a different device.
025-08-07 09:02:54,140 – root – INFO – got prompt
2025-08-07 09:02:54,277 – root – ERROR – Failed to validate prompt for output 73:
2025-08-07 09:02:54,277 – root – ERROR – * UploadToHuggingFace 89:
2025-08-07 09:02:54,277 – root – ERROR – – Required input is missing: network_trainer
2025-08-07 09:02:54,277 – root – ERROR – Output will be ignored
Hi, the notebook is fixed. Please follow the link on this page to get the new notebook v1.2
Getting an error
LoRA Caption Save
list index out of range
# ComfyUI Error Report
## Error Details
– **Node Type:** LoRA Caption Save
– **Exception Type:** IndexError
– **Exception Message:** list index out of range
## Stack Trace
“`
File “/content/ComfyUI/execution.py”, line 323, in execute
output_data, output_ui, has_subgraph = get_output_data(obj, input_data_all, execution_block_cb=execution_block_cb, pre_execute_cb=pre_execute_cb)
File “/content/ComfyUI/execution.py”, line 198, in get_output_data
return_values = _map_node_over_list(obj, input_data_all, obj.FUNCTION, allow_interrupt=True, execution_block_cb=execution_block_cb, pre_execute_cb=pre_execute_cb)
File “/content/ComfyUI/execution.py”, line 169, in _map_node_over_list
process_inputs(input_dict, i)
File “/content/ComfyUI/execution.py”, line 158, in process_inputs
results.append(getattr(obj, func)(**inputs))
File “/content/ComfyUI/custom_nodes/Image-Captioning-in-ComfyUI/LoRAcaption.py”, line 53, in save_text_file
filename = self.generate_filename(path, namelistsplit, file_extension)
File “/content/ComfyUI/custom_nodes/Image-Captioning-in-ComfyUI/LoRAcaption.py”, line 62, in generate_filename
filename = f”{namelistsplit[counter-1]}{extension}”
“`
## System Information
– **ComfyUI Version:** flux_train_colab
– **Arguments:** main.py –dont-print-server
– **OS:** posix
– **Python Version:** 3.10.12 (main, May 27 2025, 17:12:29) [GCC 11.4.0]
– **Embedded Python:** false
– **PyTorch Version:** 2.4.1+cu121
## Devices
– **Name:** cuda:0 NVIDIA L4 : cudaMallocAsync
– **Type:** cuda
– **VRAM Total:** 23795204096
– **VRAM Free:** 20992511520
– **Torch VRAM Total:** 2550136832
– **Torch VRAM Free:** 13258272
## Logs
“`
2025-07-07 21:54:19,503 – root – INFO – Total VRAM 22693 MB, total RAM 54232 MB
2025-07-07 21:54:19,503 – root – INFO – pytorch version: 2.4.1+cu121
2025-07-07 21:54:19,504 – root – INFO – Set vram state to: NORMAL_VRAM
2025-07-07 21:54:19,504 – root – INFO – Device: cuda:0 NVIDIA L4 : cudaMallocAsync
2025-07-07 21:54:20,526 – root – INFO – Using pytorch cross attention
2025-07-07 21:54:22,137 – root – INFO – [Prompt Server] web root: /content/ComfyUI/web
2025-07-07 21:54:25,863 – root – INFO – Total VRAM 22693 MB, total RAM 54232 MB
2025-07-07 21:54:25,863 – root – INFO – pytorch version: 2.4.1+cu121
2025-07-07 21:54:25,864 – root – INFO – Set vram state to: NORMAL_VRAM
2025-07-07 21:54:25,864 – root – INFO – Device: cuda:0 NVIDIA L4 : cudaMallocAsync
2025-07-07 21:54:25,975 – root – INFO –
Import times for custom nodes:
2025-07-07 21:54:25,976 – root – INFO – 0.0 seconds: /content/ComfyUI/custom_nodes/websocket_image_save.py
2025-07-07 21:54:25,976 – root – INFO – 0.0 seconds: /content/ComfyUI/custom_nodes/Image-Captioning-in-ComfyUI
2025-07-07 21:54:25,976 – root – INFO – 0.0 seconds: /content/ComfyUI/custom_nodes/rgthree-comfy
2025-07-07 21:54:25,976 – root – INFO – 0.1 seconds: /content/ComfyUI/custom_nodes/ComfyUI-KJNodes
2025-07-07 21:54:25,976 – root – INFO – 0.1 seconds: /content/ComfyUI/custom_nodes/ComfyUI-Manager
2025-07-07 21:54:25,976 – root – INFO – 1.3 seconds: /content/ComfyUI/custom_nodes/ComfyUI-FluxTrainer
2025-07-07 21:54:25,976 – root – INFO – 1.6 seconds: /content/ComfyUI/custom_nodes/was-node-suite-comfyui
2025-07-07 21:54:25,976 – root – INFO –
2025-07-07 22:00:31,200 – root – INFO – got prompt
2025-07-07 22:00:56,628 – root – ERROR – !!! Exception during processing !!! list index out of range
2025-07-07 22:00:56,629 – root – ERROR – Traceback (most recent call last):
File “/content/ComfyUI/execution.py”, line 323, in execute
output_data, output_ui, has_subgraph = get_output_data(obj, input_data_all, execution_block_cb=execution_block_cb, pre_execute_cb=pre_execute_cb)
File “/content/ComfyUI/execution.py”, line 198, in get_output_data
return_values = _map_node_over_list(obj, input_data_all, obj.FUNCTION, allow_interrupt=True, execution_block_cb=execution_block_cb, pre_execute_cb=pre_execute_cb)
File “/content/ComfyUI/execution.py”, line 169, in _map_node_over_list
process_inputs(input_dict, i)
File “/content/ComfyUI/execution.py”, line 158, in process_inputs
results.append(getattr(obj, func)(**inputs))
File “/content/ComfyUI/custom_nodes/Image-Captioning-in-ComfyUI/LoRAcaption.py”, line 53, in save_text_file
filename = self.generate_filename(path, namelistsplit, file_extension)
File “/content/ComfyUI/custom_nodes/Image-Captioning-in-ComfyUI/LoRAcaption.py”, line 62, in generate_filename
filename = f”{namelistsplit[counter-1]}{extension}”
IndexError: list index out of range
2025-07-07 22:00:56,629 – root – INFO – Prompt executed in 25.19 seconds
2025-07-07 22:11:44,231 – root – INFO – got prompt
2025-07-07 22:11:44,345 – root – ERROR – !!! Exception during processing !!! list index out of range
2025-07-07 22:11:44,346 – root – ERROR – Traceback (most recent call last):
File “/content/ComfyUI/execution.py”, line 323, in execute
output_data, output_ui, has_subgraph = get_output_data(obj, input_data_all, execution_block_cb=execution_block_cb, pre_execute_cb=pre_execute_cb)
File “/content/ComfyUI/execution.py”, line 198, in get_output_data
return_values = _map_node_over_list(obj, input_data_all, obj.FUNCTION, allow_interrupt=True, execution_block_cb=execution_block_cb, pre_execute_cb=pre_execute_cb)
File “/content/ComfyUI/execution.py”, line 169, in _map_node_over_list
process_inputs(input_dict, i)
File “/content/ComfyUI/execution.py”, line 158, in process_inputs
results.append(getattr(obj, func)(**inputs))
File “/content/ComfyUI/custom_nodes/Image-Captioning-in-ComfyUI/LoRAcaption.py”, line 53, in save_text_file
filename = self.generate_filename(path, namelistsplit, file_extension)
File “/content/ComfyUI/custom_nodes/Image-Captioning-in-ComfyUI/LoRAcaption.py”, line 62, in generate_filename
filename = f”{namelistsplit[counter-1]}{extension}”
IndexError: list index out of range
2025-07-07 22:11:44,346 – root – INFO – Prompt executed in 0.00 seconds
2025-07-07 22:12:00,022 – root – INFO – got prompt
2025-07-07 22:12:00,103 – root – ERROR – !!! Exception during processing !!! list index out of range
2025-07-07 22:12:00,103 – root – ERROR – Traceback (most recent call last):
File “/content/ComfyUI/execution.py”, line 323, in execute
output_data, output_ui, has_subgraph = get_output_data(obj, input_data_all, execution_block_cb=execution_block_cb, pre_execute_cb=pre_execute_cb)
File “/content/ComfyUI/execution.py”, line 198, in get_output_data
return_values = _map_node_over_list(obj, input_data_all, obj.FUNCTION, allow_interrupt=True, execution_block_cb=execution_block_cb, pre_execute_cb=pre_execute_cb)
File “/content/ComfyUI/execution.py”, line 169, in _map_node_over_list
process_inputs(input_dict, i)
File “/content/ComfyUI/execution.py”, line 158, in process_inputs
results.append(getattr(obj, func)(**inputs))
File “/content/ComfyUI/custom_nodes/Image-Captioning-in-ComfyUI/LoRAcaption.py”, line 53, in save_text_file
filename = self.generate_filename(path, namelistsplit, file_extension)
File “/content/ComfyUI/custom_nodes/Image-Captioning-in-ComfyUI/LoRAcaption.py”, line 62, in generate_filename
filename = f”{namelistsplit[counter-1]}{extension}”
IndexError: list index out of range
2025-07-07 22:12:00,104 – root – INFO – Prompt executed in 0.00 seconds
2025-07-07 22:13:28,238 – root – INFO – got prompt
2025-07-07 22:13:28,285 – root – ERROR – !!! Exception during processing !!! list index out of range
2025-07-07 22:13:28,285 – root – ERROR – Traceback (most recent call last):
File “/content/ComfyUI/execution.py”, line 323, in execute
output_data, output_ui, has_subgraph = get_output_data(obj, input_data_all, execution_block_cb=execution_block_cb, pre_execute_cb=pre_execute_cb)
File “/content/ComfyUI/execution.py”, line 198, in get_output_data
return_values = _map_node_over_list(obj, input_data_all, obj.FUNCTION, allow_interrupt=True, execution_block_cb=execution_block_cb, pre_execute_cb=pre_execute_cb)
File “/content/ComfyUI/execution.py”, line 169, in _map_node_over_list
process_inputs(input_dict, i)
File “/content/ComfyUI/execution.py”, line 158, in process_inputs
results.append(getattr(obj, func)(**inputs))
File “/content/ComfyUI/custom_nodes/Image-Captioning-in-ComfyUI/LoRAcaption.py”, line 53, in save_text_file
filename = self.generate_filename(path, namelistsplit, file_extension)
File “/content/ComfyUI/custom_nodes/Image-Captioning-in-ComfyUI/LoRAcaption.py”, line 62, in generate_filename
filename = f”{namelistsplit[counter-1]}{extension}”
IndexError: list index out of range
2025-07-07 22:13:28,285 – root – INFO – Prompt executed in 0.00 seconds
“`
## Attached Workflow
Please make sure that workflow does not contain any sensitive information such as API keys or passwords.
“`
Workflow too large. Please manually upload the workflow from local file system.
“`
## Additional Context
(Please add any additional context or steps to reproduce the error here)
Just tested and it is working correctly.
1. It only works with png images.
2. Make sure the input image folder contains only the image files but not the previously generated caption files.
Testing again today, the first node doesn’t work and appears red
Warning: Missing Node Types
When loading the graph, the following node types were not found:
Fast Groups Muter (rgthree)
No selected item
Nodes that have failed to load will show as red on the graph.
After restarting a couple times, it worked, but now I get this:
All images are png
ComfyUI Error Report
## Error Details
– **Node Type:** BLIP Analyze Image
– **Exception Type:** TypeError
– **Exception Message:** ‘NoneType’ object is not iterable
## Stack Trace
“`
File “/content/ComfyUI/execution.py”, line 323, in execute
output_data, output_ui, has_subgraph = get_output_data(obj, input_data_all, execution_block_cb=execution_block_cb, pre_execute_cb=pre_execute_cb)
File “/content/ComfyUI/execution.py”, line 198, in get_output_data
return_values = _map_node_over_list(obj, input_data_all, obj.FUNCTION, allow_interrupt=True, execution_block_cb=execution_block_cb, pre_execute_cb=pre_execute_cb)
File “/content/ComfyUI/execution.py”, line 169, in _map_node_over_list
process_inputs(input_dict, i)
File “/content/ComfyUI/execution.py”, line 158, in process_inputs
results.append(getattr(obj, func)(**inputs))
File “/content/ComfyUI/custom_nodes/was-node-suite-comfyui/WAS_Node_Suite.py”, line 11322, in blip_caption_image
for image in images:
“`
## System Information
– **ComfyUI Version:** flux_train_colab
– **Arguments:** main.py –dont-print-server
– **OS:** posix
– **Python Version:** 3.10.12 (main, May 27 2025, 17:12:29) [GCC 11.4.0]
– **Embedded Python:** false
– **PyTorch Version:** 2.4.1+cu121
## Devices
– **Name:** cuda:0 NVIDIA A100-SXM4-40GB : cudaMallocAsync
– **Type:** cuda
– **VRAM Total:** 42474471424
– **VRAM Free:** 39480610336
– **Torch VRAM Total:** 2550136832
– **Torch VRAM Free:** 21777952
## Logs
“`
2025-07-09 14:23:35,799 – root – INFO – Total VRAM 40507 MB, total RAM 85479 MB
2025-07-09 14:23:35,799 – root – INFO – pytorch version: 2.4.1+cu121
2025-07-09 14:23:35,800 – root – INFO – Set vram state to: NORMAL_VRAM
2025-07-09 14:23:35,800 – root – INFO – Device: cuda:0 NVIDIA A100-SXM4-40GB : cudaMallocAsync
2025-07-09 14:23:36,497 – root – INFO – Using pytorch cross attention
2025-07-09 14:23:37,395 – root – INFO – [Prompt Server] web root: /content/ComfyUI/web
2025-07-09 14:23:40,452 – root – INFO – Total VRAM 40507 MB, total RAM 85479 MB
2025-07-09 14:23:40,452 – root – INFO – pytorch version: 2.4.1+cu121
2025-07-09 14:23:40,453 – root – INFO – Set vram state to: NORMAL_VRAM
2025-07-09 14:23:40,453 – root – INFO – Device: cuda:0 NVIDIA A100-SXM4-40GB : cudaMallocAsync
2025-07-09 14:23:40,471 – root – INFO –
Import times for custom nodes:
2025-07-09 14:23:40,471 – root – INFO – 0.0 seconds: /content/ComfyUI/custom_nodes/Image-Captioning-in-ComfyUI
2025-07-09 14:23:40,471 – root – INFO – 0.0 seconds: /content/ComfyUI/custom_nodes/websocket_image_save.py
2025-07-09 14:23:40,471 – root – INFO – 0.0 seconds: /content/ComfyUI/custom_nodes/rgthree-comfy
2025-07-09 14:23:40,471 – root – INFO – 0.0 seconds: /content/ComfyUI/custom_nodes/ComfyUI-KJNodes
2025-07-09 14:23:40,471 – root – INFO – 0.1 seconds: /content/ComfyUI/custom_nodes/ComfyUI-Manager
2025-07-09 14:23:40,471 – root – INFO – 1.0 seconds: /content/ComfyUI/custom_nodes/ComfyUI-FluxTrainer
2025-07-09 14:23:40,471 – root – INFO – 1.5 seconds: /content/ComfyUI/custom_nodes/was-node-suite-comfyui
2025-07-09 14:23:40,471 – root – INFO –
2025-07-09 15:01:17,821 – root – INFO – got prompt
2025-07-09 15:01:30,940 – root – ERROR – !!! Exception during processing !!! ‘NoneType’ object is not iterable
2025-07-09 15:01:30,943 – root – ERROR – Traceback (most recent call last):
File “/content/ComfyUI/execution.py”, line 323, in execute
output_data, output_ui, has_subgraph = get_output_data(obj, input_data_all, execution_block_cb=execution_block_cb, pre_execute_cb=pre_execute_cb)
File “/content/ComfyUI/execution.py”, line 198, in get_output_data
return_values = _map_node_over_list(obj, input_data_all, obj.FUNCTION, allow_interrupt=True, execution_block_cb=execution_block_cb, pre_execute_cb=pre_execute_cb)
File “/content/ComfyUI/execution.py”, line 169, in _map_node_over_list
process_inputs(input_dict, i)
File “/content/ComfyUI/execution.py”, line 158, in process_inputs
results.append(getattr(obj, func)(**inputs))
File “/content/ComfyUI/custom_nodes/was-node-suite-comfyui/WAS_Node_Suite.py”, line 11322, in blip_caption_image
for image in images:
TypeError: ‘NoneType’ object is not iterable
2025-07-09 15:01:30,944 – root – INFO – Prompt executed in 13.04 seconds
2025-07-09 15:02:22,561 – root – INFO – got prompt
2025-07-09 15:02:22,608 – root – ERROR – !!! Exception during processing !!! ‘NoneType’ object is not iterable
2025-07-09 15:02:22,609 – root – ERROR – Traceback (most recent call last):
File “/content/ComfyUI/execution.py”, line 323, in execute
output_data, output_ui, has_subgraph = get_output_data(obj, input_data_all, execution_block_cb=execution_block_cb, pre_execute_cb=pre_execute_cb)
File “/content/ComfyUI/execution.py”, line 198, in get_output_data
return_values = _map_node_over_list(obj, input_data_all, obj.FUNCTION, allow_interrupt=True, execution_block_cb=execution_block_cb, pre_execute_cb=pre_execute_cb)
File “/content/ComfyUI/execution.py”, line 169, in _map_node_over_list
process_inputs(input_dict, i)
File “/content/ComfyUI/execution.py”, line 158, in process_inputs
results.append(getattr(obj, func)(**inputs))
File “/content/ComfyUI/custom_nodes/was-node-suite-comfyui/WAS_Node_Suite.py”, line 11322, in blip_caption_image
for image in images:
TypeError: ‘NoneType’ object is not iterable
2025-07-09 15:02:22,610 – root – INFO – Prompt executed in 0.00 seconds
2025-07-09 15:02:28,393 – root – INFO – got prompt
2025-07-09 15:02:28,440 – root – ERROR – !!! Exception during processing !!! ‘NoneType’ object is not iterable
2025-07-09 15:02:28,441 – root – ERROR – Traceback (most recent call last):
File “/content/ComfyUI/execution.py”, line 323, in execute
output_data, output_ui, has_subgraph = get_output_data(obj, input_data_all, execution_block_cb=execution_block_cb, pre_execute_cb=pre_execute_cb)
File “/content/ComfyUI/execution.py”, line 198, in get_output_data
return_values = _map_node_over_list(obj, input_data_all, obj.FUNCTION, allow_interrupt=True, execution_block_cb=execution_block_cb, pre_execute_cb=pre_execute_cb)
File “/content/ComfyUI/execution.py”, line 169, in _map_node_over_list
process_inputs(input_dict, i)
File “/content/ComfyUI/execution.py”, line 158, in process_inputs
results.append(getattr(obj, func)(**inputs))
File “/content/ComfyUI/custom_nodes/was-node-suite-comfyui/WAS_Node_Suite.py”, line 11322, in blip_caption_image
for image in images:
TypeError: ‘NoneType’ object is not iterable
2025-07-09 15:02:28,441 – root – INFO – Prompt executed in 0.00 seconds
2025-07-09 15:02:31,300 – root – INFO – got prompt
2025-07-09 15:02:31,349 – root – ERROR – !!! Exception during processing !!! ‘NoneType’ object is not iterable
2025-07-09 15:02:31,349 – root – ERROR – Traceback (most recent call last):
File “/content/ComfyUI/execution.py”, line 323, in execute
output_data, output_ui, has_subgraph = get_output_data(obj, input_data_all, execution_block_cb=execution_block_cb, pre_execute_cb=pre_execute_cb)
File “/content/ComfyUI/execution.py”, line 198, in get_output_data
return_values = _map_node_over_list(obj, input_data_all, obj.FUNCTION, allow_interrupt=True, execution_block_cb=execution_block_cb, pre_execute_cb=pre_execute_cb)
File “/content/ComfyUI/execution.py”, line 169, in _map_node_over_list
process_inputs(input_dict, i)
File “/content/ComfyUI/execution.py”, line 158, in process_inputs
results.append(getattr(obj, func)(**inputs))
File “/content/ComfyUI/custom_nodes/was-node-suite-comfyui/WAS_Node_Suite.py”, line 11322, in blip_caption_image
for image in images:
TypeError: ‘NoneType’ object is not iterable
2025-07-09 15:02:31,350 – root – INFO – Prompt executed in 0.00 seconds
2025-07-09 15:05:27,645 – root – INFO – got prompt
2025-07-09 15:05:27,692 – root – ERROR – !!! Exception during processing !!! ‘NoneType’ object is not iterable
2025-07-09 15:05:27,693 – root – ERROR – Traceback (most recent call last):
File “/content/ComfyUI/execution.py”, line 323, in execute
output_data, output_ui, has_subgraph = get_output_data(obj, input_data_all, execution_block_cb=execution_block_cb, pre_execute_cb=pre_execute_cb)
File “/content/ComfyUI/execution.py”, line 198, in get_output_data
return_values = _map_node_over_list(obj, input_data_all, obj.FUNCTION, allow_interrupt=True, execution_block_cb=execution_block_cb, pre_execute_cb=pre_execute_cb)
File “/content/ComfyUI/execution.py”, line 169, in _map_node_over_list
process_inputs(input_dict, i)
File “/content/ComfyUI/execution.py”, line 158, in process_inputs
results.append(getattr(obj, func)(**inputs))
File “/content/ComfyUI/custom_nodes/was-node-suite-comfyui/WAS_Node_Suite.py”, line 11322, in blip_caption_image
for image in images:
TypeError: ‘NoneType’ object is not iterable
2025-07-09 15:05:27,694 – root – INFO – Prompt executed in 0.00 seconds
“`
## Attached Workflow
Please make sure that workflow does not contain any sensitive information such as API keys or passwords.
“`
Workflow too large. Please manually upload the workflow from local file system.
“`
## Additional Context
(Please add any additional context or steps to reproduce the error here)
It couldn’t find the images. Did you put the images in google drive in the AI_PICS > Flux_trainer_input folder?
I’m putting the images in the right folder but still find the same issue
Also getting this now:
# ComfyUI Error Report
## Error Details
– **Node Type:** LoRA Caption Save
– **Exception Type:** IndexError
– **Exception Message:** list index out of range
## Stack Trace
“`
File “/content/ComfyUI/execution.py”, line 323, in execute
output_data, output_ui, has_subgraph = get_output_data(obj, input_data_all, execution_block_cb=execution_block_cb, pre_execute_cb=pre_execute_cb)
File “/content/ComfyUI/execution.py”, line 198, in get_output_data
return_values = _map_node_over_list(obj, input_data_all, obj.FUNCTION, allow_interrupt=True, execution_block_cb=execution_block_cb, pre_execute_cb=pre_execute_cb)
File “/content/ComfyUI/execution.py”, line 169, in _map_node_over_list
process_inputs(input_dict, i)
File “/content/ComfyUI/execution.py”, line 158, in process_inputs
results.append(getattr(obj, func)(**inputs))
File “/content/ComfyUI/custom_nodes/Image-Captioning-in-ComfyUI/LoRAcaption.py”, line 53, in save_text_file
filename = self.generate_filename(path, namelistsplit, file_extension)
File “/content/ComfyUI/custom_nodes/Image-Captioning-in-ComfyUI/LoRAcaption.py”, line 65, in generate_filename
filename = f”{namelistsplit[counter-1]}{extension}”
“`
## System Information
– **ComfyUI Version:** flux_train_colab
– **Arguments:** main.py –dont-print-server
– **OS:** posix
– **Python Version:** 3.10.12 (main, May 27 2025, 17:12:29) [GCC 11.4.0]
– **Embedded Python:** false
– **PyTorch Version:** 2.4.1+cu121
## Devices
– **Name:** cuda:0 NVIDIA A100-SXM4-40GB : cudaMallocAsync
– **Type:** cuda
– **VRAM Total:** 42474471424
– **VRAM Free:** 39379815968
– **Torch VRAM Total:** 2550136832
– **Torch VRAM Free:** 13258272
## Logs
“`
2025-07-27 15:26:27,060 – root – INFO – Total VRAM 40507 MB, total RAM 85479 MB
2025-07-27 15:26:27,060 – root – INFO – pytorch version: 2.4.1+cu121
2025-07-27 15:26:27,061 – root – INFO – Set vram state to: NORMAL_VRAM
2025-07-27 15:26:27,061 – root – INFO – Device: cuda:0 NVIDIA A100-SXM4-40GB : cudaMallocAsync
2025-07-27 15:26:27,804 – root – INFO – Using pytorch cross attention
2025-07-27 15:26:28,836 – root – INFO – [Prompt Server] web root: /content/ComfyUI/web
2025-07-27 15:26:30,881 – root – INFO – Total VRAM 40507 MB, total RAM 85479 MB
2025-07-27 15:26:30,881 – root – INFO – pytorch version: 2.4.1+cu121
2025-07-27 15:26:30,881 – root – INFO – Set vram state to: NORMAL_VRAM
2025-07-27 15:26:30,882 – root – INFO – Device: cuda:0 NVIDIA A100-SXM4-40GB : cudaMallocAsync
2025-07-27 15:26:32,705 – root – INFO –
Import times for custom nodes:
2025-07-27 15:26:32,705 – root – INFO – 0.0 seconds: /content/ComfyUI/custom_nodes/websocket_image_save.py
2025-07-27 15:26:32,705 – root – INFO – 0.0 seconds: /content/ComfyUI/custom_nodes/Image-Captioning-in-ComfyUI
2025-07-27 15:26:32,705 – root – INFO – 0.0 seconds: /content/ComfyUI/custom_nodes/rgthree-comfy
2025-07-27 15:26:32,705 – root – INFO – 0.1 seconds: /content/ComfyUI/custom_nodes/ComfyUI-KJNodes
2025-07-27 15:26:32,705 – root – INFO – 0.1 seconds: /content/ComfyUI/custom_nodes/ComfyUI-Manager
2025-07-27 15:26:32,705 – root – INFO – 1.2 seconds: /content/ComfyUI/custom_nodes/ComfyUI-FluxTrainer
2025-07-27 15:26:32,705 – root – INFO – 1.8 seconds: /content/ComfyUI/custom_nodes/was-node-suite-comfyui
2025-07-27 15:26:32,705 – root – INFO –
2025-07-27 15:28:25,539 – root – INFO – got prompt
2025-07-27 15:28:50,440 – root – ERROR – !!! Exception during processing !!! list index out of range
2025-07-27 15:28:50,441 – root – ERROR – Traceback (most recent call last):
File “/content/ComfyUI/execution.py”, line 323, in execute
output_data, output_ui, has_subgraph = get_output_data(obj, input_data_all, execution_block_cb=execution_block_cb, pre_execute_cb=pre_execute_cb)
File “/content/ComfyUI/execution.py”, line 198, in get_output_data
return_values = _map_node_over_list(obj, input_data_all, obj.FUNCTION, allow_interrupt=True, execution_block_cb=execution_block_cb, pre_execute_cb=pre_execute_cb)
File “/content/ComfyUI/execution.py”, line 169, in _map_node_over_list
process_inputs(input_dict, i)
File “/content/ComfyUI/execution.py”, line 158, in process_inputs
results.append(getattr(obj, func)(**inputs))
File “/content/ComfyUI/custom_nodes/Image-Captioning-in-ComfyUI/LoRAcaption.py”, line 53, in save_text_file
filename = self.generate_filename(path, namelistsplit, file_extension)
File “/content/ComfyUI/custom_nodes/Image-Captioning-in-ComfyUI/LoRAcaption.py”, line 65, in generate_filename
filename = f”{namelistsplit[counter-1]}{extension}”
IndexError: list index out of range
2025-07-27 15:28:50,442 – root – INFO – Prompt executed in 24.86 seconds
2025-07-27 15:31:36,655 – root – INFO – got prompt
2025-07-27 15:31:36,838 – root – ERROR – !!! Exception during processing !!! list index out of range
2025-07-27 15:31:36,838 – root – ERROR – Traceback (most recent call last):
File “/content/ComfyUI/execution.py”, line 323, in execute
output_data, output_ui, has_subgraph = get_output_data(obj, input_data_all, execution_block_cb=execution_block_cb, pre_execute_cb=pre_execute_cb)
File “/content/ComfyUI/execution.py”, line 198, in get_output_data
return_values = _map_node_over_list(obj, input_data_all, obj.FUNCTION, allow_interrupt=True, execution_block_cb=execution_block_cb, pre_execute_cb=pre_execute_cb)
File “/content/ComfyUI/execution.py”, line 169, in _map_node_over_list
process_inputs(input_dict, i)
File “/content/ComfyUI/execution.py”, line 158, in process_inputs
results.append(getattr(obj, func)(**inputs))
File “/content/ComfyUI/custom_nodes/Image-Captioning-in-ComfyUI/LoRAcaption.py”, line 53, in save_text_file
filename = self.generate_filename(path, namelistsplit, file_extension)
File “/content/ComfyUI/custom_nodes/Image-Captioning-in-ComfyUI/LoRAcaption.py”, line 65, in generate_filename
filename = f”{namelistsplit[counter-1]}{extension}”
IndexError: list index out of range
2025-07-27 15:31:36,838 – root – INFO – Prompt executed in 0.01 seconds
2025-07-27 15:31:59,879 – root – INFO – got prompt
2025-07-27 15:31:59,962 – root – ERROR – !!! Exception during processing !!! list index out of range
2025-07-27 15:31:59,962 – root – ERROR – Traceback (most recent call last):
File “/content/ComfyUI/execution.py”, line 323, in execute
output_data, output_ui, has_subgraph = get_output_data(obj, input_data_all, execution_block_cb=execution_block_cb, pre_execute_cb=pre_execute_cb)
File “/content/ComfyUI/execution.py”, line 198, in get_output_data
return_values = _map_node_over_list(obj, input_data_all, obj.FUNCTION, allow_interrupt=True, execution_block_cb=execution_block_cb, pre_execute_cb=pre_execute_cb)
File “/content/ComfyUI/execution.py”, line 169, in _map_node_over_list
process_inputs(input_dict, i)
File “/content/ComfyUI/execution.py”, line 158, in process_inputs
results.append(getattr(obj, func)(**inputs))
File “/content/ComfyUI/custom_nodes/Image-Captioning-in-ComfyUI/LoRAcaption.py”, line 53, in save_text_file
filename = self.generate_filename(path, namelistsplit, file_extension)
File “/content/ComfyUI/custom_nodes/Image-Captioning-in-ComfyUI/LoRAcaption.py”, line 65, in generate_filename
filename = f”{namelistsplit[counter-1]}{extension}”
IndexError: list index out of range
2025-07-27 15:31:59,963 – root – INFO – Prompt executed in 0.00 seconds
2025-07-27 15:34:14,582 – root – INFO – got prompt
2025-07-27 15:34:14,629 – root – ERROR – !!! Exception during processing !!! list index out of range
2025-07-27 15:34:14,629 – root – ERROR – Traceback (most recent call last):
File “/content/ComfyUI/execution.py”, line 323, in execute
output_data, output_ui, has_subgraph = get_output_data(obj, input_data_all, execution_block_cb=execution_block_cb, pre_execute_cb=pre_execute_cb)
File “/content/ComfyUI/execution.py”, line 198, in get_output_data
return_values = _map_node_over_list(obj, input_data_all, obj.FUNCTION, allow_interrupt=True, execution_block_cb=execution_block_cb, pre_execute_cb=pre_execute_cb)
File “/content/ComfyUI/execution.py”, line 169, in _map_node_over_list
process_inputs(input_dict, i)
File “/content/ComfyUI/execution.py”, line 158, in process_inputs
results.append(getattr(obj, func)(**inputs))
File “/content/ComfyUI/custom_nodes/Image-Captioning-in-ComfyUI/LoRAcaption.py”, line 53, in save_text_file
filename = self.generate_filename(path, namelistsplit, file_extension)
File “/content/ComfyUI/custom_nodes/Image-Captioning-in-ComfyUI/LoRAcaption.py”, line 65, in generate_filename
filename = f”{namelistsplit[counter-1]}{extension}”
IndexError: list index out of range
2025-07-27 15:34:14,630 – root – INFO – Prompt executed in 0.00 seconds
2025-07-27 15:34:49,920 – root – INFO – got prompt
2025-07-27 15:34:49,967 – root – ERROR – !!! Exception during processing !!! list index out of range
2025-07-27 15:34:49,967 – root – ERROR – Traceback (most recent call last):
File “/content/ComfyUI/execution.py”, line 323, in execute
output_data, output_ui, has_subgraph = get_output_data(obj, input_data_all, execution_block_cb=execution_block_cb, pre_execute_cb=pre_execute_cb)
File “/content/ComfyUI/execution.py”, line 198, in get_output_data
return_values = _map_node_over_list(obj, input_data_all, obj.FUNCTION, allow_interrupt=True, execution_block_cb=execution_block_cb, pre_execute_cb=pre_execute_cb)
File “/content/ComfyUI/execution.py”, line 169, in _map_node_over_list
process_inputs(input_dict, i)
File “/content/ComfyUI/execution.py”, line 158, in process_inputs
results.append(getattr(obj, func)(**inputs))
File “/content/ComfyUI/custom_nodes/Image-Captioning-in-ComfyUI/LoRAcaption.py”, line 53, in save_text_file
filename = self.generate_filename(path, namelistsplit, file_extension)
File “/content/ComfyUI/custom_nodes/Image-Captioning-in-ComfyUI/LoRAcaption.py”, line 65, in generate_filename
filename = f”{namelistsplit[counter-1]}{extension}”
IndexError: list index out of range
2025-07-27 15:34:49,968 – root – INFO – Prompt executed in 0.00 seconds
2025-07-27 15:38:00,731 – root – INFO – got prompt
2025-07-27 15:38:00,778 – root – ERROR – !!! Exception during processing !!! list index out of range
2025-07-27 15:38:00,778 – root – ERROR – Traceback (most recent call last):
File “/content/ComfyUI/execution.py”, line 323, in execute
output_data, output_ui, has_subgraph = get_output_data(obj, input_data_all, execution_block_cb=execution_block_cb, pre_execute_cb=pre_execute_cb)
File “/content/ComfyUI/execution.py”, line 198, in get_output_data
return_values = _map_node_over_list(obj, input_data_all, obj.FUNCTION, allow_interrupt=True, execution_block_cb=execution_block_cb, pre_execute_cb=pre_execute_cb)
File “/content/ComfyUI/execution.py”, line 169, in _map_node_over_list
process_inputs(input_dict, i)
File “/content/ComfyUI/execution.py”, line 158, in process_inputs
results.append(getattr(obj, func)(**inputs))
File “/content/ComfyUI/custom_nodes/Image-Captioning-in-ComfyUI/LoRAcaption.py”, line 53, in save_text_file
filename = self.generate_filename(path, namelistsplit, file_extension)
File “/content/ComfyUI/custom_nodes/Image-Captioning-in-ComfyUI/LoRAcaption.py”, line 65, in generate_filename
filename = f”{namelistsplit[counter-1]}{extension}”
IndexError: list index out of range
2025-07-27 15:38:00,778 – root – INFO – Prompt executed in 0.00 seconds
“`
## Attached Workflow
Please make sure that workflow does not contain any sensitive information such as API keys or passwords.
“`
Workflow too large. Please manually upload the workflow from local file system.
“`
## Additional Context
(Please add any additional context or steps to reproduce the error here)
Hi, it is the same error of not finding the image files.
1. Have you given permission to connect to google drive?
2. Do you connect to the correct google account?
3. Use the file explorer (folder icon on the side bar) to confirm that you see the files in google drive. They should be under drive > MyDrive > AI_PICS > Flux_trainer_input. (Case sensitive)
4. Try using the L4 instance for testing. (You are using A100)
Hi, I recently started getting this message in Colab , just at the beginning. Is there something that needs to be changed in the ComfyUI workflow or the Colab notebook? Could you suggest-
—————————————-
BLIP Model Loader
Due to a serious vulnerability issue in `torch.load`, even with `weights_only=True`, we now require users to upgrade torch to at least v2.6 in order to use the function. This version restriction does not apply when loading files with safetensors. See the vulnerability report here https://nvd.nist.gov/vuln/detail/CVE-2025-32434
—————————————————
You should be using models with safetensors format or from a trusted source. This risk is not a big concern when running on an isolated server like colab since it is not your machine.
That’s the point, and there was no problem till now, and I have been using your notebook and workflow downloaded from here and running on Colab as per your instructions. It’s started popping up on 21st and won’t even run the caption prompt, and started showing that message in both Colab and ComfyUi running on Colab. Also the next time on loading the ConFyUI workflow it started showing that it has missing nodes in the training modules/node. My question is this ‘torch.load’ which need to be changed, then is it in the colab notebook or the workflow? Did you have an updated workflow or notebook which I missed, I think I am using the latest one you updated in feb 2025. If you could help
OK, the bug is fixed.
Thanks, it works now
This used to work for me in December last year, but now I’m receiving the following error:
⠼/content/ComfyUI
[START] Security scan
/content/venv/bin/python: No module named pip
Failed to execute startup-script: /content/ComfyUI/custom_nodes/ComfyUI-Manager/prestartup_script.py / Command ‘[‘/content/venv/bin/python’, ‘-m’, ‘pip’, ‘freeze’]’ returned non-zero exit status 1.
Prestartup times for custom nodes:
0.0 seconds: /content/ComfyUI/custom_nodes/rgthree-comfy
0.0 seconds (PRESTARTUP FAILED): /content/ComfyUI/custom_nodes/ComfyUI-Manager
Traceback (most recent call last):
File “/content/ComfyUI/main.py”, line 87, in
import comfy.utils
File “/content/ComfyUI/comfy/utils.py”, line 20, in
import torch
ModuleNotFoundError: No module named ‘torch’
It is working on my side. The notebook was last updated 2/25/2025. Please make sure you are using the latest copy.
Question regarding training with 1:1 images but generating different aspect ratios:
I’m confused about which aspect ratio to use for training Flux LoRA models. I want to eventually create 16:9 and 4:3 images, but this article and others recommend using 1024×1024 (1:1) for training. However, my research suggests that training data should match output data to avoid inconsistencies, as other sources claim mismatched aspect ratios can negatively impact generation quality.
Can I train with 1024×1024 (1:1) images and still generate other aspect ratios (16:9, 4:3) without significant quality issues? I’d appreciate an answer with supporting evidence.
In the meantime, we share a link to ChatGPT. Please note that I am Japanese and not English.
https://chatgpt.com/share/67c41448-dce0-800e-bde5-6f4acd7eab00
Yes, you can use square images only for training. Include the subject with different zoom levels (i.e, number of pixels covering the face).
Thank you very much for your reply!
I have successfully trained two flux models from your notebook over the past few weeks. But I’ve tried today several times, and each time I load your workflow, the following node types are reported missing: VisualizeLoss, FluxTrainValidate, FluxTrainValidationSettings, FluxTrainSave, FluxTrainEnd, and OptimizerConfig. Do you have any idea why this is happening?
Hi, there was an update in colab env. fixed.
Currently I operate through Windows 7, if that’s going to be a problem?
No, this training uses google colab, a cloud compute platform.
The JSON / Notebook has an error right now. The “Step Selector” is not available anymore. And i can not find the fast groups muter anymore. Seems that in the current version of rgthree its not availbale anymore. Can you fix it?
I just tested the notebook on colab and it is working correctly. It uses specific old versions of custom nodes so any new updates of the nodes would not affect this notebook.
I cannot load workflow, it says
When loading the graph, the following node types were not found
SetNode
GetNode
VisualizeLoss
Display Any (rgthree)
AddLabel
SomethingToString
ImageConcatFromBatch
ImageBatchMulti
GetImageSizeAndCount
FluxTrainValidate
FluxTrainValidationSettings
FluxTrainSave
FluxTrainEnd
LoRA Caption Load
OptimizerConfig
TrainDatasetGeneralConfig
TrainDatasetAdd
BLIP Model Loader
LoRA Caption Save
BLIP Analyze Image
UploadToHuggingFace
FluxTrainModelSelect
InitFluxLoRATraining
FluxTrainLoop
StringConstantMultiline
Fast Groups Muter (rgthree)
No worry, I open the wrong notebook 🙁
What happens if I use a A100 GPU? Is it faster, better, worse?
It should speed up training with the right setting but I haven’t tried.
2 hours for 200 steps training
*2000 steps
Hi again,
Trying to use it via collab, got the following:
FluxTrainLoop
Allocation on device
and on logs, got these lines with errors:
2024-10-26 02:43:11,402 – root – INFO – got prompt
2024-10-26 02:43:11,835 – root – ERROR – Failed to validate prompt for output 73:
2024-10-26 02:43:11,835 – root – ERROR – * UploadToHuggingFace 89:
2024-10-26 02:43:11,835 – root – ERROR – – Required input is missing: network_trainer
2024-10-26 02:43:11,835 – root – ERROR – Output will be ignored
“`
## Attached Workflow
Please make sure that workflow does not contain any sensitive information such as API keys or passwords.
“`
Workflow too large. Please manually upload the workflow from local file system.
“`
## Additional Context
(Please add any additional context or steps to reproduce the error here)
any ideas? thank you!
The colab notebook is fixed. Please try again!
Just tried again and seemed to get the same error…
# ComfyUI Error Report
## Error Details
– **Node Type:** FluxTrainLoop
– **Exception Type:** torch.OutOfMemoryError
– **Exception Message:** Allocation on device
## Stack Trace
(…)
2024-10-27 10:04:24,690 – root – INFO – got prompt
2024-10-27 10:04:24,844 – root – ERROR – Failed to validate prompt for output 73:
2024-10-27 10:04:24,844 – root – ERROR – * UploadToHuggingFace 89:
2024-10-27 10:04:24,844 – root – ERROR – – Required input is missing: network_trainer
2024-10-27 10:04:24,844 – root – ERROR – Output will be ignored
“`
## Attached Workflow
Please make sure that workflow does not contain any sensitive information such as API keys or passwords.
“`
Workflow too large. Please manually upload the workflow from local file system.
Mmmm… Are you using Colab Pro and L4 instance with high RAM?
Are you using the notebook updated on 10/26?
Hello I get the same error with the updated notebook and Colab Pro and L4 instance with high RAM. The error in the colab: “Got an OOM, unloading all loaded models.”
The error in ComfyUI:
# ComfyUI Error Report
## Error Details
– **Node Type:** FluxTrainLoop
– **Exception Type:** torch.OutOfMemoryError
– **Exception Message:** Allocation on device
## Stack Trace
“`
Mmm.. This error is fixed on the Oct 26th update. I just ran it successfully. If you still see the error, send the notebook url to my email and the whole log.
Yes, but tried again and apparently it worked overnight. From what I could tell it completed 3 out of the 4x 400 steps and comfyui lost connection, saved in the output 3 safetensors files each named step00400, step00800, step01200.
I’ll try again now but just to know what to expect, if 100% successful should I get a single safetensors output or one for each step (4 in total)?
thanks!
Yes you should get the 1600 step model saved if the run is complete. It is usually not necessary to train that long. You can test the 800 and 1200 model to see if they are good enough.
Hi there,
Trying to run it locally, feel free to ignore if you prefer not to support this as you mentioned.
Got the captioning done successfully, when running the training I’m getting the following error:
Prompt outputs failed validation
UploadToHuggingFace:
– Required input is missing: network_trainer
InitFluxLoRATraining:
– Failed to convert an input value to a FLOAT value: T5_lr, enabled, could not convert string to float: ‘enabled’
Hi,
the colab lora trainer works fine, thank you! I noticed that a message is displayed at the start of the training like “no text encoder used” and it seems to me that improving the captions does not improve the loss score…should I download a text encoder to the folder AI Pics/models/text encoder? If yes, is this text encoder used automatically or should I change some settings in the lora trainer? Best regards, Gerald
I am not sure if training the text encoder is supported. You normally don’t need to train the text encoder since flux uses pretrained ones. Fine-tuning the UNet like in this notebook should be enough.
Hi, ok thanks, I was afraid that the message meant that the Lora would be trained completely without captions! Because I had an extra message afterwards that the text encoder is not trained either, but maybe both messages referred to that. Best regards, Gerald
When trying to caption, I get this error
LoRA Caption Load
local variable ‘image1’ referenced before assignment
Please help
Sorry to bother you, my image is jpg. That’s why.
Hi thanks so much for posting this tutorial.
I have a probleme, the preview image is tottaly different from the reference, i train for a woman, and the preview show me some men with differnt style.
This my second lora, first time i was not have this error.
The lora is not training. Make sure you start with the default setting in the workflow. I found changing the settings have a big effect. Using similar number of images and diversity in the training example should work.
I have also a question about an error message, maybe you can comment on that if you like.
I had multiple tries where I could go on beacuse of theis Error message: # ComfyUI Error Report
## Error Details
– **Node Type:** InitFluxLoRATraining
– **Exception Type:** AttributeError
– **Exception Message:** module ‘torch’ has no attribute ‘float8_e4m3fnuz’
I managed to start my first run, I am not exactly sure what I have done to avoid this error but it worked. Unfortunately this run was interrupted while I was away. Trying to start again, got this error message again. I tried toggeling fp8_base in the Init node but it did not make difference. After googleing I found some comments that the torch version might not be the correct one. However after installing
pip install –upgrade transformers
pip install –upgrade safetensors
pip install –upgrade torch torchvision torchaudio
it worked again. But I have no clue what actually the problem was. You?
It may be caused by the order of installation when you try the notebook the 2nd time. Before running the notebook again, you can disconnect the runtime so that it starts fresh.
No I don’t think so. I started the notebook many times from scratch and always landed there. I even switched to an A100 to test it and burned through half my credits. Only after pip install –upgrade transformers
pip install –upgrade safetensors
pip install –upgrade torch torchvision torchaudio
it seemed to work.
Do you have any explanation for that?
Mmm.. Not so sure. The notebook works with a L4 instance with high RAM. As long as you have Colab Pro, you can use high RAM and launch the exact hardware config.
Workbook is throwing a “torch.OutOfMemoryError 4 Flux TrainLoop” error (running it as per directions and not locally, just FYI).
I just tested and its working fine. Do you have colab Pro and use the L4 instance?
I have pay as you go, not Collab Pro, and yes using an L4 – the descriptions say that there is no memory difference between the GPU machines…
The only extra resources is that high CPU RAM for Pro and Pro+. I do see the notebook has set to use High RAM.
Works on the Collab Pro plan, must be the CPU RAM. May want to note that as well as that it requires PNG files for your images. Great work!
Thank you for this tutorial.
I have a Collab Pro account; when training, the comfyUI workflow keeps crashing with this error:
FluxTrainLoop
Allocation on device
Might you know what the issue is?
I don’t see this issue. You can try the example training dataset to see if that works first and then create an image set that is similar.
I am getting the following error message on both Google Colab and locally. Any thoughts on what might be wrong?
LoRA Caption Load
cannot access local variable ‘image1’ where it is not associated with a value
Also the check arguments node id red and does not have any text where it looks like from your screenshot there is some text in there.
Seems to be something it doesn’t like about my source images. Your demo ones seem to work.
Seems it did not like JPGs. I converted them to PNGs and seems to be working now.
Good find. Thanks!
Hi thanks so much for posting this tutorial. It works great, except the colab notebook keeps timing out due to inactivity in the middle of the training. It’s very frustrating. Do you by any chance have a workaround? Or a way to continue training on the 800th step?
I have the Colab Plus paid plan and it has not been disconnecting me. My experience has always been good as long as I pay.
I have the same experience. I went away coming back and I thought it crashed. Then started the 2nd run, annoyingly it does not continue at where it stopped although I turned on save state. I had around 800+ its at this point. Then suddenly a captcha poped up asking “still there?”. So I was able to confirm this time and it went on. At the moment it is stilll running. But I can’t sit next to the computer for 6 hours just waiting for captchas. There has to be a way to continue from the saved states. I used to train loras with ai-toolkit and train_lora_flux_24gb.yaml and it would resume if you stopped the process. I don’t see a future for this project as it is at the moment. Besides running the colab is do damn slow that it’s really frustrating to use. I have no paid plan but used Pay As You Go to buy credits.
Yeah this was my experience as well. It workwd though when I subscribed to the Colab Pro plan. It seems to only cause problems with the Pay as you go plan.
Great tutorial, thanks!
When training faces you said to include high-definition headshots but a few lines before you wrote the ideal training image size is 1024×1024. Do you mean for headshots use 1024×1024 or can I use larger sizes? From what I understand during the training process it will resize to 512 or 1024 (defined in settings – I used fluxgym locally but couldn’t run it in collab)
Yes, you can use larger sizes.