
Do you wish AI to run faster on your PC? TeaCache can speed up diffusion models with negligible changes in quality. It is simple to implement and is available for image generation with Flux and video generation with Hunyuan Video on ComfyUI.
In this tutorial, I will cover:
- How does TeaCache work
- TeaCache workflow for Flux (2x speed up)
- TeaCache workflow for HunyuanVideo (2x speed up)
Table of Contents
Software
We will use ComfyUI, a free AI image and video generator. You can use it on Windows, Mac, or Google Colab.
Think Diffusion provides an online ComfyUI service. They offer an extra 20% credit to our readers.
Read the ComfyUI beginner’s guide if you are new to ComfyUI. See the Quick Start Guide if you are new to AI images and videos.
Take the ComfyUI course to learn how to use ComfyUI step by step.
What is TeaCache?
Timestep Embedding Aware Cache (TeaCache) speeds up the sampling steps of the Diffusion Transformer (DiT) models. That’s the architecture most new diffusion models use. (E.g. Flux and HunyuanVideo)
Unlike distillation, TeaCache doesn’t require training a new model. So, all your LoRAs and ControlNets are compatible with this speed-up.
Distilled models are faster because they use fewer sampling steps, significantly reducing quality. In Contrast, TeaCache uses the same number of steps to preserve the quality. You can adjust the cache parameter to attain a significant speed-up without quality loss.
The flexibility in trading between quality and speed shines. Companies can use this simple method to reduce inference costs by half. Local users can fill up their local storage with those very useful AI videos twice as quickly…
How does TeaCache work?
TeaCache takes advantage of the observation that some neural network blocks don’t do much during sampling. Researchers have recognized that diffusion models generate image outlines in the initial sampling steps and fill in details in the late steps.
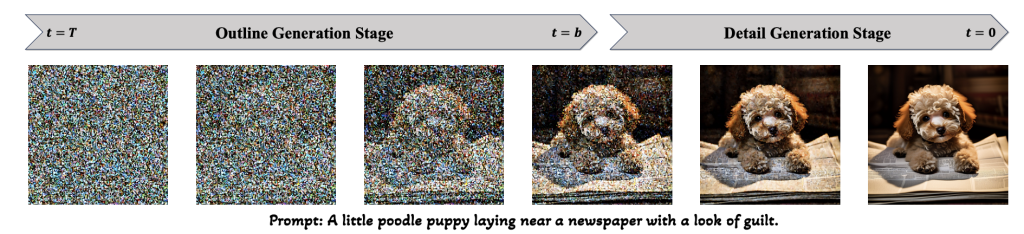
A Diffusion Transformer model is made of a series of transformer blocks. The front transformer blocks draw the outlines, and the rear transformer blocks draw the details. Since the outline doesn’t change in the later steps, the delta-DiT method cleverly uses the cached outputs of the front blocks instead of calculating them every time, speeding up the sampling steps.
TeaCache goes one step further. It intelligently determines when to use caches during sampling. It uses the cached output when the current input is similar to that produced the cache. It only recomputes the cache when the input becomes substantially different. You can control how often the cache is recomputed by a threshold value.
Using TeaCache with Flux
It all sounds great on paper. Let’s see how it does on a consumer-grade GPU card in real life.
The threshold parameter delta controls the caching. 0 turns it off. A higher delta value refreshes the cache less frequently and makes the sampling faster.
| delta threshold | Image generation time |
|---|---|
| 0 (off) | 13.5 sec |
| 0.2 | 11.7 sec |
| 0.4 | 7.4 sec |
| 0.6 | 6.0 sec |
| 0.8 | 5.3 sec |
| 1.0 | 4.0 sec |
Setting the threshold to 0.2 – 0.4 results in minimal change in the image. Interestingly, most changes are in the background instead of the subject.
It starts to show artifacts at 0.6 (look at her hands). The image changes quite a lot and becomes incoherent at 1.0.
Setting the threshold to 0.4 is a safe starting point. It speeds up generation by 2x without quality loss.
Follow the steps below to use TeaCache with Flux on ComfyUI.
Step 1: Download the Flux AI model
Download the Flux1 dev FP8 checkpoint.
Put the model file in the folder ComfyUI > models > checkpoints.
Step 2: Load Flux TeaCache workflow
Download the Flux1 TeaCache workflow JSON file below.
Drop it into your ComfyUI.
Step 3: Install missing nodes
This workflow uses the ComfyUI-TeaCache custom node. If you see some red blocks, you don’t have the custom node that this workflow needs.
Click Manager > Install missing custom nodes, and install the missing nodes.
Restart ComfyUI.
Step 4: Generate an image
Update ComfyUI and reload the page if you see red boxes.
Press Queue Prompt to generate an image.

Using TeaCache with Hunyuan Video
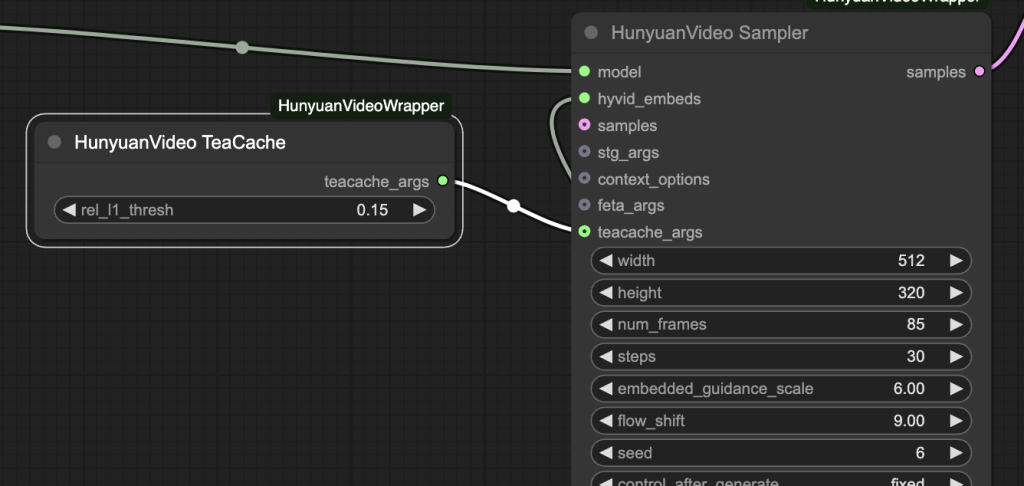
The popular ComfyUI-HunyuanVideoWrapper custom nodes have native support for Hunyuan Video. You only need to connect the HunyuanVideo TeaCache node to the HunyuanVideo Sampler node, as shown below.
Or you can use my workflow below. You can expect to cut down the generation time by half.
| Threshold | Video generation time |
|---|---|
| 0 (Off) | 140 secs |
| 0.15 | 76 secs |
Step 0: Update ComfyUI
Before loading the workflow, make sure your ComfyUI is up-to-date. The easiest way to do this is to use ComfyUI Manager.
Click the Manager button on the top toolbar.

Select Update ComfyUI.
Restart ComfyUI.
Step 1: Download video model
Download the hunyuan_video_FastVideo_720_fp8_e4m3fn.safetensors and put it in ComfyUI > models > diffusion_models.
Step 2: Download VAE
Download hunyuan_video_vae_bf16.safetensors.
This VAE file differs from the one released by ComfyUI and is used in the text-to-video tutorial. Rename it to hunyuan_video_vae_bf16-kj.safetensors
Put it in ComfyUI > models > vae.
Step 3: Load workflow
Download the Hunyuan video TeaCache workflow JSON file below.
Drop it to ComfyUI.
Step 4: Install missing nodes
If you see red blocks, you don’t have the custom node that this workflow needs.
Click Manager > Install missing custom nodes and install the missing nodes.
Restart ComfyUI.
Step 5: Run the workflow
Click the Queue button to generate the video.
Tips: Change the seed value in HunyuanVideo Sampler node if you see a subpar video.
Single image workflow needs updating. The TeaCacheForImgGen node could not be found anywhere. Replaced it with the Teacache node from the node library. A setting of 0.4 only shaved 5 seconds off the non-teacache gen of 27 seconds.
Thanks for reporting the issue. Updated.
How can I use it with GGUF,
Flux schnell ?
Hi, Load Checkpoint did not recognize Flux Dev model “ERROR: Could not detect model type”.
What could be the reason?
Hello Andrew, get this error when trying to run first workflow. any idea, please?
KSampler: DoubleStreamBlock.forward() got an unexpected keyword argument ‘attn_mask’
It seems your comfyui is outdated. Select Manager > Update All.
Hi Andrew,
On Colab L4, I found that generation time of your 832×1216 image was reduced from 47 secs without TeaCache to 31secs at a threshold of 0.4, 26 secs at 0.5 and 24 secs at 0.6. It was only at 0.6 that I started to see the image changing – the skulls on her jacket were distorted – and that was only on some images which were otherwise still useable. At 0.7, 21 secs, hands were distorted and weren’t. So your finding of halving the generation time was borne out by my test on Google Colab’s gpus. Thanks for bring this really useful tool to us!
Thanks for reporting!