An infinite zoom art is a visual art technique that creates an illusion of an infinite zoom-in or zoom-out on an image. You can easily use Stable Diffusion, an AI art generator, to create one.
You will learn how to make an infinite zoom art like this:
We will cover
- Software setup
- A step-by-step guide to creating your first infinite zoom
- Guide for generating good results
- Advanced options
Table of Contents
Stable Diffusion Software
We will use AUTOMATIC1111 Stable Diffusion WebUI to create infinite zoom videos. It is a popular and free open-source software. You can use this GUI on Windows, Mac, or Google Colab.
Check out the Quick Start Guide if you are new to Stable Diffusion.
Check out the AUTOMATIC1111 Guide if you are new to AUTOMATIC1111.
You will need to install the infinite zoom extension in AUTOMATIC1111.
Installing Infinite Zoom on Google Colab
If you use our Colab Notebook, enter the following URL in the Extensions_from_URL field.
https://github.com/v8hid/infinite-zoom-automatic1111-webui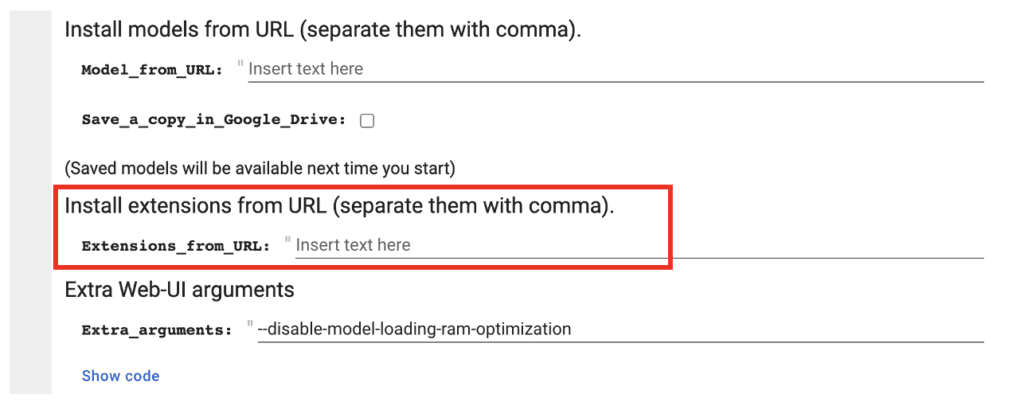
Installing Infinite Zoom on Windows or Mac
- Start AUTOMATIC1111 Web-UI normally.
2. Navigate to the Extension Page.
3. Click the Install from URL tab.
4. Enter the following URL in the URL for extension’s git repository field.
https://github.com/v8hid/infinite-zoom-automatic1111-webui5. Wait for the confirmation message that the installation is complete.
6. Restart AUTOMATIC1111.
A simple first example
You can use this quick example to test your setup and ensure everything works correctly.
Step 1: Download an inpainting model
You should use an inpainting model for a reasonable result. Let’s use the Dreamshaper Inpainting model. Download the model file and put it in the folder:
stable-diffusion-webui\models\Stable-diffusionStep 2: Select the inpainting model
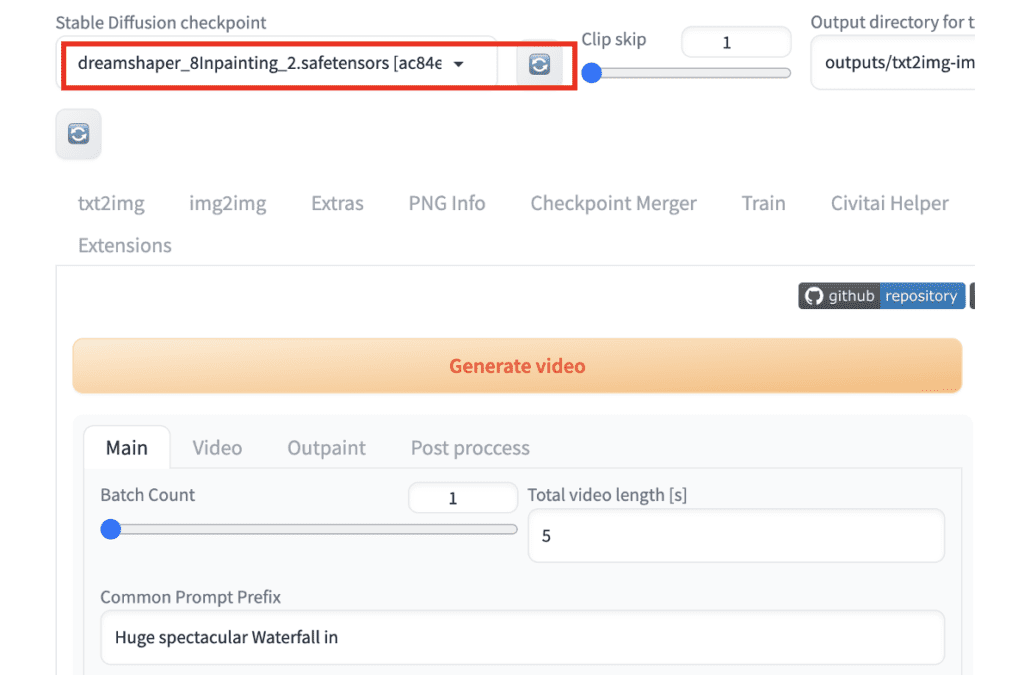
Select the inpainting model in the Stable Diffusion checkpoint dropdown menu.
Step 3: Review settings and press generate
You should see the Common Prompt Prefix, the Prompt Start at second, the Common Prompt Suffix, and the Negative Prompt populated with the default values. We will explain them later, but the Prompt Start at second is the prompt that is switched to at that time.
Press Generate.
After a brief wait, you should get a video like this.
How does Infinite Zoom work?
Now, it’s a good time to pause and understand what happened.
The prompt of the initial image is a combination of the common prefix, prompt, and the common suffix. The subject is written in the prompt and has changed at 2 sec, 3 sec, and 5 sec.
So, the initial image is generated with the prompt at time 0 using the inpainting model.
In the next frame, the initial image is shrunk slightly to create the illusion of zooming out. Now, you have created a small frame of empty space around the shrunk image. The extension inpaints the empty space using the same prompt.
The process repeats itself until you reach 2 sec, where you switch to the next prompt. Now, you use the new prompt for inpainting.
And you get the idea.
Step-by-step guide for Infinite Zoom
Now you have verified that your setup is working, let’s go through a slightly more advanced example.
We used the inpainting model in the previous example to generate the initial image. It is not the best because an inpainting model is trained to fill in a missing part of an image, not directly creating one.
You should use a pairing model to generate the first image for the best result. For example, use the DreamShaper 8 model to create the initial image and the DreamShape 8 inpainting model to create the infinite zoom video.
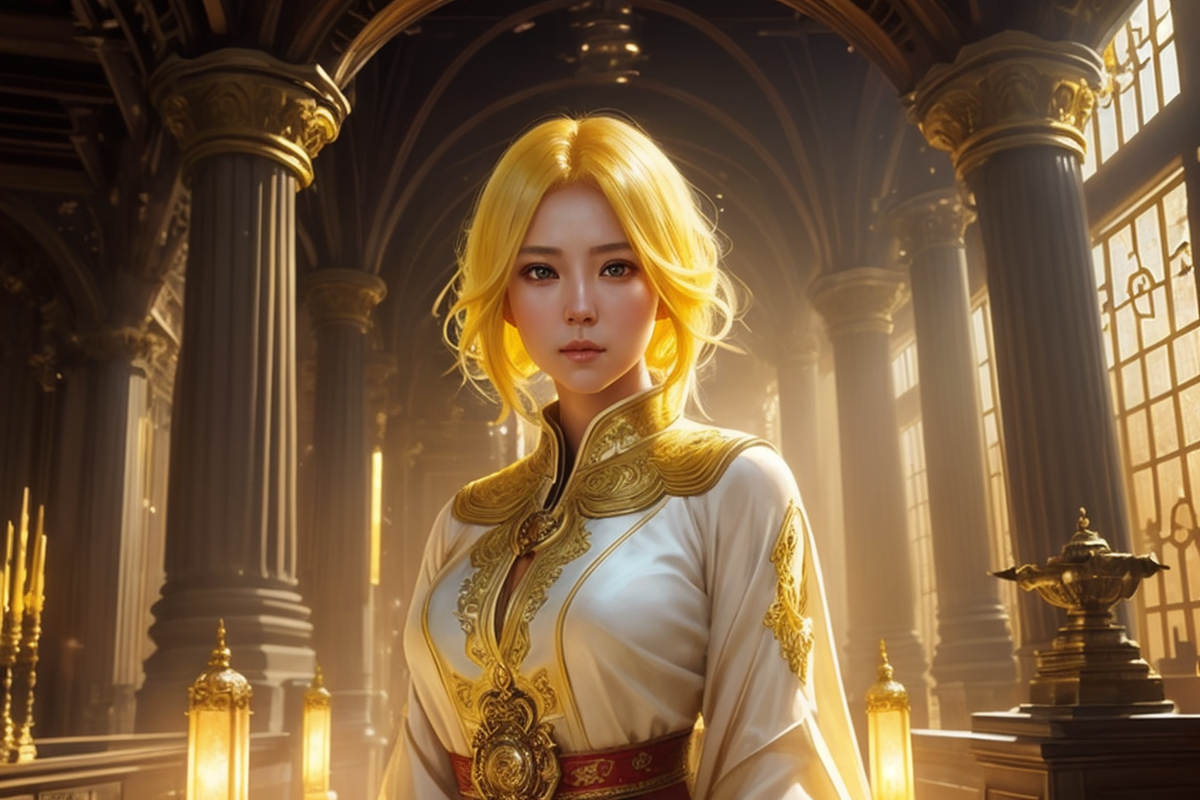
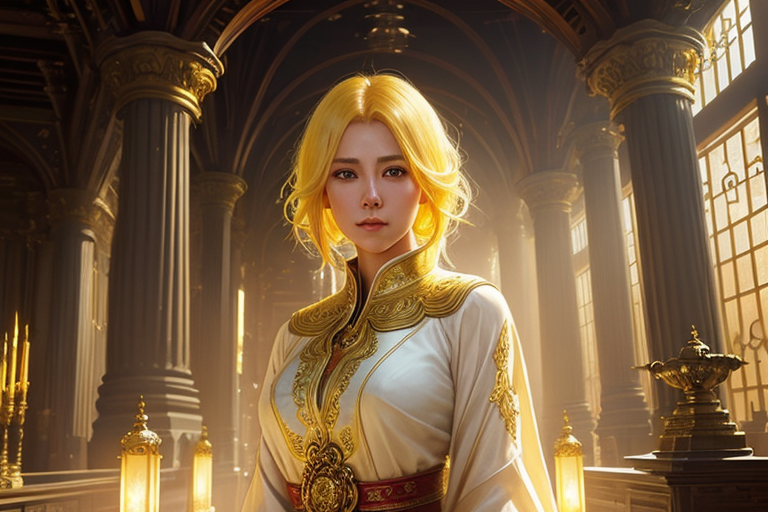
Step 1: Generate the initial image
Go to the txt2img page in AUTOMATIC1111.
- Stable Diffusion checkpoint: DreamShaper 8 Model
- Prompt and Negative Prompt:
beautiful woman, yellow hair, in temple, magical scene, shining eyes, dazzling glow, 8k, intricate, elegant, highly detailed, majestic, digital photography, art by artgerm and ruan jia and greg rutkowski, hdr
BadDream
(Note: BadDream is a negative embedding for DreamShaper.)
- Sampling Method: DPM++ 2M Karras
- Sampling steps: 20
- Width: 768
- Height: 512
Press Generate. We get the initial image.
Step 2: Enter Infinite Zoom settings
Go to the Infinite Zoom page in AUTOMATIC1111.
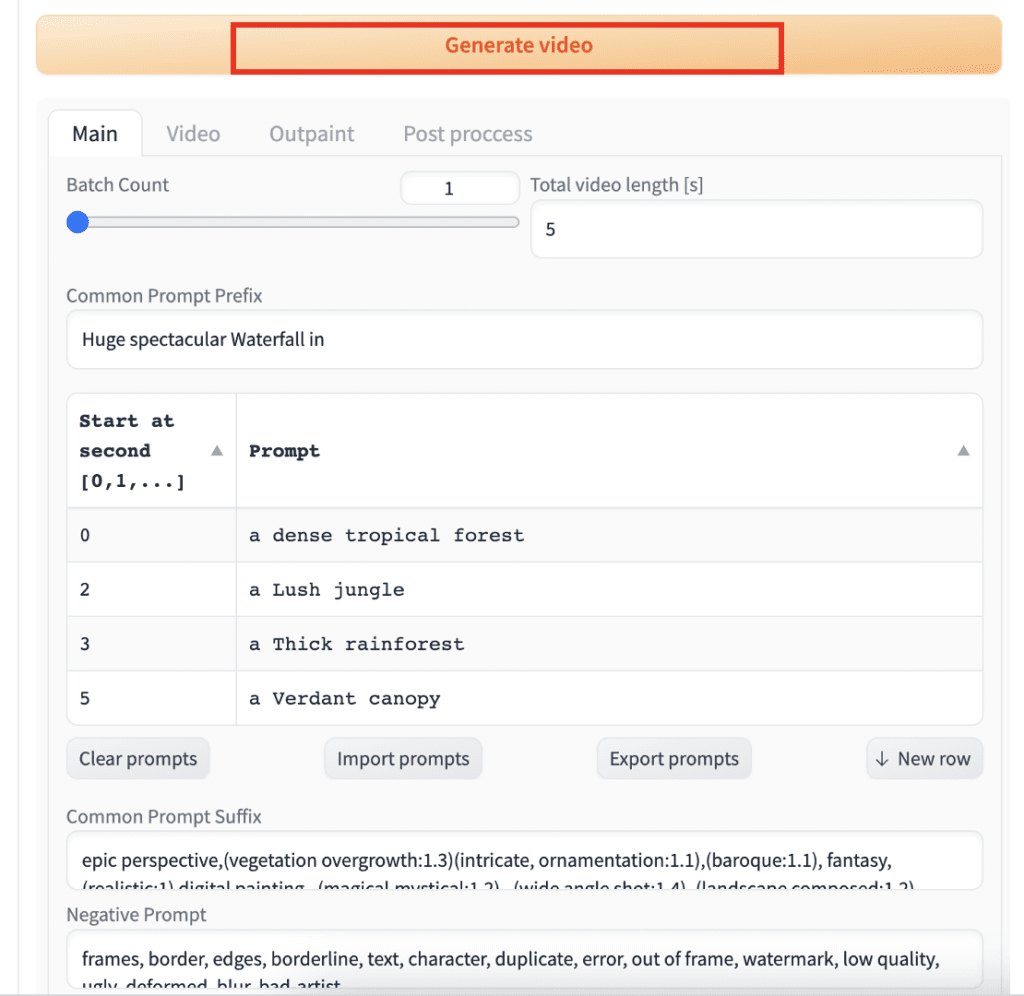
Main tab
Select the Main tab.
Batch Count is the number of videos you are going to make each time you press the Generate button. Keep it as 1.
Total video length [s] is the total length of the video. Enter 12 sec for this video.
This extension breaks the prompt into 3 parts:
- Common Prompt Prefix: Beginning part of the prompt. This is common to all frames of the video.
- Prompt: Middle part of the prompt. This can be changed at any different time in the video.
- Common Prompt Suffix: Ending part of the prompt. Similar to the prefix, all frames use the same prompt suffix.
Now you know you can have a fixed and variable part in the prompt. Let’s break the prompt of the initial image into two parts:
- Subject: the variable part. This can be changed at any time point, defined in the table.
- Style: the fixed part. We keep the same style throughout the video.
The subject part of the initial prompt is
beautiful woman, yellow hair, in temple
The style part of the initial prompt is
magical scene, shining eyes, dazzling glow, 8k, intricate, elegant, highly detailed, majestic, digital photography, art by artgerm and ruan jia and greg rutkowski, hdr
We will use the subject in the middle, variable part of the prompt. We will use the style in the common part of the prompt.
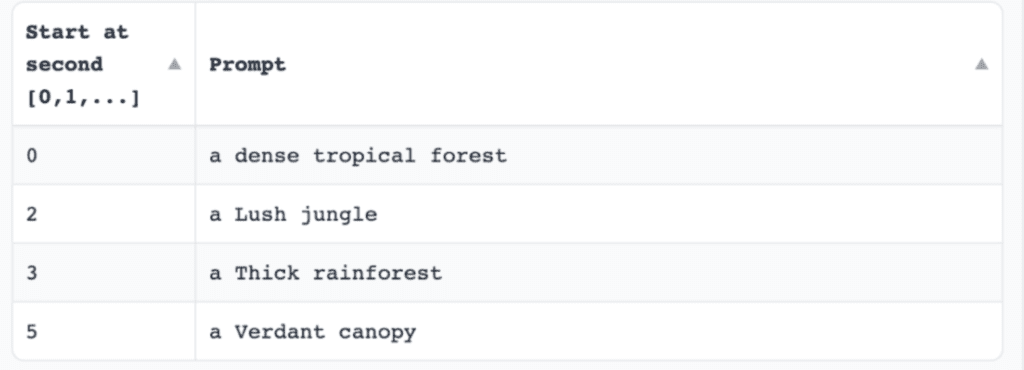
In the table, enter:
Common Prompt Prefix: (leave empty)
Enter the following prompts for different time points in the table.
| Start at second | Prompt |
|---|---|
| 0 | beautiful woman, shining eyes, yellow hair, in temple |
| 2 | temple in waterfall |
| 6 | close up of giant waterfall in jungle |
I found it produces better results when you have a gradual transition of the subject
- 0 second: woman, temple
- 2 second: temple, waterfall
- 6 second: waterfall, jungle
Common prompt suffix:
magical scene, dazzling glow, 8k, intricate, elegant, highly detailed, majestic, digital photography, art by artgerm and ruan jia and greg rutkowski, hdr
Negative Prompt:
BadDream
Output width: 768
Output height: 512
Sampling Steps for each outpaint: 20
Outpainting tab
Switch to the outpainting tab.
Set the Mask Blur all the way up to 64. The Mask Blur is the amount of blurring near the edge of the newly created empty space. A higher value helps to increase the consistency of inpainting.
Step 3: Generate Infinite Zoom video
We will keep the rest of the parameters as default. Press Generate to create the video.
Step 4: Convert to animated GIF (Optional)
You can use this free service to convert the MP4 video to an animated GIF:
https://ezgif.com/video-to-gif
Here’s one result.
Here’s another one.
Tips
Inpainting models
DreamShaper is not the only model/inpainting model you can use. Here’s an extended list
- DreamShaper 8 / DreamShaper 8 inpainting — Realistic painting style
- Realistic Vision 5/ Realistic Vision 5 inpainting — Realistic photo style
- Deliberate v3/ Deliberate v3 inpainting — Painting style
Zoom settings
Set zoom in or out in Video > Zoom mode.
Set zoom speed in Video > Zoom speed
Color correction setting
Uncheck Settings > Img2img > Apply color correction to img2img results to match original colors.
Hi Andrew, using the dreamshaper input model I get this error: “Traceback (most recent call last):
File “/Users/beratung3/stable-diffusion-webui/venv/lib/python3.10/site-packages/gradio/routes.py”, line 488, in run_predict
output = await app.get_blocks().process_api(
File “/Users/beratung3/stable-diffusion-webui/venv/lib/python3.10/site-packages/gradio/blocks.py”, line 1434, in process_api
data = self.postprocess_data(fn_index, result[“prediction”], state)
File “/Users/beratung3/stable-diffusion-webui/venv/lib/python3.10/site-packages/gradio/blocks.py”, line 1297, in postprocess_data
self.validate_outputs(fn_index, predictions) # type: ignore
File “/Users/beratung3/stable-diffusion-webui/venv/lib/python3.10/site-packages/gradio/blocks.py”, line 1272, in validate_outputs
raise ValueError(
ValueError: An event handler (create_zoom) didn’t receive enough output values (needed: 5, received: 4).
Wanted outputs:
[video, gallery, textbox, html, html]
Received outputs:
[None, “”, “”, “RuntimeError: No ffmpeg exe could be found. Install ffmpeg on your system, or set the IMAGEIO_FFMPEG_EXE environment variable.Time taken: 4 min. 13.6 sec.”]” I wonder about the “EXE” in the error message. I am on a Mac (M3)
This is a trickier part of the installation. You will need to have ffmpeg installed. Open a terminal and run the command “ffmpeg”. You should be able to see some output instead of command not found.
If you don’t have it yet, and you have followed my installation guide on Mac, you should have homebrew installed on your system.
Run: brew install ffmpeg
Do the test again.
Thank you. Works great!
Hi there, I spent a lot of time looking for any guide but I didn’t get any. May be you can give some advice, here it is the link to the video: https://drive.google.com/file/d/1B_oAuk5vztqIWmABHc8oeW4iQPeJOMyd/view?usp=drive_link
actually it is almost same infinite zoom but with dinamically changing canny zone which create feeling that zoom happening from the center of the screen.
Hi! I think it is not made with Infinity zoom but animatediff video to video. I can make a tutorial later.
Thank for the tutorial. For some reason I’m not getting any results after the first initial picture is generated. I have reinstalled the IZ extension a few times with no luck. It was working about a week ago.
try deleting the venv folder and restart webui.
Usually very good tutorials but this one you have to explain since doing a normal infinite zoom worked but with adding the women just becomes weird on my end, like changes the women so it zooms out on another woman so bizzare things that even can’t explain so wondering if you can explain what im missing.
I found the Common prompt prefix, Prompt and Common prompt Suffix which dosen’t really say alot of anything in the explanation.
Then we talk about the Subject and the Style okay don’t see anything about that in the Infinite zoom or why you write “beautiful woman, yellow hair, in temple” since where would I put that?
Same with the style is that the “Common prompt suffix” or?
Why would we leave the “Common prompt prefix” empty?
Also did the Prompt like that 3 new ones with the same text and everything, but still at the end it start with the girl zoomed in then the first it zooms out it zooms out from a women in a women in a women like what?
What Can I be missing? Using all the same things
Uploaded if you can watch it easier also, don’t know how long the gyazo have the things uploaded.
https://gyazo.com/9657f6b2bd0691ae2ba74594bc53ea4a
Please review this section for what prefix, suffix prompts are.
https://stable-diffusion-art.com/infinite-zoom/#Step_2_Enter_Infinite_Zoom_settings
The table specifies the subjects at different time point. You should enter the table in the table in Infinite Zoom.
Keep the keywords in the table minimal, and make sure there’s something connecting between the time points.
This is what I tried to do in the table:
0 second: woman, temple
2 second: temple, waterfall
6 second: waterfall, jungle
I had temple in both 0 and 2 seconds, and waterfall in both 2 and 6 seconds.
Sometimes it just need to change the seed to get good result.
Great !
This concept was executed amazingly on the music video Heart Strings by Tim McMorris. Look it up on YouTube!
Thank you again
Hi Andrew,
thank you for this, It was very helpful, as usual.
We’ve tried to use the inpainting SDXL model at https://huggingface.co/diffusers/stable-diffusion-xl-1.0-inpainting-0.1, but it crashes every time.
We used Realistic too, but it seems not to be at the same level as the SDXL base model, probably because it’s trained the SD v1.5?
This appears to be a diffusers model. You will need to wait for a checkpoint model.
thanks a lot for this step by step written tutorial, works far better for following than the tube. now i just have to come up with a good idea myself 🙂