
Dreambooth is a way to put anything — your loved one, your dog, your favorite toy — into a Stable Diffusion model. We will introduce what Dreambooth is, how it works, and how to perform the training.
This tutorial is aimed at people who have used Stable Diffusion but have not used Dreambooth before.
You will follow the step-by-step guide to prepare your training images and use our easy 1-click Colab notebook for dreambooth training. No coding is required!
You can put real-life objects or persons into a Stable Diffusion model and generate images in different styles and settings.


Do you know many custom models are trained using Dreambooth? After completing this tutorial, you will know how to make your own.
You will first learn about what Dreambooth is and how it works. But You can skip to the step-by-step guide if you are only interested in the training.
Table of Contents
Software
To follow this tutorial and perform a training, you will need to
- Be a member of the site, OR
- Purchase the training notebook.
Either option grants you access to the training notebook and example images.
Site members: Open the notebook below.
Note:
- This notebook can only train a Stable Diffusion v1.5 checkpoint model. Train an SDXL LoRA model if you are interested in the SDXL Model.
- This notebook can be run with a free Colab account. A paid account allows you to use a faster V100 GPU, which speeds up the training.
What is Dreambooth?
Published in 2022 by the Google research team, Dreambooth is a technique to fine-tune diffusion models (like Stable Diffusion) by injecting a custom subject into the model.
Why is it called Dreambooth? According to the Google research team,
It’s like a photo booth, but once the subject is captured, it can be synthesized wherever your dreams take you.
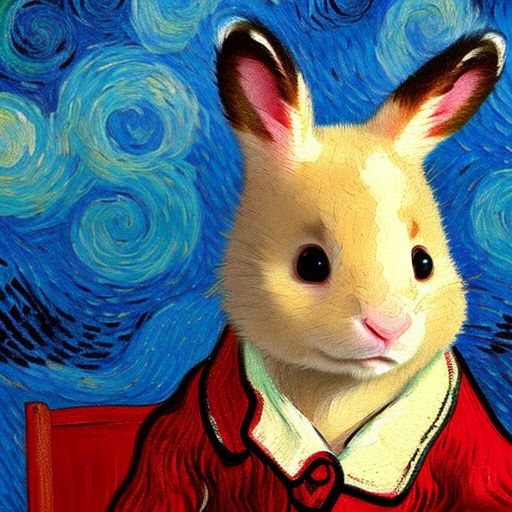
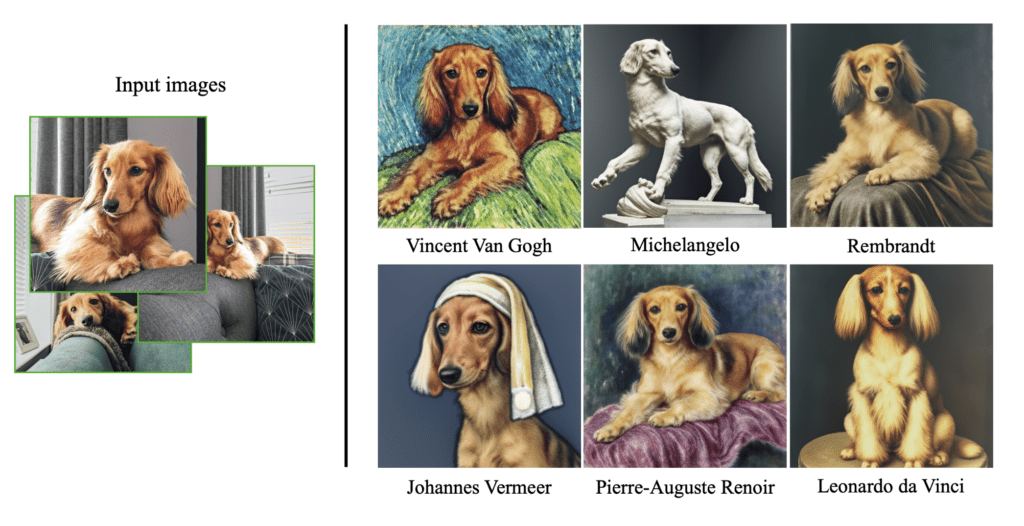
Sounds great! But how well does it work? Below is an example from the research article. Using just 3 images of a particular dog (Let’s call her Devora) as input, the dreamboothed model can generate images of Devora in different contexts.
How does Dreambooth work?
You may ask why you can’t train the model with additional steps with those images. The issue is that doing so is known to cause catastrophic failure due to overfitting (since the dataset is quite small) and language drift.
Dreambooth resolves these problems by
- Using a rare word for the new subject (Notice I used a rare name, Devora, for the dog) so that it does not have a lot of meaning in the model in the first place.
- Prior preservation on class: In order to preserve the meaning of the class (dog in the above case), the model is fine-tuned in a way that the subject (Devora) is injected while the image generation of the class (dog) is preserved.
There’s another similar technique called textual inversion. The difference is that Dreambooth fine-tunes the whole model, while textual inversion injects a new word, instead of reusing a rare one, and fine-tunes only the text embedding part of the model.
What you need to train Dreambooth
You will need three things
- A few custom images
- An unique identifier
- A class name
In the above example. The unique identifier is Devora. The class name is dog.
Then you will need to construct your instance prompt:
a photo of [unique identifier] [class name]
And a class prompt:
a photo of [class name]
In the above example, the instance prompt is
a photo of Devora dog
Since Devora is a dog, the class prompt is
a photo of a dog
Now you understand what you need, let’s dive into the training!
Step-by-step guide
Step 1: Prepare training images
As in any machine learning task, high-quality training data is the most important factor to your success.
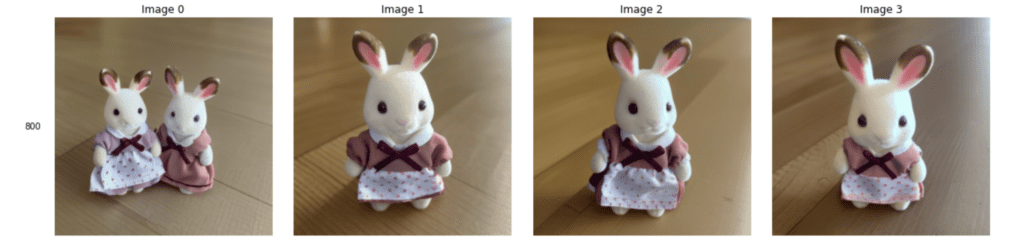
Take 3-10 pictures of your custom subject. The picture should be taken from different angles.
The subject should also be in a variety of backgrounds so that the model can differentiate the subject from the background.
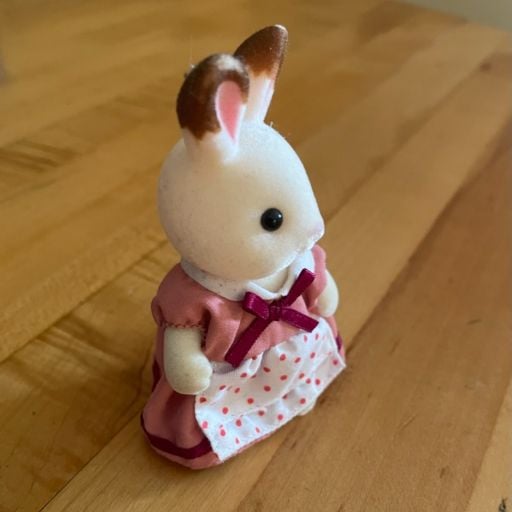
I will use this toy in the tutorial.

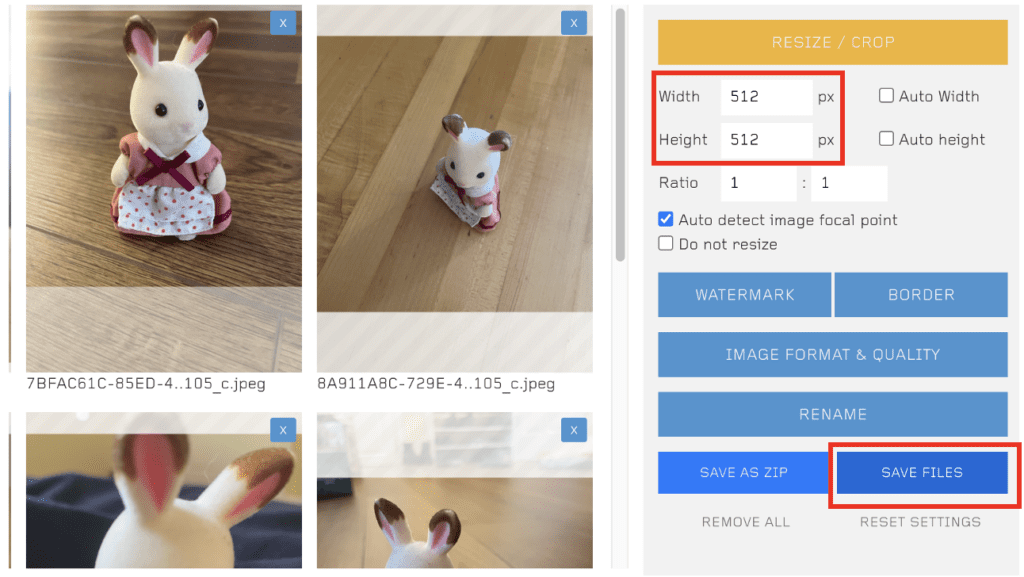
Step 2: Resize your images to 512×512
In order to use the images in training, you will first need to resize them to 512×512 pixels for training with v1 models.
BIRME is a convenient site for resizing images.
- Drop your images to the BIRME page.
- Adjust the canvas of each image so that it shows the subject adequately.
- Make sure the width and height are both 512 px.
- Press SAVE FILES to save the resized images to your computer.
Alternatively, you can download my resized images if you want to go through the tutorial.
To download the training images:
- Site Members: Visit the members’ resources page.
- If you have purchased the notebook, you can download the training images on the product page.
Step 3: Training
I recommend using Google Colab for training because it saves you the trouble of setting up. The following notebook has been modified from Shivam Shrirao’s repository and is more user-friendly. If you prefer other setups, follow the repository’s instructions.
The whole training takes about 30 minutes. If you don’t use Google Colab much, you can probably complete the training without getting disconnected. Purchase some compute credits to avoid the frustration of getting disconnected.
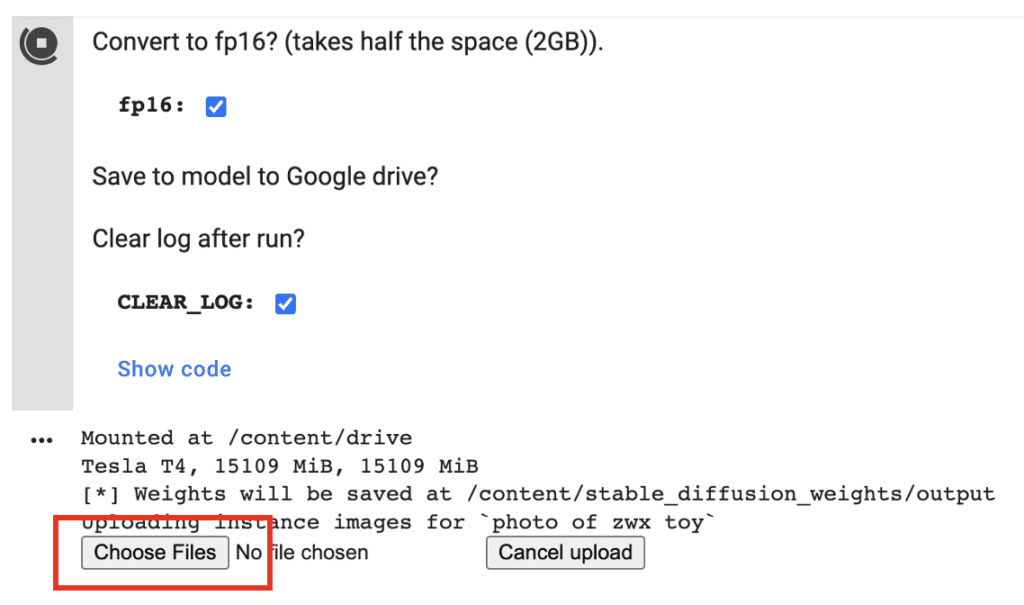
The notebook will save the model to your Google Drive. Make sure you have at least 2GB if you choose fp16 (recommended) and 4GB if you don’t.
1. Open the Colab notebook.
- Site Members – Log in and access the notebook below.
- If you have purchased the notebook, you can access the notebook on the product page.
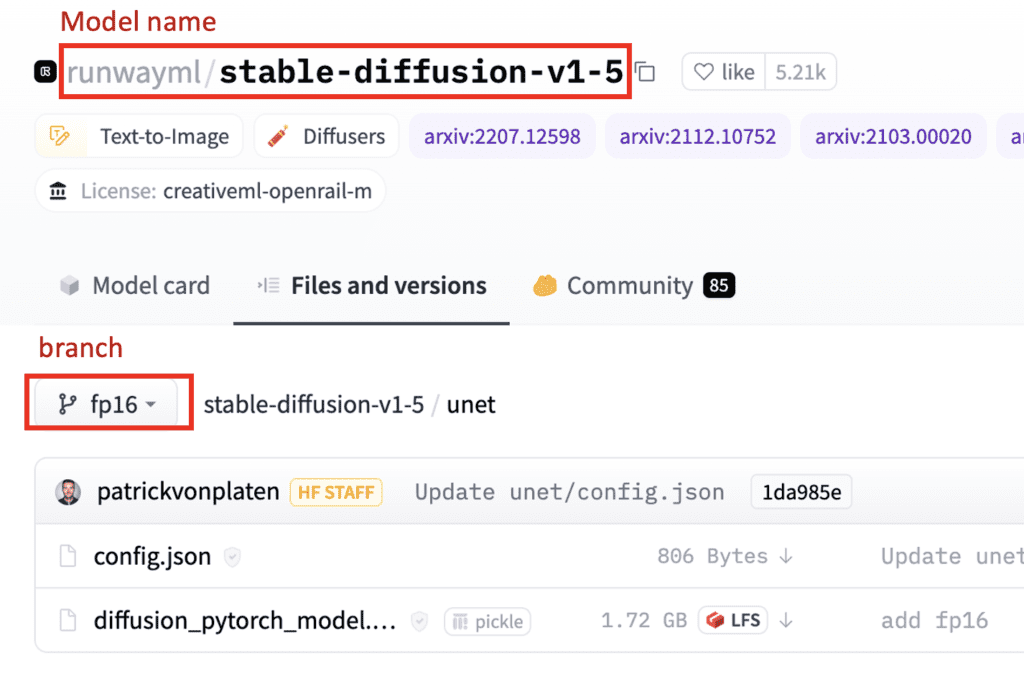
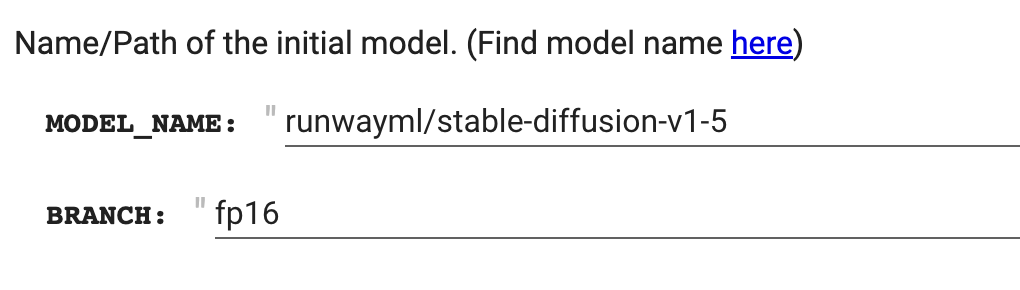
2. Enter the MODEL_NAME. You can use the Stable Diffusion v1.5 model (HuggingFace page). You can find more models on HuggingFace here. The model name should be in the format user/model.
stable-diffusion-v1-5/stable-diffusion-v1-5
3. Enter the BRANCH name. See the screenshot below for the model and branch names.
main
Update: the runwayml model shown in the picture below is no longer available. Use the model name and branch above.
4. Put in the instance prompt and class prompt. For my images, I name my toy rabbit zwx so my instance prompt is:
photo of zwx toy
My class prompt is:
photo of a toy
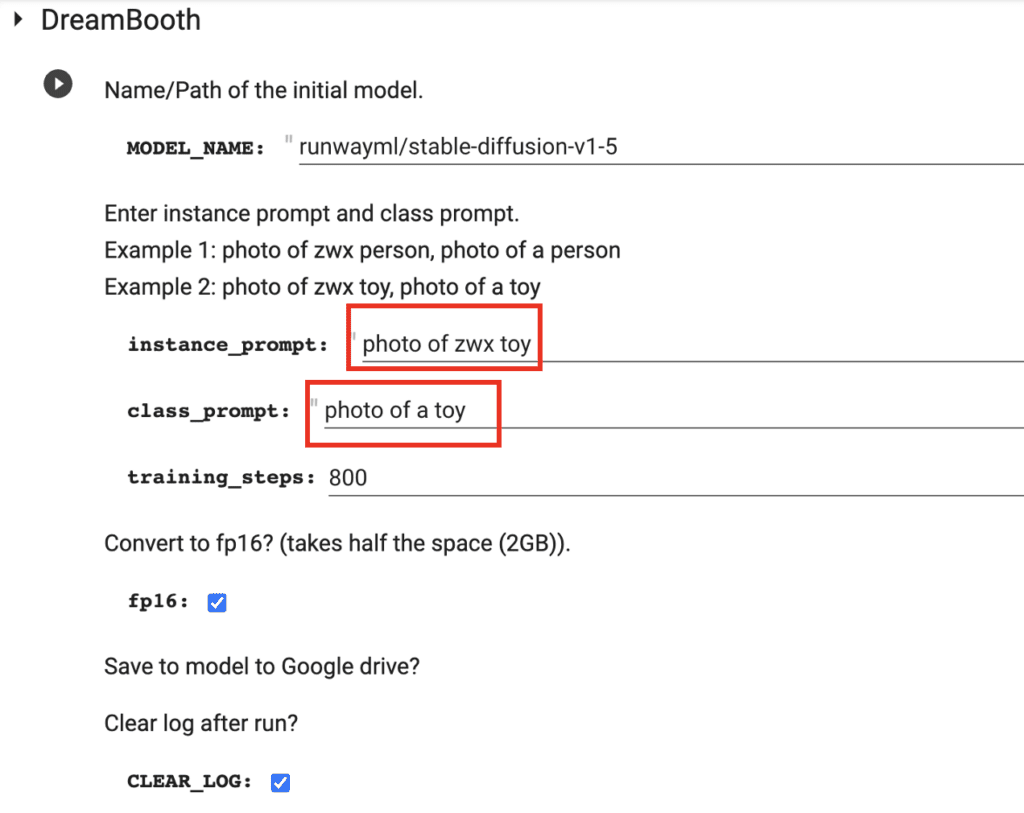
5. Click the Play button ( ▶️ ) on the left of the cell to start processing.
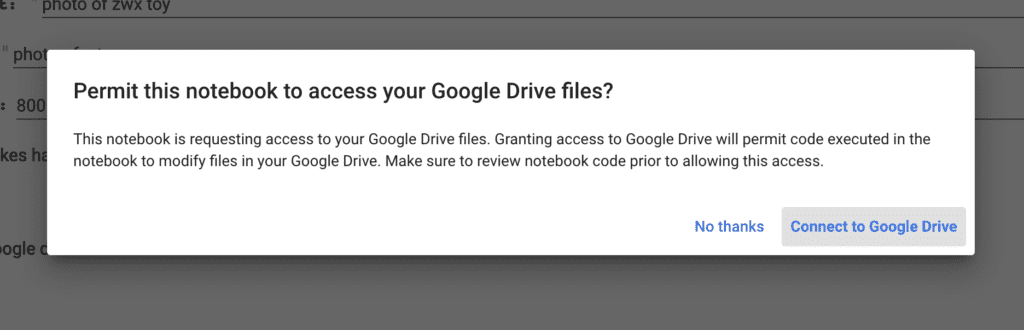
6. Grant permission to access Google Drive. Currently, there’s no easy way to download the model file except by saving it to Google Drive.
7. Press Choose Files to upload the resized images.
- Site Members – Log in and access the sample training images below.
8. It should take 10-30 minutes to complete the training, depending on which runtime machine you use. When it is done, you should see a few sample images generated from the new model.
8. Your custom model will be saved in your Google Drive, under the folder Dreambooth_model. Download the model checkpoint file and install it in your favorite GUI.
That’s it!
Step 4: Testing the model (optional)
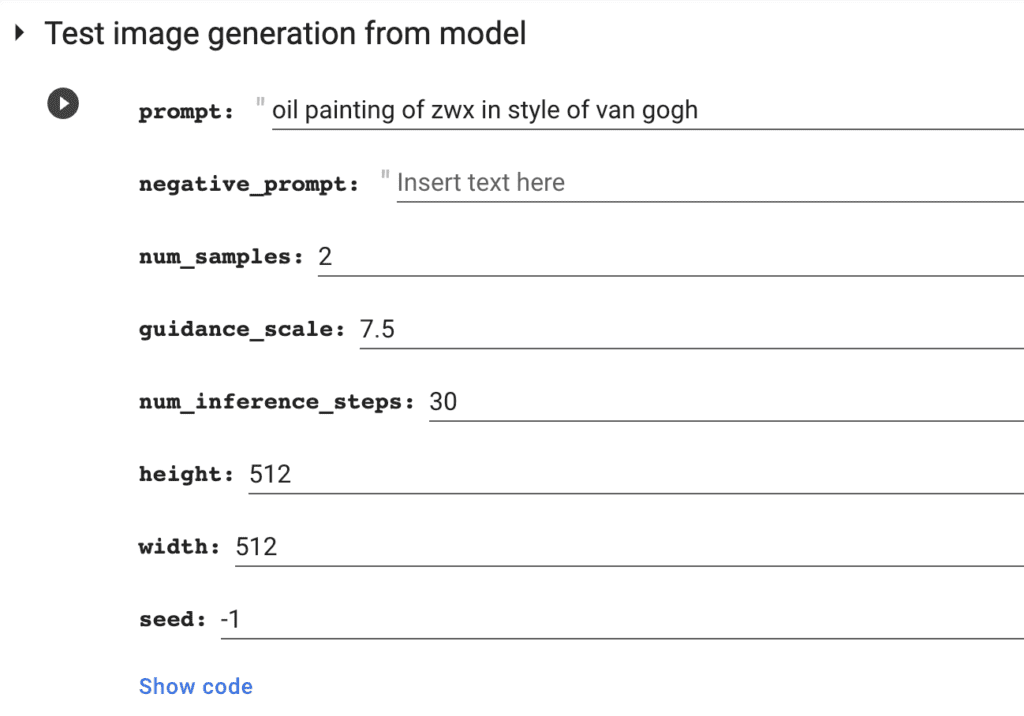
You can also use the second cell of the notebook to test using the model.
Prompt:
oil painting of zwx in style of van gogh
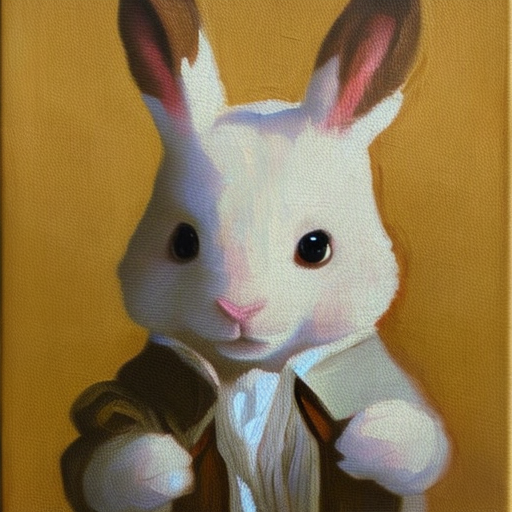
Using the prompt
oil painting of zwx in style of van gogh
with my newly trained model, I am happy with what I got:
Note that you have to run this cell right after the training is complete. Otherwise your notebook may be disconnected.
Using the model
You can use the model checkpoint file in AUTOMATIC1111 GUI. It is a free and full-featured GUI. You can run it on Windows, Mac, and Google Colab.
Using the model with the Stable Diffusion Colab notebook is easy. Your new model is saved in the folder AI_PICS/models in your Google Drive. It is available to load without any moving around.
If you use AUTOMATIC1111 locally, download your dreambooth model to your local storage and put it in the folder stable-diffusion-webui > models > Stable-diffusion.
How to train from a different model
Stable Diffusion v1.5 may not be the best model to start with if you already have a genre of images you want to generate. For example, you should use the Realistic Vision model (see below) if you ONLY want to generate realistic images with your model.
You will need to change the MODEL_NAME and BRANCH.
Currently, the notebook only supports training half-precision v1 and v2 models. You can tell by looking at the model size. It should be about 2GB for v1 models.
You can find the model name and the branch name below on a Huggingface page. The page shown below is here.
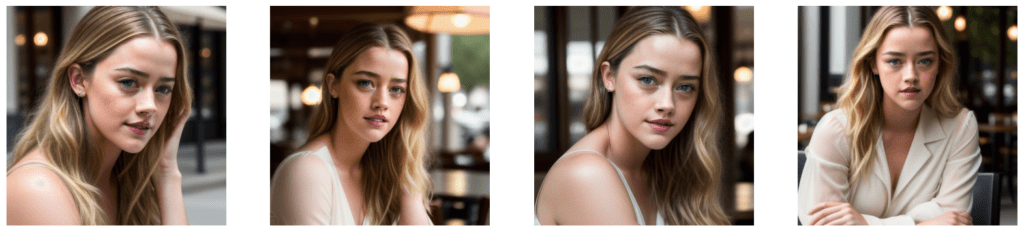
Example: a realistic person
Realistic Vision v2 is a good model for training a new model with a realistic person. Use the following settings for a woman.
MODEL_NAME:
SG161222/Realistic_Vision_V2.0BRANCH:
mainInstance prompt:
photo of zwx woman
Class prompt:
photo of woman
To download the training images:
- Site Members: Visit the members’ resources page.
- If you have purchased the notebook, you can download the training images on the product page.
Below are some samples of the training images.

Here are a few images from the new model. You can find the training images in the Dreambooth guide.
Tips for successful training
Each training dataset is different. You may need to adjust the settings.
Training images
The quality of training images is argueably the most important for a successful dreambooth training.
If you are training a face, the dataset should make of be high-quality images that clearly show the face. Avoid full-body images where the face is too small.
The images ideally should have different background. Otherwise, the background may show up in the AI images.
You don’t need too many images. 7-10 images are enough. Quality is more important than quantity.
Training steps
It is possible to over-train the model so that the AI images all look too much like the training images. The goal is to train just enough so that the model can generalize your subject to all scenes.
Reduce the steps if the model is over-trained.
Typically, you need 100 to 500 steps to train.
Class prompt
Adding more qualifiers to the class prompt helps the training.
For example, if the subject is a middle-aged woman, instead of using
Photo of a woman
You can use:
Photo of a 50 year old woman
You can also add ethnicity. It helps train a subject of a minority.
The dreambooth token
Although the traditional wisdom is to use a rare token like zwx or sks, it is not always the best.
This especially true for training a face of a realistic person.
It could be better off to use a generic name like Jane, Emma, Jennifer, etc. Prompt the model with a single word to see what you get. Find a name that looks like your subject.
Learning rate
A large learning rate trains the model faster. You need fewer steps. But if it is too large, the training won’t work and you get bad results.
If you don’t get good results, you can experiment with reducing the learning rate. But at the same time, you should increase the training steps. Roughly, if you reduce the learning rate by half, you should double your training steps.
Further readings
I recommend the following articles if you want to dive deeper into Dreambooth.
- Training Stable Diffusion with Dreambooth using Diffusers – Huggingface blog
- Dreambooth training guide – nitrosocke
- BlueFaux’s dreamBooth guide
- The research paper
Hi. Much like a few others I’ve seen here with the same problem I too keep getting the error-
OSError: Error no file named model_index.json found in directory /content/output.
Was working fine not long ago but now when ever I try create a new model I get this every time. I have tried using the default SG161222/Realistic_Vision_V2.0 but still getting this error. Thank you
I just tested the notebook with default settings.
1. Can you confirm you are using the notebook dated Oct 25, 2024?
2. Can you use the example training images of the woman with the default SG161222/Realistic_Vision_V2.0 model?
3. You can send me the full log in email for further troubleshooting?
Yeah I was originally using the old notebook but I updated to the latest one thinking it would fix it and no luck. I have tried with all default setting and example training images. Just shot you an email with the full log. Cheers.
Since last night, i have this error, Model was done, i can even see examples
but this error happened: NotImplementedError: A UTF-8 locale is required. Got ANSI_X3.4-1968
It doesn’t save my model on the drive
I tried using the Ai to help me manually save it but couldn’t manage it
Requires me to change stuff in the code apparently, I’m really not savvy with programming and even asking the Ai to guide me, it’s way over my head.
Last time i had a problem, it resolved itself before your reply (Thanks for the reply and hard work you put on all this by the way). But this time, to test if it is resolve, i need to let a model creation run all the way which cost me generation tokens.
Hi, I have updated the notebook. Please follow the link in this post to access it.
Hi. I’m new to all of this so go easy on me. I was following your guide but get the error – OSError: Error no file named model_index.json found in directory /content/output.
I’ve tried a few different models from hugging tree, including the 2 in the tutorial
Have you tried the default “SG161222/Realistic_Vision_V2.0”? I just tested and it works.
Hi, Since yesterday, i can’t seem to connect to the workspace. When i try to launch a process with the play button or log in in the top right corner to see how much data i have left it say: impossible to connect to the work place. I don’t know anything about all this stuff, i just know how to use Dreambooth thank to this tutorial, never had this problem before so i don’t know if it’s on my end or if it’s a dreambooth problem?
I tested the notebook and it works as expected. Is it a temp issue on your side? You can try following the original link to the notebook and try again.
Hey Andrew, not sure if you happen to know how to configure Dreambooth on A1111. There is a section called Model Type offering 5 options ( v1x, v2x512, v2x, SDXL, controlnet) when we create model. Wonder if you know which Model Type I should choose when my base checkpoint is SD1.5 and training image is 512×512. Much appreciated!
I don’t use dreambooth on A1111 so cannot help.
Hi Andrew,
I am trying the Dreambooth extension locally. On it there are there are a few tab.
The Parent level Tabs has Model, Concept and Paramters.
Model – creates the model based on an existing cktp or .safetensor – I just gave it a name and saved it.
It is the Concept tab I am confused about, which has three table
Instance Images
Class Images
Sample image
Instance images – I took 10 photos my myself (headshots) in various positions in different setting and put the path to them in the Directory field
It then asks for a prompt (“Use [filewords] here to read prompts from caption files/filename, or a prompt to describe your training images.
If using [filewords], your instance and class tokens will be inserted into the prompt as necessary for training.”) – so I left this blank.
Then it asks for an Instance token I used my name with some x beside it (ie Veepxxxxx)
Then it asks for a class token so I used the word ‘person’
But there is also a Class tab with an option to add a directory. I assume that would be for images of a person?
I only used the Instance tab with 10 images, and it was not great, but they were clearly images of a very gruesome me.
What is the class tab for?
(did this make any sense?)
Thanks,
V
I don’t use the extension, sorry!
Will the Dreambooth Extension work with WebForge?
No idea!
hey andrew! amazing notebook. i just has a few questions. i want to train a dreambooth that mimics a certain artstyle (lets say oilpainting). i trained it on 61 images of oilpainting (mostly containing flowers, nature scenary, rivers, fish, etc.). trained it for 3000 steps since the dataset was quite large. but now i am noticing that the resultant model gives me flowers and water and fish in every prompt, even when there is no mention of it in the prompt. is it because i have overtrained my model? is my dataset less diverse or perpaps too repetitive? please give me some tips on how to train this model to only capture the artstyle and not the objects in it.
seems to be over-trained. you can try lowering the steps to see if your style still shows.
Andrew,
Is this:- stabilityai/stable-diffusion-xl-base-1.0 – still viable to use for a model base? It is still there and was updated in Nov 23 but the model creation got nearly to the end and bombed out. Thsese are tghe rrors:
OSError Traceback (most recent call last)
in ()
103
104 if ‘pipe’ not in locals():
–> 105 pipe = StableDiffusionPipeline.from_pretrained(OUTPUT_DIR, safety_checker=None, torch_dtype=torch.float16).to(“cuda”)
106 pipe.scheduler = EulerDiscreteScheduler.from_config(pipe.scheduler.config)
107 g_cuda = None
3 frames
/usr/local/lib/python3.10/dist-packages/diffusers/configuration_utils.py in load_config(cls, pretrained_model_name_or_path, return_unused_kwargs, return_commit_hash, **kwargs)
368 config_file = os.path.join(pretrained_model_name_or_path, subfolder, cls.config_name)
369 else:
–> 370 raise EnvironmentError(
371 f”Error no file named {cls.config_name} found in directory {pretrained_model_name_or_path}.”
372 )
OSError: Error no file named model_index.json found in directory /content/output.
As stated in the article, this notebook is for training a SD 1.5 model only. SDXL models are not supported.
Hey Andrew, I successfully trained my own model and tested it in Google Colab by using the unique identifier name. However, the model failed to generate the target image when I uploaded it to WebUI A1111 as a checkpoint and entered the unique identifier. I wonder which part I got wrong, as the model successfully generated the target image in Google Colab.
Sorry my bad. I uploaded the wrong model
👍
Hello, thank you for the guide, Is there a way to contact you directly?
(I support you, paying, from Italy!!!)
Anyway, I need a model fine tuned that generates high quality photos of a meter. (like water/gas meter) I made it followng your steps but I wander if there is the possibility to add a caption for each photos.
I need to set the “consuption” and the “meter id” before the generation, and I want them to appear on the meter generated. I’d like to add the caption for this. Like telling the model what the id and the consumption are for each photos so I can ask for specific ones while generating.
I dont know If I explained it well, If you need futher information please contact me.
Thank you very much in advance
You can reach me directly using the “contact us” form on this site.
SD is not good at printing numbers. It can be tough. XL model is a bit better.
But if you want to try: try using a prompt like a meter with numbers “1234” on it. If that doesn’t work, you need training images with meters with numbers.
Hello.
Why is there no Step-by-Step Guide how to train your own model with automatic1111/Dreambooth.
I dont care about google colab which is very restricted I want to use it at the tool that you support.
I tried that and it was finicky and I don’t want to rely on it. In general, its a bad idea to do so many different things with one software.
What option do you need?
I am going to echo @Juergen DIetl. I was hoping to do it locally.
Any way to give a general idea how to pursuit it with A1111? Then the rest of us can chat on the forums to figure it out.
I would love to see a step by step guide with photos and see what you end result is like, whether it works or not. It is the examples I am looking for.
But I get it…you are BUSY!
Fyi – always grateful for your worke and finding this site!
Thank you!
V
Love the tutorial! However i get is it compatible with SDXL? I get “OSError: Error no file named model_index.json found in directory /content/output.” when I try to run it in Colab. I have a pro account
Unfortunately, as stated in the software section, this notebook cannot train an SDXL model. Try training a LoRA instead.
Can you please make something more complicated ? you need to be a major at M.I.T. to understand all this…. ;-(
Which part is not clear to you?
Hi Andrew, I’m a different user and I have a question. Everything was running fine in the Colab notebook, until I got some weird errors. I should note I’m on a Mac with an Intel chip/processor or whatever.
Anyways, I mistakenly downloaded the 6.0 Realistic Vision from Citivai and installed it. I tried to delete its files, but it seems some remained. When I type Vision V6, some tensor files come up that take up about 4 gb each, and I can’t delete them. I don’t know why this is happening and how to resolve it.
The reason I bring this up is, eventually I used a 5.1 No VAE version from huggingface and put that into the Google Colab notebook. The notebook was processing just fine, until it seems it ran into some weird problems with leftover files from previous versions of Realistic Vision I downloaded and attempted to delete. I can’t code or read code, but that’s what it looks like from the error log. Here is the part where it seems stuff started to go wrong, if you need more, let me know. Please help!
Requirement already satisfied: scipy in /usr/local/lib/python3.10/dist-packages (from bitsandbytes) (1.11.4)
Requirement already satisfied: numpy=1.21.6 in /usr/local/lib/python3.10/dist-packages (from scipy->bitsandbytes) (1.23.5)
Installing collected packages: bitsandbytes
Successfully installed bitsandbytes-0.42.0
accelerate configuration saved at /root/.cache/huggingface/accelerate/default_config.yaml
2.1.0+cu121
2024-02-01 05:58:34.696601: E external/local_xla/xla/stream_executor/cuda/cuda_dnn.cc:9261] Unable to register cuDNN factory: Attempting to register factory for plugin cuDNN when one has already been registered
2024-02-01 05:58:34.696658: E external/local_xla/xla/stream_executor/cuda/cuda_fft.cc:607] Unable to register cuFFT factory: Attempting to register factory for plugin cuFFT when one has already been registered
2024-02-01 05:58:34.699075: E external/local_xla/xla/stream_executor/cuda/cuda_blas.cc:1515] Unable to register cuBLAS factory: Attempting to register factory for plugin cuBLAS when one has already been registered
2024-02-01 05:58:36.304472: W tensorflow/compiler/tf2tensorrt/utils/py_utils.cc:38] TF-TRT Warning: Could not find TensorRT
usage: train_dreambooth.py [-h] –pretrained_model_name_or_path PRETRAINED_MODEL_NAME_OR_PATH
[–revision REVISION] [–variant VARIANT]
[–tokenizer_name TOKENIZER_NAME] –instance_data_dir INSTANCE_DATA_DIR
[–class_data_dir CLASS_DATA_DIR] –instance_prompt INSTANCE_PROMPT
[–class_prompt CLASS_PROMPT] [–with_prior_preservation]
[–prior_loss_weight PRIOR_LOSS_WEIGHT]
[–num_class_images NUM_CLASS_IMAGES] [–output_dir OUTPUT_DIR]
[–seed SEED] [–resolution RESOLUTION] [–center_crop]
[–train_text_encoder] [–train_batch_size TRAIN_BATCH_SIZE]
[–sample_batch_size SAMPLE_BATCH_SIZE]
[–num_train_epochs NUM_TRAIN_EPOCHS]
[–max_train_steps MAX_TRAIN_STEPS]
[–checkpointing_steps CHECKPOINTING_STEPS]
[–checkpoints_total_limit CHECKPOINTS_TOTAL_LIMIT]
[–resume_from_checkpoint RESUME_FROM_CHECKPOINT]
[–gradient_accumulation_steps GRADIENT_ACCUMULATION_STEPS]
[–gradient_checkpointing] [–learning_rate LEARNING_RATE] [–scale_lr]
[–lr_scheduler LR_SCHEDULER] [–lr_warmup_steps LR_WARMUP_STEPS]
[–lr_num_cycles LR_NUM_CYCLES] [–lr_power LR_POWER] [–use_8bit_adam]
[–dataloader_num_workers DATALOADER_NUM_WORKERS]
[–adam_beta1 ADAM_BETA1] [–adam_beta2 ADAM_BETA2]
[–adam_weight_decay ADAM_WEIGHT_DECAY] [–adam_epsilon ADAM_EPSILON]
[–max_grad_norm MAX_GRAD_NORM] [–push_to_hub] [–hub_token HUB_TOKEN]
[–hub_model_id HUB_MODEL_ID] [–logging_dir LOGGING_DIR]
[–allow_tf32] [–report_to REPORT_TO]
[–validation_prompt VALIDATION_PROMPT]
[–num_validation_images NUM_VALIDATION_IMAGES]
[–validation_steps VALIDATION_STEPS]
[–mixed_precision {no,fp16,bf16}]
[–prior_generation_precision {no,fp32,fp16,bf16}]
[–local_rank LOCAL_RANK]
[–enable_xformers_memory_efficient_attention] [–set_grads_to_none]
[–offset_noise] [–snr_gamma SNR_GAMMA]
[–pre_compute_text_embeddings]
[–tokenizer_max_length TOKENIZER_MAX_LENGTH]
[–text_encoder_use_attention_mask] [–skip_save_text_encoder]
[–validation_images VALIDATION_IMAGES [VALIDATION_IMAGES …]]
[–class_labels_conditioning CLASS_LABELS_CONDITIONING]
[–validation_scheduler {DPMSolverMultistepScheduler,DDPMScheduler}]
train_dreambooth.py: error: unrecognized arguments: Vision V6.0 B1
Traceback (most recent call last):
File “/usr/local/bin/accelerate”, line 8, in
sys.exit(main())
File “/usr/local/lib/python3.10/dist-packages/accelerate/commands/accelerate_cli.py”, line 47, in main
args.func(args)
File “/usr/local/lib/python3.10/dist-packages/accelerate/commands/launch.py”, line 1023, in launch_command
simple_launcher(args)
File “/usr/local/lib/python3.10/dist-packages/accelerate/commands/launch.py”, line 643, in simple_launcher
raise subprocess.CalledProcessError(returncode=process.returncode, cmd=cmd)
subprocess.CalledProcessError: Command ‘[‘/usr/bin/python3’, ‘train_dreambooth.py’, ‘–pretrained_model_name_or_path=SG161222/Realistic’, ‘Vision’, ‘V6.0’, ‘B1’, ‘–revision=main’, ‘–instance_prompt=photo of olis beautiful woman’, ‘–class_prompt=photo of a beautiful woman’, ‘–class_data_dir=/content/data/class’, ‘–instance_data_dir=/content/data/instance’, ‘–output_dir=/content/output’, ‘–with_prior_preservation’, ‘–prior_loss_weight=1.0’, ‘–seed=1337’, ‘–resolution=512’, ‘–train_batch_size=1’, ‘–train_text_encoder’, ‘–use_8bit_adam’, ‘–gradient_accumulation_steps=1’, ‘–learning_rate=5e-06’, ‘–lr_scheduler=constant’, ‘–lr_warmup_steps=0’, ‘–num_class_images=50’, ‘–sample_batch_size=4’, ‘–max_train_steps=350′]’ returned non-zero exit status 2.
/content
—————————————————————————
OSError Traceback (most recent call last)
in ()
103
104 if ‘pipe’ not in locals():
–> 105 pipe = StableDiffusionPipeline.from_pretrained(OUTPUT_DIR, safety_checker=None, torch_dtype=torch.float16).to(“cuda”)
106 pipe.scheduler = EulerDiscreteScheduler.from_config(pipe.scheduler.config)
107 g_cuda = None
3 frames
/usr/local/lib/python3.10/dist-packages/diffusers/configuration_utils.py in load_config(cls, pretrained_model_name_or_path, return_unused_kwargs, return_commit_hash, **kwargs)
368 config_file = os.path.join(pretrained_model_name_or_path, subfolder, cls.config_name)
369 else:
–> 370 raise EnvironmentError(
371 f”Error no file named {cls.config_name} found in directory {pretrained_model_name_or_path}.”
372 )
OSError: Error no file named model_index.json found in directory /content/output.
I think your model name is incorrect. It seems to contain spaces which shouldn’t. You need to pick a diffusers model where you see folders similar to the one used in the default settings.
Thank you for the prompt response.
My model name for which one? Realistic Vision 5.1?
I’m sorry, I’m very new to all this, where can I get a diffusers model for Realistic Vision 5.1?
https://huggingface.co/SG161222/Realistic_Vision_V5.1_noVAE/tree/main
Which file do I download from here?
OK, it seems the model was successfully created. There were output images that resembled the person I was training for, but, they seemed slightly deformed/off. I tested output using the second cell underneath, but most of them didn’t resemble the subject, or when they did, they had deformities.
What could be causing this? How do I correct for this? Thank you.
Also, I think I trained with around 19 images. Not sure if that’s responsible for deformities.
Training models requires experimentation because the standard recipe may not work perfectly for your case. You can read the following section and try out a few ideas to see which one helps.
https://stable-diffusion-art.com/dreambooth/#Tips_for_successful_training
The quality of training images is very important. I would select the best 7-10 for another round of training to see if it improves.
No encuentro claro donde debo abrir la pantalla de Stable Difusion?
( he descargado un stable difusion en mi laptop, pero no entiendo aun como poder practicar con este tutorial ) He abierto tambien el archivo de 1 click y veo el tutorial de fotos de una mujer, pero ni idea ni aclaracion que deberia uno hacer alli, para aprender de eso ? ….deberias aclarar que debe un novato abrir o tocar para aprender el tutorial .( descargados los archivos, si, eso es simple, ….cambiar el formato a 512 ,si ,eso tambien es simple,….pero como llevar todo eso a stable diffusion ? help, no entiendo como seguir este tutorial aun .
Hey there, thanks for all the great instructions.
Today when I tried to run the colab, I received the following errors, any ideas?:
/content
—————————————————————————
OSError Traceback (most recent call last)
in ()
17
18 if ‘pipe’ not in locals():
—> 19 pipe = StableDiffusionPipeline.from_pretrained(OUTPUT_DIR, safety_checker=None, torch_dtype=torch.float16).to(“cuda”)
20 pipe.scheduler = EulerDiscreteScheduler.from_config(pipe.scheduler.config)
21 g_cuda = None
3 frames
/usr/local/lib/python3.10/dist-packages/huggingface_hub/utils/_validators.py in _inner_fn(*args, **kwargs)
116 kwargs = smoothly_deprecate_use_auth_token(fn_name=fn.__name__, has_token=has_token, kwargs=kwargs)
117
–> 118 return fn(*args, **kwargs)
119
120 return _inner_fn # type: ignore
/usr/local/lib/python3.10/dist-packages/diffusers/pipelines/pipeline_utils.py in from_pretrained(cls, pretrained_model_name_or_path, **kwargs)
1115 cached_folder = pretrained_model_name_or_path
1116
-> 1117 config_dict = cls.load_config(cached_folder)
1118
1119 # pop out “_ignore_files” as it is only needed for download
/usr/local/lib/python3.10/dist-packages/huggingface_hub/utils/_validators.py in _inner_fn(*args, **kwargs)
116 kwargs = smoothly_deprecate_use_auth_token(fn_name=fn.__name__, has_token=has_token, kwargs=kwargs)
117
–> 118 return fn(*args, **kwargs)
119
120 return _inner_fn # type: ignore
/usr/local/lib/python3.10/dist-packages/diffusers/configuration_utils.py in load_config(cls, pretrained_model_name_or_path, return_unused_kwargs, return_commit_hash, **kwargs)
368 config_file = os.path.join(pretrained_model_name_or_path, subfolder, cls.config_name)
369 else:
–> 370 raise EnvironmentError(
371 f”Error no file named {cls.config_name} found in directory {pretrained_model_name_or_path}.”
372 )
OSError: Error no file named model_index.json found in directory /content/output.
It cannot load the initial model. You will need to put a Hugging Face repository with a diffusers model. (checkpoint model doesn’t work) See the article.
I am unable to train the model on my photos successfully. I have tried 5 five times with different settings, and nothing has worked.
1. My first attempt was with the default settings. I used a set of 20 images, and it was overtrained.
2. I read some of the articles you posted and saw that a lower setting is needed to train faces. I changed the learning rate to 1e-6 and ran it with 2000 steps (100 per image). This was also overtrained and very distorted. The prompt had no effect, and all photos looked like my training set.
3. Based on another article, I changed the learning rate to 1e-5 and lowered the steps to 1500. The resulting images were not as bad, but when I ran the last cell, the output looked like a different person.
4. I decided to go even lower with the steps, and at 1000, the output looked like someone else.
5. My last attempt was with the learning rate of 1e-5 and steps set at 1600. The result was images that looked like distorted versions of my training set. The prompt did not change anything. I even changed it, but all the generated pictures resemble the training set.
I don’t know what to do. Please advise me on the optimal settings to train the checkpoint on my face. I need it to be flexible but still look like me. I have images with different lighting, backgrounds, hairstyles, and clothing. I have no idea why it won’t work. Thank you.
I can take a look if you send me in email a set of training images that didn’t work.
Great! I’ll send over a few of the images. I won’t send them all because some are NSFW, as I’m training a model to make artwork for my erotica.
LOL I just noticed that my original comment has my real name. Is there a way to change it in my profile?
Hi, I have updated the names of your comments. You can change it in the Acount page after login.
I used this collab a ton, work great but since around christmas (when the default model name was changed from SD1.5 to Realistic2), all the woman model I make seems to be more facially accurate but now it is almost impossible to do nude without using a Lora. I tried a ton of prompts positive and negative, with boosted strength, I can’t seem to do nude art with model anymore while it was working super fine before. I don’t know what was changed but it feels like an NSFW filter or something. I normally train with 2000 to 3000 steps, which might be that, but I’ll do a test with lower training steps if you have an idea of why the model changed (I tried doing the model with SD1.5 and Realistic as a base and, the same problem with both model.
Did some test after posting my comment and with a training step of 400, i can make nude out of my model. So i guess i’ll train with less step, so far, seems to work as fine and is easier to work with. Good thing i keep all my image for training, will have to redo a few. The wierd thing is i didn’t have the “nude” problem with a 2000 step model before…
yes, after updating the diffuser package, I notice the training is more powerful. I may adjust the default steps later.
There’s no nsfw filter. You can still use the SD 1.5 base model. The change was because most people don’t use the 1.5 model anymore so the default was set to the most frequent use case for convenience.
Hi, quick question.
I realized that all the pictures I’m generating are very similar to those images I used during the training phase, in terms of environment. Is there a way to improve it, maybe using regularization images?
Your training images should have some diversity in background. Otherwise the training won’t know the background is not associate with your keyword
You can try changing some of your images background in software. (I have a recent tutorial on that)
You can also try picking a keyword that is close to what you want to train, and reduce the number of steps.
every time I try to train a diffuser model that is XL that is different than the default example this error code appears, anyway to fix it?
OSError: Error no file named model_index.json found in directory /content/output.
Andrew? Can you help? I would love to make a Dreambooth XL model
Hi, SDXL is not supported with the method used in this notebook. It is quite resources-intensive. I am not sure if we can pull it off on Colab.
You can try train a SDXL LoRA instead.
https://stable-diffusion-art.com/train-lora/
Hi Andrew, I’ve bought your Colab and this is very good!
Which model do you think, currently, is the best one to train with and create new images keeping my face consistent through them? RealVis 3.0?
Thanks!
I only tested realistic vision v2. It is good for both dreambooth and lora.
the SDXL version realvis lora seems to be a bit harder to train but still works.
Just want to say this worked like a charm and also how great the site is in general. I literally couldn’t have progressed with SD / A1111 at all without this site as a resource.
Great!
Can’t generate images, in stable diffusion just gets an error and doesn’t create an image, indicates that the training process went well without errors, the model is saved in Google but can’t generate images
Do you see the sample images showing your subject?
For a standard environment for troubleshooting, please use the A1111 colab notebook to test the model. Post the error message if you still see it.
Yes I see, but can’t generate images
Attach the error message
Thanks in advance for your help
NotImplementedError: No operator found for `memory_efficient_attention_forward` with inputs: query : shape=(2, 4096, 8, 40) (torch.float16) key : shape=(2, 4096, 8, 40) (torch.float16) value : shape=(2, 4096, 8, 40) (torch.float16) attn_bias : p : 0.0 `flshattF` is not supported because: xFormers wasn’t build with CUDA support Operator wasn’t built – see `python -m xformers.info` for more info `tritonflashattF` is not supported because: xFormers wasn’t build with CUDA support requires A100 GPU Only work on pre-MLIR triton for now `cutlassF` is not supported because: xFormers wasn’ t build with CUDA support Operator wasn’t built – see `python -m xformers.info` for more info `smallkF` is not supported because: xFormers wasn’t build with CUDA support dtype=torch.float16 (supported: {torch. float32}) max(query.shape[-1] != value.shape[-1]) > 32 Operator wasn’t built – see `python -m xformers.info` for more info unsupported embed per head: 40
It has more to do with your settings. You haven’t mention what GUI you are using. If you use A1111, remove the
--xformersflag, or switch to a T4 in place of A100 GPU.hi,
I can’t find the model I created in Google Drive, everything goes successfully but the model is not saved in Drive, thanks for the help
It’s in AI_PICS > models in your google drive.
If you don’t see it, please post your error message in google colab.
The whole process goes through successfully, even at the end of the process I check in COLAB everything works, the AP_PICS folder is not in Google Drive
AI_PICS Does not exist in Google Drive
These are the last lines of the end of the whole process,
Maybe you recognize any problem there?
Points out that in the previous versions everything worked fine
Thanks in advance.
Loading pipeline components…: 71% 5/7 [00:00<00:00, 9.39it/s]{'timestep_spacing', 'prediction_type'} was not found in config. Values will be initialized to default values.
Loaded scheduler as PNDMScheduler from `scheduler` subfolder of runwayml/stable-diffusion-v1-5.
Loading pipeline components…: 100% 7/7 [00:00<00:00, 10.66it/s]
{'timestep_spacing', 'prediction_type'} was not found in config. Values will be initialized to default values.
Configuration saved in /content/output/vae/config.json
Model weights saved in /content/output/vae/diffusion_pytorch_model.safetensors
Configuration saved in /content/output/unet/config.json
Model weights saved in /content/output/unet/diffusion_pytorch_model.safetensors
Configuration saved in /content/output/scheduler/scheduler_config.json
Configuration saved in /content/output/model_index.json
Steps: 100% 200/200 [09:28<00:00, 2.84s/it, loss=0.352, lr=5e-6]
/content
Loading pipeline components…: 100%
6/6 [00:19<00:00, 4.93s/it]
You have disabled the safety checker for by passing `safety_checker=None`. Ensure that you abide to the conditions of the Stable Diffusion license and do not expose unfiltered results in services or applications open to the public. Both the diffusers team and Hugging Face strongly recommend to keep the safety filter enabled in all public facing circumstances, disabling it only for use-cases that involve analyzing network behavior or auditing its results. For more information, please have a look at https://github.com/huggingface/diffusers/pull/254 .
100%
25/25 [00:15<00:00, 1.61it/s]
Traceback (most recent call last):
File "/content/diffusers/scripts/convert_diffusers_to_original_stable_diffusion.py", line 330, in
save_file(state_dict, args.checkpoint_path)
File “/usr/local/lib/python3.10/dist-packages/safetensors/torch.py”, line 281, in save_file
serialize_file(_flatten(tensors), filename, metadata=metadata)
safetensors_rust.SafetensorError: Error while serializing: IoError(Os { code: 2, kind: NotFound, message: “No such file or directory” })
[*] Converted ckpt saved at /content/drive/MyDrive/AI_PICS/models/my_dreambooth_model.safetensors
Dreambooth completed successfully. It took 19.1 minutes.
Maybe a silly suggestion, but could your Google Drive be full?
Google Drive p have full space
My bad. model didn’t save if folder didn’t exist. Fixed in the latest version.
Thanks, it works now, is there maybe a way to load the model through Google Collab? My computer is very weak for local installation
Is there a way to resend a model to the google drive from Colab if the transfer didn’t work?
It is currently only possible with a new training.
Training Module in Diffusionbee: I am testing the training using the latest beta Diffusionbee V2.4.3. My M2 Ultra is clocking an iteration every 2.12 seconds. I am about halfway through; this will be interesting as it is a breeze to use the interface.
HI Andrew.
I get this error:
OSError Traceback (most recent call last)
in ()
99 if ‘pipe’ not in locals():
100 scheduler = DDIMScheduler(beta_start=0.00085, beta_end=0.012, beta_schedule=”scaled_linear”, clip_sample=False, set_alpha_to_one=False)
–> 101 pipe = StableDiffusionPipeline.from_pretrained(model_path, scheduler=scheduler, safety_checker=None, torch_dtype=torch.float16).to(“cuda”)
102 g_cuda = None
103
3 frames
/usr/local/lib/python3.10/dist-packages/diffusers/configuration_utils.py in load_config(cls, pretrained_model_name_or_path, return_unused_kwargs, return_commit_hash, **kwargs)
368 config_file = os.path.join(pretrained_model_name_or_path, subfolder, cls.config_name)
369 else:
–> 370 raise EnvironmentError(
371 f”Error no file named {cls.config_name} found in directory {pretrained_model_name_or_path}.”
372 )
OSError: Error no file named model_index.json found in directory output.
Thank you for everything.
This is an error when generating the images. The training was not successful and there’s no new model created. Please see the error earlier.
I bought the training notebook – how can I use it with models from CivitAI (e.g. not on Hugging Face)?
Unfortunately, the CivitAI models are not in a format that is ready for training (diffusers). You will need to find the same one or convert it yourself and put it on Hugging Face. e.g. https://discuss.huggingface.co/t/how-to-convert-ckpt-to-diffusers-format/35635
It all works perfectly for me, thank you so much! I have trained many models successfully. Since I started using Chrome on my M2 Mac Studio Ultra, that is, Safari was causing failures. Meanwhile Diffusionbee beta 2.3 supports SDXL, and I was wondering if you have a template to create such models and also what realistic initial model you would link to on Hugging face for this..
Yes, I will update this post to include training a SDXL model. It’s on my list…
Awesome. Happy Holidays.
Andrew, I tried changing the suggested base model from SG161222/Realistic_Vision_V2.0 (main) to SG161222/Realistic_Vision_V3.0_VAE (main), and the final four generated images on Colab are four small Asian boys’ faces, not my supplied faces which work with V2.0. Why is this?
You may need to adjust the training parameters. Can you try again? I just updated the diffusers to a newer version. It seems to train more.
Hi Andrew, OK, ran the same setup again, and it took over eight minutes, as opposed to two, so you certainly changed something! However, instead of four Asian boy’s face, I got a similar Asian boy riding a bike and other poses. This was at the end of the run:
/usr/local/lib/python3.10/dist-packages/diffusers/pipelines/stable_diffusion/pipeline_stable_diffusion.py:182: FutureWarning: The configuration file of this scheduler: DDIMScheduler {
“_class_name”: “DDIMScheduler”,
“_diffusers_version”: “0.25.0.dev0”,
“beta_end”: 0.012,
“beta_schedule”: “scaled_linear”,
“beta_start”: 0.00085,
“clip_sample”: false,
“clip_sample_range”: 1.0,
“dynamic_thresholding_ratio”: 0.995,
“num_train_timesteps”: 1000,
“prediction_type”: “epsilon”,
“rescale_betas_zero_snr”: false,
“sample_max_value”: 1.0,
“set_alpha_to_one”: false,
“steps_offset”: 0,
“thresholding”: false,
“timestep_spacing”: “leading”,
“trained_betas”: null
}
is outdated. `steps_offset` should be set to 1 instead of 0. Please make sure to update the config accordingly as leaving `steps_offset` might led to incorrect results in future versions. If you have downloaded this checkpoint from the Hugging Face Hub, it would be very nice if you could open a Pull request for the `scheduler/scheduler_config.json` file
deprecate(“steps_offset!=1”, “1.0.0”, deprecation_message, standard_warn=False)
The warning was generated during using the newly trained model to generate the final images. There’s nothing to worry about but I will change the code to make it go away.
It would be great if you can send me a failed example of training images and the prompts you used.
Hi Andrew, No problem. How can I send the stuff you ask for without using an open forum.
You can send me an email. My address is andrew@ + domain of this site.
Thanks, good to know 🙂 I purchased the tutorial from the Gumroad and now tried to implement it – and though that I could just put the SDXL 1.0 model info and feed my images in 1024 size. Apparently it’s not so easy 😅
Happy holidays, I guess it’s better to wait for the updated notebook and not spend my holiday in trying to crack this.
Happy holidays! will work on it as soon as my schedule allows.
Hi Andrew,
Are you sure it is fixed? I get the same error:
KeyboardInterrupt: No training weights directory found
I have followed your tutorial to the letter, with the sample images (trying to import but with the .zip straight away, and with individual images).
Using the latest notebook (the link provided in the text above) with edits from 14 december in there. Still, I can’t seem to run it.
Yes, I just confirmed (again) the notebook is working. Note that it only works for v1 models. If you are using the same settings and images as in my post and still gets error, please post or email me the FULL error message.
Ok, thanks, I’ll try again 😉
It works indeed. Probably I made a small mistake earlier when I started and that mistake (uploading a zip of the images instead of separate images, maybe the Google connection didn’t work straight away). Compliments for this site btw, it is very clearly explained, with the examples it makes this very accessible. I learned a lot!
Try using Chrome if you are using Safari at present (this assumes you are on a Mac, of course). Not sure if similar issues occur on a PC.
I have just bought this Product and tried to run it. All seemed ok for about 10 mins and then got this error, the same as Lachezar a few days ago. I did not knowingly press any keys on the keyboard to interrupt the process. I have emailed Andrew about it and hopefully he can fix.
KeyboardInterrupt Traceback (most recent call last)
in ()
122 weightdirs = natsorted(glob(OUTPUT_DIR + os.sep + “*”))
123 if len(weightdirs) == 0:
–> 124 raise KeyboardInterrupt(“No training weights directory found”)
125 WEIGHTS_DIR = weightdirs[-1]
126
KeyboardInterrupt: No training weights directory found
The above was with stable diffusion sdxl. I tried with the Stable Diffusion 2 model and also got the same or similar errors. Now trying with the one specified when you first open the notebook and I’m seeing messages about pip’s dependency resolve, kaleido, cohere, openai, toktoken, not being installed. Typingsensor 4.9.0 incompatible, downloading nvidia_cuda, cudn, cufft, cublas cupti cu11 and runtimes, requiring torch 2.1.0 but has torch 2.0.1. Sadly failred again:
===================================BUG REPORT===================================
Welcome to bitsandbytes. For bug reports, please submit your error trace to: https://github.com/TimDettmers/bitsandbytes/issues
For effortless bug reporting copy-paste your error into this form: https://docs.google.com/forms/d/e/1FAIpQLScPB8emS3Thkp66nvqwmjTEgxp8Y9ufuWTzFyr9kJ5AoI47dQ/viewform?usp=sf_link
================================================================================
/usr/local/lib/python3.10/dist-packages/bitsandbytes/cuda_setup/paths.py:105: UserWarning: /usr/lib64-nvidia did not contain libcudart.so as expected! Searching further paths…
warn(
/usr/local/lib/python3.10/dist-packages/bitsandbytes/cuda_setup/paths.py:27: UserWarning: WARNING: The following directories listed in your path were found to be non-existent: {PosixPath(‘/sys/fs/cgroup/memory.events /var/colab/cgroup/jupyter-children/memory.events’)}
warn(
/usr/local/lib/python3.10/dist-packages/bitsandbytes/cuda_setup/paths.py:27: UserWarning: WARNING: The following directories listed in your path were found to be non-existent: {PosixPath(‘http’), PosixPath(‘8013’), PosixPath(‘//172.28.0.1’)}
warn(
/usr/local/lib/python3.10/dist-packages/bitsandbytes/cuda_setup/paths.py:27: UserWarning: WARNING: The following directories listed in your path were found to be non-existent: {PosixPath(‘–logtostderr –listen_host=172.28.0.12 –target_host=172.28.0.12 –tunnel_background_save_url=https’), PosixPath(‘//colab.research.google.com/tun/m/cc48301118ce562b961b3c22d803539adc1e0c19/gpu-t4-s-dlp2ql3fxc46 –tunnel_background_save_delay=10s –tunnel_periodic_background_save_frequency=30m0s –enable_output_coalescing=true –output_coalescing_required=true’)}
warn(
/usr/local/lib/python3.10/dist-packages/bitsandbytes/cuda_setup/paths.py:27: UserWarning: WARNING: The following directories listed in your path were found to be non-existent: {PosixPath(‘/datalab/web/pyright/typeshed-fallback/stdlib,/usr/local/lib/python3.10/dist-packages’)}
warn(
/usr/local/lib/python3.10/dist-packages/bitsandbytes/cuda_setup/paths.py:27: UserWarning: WARNING: The following directories listed in your path were found to be non-existent: {PosixPath(‘/env/python’)}
warn(
/usr/local/lib/python3.10/dist-packages/bitsandbytes/cuda_setup/paths.py:27: UserWarning: WARNING: The following directories listed in your path were found to be non-existent: {PosixPath(‘module’), PosixPath(‘//ipykernel.pylab.backend_inline’)}
warn(
CUDA_SETUP: WARNING! libcudart.so not found in any environmental path. Searching /usr/local/cuda/lib64…
CUDA SETUP: CUDA runtime path found: /usr/local/cuda/lib64/libcudart.so
CUDA SETUP: Highest compute capability among GPUs detected: 7.5
CUDA SETUP: Detected CUDA version 122
CUDA SETUP: TODO: compile library for specific version: libbitsandbytes_cuda122.so
CUDA SETUP: Defaulting to libbitsandbytes.so…
CUDA SETUP: CUDA detection failed. Either CUDA driver not installed, CUDA not installed, or you have multiple conflicting CUDA libraries!
CUDA SETUP: If you compiled from source, try again with `make CUDA_VERSION=DETECTED_CUDA_VERSION` for example, `make CUDA_VERSION=113`.
Traceback (most recent call last):
File “/content/train_dreambooth.py”, line 869, in
main(args)
File “/content/train_dreambooth.py”, line 571, in main
import bitsandbytes as bnb
File “/usr/local/lib/python3.10/dist-packages/bitsandbytes/__init__.py”, line 6, in
from .autograd._functions import (
File “/usr/local/lib/python3.10/dist-packages/bitsandbytes/autograd/_functions.py”, line 5, in
import bitsandbytes.functional as F
File “/usr/local/lib/python3.10/dist-packages/bitsandbytes/functional.py”, line 13, in
from .cextension import COMPILED_WITH_CUDA, lib
File “/usr/local/lib/python3.10/dist-packages/bitsandbytes/cextension.py”, line 41, in
lib = CUDALibrary_Singleton.get_instance().lib
File “/usr/local/lib/python3.10/dist-packages/bitsandbytes/cextension.py”, line 37, in get_instance
cls._instance.initialize()
File “/usr/local/lib/python3.10/dist-packages/bitsandbytes/cextension.py”, line 27, in initialize
raise Exception(‘CUDA SETUP: Setup Failed!’)
Exception: CUDA SETUP: Setup Failed!
—————————————————————————
KeyboardInterrupt Traceback (most recent call last)
in ()
122 weightdirs = natsorted(glob(OUTPUT_DIR + os.sep + “*”))
123 if len(weightdirs) == 0:
–> 124 raise KeyboardInterrupt(“No training weights directory found”)
125 WEIGHTS_DIR = weightdirs[-1]
126
KeyboardInterrupt: No training weights directory found
Hi all, fixed.
Having the exact same problem. I thought I was an idiot at first lol. I also emailed andrew.
I encountered this error:
“KeyboardInterrupt Traceback (most recent call last)
in ()
122 weightdirs = natsorted(glob(OUTPUT_DIR + os.sep + “*”))
123 if len(weightdirs) == 0:
–> 124 raise KeyboardInterrupt(“No training weights directory found”)
125 WEIGHTS_DIR = weightdirs[-1]
126
KeyboardInterrupt: No training weights directory found”
I am using stablediffusionapi / juggernaut-xl model. Any suggestions?
getting this error when i try using a new model.
AttributeError: ‘NoneType’ object has no attribute ‘pop’
Not all models on huggingface are diffusers. It should work as long as they are set up correctly.
I am confuse that it did not work today but worked last month. pip install xformers==0.0.21
I also can’t get it to work like the commenter above. I used it successfully many months ago and was trying again today but it didn’t work.
Where specifically do we find these settings to change and/or where is the AI_PICS folder supposed to be?
I was confused about the post. My previous comment (deleted) was not correct. I will take a look at the dreambooth notebook later today.
OK, issue fixed.
Issue fixed.
Just tried it, worked great, thank you!
Getting this error, any ideas?
ERROR: pip’s dependency resolver does not currently take into account all the packages that are installed. This behaviour is the source of the following dependency conflicts.
torch 2.0.1+cu118 requires triton==2.0.0; platform_system == “Linux” and platform_machine == “x86_64”, but you have triton 2.1.0 which is incompatible.
I cannot reproduce this error message. It doesn’t affect the function of the notebook. Everything is working as expected so I am not changing it now.
Hi… I need to train a model using difussers v0.14 or less… this is because later a want to extract the lora from the model using supermerger extension in automatic 1111 and this extension only works if the model use 0.14 difussers or less.
Is there any way to use this google colab in that way. I mean add or change something in the code to force that version of difussers. Somebody told me that is possible using dreambooth extension in automatic 1111 locally but I don’t have enough resources in my PC. Thanx in advance and sorry for my English.
Is there a way to train an object *with scale*? I’m a blacksmith. Getting an anvil out of any model is an exercise in sci-fi frustration. (Or a hammer, for that matter.) I tried textual inversion and an anvil-faced man is a sight that can’t be unseen. Would Dreambooth help with that? I don’t want a micro-anvil or a building-sized one, hence my question.
Haha, yes. dreambooth is a lot of powerful than textual inversion. It’s worth a try.
This is a really great article! Thank you a lot! Can we also train based on XL model? I tried with “stabilityai/stable-diffusion-xl-base-1.0” and it didn’t work. Could you please update the Colab and your article to show that? 🙂
SDXL is not supported with this notebook. I’m working on a lora training notebook. hope to get sdxl to work there.
Thank you for a great tutorial. I am trying to inject a custom model (natural person) into the realistic anime characters.
Would you please recommend a model to use and a step-by-step guideline process for creating an AI image of a 3D-realistic anime character pose and outfit with a real person. Thank you.
Anything v3 is a good base model for further finetuning. Find more here: https://stable-diffusion-art.com/anime-models-and-prompts/
You can experiment with using lora to make it look 3D. For example the following but there are many.
https://civitai.com/models/10679/stylized-3d-model-lora
Currently i’m using Automatic111 local on my machine with a custom model to create a real person from civitai.
I’d like to train a dreambooth model face using the colab notebook like this post. Is it possible to select that custom model that i’m using from civitai? or only the huggingface models are available for training? If so, how to train the custom model from civitai? Or it is best to train a lora?
Only huggingface is supported right now. There’s a way to but needs some setup.
Any SDXL dreambooth?
coming soon!
Hello. I appreciate the detailed tutorial however, it didn’t work for me. As far as I can tell, I have followed the instructions to a T. The behavior I saw was that the top portion finished and I was correctly shown the sample images but then I tried to generate the Van Gogh images using the identifier I used in the top section did not work. I realized that perhaps that identifier wasn’t specific enough so I tried again. It was an identifier that couldn’t be a common term yet I saw the same behavior. I’m not sure what other information you’d need to help but I am willing to try it a third time to see where it’s failing. Thanks!
I just tested the notebook and it is working as expected using the toy example. You can try that first to make sure your setup is correct.
You can also try not changing the dreambooth keyword to see if that works for you.
AttributeError: ‘NoneType’ object has no attribute ‘cuDeviceGetCount’
—————————————————————————
KeyboardInterrupt Traceback (most recent call last)
in ()
121 weightdirs = natsorted(glob(OUTPUT_DIR + os.sep + “*”))
122 if len(weightdirs) == 0:
–> 123 raise KeyboardInterrupt(“No training weights directory found”)
124 WEIGHTS_DIR = weightdirs[-1]
125
KeyboardInterrupt: No training weights directory found
Hi, I did a test run and it is working correctly. Use the image examples in the article to test your setup.
I still have the same error. How did you fix it?
Try running the example images in the tutorial.
This is the error:
HFValidationError: Repo id must be in the form ‘repo_name’ or ‘namespace/repo_name’: ‘/content/drive/MyDrive/Dreambooth_model/model1.ckpt’. Use `repo_type` argument if needed.
Okay, I have a model.ckpt saved in my drive. Now how do I use it directly? When I paste the path of the model in the 2nd cell, it is giving an error.
You can download and use it in Stable Diffusion as a custom model like those downloaded from civitai.
So apparently I was using an older version, it’s working now, thanks 😉
Hi, I’m getting the same error :
KeyboardInterrupt Traceback (most recent call last)
in ()
121 weightdirs = natsorted(glob(OUTPUT_DIR + os.sep + “*”))
122 if len(weightdirs) == 0:
–> 123 raise KeyboardInterrupt(“No training weights directory found”)
124 WEIGHTS_DIR = weightdirs[-1]
125
KeyboardInterrupt: No training weights directory found
Can you try with the latest updated notebook and with the example images in the article? All errors should have been fixed.
I’m getting (“No training weights directory found”) as of this afternoon (worked last night)
Hi! I´ve followed the guide step by step but I got the error
ImportError: accelerate>=0.20.3 is required for a normal functioning of this module, but found accelerate==0.19.0.
Try: pip install transformers -U or pip install -e ‘.[dev]’ if you’re working with git main
—————————————————————————
KeyboardInterrupt Traceback (most recent call last)
in ()
121 weightdirs = natsorted(glob(OUTPUT_DIR + os.sep + “*”))
122 if len(weightdirs) == 0:
–> 123 raise KeyboardInterrupt(“No training weights directory found”)
124 WEIGHTS_DIR = weightdirs[-1]
125
KeyboardInterrupt: No training weights directory found
I tried to restart the process as other user suggested but It did nothing, I´ve also tried with the sample images and nothing 🙁 Any help?
Hi, thanks for reporting. The issue is fixed. Please pull the latest notebook (7/19).
I am getting this error, does accelerate need to be updated again?
ImportError: accelerate>=0.20.3 is required for a normal functioning of this module, but found accelerate==0.19.0.
Try: pip install transformers -U or pip install -e ‘.[dev]’ if you’re working with git main
—————————————————————————
KeyboardInterrupt Traceback (most recent call last)
in ()
121 weightdirs = natsorted(glob(OUTPUT_DIR + os.sep + “*”))
122 if len(weightdirs) == 0:
–> 123 raise KeyboardInterrupt(“No training weights directory found”)
124 WEIGHTS_DIR = weightdirs[-1]
125
KeyboardInterrupt: No training weights directory found
I’m getting the same error. The notebook was working fine until yesterday. None of the fixes mentioned here work anymore. Maybe it’s some new bug
Hi, thanks for reporting. The issue is fixed. Please pull the latest notebook (7/19).
I tired again a few hours later and everything worked fine – ¯\_(ツ)_/¯
Hey, I have the same problem – there’s a warning about not being able to find TensorRT
You can safely ignore the warning.
Went through guide and keep coming up with Message Error after attempting to upload my png pics. Would appreciate some guidance. Specifically it says
MessageError Traceback (most recent call last)
in ()
75 for c in concepts_list:
76 print(f”Uploading instance images for `{c[‘instance_prompt’]}`”)
—> 77 uploaded = files.upload()
78 for filename in uploaded.keys():
79 dst_path = os.path.join(c[‘instance_data_dir’], filename)
3 frames
/usr/local/lib/python3.10/dist-packages/google/colab/_message.py in read_reply_from_input(message_id, timeout_sec)
101 ):
102 if ‘error’ in reply:
–> 103 raise MessageError(reply[‘error’])
104 return reply.get(‘data’, None)
105
MessageError: RangeError: Maximum call stack size exceeded.
Hi, I just tested the notebook and it is working properly. Please run with the example images in the tutorial to make sure your setup is correct.
It seems to exceed some kind of limit. Do you have too many images?
Still doesn’t work. 🙁 ‘No training weights directory found’. Can you help me?
Hi, are you able to run through the example in the post?
I paid the $5 for access but I get an error saying selected gpu is not available, I tried changing the hardware accelerator to none but it doesn’t work. Do I have to pay another $13 to get access??
Sorry, had to refresh the execution to get it working. Hope this helps other people.
It works. I just trained a model.
This is definately one of the HUGE problems for users like me and you when it comes to Colab services, not sure about the others but definately Google seems to upgrade their asses at every chance they get. Ive been at this since christmas and not sure how many times my notebooks crashes for some unknown reason… Heck – learned Python development aswell since then… 😀
Im struggling with the excact same error at the moment, but maby we should just wait since even Colab notebooks from Huggingface crash. Im referring to the official ones.
Hello! Using the colab from the quick start guide ran into this error. Interestingly, it worked maybe two days ago. Calling the realistic visions 2.0 model on branch main from huggingface.
Unsure if the true issue is a problem with the directory as per the traceback, or the TF-TRT warning about not being able to find TensorRT. Look forward to any advice!
===============================
Install xformers
2023-06-07 16:46:56.928864: W tensorflow/compiler/tf2tensorrt/utils/py_utils.cc:38] TF-TRT Warning: Could not find TensorRT
╭───────────────────── Traceback (most recent call last) ──────────────────────╮
│ /content/train_dreambooth.py:869 in │
│ │
│ 866 │
│ 867 if __name__ == “__main__”: │
│ 868 │ args = parse_args() │
│ ❱ 869 │ main(args) │
│ 870 │
│ │
│ /content/train_dreambooth.py:425 in main │
│ │
│ 422 def main(args): │
│ 423 │ logging_dir = Path(args.output_dir, “0”, args.logging_dir) │
│ 424 │ │
│ ❱ 425 │ accelerator = Accelerator( │
│ 426 │ │ gradient_accumulation_steps=args.gradient_accumulation_steps, │
│ 427 │ │ mixed_precision=args.mixed_precision, │
│ 428 │ │ log_with=”tensorboard”, │
╰──────────────────────────────────────────────────────────────────────────────╯
TypeError: Accelerator.__init__() got an unexpected keyword argument
‘logging_dir’
—————————————————————————
KeyboardInterrupt Traceback (most recent call last)
in ()
121 weightdirs = natsorted(glob(OUTPUT_DIR + os.sep + “*”))
122 if len(weightdirs) == 0:
–> 123 raise KeyboardInterrupt(“No training weights directory found”)
124 WEIGHTS_DIR = weightdirs[-1]
125
================================
I solved it, the latest Accellerator library. So before training add another cell and add this code and run it:
!yes | pip uninstall accelerate
!pip install accelerate==0.19.0
Then everything should work.
Thanks for the pointer! The notebook is now fixed.
Hi, it should be fixed now.
so what I did in the end is instead of saving ckpt as the current notebook suggest, I saved the JSON file into google doc, so that the pre-trained model can be used for future runs.
good to know! adding to my list to change that.
How do I use StableDiffusionPipeline.from_pretraine to load previously trained ckpt file?
In the code, it says to use previously trained model saved in gdrive, replace model_path with the full path of model in gdrive. However, after I did that, StableDiffusionPipeline.from_pretrained is still looking for the json file instead of the ckpt file that we saved on the gdrive. How do I ask StableDiffusionPipeline.from_pretrained to read ckpt?
It is currently not supported. Someone was able to upload a custom checkpoint to HuggingFace and use it.
How can I find the colab notebook?
Hi, get the dreambooth notebook here: https://stable-diffusion-art.com/dreambooth-notebook-guide
Great stuff! Thanks for this. I just wanted to mention that there is a bug and it is fixed by increasing the torch version to torch==2.0.1
Yes, it’s also fixed now.
After that comes:
RuntimeError: Detected that PyTorch and torchvision were compiled with different
CUDA versions. PyTorch has CUDA Version=11.7 and torchvision has CUDA
Version=11.8. Please reinstall the torchvision that matches your PyTorch
install.
—————————————————————————
KeyboardInterrupt Traceback (most recent call last)
in ()
121 weightdirs = natsorted(glob(OUTPUT_DIR + os.sep + “*”))
122 if len(weightdirs) == 0:
–> 123 raise KeyboardInterrupt(“No training weights directory found”)
124 WEIGHTS_DIR = weightdirs[-1]
125
And
RuntimeError: Detected that PyTorch and torchvision were compiled with different
CUDA versions. PyTorch has CUDA Version=11.7 and torchvision has CUDA
Version=11.8. Please reinstall the torchvision that matches your PyTorch
install.
Hey Man just bought a bunch of your stuff – thanks for all the help! I’ve been trying to create a model for 2 days now and getting very frustrated. My current issue is this, RuntimeError: Detected that PyTorch and torchvision were compiled with different
CUDA versions. PyTorch has CUDA Version=11.7 and torchvision has CUDA
Version=11.8. Please reinstall the torchvision that matches your PyTorch
install. | Could you help out with this or advise? btw I have 0 experience in coding.
Appreciate your support!
The bug is now fixed. Please refresh the notebook (May 19 update).
It seems that this exact issue with the PyTorch and CUDA versions is persisting past May 19th as I cannot get it to work for these reasons. Thank you for any help in fixing the colab, I am in the midst of training models for animating a movie and your setup was very helpful for the first one I trained a week ago.
Hi, the notebook is fixed now.
Glad to help!
I get the manual and the notebook from the gumroad link. But the noteook has torch errors.
Building wheel for ffmpy (setup.py) … done
ERROR: pip’s dependency resolver does not currently take into account all the packages that are installed. This behaviour is the source of the following dependency conflicts.
torchaudio 2.0.1+cu118 requires torch==2.0.0, but you have torch 2.0.1 which is incompatible.
torchvision 0.15.1+cu118 requires torch==2.0.0, but you have torch 2.0.1 which is incompatible.
Install xformers
2023-05-24 11:00:56.220492
Hi, the error is fixed. Please pull the May 24th updated copy.
I managed to train successfully, and the model works fine if I don’t try to do add too many prompt. But the moment I try to change lighting, background, etc in the prompt, the generated image would look nothing like the person I used to train. Is there anything specific that I need to do to the training images?
Awesome tuto, thanks for that.
It runs fine on 1.5 but I tried 2.1 (stabilityai/stable-diffusion-2-1-base), it created the model.
But then when I try to run it on my Mac M1 chip, I get this: Torch not compiled with CUDA enabled
Do you have any idea?
And I just want to emphasize that I use stabilityai/stable-diffusion-2-1-base on my mac without issue (when not fined tuned with dreambooth)
Hi, the error message suggests a problem with your setup because it should not call cuda on mac. But it should run if you can run the 2.1 base model. Do you have a config file for your fine-tuned model? copy the yaml file from 2.1 model and rename to match your new model.
Brilliant, I completely forgot about the yaml, thanks!
Hi, I asked a version of this question before but I think I understand better now what/how to ask: so I want to “sequentially” train a model and currently I have a handful of custom trained models for various friends and family but my goal would be to have a single custom model where I could prompt for anyone/anything I’ve trained it on, and in whatever combinations I want (including all at once like say for a group photo).
So I’m wondering what exactly it is pulling for files etc when you designate a model in the:
“Name/path of the initial model” model name field… I understand it pulls the model from huggingface, but is there a way to modify this collab notebook to have it use a cpkt file that you upload? Or somehow point it to the saved file(s) in Gdrive?
My novice thinking was to perhaps upload the file to my huggingface account so that it would have the same kind of pathway so I could enter that into the model name field, but the only file I even have is the ckpt file… Is that enough? Or are there additional files I would need to upload? And if so, where/what are they and how do I find them? Thanks!
Hi, I will need to see how hard it is to modify to load a model file in G Drive.
Adding to my to-do list…
Thanks Andrew. So I managed to download all the files from the collab notebook in the folder that is at the pathway: “stable diffusion weights—>output—>1800” (1800 I think refers to the steps I used) and then I uploaded all of these to a new model on my own Huggingface account page. I successfully used this now custom trained (on images of my friend) model as the “initial model” with your collab notebook and tried training it a second time with photos of myself. It actually DID work, however, instead of being able to prompt for both unique tokens (myself and my friend), it seemed to combine us both into one … If i used my token prompt word for me, it looked normal, but if I used the one I used for my friend, it spit out a hybrid version of us (but mostly looking like me and not him, but still unmistakably him).
Do you think this is because I used the same class name for both? (person). And is there a way to avoid this going forward? Perhaps only bringing specific json files from the newly trained model and instead using various files from the original base model page I trained from? (In other words, a combination of the new ckpt model and the other files? And if so, which ones? vae? unet? etc? ). Thanks and apologies for my noobishness.
Yes you can try a different class label, man, woman, dude… to try separating you two out.
Another possibility is try to describe TWO persons in the prompt. If you say xyz1 and xyz2 (new dreambooth tokens), SD tends to interpret it as one person but blending the facial features. Say “two men”, “A man and a woman”, etc. to get two people.
Another trick is to use regional prompt to specify your token in one region and your friend’s token in another region.
https://stable-diffusion-art.com/regional-prompter/
Finally, you can always train two models separately, generate two people with the first one, and inpaint the face with the other one.
Let me know how it goes.
I found the same model, with the same error
https://huggingface.co/MinVer001/BeautifulRealisticAsiansV4
Hey! Great tutorial. I wanted to ask in-depth about what I need to do with AI training and see if you can give me a hand.
I’ve been generating 3D models of some characters and also making scenes with them. For example, one running. I’ve been looking for a way to create these scenes without having to 3D render each one. So, I’ve tried putting images of these characters in AI to make scenarios using them as a base, but I haven’t been successful,as in the AI isn’t recognizing the characters in the images i’m uploading
. What would you say is the best approach to solve this problem? Is it even possible to achieve what I’m asking with AI? Thanks a lot for your response.
You should be able to get some 3D-looking characters if you use the right keyword combinations in the 1.5 model, so I think it is possible to generate this style.
It’s all about experimentation so I don’t have the answer. perhaps you can try replacing the “photo” with “3D rendering” to leverage what the model already has.
Hi Andrew, I’m trying to use other models from Civitai
Already uploaded the model to drive and I put the path to the drive in the model url section
But it always output
HFValidationError: Repo id must be in the form ‘repo_name’ or
‘namespace/repo_name’:
‘/content/drive/MyDrive/AI_PICS/models/braBeautifulRealistic_v40.safetensors’.
Use `repo_type` argument if needed.
Any help?
Currently, the notebook only supports pulling a model from huggingface. See if you can find the same model there.
I found the same model, with the same error
https://huggingface.co/MinVer001/BeautifulRealisticAsiansV4
Hi, the model repository is incomplete. It is missing a necessary file. I have plan to investigate how to use a copy of model in google drive. stay tuned.
Thanks Andrew, that’s good to know it can be trained sequentially. I’m very much inexperienced with Collab or anything of this nature… Is there a straightforward way to upload a model I’ve trained to then use it in place of a different huggingface model/link? (As you explain in the “How to train from a different model” section) so that I can train sequentially?
Speaking of using different models, BTW, I’ve been able to successfully train a 768-trained model (dreamlike-art/dreamlike-photoreal-2.0) using your Collab notebook and this tutorial (IIRC you said somewhere that this wasn’t possible yet, only 512-trained models, but maybe you’ve updated it or something).
Thanks again!
I will need to look into this. The software by default can only pull model from HF.
Thanks again. I’ll be interested to see what you find.
I was thinking too, would it be possible to just pull the model from where it is saved in your google drive after the initial training process is done? If we could do that, then it seems like it would be pretty simple to just run the process again, or as many times as you want, to train it for different people/objects. That would be really awesome if we could have just a single custom model that contains all our unique trained prompts.
Is it possible to use Dreambooth/this tutorial to train a custom model on more than one person/unique prompt? For example, if I wanted to be able to place myself and a friend in the same images using two unique prompt words (and be able to also make images with just one person or the other, using the same model)?
I was thinking perhaps it could work by training a custom model on say, a person named “FXZ”, then uploading that trained model somehow (?) and then using that FXZ-trained model to train a second time, on say a person named “GDF”? (As in, using your ” How to train from a different model” section of the tutorial but the different model is the FXZ-trained custom model you just made).
I’m wondering it then the result would be a model where you could use the FXZ prompt to put that person in the image, OR the GDF prompt to put THAT person in the image, OR, both the FXZ and the GDF prompts to put the two people together in the same image?
Alternatively, is it possible to simultaneously train on two people using a single prompt? (I know it’s possible, since I tried training it for my girlfriend and I with the class “couple” but it didn’t seem to work very well… It seemed to reproduce me fine but not her).
Thanks!
I think it should be possible to train the model sequentially to inject two persons with different keywords in.
Prompting could be challenging. I advise using controlnet and perhaps with inpainting.
Any idea why this error is popping up when I try to upload my reference photos?
Drive already mounted at /content/drive; to attempt to forcibly remount, call drive.mount(“/content/drive”, force_remount=True).
Tesla T4, 15360 MiB, 15101 MiB
[*] Weights will be saved at /content/stable_diffusion_weights/output
Uploading instance images for `photo of safab`
IMG_0531.jpeg(image/jpeg) – 135870 bytes, last modified: n/a – 0% done
—————————————————————————
MessageError Traceback (most recent call last)
in ()
75 for c in concepts_list:
76 print(f”Uploading instance images for `{c[‘instance_prompt’]}`”)
—> 77 uploaded = files.upload()
78 for filename in uploaded.keys():
79 dst_path = os.path.join(c[‘instance_data_dir’], filename)
3 frames
/usr/local/lib/python3.9/dist-packages/google/colab/_message.py in read_reply_from_input(message_id, timeout_sec)
101 ):
102 if ‘error’ in reply:
–> 103 raise MessageError(reply[‘error’])
104 return reply.get(‘data’, None)
105
MessageError: RangeError: Maximum call stack size exceeded.
Hi, can you try using a different browser, e.g. Chrome or firefox.
If this doesn’t work, I can modify the code so that it takes photo from your google drive.
Hi, Andrew. Based on my reading and this great tute, it appears that Dreambooth may be the answer to my goal of achieving a consistently repeatable human character. But before I invest a lot of effort in trying it on Colab, I have a few initial questions. One: When we want to achieve a consistently repeatable human character, are we training just the face, or the hair and clothing as well. It seems to me that if you want to present the character in a consistently repeatable way, you’d need the outfit and hair to be trained as well. Am I mistaken that you’d perhaps need to train the character from images of how you want to present them (with various hair and clothes for different presentations) in a separate model for each presentation? That seems like a tall order (in terms of getting reference images) unless you’re creating and suiting up your character in DAZ or something. And two: What if you like a model such as, say, F222 for realism? If you train a character on your own model, are you committed to using only your custom model? This whole subject is very intriguing.
Thank you, I’ll try it!
You need to change the revision (–revision=”fp16″). A revision is basically just the name of a branch. For Protogen_x3.4 change it to “main” (–revision=”main”).
Thank you so much for this tutorial. I love it. I tried it and it worked normally, but I’ve a few problems. I use the ChillOut model and I tried 3200 Steps and it’s not that smooth, and I tried with 10000 Steps and this was worse than 3200 Steps. How many steps do you usually use for making a model from a human face? , and is it possible to convert from model/checkpoint to LoRA model? , Thank you much for your hard work!!
100 steps for every image usually. 10 images 1000 steps
same problem
I just did a quick test and the notebook is working correctly. What problem do you see?
Hey Andrew!
So I’ve tried multiple ways to try and train with a a model that isn’t the default I’ve attempted the naming convention two different ways.
huggingface/SG161222/Realistic_Vision_V2.0
huggingface/Realistic_Vision_V2.0
Neither of these works and it tells me KeyboardInterrupt: No training weights directory found
Suggestions?
Hi Russell, I just fixed a new compatibility issue with colab. Please refresh to get the new notebook. It should work with the model parameters below
model name: SG161222/Realistic_Vision_V2.0
branch: main
Thank you very much, I will follow that instruction.
Also, I tried the AUTOMATIC1111 to solve the issue.
When I put “zwx” it generates the rabbit, but putting “oil painting of zwx in style of Van Gogh” generates just a painting of Van Gogh (without the rabbit) .
Is there any setting that I have to do before using dreambooth on AUTOMATIC1111??
No, the notebook converted the model to a format that A1111 can read. I just tested the dreambooth model in A1111. The prompt “oil painting of zwx in style of Van Gogh” works as expected. I used 25 steps and CFG 7.
Thank you for writing this article. But it seem that I have a problem here.
I have run the second cell but I keep on getting results from the original model (not the one that I’ve trained).
I’ve changed the model_path to the new model that’s in GoogleDrive but it won’t still function.
It seems that this for statement hasn’t been run.
if ‘pipe’ not in locals():
So I deleted that line but got this error
OSError: It looks like the config file at ‘/content/drive/MyDrive/Dreambooth_model/model1.ckpt’ is not a valid JSON file.
Hi, model_path should point to a model in Hugging Face, not your own google drive. The second cell uses the trained model. It should be run right after the training.
I suggest you use my example images first to ensure your setup is ok. You should get results similar to mine in the article. Then you can proceed with your own training images.
thank you very very much, I trained ” loggerhead musk turtle” success
When I run the Colab, the following error occurred:
Training weight directory not found
Hi I tested the notebook and it is working correctly with my examples.
There’s likely an error that happened during the training, causing the weight files not written. You take a look to see what the actual error is.
Hello,
I found a model which I’d like to use that has the 16fp pruned version. Does that work for the training? The other non-pruned files are not 16fp. Could I use those in training? I read your notebook only supports fp16. What is the best way forward? Thanks for the guide and collab!
Hi Lars, it should work, but I haven’t tried it.
Thoughts on replacing the unique instance token name e.g. ohwx with the name of a celebrity that looks similar (using a tool like starmyface.com) to your subject when training people, as per JoePenna’s github: “Best practice is to change the token to a celebrity name (note: token, not class — so your prompt would be something like: Chris Evans person)”
Not a bad idea because you can take advantage of the celebrity’s prior training in the model. One caveat is each celebrity has his or her bias in pose and association. So choose carefully. See
https://stable-diffusion-art.com/prompt-guide/#Association_of_celebrity_names
Hello!
I am getting this error while testing image generation from model:
—————————————————————————
OutOfMemoryError Traceback (most recent call last)
in
30
31 with autocast(“cuda”), torch.inference_mode():
—> 32 images = pipe(
33 prompt,
34 height=height,
13 frames
/usr/local/lib/python3.8/dist-packages/diffusers/models/cross_attention.py in get_attention_scores(self, query, key, attention_mask)
206
207 if attention_mask is None:
–> 208 baddbmm_input = torch.empty(
209 query.shape[0], query.shape[1], key.shape[1], dtype=query.dtype, device=query.device
210 )
OutOfMemoryError: CUDA out of memory. Tried to allocate 4.50 GiB (GPU 0; 14.76 GiB total capacity; 11.97 GiB already allocated; 1.50 GiB free; 11.99 GiB reserved in total by PyTorch) If reserved memory is >> allocated memory try setting max_split_size_mb to avoid fragmentation. See documentation for Memory Management and PYTORCH_CUDA_ALLOC_CONF
What should I do?
Is it due to my hardware?
Are you running on colab or your own hardware? Colab should work fine. You may reduce ram usage with settings but that’s out of scope of this tutorial.
Whenever I try and use a model path from Huggingface I keep getting errors. Suggestions?
File “/usr/local/lib/python3.8/dist-packages/requests/models.py”, line 943, in raise_for_status
raise HTTPError(http_error_msg, response=self)
requests.exceptions.HTTPError: 404 Client Error: Not Found for url: https://huggingface.co/darkstorm2150/Protogen_x3.4_Official_Release/resolve/fp16/model_index.json
Revision Not Found for url: https://huggingface.co/darkstorm2150/Protogen_x3.4_Official_Release/resolve/fp16/model_index.json.
Invalid rev id: fp16
OSError: fp16 is not a valid git identifier (branch name, tag name or commit id) that exists for this model name. Check the model page at ‘https://huggingface.co/darkstorm2150/Protogen_x3.4_Official_Release’ for available revisions.
Traceback (most recent call last):
IndexError Traceback (most recent call last)
in
119 from glob import glob
120 import os
–> 121 WEIGHTS_DIR = natsorted(glob(OUTPUT_DIR + os.sep + “*”))[-1]
122
123
IndexError: list index out of range
Hi, please follow the naming convention in the original notebook.
E.g. the following for the 1.5 model
runwayml/stable-diffusion-v1-5
Thanks a lot for the tutorial! Just a question on the last step, as I am not able to find the .ckpt file in my google drive (the Dreambooth_model folder is there though). Am I missing any step?
I get the following message.
Dreambooth completed successfully. It took 19.5 minutes.
cp: cannot stat ‘/content/stable_diffusion_weights/output/800/model.ckpt’: No such file or directory
Model saved to /content/drive/MyDrive/Dreambooth_model/model.ckpt
Hi, should be fixed now.
still having this problem with the last version and using supermerger
I am not familiar with supermerger. you can visit their page for troubleshooting.
Hi Andrew, I’m trying to load a model from another source other than huggingface. I have several in my stable diffusion model folder, but when I put the copied path from my gdrive, I get errors saying that it couldn’t connect to huggingface.co, and there doesn’t appear to be a model_index.json file. What am I doing wrong, and could you give me an example of a proper format to put into that field. Thanks!
Hi Paul, this notebook is based on Shivam Shrirao’s repo. I haven’t run with a local ckpt but looks like you will need to convert the ckpt file to a diffuser model. See
https://www.reddit.com/r/DreamBooth/comments/y1q7bo/comment/it8dh3p/?utm_source=share&utm_medium=web2x&context=3
How do i upload the completed downloaded model to a GUI for usage? Where can I find said GUI’s, and how do install the models onto them?
Hi, you can use AUTOMATIC1111 GUI to use the model. The easiest way is to use our Colab noteobok. You simply need to provide the path of the model in google drive to use it.
https://stable-diffusion-art.com/automatic1111-colab
Hi Andrew,
Thanks so much for all these tutorials, they’ve been really helpful.
I couldn’t get the Dreambooth tutorial to work at all, I’m really lost…
I am on a laptop and using the free version of colab.
I run Dreambooth and upload your photos of the toy, it does export a .ckpt file, but it also gives lots of warnings along the way.
When I tested the model, it just output similar photos of the toy, despite having the Van Gogh prompt, doesn’t look like a Van Gogh painting.
The output model appears in my Google Drive, just called “model.ckpt”
I then moved that file into “stable-diffusion-webui/models/Stable-diffusion/”
Then I close the Dreambooth session and open Automatic1111. If I try a prompt with “photo of zxw” the toy does not show up in the picture. Should it? is that how it works?
In Automatic1111, the zxw toy model, called “model” is not listed in the drop down, if I refresh the models, should it show up there? Do I need to tick something when I run the colab where it says “only check the models you are going to use”?
I don’t know whether the .ckpt I’m creating in Dreambooth is broken as it doesn’t seem to work in the Dreambooth testing, or if I’m not understanding how to use it?
Hi Steve,
Are you able to test the trained model with the 2nd cell of dreambooth notebook? It has to be done right after training.
If I understand correctly, you are using the Google Colab notebook provided in Quick Start Guide to run automatic1111. You will need to first rename the model file to something unique (e.g. model_toy.ckpt). The upload the file to Colab under /content/stable-diffusion-webui/models/Stable-diffusion. You can access the folder by clicking the “File” icon on the right side panel. Open the folders: stable-diffusion-webui → models → Stable-diffusion. Drag and drop the model file from your local computer to the Stable-diffusion folder.
You should see your model file name after refreshing the checkpoint drop down menu.
Hi Andrew,
Thanks for replying. Yes that’s correct, I’m using the Automatic1111 colab recommended in the Quick Start Guide.
When I test Dreambooth in cell 2, immediately after training and using the same prompt in the example, I do get 2 photos of the toy, but not in the style of Van Gogh.
I tried to upload the .ckpt file to colab but the file is 2GB and uploads very slowly, it will take about 1-2 hours and I got disconnected from colab before it finished. If I do manage to get it to work, would I have to re-upload any .ckpt files I want to use every single time I use colab and then they get deleted when the session closes? Or can I save a version of that whole notebook to my GDrive, and the toy model will then be available next time I run it?
Thanks for your help and sorry for all the basic noob questions
Steve
Hi Steve,
There’s a bug in the dreambooth notebook causing incorrect training. I have updated the notebook and now the training should be working.
I also updated the Colab Notebook in Quick Start Guide to have the ability to load a custom model in your Google Drive. Try it out.
Wow! thank you so much Andrew, it works perfectly now. I really appreciate your help.
One last thing (I promise!) – is there a way to load more than one custom .ckpt model from the Google Drive? If I put a comma, or a colon or slash between the files or something, so that I could load in a custom object AND a custom Style, or two objects, etc.?
Thanks,
Steve
OK, I updated the notebook to load multiple models. Check it out.
Hi Andrew,
I also am getting an IndexError warning you can see below:
IndexError Traceback (most recent call last)
in
120 from glob import glob
121 import os
–> 122 WEIGHTS_DIR = natsorted(glob(OUTPUT_DIR + os.sep + “*”))[-1]
123
124
IndexError: list index out of range
any guidance would be appreciated! thanks
Hello, it is fixed.
Hi, I received this error and I am at a loss at what to do.
[*] WEIGHTS_DIR=/content/stable_diffusion_weights/output/0
Dreambooth completed successfully. It took 89.7 minutes.
—————————————————————————
IndexError Traceback (most recent call last)
in
146
147 row = len(folders)
–> 148 col = len(os.listdir(os.path.join(weights_folder, folders[0], “samples”)))
149 scale = 4
150 fig, axes = plt.subplots(row, col, figsize=(col*scale, row*scale), gridspec_kw={‘hspace’: 0, ‘wspace’: 0})
IndexError: list index out of range
Hi Shawn, it should be working now.
Thank you, that works now. New issue, Test image generation from model is not working.
—————————————————————————
ModuleNotFoundError Traceback (most recent call last)
in
13 import torch
14 from torch import autocast
—> 15 from diffusers import StableDiffusionPipeline, DDIMScheduler
16 from IPython.display import display
17
ModuleNotFoundError: No module named ‘diffusers’
—————————————————————————
NOTE: If your import is failing due to a missing package, you can
manually install dependencies using either !pip or !apt.
To view examples of installing some common dependencies, click the
“Open Examples” button below.
—————————————————————————
I just tested and it was working. By any chance your session has timed out? diffuser was imported in the first cell. You will need to run the test cell right after you completed first.
It did time out. i will make sure to stay by the computer and try it again. thanks!
Sorry to keep bugging. another error. Trying so hard to get this to work.
[*] WEIGHTS_DIR=/content/stable_diffusion_weights/output/800
Dreambooth completed successfully. It took 1.7 minutes.
—————————————————————————
FileNotFoundError Traceback (most recent call last)
in
146
147 row = len(folders)
–> 148 col = len(os.listdir(os.path.join(weights_folder, folders[0], “samples”)))
149 scale = 4
150 fig, axes = plt.subplots(row, col, figsize=(col*scale, row*scale), gridspec_kw={‘hspace’: 0, ‘wspace’: 0})
FileNotFoundError: [Errno 2] No such file or directory: ‘/content/stable_diffusion_weights/output/800/samples’
The training is way too short (1.7mins). There should be an error before that. You can disable clear log to see what it is.
Hello Andrew,
Why I always get the same images whatever I write as a prompt? Apparently everything worked fine.
Did you set seed to random? (-1)
Hi Andrew,
I wonder how can I use another model. The notebook has a field MODEL_NAME where the runwayml 1.5 is set by default. But if I try to give it an URL, a huggingface address or a PATH to my gdrive, it says that i cannot find the file. What format should I use, or what can I do?
Thank you
BTW, thank you for your amazing guides
Hi Jack, yes you can use other models. The model name follows the ones found in this page
https://huggingface.co/models
For example, v1.4 model is
CompVis/stable-diffusion-v1-4
Sorry for the confusion.
Thank you for your answer.
Could it be possible to use a direct link to a ckpt file, or to a path on the drive?. There are models that are in civitai or in other places, that are not in huggingface.
Also, how many steps do you recommend per image?
Thank you
Yes, you should be able to use a path in colab. You can copy the path from the context menu of colab’s file explorer sidebar. 800 steps are enough for most cases.
I manged to make ti work with some HF models by removing this from the training cell:
–pretrained_vae_name_or_path=”stabilityai/sd-vae-ft-mse” \
–revision=”fp16″ \
So it kinda works now. Got really good results for a face.
However my new question (dorry to bother you), is how can I use this to train a style? How many images, steps and settings?
Thanks again for your help
See this guide for training style: https://github.com/nitrosocke/dreambooth-training-guide
It’s using the same repos.
Hi Andrew,
Most “training” tutorials focus on applying popular art styles to images or training to understand objects.
But I’m having a hard time finding any tutorials/guides that explain how to import a custom/personal art style.
For example, I’m a PhotoShop artist. It takes me an unnecessarily long time to create this unique neon aesthetic via brushing and filters. It’s not a popular or public style…so I can’t really use text prompts to imitate it.
It’s a very distinctive style, so I think Stable Diffusion could understand it via “training” – then I’d be able to apply it to my desired images. I’ve got so many past images for it to train on.
But I have two problems…
1) As per the intro, I can’t find a tutorial that explains how to train to a style (rather than object/person).
2) I’m confused as to whether it’s possible to train in a simple manner on a budget graphics card like my Nvidia 1660 TI card. Like if I’m only trying to train a “style” (that involves colors, lines, and brightness)…do I still need to use complex “Google Colab” solutions?
Hoping you could shed some light or point me in the right direction! I learn so much from your site – and absolutely love what you do!
Hi Misha, you should be able to train your personal style with dreambooth. I haven’t written a tutorial for style but it can be done in the same way. prompts for each training image will need to be set accordingly.
Another direction is to use textual inversion. The result is a embedding file you can use with a model.
Dreambooth would need at least 10GB VRAM. If you don’t have a graphic card like this colab is a convenient option.
When the photos are uploaded, where are they uploaded to? Are they at risk of being accessed by another person?
The images are uploaded to the temporary Google Colab environment only you have access to. When you are disconnected from the runtime, the whole thing got deleted, including the images.
So they cannot be accessed by another person.