
You can change clothes in an image with Stable Diffusion AI for free. You can specify the new clothes with:
- A text description of the new clothes
- A pattern image
- An image of the new clothes
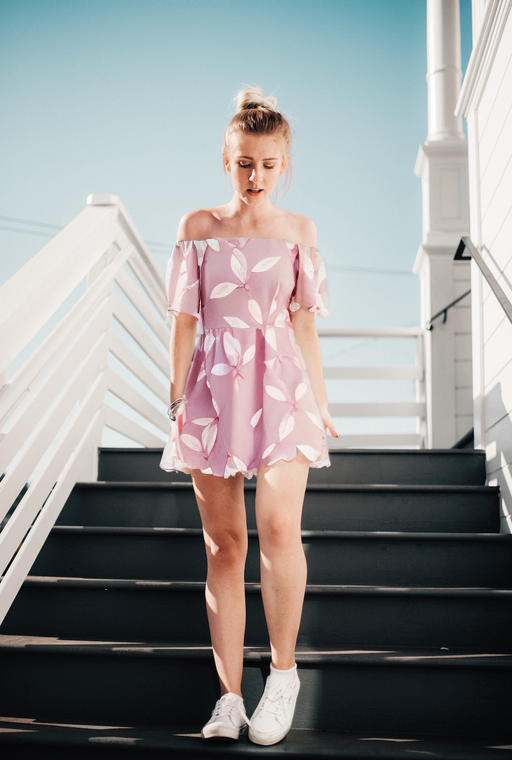
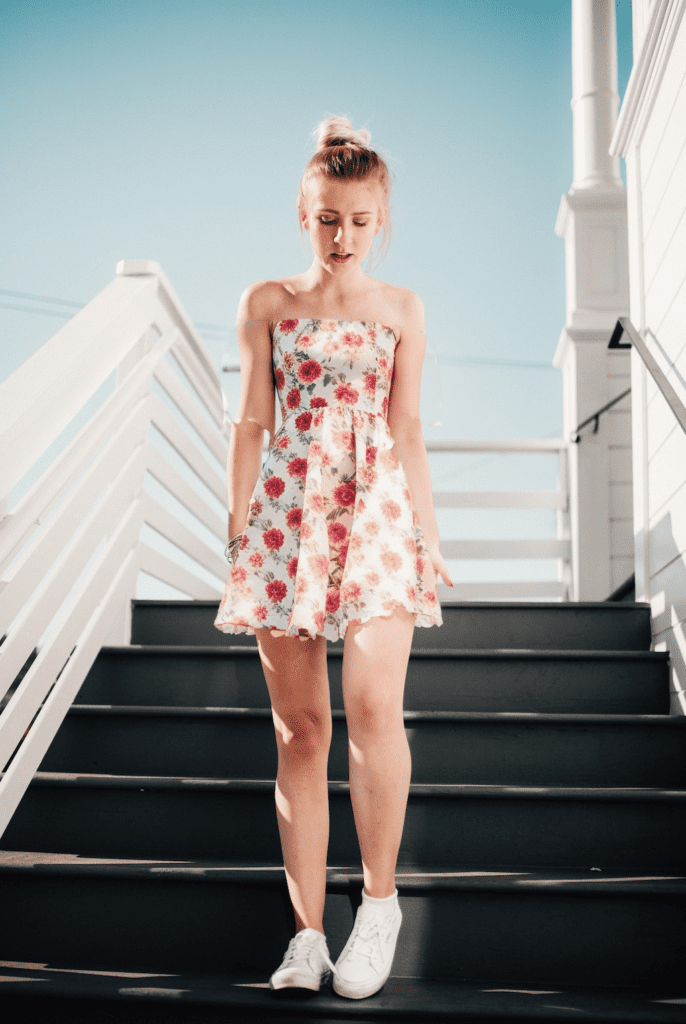
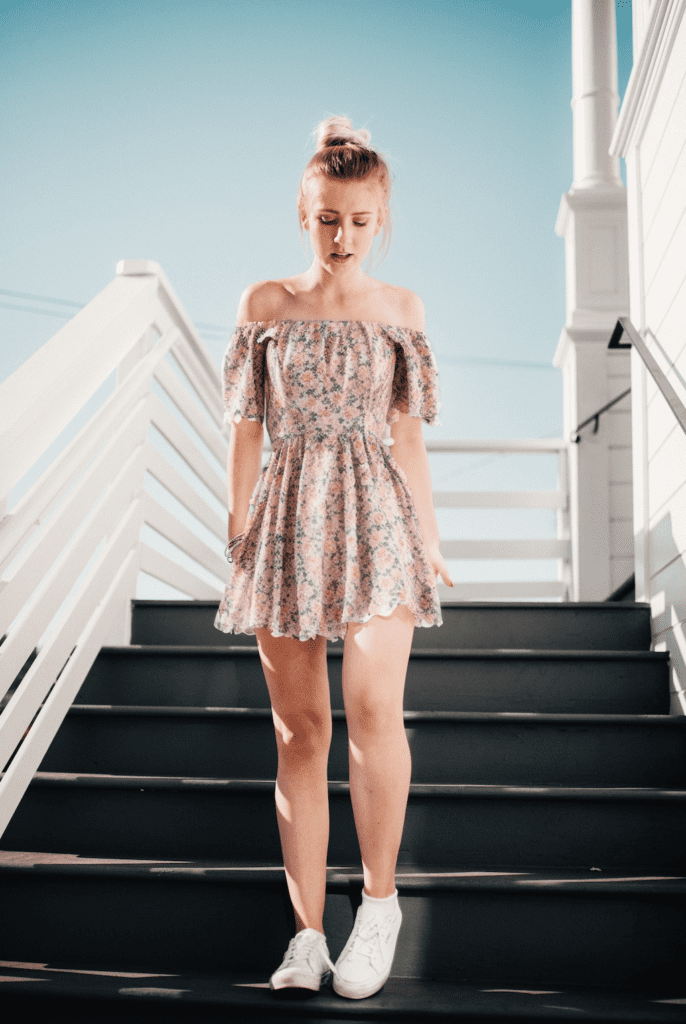
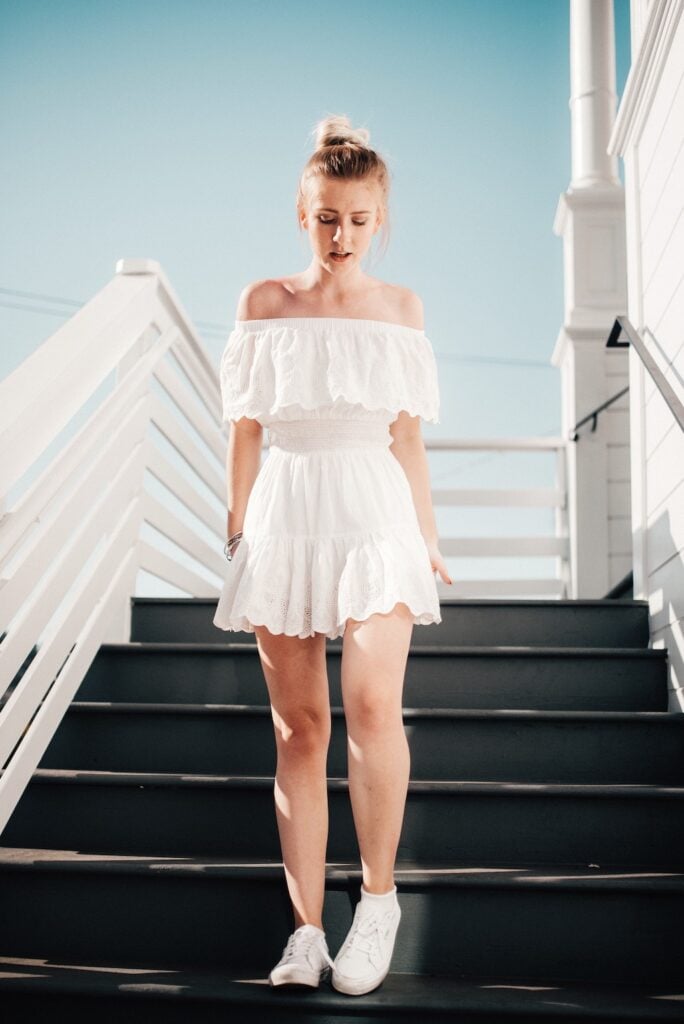
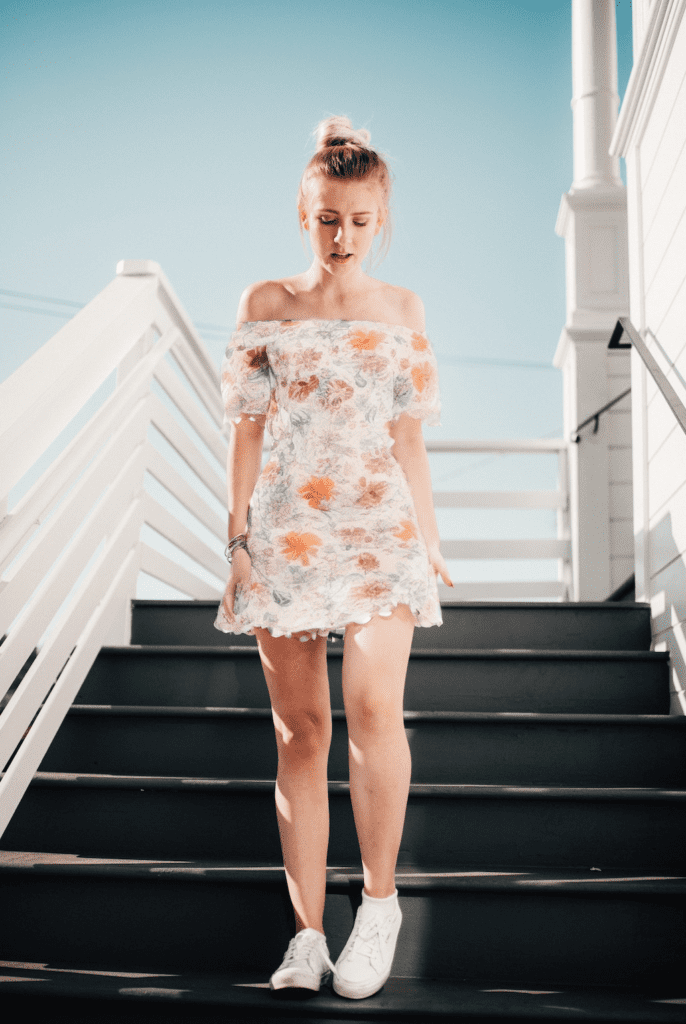
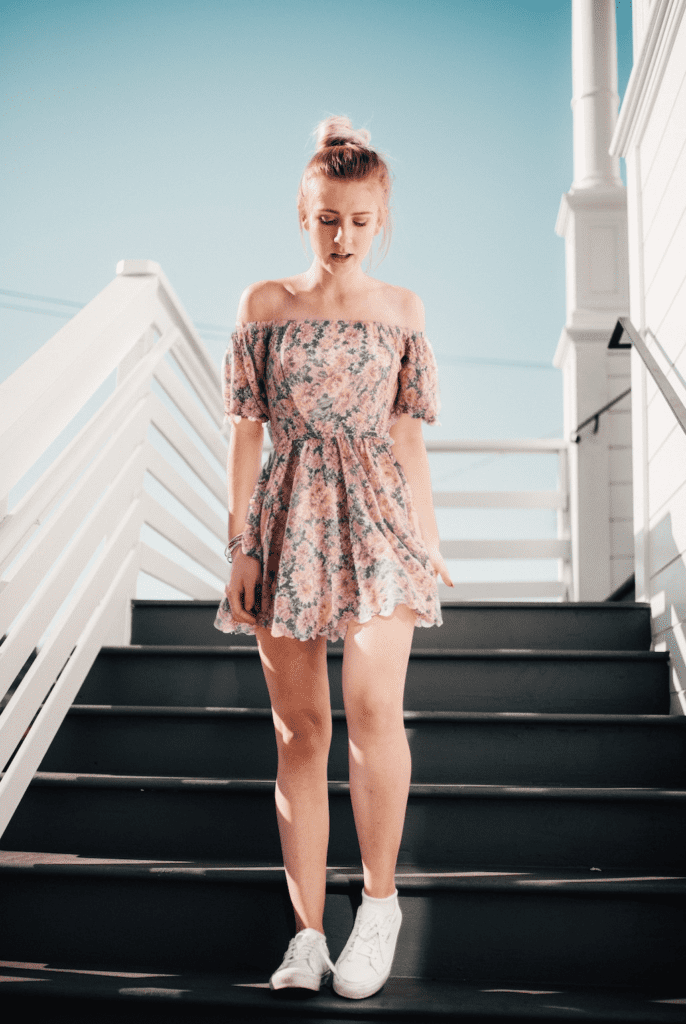
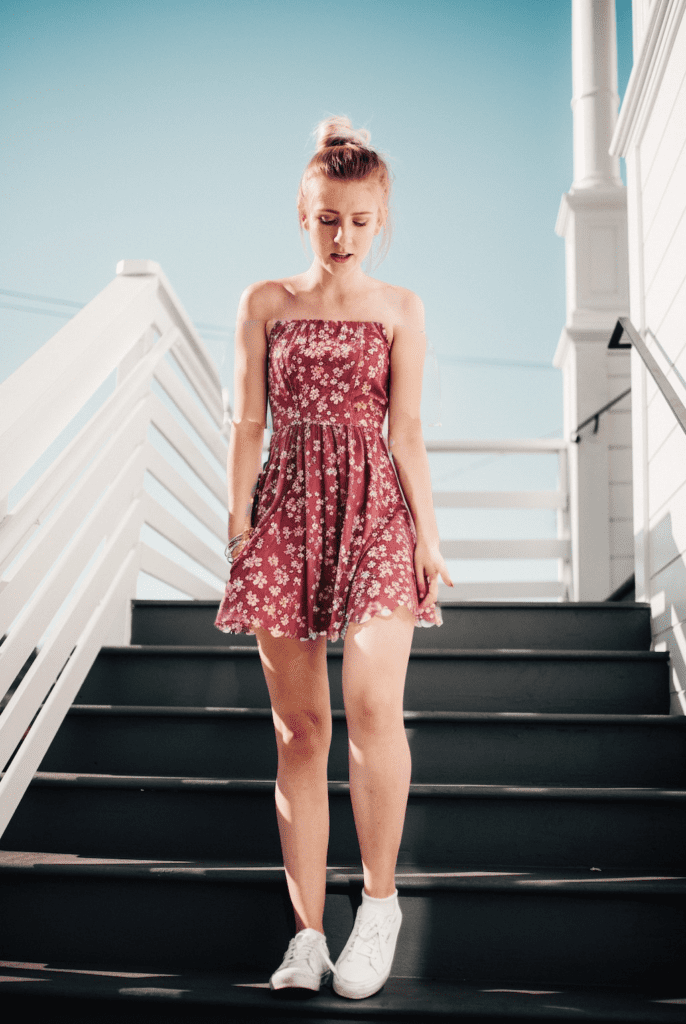
Here are some samples of AI-generated clothes.

This tutorial will show you how.
Table of Contents
Software
We will use AUTOMATIC1111, a popular and free Stable Diffusion software. You can use this GUI on Windows, Mac, or Google Colab.
New to Stable Diffusion? Check out the Quick Start Guide to start using Stable Diffusion. Become a Scholar Member to access the structured courses.
Inpaint Anything extension
Google Colab
If you use my AUTOMATIC1111 Colab notebook, simply select the Inpaint_Anything extension before launching.

Windows, Mac, or Linux
To install Inpaint Anything extension in a local AUTOMATIC1111 Stable Diffusion WebUI:
- Start AUTOMATIC1111 Web-UI normally.
2. Navigate to the Extension Page.
3. Click the Install from URL tab.
4. Enter the following URL in the URL for extension’s git repository field.
https://github.com/Uminosachi/sd-webui-inpaint-anything5. Click the Install button.
6. Wait for the confirmation message that the installation is complete.
7. Restart AUTOMATIC1111.
Inpaint with Inpaint Anything
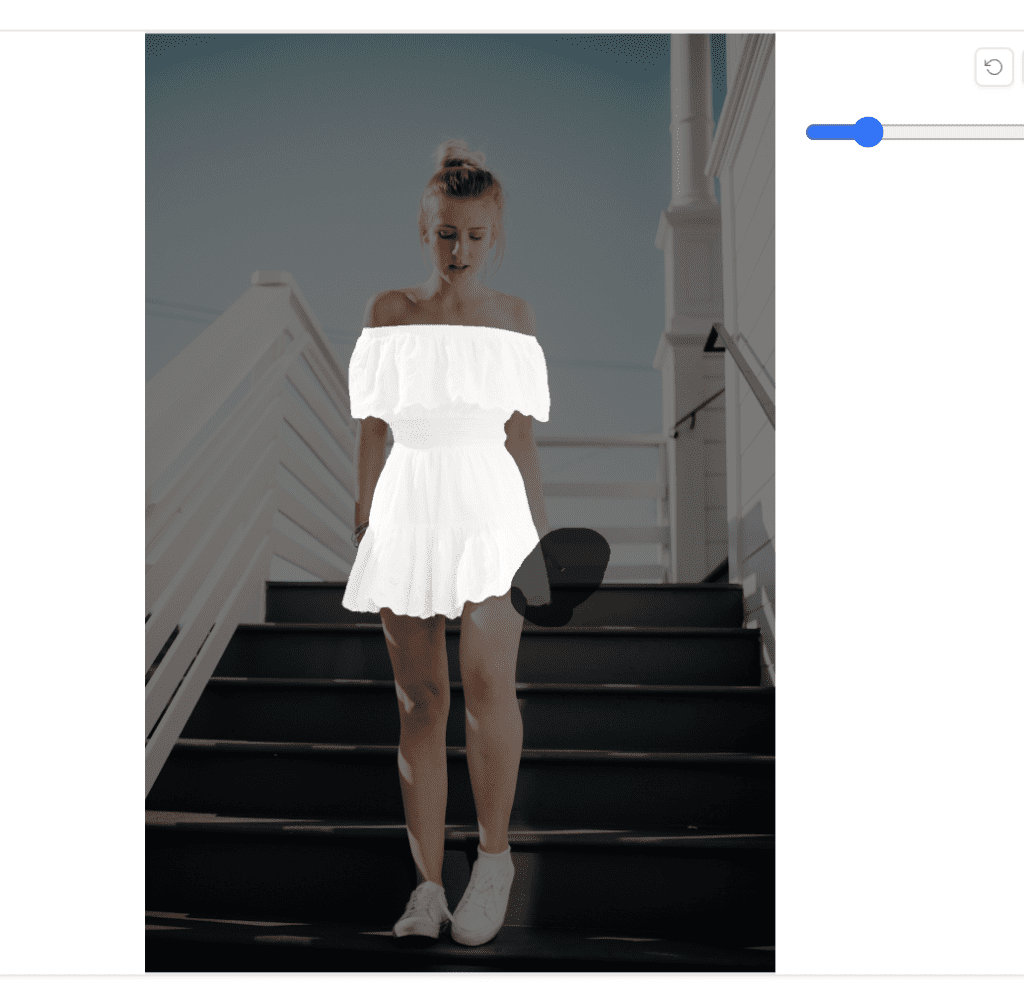
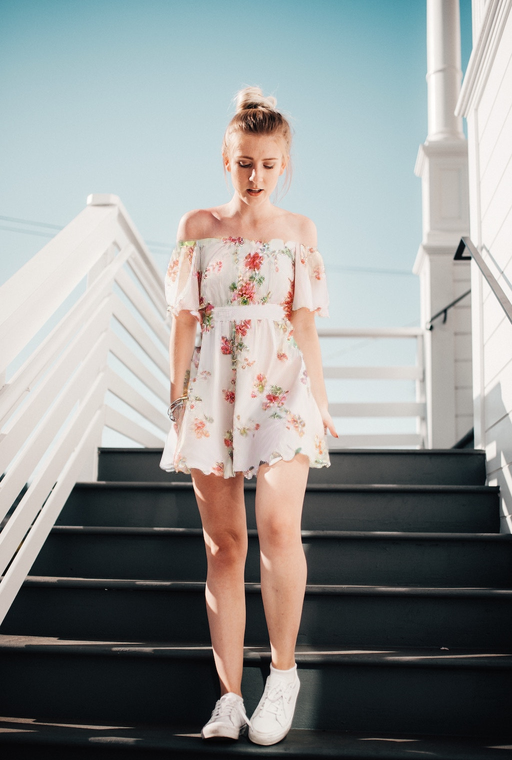
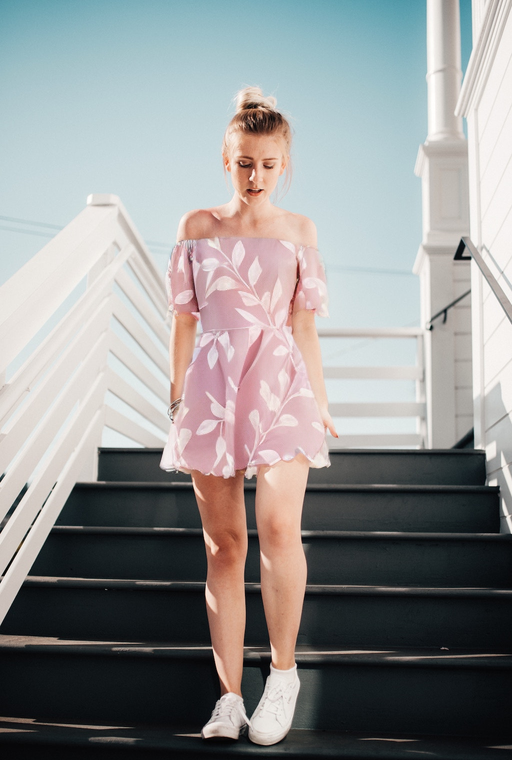
Let’s change the dress in the following image while keeping everything else untouched. This is a common use case for showing variations of a fashion product.
You will need to create an inpaint mask over her dress. However, it is difficult to create the mask manually with precision. This is where the Inpaint Anything extension can help.
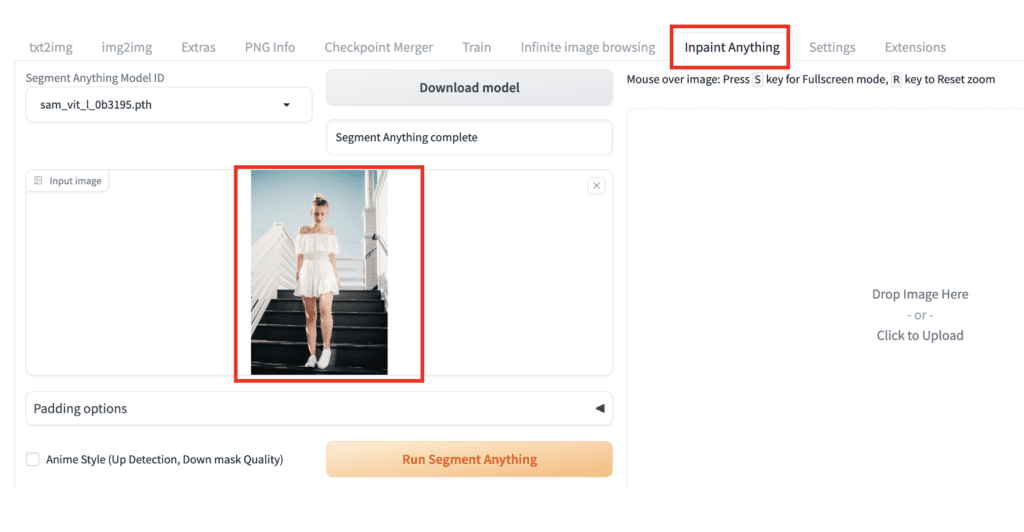
Step 1: Upload the image
Before using an image in Inpaint Anything, you may need to resize it to a suitable size for Stable Diffusion. Let’s resize the width to 1024 pixels.
You should see the Inpaint Anything page after installing the extension. Go to the Inpaint Anything page.
Upload the image to the Input Image canvas.
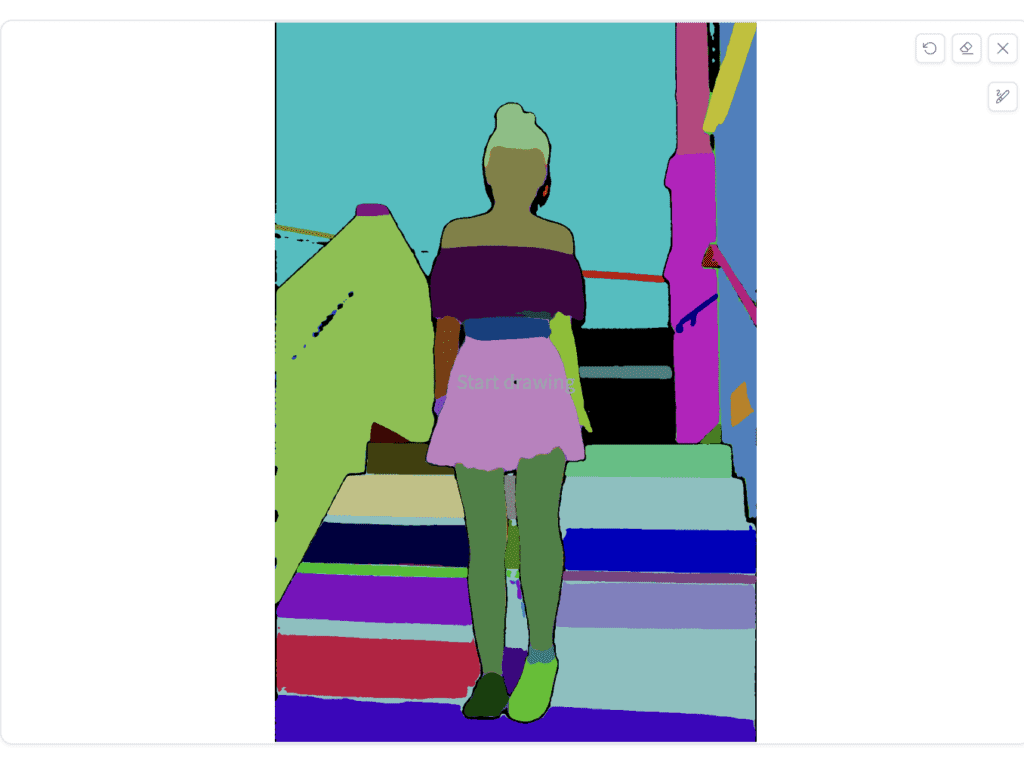
Step 2: Run the segmentation model
Click the Run Segment Anything button. It runs the Segment Anything model (SAM), which creates masks of all objects in the image.
You should see a segmentation map like this. Different colors represent different objects identified.
Step 3: Create a mask
Use the paintbrush tool to paint over the object you want to keep. Since we want to regenerate the dress, you will need to paint over the dress.
You don’t need to paint the whole dress. A dot in each segment of the dress will do.
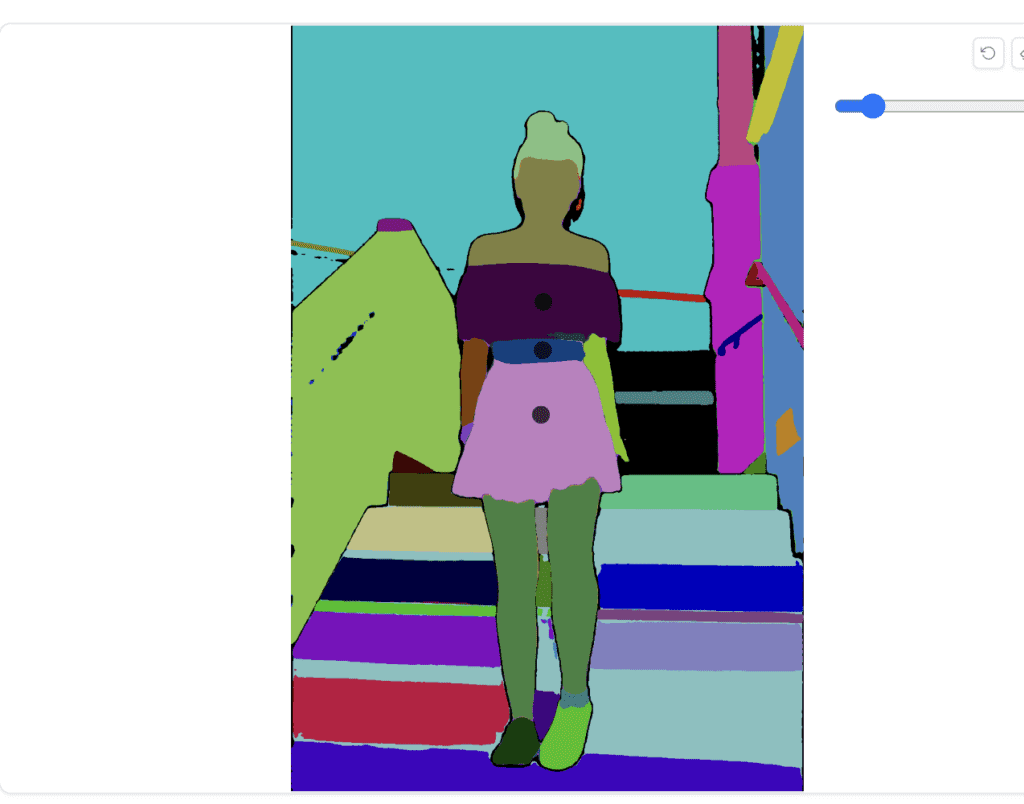
Click Create Mask to create a mask over the selected area.
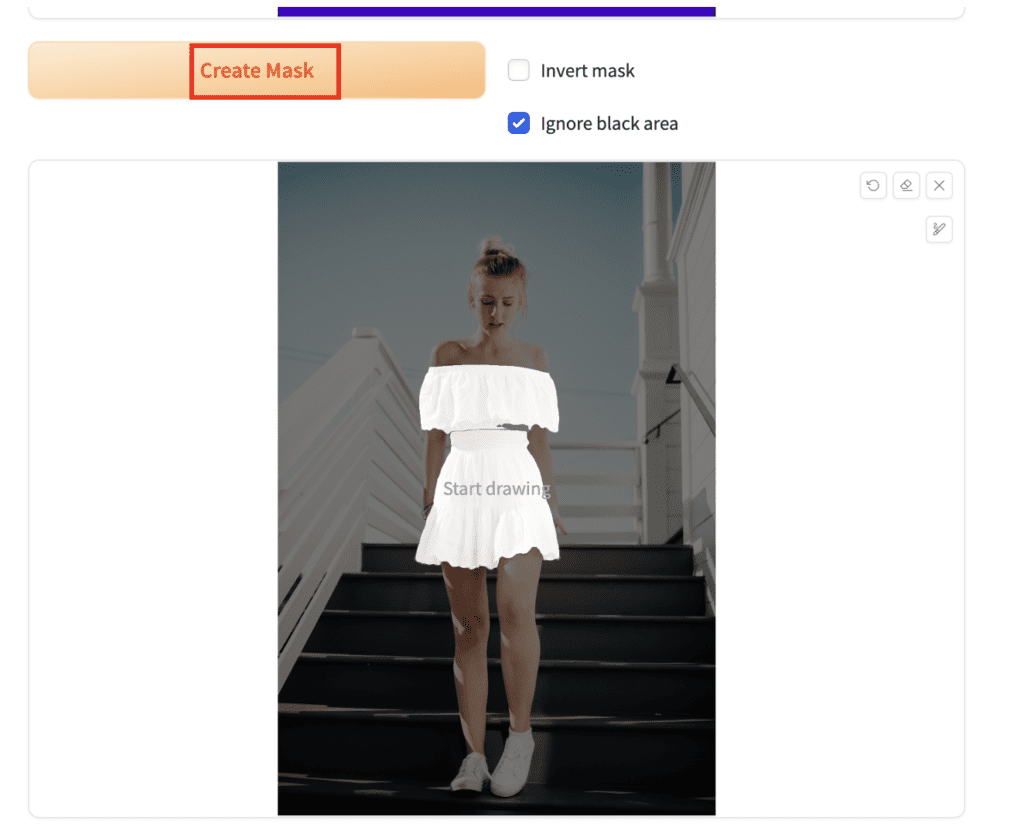
If you see the mask not covering all the areas you want, go back to the segmentation map and paint over more areas.
If the image is too small to see the segments clearly, move the mouse over the image and press the S key to enter the full screen. Press the R key to reset.
Here, I put an extra dot on the segmentation mask to close the gap in her dress.

You can further use the following buttons to modify the mask:
- Expand mask region: Expand the mask slightly in all directions.
You can also add or subtract an area manually. First, use the inpainting tool to mask an area of the masked image.
Use the following buttons:
- Trim mask by sketch: Subtract the painted new area from the mask.
- Add mask by sketch: Add the painted new area to the mask.
Since our mask looks pretty good, we don’t need to use any of these functions to refine the mask.
Step 4: Send mask to inpainting
You can do inpainting directly in the Inpaint Anything extension. However, the functionality is limited. I prefer to send the mask to the img2img page for inpainting.
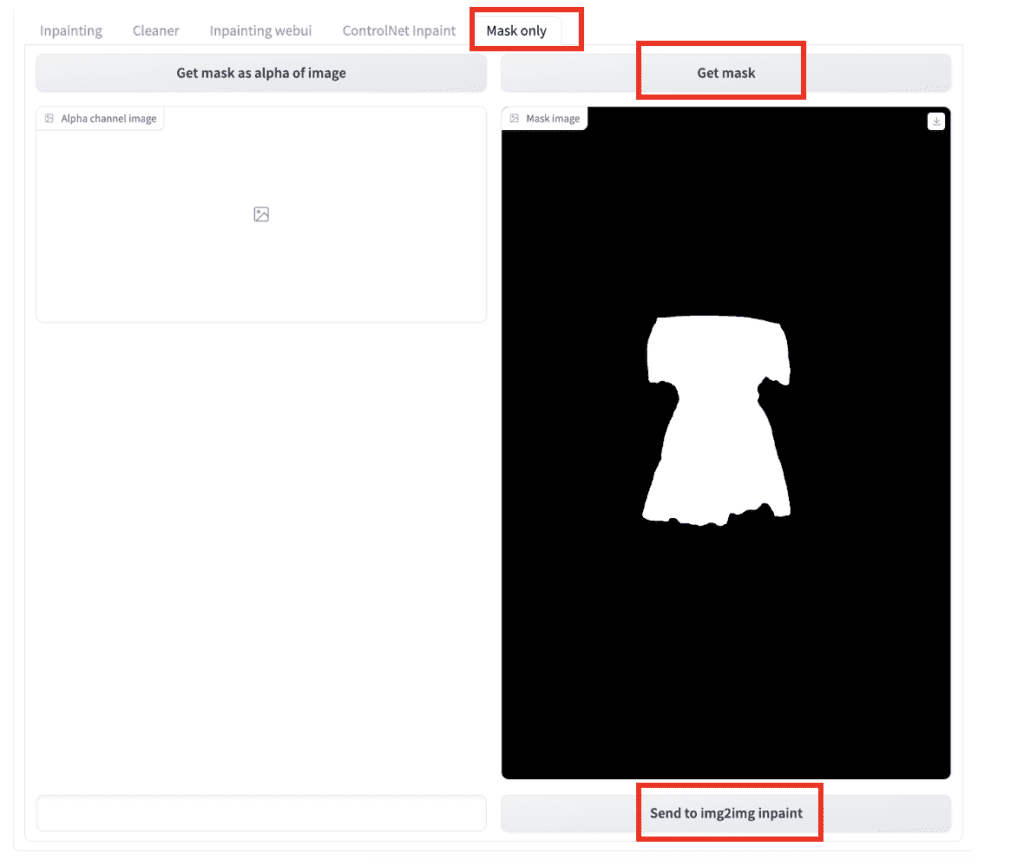
On the Inpaint Anything extension page, switch to the Mask Only tab.
Click Get Mask. A black-and-white mask should appear under the button.
Click Send to img2img inpaint.
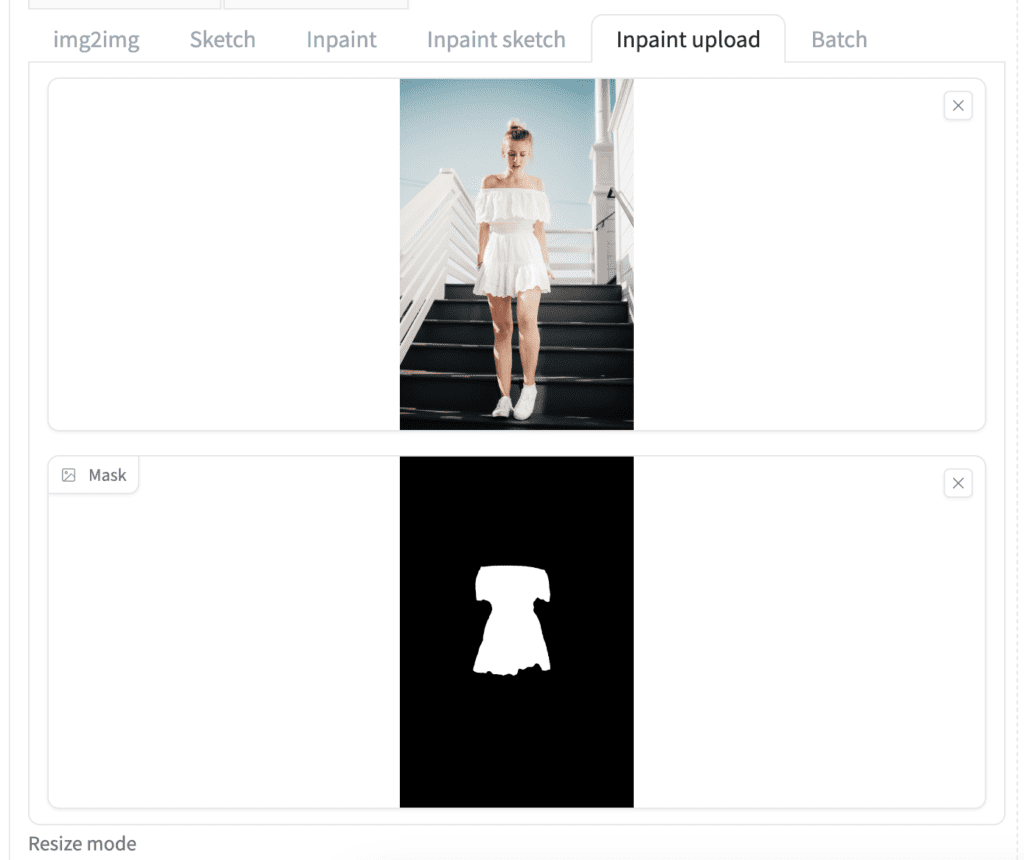
The image and the inpaint mask should appear in the Inpaint upload tab on the img2img page.
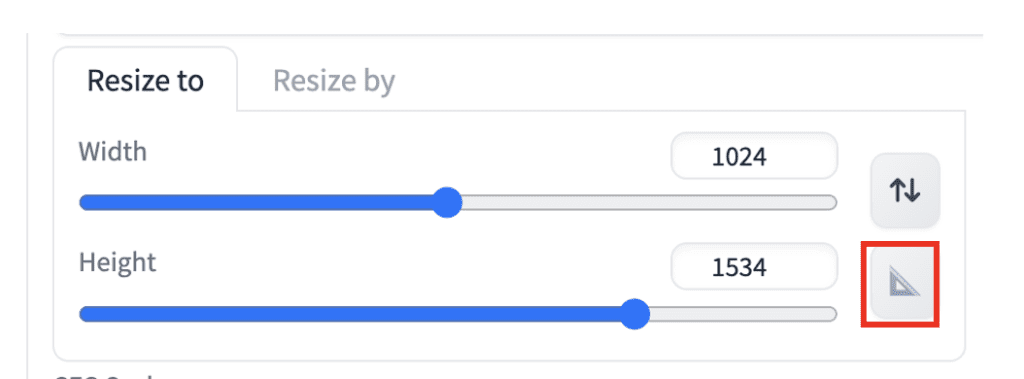
Click the Auto Detect Size button (the triangular scale icon) to detect the size of the image.
Use the following settings for inpainting.
- Checkpoint Model: sd_xl_base_1.0.safetensors (Stable Diffusion XL base model)
- Prompt:
a woman in a dress with floral pattern
- Mask mode: Inpaint masked
- Inpaint area: Whole picture
- Sampling method: Euler a
- Sampling steps: 25
- Denoising strength: 0.8 (Higher values change more. But the image may be incoherent if it is too high.)
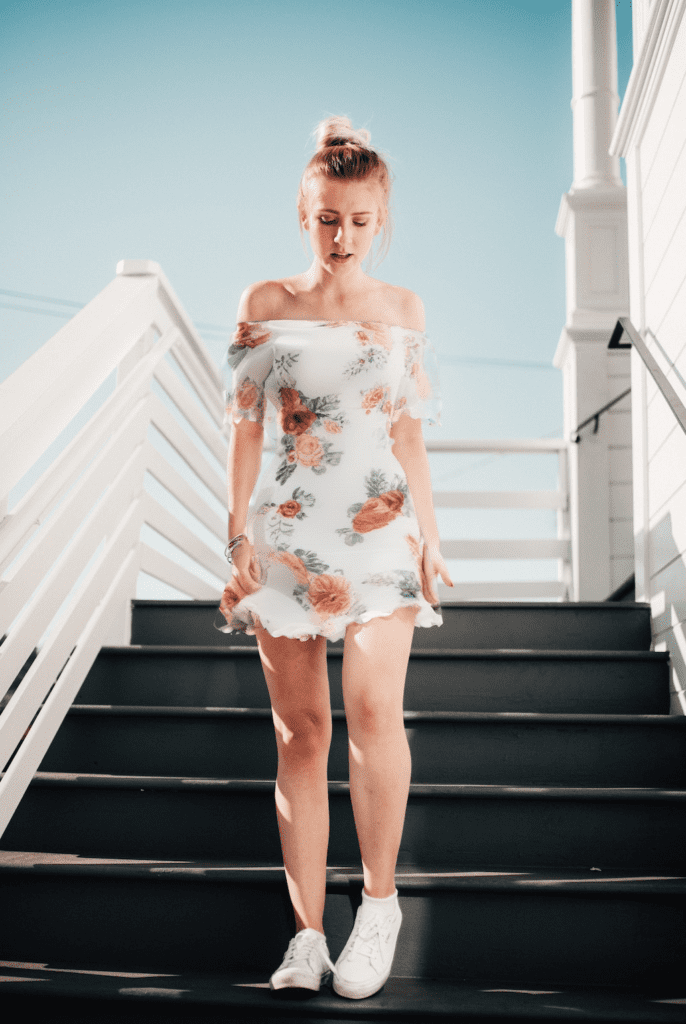
Now, she has new dresses!
Advanced inpainting techniques
If you don’t quite get what you want, you can try the following techniques.
Use an inpainting model
If the inpainted area is inconsistent with the rest of the image, you can use an inpainting model. They are special models for inpainting.
Let’s use the Realistic Vision Inpainting model because we want to generate a photo-realistic style.
- Checkpoint model: Realistic Vision Inpainting
- Denoising strength: 0.8 – 1.0
With an inpainting model, the denoising strength can be as high as you want without losing consistency.
Use ControlNet inpainting
However, there are not many inpainting models available.
You can use ControlNet inpainting with any Stable Diffusion v1.5 model!
- Checkpoint model: cyberrealistic_v33
- Prompt:
a woman in a dress with floral pattern
disfigured, ugly, bad, immature, cartoon, anime, 3d, painting, b&w, 2d, 3d, illustration, sketch, nfsw, nude
- Denoising strength: 1
In the ControlNet section:
Enable: Yes
Control Type: Inpaint
Preprocessor: inpaint_global_harmonious
These are what we get.
We get some new patterns by using a different model!
ControlNet Canny
You can also experiment with other ControlNets, such as Canny, to let the inpainting better follow the original content.
- Enable: Ues
- Control Type: Canny
- Preprocessor: Canny
- Model: control_v11p_sd15_canny (For a v1.5 model)

You can keep the denoising strength as 1.
You must set the width to a size compatible with Stable Diffusion v1.5, i.e. 512 px. I did that by setting the resize scale factor to 0.5. You can also set Resize to 512×767 directly.

Here’s what I got.
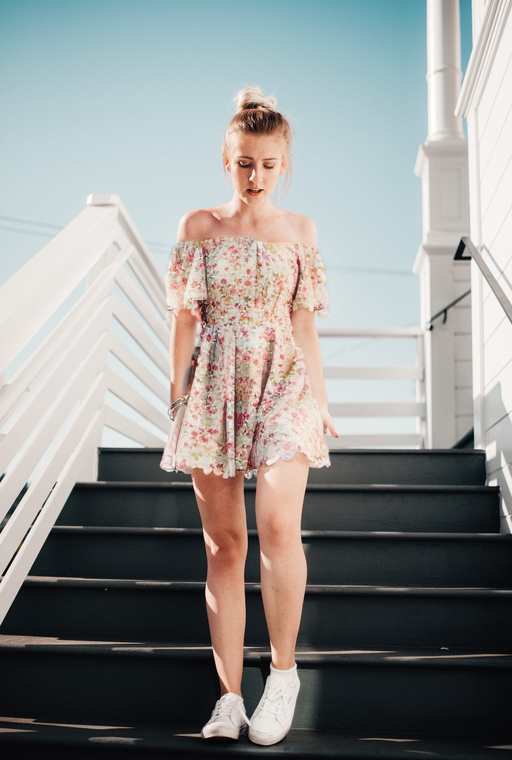
Like inpainting, the Canny method allows you to use a very high denoising strength. It also honors the lines and shapes of the original dress. See the hands are always behind the dress like the original image.
ControlNet IP-adapter
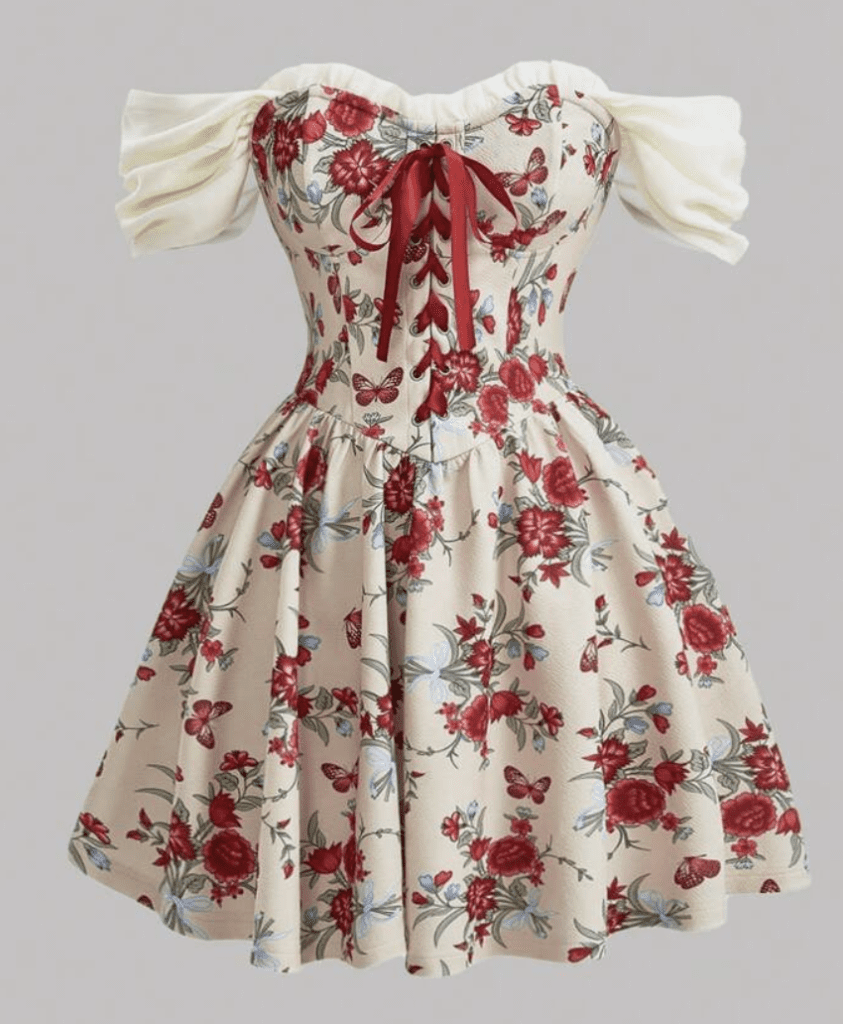
What if you have a certain pattern you want to put on? Like the one below.
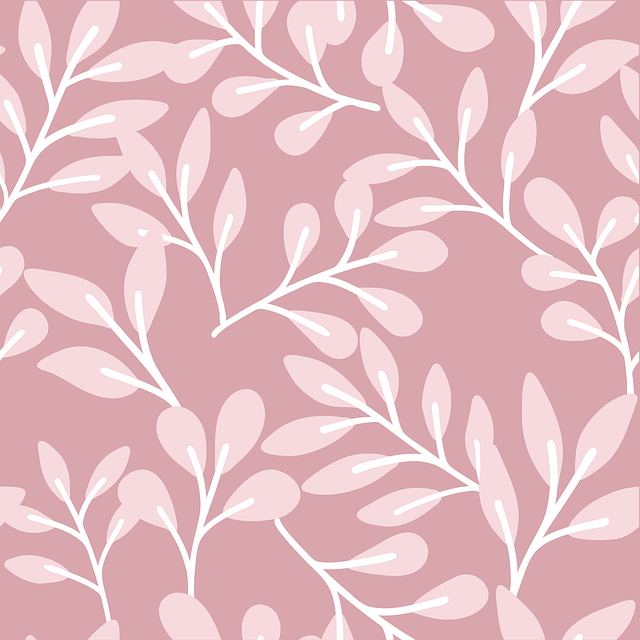
You will need two controlNets. Keep the Canny ControlNet and add an IP-adapter ControlNet.
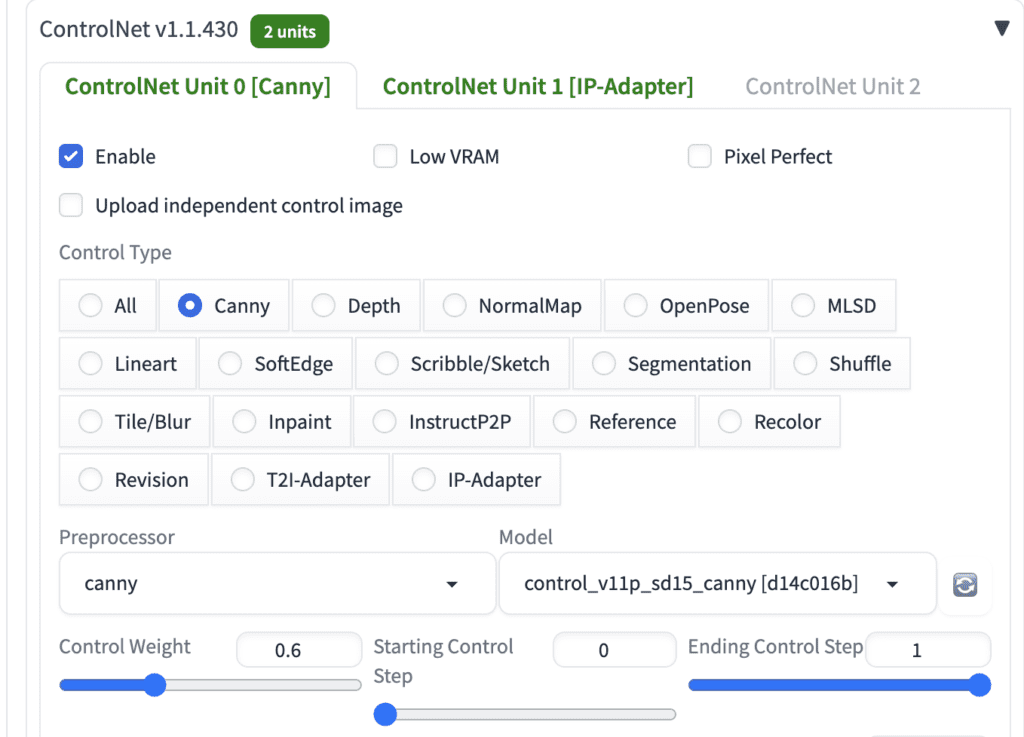
ControlNet Unit 0 settings:
- Enable: Yes
- Control Type: Canny
- Preprocessor: Canny
- Model: control_v11p_sd15_canny (For a v1.5 model)
- Control Weight: 0.6
ControlNet Unit 1 settings:
- Enable: Yes
- Upload independent control image: Yes. Upload the pattern to the canvas above.
- Control Type: IP-adapter
- Preprocessor: ip-adapter-auto or ip-adapter_clip_h (updated for new versions)
- Model: ip-adapter_sd15_plus (For a v1.5 model)
- Control Weight: 0.9
- Ending control step: 0.8
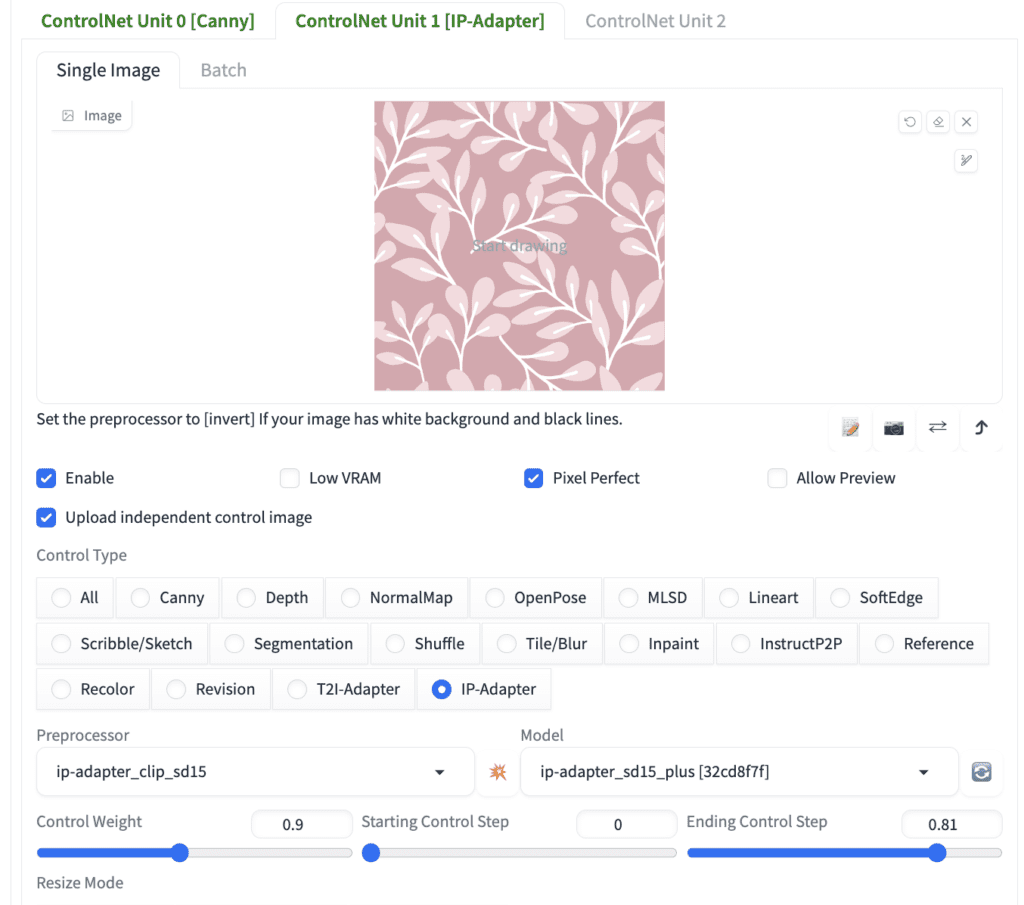
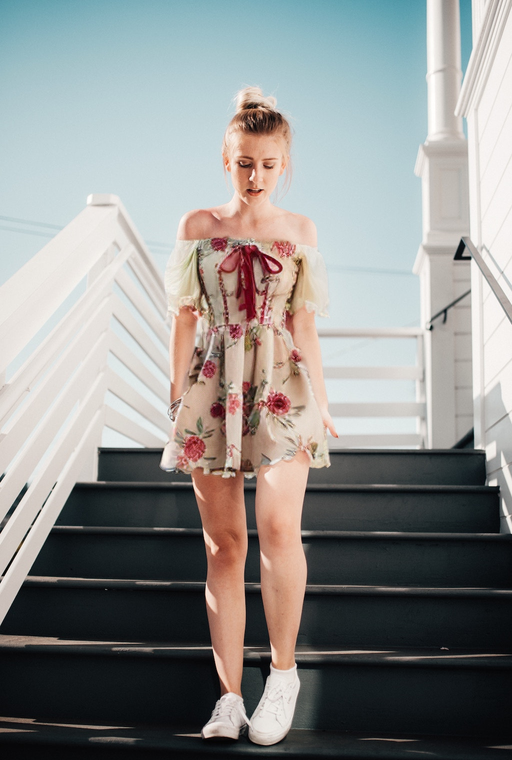
You can keep the denoising strength as 1.
You can also put an exact image of the dress you want in the IP-Adapter unit.
Notes
If you specify the dress’s color in the prompt but don’t quite get it, try expanding the mask in Inpaint Anything. There could be some pixels surrounding the mask with the original color.
In ControlNet, increase the weight to increase the effect. Decrease the Ending Control Step to decrease the effect.
Okay so I’ve no idea what I’m doing wrong here.
I’m trying the Canny & Ip-Adapter combo but whilst I’m getting some elements of the colors of the pattern I’m trying to adapt, the output is nothing like the pattern itself.
The only changes I can think of is that I’m using forge with the Id-Apapter preprocessor being CLIP-ViT-bigG (IPAdapter) and the model being ip-adapter_xl. I’m Also using a pony based model. The canny model is using the controlnet-union-sdxl-1.0 but this has worked for me before.
Any advice that can be had for this? The inpaint anything section seems to work fine.
the xl ip-adapter is not copying as well as the sd one. try the one in this tutorial.
No luck I’m afraid, though this is probably due to the ControlNet integrated that runs in Forge lacking the ip-adapter_clip_sd15 preprocessor and I can’t find a way to download it from anywhere.
I tried with the ip-adapter_SD15_plus model but no improvements there. Thanks anyway.
Can you help to have another tutorial for using Automatic1111 API with inpaint anything extension to change clothes? Thanks a lot
Hi! Thanks for such detailed tutorial. Don’t you know how the body shape consistency might be kept? If I inpaint the whole body to change the clothes, quite often the body itself tends to be changed too (bust, i.e). I tried different loras but maybe there are better solutions? Thanks!
That is likely the model. Put something like small breast in the prompt, or big breast in the negative prompt.
I was having similar troubles to other users on getting this installed. There are instructions on the github page, but there are a lot of different instructions, and they certainly aren’t clear (don’t mention some important steps, don’t mention paths for installs.) Inpaint anything also appears to be forked. I was able to get an inpaint anything tab eventually only after installing “segment anything”, and I believe segment anything to be necessary to the installation of inpaint anything. Of course, exactly what needs to happen for the installation, and what the github frontpage says, can change at any time, just offering this as something that might be helpful to others experiencing the same problem.
Did fresh install on ubuntu, but I got same problem as that other guy, the extension says its installed but there is no new tab for it with inpaint.
this is a pretty early failure. pls go to the repo to report the issue
This tuto is “overfly”..DO not mention… Inpaint anything TAB… sam_vit model DL… Hope get a tuto with more preparation in tuto for beginner (if suppose i pay it…).
Yes this tut is a bit more advanced. You can read these free tuts:
https://stable-diffusion-art.com/inpainting/
https://stable-diffusion-art.com/inpainting_basics/
Or attend the structured course (Scholar member)
Hi Andrew,
Thanks for kind answer and advice. Did a lot of tuto and follow some courses but I really enjoy what I read here O_o ! Strong probability become soon a member here.
Greetings,
Kvml.
I installed the inpaint-anything plugin in AUTOMATIC1111 but the tab doesnt show up in the ui.
please stop the webui and restart it on console
any error message on console?
Same. No Error message, no message at all about the extension. But installed with your tutorial. This is a fresh install with fresh inpaint-anything extension installed. But not showing up:
venv “C:\Users\XXXXX\stable-diffusion-webui\venv\Scripts\Python.exe”
Python 3.10.6 (tags/v3.10.6:9c7b4bd, Aug 1 2022, 21:53:49) [MSC v.1932 64 bit (AMD64)]
Version: v1.7.0
Commit hash: cf2772fab0af5573da775e7437e6acdca424f26e
Launching Web UI with arguments:
no module ‘xformers’. Processing without…
no module ‘xformers’. Processing without…
No module ‘xformers’. Proceeding without it.
Style database not found: C:\Users\XXXXX\stable-diffusion-webui\styles.csv
Loading weights [6ce0161689] from C:\Users\XXXXX\stable-diffusion-webui\models\Stable-diffusion\v1-5-pruned-emaonly.safetensors
Creating model from config: C:\Users\XXXXX\stable-diffusion-webui\configs\v1-inference.yaml
Running on local URL: http://127.0.0.1:7860
To create a public link, set `share=True` in `launch()`.
Startup time: 20.9s (initial startup: 0.1s, prepare environment: 3.6s, import torch: 6.4s, import gradio: 2.0s, setup paths: 1.8s, initialize shared: 0.4s, other imports: 1.2s, setup codeformer: 0.3s, load scripts: 3.7s, create ui: 0.7s, gradio launch: 0.5s).
Applying attention optimization: Doggettx… done.
Model loaded in 6.2s (load weights from disk: 0.8s, create model: 0.4s, apply weights to model: 4.6s, calculate empty prompt: 0.2s).
yes thats strange. Not sure why. You can try adding
--xformersbut not sure how much it is going to help.probable the repro owner would have better answers.
Had the same problem.
I’ve fixed it by going into the Extensions tab—>Available—> Load from—you’ll find Inpaint anything in the repository.
Let it install and restart SD. Worked like a charm for me.
Hope this helps!
Thank you, Max!
when i install this extension on windows , and download model:sam_vit_h_4b8939.pth, saved the model on directory pretrained_models; when i put a image and click “Run segment anything” button, but it shows error:”sam_vit_h_4b8939.pth not found, please download”, can you help me? thanks.
I don’t know enough about this plugin to give you good pointers. You can try ask at the github repo.
error messgae:
sam_vit_b_01ec64.pth not found, please download
download model failed,
added message:
Inpaint Anything – ERROR –
Thanks for you instruction. But I see the new clothes are the same form as the previous one. I wonder how can we change the outfit to a completely new form. For example the dress above will be changed to a long dress, or winter outfit?
A standard inpainting with a large area will do.
https://stable-diffusion-art.com/4-methods-to-generate-fashion-ideas-with-image-ai/
https://stable-diffusion-art.com/fashion-idea-generator-comfyui/
Great post, thank you for that 🙂
I have problems with receiving such good results for the exact clothes as you did (last step). Did you set up any other settings to achieve that?
I used the same setting as the pattern art. I don’t recall it’s particular trickly. You can try the images in the tutorial. Just make sure you use ip adapter plus.
Hmm… you were right. It worked for examples from your tutorial. For example when I tried to change the outfit of a model wearing a white t-shirt into colorful t-shirt – it resulted in weird grey tshirt. Does the weight, background (in your case it was not white) or file format (webp, png, jpg) matters for reference image?
Webui only supports png and jpeg. webp will load but it is not doing what you think. You can try expanding the mask and higher denoising strength. I am happy to take a look if you send me the images.
Really cool tutorial, also a protip if you are dealing with high resolutions you can use the LCM lora in the inpainting with 4-6LCM steps to reduce GPU time.
great idea!