
ComfyUI is a popular way to run local Stable Diffusion and Flux AI image models. It is a great complement to AUTOMATIC1111 and Forge. Some workflows may require a good GPU to run.
In this article, you will find instructions on how to run ComfyUI on Google Colab using the notebook I maintain.
Table of Contents
- ComfyUI Notebook
- Using ComfyUI on Google Colab
- Alternatives
- Running ComfyUI on Colab
- Connection options
- Input and Output folders
- Speeding up image generation
- When you are done
- Computing resources and compute units
- Models available
- ControlNet models
- Installing models
- Notebook secrets
- Custom nodes
- Extra arguments to ComfyUI
- Frequently asked questions
- Next Step
ComfyUI Notebook
I maintain a ComfyUI notebook for community use. This is a detailed guide for using ComfyUI on Google Colab with my notebook.
If you are a member of this site, you can access the notebook directly below:
This notebook shares models in Google Drive with the following notebooks I also maintain.
Using ComfyUI on Google Colab
Google Colab (Google Colaboratory) is an interactive computing service offered by Google. It is a Jupyter Notebook environment that allows you to execute code.
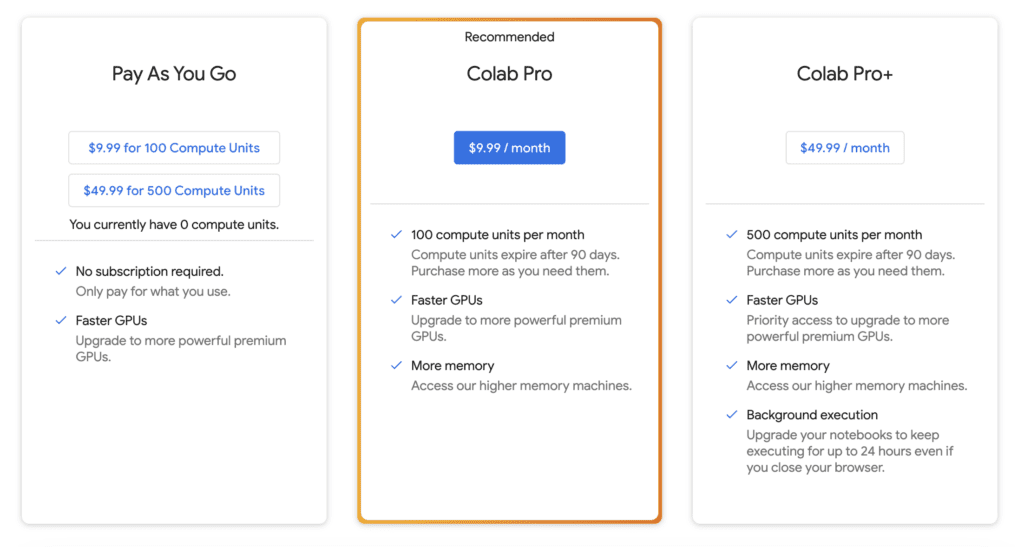
Due to the computing resources required (High RAM), you need a Google Pro and Pro+ to run ComfyUI on Colab.
I recommend using the Colab Pro plan. It buys 100 monthly compute units, about 50 hours on a standard T4 GPU. (It’s a steal)
Alternatives
Think Diffusion provides a fully managed ComfyUI/AUTOMATIC1111/Forge online service. They cost a bit more than Colab but provide a better user experience by installing models and extensions. They offer 20% extra credit to our readers. (Affiliate link)
Running ComfyUI on Colab
Step 0: Sign up
Sign up a Google Colab Pro or Pro+ plans. (I use Pro.)
Step 1: Open the ComfyUI Colab notebook
Open the ComfyUI Colab notebook.
You should see the notebook with the second cell below.
For a quick start, you can skip the following steps and run the notebook with the default settings.
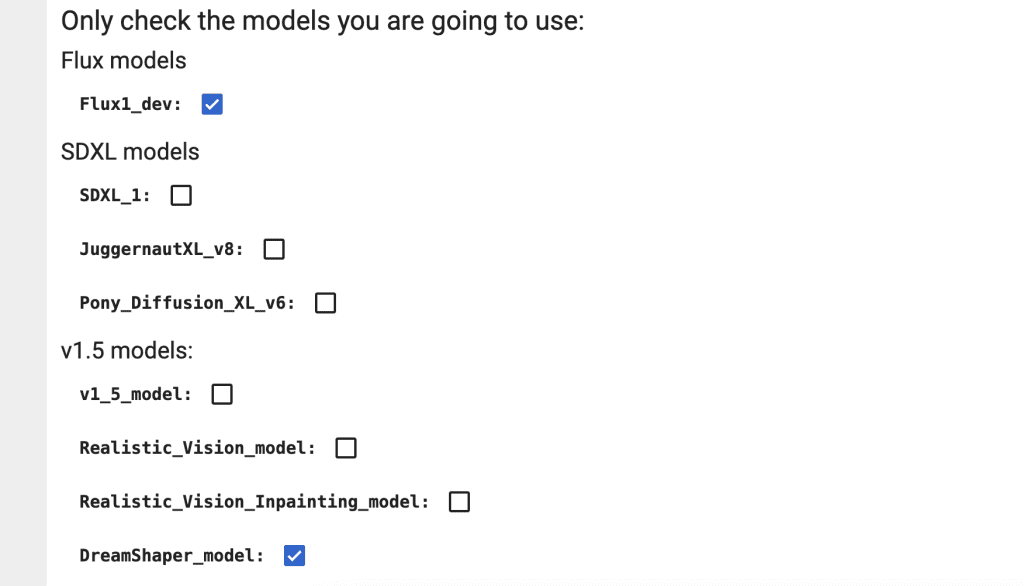
Step 2: Select models
Review which models you want to use.
The more you select, the longer it takes to download. They will be downloaded to the Colab drive, not your Google Drive.
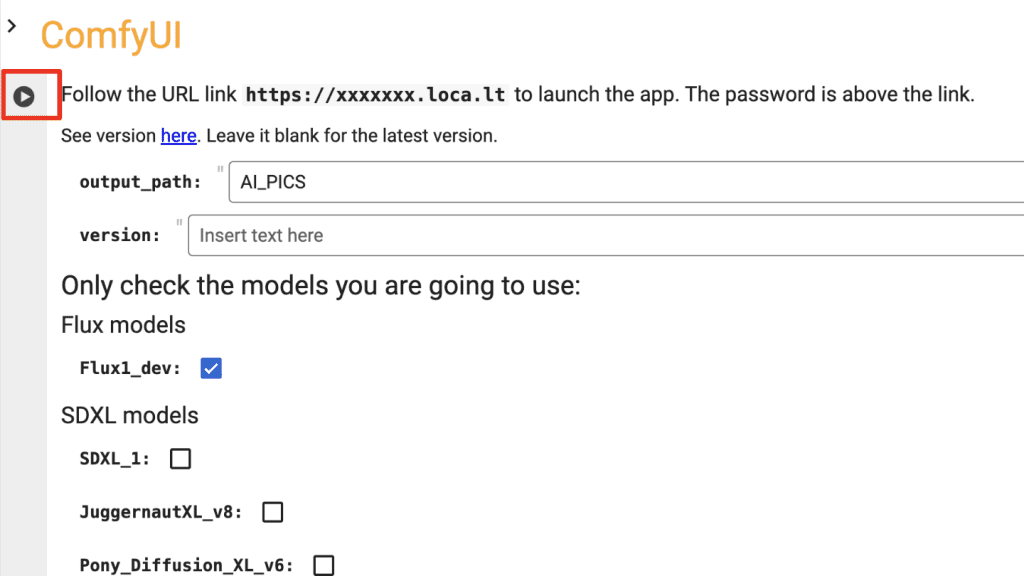
Step 3: Run the notebook
Click the Play button on the left of the cell to start.
The notebook will ask for permission to access your Google Drive. Grant permission as it is necessary to save the images and access the models in your Google Drive.
The start-up should be completed within a few minutes. The time depends on how many models you include. When it is done, you should see the message below.
Step 4: Start ComfyUI
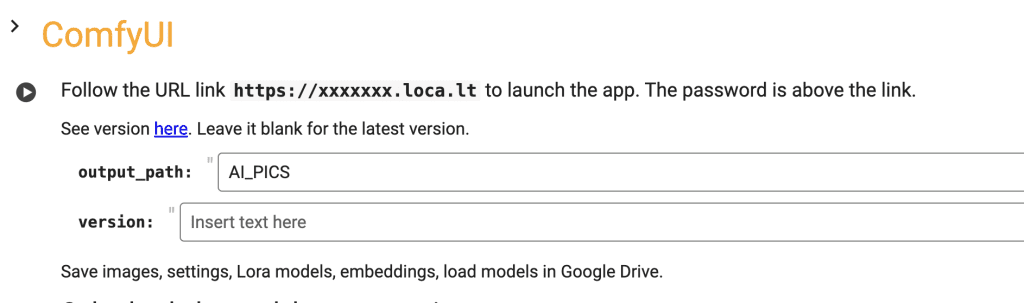
Visit the https://xxxxxx.trycloudflare.com link to start ComfyUI.

The page may take some time to load. You should see the page like below. Reload the page if it doesn’t show.
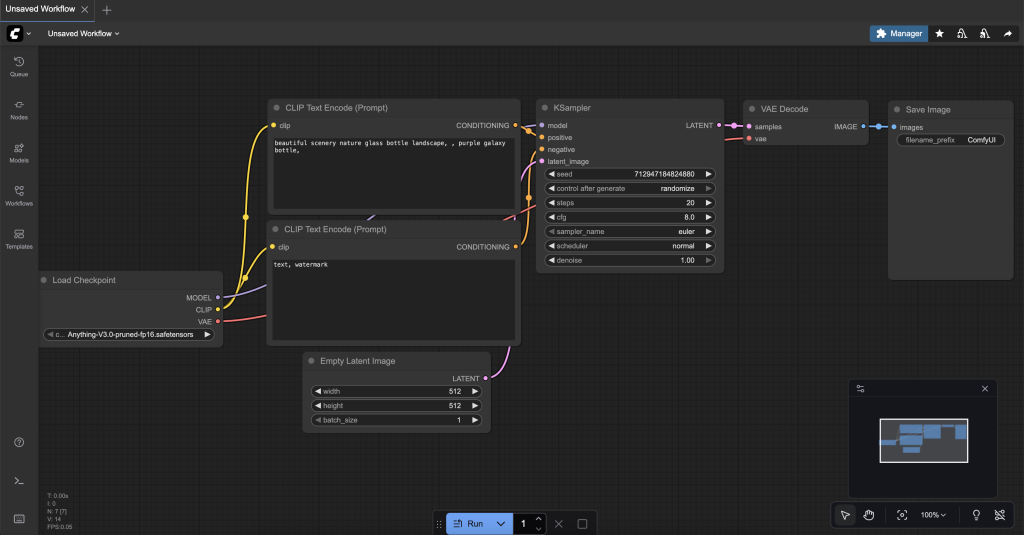
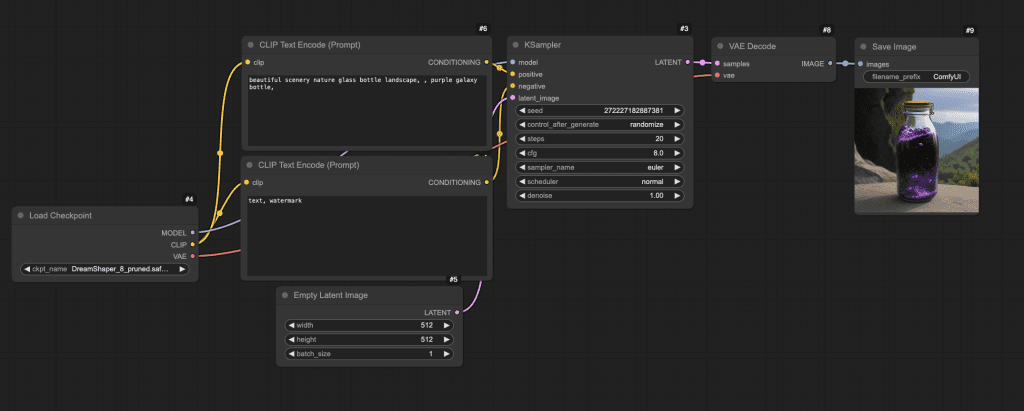
Step 5: Generate an image
Select the DreamShaper_8 model. Click the Run button to run the workflow.

Connection options
The Colab notebook runs on Google’s internal server. The notebook uses a tunnel to expose ComfyUI to the public internet, allowing you to connect to it.
I currently have enabled three connection options:
- Cloudflared (default)
- ngrok
- localTunnel
Cloudflared
The default option. Free to use.
After ComfyUI startup, you should see a box with a trycloudflare.com link similar to the one below.

Click the link to use ComfyUI.
The initial startup can be slow (Hey, it is free!). It is not uncommon to wait for a minute before ComfyUI fully loads. Try reloading the page if it appears to stop loading.
The second time you use the link should be fast.
ngrok
This notebook supports ngrok to establish a public connection. It is a more stable alternative.
Currently, it only works if you have a paid plan. Otherwise, you will see the error message.
ERR_NGROK_734
You have exceeded your limit of 360 requests per minute. This limit will reset within 1 minute.

If you have a paid plan, select ngrok in the Connection dropdown menu.

You will need to set up a free account and get an authoken.
- Go to https://ngrok.com/
- Create an account
- Verify email
- Copy the authoken from https://dashboard.ngrok.com/get-started/your-authtoken and paste it into the NGROK field in the notebook.
localTunnel
localTunnel works intermittently. I recommend Cloudflared over localTunnel.
Input and Output folders
The default input folder is AI_PICS > inputs in your Google Drive.
The default output folder is AI_PICS > outputs in your Google Drive.
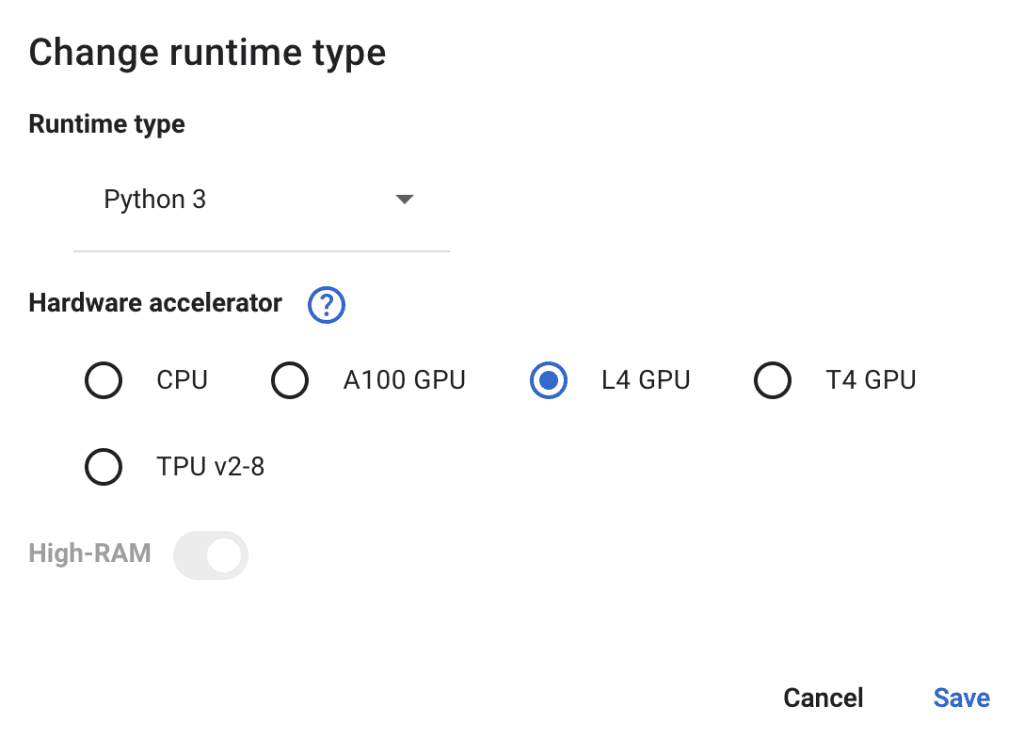
Speeding up image generation
You can pick a faster runtime type to speed up the generation, which costs more per hour.
Click downward caret on the top right and then select Change runtime type.

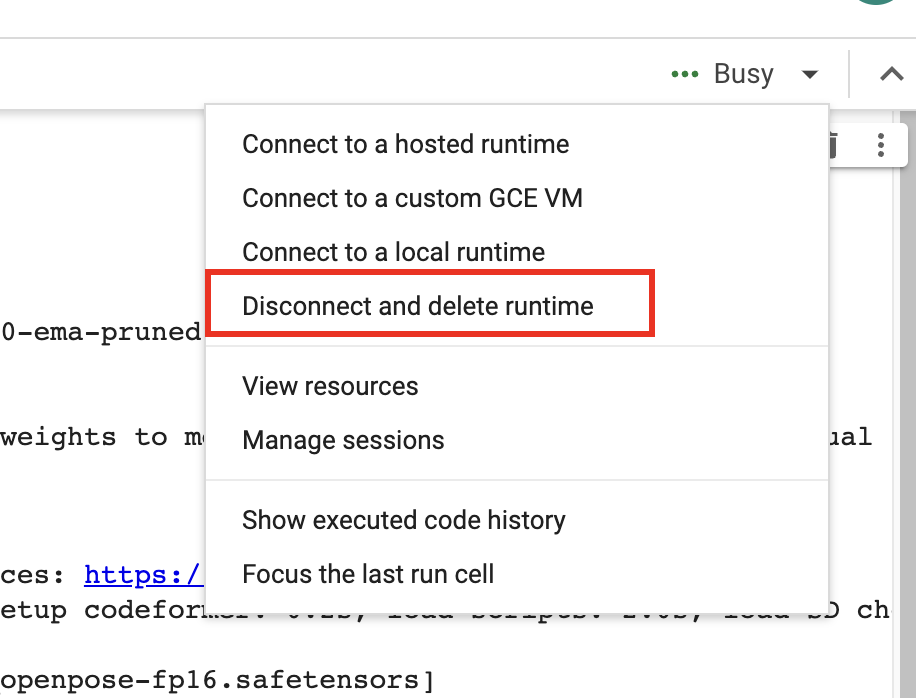
When you are done
When you finish using the notebook, don’t forget to click “Disconnect and delete runtime” in the top right drop-down menu. Otherwise, you will continue to consume compute credits.
Computing resources and compute units
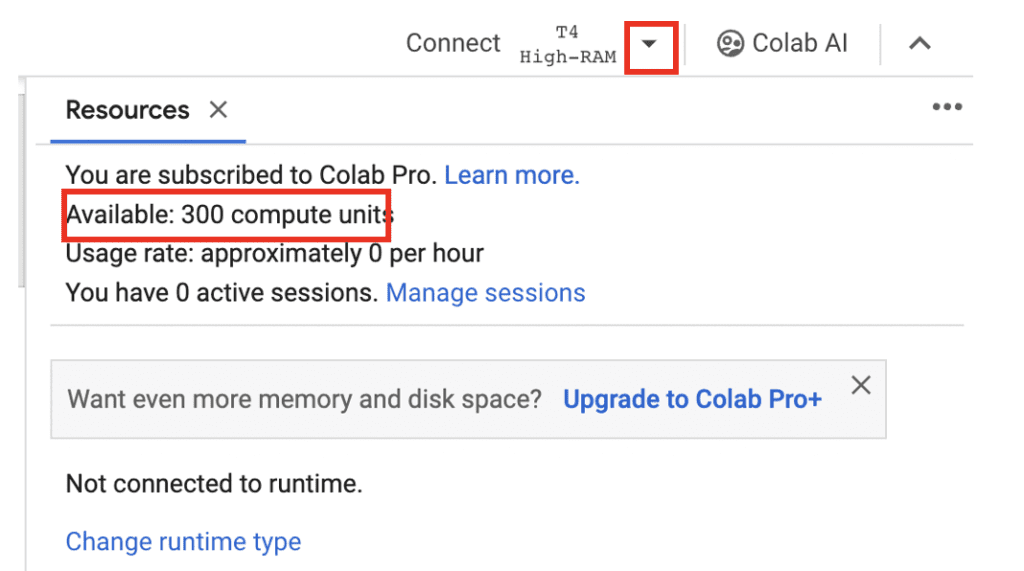
To view computing resources and credits, click the downward caret next to the runtime type (E.g. T4, High RAM) on the top right. You will see the remaining compute units and usage rate.
Models available
For your convenience, the notebook has options to load some popular models. You will find a brief description of them in this section.
Flux models

Flux AI is a state-of-the-art AI model that produces stunning images.
v1.5 models
Stable Diffusion 1.5

The Stable Diffusion 1.5 model is the officially released model which is trained with diverse styles.
Realistic Vision

Realistic Vision v2 is suitable for generating anything realistic, whether they are people, objects, or scenes.
Dreamshaper

Dreamshaper is easy to use and good at generating a popular photorealistic illustration style. It is an easy way to “cheat” and get good images without a good prompt!
Anything v3

Anything V3 is a special-purpose model trained to produce high-quality anime-style images. You can use danbooru tags (like 1girl, white hair) in the text prompt.
It’s useful for casting celebrities to amine style, which can then be blended seamlessly with illustrative elements.
SDXL 1.0 model

This Coalb notebook supports the SDXL 1.0 base model.
Select SDXL_1 to load the SDXL 1.0 model.
Check out some SDXL prompts to get started.
JuggernautXL

The Juggernaut XL model is all-rounded for diverse styles. It is especially good at realistic images.
Pony Diffusion XL

The Pony Diffusion XL model excels in creative artistic images. See also the prompt tags for Pony XL.
ControlNet models
You need the ControlNet models to use the ControlNet custom node.
- SD_1_5_ControlNet_models: SD 1.5 ControlNet models.
- SDXL_ControlNet_models: SDXL ControlNet models.
- IP_Adapter_models: IP adapter models.

Alternatively, you can put the ControlNet models in the Google Drive folder AI_PICS > models > ControlNet.
Installing models
There are two ways to install models not on the model selection list.
- Use ComfyUI Manager.
- Put model files in your Google Drive.
Install models using ComfyUI Manager
Click the Manager button > Model Manager.
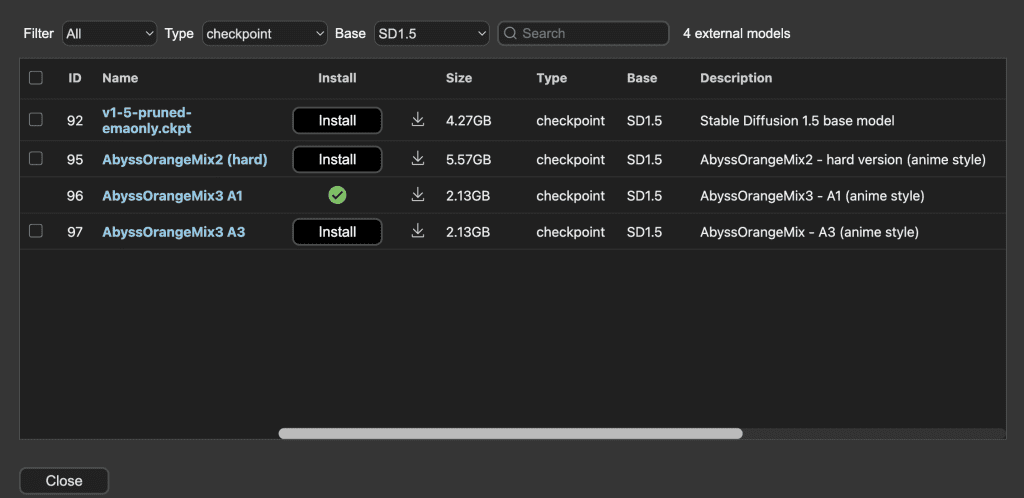
Use the filter to narrow down the model type.
Installing models in Google Drive
After running the notebook for the first time, you should see the folder AI_PICS > models created in your Google Drive. The folder structure inside this folder mirrors AUTOMATIC1111‘s and is designed to share models with:
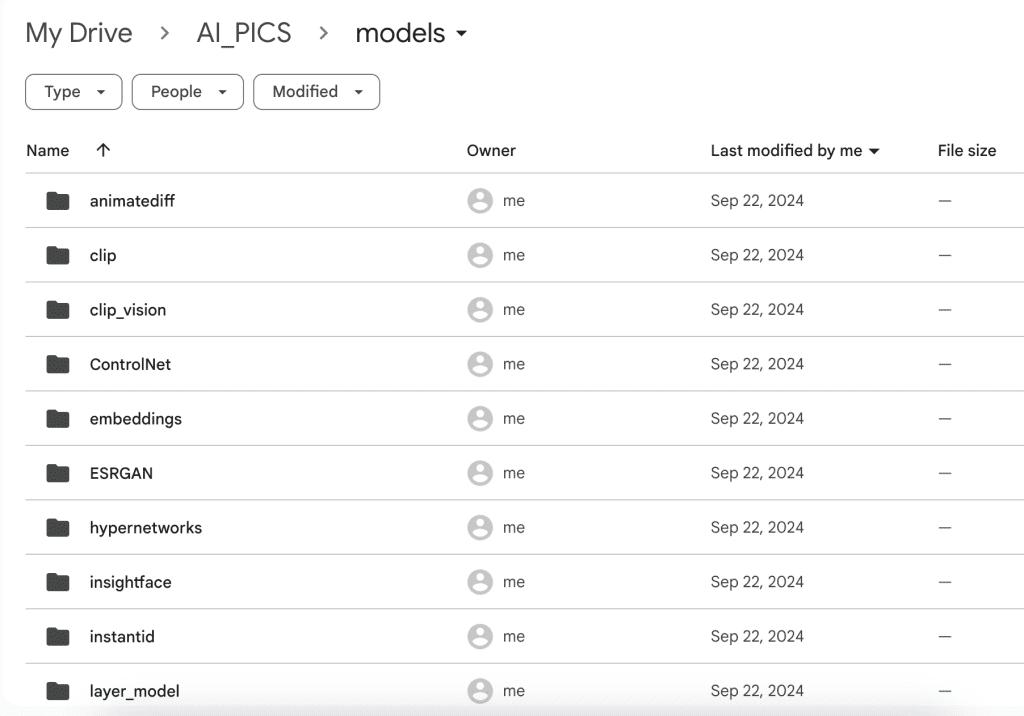
Put your model files in the corresponding folder. For example,
- Put checkpoint model files in AI_PICS > models > Stable-diffusion.
- Put LoRA model files in AI_PICS > models > Lora.
You will need to restart the notebook to see the new models.
Notebook secrets
This notebook supports storing API keys in addition to Secrets. If the keys were defined in secrets, the notebook would always use them. The notebook currently supports the following API keys (All upper case):
NGROK: Ngrok API key.
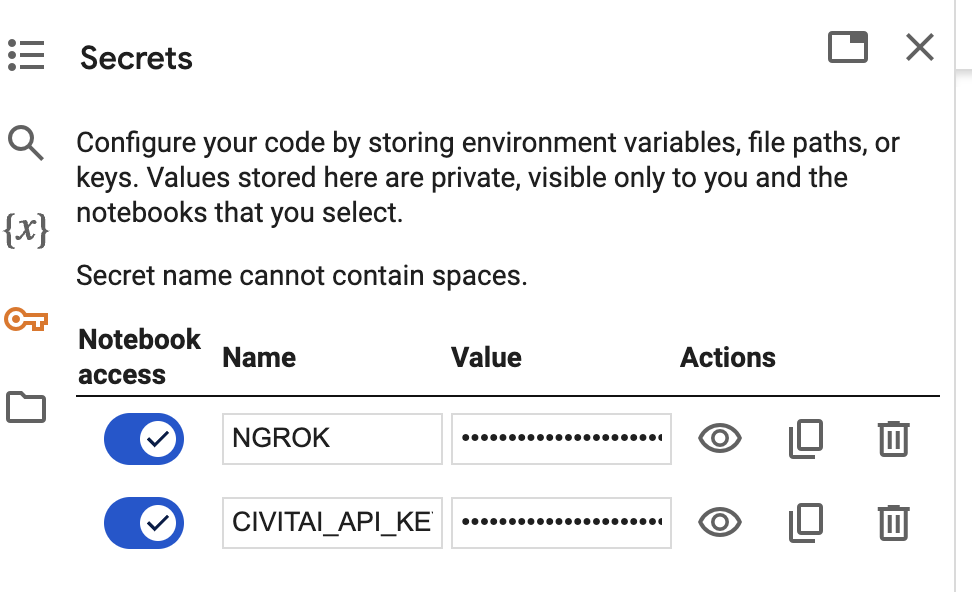
You will need to enable Notebook access for each key like above.
Custom nodes
Installing a custom node
You can use ComfyUI Manager to install custom nodes. Click Manager > Install custom nodes.
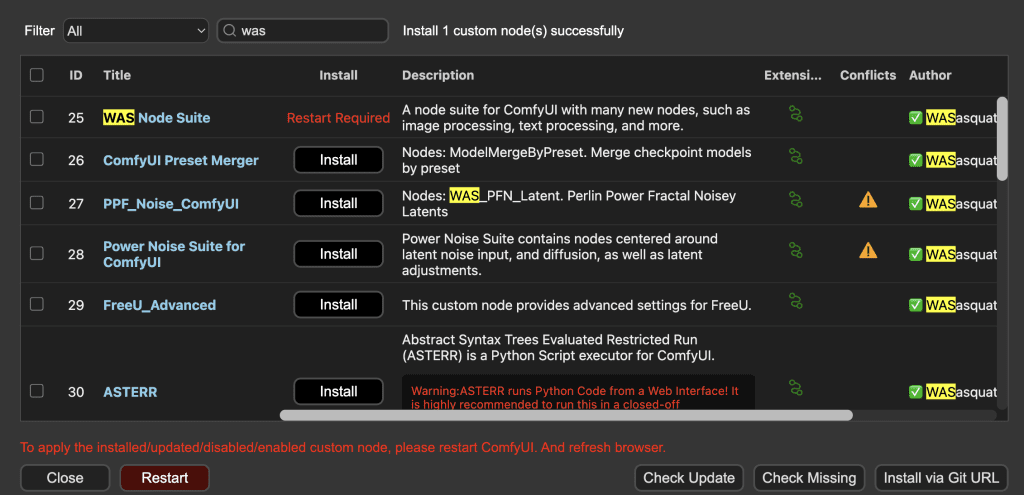
Search and select a custom node to install.
Click the Restart button AND refresh the ComfyUI page after installation.
The custom nodes are stored in your Google Drive: AI_PICS > ComfyUI > custom_nodes.
Removing a custom node
Delete the custom node’s folder in AI_PICS > ComfyUI > custom_nodes to remove a custom node.
Extra arguments to ComfyUI
You can add any extra command line arguments to the Extra_arguments field.

Frequently asked questions
Do I need a paid account to use the notebook?
Yes, you need a paid Google Colab account to use this notebook. Google has blocked the free usage of Stable Diffusion.
Is there any alternative to Google Colab?
Think Diffusion provides fully-managed Forge/AUTOMATIC1111/ComfyUI WebUI web service. They offer 20% extra credit to our readers. (Affiliate link)
How do you resolve an out-of-memory error?
The T4 runtime type has 15 GB of VRAM. You can select a runtime type of higher memory, such as L4 or A100. (They cost more.)
Can I use the checkpoint and LoRA models I trained?
Yes, put the model file in the corresponding folder in Google Drive.
- Checkpoint models: AI_PICS > models > Stable-diffusion.
- LoRA models: AI_PICS > models > Lora.
How do I use the Flux.1 Dev model?
- Select the
Flux1_devunder models. - Use the workflow JSON File in the tutorial: Flux1 Dev FP8 workflow.
How long does it take to generate a Flux image?
It depends on the runtime type. Using the Flux1 Dev FP8 model:
- T4: 2 mins.
- L4: 50 secs.
Select Runtime > Change runtime type to change.
Next Step
- Absolute Beginner’s Guide: Read this if you have no idea about Stable Diffusion or Flux AI.
- ComfyUI Beginner’s Guide
- Stable Diffusion Courses
Why do you remove SAVE_CUSTOM_NODES_IN_GOOGLE_DRIVE? I think it’s very useful.
It causes issues with some custom nodes so that it cannot be updated. what’s the use case for this? Installing custom nodes is quick.
Hi, it seems like my laptop isn’t working anymore, I’m getting a white screen.
collab notebook sorry haha
Hi, fixed.
hm, I still get a white screen through ngrok connection (using notebook comfyui v2)
o yes, ngork doesn’t work for now. The comfyui’s interface is now hitting their rate limit per minute. Use cloudflared.
Hi Andrew, thanks for this. Took a leap of faith to use this for video generation as my PC isn’t too strong for that atm. I noticed that ComfyUI keeps reconnecting after a certain amount of time for extended periods, not too sure if the connection is stable?
Yes, you can use the ngrok option.
Thanks, works like a charm. Noticed that ngrok has a 1GB limit tho. Any alternatives that this notebook can take, like Tailscale or Cloudflare?
Hi, where can I find the config file to change the security level?
Do you mean the security level in ComfyUI manager? It’s in \ComfyUI\custom_nodes\ComfyUI-Manager\config.ini but it doesn’t persist across sessions.
Yeah I can’t find it, I have some problems installing Hunyuan3DWrapper custom nodes and someone suggested changing the security level, so what can I do?
Use colab’s file explorer to edit: /content/ComfyUI/user/default/ComfyUI-Manager/config.ini and set the security level.
Stop and start the cell to restart comfyui.
Hey Andrew, thanks a lot for this guide, I’ve been able to use Comfy on Google Colab and I’m not stopped by the limits of my laptop anymore. I even tried out the A100, it was wild.
However, you forgot this (I’m serious):
`f'{models_gdrive_path}/upscale_models’: f'{app_local_path}/models/upscale_models’,`
Hi Andrew
Great work as always! However, when i try to run the reactor node it does not follow through with the workflow. Where do you put the inswapper_128.onnx Model file?
Thanks for your help!
there’s a crack down on reactor repos on github so it may be affected. what’s the custom node you used?
Thanks Andrew! Another great tutorial 💪 I’ve been using A1111, and gave a try at ComfyUI to have a go at flux. So far I’m enjoying the progress I’m making. One thing I’m having trouble is saving the workflows. Can they be stored in G Drive so that they are in the folder when I start the notebook the next time?
Great idea. I will look into it
I looked into the different runtypes on Colab. According to Gemini, T4 and L4 both use 16Gb GPUs but with different architectures. Here’s what it said about why L4 is better for AI imaging:
T4 vs. L4 for Stable Diffusion
Both T4 and L4 GPUs can be used for Stable Diffusion, but the L4 generally offers better performance due to its architectural advantages. Here’s a breakdown:
L4 Advantages:
1. Faster Inference: Stable Diffusion inference involves many matrix multiplications and convolutions, which are accelerated by the L4’s Tensor Cores. This leads to faster image generation compared to the T4.
2. FP16 Support: Stable Diffusion models can often run efficiently in FP16 precision, which the L4 supports well. This further enhances inference speed and reduces memory usage.
3. Larger Memory Capacity: While the memory capacity can vary depending on the specific Colab instance, L4 GPUs sometimes offer more VRAM compared to T4s. This can be beneficial for running larger Stable Diffusion models or generating higher-resolution images.
T4 Considerations:
While the T4 is capable of running Stable Diffusion, it might be slower due to the lack of Tensor Cores and potentially lower memory bandwidth. However, if your models and image sizes are relatively small, the T4 could still be a viable option.
In summary: For AI image generation tasks like Stable Diffusion, the L4 GPU is generally preferred because of its Tensor Cores, FP16 support, and potentially larger memory capacity. These features contribute to faster and more efficient image generation. While the T4 can also be used, it might be slower for demanding models or higher resolutions.
Recommendation: If performance is a priority and you have access to an L4 GPU runtime in Colab, it’s generally the better choice for Stable Diffusion. If you’re working with smaller models or lower resolutions, or if the L4 is unavailable, the T4 can still be a workable option.
The L4 GPU, powered by the NVIDIA Ampere architecture, excels in tensor-based tasks due to its Tensor Core technology. Tensor Cores are specialized processing units designed to significantly accelerate matrix operations, which are fundamental to deep learning and many other tensor-based workloads.
Here’s why L4 is better for tensor-based tasks:
1. Tensor Cores: As mentioned, Tensor Cores are purpose-built for accelerating tensor operations, like matrix multiplications and convolutions. These operations are the building blocks of deep learning models.
2. FP16 and FP8 Support: L4 GPUs efficiently support lower-precision data types like FP16 (half-precision) and FP8 (quarter-precision). This enables faster computations and reduced memory requirements for tensor-based tasks.
3. Higher Memory Bandwidth: Compared to the T4, the L4 generally offers higher memory bandwidth, which is crucial for moving data quickly to and from the GPU during tensor operations. This higher bandwidth helps to prevent bottlenecks and keep the GPU fed with data.
I hope this is useful
TL;DR:
T4 costs 1.67 units/hour
L4 costs 2.09 units/hour
A100 costs 7.69 units/hour
L4 is about 2x faster than T4 (T4 is basically not worth using unless you’re being really frugal for some reason and are not actively generating images but just noodling around in ComfyUI)
A100 is about 3x faster than L4 (basically only worth using if you’re in a rush or don’t mind paying a bit of a premium)
If a workflow is executed in 120s by T4, it’s executed in about 60s by L4, and 20s by A100. YMMV, but this is based on my testing (with the numbers severely rounded and from memory ngl).
A100 is probably only available on Pro+ (at least when I tried on Pro, it told me I need to wait for my turn, but then I just upgraded to Pro+ since I like the service enough)
Thanks Mets, interesting to hear your experiences with A100. Colab Pro+ costs a lot more than the standard version but looks like it’s worth considering for video, at least.
Hi, I tried running this and it seems to work fine, except for the fact that my models are not in the checkpoint folder but in the VAE folder ( I don’t know if maybe it’s just files with the same name ), and I can’t seem to solve this issue, any idea?
Can you say more? Do you mean the v1.5, realistic_vision models, etc go automatically downloaded to the VAE folder in the colab’s temporary storage, or in your google drive?
any issues with the notebook? cannot run the ui
Hi Andrew, checking this out for the first time, exploring options beyond A1111. Appreciate your work, for sure.
Notebook seems to run with no errors, Colab connection and install seem to go fine, but upon clicking the link I’m mostly getting a 502 Bad Gateway error. I saw this mentioned above and refreshed per your recommendation which helps – goes to the login screen. After entering PW and clicking the link to the tunnel, I get a blank white screen. I tried to refresh this after a minute or two and got another 502 error. Killed and re-ran the notebook to start over, same result. Right now I’m just letting it sit on the blank screen for awhile, in case it just takes more time to load from here. I’m not seeing any mention of expected load time anywhere though, am I thinking correctly here? I know that A1111 takes a solid 10+ minutes to load models etc, but that’s either before it provides the URL or after the UI is already launched (both, actually). So is the delay at this step normal or am I having issues with the tunnel? TIA for any guidance here.
Ok, update: waited for awhile with no change, so tried the NGROK option after I noticed that it’s labeled “Use NGROK if ComfyUI page has lodading issue” hmmm….
Haven’t used it before so set it up quickly to get a token, restarted and BOOM, I’ve got a UI. Problem solved. I’m sure this won’t be the last time I’m stumped, but I’m good for the moment lol. Thanks again for your work.
Yes, the default connection can be unusable at times. You can also use Colab secret to store the NGROK key so you don’t need to put it in every time.
ok i see u dont need to enter a username or password. just leave it as it is and enter it as “a” and “a” when prompted.
why do i need to give full access to my google drive. i dont like that and seems scammy. i would suggest anyone using this to create a new google account so this site doesnt have access to your entire google drive to add create delete view whatever they want.
Thank you for this guide. Can you tell me how to save the output images? If it’s automatic, I don’t see it in my Output folder on my google drive. Do I need to click on anything to save the image? Please advise. Also the queue box I have
It is in your google drive AI_PICS > outputs.
Whether images would be saved automatically depends on the workflow itself. You can always right click the image and save to your PC.
Hey Andrew! Really loving the notebook and thank you so much for putting it together for us! I’ve run into a situation where my NGROK “account has exceeded its http requests limit” and need to upgrade to their paid plan which is very much not ideal for me.. and the local tunnel gives me such an insane amount of problems to use that it stops becoming worth it.
Are there any other alternatives other than NGROK or the local tunnel??
I will look into it but it won’t be a priority.
hi Andrew,
Why is it’s not possible to download models to a folder in google drive, so that they don’t have to be downloaded each time?
Ah sorry, already works like that.
They actually won’t be saved in google drive by design. Some models are large and saving them in google drive may cause out of space error.
You can put them in google drive manually if you want to so that you don’t need to redownload.
Ah thank you Andrew.
hi Andrew,
cannot use upscalers on comfyui colab
i understand that there should be a folder
AI_PICS>models>upscale_models
so i created one manually
but i get for example:
“Value not in list: model_name: ‘RealESRGAN_x2.pth’ not in []”
comfyui does not seem to read the content of that folder….. and the upscalers i put there….
thank you
🙂
nami
Put the upscaler models in ESRGAN folder. The models folder is shared between A1111, Forge, and comfyui.
The local tunnel is giving me an OBSCENE amount of issues…. I know you mentioned copy/pasting the authoken from ngrok in the “NGROK field in the notebook”, but the Colab Notebook I picked up from your GumRoad doesn’t have an ngrok field in it
It’s pointing to the latest notebook but you will need to follow the link in the guide to retrieve the latest one.
Hi Andrew, thank you for improving this workbook. with every update, it’s getting better and better. there are 2 things I would like to ask:
1) Loras – is there any limitation (size) on the Loras? I can select almost all Loras I uploaded to google drive, but some are not visible… for example Flux turbo lora (which has 600mb+) is not visible for selection in comfyui environment
2) xlab controlnets – is there any way to use these? normally they are stored in xlab directory in Comfyui models folder in my local installation.
thanks for great works
regards
Pavel
1. The size of loras shouldn’t matter. Do you have an example I can test?
2. Just added the xlabs folder in google drive.
Hi Andrew, it seems the lora was corrupted. uploaded it again and it works now
Hello Andrew, getting this error when I try to use FLUX. CheckpointLoaderSimple
Error while deserializing header: HeaderTooLarge
any idea how to fix it, please?
The problem should be fixed now. I also added a section in FAQ for using the flux model.
thank you Andrew. it works now. BTW is there a way to instal custom nodes? or this is just for basic workflow with built-in nodes?
You can install them through the comfyui manager. I just added a Custom nodes section in the post.
Hi Andrew, I was trying to instal impact-pack through manager, but it didn’t work due to security level. can the security level can be somehow changed when starting comfyui or could you add comyui impact pack installation into the workbook, please?
OK, I found the issue. This custom node doesn’t like to be in google drive. Please use the updated notebook (11/2) and don’t select “SAVE_CUSTOM_NODES_IN_GOOGLE_DRIVE” (default).
I earlier used your stable diffusion colab link and I could add loras by copy them to my lora folder. Now bo lora is shown, tried even to copy loras link for flux loras into the colab notebook before I run it but no luck… should I try to delete the whole folder AI_pics and try again?
I just tested the comfyui notebook. The loras in google drive is loading correctly.
Note that there’s a change in the lora folder location. The model folder structure now mirrors A1111’s. So AI_PICS > models > Lora.
You can rename the AI_PICS folder in google drive to AI_PICS_OLD. A new folder with model folder structure will be regenerated.
Ok! Thank you!
I’m having trouble getting this to work! 🙂 It did run fine for me the first time I tried, but now, not so much.
The code in the notebook runs fine, no errors that I can find. When I click on the link for the local tunnel I get the login page, then I get either a blank white screen, or I get the ComfyUI page but the potion where the graph goes just spins and spins. Also, the ComfyUI manager does not get loaded (though it did the first time I ran everything). If I try to reload the page I get “Error loading workflows: Error getting user data list ‘workflows’: 502”
I’m running it on Google Collab with this notebook: and using all the defaults set in the notebook.
it is working but the connection is unstable. I will add another connection option when I got a chance. In the meantime, it can be resolved by refreshing the page.