
Stable Diffusion Forge WebUI has emerged as a popular way to run Stable Diffusion and Flux AI image models. It is optimized to run fast and pre-installed with many essential extensions. If you don’t have a powerful GPU card, you can run Forge on Google Colab.
Table of Contents
- What is SD Forge?
- Using SD Forge on Google Colab
- Alternatives
- Running SD Forge on Colab
- Speeding up image generation
- ngrok (Optional)
- When you are done
- Computing resources and compute units
- Models available
- ControlNet models
- Installing models
- API key secrets
- Extensions
- Extra arguments to webui
- Frequently asked questions
- Next Step
What is SD Forge?
Once upon a time, AUTOMATIC1111 WebUI (A1111) was the go-to software for running Stable Diffusion locally. Armed with a large “Generate” button, A1111 is perfect for interactive AI image creation.
However, the development of A1111 has lagged behind. It doesn’t support the latest local models like Flux. Optimized to run fast and supporting Flux, SD Forge WebUI has gained popularity.
This is a detailed guide for Forge on Google Colab. You can access the notebook by getting the Quick Start Guide.
If you are a site member, log in and access the notebook below.
This notebook shares models with the following notebooks in Google Drive.
Using SD Forge on Google Colab
Google Colab (Google Colaboratory) is an interactive computing service offered by Google. It is a Jupyter Notebook environment that allows you to execute code.
Due to the computing resources required (High RAM), you need a Google Pro and Pro+ to run Forge on Colab.
I recommend using the Colab Pro plan. It gives you 100 compute units per month on T4, which are about 50 hours on a standard GPU. (It’s a steal)

Alternatives
Think Diffusion provides fully managed Forge/ComfyUI/AUTOMATIC1111 online service. They cost a bit more than Colab but provide a better user experience by installing models and extensions. They offer 20% extra credit to our readers. (Affiliate link)
Running SD Forge on Colab
Step 0: Sign up
Sign up a Google Colab Pro or Pro+ plans. (I use Pro.)
Step 1: Open the Forge Colab notebook
Open the Forge Colab notebook in the Quick Start Guide. You should see the notebook with the second cell below.
Note: For quick start, you can skip the following steps and run the notebook with the default settings.
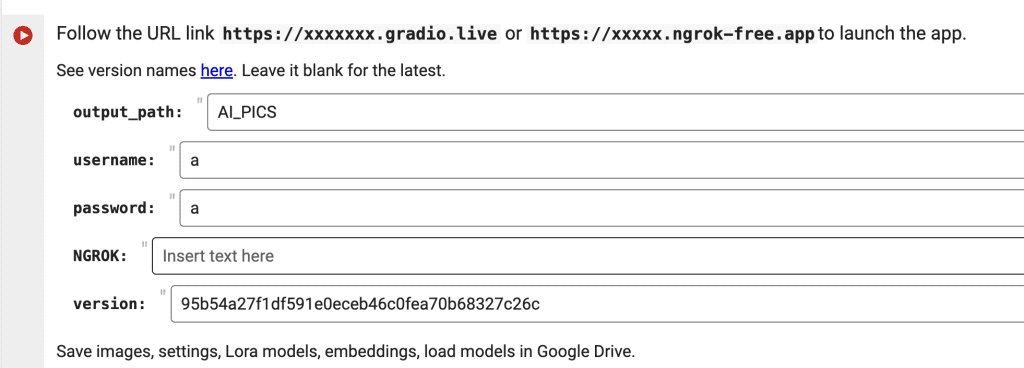
Set the username and password. You will need to enter them before using Forge.
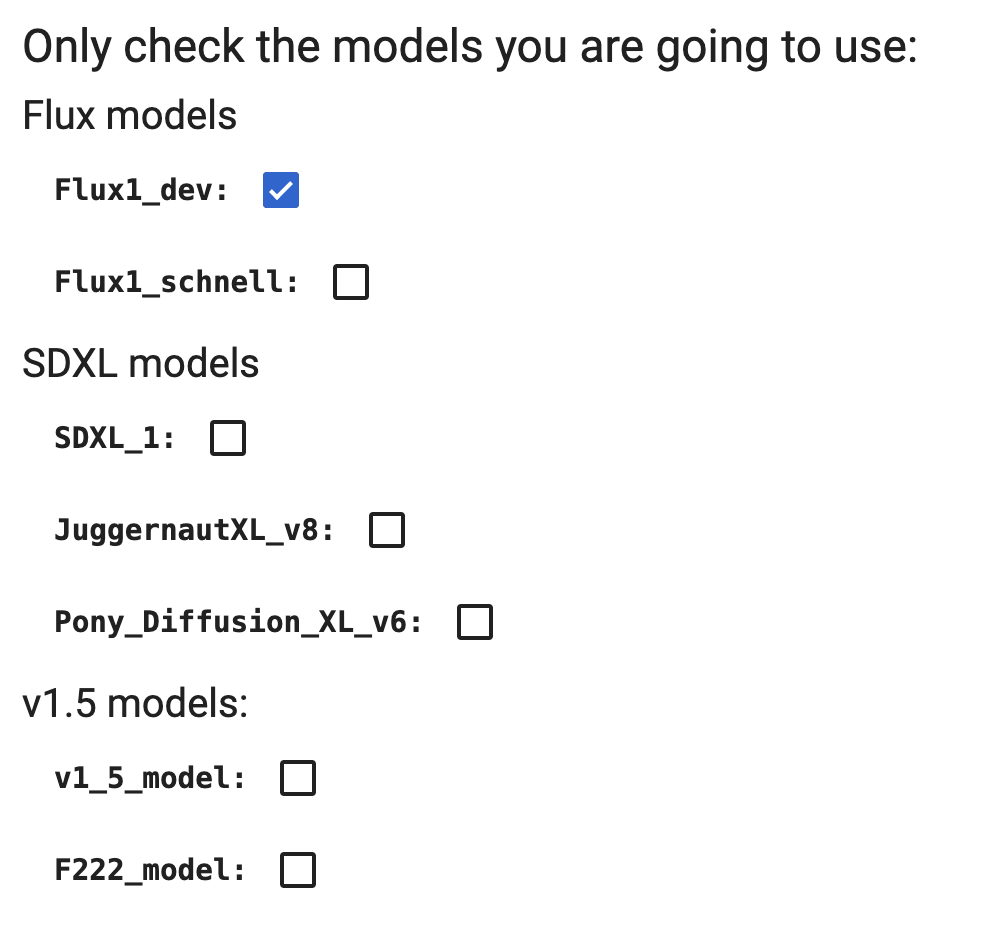
Step 2: Select models
Review which models you want to use.
The more you select, the longer it takes to download. They will be downloaded to the Colab drive, not your Google Drive.
Step 3: Run the notebook
Click the Play button on the left of the cell to start.

Start-up should complete within a few minutes. How long it takes depends on how many models you include. When it is done, you should see the message below.

Step 4: Start Forge
Follow the gradio.live link to start Forge.
Enter the username and password you specified in the notebook.
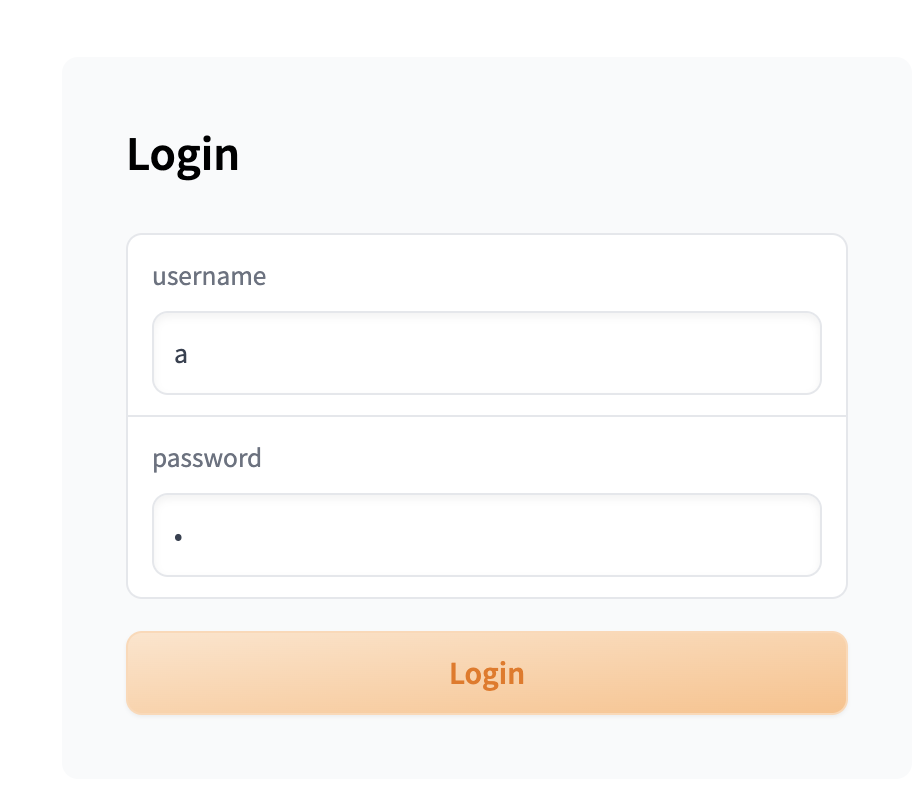
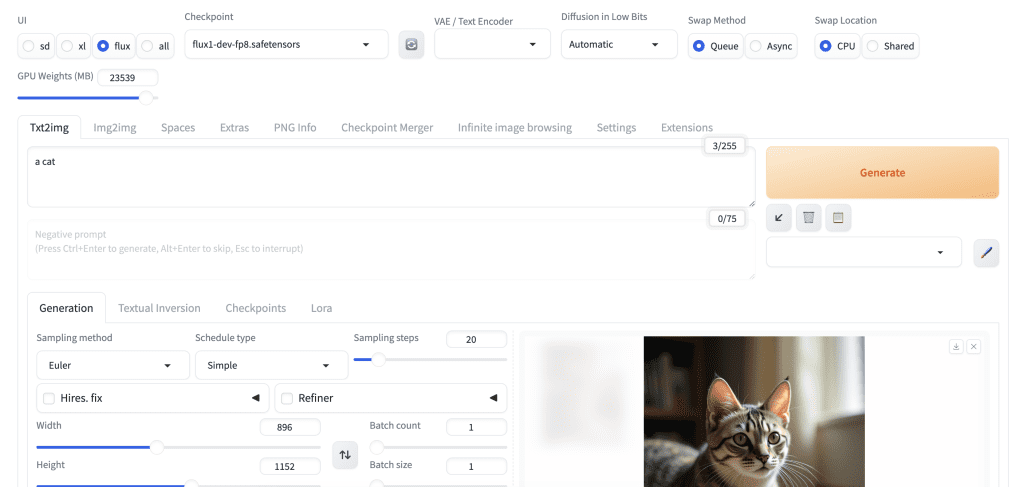
You should see the Forge GUI after you log in.
Put in “a cat” in the prompt text box and press Generate to test using Stable Diffusion. You should see it generates an image of a cat.
Speeding up image generation
You can pick a faster runtime type to speed up the generation, which costs more per hour.
Click downward caret on the top right and then select Change runtime type.

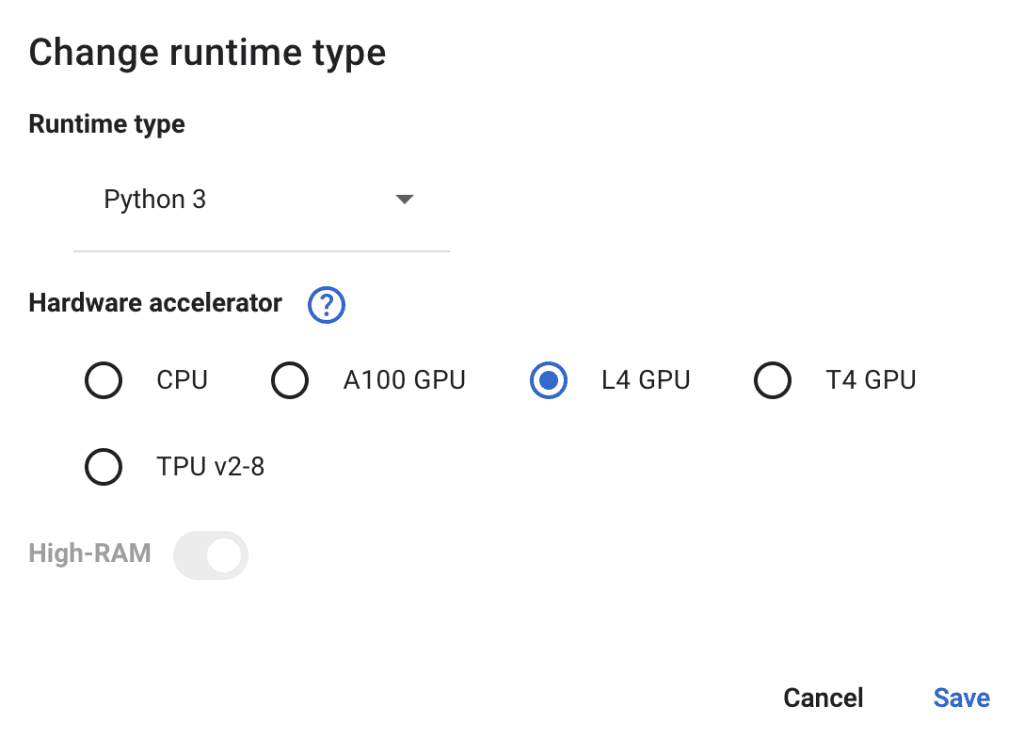
This notebook only supports GPU. Below is the approximate performance for Flux.1 Dev.
- T4 GPU: ~ 1.5 mins per image.
- L4 GPU: ~ 30 seconds per image.
ngrok (Optional)
If you run into display issues with the GUI, you can try using ngrok instead of Gradio to establish the public connection. It is a more stable alternative to the default gradio connection.
You will need to set up a free account and get an authoken.
- Go to https://ngrok.com/
- Create an account
- Verify email
- Copy the authoken from https://dashboard.ngrok.com/get-started/your-authtoken and paste it into the
NGROKfield in the notebook.
The Stable Diffusion cell in the notebook should look like the one below after you put in your ngrok authtoken.
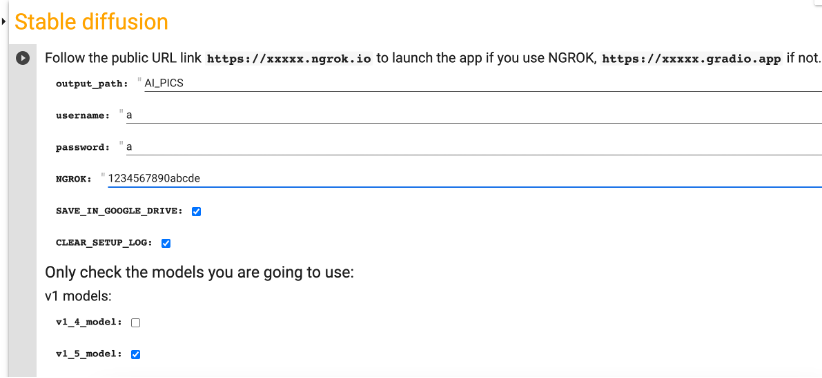
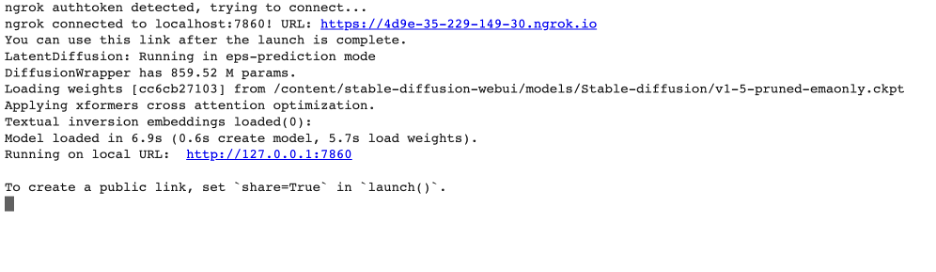
Click the play button on the left to start running. When it is done loading, you will see a link to ngrok.io in the output under the cell. Click the ngrok.io link to start Forge. The first link in the example output below is the ngrok.io link.
When you visit the ngrok link, it should show a message like below
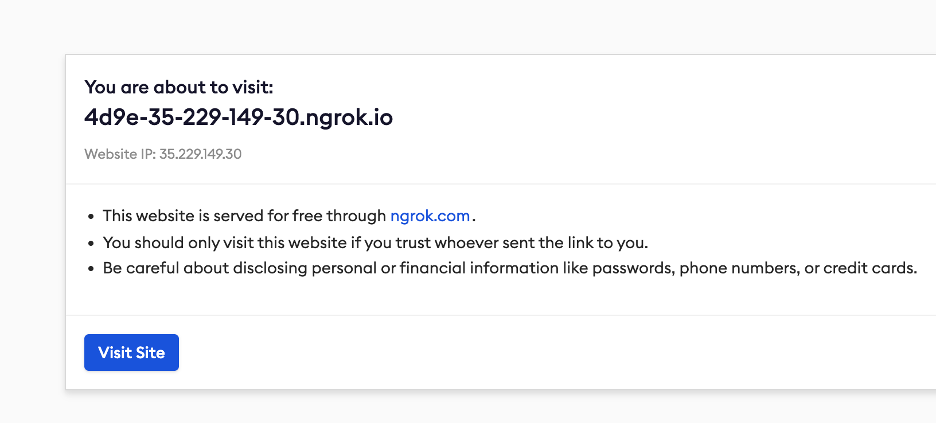
Click on Visit Site to Start AUOTMATIC1111 GUI. Occasionally, you will see a warning message that the site is unsafe. It is likely because someone used the same Ngrok link to post something malicious. Since you are the one who created this link, you can ignore the safety warning and proceed.
Save the trouble from re-entering the API key by using Colab secrets.
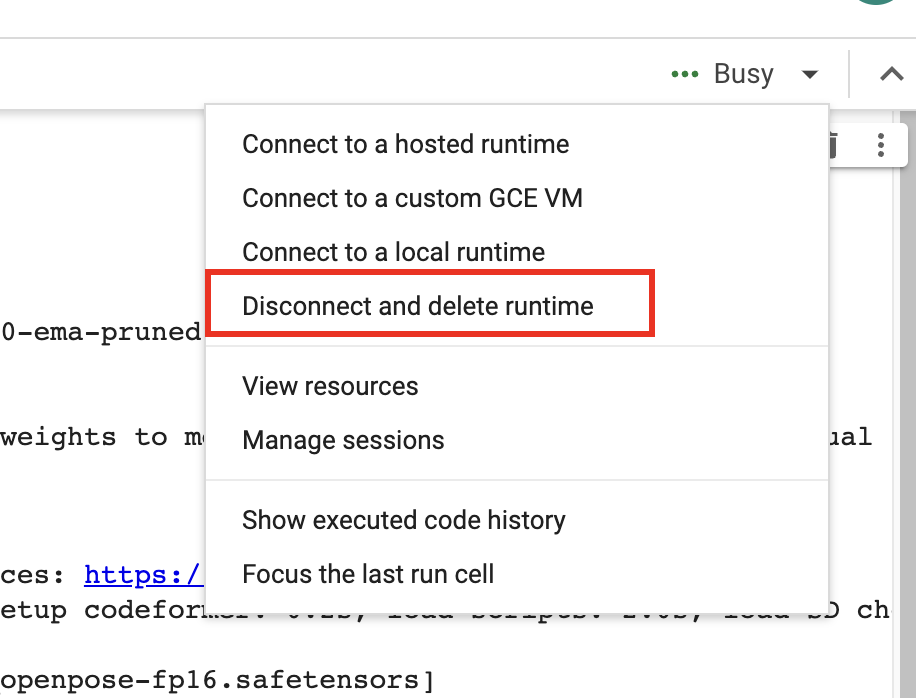
When you are done
When you finish using the notebook, don’t forget to click “Disconnect and delete runtime” in the top right drop-down menu. Otherwise, you will continue to consume compute credits.
Computing resources and compute units
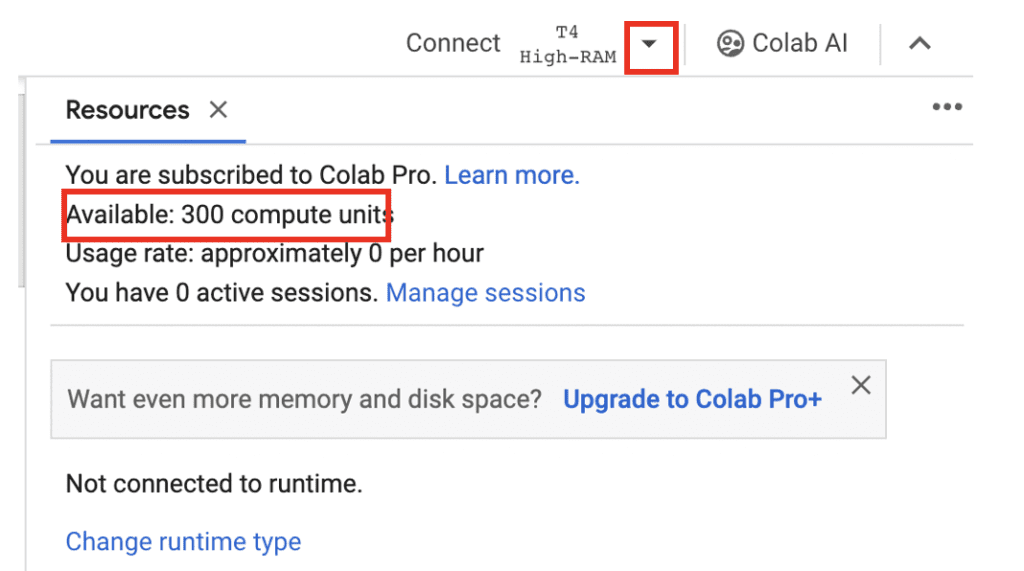
To view computing resources and credits, click the downward caret next to the runtime type (E.g. T4, High RAM) on the top right. You will see the remaining compute units and usage rate.
Models available
For your convenience, the notebook has options to load some popular models. You will find a brief description of them in this section.
Flux models

Flux AI is a state-of-the-art AI model that produces stunning images. You can use
- Flux.1 Dev: The full development Flux model.
- Flux.1 Schnell: The fast version.
v1.5 models
Stable Diffusion 1.5

The Stable Diffusion 1.5 model is the officially released model which is trained with diverse styles.
Realistic Vision

Realistic Vision v2 is good for generating anything realistic, whether they are people, objects, or scenes.
F222

F222 is good at generating photo-realistic images. It is good at generating females with correct anatomy.
Caution: F222 is prone to generating explicit images. Suppress explicit images with a prompt “dress” or a negative prompt “nude”.
Dreamshaper

Dreamshaper is easy to use and good at generating a popular photorealistic illustration style. It is an easy way to “cheat” and get good images without a good prompt!
Open Journey Model

Open Journey is a model fine-tuned with images generated by Mid Journey v4. It has a different aesthetic and is a good general-purpose model.
Triggering keyword: mdjrny-v4 style
Anything v3

Anything V3 is a special-purpose model trained to produce high-quality anime-style images. You can use danbooru tags (like 1girl, white hair) in the text prompt.
It’s useful for casting celebrities to amine style, which can then be blended seamlessly with illustrative elements.
Inkpunk Diffusion

Inkpunk Diffusion is a Dreambooth-trained model with a very distinct illustration style.
Use keyword: nvinkpunk
SDXL model

This Coalb notebook supports SDXL 1.0 base and refiner models.
Select SDXL_1 to load the SDXL 1.0 model.
Important: Don’t use VAE from v1 models. Go to Settings > Stable Diffusion. Set SD VAE to AUTOMATIC or None.
Check out some SDXL prompts to get started.
ControlNet models
Forge comes with the ControlNet extension installed but you still need to download the ControlNet models.
- SD_1_5_ControlNet_models: SD 1.5 ControlNet models.
- SDXL_ControlNet_models: SDXL ControlNet models.
- IP_Adapter_models: IP adapter models.

Alternatively, you can put the ControlNet models in the Google Drive folder AI_PICS > models > ControlNet.
Installing models
There are two ways to install models that are not on the model selection list.
- Use the
Checkpoint_models_from_URLandLoRA_models_from_URLfields. - Put model files in your Google Drive.
Install models using URLs
You can only install checkpoint or LoRA models using this method.
Put in the download URL links in the field. The link you initiate the file download when you visit it in your browser.
Checkpoint_models_from_URL: Use this field for checkpoint models.LoRA_models_from_URL: Use this field for LoRA models.
Some models on CivitAi needs an API key to download. Go to the account page on CivitAI to create a key and put it in Civitai_API_Key.

Below is example of getting the download link on CivitAI.
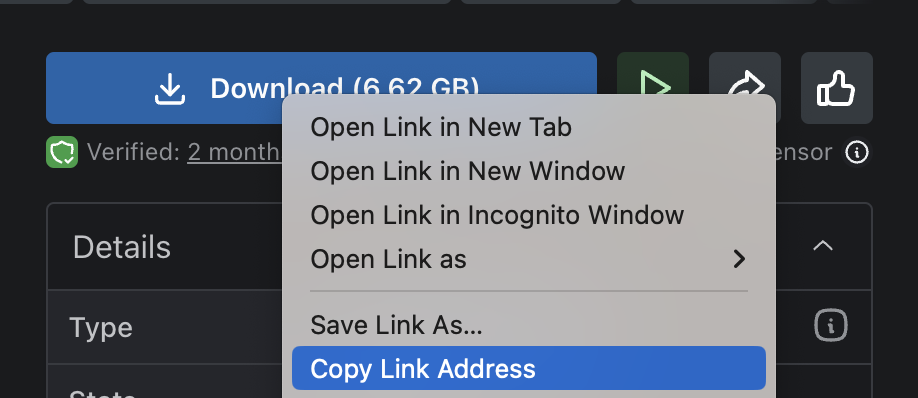
Put it in the Model_from_URL field.
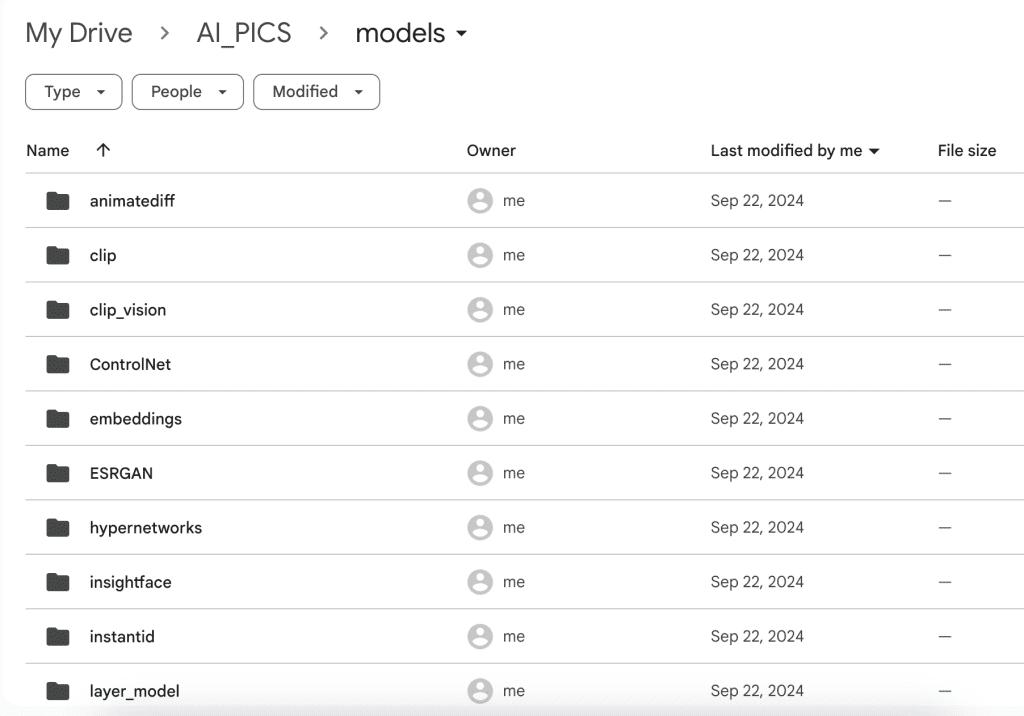
Installing models in Google Drive
After running the notebook for the first time, you should see the folder AI_PICS > models created in your Google Drive. The folder structure inside this folder mirrors AUTOMATIC1111‘s and is designed to share models with:
Put your model files in the corresponding folder. For example,
- Put checkpoint model files in AI_PICS > models > Stable-diffusion.
- Put LoRA model files in AI_PICS > models > Lora.
You will need to restart the notebook to see the new models on Forge.
API key secrets
This notebook supports storing API keys in addition to Secrets so that you don’t need to keep pasting the API keys in the fields.
The notebook would always use the keys if they were defined in secrets. The notebook currently supports these two API keys (All upper cases):
NGROK: Ngrok API key.CIVITAI_API_KEY: API key for CivitAI.
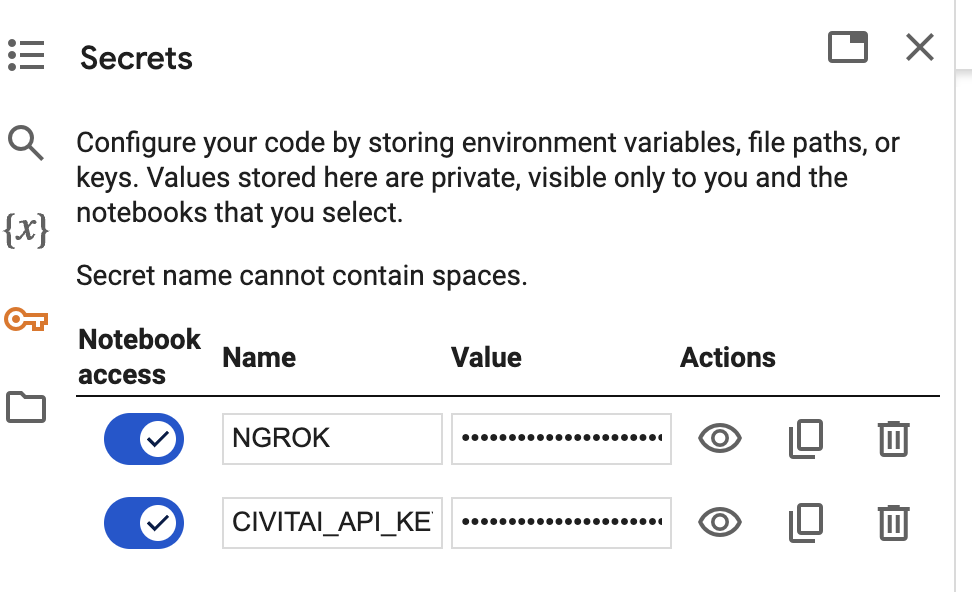
To use an NGROK secret, for example, click the key icon on the left sidebar.
Name: NGROK
Value: Enter your NGROK API key
Enable Notebook access for each key, as shown in the screenshot below.
Extensions
The notebook loads the following extensions by default.
- Infinite Image browser – For viewing and searching generated images. The secret key is
SDA. - Aspect ratio helper – Extra buttons for setting the aspect ratio of images.
Extensions are saved in Google Drive under AI_PICS > Forge > Extensions. You can put or edit files in the extension folders.
Installing extensions from URL
You can install any number of extensions by using this field. You will need the URLs of the Github page of the extension.
For example, put in the following if you want to install the Civitai model extension.
https://github.com/civitai/sd_civitai_extensionYou can also install multiple extensions. The URLs need to be separated with commas. For example, the following URLs install the Civitai and the multi-diffusion extensions.
https://github.com/civitai/sd_civitai_extension,https://github.com/pkuliyi2015/multidiffusion-upscaler-for-automatic1111Updating an extension
You cannot use the Extensions tab to update an extension in this notebook. Follow the steps below.
- Delete the extension’s folder in Google Drive. (They are under AI_PICS > Forge > extensions)
- Reinstall the extensions from the URL.
Extra arguments to webui
You can add extra arguments to the Web-UI by using the Extra_arguments field.
Other useful arguments are
--api. Allow API access. Useful for some applications, e.g. the PhotoShop Automatic1111 plugin.
Frequently asked questions
Do I need a paid account to use the notebook?
Yes, you need a paid Google Colab account to use this notebook. Google has blocked the free usage of Stable Diffusion.
Is there any alternative to Google Colab?
Think Diffusion provides fully-managed Forge/AUTOMATIC1111/ComfyUI WebUI web service. They offer 20% extra credit to our readers. (Affiliate link)
How do you resolve an out-of-memory error?
The T4 runtime type has 15 GB of VRAM. You can select a runtime type of higher memory, such as L4 or A100. (They cost more.)
Do I need to use ngrok?
You don’t need to use ngrok to use the Colab notebook. In my experience, ngrok provides a more stable connection between your browser and the GUI. If you experience issues like buttons not responding, you should try ngrok.
What is the password for the Infinite Image Browser?
SDACan I use the checkpoint and LoRA models I trained?
Yes, put the model file in the corresponding folder in Google Drive.
- Checkpoint models: AI_PICS > models > Stable-diffusion.
- LoRA models: AI_PICS > models > Lora.
Why do my SDXL images look garbled?
Check to make sure you are not using a VAE from v1 models. Check Settings > Stable Diffusion > SD VAE. Set it to None or Automatic.
Next Step
If you are new to Stable Diffusion, check out the Absolute beginner’s guide.
Also getting the clip installation error out of nowhere yesterday. Have tried the setuptools update with no luck. Any ideas?
Hi fixed. Follow the link to get the updated version.
I’m now getting a different error from the ones others have posted:
[Errno 20] Not a directory: ‘/content//stable-diffusion-webui-forge’
/content
WEBUI ARGUMENTS: –gradio-img2img-tool color-sketch –enable-insecure-extension-access –gradio-queue –share –gradio-auth “a”:”a” –xformers
python: can’t open file ‘/content//stable-diffusion-webui-forge/launch.py’: [Errno 20] Not a directory
It was working fine yesterday.
Hi fixed. Follow the link to get the updated version.
Hello Andrew
I am currently unable to use your Forge Notebook because I am getting the following error:
stderr: error: subprocess-exited-with-error
× Getting requirements to build wheel did not run successfully. │
exit code: 1 ╰─> No available output.
note: This error originates from a subprocess, and is likely not a problem with pip. ERROR: Failed to build ‘https://github.com/openai/CLIP/archive/d50d76daa670286dd6cacf3bcd80b5e4823fc8e1.zip’ when getting requirements to build wheel
Is there anything you can do about this?
Hi fixed. Follow the link the get the updated version.
Getting this error all of the sudden
Installing clip
Traceback (most recent call last):
File “/content//stable-diffusion-webui-forge/launch.py”, line 54, in
main()
File “/content//stable-diffusion-webui-forge/launch.py”, line 42, in main
prepare_environment()
File “/content/stable-diffusion-webui-forge/modules/launch_utils.py”, line 445, in prepare_environment
run_pip(f”install {clip_package}”, “clip”)
File “/content/stable-diffusion-webui-forge/modules/launch_utils.py”, line 153, in run_pip
return run(f'”{python}” -m pip {command} –prefer-binary{index_url_line}’, desc=f”Installing {desc}”, errdesc=f”Couldn’t install {desc}”, live=live)
File “/content/stable-diffusion-webui-forge/modules/launch_utils.py”, line 125, in run
raise RuntimeError(“\n”.join(error_bits))
RuntimeError: Couldn’t install clip.
Command: “/usr/local/bin/python” -m pip install https://github.com/openai/CLIP/archive/d50d76daa670286dd6cacf3bcd80b5e4823fc8e1.zip –prefer-binary
Error code: 1
stdout: Collecting https://github.com/openai/CLIP/archive/d50d76daa670286dd6cacf3bcd80b5e4823fc8e1.zip
Using cached https://github.com/openai/CLIP/archive/d50d76daa670286dd6cacf3bcd80b5e4823fc8e1.zip (4.3 MB)
Installing build dependencies: started
Installing build dependencies: finished with status ‘done’
Getting requirements to build wheel: started
Getting requirements to build wheel: finished with status ‘error’
stderr: error: subprocess-exited-with-error
× Getting requirements to build wheel did not run successfully.
│ exit code: 1
╰─> No available output.
note: This error originates from a subprocess, and is likely not a problem with pip.
ERROR: Failed to build ‘https://github.com/openai/CLIP/archive/d50d76daa670286dd6cacf3bcd80b5e4823fc8e1.zip’ when getting requirements to build wheel
Hi fixed. Follow the link the get the updated version.
Hello there ! First of all, thanks for Forge, it’s amazing work.
I’m having an issue when running Forge on Google Colab where everything seems to start correctly, models are detected and loaded, but no images are ever generated/saved.
My setup:
– Environment: Google Colab
– GPU: NVIDIA L4
– Python: 3.10.12
– Forge path: /content/onedrive/stable-diffusion-webui-forge
– Models are located in:
/content/onedrive/stable-diffusion-webui-forge/models/Stable-diffusion
and they are correctly listed in the UI.
What happens:
1. Forge starts normally, no visible errors. Example log:
Version: f2.0.1v1.10.1-previous-635-gf5330788
Total VRAM 22693 MB, total RAM 54229 MB
Device: cuda:0 NVIDIA L4 : native
Model selected: /content/onedrive/stable-diffusion-webui-forge/models/Stable-diffusion/v1-5-pruned-emaonly.safetensors
2. I open the Web UI (Gradio link), select the model, go to txt2img, and try a simple prompt like:
“cat”
with 512×512, 20 steps, no ControlNet, no LoRAs, default settings.
3. The Web UI shows as if it is processing, but:
– No image appears in the gallery.
– The folder /content/onedrive/stable-diffusion-webui-forge/outputs stays completely empty.
4. I confirmed in Colab that:
– The base folder exists:
/content/onedrive/stable-diffusion-webui-forge
– There are no PNG files:
Total images found in outputs: 0
– I can manually create files inside outputs (so it’s not a permission issue):
%cd /content/onedrive/stable-diffusion-webui-forge
mkdir -p outputs/teste_debug
echo “teste” > outputs/teste_debug/teste.txt
This works fine, so OneDrive seems to allow writes.
The weird part is that I see no obvious error in the log when I click “Generate” – just normal messages and sometimes an [Unload] freeing memory.
My questions:
1. Is there any known limitation or issue when running Forge directly from a cloud-synced path like OneDrive (in this case mounted at /content/onedrive) on Google Colab?
2. Do you recommend avoiding putting the whole Forge repo inside OneDrive and instead using /content for the repo and only symlinking models/outputs from OneDrive?
3. Is there any debug flag or log I can enable to see why the image is not being saved to outputs (even though the folder is writable)?
Thanks in advance for any guidance.
Hi, I am not sure about onedrive but it is working well with google drive.
Hello Andrew,
Are there any plans to implement Forge Neo Colab so that Wan2.2 can be used with this notebook?
ok I will take a look.
I’m using your Forger notebook on Colab. For the last couple of days I’ve been having a problem where I get several error messages about the connection being lost. This happens in both gradio and ngrok. At the end of the notebook output is a ^C. In Forge itself I get: “Could not parse server response: SyntaxError unexpected token ‘<'," Everything works fine for a while, then suddenly this crops up. Any suggestions?
This looks like out-of-memory error. You should use a high-RAM instance.
Thanks, Andrew. I did change the runtime type (sometimes Colab changes it for you if the one you selected isn’t available). Cranking the GPU weights to 14000 did the trick.
This is timing out after the last iteration now. I have a + subscription. the images arent even being saved. All stock settings. it gets to 95% in the UI and 100% in console but then i get the timeout error in UI
I just tested with the flux1.dev model and it is working. If the console shows 100% but the UI times out, its an connection issue between the UI and the colab server. You can try ngrok which provides a more stable connection.
File “/usr/local/lib/python3.10/dist-packages/torch/library.py”, line 214, in _register_fake
handle = entry.fake_impl.register(func_to_register, source)
File “/usr/local/lib/python3.10/dist-packages/torch/_library/fake_impl.py”, line 31, in register
if torch._C._dispatch_has_kernel_for_dispatch_key(self.qualname, “Meta”):
RuntimeError: operator torchvision::nms does not exist
… no longer works since today :/
I tested it with flux and it worked. what was not working?
New Error with filterpy
Collecting filterpy (from facexlib==0.3.0->-r requirements_versions.txt (line 9))
Using cached filterpy-1.4.5.zip (177 kB)
Preparing metadata (setup.py): started
Preparing metadata (setup.py): finished with status ‘error’
stderr: error: subprocess-exited-with-error
× python setup.py egg_info did not run successfully.
│ exit code: 1
╰─> See above for output.
note: This error originates from a subprocess, and is likely not a problem with pip.
error: metadata-generation-failed
× Encountered error while generating package metadata.
╰─> See above for output.
note: This is an issue with the package mentioned above, not pip.
hint: See above for details.
i don’t see any error
Greetings. I have just used your notebook (Colab Pro/Forge) and I get the same error as described in the forum (Key backend). You wrote that this has been fixed, but I am still not getting a link resp. the installation ends with this error message. Is the problem perhaps on my side? Thank you.
I’m getting the same error. On Colab Pro/Forge as well. Is there a newer version of the notebook? Mine is 11/05/2024. Thanks!
Hello Andrew. Do you have a solution for this Forge Colab error code:
ValueError: Key backed: ‘module://matplotlib_inline.backed_inline’ is not a valid for backed
fixed
Hmm, unfortunately I still get the error.
It works again. Thank you.
Unfortunately I’ve been seeing the same error for the last 48ish hours. Is it possible there is an issue on my end? I have tried every workaround I can think of
ValueError: Key backend: ‘module://matplotlib_inline.backend_inline’ is not a valid value for backend
I never thought to create a new copy of the notebook, which just fixed the problem for me 😀
The best way to get the updated notebook is to follow the original url
Hi Andrew,
There are a bunch of functions that I’ve yet to fathom at the botttom of the Forge UI:
– Dynamic thresholding
– FreeU integrated
– SelfAttentionGuidance integrated
– PerturbedAttention Guidance integrated
– KohyaHR fix integrated
– LatentModifier integrated
– MultiDiffusion integrated
– StyleAlign integrated
– NeverOOM integrated
Can you say something about what these do?
Thanks
They are too much to cover in a comment. I may cover them in a course in the future.
I’m using an SDXL model and it works great for the first prompt I put in, and I can generate multiple images with that prompt, but if I change the prompt in any way I get this error. The only way I can fix it is by relaunching the whole thing.
error
Connection errored out.
error
Could not parse server response: SyntaxError: JSON.parse: unexpected character at line 2 column 1 of the JSON data
The server seemed to stop. You can rerun the notebook. Paying them would prevent random connections, if you are not using a paid colab plan.
I’m on a paid plan. I’ve isolated the issue as only occurring when I switch Loras.
1. Use Pony_Diffusion_XL_v6
2. Generating images with the first Lora works correctly (any Pony Lora works fine)
2a. (Optional) Remove the Lora and generate images without a Lora (works fine)
3. Try to generate an image using a different Lora (any Pony Lora)
4. The server stops, for some reason. The resources graph shows the RAM spikes to max usage.
Thank you for the help.
Did you use a high-RAM setting? SDXL needs high RAM to work consistently. You can only use high RAM with the Pro or Pro Plus plans.
Hi Andrew, please could you explain what secrets are and how to use them. I have Civitai and NGROK APIs and insert them manually each time as needed – the text implies that they can be saved for reuse somehow?
Thanks
btw in the notebook, I think point 4 under instructions should refer to Forge rather than A1111
Hi, see: https://stable-diffusion-art.com/forge-colab/#API_key_secrets
Thanks, I should have read your description more carefully. A useful timesaver
I have used Forge WebUI on Google Colab for a few weeks without a problem (and love it!) but I received the below error message today when trying, any idea why that is?
RuntimeError: Your device does not support the current version of Torch/CUDA! Consider download another version:
https://github.com/lllyasviel/stable-diffusion-webui-forge/releases/tag/latest
It is working correctly on my side. Are you using the T4 runtime?
Yes, using a colab pro account. Maybe I have used up the compute units for this month, could that be why?
Check the top right corner to see if you are using a T4 instance when running.
how to run localhost it doesn’t work for me?
Use the gradio.live link, not localhost.
i know but i need a local server to use it in silly tavern
You need a local tunnel. You can try the ngrok option.
my respects, it worked
im confused, what do i put for username and password? i dont pay for your monthly thing. is it only avail to ppl that pay for ur monthly thing?
The ones you set in the notebook. They are both “a” by default.
Hello Andrew. I am getting the following error:
[Errno 20] Not a directory: ‘/content//stable-diffusion-webui-forge’
/content
WEBUI ARGUMENTS: –gradio-img2img-tool color-sketch –enable-insecure-extension-access –gradio-queue –share –gradio-auth “a”: “a”
python3: can’t open file ‘/content//stable-diffusion-webui-forge/launch.py’: [Errno 20] Not a directory
I just confirmed it is working. You can try again.
anyone else’s controlnet not available as an on their UI?
Hey Andrew! When running your Forge notebook, it launches a completely separate version of Auto1111 (which is weird) that I have saved elsewhere on my good drive instead of Forge and I’m scratching my head as to why.. I’m SUPER confused and hoping you can help me out.
disregard this.. I deleted the A111 folder so there wouldn’t be anymore confusion (asking a new separate question below this one, though)
I don’t think it is possible… it runs the forge webui cloned in the temporary storage. Try again with the latest one (follow the original link)
Hello Andrew. I’m getting a python-multipart error with your colab notebook. Is there anything you can do?
The errors I see are from extensions and should not affect the functions. I will see what I can do with them.
Which extensions? I try ngrok URL and it doesn’t work. So the whole notebook is not usable 🙁
Can you post the error message? Its working on my end
It works again. For a while there was this python-multipart error and nothing worked anymore.
As for the extensions:
They are loaded to the virtual drive, but I want to include an extension that uses wildcards for prompts.
I tried to load the gdrive extension folder but somehow it failed.
Any suggestions on this?
And btw:
thx a lot for that notebook – it’s an epiphany! Spent the whole weekend to get it up and going.
The trick was to manually change the graphic card in Google Collab from T4 to L4, which is also possible in the pre-paid plan!
what’s the url of the extension you tried to install?
It’s the dynamic prompt extension:
https://github.com/adieyal/sd-dynamic-prompts
The default libraries are loaded to the virtual drive and work from there.
But my custom libraries need to be in the folder “wildcards” and atm the only way to make it work is to upload them to the temporary disk, which is quite time consuming.
As for extensions/loras beeing loaded through the script in general, it would be cool to have a switch between “Load to temporary virtual drive” and “Load to GDrive (this will take disk space of your GDrive)” and a checkbox to “Load existing extensions from GDrive”. Just an idea.
I updated the notebook to save extensions in google drive. Follow the link in quick start guide to access the new notebook.
Hi Andrew, thanks for sharing the notebook. As far as I can see it works. But I am running into an issue: From all my Loras and models I see only a selection: 5 Loras and 4 models. But is the problem here?
Do you mean you cannot see all the models in Google Drive? You can try pressing the refresh button. You need to stop and rerun the cell (but no need to restart the notebook) if you just uploaded the models to Google Drive.
Thx for sharing the notebook and for explaining everything.
Works great with the Flux versions loaded through colab.
But I ran into an issue with some custom model from Civitai.
Basically I should be able to solve it by adding the folder /models/text_encoder for those files:
clip_l.safetensors
t5xxl_fp8_e4m3fn.safetensors
t5xxl_fp16.safetensors
But the notebook doesn’t read or find that folder.
Any idea on how to solve this?
Found out that I could add it to the code.
Add this line for text_encoder
f'{models_gdrive_path}/text_encoder’: f'{forge_local_path}/models/text_encoder’,
}
I added this to the notebook.
Hey Andrew, love that you put this together! Question.. I already have all of my controlnet, checkpoint and lora models uploaded into my Google Drive. Google Drive takes such an incredible amount of time to upload anything, so can you please let me know how would I point go about pointing Forge to those folders instead of AI_PICS > models??
Moving the models to the AI_PICS/models folder in Google Drive should be quick.
If you cannot move the models, you can create symbolic links in Colab’s terminal. (This is a more technical solution. I unfortunately cannot provide the instructions)
The presets in Forge for the type of model – SD, XL, Forge – produce default image sizes that aren’t 1:1 nor 512 or 1024. Is the default optimal in terms of processing the image or should we revert to the standard ratios/sizes?
Also, using Flux for the first time or the preset defaults to Euler as the sampler rather than DPM++2M – is one better than the other?
The choice of sampler is not very important for flux. I leave it as euler for simplicity.
The optimal image size for the models are 512×512, or 1024×1024 because this is how they are trained. But the square aspect ratios are normally not what we want. The different aspect ratio is a compromise that it still works reasonably well.
Thanks, Andrew
Hello Andrew, maybe you can help me. I am using your Forge Colab Notebook with Colab Pro. If I want to use inpaint in Img2img and load a Lora into the prompts, nothing happens. The result changes only marginally and in no way corresponds to the Lora. What am I doing wrong or what am I overlooking?
Is your denoising strength too low? It may take a few rounds of inpainting.
You had to remove “Automatic” from the low bits setting and select “Lora”. Otherwise Loras are apparently not recognized.
When I run any Flux model, the notebook always automatically aborts the program without saving the image, I tested the notebook on SDXL model, it works fine, the issue only appears with Flux models generation.
0% 0/20 [00:00<?, ?it/s]
5% 1/20 [00:02<00:56, 2.96s/it]
10% 2/20 [00:07<01:07, 3.77s/it]
15% 3/20 [00:11<01:09, 4.07s/it]
20% 4/20 [00:16<01:07, 4.21s/it]
25% 5/20 [00:20<01:04, 4.31s/it]
30% 6/20 [00:25<01:01, 4.38s/it]
35% 7/20 [00:29<00:57, 4.43s/it]
40% 8/20 [00:34<00:53, 4.46s/it]
45% 9/20 [00:38<00:49, 4.50s/it]
50% 10/20 [00:43<00:45, 4.54s/it]
55% 11/20 [00:48<00:41, 4.57s/it]
60% 12/20 [00:52<00:36, 4.61s/it]
65% 13/20 [00:57<00:32, 4.64s/it]
70% 14/20 [01:02<00:28, 4.67s/it]
75% 15/20 [01:06<00:23, 4.70s/it]
80% 16/20 [01:11<00:18, 4.75s/it]
85% 17/20 [01:16<00:14, 4.77s/it]
90% 18/20 [01:21<00:09, 4.80s/it]
95% 19/20 [01:26<00:04, 4.80s/it]
100% 20/20 [01:31<00:00, 4.55s/it]
^C
I just tested the notebook and it is working correctly on Flux. Do you have a Google Colab+ subscription? Forge needs high ram to run.
My subscription has just expired, I think that might be the reason, thanks!
Hello Andrew,
Thank you very much for the guidance! I have one question though—I’m not entirely clear on how to add a GitHub extension like this one: https://github.com/Ethereum-John/sd-webui-forge-faceswaplab.
I appreciate your help!
Best regards,
You can add the extension’s URL to “Extensions_from_URL” before running the notebook.
I works without any error just now.