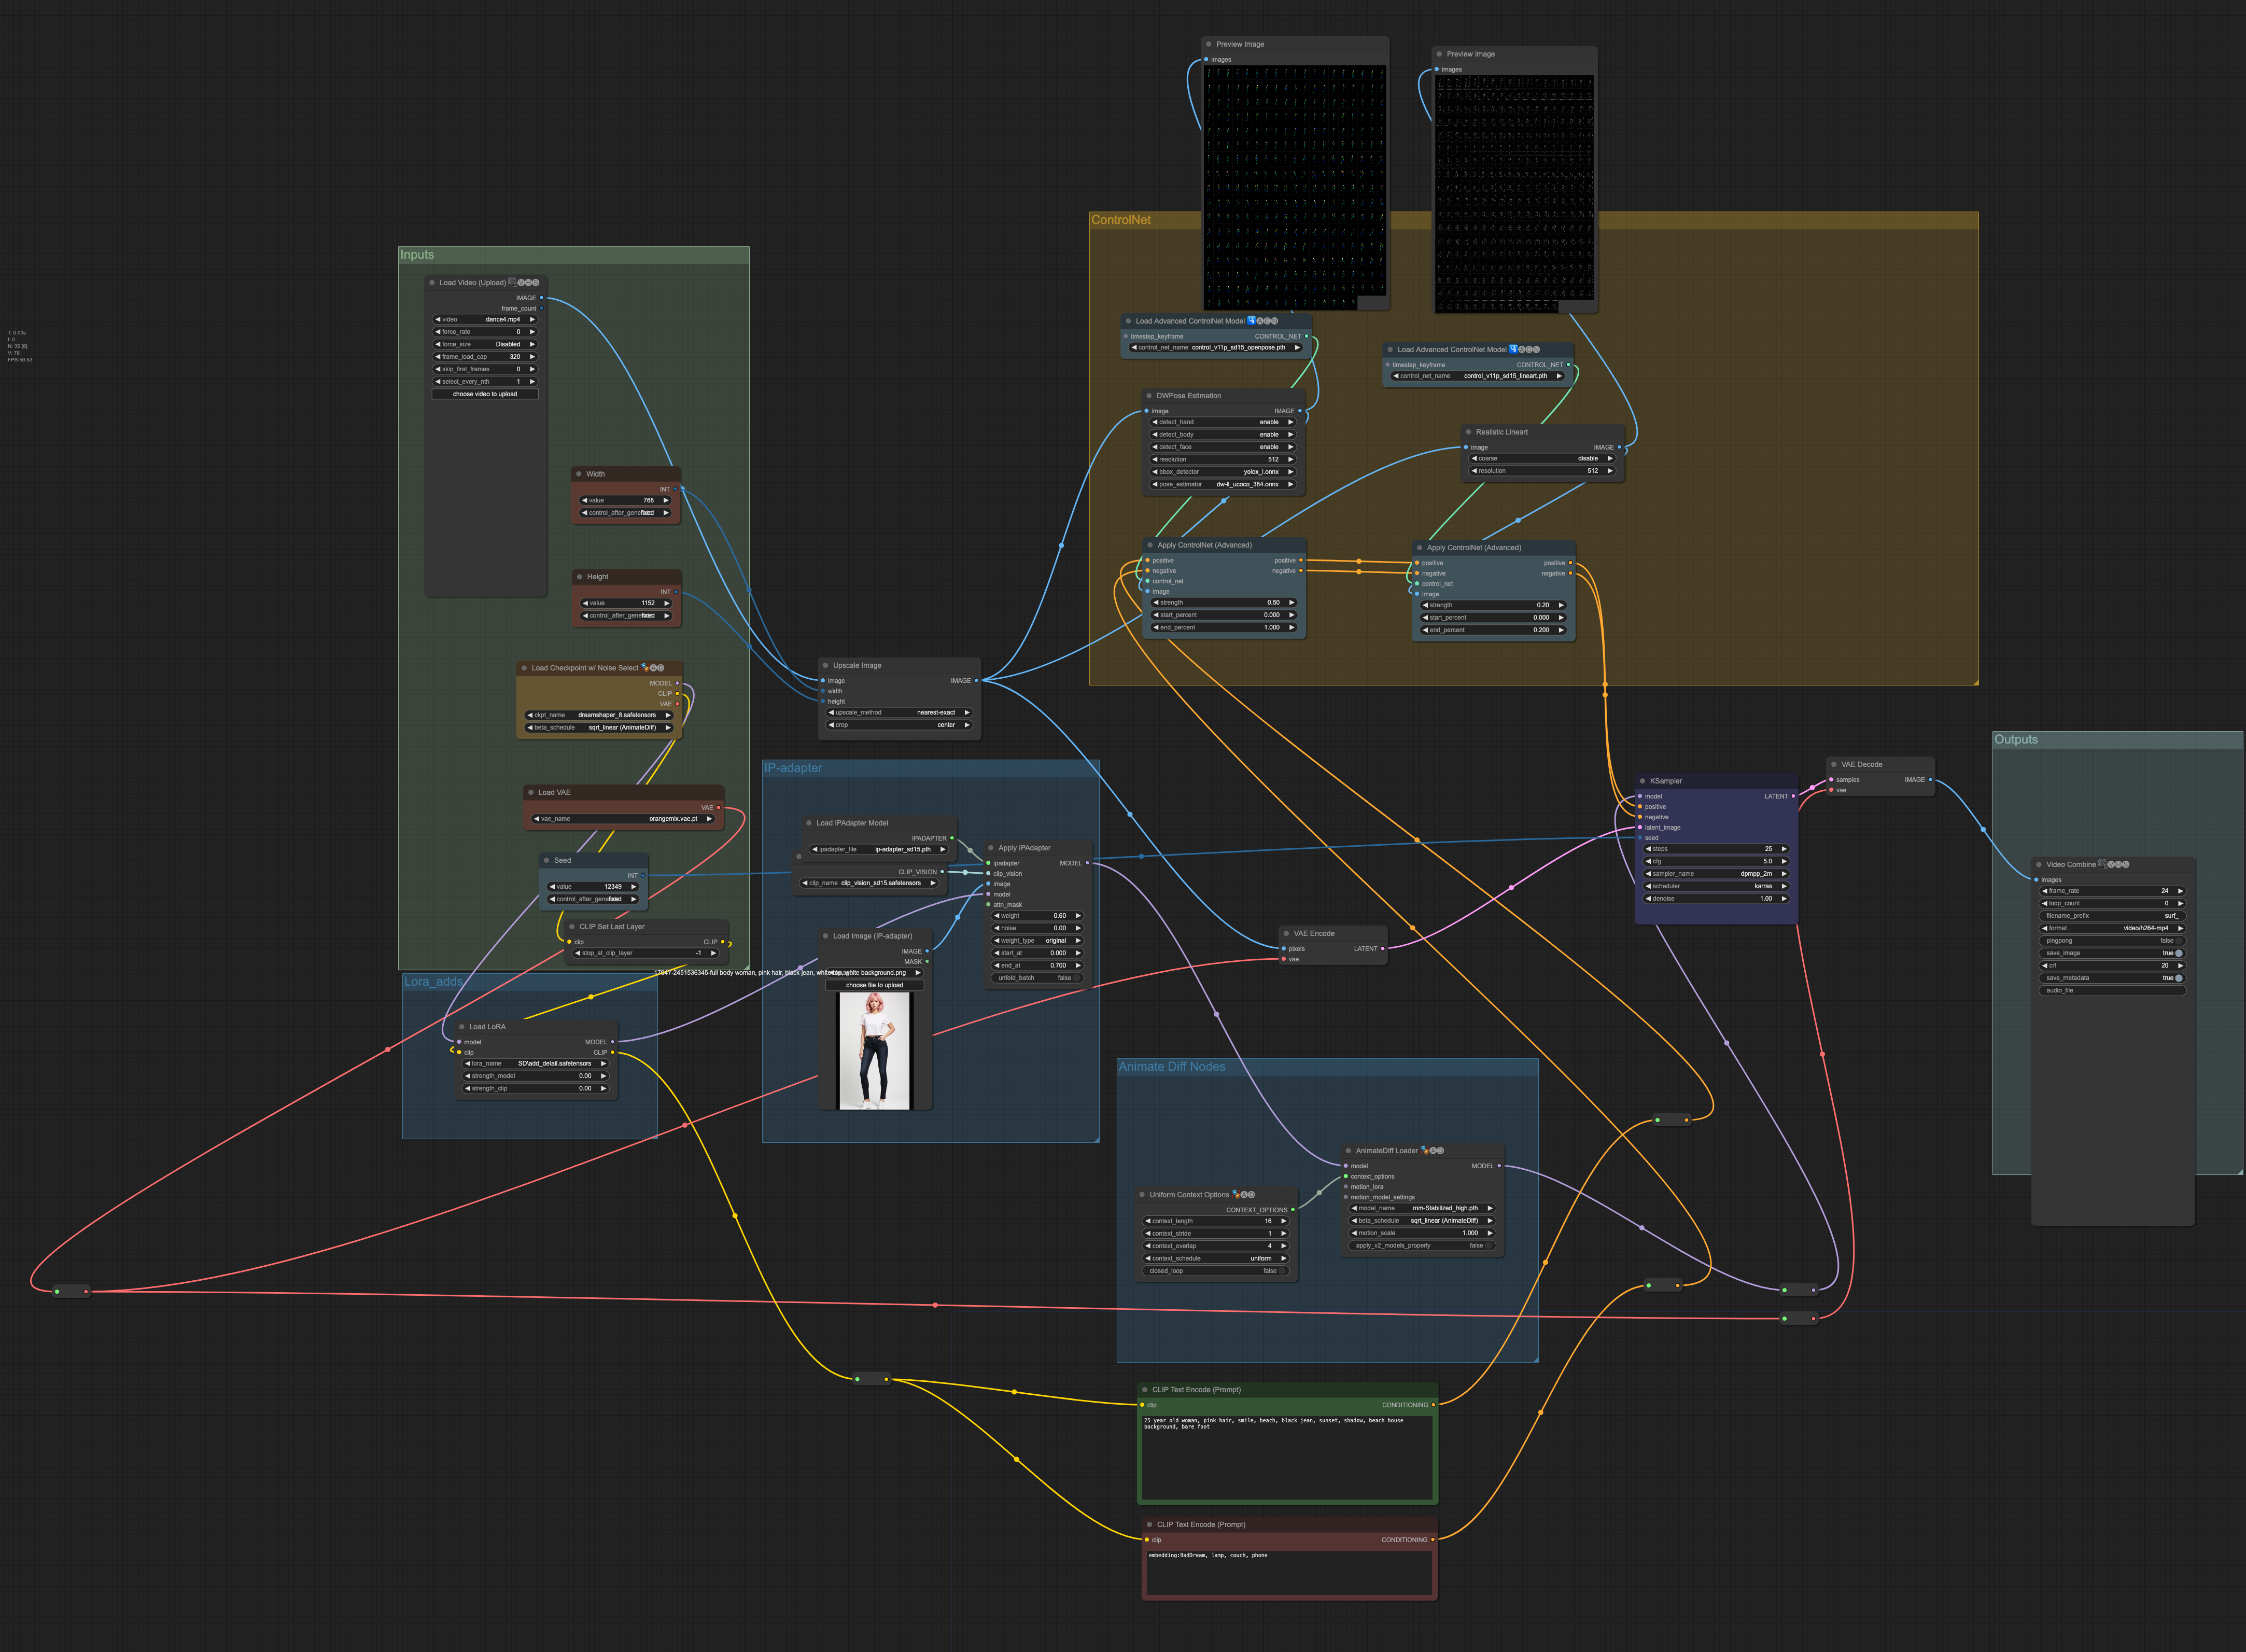
This workflow stylizes a dance video with a consistent character.
Output (left) and reference (right) video.
The following image is used for stylization.

You will learn/get:
- A downloadable ComfyUI workflow that generates this video.
- Customization options.
- Notes on building this workflow. What worked and what didn’t.
You must be a member of this site to download the JSON workflow.
Table of Contents
Software
Stable Diffusion GUI
We will use ComfyUI, a node-based Stable Diffusion GUI. You can use ComfyUI on Window/Mac or Google Colab.
Check out Think Diffusion for a fully managed ComfyUI/A1111/Forge online service. They offer 20% extra credits to our readers. (and a small commission to support this site if you sign up)
See the beginner’s guide for ComfyUI if you haven’t used it.
Step-by-step guide
Step 1: Load the ComfyUI workflow
Download the workflow JSON file below.

Drag and drop it to ComfyUI to load.
Step 2: Go through the drill…
Every time you try to run a new workflow, you may need to do some or all of the following steps.
- Install ComfyUI Manager
- Install missing nodes
- Update everything
Install ComfyUI Manager
Install ComfyUI manager if you haven’t done so already. It provides an easy way to update ComfyUI and install missing nodes.
To install this custom node, go to the custom nodes folder in the PowerShell (Windows) or Terminal (Mac) App:
cd ComfyUI/custom_nodesInstall ComfyUI by cloning the repository under the custom_nodes folder.
git clone https://github.com/ltdrdata/ComfyUI-ManagerRestart ComfyUI completely. You should see a new Manager button appearing on the menu.

If you don’t see the Manager button, check the terminal for error messages. One common issue is GIT not installed. Installing it and repeat the steps should resolve the issue.
Install missing custom nodes
To install the custom nodes that are used by the workflow but you don’t have:
- Click Manager in the Menu.
- Click Install Missing custom Nodes.
- Restart ComfyUI completely.
Update everything
You can use ComfyUI manager to update custom nodes and ComfyUI itself.
- Click Manager in the Menu.
- Click Updates All. It may take a while to be done.
- Restart the ComfyUI and refresh the ComfyUI page.
Step 3: Set input video
Upload an input video. You can find the video I used below.
Upload it in the Load Video (Upload) node.
The frame_load_cap sets the maximum number of frames to be used. Set it to 16 if you are testing settings.

The width and height setting needs to match the size of the video.

Step 4: Download models
Checkpoint model
Download the DreamShaper 8 model. Put it in ComfyUI > models > checkpoints.
Refresh and select the model in Load Checkpoint.

VAE
Download the orangemix VAE model. Put it in ComfyUI > models > vae.
Refresh and select the model in Load VAE.

IP adapter
Download the IP adapter model. Put it in ComfyUI > models > ipadapter.
Refresh and select the model in Load IPAdapter Model.

Download the SD 1.5 CLIP vision model. Put it in ComfyUI > models > clip_vision. Rename it to CLIP-ViT-H-14-laion2B-s32B-b79K.safetensors.
Refresh and select the model in Load CLIP Vision Model.

Upload the reference image for the character in the Load Image (IP-adapter) node. You can download the image below.

LoRA
The LoRA is unused in this workflow (weight is set to 0). You can load any LoRA to bypass it.
ControlNet
Download the OpenPose ControlNet model. Put it in ComfyUI > models > controlnet.
Download the Line art ControlNet model. Put it in ComfyUI > models > controlnet.
Refresh and select the models in the Load Advanced ControlNet Model nodes.


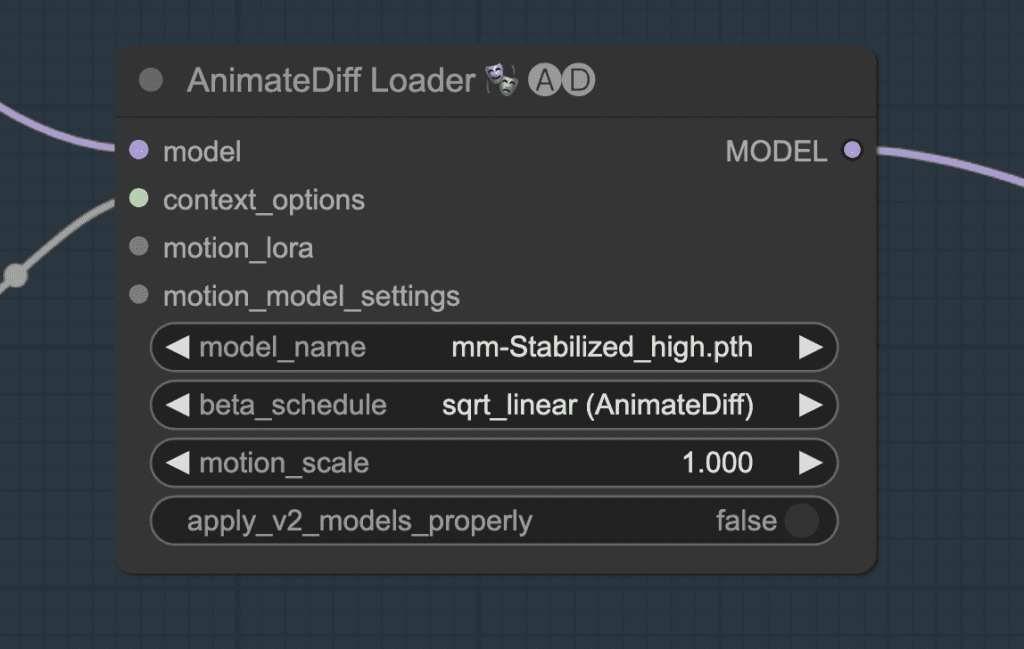
AnimateDiff
Download the AnimateDiff Stabilized high motion module. Put it in custom_nodes > ComfyUI-AnimateDiff-Evolved > models.
Refresh and select the model.

Step 5: Generate video
The DWPose preprocessor is default to use CPU. It could be slow. If you use Nvidia GPU card, you can go to ComfyUI_windows_portable > python_embeded and run the following command to speed up the generation.
./python -m pip install onnxruntime-gpuPress Queue Prompt. To start generating the video. It will take a good while since it uses AnimateDiff, IP-adapter, and two ControlNets.
Customization
Seed
Changing the seed can sometimes fix an inconsistency.
Prompt
Change the prompt and the IP-adapter image to customize the look of the character. The best is to have them match each other.
The prompt also controls the background.
ControlNet
The line art ControlNet is set very weak. Increase the weight to fix the scene like in the video.
Notes
Consistent character
This workflow uses three components to generate a consistent character:
- ControlNet Openpose
- ControlNet line art realistic
- IP-adapter
OpenPose alone cannot generate consistent human pose movement. Line art is critical in fixing the shape of the body.
IP-adapter is for fixing the style of the clothing and face. The character is changing too much without it.
Checkpoint model
The checkpoint model has a big impact on the quality of the animation. Some models, especially the anime ones, do not generate clear images.
LoRA model
Likewise, the LoRA model can make the video blurry. Test turning it on and off alone to make sure it works on your video.
IP-adapter
The IP-adapter is critical in producing a consistent character. But the weight cannot be set to high. Otherwise, the video will be blurry.
Remove the background of the control image to avoid getting the background to the video,
ControlNet
The line art realistic preprocessor works better than line art and line art anime for this video. The outline produced is clearer.
The weight and end percent are set to very low to avoid fixing the background too much.
Prompt
Use the prompt to fix the character further. E.g. Hair color, clothing, footwear.
Put any objects you don’t want to video to show in the negative prompt.

Hi Andrew, I’ve not been able to load one of the custom nodes: IPAdapterApply. I think it should be in the ComfyUI-IPAdapter_plus group which is installed but I keep getting an error: missing node types IPAdapterApply.
Hi, fixed.
Thanks
Hi where can I get the completed video?
It is saved in the output directory of comfy
Hello Andrew, I was trying this, however unable to make it work, it says pytorch memory error, I have 8GB VRAM, Nvidia 2080Super, Not sure if it is sufficient enough, but I was able to generate photos and some animations earlier. Do you think, for this specific case, probably my setup is weak and can’t process this. Or am I doing some mistake, which I need to think about. Thanks again !!!
Yes 8gb is a bit too low. You can consider an online service.
What is ideal VRAM for such things, also I want to understand these steps, like how to know which node to be used where, I have sometimes an intuition but it is good if there is a process flow somewhere, is there any a generic process flow somewhere that you came across, or you have written, if yes, please direct it if its possible.
I use a GPU card with 24GB VRAM.
This is the article I have written about comfyui. I also plan to write a beginner’s course.
https://stable-diffusion-art.com/comfyui/
Thank you for reply. It was a good read about comfyui, not sure how I missed it. Most of the work you presented can be done on 8GB in comfyui. AUTOMATIC1111 seems to have some memory issues, however , I realised that comfyui is more efficient . Now my question to you is this, is 16GB VRAM is sufficient enough, because 24GB is definitely is budget constraint. As per online services, I really think those are not very cheap either. Please let me know. Thanks again !!!
16GB is a decent amount of VRAM. It should work for almost all workflows.
Good day Andrew,
I tried following your guide and encountered this error below, coming from the animatediff loader node –
Error occurred when executing ADE_AnimateDiffLoaderWithContext:
module ‘comfy.ops’ has no attribute ‘Linear’
I can reproduce the error. Comfyui manager does not update animatediff evolve correctly. updating it manually resolves the issue.
Run the following in command prompt:
cd ComfyUI_windows_portable\ComfyUI\custom_nodes\ComfyUI-AnimateDiff-Evolved

git pull
Hi Andrew, problem solve!
That certainly a big help, Thank you very much!
I just installed ComfyUI and I’m trying to reproduce your results w/the video. I don’t see a ‘Load Video (Upload) node’. Must I do something extra to get one?
Did you load the JSON and install all the missing nodes? restart comfyui after that
I just attempted to install any missing nodes. The manager to do this itself is missing. Looks like the install failed to include it. I’ve installed it twice now, same results. What should I do?
Hi, you will need to install it: https://stable-diffusion-art.com/comfyui/#Installing_ComfyUI_Manager
Okay, I got everything running from looking at the log files. However, queue size says ‘0’. Shouldn’t it say ‘1’? Also, where can I get the completed video?
The workflow should take some time to run so you shouldn’t miss the “1” in the queue size. Check the terminal for errors.