Local AI video has gone a long way since the release of the first local video model. The quality is much higher, and you can now control the video generation with both an image and a prompt.
In this tutorial, I will show you how to set up and run the state-of-the-art video model CogVideoX 5B. You can control the video by specifying an image and a prompt.
Table of Contents
Software
We will use ComfyUI, an alternative to AUTOMATIC1111.
Read the ComfyUI installation guide and ComfyUI beginner’s guide if you are new to ComfyUI.
Take the ComfyUI course to learn ComfyUI step-by-step.
CogVideoX Image-to-video workflow
Step 0: Update ComfyUI
Before loading the workflow, make sure your ComfyUI is up-to-date. The easiest way to do this is to use ComfyUI Manager.
Click the Manager button on the top toolbar.

Select Update ComfyUI.
Restart ComfyUI.
Step 1: Load the workflow
Download the CogVideoX 5B Image-to-video workflow below.
Drag and drop the JSON file to ComfyUI.
Step 2: Install missing nodes
Click Manager > Install Missing Custom Nodes.
Install the nodes that are missing.
Restart ComfyUI.
Step 3: Install the text encoder model
Download the t5xxl_fp8_e4m3fn text encoder model.
Put the model file in the folder ComfyUI > models > clip.
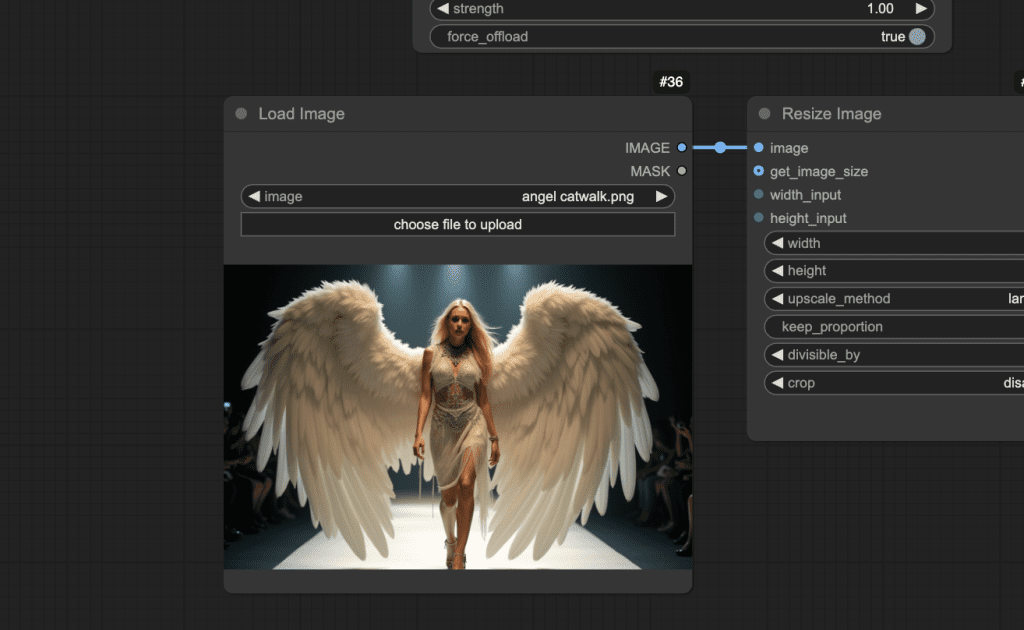
Step 4: Upload the first frame’s image
Download the image below.

Upload it to the Load Image node.

Step 5: Run the workflow
Press Queue Prompt to generate a video.
Running the workflow for the first time takes a while because it needs to download the CogVideo Image-to-Video model.
Note
You will need to change the prompt to match your uploaded image.
Have fun making local AI videos.

[ComfyUI-Manager] broken item:{‘author’: ‘fr0nky0ng’, ‘title’: ‘ComfyUI-Face-Comparator’…
Where is this set and how to fix? Its not in the workflow json?
I don’t think this error is from my workflow. It doesn’t use this node.
Works great, thx. Really fantastic results so far. But i encountered some problems. I tried to anime a picture of a fictional Universe. Only portait and want to let her smile in a shy way. The result is aways neary a freezine image (she dont move, maybe blink one time.). Some clues?
But overall, great model 🙂
It may do that sometimes. Change the seed and use a longer prompt.
Nice model, Andrew. It generates the video in about 5 minutes on a L4 Colab GPU
A limitation seems to be that it will only work on landscape format images resized to 720×480 but that’s not a big issue.
The video is in slow motion – I tried to speed it up and also to extend its length but got rubbish garbled output. Could you explain the key parameters of the sampler and combine nodes?
Thanks
great tutorial. I have everything setup but still ironing out some bugs. I cut the number of frames down just to make things simpler but the video i got looks nothing like what is above. It looks like im viewing the original image moving behind a bunch of blue and red tiles.
Also, are there some specific settings in the nodes that you used for this demo?
it process 30% and doing since long time more than 30mins Cogvideo Image Encoder node and in the prompt this is what i can see
To see the GUI go to: http://127.0.0.1:8188
FETCH DATA from: C:\Users\User\ComfyUI\ComfyUI_windows_portable\ComfyUI\custom_nodes\comfyui-manager\extension-node-map.json [DONE]
Cannot connect to comfyregistry.
nightly_channel: https://raw.githubusercontent.com/ltdrdata/ComfyUI-Manager/main/remote
FETCH DATA from: https://raw.githubusercontent.com/ltdrdata/ComfyUI-Manager/main/custom-node-list.json [DONE]
got prompt
C:\Users\User\ComfyUI\ComfyUI_windows_portable\python_embeded\Lib\site-packages\diffusers\models\embeddings.py:186: FutureWarning: `get_3d_sincos_pos_embed` uses `torch` and supports `device`. `from_numpy` is no longer required. Pass `output_type=’pt’ to use the new version now.
deprecate(“output_type==’np'”, “0.33.0”, deprecation_message, standard_warn=False)
C:\Users\User\ComfyUI\ComfyUI_windows_portable\python_embeded\Lib\site-packages\diffusers\models\embeddings.py:304: FutureWarning: `get_2d_sincos_pos_embed_from_grid` uses `torch` and supports `device`. `from_numpy` is no longer required. Pass `output_type=’pt’ to use the new version now.
deprecate(“output_type==’np'”, “0.33.0”, deprecation_message, standard_warn=False)
C:\Users\User\ComfyUI\ComfyUI_windows_portable\python_embeded\Lib\site-packages\diffusers\models\embeddings.py:337: FutureWarning: `get_1d_sincos_pos_embed_from_grid` uses `torch` and supports `device`. `from_numpy` is no longer required. Pass `output_type=’pt’ to use the new version now.
deprecate(“output_type==’np'”, “0.33.0”, deprecation_message, standard_warn=False)
do it work without dedicated graphic card and with Intel i7 8th Gen CPU with 16GB RAM specification?
You should only run locally if you have a gpu card, unless you are very very patient…
so that mean it will support to my laptop specification but need to be patient, any idea how long it may take approximate as I want to test it?
no idea man. I wouldn’t use a laptop without a gpu card. You can try my google colab notebook instead.
I want to try with google colab notebook, please send me the guide.
https://stable-diffusion-art.com/comfyui-colab/
I am getting this error, please help
DownloadAndLoadCogVideoModel
Error no file named diffusion_pytorch_model.bin found in directory C:\Users\User\ComfyUI\ComfyUI_windows_portable\ComfyUI\models\CogVideo\CogVideoX-5b-I2V.
Delete the CogVideoX-5b-I2V folder and let it redownload.
can you please share me the link to download and where to put it exactly?
You only need to delete the folder. The download is automatic.
I was able to set all up like descripted on this tutorial. So thanks a lot.
But have i done something wrong?
The console says that it will take 12+ Hours on my setup? Is it a realistic value?
Sampling 49 frames in 13 latent frames at 720×480 with 25 inference steps
8%|██████ | 2/25 [1:02:11<11:50:17, 1852.93s/it]
AMD Ryzon 7 5700 3400gHZ
32 GB RAM (3000mHZ)
GeForce RTX 3060 (12GB)
It took 3 mins on RTX4090 with 24GB VRAM. The VRAM usage went to up 16GB, so this could be a VRAM issue.
Sometimes restarting the PC helps.
Argh, I get a torch error (out of memory). – i need to investigate / tweak
Thank you so much Andrew! Everything works, very cool!!!