
This workflow generates a morphing video across 4 images, like the one below, from text prompts. You can fine-tune each image by changing its prompt, and the transition pattern can be adjusted.
You will need to be a member of this site to download the ComfyUI workflow.
Table of Contents
Software
Stable Diffusion GUI
We will use ComfyUI, a node-based Stable Diffusion GUI. You can use ComfyUI on Window/Mac or Google Colab.
Check out Think Diffusion for a fully managed ComfyUI/A1111/Forge online service. They offer 20% extra credits to our readers. (and a small commission to support this site if you sign up)
See the beginner’s guide for ComfyUI if you haven’t used it.
Use the L4 runtime type to speed up the generation if you use my Google Colab notebook.
How this workflow works
Overview
The morphing video is created using AnimateDiff for frame-to-frame consistency. This workflow uses four reference images, each injected into a quarter of the video. Each of them is independently generated by an SDXL model. You can change the prompts to change the images.
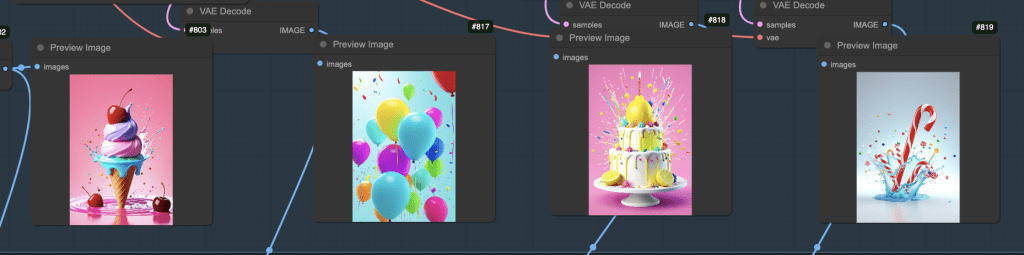
Image injection
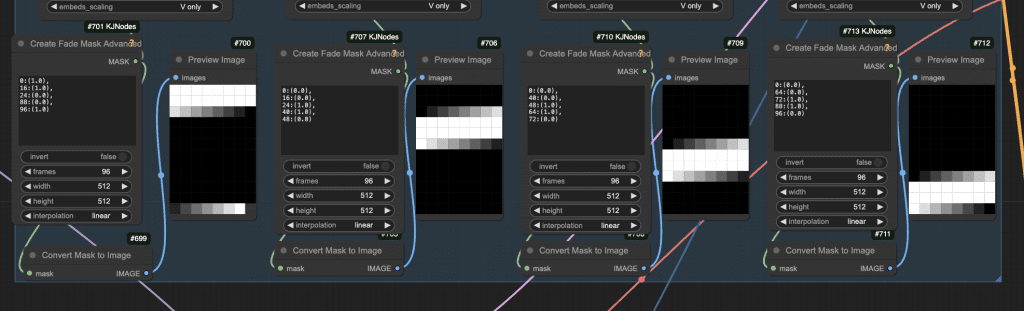
IP adapter is used to inject these images into the video generation process. Each image is injected with a mask over frames so that it only affects part of the video.
Dynamic pattern
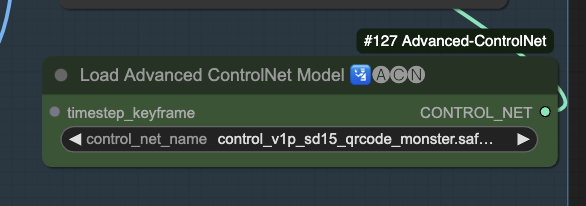
If you watch the video carefully, you will see an outward motion originating at the center of the video. This is done by injecting a QR ControlNet into the video frames.
Post-processing options
After generating the video with Stable Diffusion, you can optionally (All nodes are in the workflow)
- Upscale the video to a higher resolution.
- Make the video smoother by interpolating the frames.
- Add audio to the video.
- Correct color balance.
Step-by-step guide
Step 1: Load the ComfyUI workflow
Download the workflow JSON file below. You will need to be a member and log in to download the workflow.
Drag and drop it to ComfyUI to load.

Step 2: Install Missing nodes
You may see a few red nodes in the workflow. That means you are missing some custom nodes needed for this workflow.
First, install ComfyUI manager if you haven’t already.
Click the Manager button on the top bar.

In the popup menu, click Install Missing Custom Nodes. Install the missing custom nodes on the list.
Restart ComfyUI. Refresh the ComfyUI page.
If you still see red nodes, try Update All in the ComfyUI manager’s menu.
Step 3: Download models
The following models are needed for this workflow.
Checkpoint model
Download the Juggernaut Reborn (SD 1.5) model. Put it in ComfyUI > models > checkpoints.
Refresh and select the model in the Load Checkpoint node in the Settings group.
(If you use my Colab notebook: AI_PICS > models > Stable-Diffusion )
Download the Juggernaut XL Jugg XI model. Put it in ComfyUI > models > checkpoints.
Refresh and select the model in the Load Checkpoint node in the Images group.
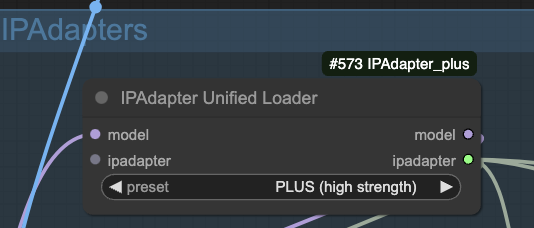
IP adapter
This workflow uses the IP-adapter to achieve a consistent face and clothing.
Download the SD 1.5 IP adapter Plus model. Put it in ComfyUI > models > ipadapter.
(If you use my Colab notebook: AI_PICS > models > ipadapter)
Download the SD 1.5 CLIP vision model. Put it in ComfyUI > models > clip_vision. Rename it to CLIP-ViT-H-14-laion2B-s32B-b79K.safetensors to conform to the custom node’s naming convention.
(If you use my Colab notebook: AI_PICS > models > clip_vision)
These two models are needed for the IPAdapter Unified Loader node.
ControlNet
Download the QR Code Monster ControlNet model. Put it in ComfyUI > models > controlnet.
(If you use my Colab notebook: AI_PICS > models > ControlNet)
Refresh and select the models in the Load Advanced ControlNet Model node in the QRCode ControlNet group.
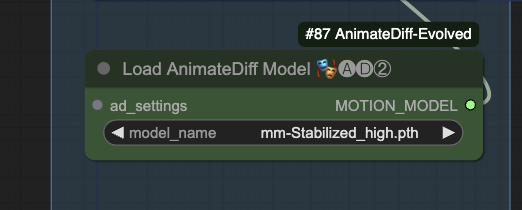
AnimateDiff
Download the AnimateDiff MM-Stabilized High model. Put it in ComfyUI > models > animatediff_models.
(If you use my Colab notebook: AI_PICS > models > animatediff)
Refresh and select the model.
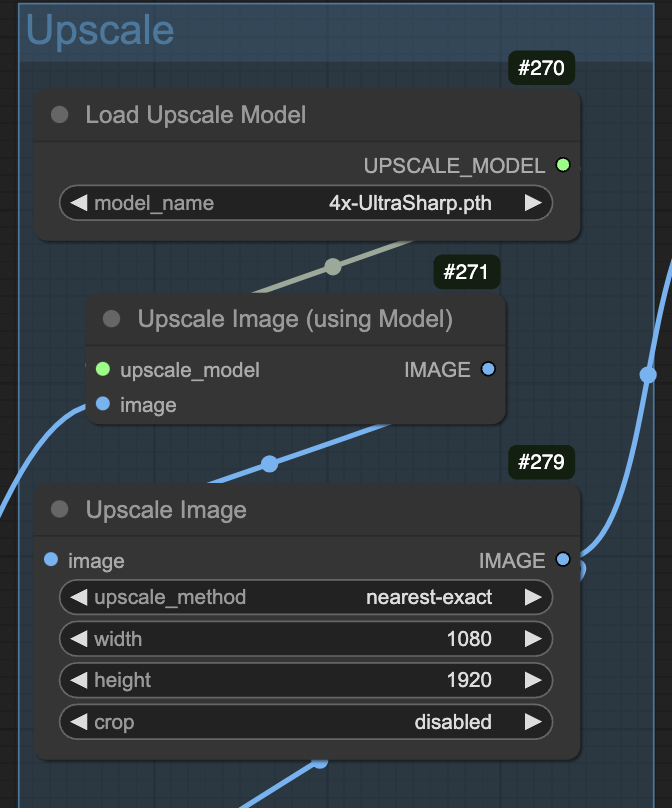
Upscaler
Download the 4x-Ultrasharp upscaler model. Put it in ComfyUI > models > upscale_models.
(If you use my Colab notebook: AI_PICS > models > ESRGAN )
Step 4: Generate video
Press Queue Prompt to start generating the video.
If you see an out-of-memory error, you can add the extra argument --disable-smart-memory to run_nvidia_gpu.bat.
.python_embededpython.exe -s ComfyUImain.py --windows-standalone-build --disable-smart-memoryCustomization
Balancing static images and transition
The video is in a dedicated balance between the IP-Adapter and the QR Code ControlNet. The IP-adapter wants to show a static image. The QR code ControlNet wants the video to follow the pattern video.
When you change the prompts, you may need to adjust the effect of the QR Code ControlNet by:
- Increase the strength.
- Increase the end_precent.
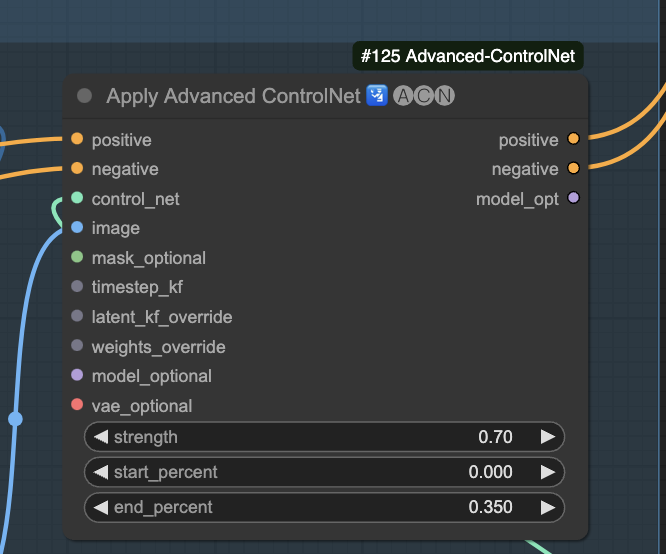
You likely don’t need to touch the IP-adapter values. But you can adjust their effect similar to the QR ControlNet.
Seed
Changing the seed in the Sampler node to generate a different morphing.
Prompts
Change the prompts to customize each image.
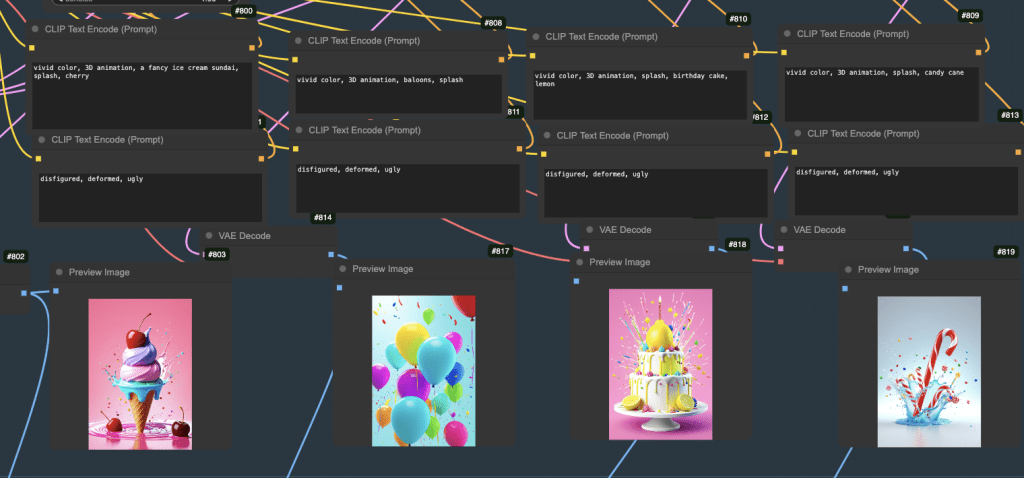
Styles
You can change style by changing the prompt and/or the checkpoint models. I used the Juggernaut models to generate both images and videos with AnimateDiff. They are general-purpose models. You should be able to change the style by adjusting the prompt.
For example, I used the following keywords for style.
vivid color, 3D animation
Dynamic pattern
You can change the dynamic pattern by changing the link in the Load Video (Path) node.
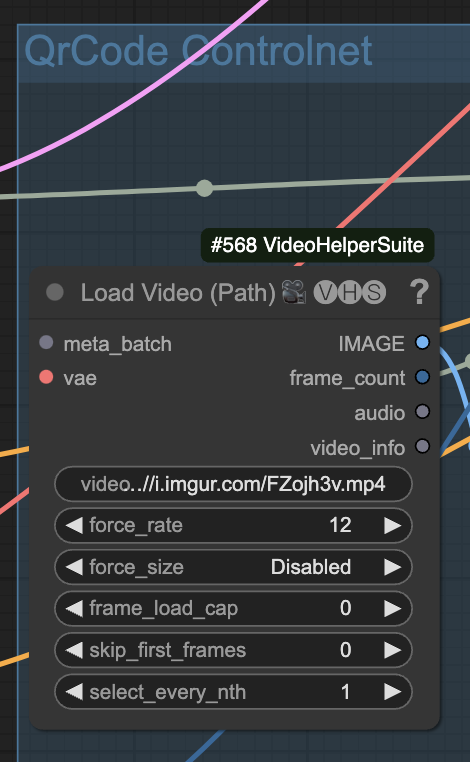
Here are a few options.
Video size
The video size is set to 432×768 for the native generation.
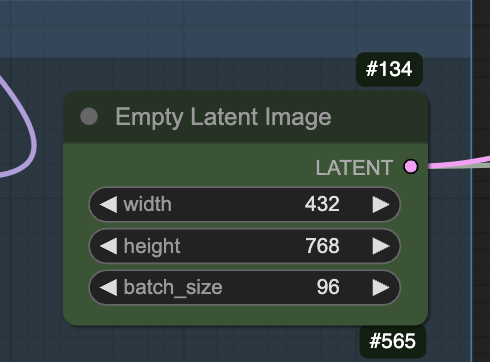
Change the aspect ratio to match what you want.
You can also reduce the width to as low as 256 px to speed up the generation. However, you will get fewer details.
Video length
The video is set to 96 frames in the following node.
To adjust the video length, you can change the number of frames. Then, you will need to adjust the Create Fade Mask Advanced node accordingly.

Upscaling
The size and models for upscaling are controlled by the following nodes. The upscale model has some effect on the style. You can pick one that works best for your artwork. See the upscaler tutorial for details.
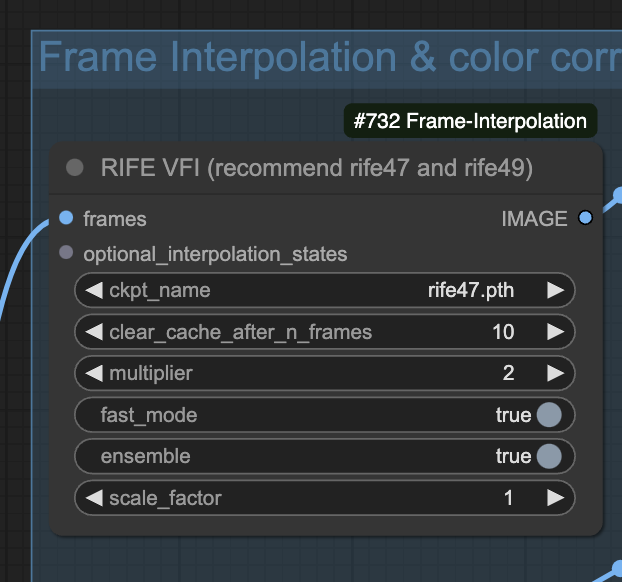
Frame interpolation
You can adjust the frame interpolation settings in the RIFE VFI node. It is set to doubling the frame rate (2) in this workflow.
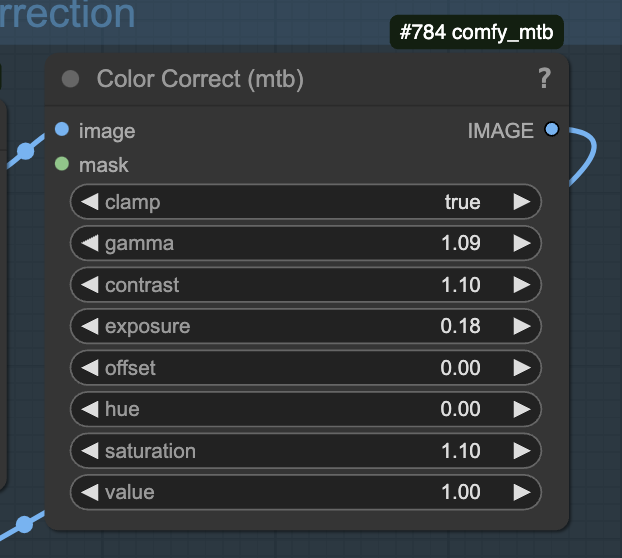
Color correction
You can use the Color Correct node to correct any color artifacts in the video.
Hi
I am using Colab and facing issues installing IP adapter, ControlNet, and AnimateDiff. I cannot find a folder to upload these models to. Or I can skip these as thee are already incorporated into notebook?
Hi, I have added instruction for colab in the post. Let me know how it goes.
Thanx. I put the files in the folders. However, there’s still issues. When restarting UI after missing nodes installation, the notebook doesnt give the new url to the UI. It gives only local one (i.e. http://127.0.0.1:8188), which doesnt work. The one with tunnel password never appears after restarting the UI. If I reboot the notebook completely, it launches the UI without manager, so after the second run I cannot even install missing nodes
You can simply refresh the original comfyui page after installing the missing nodes. No need to enter a new url.
I’m probably missing something but I don’t see where the frames are to make this video longer… do I adjust all four under KJNodes (701,710, 707,713)?
I’m getting some really cool results – definitely worth it to join 🙂
I am glad that you get some great results!
You can follow the instruction here: https://stable-diffusion-art.com/animatediff-morphing-transition-video-comfyui/#Video_length
It progressed much further but now I get this:
# ComfyUI Error Report
## Error Details
– **Node Type:** ControlNetLoaderAdvanced
– **Exception Type:** TypeError
– **Exception Message:** ControlNet.__init__() got an unexpected keyword argument ‘device’
## Stack Trace
“`
File “D:\pinokio\api\comfy.git\app\execution.py”, line 323, in execute
output_data, output_ui, has_subgraph = get_output_data(obj, input_data_all, execution_block_cb=execution_block_cb, pre_execute_cb=pre_execute_cb)
Seems to have incompatibility between nodes. Try using comfyui manager > update all
Received the following error: Note I have attempted to install the correct IPAdapter model many times, where should I get it?
# ComfyUI Error Report
## Error Details
– **Node Type:** IPAdapterUnifiedLoader
– **Exception Type:** Exception
– **Exception Message:** IPAdapter model not found.
## Stack Trace
“`
File “D:\pinokio\api\comfy.git\app\execution.py”, line 323, in execute
output_data, output_ui, has_subgraph = get_output_data(obj, input_data_all, execution_block_cb=execution_block_cb, pre_execute_cb=pre_execute_cb)
File “D:\pinokio\api\comfy.git\app\execution.py”, line 198, in get_output_data
return_values = _map_node_over_list(obj, input_data_all, obj.FUNCTION, allow_interrupt=True, execution_block_cb=execution_block_cb, pre_execute_cb=pre_execute_cb)
File “D:\pinokio\api\comfy.git\app\execution.py”, line 169, in _map_node_over_list
process_inputs(input_dict, i)
File “D:\pinokio\api\comfy.git\app\execution.py”, line 158, in process_inputs
results.append(getattr(obj, func)(**inputs))
File “D:\pinokio\api\comfy.git\app\custom_nodes\ComfyUI_IPAdapter_plus\IPAdapterPlus.py”, line 573, in load_models
raise Exception(“IPAdapter model not found.”)
“`
## System Information
– **ComfyUI Version:** v0.2.3-13-g7390ff3
– **Arguments:** main.py
– **OS:** nt
– **Python Version:** 3.10.15 | packaged by conda-forge | (main, Oct 16 2024, 01:15:49) [MSC v.1941 64 bit (AMD64)]
– **Embedded Python:** false
– **PyTorch Version:** 2.5.0+cu121
## Devices
– **Name:** cuda:0 NVIDIA GeForce RTX 3080 : cudaMallocAsync
– **Type:** cuda
– **VRAM Total:** 10736893952
– **VRAM Free:** 7291860322
– **Torch VRAM Total:** 2147483648
– **Torch VRAM Free:** 5305698
## Logs
“`
2024-10-27 11:41:05,980 – root – INFO – Total VRAM 10240 MB, total RAM 16197 MB
2024-10-27 11:41:05,980 – root – INFO – pytorch version: 2.5.0+cu121
2024-10-27 11:41:05,981 – root – INFO – Set vram state to: NORMAL_VRAM
2024-10-27 11:41:05,981 – root – INFO – Device: cuda:0 NVIDIA GeForce RTX 3080 : cudaMallocAsync
2024-10-27 11:41:18,695 – root – INFO – Using pytorch cross attention
2024-10-27 11:41:35,230 – root – INFO – [Prompt Server] web root: D:\pinokio\api\comfy.git\app\web
2024-10-27 11:41:50,769 – root – INFO – Total VRAM 10240 MB, total RAM 16197 MB
2024-10-27 11:41:50,769 – root – INFO – pytorch version: 2.5.0+cu121
2024-10-27 11:41:50,770 – root – INFO – Set vram state to: NORMAL_VRAM
2024-10-27 11:41:50,770 – root – INFO – Device: cuda:0 NVIDIA GeForce RTX 3080 : cudaMallocAsync
2024-10-27 11:42:02,256 – root – INFO – ————–
2024-10-27 11:42:02,256 – root – INFO – [91m ### Mixlab Nodes: [93mLoaded
2024-10-27 11:42:02,334 – root – INFO – ChatGPT.available True
2024-10-27 11:42:02,348 – root – INFO – edit_mask.available True
2024-10-27 11:42:04,629 – root – INFO – ClipInterrogator.available True
2024-10-27 11:42:06,648 – numexpr.utils – INFO – Note: NumExpr detected 20 cores but “NUMEXPR_MAX_THREADS” not set, so enforcing safe limit of 16.
2024-10-27 11:42:06,648 – numexpr.utils – INFO – NumExpr defaulting to 16 threads.
2024-10-27 11:42:09,174 – root – INFO – PromptGenerate.available True
2024-10-27 11:42:09,174 – root – INFO – ChinesePrompt.available True
2024-10-27 11:42:09,174 – root – INFO – RembgNode_.available True
2024-10-27 11:42:14,035 – root – INFO – TripoSR.available
2024-10-27 11:42:14,047 – root – INFO – MiniCPMNode.available
2024-10-27 11:42:16,709 – root – INFO – Scenedetect.available
2024-10-27 11:42:16,820 – root – INFO – FishSpeech.available False
2024-10-27 11:42:16,963 – root – INFO – SenseVoice.available
2024-10-27 11:42:18,189 – root – INFO – Whisper.available False
2024-10-27 11:42:18,288 – root – INFO – FalVideo.available
2024-10-27 11:42:18,288 – root – INFO – [93m ————– [0m
2024-10-27 11:42:18,455 – py.warnings – WARNING – D:\pinokio\api\comfy.git\app\custom_nodes\ComfyUI-segment-anything-2\sam2\modeling\sam\transformer.py:20: UserWarning: Flash Attention is disabled as it requires a GPU with Ampere (8.0) CUDA capability.
OLD_GPU, USE_FLASH_ATTN, MATH_KERNEL_ON = get_sdpa_settings()
2024-10-27 11:42:19,647 – py.warnings – WARNING – D:\pinokio\api\comfy.git\app\custom_nodes\ComfyUI-tbox\nodes\preprocessor\dwpose_node.py:28: UserWarning: DWPose: Onnxruntime not found or doesn’t come with acceleration providers, switch to OpenCV with CPU device. DWPose might run very slowly
warnings.warn(“DWPose: Onnxruntime not found or doesn’t come with acceleration providers, switch to OpenCV with CPU device. DWPose might run very slowly”)
2024-10-27 11:42:21,393 – OpenGL.acceleratesupport – INFO – No OpenGL_accelerate module loaded: No module named ‘OpenGL_accelerate’
2024-10-27 11:42:28,596 – py.warnings – WARNING – D:\pinokio\api\comfy.git\app\env\lib\site-packages\albumentations\__init__.py:13: UserWarning: A new version of Albumentations is available: 1.4.20 (you have 1.4.15). Upgrade using: pip install -U albumentations. To disable automatic update checks, set the environment variable NO_ALBUMENTATIONS_UPDATE to 1.
check_for_updates()
2024-10-27 11:42:32,737 – root – INFO –
Import times for custom nodes:
2024-10-27 11:42:32,738 – root – INFO – 0.0 seconds: D:\pinokio\api\comfy.git\app\custom_nodes\ComfyUI-WD14-Tagger
2024-10-27 11:42:32,738 – root – INFO – 0.0 seconds: D:\pinokio\api\comfy.git\app\custom_nodes\websocket_image_save.py
2024-10-27 11:42:32,738 – root – INFO – 0.0 seconds: D:\pinokio\api\comfy.git\app\custom_nodes\ComfyUI_essentials
2024-10-27 11:42:32,738 – root – INFO – 0.1 seconds: D:\pinokio\api\comfy.git\app\custom_nodes\cg-use-everywhere
2024-10-27 11:42:32,738 – root – INFO – 0.1 seconds: D:\pinokio\api\comfy.git\app\custom_nodes\ComfyUI_IPAdapter_plus
2024-10-27 11:42:32,738 – root – INFO – 0.1 seconds: D:\pinokio\api\comfy.git\app\custom_nodes\ComfyUI_FizzNodes
2024-10-27 11:42:32,738 – root – INFO – 0.1 seconds: D:\pinokio\api\comfy.git\app\custom_nodes\comfyui-inpaint-nodes
2024-10-27 11:42:32,738 – root – INFO – 0.1 seconds: D:\pinokio\api\comfy.git\app\custom_nodes\ComfyUI_tinyterraNodes
2024-10-27 11:42:32,739 – root – INFO – 0.1 seconds: D:\pinokio\api\comfy.git\app\custom_nodes\Derfuu_ComfyUI_ModdedNodes
2024-10-27 11:42:32,739 – root – INFO – 0.2 seconds: D:\pinokio\api\comfy.git\app\custom_nodes\ComfyUI-Frame-Interpolation
2024-10-27 11:42:32,739 – root – INFO – 0.2 seconds: D:\pinokio\api\comfy.git\app\custom_nodes\ComfyUI-VideoHelperSuite
2024-10-27 11:42:32,739 – root – INFO – 0.3 seconds: D:\pinokio\api\comfy.git\app\custom_nodes\ComfyUI-KJNodes
2024-10-27 11:42:32,739 – root – INFO – 0.3 seconds: D:\pinokio\api\comfy.git\app\custom_nodes\ComfyUI-Advanced-ControlNet
2024-10-27 11:42:32,739 – root – INFO – 0.3 seconds: D:\pinokio\api\comfy.git\app\custom_nodes\ComfyUI-Custom-Scripts
2024-10-27 11:42:32,739 – root – INFO – 0.4 seconds: D:\pinokio\api\comfy.git\app\custom_nodes\ComfyUI-Manager
2024-10-27 11:42:32,739 – root – INFO – 0.4 seconds: D:\pinokio\api\comfy.git\app\custom_nodes\efficiency-nodes-comfyui
2024-10-27 11:42:32,739 – root – INFO – 0.4 seconds: D:\pinokio\api\comfy.git\app\custom_nodes\comfyui-tensorops
2024-10-27 11:42:32,739 – root – INFO – 0.4 seconds: D:\pinokio\api\comfy.git\app\custom_nodes\ComfyUI_Comfyroll_CustomNodes
2024-10-27 11:42:32,740 – root – INFO – 0.4 seconds: D:\pinokio\api\comfy.git\app\custom_nodes\ComfyUI-tbox
2024-10-27 11:42:32,740 – root – INFO – 0.5 seconds: D:\pinokio\api\comfy.git\app\custom_nodes\comfyui_controlnet_aux
2024-10-27 11:42:32,740 – root – INFO – 0.5 seconds: D:\pinokio\api\comfy.git\app\custom_nodes\ComfyUI-AnimateDiff-Evolved
2024-10-27 11:42:32,740 – root – INFO – 0.9 seconds: D:\pinokio\api\comfy.git\app\custom_nodes\ComfyUI-segment-anything-2
2024-10-27 11:42:32,740 – root – INFO – 1.2 seconds: D:\pinokio\api\comfy.git\app\custom_nodes\was-node-suite-comfyui
2024-10-27 11:42:32,740 – root – INFO – 1.3 seconds: D:\pinokio\api\comfy.git\app\custom_nodes\rgthree-comfy
2024-10-27 11:42:32,740 – root – INFO – 1.5 seconds: D:\pinokio\api\comfy.git\app\custom_nodes\ComfyUI-Florence2
2024-10-27 11:42:32,740 – root – INFO – 3.4 seconds: D:\pinokio\api\comfy.git\app\custom_nodes\comfy_mtb
2024-10-27 11:42:32,740 – root – INFO – 4.8 seconds: D:\pinokio\api\comfy.git\app\custom_nodes\ComfyUI_Fill-Nodes
2024-10-27 11:42:32,740 – root – INFO – 5.0 seconds: D:\pinokio\api\comfy.git\app\custom_nodes\ComfyUI-Easy-Use
2024-10-27 11:42:32,740 – root – INFO – 27.0 seconds: D:\pinokio\api\comfy.git\app\custom_nodes\comfyui-mixlab-nodes
2024-10-27 11:42:32,741 – root – INFO –
2024-10-27 11:42:32,754 – root – INFO – Starting server
2024-10-27 11:42:32,755 – root – INFO – To see the GUI go to: http://127.0.0.1:8188
2024-10-27 11:42:38,929 – root – ERROR – [ERROR] An error occurred while retrieving information for the ‘Florence2ModelLoader’ node.
2024-10-27 11:42:38,957 – root – ERROR – Traceback (most recent call last):
File “D:\pinokio\api\comfy.git\app\server.py”, line 564, in get_object_info
out[x] = node_info(x)
File “D:\pinokio\api\comfy.git\app\server.py”, line 531, in node_info
info[‘input’] = obj_class.INPUT_TYPES()
File “D:\pinokio\api\comfy.git\app\custom_nodes\ComfyUI-Florence2\nodes.py”, line 148, in INPUT_TYPES
“model”: ([item.name for item in Path(folder_paths.models_dir, “LLM”).iterdir() if item.is_dir()], {“tooltip”: “models are expected to be in Comfyui/models/LLM folder”}),
File “D:\pinokio\api\comfy.git\app\custom_nodes\ComfyUI-Florence2\nodes.py”, line 148, in
“model”: ([item.name for item in Path(folder_paths.models_dir, “LLM”).iterdir() if item.is_dir()], {“tooltip”: “models are expected to be in Comfyui/models/LLM folder”}),
File “D:\pinokio\bin\miniconda\lib\pathlib.py”, line 1017, in iterdir
for name in self._accessor.listdir(self):
FileNotFoundError: [WinError 3] The system cannot find the path specified: ‘D:\\pinokio\\api\\comfy.git\\app\\models\\LLM’
2024-10-27 11:42:39,251 – root – ERROR – [ERROR] An error occurred while retrieving information for the ‘Florence2ModelLoader’ node.
2024-10-27 11:42:39,252 – root – ERROR – Traceback (most recent call last):
File “D:\pinokio\api\comfy.git\app\server.py”, line 564, in get_object_info
out[x] = node_info(x)
File “D:\pinokio\api\comfy.git\app\server.py”, line 531, in node_info
info[‘input’] = obj_class.INPUT_TYPES()
File “D:\pinokio\api\comfy.git\app\custom_nodes\ComfyUI-Florence2\nodes.py”, line 148, in INPUT_TYPES
“model”: ([item.name for item in Path(folder_paths.models_dir, “LLM”).iterdir() if item.is_dir()], {“tooltip”: “models are expected to be in Comfyui/models/LLM folder”}),
File “D:\pinokio\api\comfy.git\app\custom_nodes\ComfyUI-Florence2\nodes.py”, line 148, in
“model”: ([item.name for item in Path(folder_paths.models_dir, “LLM”).iterdir() if item.is_dir()], {“tooltip”: “models are expected to be in Comfyui/models/LLM folder”}),
File “D:\pinokio\bin\miniconda\lib\pathlib.py”, line 1017, in iterdir
for name in self._accessor.listdir(self):
FileNotFoundError: [WinError 3] The system cannot find the path specified: ‘D:\\pinokio\\api\\comfy.git\\app\\models\\LLM’
2024-10-27 11:43:00,908 – root – INFO – got prompt
2024-10-27 11:43:05,491 – root – INFO – model weight dtype torch.float16, manual cast: None
2024-10-27 11:43:05,771 – root – INFO – model_type EPS
2024-10-27 11:43:15,978 – root – INFO – Using pytorch attention in VAE
2024-10-27 11:43:15,979 – root – INFO – Using pytorch attention in VAE
2024-10-27 11:43:24,647 – root – INFO – loaded straight to GPU
2024-10-27 11:43:24,648 – root – INFO – Requested to load BaseModel
2024-10-27 11:43:24,648 – root – INFO – Loading 1 new model
2024-10-27 11:43:24,659 – root – INFO – loaded completely 0.0 1639.406135559082 True
2024-10-27 11:43:28,516 – root – INFO – Requested to load SD1ClipModel
2024-10-27 11:43:28,516 – root – INFO – Loading 1 new model
2024-10-27 11:43:28,726 – root – INFO – loaded completely 0.0 235.84423828125 True
2024-10-27 11:43:40,309 – root – INFO – Requested to load AutoencoderKL
2024-10-27 11:43:40,309 – root – INFO – Loading 1 new model
2024-10-27 11:43:40,350 – root – INFO – loaded completely 0.0 159.55708122253418 True
2024-10-27 11:45:26,103 – root – ERROR – !!! Exception during processing !!! IPAdapter model not found.
2024-10-27 11:45:26,124 – root – ERROR – Traceback (most recent call last):
File “D:\pinokio\api\comfy.git\app\execution.py”, line 323, in execute
output_data, output_ui, has_subgraph = get_output_data(obj, input_data_all, execution_block_cb=execution_block_cb, pre_execute_cb=pre_execute_cb)
File “D:\pinokio\api\comfy.git\app\execution.py”, line 198, in get_output_data
return_values = _map_node_over_list(obj, input_data_all, obj.FUNCTION, allow_interrupt=True, execution_block_cb=execution_block_cb, pre_execute_cb=pre_execute_cb)
File “D:\pinokio\api\comfy.git\app\execution.py”, line 169, in _map_node_over_list
process_inputs(input_dict, i)
File “D:\pinokio\api\comfy.git\app\execution.py”, line 158, in process_inputs
results.append(getattr(obj, func)(**inputs))
File “D:\pinokio\api\comfy.git\app\custom_nodes\ComfyUI_IPAdapter_plus\IPAdapterPlus.py”, line 573, in load_models
raise Exception(“IPAdapter model not found.”)
Exception: IPAdapter model not found.
2024-10-27 11:45:26,126 – root – INFO – Prompt executed in 145.01 seconds
“`
## Attached Workflow
Please make sure that workflow does not contain any sensitive information such as API keys or passwords.
“`
Workflow too large. Please manually upload the workflow from local file system.
“`
## Additional Context
(Please add any additional context or steps to reproduce the error here)
It couldn’t find the ip adapter plus model. Follow this section https://stable-diffusion-art.com/animatediff-morphing-transition-video-comfyui/#IP_adapter
You also need to rename it.
Does this workflow use the ComfyUI MuseV Evolved node by storyicon? That node has been broken for quite awhile.
No.